Android学习系列
Android之Room学习
Android之自定义View学习(一)
Android之自定义View学习(二)
目录
-
Android学习系列
-
Android之Room学习
-
Android之自定义View学习(一)
-
Android之自定义View学习(二)
-
Android之自定义View学习(二)
-
前言
-
2. 自定义View初体验
-
2.1 View类简介
-
2.2 自定义View构造函数
-
2.3 绘制自定义View
-
2.3.1 测量View
-
2.3.1.1 MeasureSpec
-
2.3.1.2 DecorView
-
2.3.1.3 onMeasure
-
2.3.2 布局View
-
2.3.3 绘制View
-
2.3.4 绘制自定义View总结
-
其他学习分享系列
-
数据结构与算法系列
-
数据结构与算法之哈希表
-
数据结构与算法之跳跃表
-
数据结构与算法之字典树
-
数据结构与算法之2-3树
-
数据结构与算法之平衡二叉树
-
数据结构与算法之十大经典排序
-
数据结构与算法之二分查找三模板
Android之自定义View学习(二)
前言
在上一节当中,博主介绍了布局加载的流程以及布局加载的源码,今天主要介绍一下View的工作原理和源码。
2. 自定义View初体验
2.1 View类简介
- 直观上:视图上的各种控件包括布局都是一种View
- 代码上:View类是Android所有组件控件间接或者直接的父类
借用红黑联盟网站上的一张图,下图为View的继承关系图,红色控件为常用控件
自定义View,顾名思义,就是写自己所需要的控件。下面开始View第一步。
2.2 自定义View构造函数
观看控件的源码,控件都是或直接或间接的继承了View类进行操作。因此第一步继承View类,并继承四种构造函数如下。
1public class MyTestView extends View {
2    public static String TAG = "View";
3
4    //第一类,MyTestView在代码中创建
5    public MyTestView(Context context) {
6        super(context);
7    }
8
9	//第二类,MyTestView在.xml的布局文件中创建
10    //自定义属性从AttributeSet传入
11    public MyTestView(Context context, @Nullable AttributeSet attrs) {
12        super(context, attrs);
13    }
14
15    //第三类,MyTestView有自定义style属性时调用
16    public MyTestView(Context context, @Nullable AttributeSet attrs, int defStyleAttr) {
17        super(context, attrs, defStyleAttr);
18    }
19
20    //第四类,MyTestView设置自定义style resource文件时调用
21    public MyTestView(Context context, @Nullable AttributeSet attrs, int defStyleAttr, int defStyleRes) {
22        super(context, attrs, defStyleAttr, defStyleRes);
23    }
24}
2.3 绘制自定义View
绘制自定义View主要用到以下函数
1public class MyTestView extends View {
2	......
3    @Override
4    //用于被内部调用测量视图大小
5    protected void onMeasure(int widthMeasureSpec, int heightMeasureSpec) {
6        super.onMeasure(widthMeasureSpec, heightMeasureSpec);
7    }
8
9    @Override
10    //用于被内部调用安排视图位置
11    protected void onLayout(boolean changed, int left, int top, int right, int bottom) {
12        super.onLayout(changed, left, top, right, bottom);
13    }
14
15    @Override
16    //用于被内部调用绘制视图样式
17    protected void onDraw(Canvas canvas) {
18        super.onDraw(canvas);
19
20    }
21}
2.3.1 测量View
View系统的绘制流程会从ViewRoot(源码位置是ViewRootImpl.java)的performTraversals()方法中开始调用performMeasure(),进而调用View的measure()方法。
然后onMeasure方法在源码中被measure方法调用,用来测量自定义View的大小,并且在measure方法注解中提及,想要自定义View必须要重写onMeasure方法。
同时,onMeasure方法的参数widthMeasureSpec、heightMeasureSpec也有着重要意义,这两个参数是从MeasureSpec得到。
2.3.1.1 MeasureSpec
MeasureSpec封装了父类给子类的布局要求,widthMeasureSpec、heightMeasureSpec即对宽度、高度的要求。
MeasureSpec实质上是一个32位int值,由测量模式SpecMode和测量模式下的大小值SpecSize组成,高两位是测量模式,有三种模式,低30位是测量模式下的大小值。
UNSPECIFIED
父类不指定尺寸也不限制尺寸,随便继承的子类如何定义尺寸。
EXACTLY
父类指定子类具体尺寸
AT_MOST
父类指定子类的最大尺寸
定义如下:
1 public static class MeasureSpec {
2        private static final int MODE_SHIFT = 30;
3        private static final int MODE_MASK  = 0x3 << MODE_SHIFT;
4
5        /** @hide */
6        @IntDef({UNSPECIFIED, EXACTLY, AT_MOST})
7        @Retention(RetentionPolicy.SOURCE)
8        public @interface MeasureSpecMode {}
9
10        public static final int UNSPECIFIED = 0 << MODE_SHIFT;
11
12        public static final int EXACTLY     = 1 << MODE_SHIFT;
13
14        public static final int AT_MOST     = 2 << MODE_SHIFT;
15     	......
16 }
2.3.1.2 DecorView
正常情况下,我们直接按照MeasureSpec来进行指定即可。对于一般View,确实好像没有问题,但是仔细思考一下,那么XML中指定属性match_parent、wrap_content从哪儿得到的?LinearLayout是个ViewGroup,ViewGroup继承于View,当Activity启动时,最开始的根视图是谁呢,这个根视图又是如何获得宽高的呢?
这时候就要引入LayoutParams和DecorView的概念。
首先LayoutParams比较简单,就是布局所需要的宽高设置。
1ViewGroup.java
2
3public static class LayoutParams {
4	......
5    @SuppressWarnings({"UnusedDeclaration"})
6    @Deprecated
7    public static final int FILL_PARENT = -1;
8
9    public static final int MATCH_PARENT = -1;
10
11    public static final int WRAP_CONTENT = -2;
12    ......
13}
因此对于一般View,它的宽高是由父容器的MeasureSpec 和自身 LayoutParams一起决定的。关于XML中标签指定宽高的问题已经解决了。
那么进入第二个问题,根视图是谁的呢?它是如何获取宽高呢?
最顶层也就是最外层的根视图我们称之为DecorView.
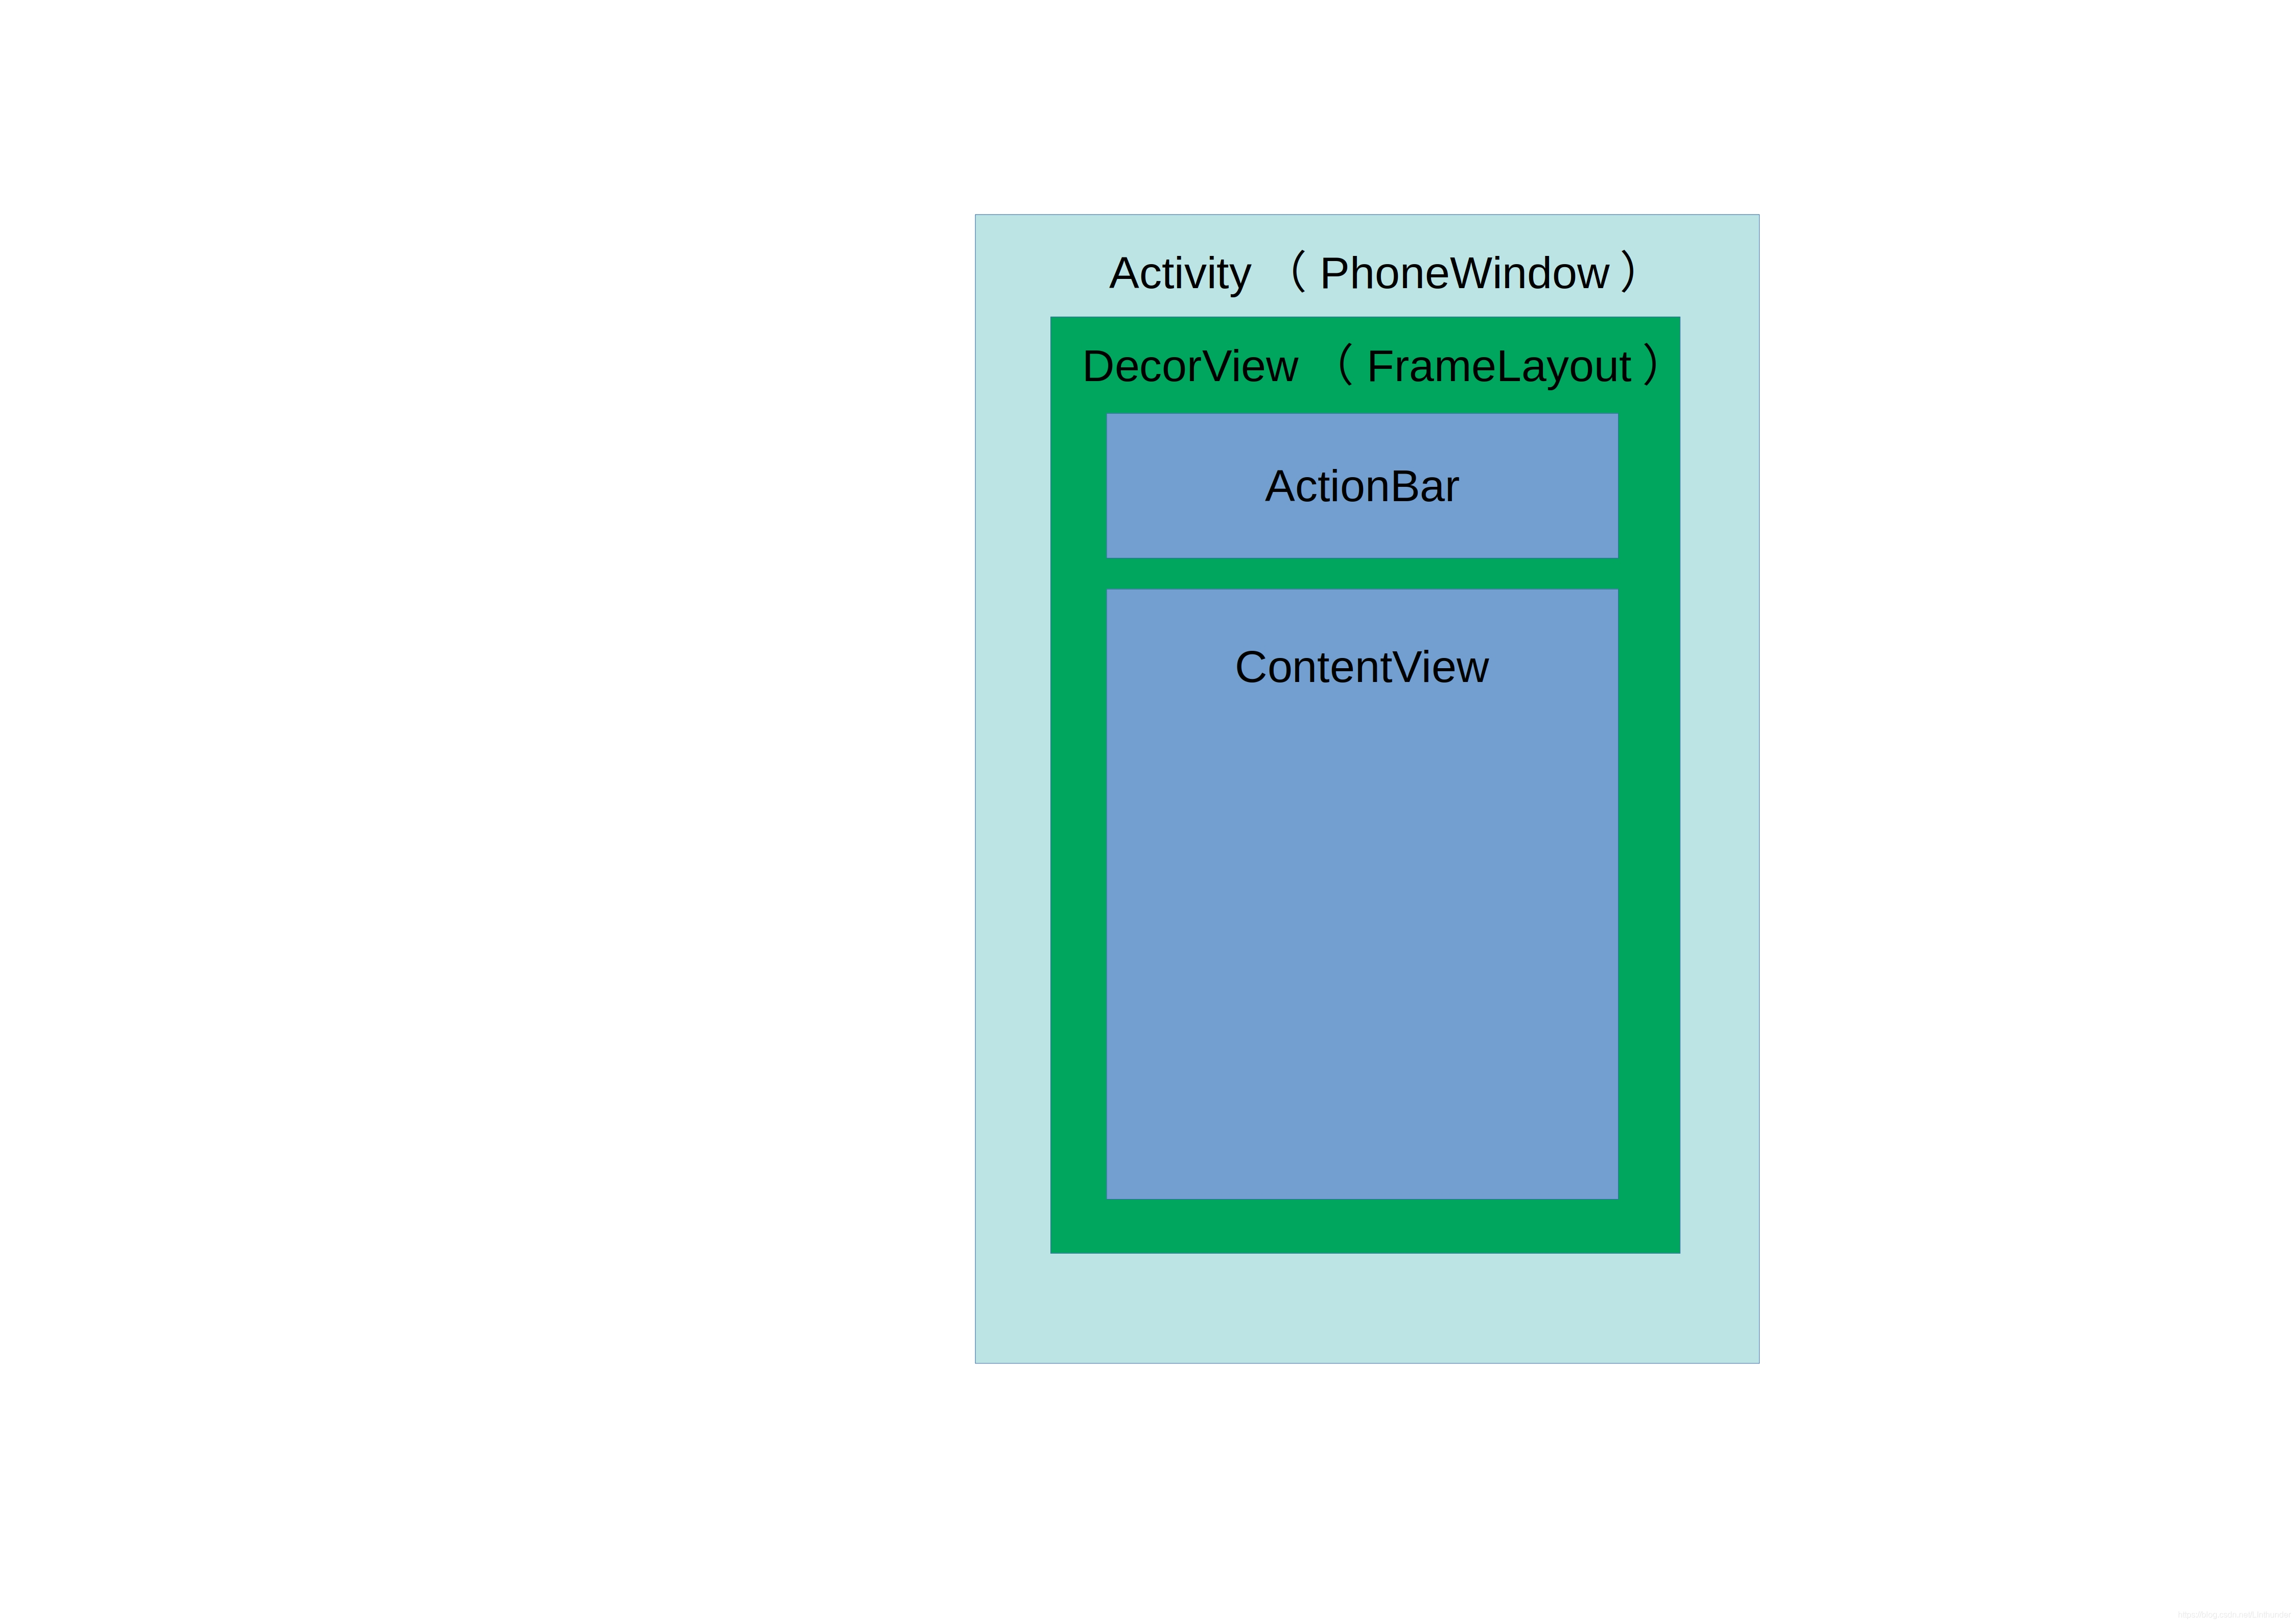
如下图,Activity是一个PhoneWindow实例,其布局形式即为DecorView,DecorView是一个FrameLayout布局,有标题栏(ActionBar)和内容视图(ContentView, 也就是每个活动我们所调用的函数SetContentView)
那么现在来看,DecorView又是如何获得宽高的呢?
在ViewRootImpl的measureHierarchy中有着如下一段代码,就是DecorView的MeasureSpec的赋值。
1childWidthMeasureSpec = getRootMeasureSpec(baseSize, lp.width);
2childHeightMeasureSpec = getRootMeasureSpec(desiredWindowHeight, lp.height);
3performMeasure(childWidthMeasureSpec, childHeightMeasureSpec);
再来看下getRootMeasureSpec的实现:
1    private static int getRootMeasureSpec(int windowSize, int rootDimension) {
2        int measureSpec;
3        switch (rootDimension) {
4
5        case ViewGroup.LayoutParams.MATCH_PARENT:
6            // Window can't resize. Force root view to be windowSize.
7            measureSpec = MeasureSpec.makeMeasureSpec(windowSize, MeasureSpec.EXACTLY);
8            break;
9        case ViewGroup.LayoutParams.WRAP_CONTENT:
10            // Window can resize. Set max size for root view.
11            measureSpec = MeasureSpec.makeMeasureSpec(windowSize, MeasureSpec.AT_MOST);
12            break;
13        default:
14            // Window wants to be an exact size. Force root view to be that size.
15            measureSpec = MeasureSpec.makeMeasureSpec(rootDimension, MeasureSpec.EXACTLY);
16            break;
17        }
18        return measureSpec;
19    }
可以看出,三种模式,且都和windowSize有关,即可以理解为根视图/最外层视图的宽高是由窗口尺寸和自身LayoutParams决定的。
我们可以得出结论:
- 对于一般视图View,它的宽高是由父容器的
MeasureSpec和自身LayoutParams一起决定的。 - 对于根视图DecorView,它的宽高是由窗口尺寸和自身
LayoutParams一起决定的。
2.3.1.3 onMeasure
根据getDefaultSize函数来给定高度或者宽度的大小,然后使用setMeasuredDimension函数来指定自定义View的(尺寸)高度、宽度
getSuggestedMinimumWidth用来获取内容或者背景尺寸二者中的较大值。
1   	   public final void measure(int widthMeasureSpec, int heightMeasureSpec) {
2            boolean optical = isLayoutModeOptical(this);
3            if (optical != isLayoutModeOptical(mParent)) {
4                //父类子类不同种View 则调整宽高
5                Insets insets = getOpticalInsets();
6                int oWidth  = insets.left + insets.right;
7                int oHeight = insets.top  + insets.bottom;
8                widthMeasureSpec  = MeasureSpec.adjust(widthMeasureSpec,  optical ? -oWidth  : oWidth);
9                heightMeasureSpec = MeasureSpec.adjust(heightMeasureSpec, optical ? -oHeight : oHeight);
10            }
11
12            // Suppress sign extension for the low bytes
13            long key = (long) widthMeasureSpec << 32 | (long) heightMeasureSpec & 0xffffffffL;
14            if (mMeasureCache == null) mMeasureCache = new LongSparseLongArray(2);
15
16            final boolean forceLayout = (mPrivateFlags & PFLAG_FORCE_LAYOUT) == PFLAG_FORCE_LAYOUT;
17
18            // Optimize layout by avoiding an extra EXACTLY pass when the view is
19            // already measured as the correct size. In API 23 and below, this
20            // extra pass is required to make LinearLayout re-distribute weight.
21
22            //宽高是否发生了变化
23            final boolean specChanged = widthMeasureSpec != mOldWidthMeasureSpec
24                    || heightMeasureSpec != mOldHeightMeasureSpec;
25
26           //是否是EXACT模式
27           final boolean isSpecExactly = MeasureSpec.getMode(widthMeasureSpec) == MeasureSpec.EXACTLY
28                && MeasureSpec.getMode(heightMeasureSpec) == MeasureSpec.EXACTLY;
29
30           //匹配
31            final boolean matchesSpecSize = getMeasuredWidth() == MeasureSpec.getSize(widthMeasureSpec)
32                    && getMeasuredHeight() == MeasureSpec.getSize(heightMeasureSpec);
33            final boolean needsLayout = specChanged
34                    && (sAlwaysRemeasureExactly || !isSpecExactly || !matchesSpecSize);
35
36            if (forceLayout || needsLayout) {
37                // first clears the measured dimension flag
38                mPrivateFlags &= ~PFLAG_MEASURED_DIMENSION_SET;
39
40                resolveRtlPropertiesIfNeeded();
41
42                int cacheIndex = forceLayout ? -1 : mMeasureCache.indexOfKey(key);
43                if (cacheIndex < 0 || sIgnoreMeasureCache) {
44                    // measure ourselves, this should set the measured dimension flag back
45                    onMeasure(widthMeasureSpec, heightMeasureSpec);
46                    mPrivateFlags3 &= ~PFLAG3_MEASURE_NEEDED_BEFORE_LAYOUT;
47                } else {
48                    long value = mMeasureCache.valueAt(cacheIndex);
49                    // Casting a long to int drops the high 32 bits, no mask needed
50                    setMeasuredDimensionRaw((int) (value >> 32), (int) value);
51                    mPrivateFlags3 |= PFLAG3_MEASURE_NEEDED_BEFORE_LAYOUT;
52                }
53
54                // flag not set, setMeasuredDimension() was not invoked, we raise
55                // an exception to warn the developer
56                if ((mPrivateFlags & PFLAG_MEASURED_DIMENSION_SET) != PFLAG_MEASURED_DIMENSION_SET) {
57                    throw new IllegalStateException("View with id " + getId() + ": "
58                            + getClass().getName() + "#onMeasure() did not set the"
59                            + " measured dimension by calling"
60                            + " setMeasuredDimension()");
61                }
62
63                mPrivateFlags |= PFLAG_LAYOUT_REQUIRED;
64            }
65
66            mOldWidthMeasureSpec = widthMeasureSpec;
67            mOldHeightMeasureSpec = heightMeasureSpec;
68
69            mMeasureCache.put(key, ((long) mMeasuredWidth) << 32 |
70                    (long) mMeasuredHeight & 0xffffffffL); // suppress sign extension
71    }
72
73	protected void onMeasure(int widthMeasureSpec, int heightMeasureSpec) {
74        setMeasuredDimension(getDefaultSize(getSuggestedMinimumWidth(), widthMeasureSpec),
75                getDefaultSize(getSuggestedMinimumHeight(), heightMeasureSpec));
76    }
77
78   protected final void setMeasuredDimension(int measuredWidth, int measuredHeight) {
79        boolean optical = isLayoutModeOptical(this);
80       //如果当前View与父类View不是同种View
81        if (optical != isLayoutModeOptical(mParent)) {
82            //不同就要调整测量值大小
83            Insets insets = getOpticalInsets();
84            int opticalWidth  = insets.left + insets.right;
85            int opticalHeight = insets.top  + insets.bottom;
86            measuredWidth  += optical ? opticalWidth  : -opticalWidth;
87            measuredHeight += optical ? opticalHeight : -opticalHeight;
88        }
89        setMeasuredDimensionRaw(measuredWidth, measuredHeight);
90    }
91	//直接赋值
92    private void setMeasuredDimensionRaw(int measuredWidth, int measuredHeight) {
93        mMeasuredWidth = measuredWidth;
94        mMeasuredHeight = measuredHeight;
95		//打上标识,已经测量该View的大小
96        mPrivateFlags |= PFLAG_MEASURED_DIMENSION_SET;
97    }
98
99	//获取默认大小
100	//根据三种模式调整再次调整大小
101    public static int getDefaultSize(int size, int measureSpec) {
102        int result = size;
103        int specMode = MeasureSpec.getMode(measureSpec);
104        int specSize = MeasureSpec.getSize(measureSpec);
105
106        //三种模式
107        switch (specMode) {
108        case MeasureSpec.UNSPECIFIED: //子类自身决定
109            result = size;
110            break;
111        case MeasureSpec.AT_MOST: //父类决定的两种
112        case MeasureSpec.EXACTLY:
113            result = specSize;
114            break;
115        }
116        return result;
117    }
118	//获取内容或者背景尺寸二者中的较大值
119    protected int getSuggestedMinimumWidth() {
120        return (mBackground == null) ? mMinWidth : max(mMinWidth, mBackground.getMinimumWidth());
121    }
上述过程就是一个单一View的测量过程,当然对于ViewGroup来说其包含多个子View,因此在ViewGroup的源码中有measureChildren来测量子View的尺寸。
1   protected void measureChildren(int widthMeasureSpec, int heightMeasureSpec) {
2        final int size = mChildrenCount;
3        final View[] children = mChildren;
4        for (int i = 0; i < size; ++i) {
5            //子View的测量过程
6            final View child = children[i];
7            if ((child.mViewFlags & VISIBILITY_MASK) != GONE) {
8                measureChild(child, widthMeasureSpec, heightMeasureSpec);
9            }
10        }
11    }
12
13    protected void measureChild(View child, int parentWidthMeasureSpec,
14            int parentHeightMeasureSpec) {
15        final LayoutParams lp = child.getLayoutParams();
16		//getChildMeasureSpec方法,大致过程也是设置size和mode
17        //其中与LayoutParams.MATCH_PARENT以及 LayoutParams.WRAP_CONTENT进行匹配判断
18        final int childWidthMeasureSpec = getChildMeasureSpec(parentWidthMeasureSpec,
19                mPaddingLeft + mPaddingRight, lp.width);
20        final int childHeightMeasureSpec = getChildMeasureSpec(parentHeightMeasureSpec,
21                mPaddingTop + mPaddingBottom, lp.height);
22
23        child.measure(childWidthMeasureSpec, childHeightMeasureSpec);
24    }
2.3.2 布局View
测量好View的大小之后,performTraversals继续会调用performLayout方法,进而调用View的layout方法,然后onLayout方法在源码中被layout方法调用,用来在视图中给View布局。因此,该步骤主要是给予View在布局中的位置。
1   public void layout(int l, int t, int r, int b) {
2        if ((mPrivateFlags3 & PFLAG3_MEASURE_NEEDED_BEFORE_LAYOUT) != 0) {
3            onMeasure(mOldWidthMeasureSpec, mOldHeightMeasureSpec);
4            mPrivateFlags3 &= ~PFLAG3_MEASURE_NEEDED_BEFORE_LAYOUT;
5        }
6	//记录四个坐标,左上、右下
7        int oldL = mLeft;
8        int oldT = mTop;
9        int oldB = mBottom;
10        int oldR = mRight;
11		//判断当前视图大小是否发生了变化,发生变化需要对当前视图重新绘制
12        boolean changed = isLayoutModeOptical(mParent) ?
13                setOpticalFrame(l, t, r, b) : setFrame(l, t, r, b);
14
15        if (changed || (mPrivateFlags & PFLAG_LAYOUT_REQUIRED) == PFLAG_LAYOUT_REQUIRED) {
16            //如果发生了变化,确定View在布局中的位置
17            onLayout(changed, l, t, r, b);
18            ......
19        }
20	......
21    }
setOptionalFrame和setFrame函数的主要目的就是给View确定位置并判断位置是否变化,setOptionalFrame内核也是调用setFrame函数,因此直接分析setFrame源码。
1   protected boolean setFrame(int left, int top, int right, int bottom) {
2        boolean changed = false;
3
4        if (DBG) {
5            Log.d(VIEW_LOG_TAG, this + " View.setFrame(" + left + "," + top + ","
6                    + right + "," + bottom + ")");
7        }
8		//判断位置是否变化,变化则需要重新绘制
9        if (mLeft != left || mRight != right || mTop != top || mBottom != bottom) {
10            changed = true;
11
12            // Remember our drawn bit
13            int drawn = mPrivateFlags & PFLAG_DRAWN;
14
15            int oldWidth = mRight - mLeft;
16            int oldHeight = mBottom - mTop;
17            int newWidth = right - left;
18            int newHeight = bottom - top;
19            boolean sizeChanged = (newWidth != oldWidth) || (newHeight != oldHeight);
20
21            // Invalidate our old position
22            invalidate(sizeChanged);
23
24            //存储新的位置并设置
25            mLeft = left;
26            mTop = top;
27            mRight = right;
28            mBottom = bottom;
29            mRenderNode.setLeftTopRightBottom(mLeft, mTop, mRight, mBottom);
30			......
31        }
32        return changed;
33    }
对于我们来说,我们仅需在代码中重写onLayout()函数,如下。
1    @Override
2    protected void onLayout(boolean changed, int left, int top, int right, int bottom) {
3        super.onLayout(changed, left, top, right, bottom);
4    }
接着,我们追溯到View的onLayout源码,发现…
1    protected void onLayout(boolean changed, int left, int top, int right, int bottom) {
2    }
???小朋友你是否有很多问号,突然想了想,好像确实应该为空,因为自定义View的位置本该就由其父布局决定,即父布局(一般继承ViewGroup)决定其子View布局(一般继承View类)。那就到ViewGroup里一探究竟吧。
1    @Override
2    public final void layout(int l, int t, int r, int b) {
3        if (!mSuppressLayout && (mTransition == null || !mTransition.isChangingLayout())) {
4            if (mTransition != null) {
5                mTransition.layoutChange(this);
6            }
7            super.layout(l, t, r, b);
8        } else {
9            // record the fact that we noop'd it; request layout when transition finishes
10            mLayoutCalledWhileSuppressed = true;
11        }
12    }
13
14    @Override
15    protected abstract void onLayout(boolean changed,
16            int l, int t, int r, int b);
17
然而貌似问号越来越多,ViewGroup的layout最关键的部分还是调用其父类View的layout函数(是的,ViewGroup的父类也是View)来确定自身位置。而ViewGroup的onLayout函数却是一个抽象方法??
仔细考虑一下,ViewGroup的onLayout()函数是抽象方法是正确的,因为每个ViewGroup都有着自己的独特布局,如LinearLayout、RelativeLayout等等对于子View的布局规则是不同的,所以写成抽象方法后方便后来继承者自定义自己的布局规则。
接下来看看LinearLayout的onLayout实现
LinearLayout有两种布局形式,以其中一种作为例子分析。
为了好理解布局中一些属性(如margin、padding等),从浏览器中抠出一张图仅供参考。

1@Override
2    protected void onLayout(boolean changed, int l, int t, int r, int b) {
3        if (mOrientation == VERTICAL) {
4            layoutVertical(l, t, r, b);//纵向线性布局
5        } else {
6            layoutHorizontal(l, t, r, b);//横向线性布局
7        }
8    }
9
10    /**
11     * Position the children during a layout pass if the orientation of this
12     * LinearLayout is set to {@link #VERTICAL}.
13     *
14     * @see #getOrientation()
15     * @see #setOrientation(int)
16     * @see #onLayout(boolean, int, int, int, int)
17     * @param left
18     * @param top
19     * @param right
20     * @param bottom
21     */
22    void layoutVertical(int left, int top, int right, int bottom) {
23        final int paddingLeft = mPaddingLeft;//左内填充
24
25        int childTop;//上位置
26        int childLeft;//左位置
27
28        // Where right end of child should go
29        final int width = right - left;//宽度
30        int childRight = width - mPaddingRight;//去掉内填充的右位置
31
32        // Space available for child
33        int childSpace = width - paddingLeft - mPaddingRight;//内容部分要用宽度去除内填充的长度
34		//获得子View数量 getVirtualChildCount()调用的就是getChildCount()
35        final int count = getVirtualChildCount();
36
37        //对齐方式,通过改变子ViewTop值
38        final int majorGravity = mGravity & Gravity.VERTICAL_GRAVITY_MASK;
39        final int minorGravity = mGravity & Gravity.RELATIVE_HORIZONTAL_GRAVITY_MASK;
40
41        switch (majorGravity) {
42           case Gravity.BOTTOM:
43               // mTotalLength contains the padding already
44               childTop = mPaddingTop + bottom - top - mTotalLength;
45               break;
46
47               // mTotalLength contains the padding already
48           case Gravity.CENTER_VERTICAL:
49               childTop = mPaddingTop + (bottom - top - mTotalLength) / 2;
50               break;
51
52           case Gravity.TOP:
53           default:
54               childTop = mPaddingTop;
55               break;
56        }
57		//循环遍历子View
58        for (int i = 0; i < count; i++) {
59            final View child = getVirtualChildAt(i);
60            if (child == null) {
61                childTop += measureNullChild(i);//子View的Top是基于上一个的,nullChild的值为0
62            } else if (child.getVisibility() != GONE) {//这就解释了为什么GONE状态不会占用布局内容
63                final int childWidth = child.getMeasuredWidth();
64                final int childHeight = child.getMeasuredHeight();
65
66                final LinearLayout.LayoutParams lp =
67                        (LinearLayout.LayoutParams) child.getLayoutParams();
68
69                int gravity = lp.gravity;
70                if (gravity < 0) {
71                    gravity = minorGravity;
72                }
73                final int layoutDirection = getLayoutDirection();
74                final int absoluteGravity = Gravity.getAbsoluteGravity(gravity, layoutDirection);
75                switch (absoluteGravity & Gravity.HORIZONTAL_GRAVITY_MASK) {
76                    case Gravity.CENTER_HORIZONTAL:
77                        childLeft = paddingLeft + ((childSpace - childWidth) / 2)
78                                + lp.leftMargin - lp.rightMargin;
79                        break;
80
81                    case Gravity.RIGHT:
82                        childLeft = childRight - childWidth - lp.rightMargin;
83                        break;
84
85                    case Gravity.LEFT:
86                    default:
87                        childLeft = paddingLeft + lp.leftMargin;
88                        break;
89                }
90
91                if (hasDividerBeforeChildAt(i)) {
92                    childTop += mDividerHeight;
93                }
94
95                childTop += lp.topMargin;
96                //确定子View位置,并判断是否变化
97                setChildFrame(child, childLeft, childTop + getLocationOffset(child),
98                        childWidth, childHeight);
99                childTop += childHeight + lp.bottomMargin + getNextLocationOffset(child);//下一个子View的Top位置
100
101                i += getChildrenSkipCount(child, i);
102            }
103        }
104    }
105
最后做一个小小的实践。
布局文件如下:
1<?xml version="1.0" encoding="utf-8"?>
2<com.example.myviewlearning.TestLayout xmlns:android="http://schemas.android.com/apk/res/android"
3    android:layout_width="match_parent"
4    android:layout_height="match_parent">
5    <ImageView
6        android:layout_width="wrap_content"
7        android:layout_height="wrap_content"
8        android:src="@mipmap/ic_launcher"/>
9</com.example.myviewlearning.TestLayout>
TestLayout.java如下:
1public class TestLayout extends ViewGroup {
2
3    public TestLayout(Context context) {
4        super(context);
5    }
6
7    public TestLayout(Context context, AttributeSet attrs) {
8        super(context, attrs);
9    }
10
11    public TestLayout(Context context, AttributeSet attrs, int defStyleAttr) {
12        super(context, attrs, defStyleAttr);
13    }
14
15    public TestLayout(Context context, AttributeSet attrs, int defStyleAttr, int defStyleRes) {
16        super(context, attrs, defStyleAttr, defStyleRes);
17    }
18	//上述四类和继承View的自定义View相同
19
20    //注意一个顺序,在Measure测量以前,getMeasureWidth和getMeasureHeight两个函数返回值为0
21    //这里只给了一个子View
22    @Override
23    protected void onMeasure(int widthMeasureSpec, int heightMeasureSpec) {
24        super.onMeasure(widthMeasureSpec, heightMeasureSpec);
25        int childCount = getChildCount();
26        //循环遍历子View
27        for(int i = 0; i < childCount; i++) {
28            View childView = getChildAt(i);
29            measureChild(childView, widthMeasureSpec, heightMeasureSpec);//测量子View
30        }
31    }
32
33    @Override
34    protected void onLayout(boolean changed, int l, int t, int r, int b) {
35        if (getChildCount() > 0) {
36           View childView = getChildAt(0);
37           childView.layout(0, 0, childView.getMeasuredWidth() + 100, childView.getMeasuredHeight() + 100);//给子View安排位置
38			Log.d("View Size", "Width: "+ Integer.toString(childView.getWidth()) + " height:" + Integer.toString(childView.getHeight()));
39            Log.d("View MeasuredSize", "MeasureWidth: "+ Integer.toString(childView.getMeasuredWidth()) + " height:" + Integer.toString(childView.getMeasuredHeight()));
40        }
41    }
42}
当onLayout运行结束后,我们可以通过getWidth、getHeight方法来获取子View的高和宽。
注意:
childView.layout(0, 0, childView.getMeasuredWidth(), childView.getMeasuredHeight());//给子View安排位置
一般来说childView.getWidth()与 childView.getMeasuredWidth()会相同,原因是上述给子View布局的这句代码。
getWidth() = childView.getMeasuredWidth() - 0(就是 right - left);
但是实际上两者意义是不同的。
childView.getWidth()主要是用来表示当前childView在该布局中的宽度,只有在layout过程过后才有值。
childView.getMeasuredWidth()主要是用来测量视图本身的大小,在measure之后即可获取到值。
2.3.3 绘制View
测量好View(measure),给View布局好位置(layout),ViewRoot中会继续执行调用performDraw。
1private void performDraw() {
2	......
3    try {
4        boolean canUseAsync = draw(fullRedrawNeeded);
5		......
6		}
7    ......
8}
performDraw调用自身的draw方法,在drawSoftware中创建出一个Canvas对象进行一些基本绘制(如背景颜色)并且真正的调用View类中的draw方法,传入创建的Canvas对象。
1ViewRootImpl.java
2
3private boolean draw(boolean fullRedrawNeeded) {
4    .......
5            if (!drawSoftware(surface, mAttachInfo, xOffset, yOffset,
6                    scalingRequired, dirty, surfaceInsets)) {
7                return false;
8            }
9        }
10    }
11......
12}
13
14  private boolean drawSoftware(Surface surface, AttachInfo attachInfo, int xoff, int yoff,
15            boolean scalingRequired, Rect dirty, Rect surfaceInsets) {
16
17        // Draw with software renderer.
18        final Canvas canvas;
19		......
20        try {
21            if (DEBUG_ORIENTATION || DEBUG_DRAW) {
22                Log.v(mTag, "Surface " + surface + " drawing to bitmap w="
23                        + canvas.getWidth() + ", h=" + canvas.getHeight());
24                //canvas.drawARGB(255, 255, 0, 0);
25            }
26
27            if (!canvas.isOpaque() || yoff != 0 || xoff != 0) {
28                canvas.drawColor(0, PorterDuff.Mode.CLEAR);
29            }
30
31            ......
32            try {
33                canvas.translate(-xoff, -yoff);
34                if (mTranslator != null) {
35                    mTranslator.translateCanvas(canvas);
36                }
37                canvas.setScreenDensity(scalingRequired ? mNoncompatDensity : 0);
38                attachInfo.mSetIgnoreDirtyState = false;
39
40                mView.draw(canvas);
41
42                drawAccessibilityFocusedDrawableIfNeeded(canvas);
43            } finally {
44                if (!attachInfo.mSetIgnoreDirtyState) {
45                    // Only clear the flag if it was not set during the mView.draw() call
46                    attachInfo.mIgnoreDirtyState = false;
47                }
48            }
49        } finally {
50			......
51        }
52        return true;
53    }
然后调用View的draw()方法来执行具体的开始绘制(draw)View,最后onDraw方法被View类中的draw方法调用进行内容绘制,内容绘制也是最关键的一步。
绘制过程主要分六步骤,其中第二、第五步骤相对使用较少。
1    View.java
2	public void draw(Canvas canvas) {
3        final int privateFlags = mPrivateFlags;
4        final boolean dirtyOpaque = (privateFlags & PFLAG_DIRTY_MASK) == PFLAG_DIRTY_OPAQUE &&
5                (mAttachInfo == null || !mAttachInfo.mIgnoreDirtyState);
6        mPrivateFlags = (privateFlags & ~PFLAG_DIRTY_MASK) | PFLAG_DRAWN;
7
8        /*
9         * Draw traversal performs several drawing steps which must be executed
10         * in the appropriate order:
11         *      1. 绘制背景
12         *      2. 保存当前canvas,非必须
13         *      3. 绘制View的内容
14         *      4. 绘制子View
15         *      5. 绘制边缘、阴影等效果,非必须
16         *      6. 绘制装饰,如滚动条等
17         */
18
19        // Step 1, draw the background, if needed
20        int saveCount;
21
22        if (!dirtyOpaque) {
23            drawBackground(canvas);
24        }
25
26        // skip step 2 & 5 if possible (common case)
27        final int viewFlags = mViewFlags;
28        boolean horizontalEdges = (viewFlags & FADING_EDGE_HORIZONTAL) != 0;
29        boolean verticalEdges = (viewFlags & FADING_EDGE_VERTICAL) != 0;
30        if (!verticalEdges && !horizontalEdges) {
31            // Step 3, draw the content
32            if (!dirtyOpaque) onDraw(canvas);
33
34            // Step 4, draw the children
35            dispatchDraw(canvas);
36
37            // Step 6, draw decorations (foreground, scrollbars)
38            onDrawForeground(canvas);
39
40            .......
41            // we're done...
42            return;
43        }
44		......
45    }
46
47  private void drawBackground(Canvas canvas) {
48        final Drawable background = mBackground;
49        if (background == null) {
50            return;
51        }
52
53        setBackgroundBounds();
54		......
55    }
56
57    void setBackgroundBounds() {
58        if (mBackgroundSizeChanged && mBackground != null) {
59            mBackground.setBounds(0, 0, mRight - mLeft, mBottom - mTop);
60            mBackgroundSizeChanged = false;
61            rebuildOutline();
62        }
63    }
从代码中看出,第一步,背景的绘制实际上调用了一个Drawable对象mBackground进行背景绘制,然后根据layout过程确定的视图位置(mLeft mRight mTop mBottom)来设置背景的绘制区域,之后再调用onDraw方法来完成背景的绘制工作。
而这个mBackground对象其实就是在XML中通过android:background属性设置的图片或颜色。当然也可以在代码中通过setBackgroundColor()、setBackgroundResource()等方法进行赋值。
跳过第二步,来到第三步骤,调用onDraw方法对View内容进行绘制,但是有了onLayout经验,这里onDraw方法同样需要被重写。
第四步,进行子View绘制处理,当然对于View来说,dispatchDraw是空方法,因为没有子View,但是对于ViewGroup来说,dispatchDraw还是比较复杂的。
跳过第五步,来到最后一步,对视图的滚动条进行装饰,从这里其实就可以看出,其实所有的控件都是有着自己的滚动条的,只不过被隐藏了起来。
最后同样来个小实践。
布局文件如下:
1<?xml version="1.0" encoding="utf-8"?>
2<LinearLayout xmlns:android="http://schemas.android.com/apk/res/android"
3    xmlns:tools="http://schemas.android.com/tools"
4    android:orientation="vertical"
5    android:layout_width="match_parent"
6    android:layout_height="match_parent"
7    android:id="@+id/main_layout"
8    tools:context=".MainActivity">
9
10    <com.example.myviewlearning.MyTestView
11        android:layout_height="match_parent"
12        android:layout_width="match_parent"
13        android:background="#000000"/>
14
15
16</LinearLayout>
onDraw()重写如下:
1    @Override
2    protected void onDraw(Canvas canvas) {
3        super.onDraw(canvas);
4        final int paddingLeft = getPaddingLeft();
5        final int paddingRight = getPaddingRight();
6        final int paddingTop = getPaddingTop();
7        final int paddingBottom = getPaddingBottom();
8        int width = getWidth() - paddingLeft - paddingRight;
9        int height = getHeight() - paddingTop - paddingBottom;
10        int radius = Math.min(width, height)/2;
11
12       	//画圆
13        canvas.drawCircle(paddingLeft + width/2, paddingTop + height/2, radius, mPaint);
14
15        //设置text和textColor
16        mPaint.setTextSize(88);
17        String text = "Hi, my view";
18        mPaint.setColor(Color.WHITE);
19        canvas.drawText(text,width/3, height/2, mPaint);
20
21    }
2.3.4 绘制自定义View总结
到此为止,我们就明白了,要想能够自定义一个View,少不了这三个步骤。
测量------>布局------>绘制
其他学习分享系列
数据结构与算法系列
数据结构与算法之哈希表
数据结构与算法之跳跃表
数据结构与算法之字典树
数据结构与算法之2-3树
数据结构与算法之平衡二叉树
数据结构与算法之十大经典排序
数据结构与算法之二分查找三模板
如有兴趣可以关注我的微信公众号,每周带你学一点算法与数据结构。