
事件监听的流程分为三步:
1、自定义事件,一般是继承ApplicationEvent抽象类。
2、定义事件监听器,一般是实现ApplicationListener接口。
3、a、启动的时候,需要将监听器加入到Spring容器中。b、或者将监听器加入到容器中。@Component
c、使用@EventListener注解,在方法上面加入@EventListener注解,且该类需要纳入到spring容器中进行管理。
d、或者使用配置项,在默认的配置文件application.properties配置文件里面加入进去,context.listener.classes配置项。context.listener.classes=com.bie.license.ListenerApplicationListener
4、发布事件。使用ApplicationContext.publishEvent发布事件。
1、事件监听第一步,定义一个事件,继承ApplicationEvent抽象类。
1 1 package com.bie.license;
2 2
3 3 import org.springframework.context.ApplicationEvent;
4 4
5 5 /**
6 6  *
7 7  * @Description TODO
8 8  * @author biehl
9 9  * @Date 2018年12月31日 下午5:02:43
1010  * 1、第一步,创建一个事件,继承ApplicationEvent
1111  *  定义事件
1212  */
1313
1414 public class EventApplicationEvent extends ApplicationEvent{
1515
1616     /**
1717      *
1818      */
1919     private static final long serialVersionUID = 1L;
2020
2121     public EventApplicationEvent(Object source) {
2222         super(source);
2323     }
2424
2525 }
2、第二步,定义一个监听器,看看是监听那个事件。继承ApplicationListener类。
1 1 package com.bie.license;
2 2
3 3 import org.springframework.context.ApplicationListener;
4 4
5 5 /**
6 6  *
7 7  * @Description TODO
8 8  * @author biehl
9 9  * @Date 2018年12月31日 下午5:05:46
1010  * 2、第二步,定义一个监听器,监听哪一个事件。如果不执行第三步,将ListenerApplicationListener加入到容器中,使用@Component注解也可以的。
1111  */
1212
1313 public class ListenerApplicationListener implements ApplicationListener<EventApplicationEvent>{
1414
1515     @Override
1616     public void onApplicationEvent(EventApplicationEvent event) {
1717         System.out.println("接受到事件 : " + event.getClass());
1818     }
1919
2020 }
3、第三步,启动的时候,需要将监听器加入到Spring容器中。发布事件。使用ApplicationContext.publishEvent发布事件。
1 1 package com.bie.license;
2 2
3 3 import org.springframework.boot.SpringApplication;
4 4 import org.springframework.boot.autoconfigure.SpringBootApplication;
5 5 import org.springframework.context.ConfigurableApplicationContext;
6 6
7 7 /**
8 8  *
9 9  * @Description TODO
1010  * @author biehl
1111  * @Date 2018年12月31日 下午5:09:10
1212  *
1313  */
1414 @SpringBootApplication
1515 public class ListenerApplication {
1616
1717     public static void main(String[] args) {
1818         SpringApplication app = new SpringApplication(ListenerApplication.class);
1919         app.addListeners(new ListenerApplicationListener());//app.addListeners(new ListenerApplicationListener());或者将ListenerApplicationListener加入到bean中也可以。
2020         ConfigurableApplicationContext context = app.run(args);
2121         // 第三步,发布事件
2222         context.publishEvent(new EventApplicationEvent(new Object()));
2323         // 关闭
2424         context.close();
2525     }
2626 }
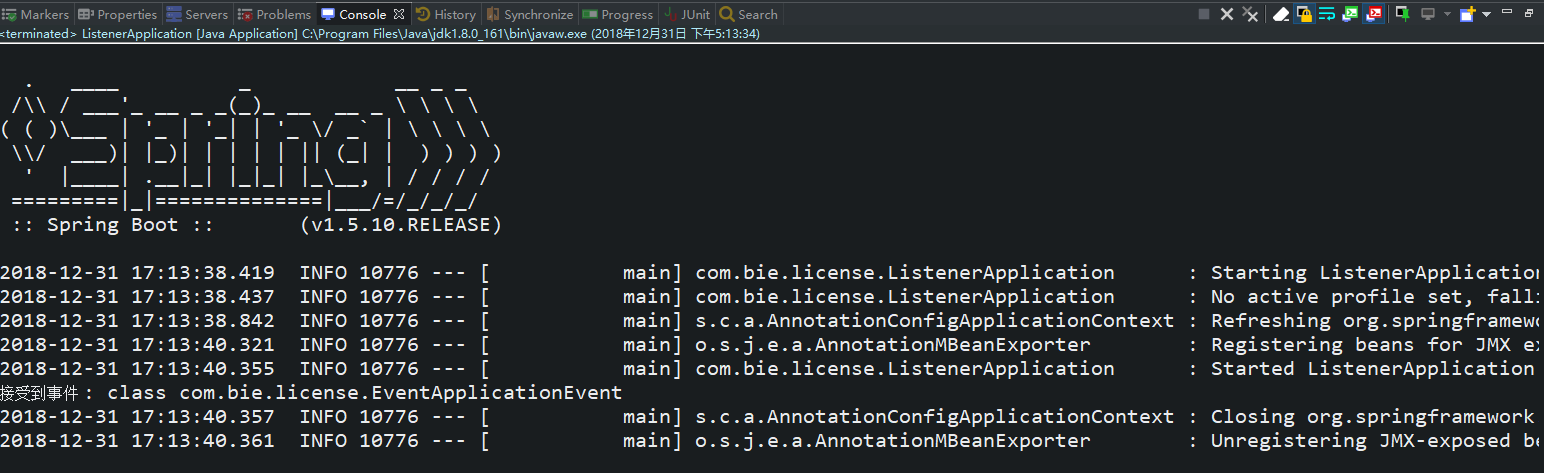
运行效果如下所示:
使用@EventListener注解来进行加入到Spring容器中:
1 1 package com.bie.license;
2 2
3 3 import org.springframework.context.ApplicationEvent;
4 4 import org.springframework.context.event.EventListener;
5 5 import org.springframework.stereotype.Component;
6 6
7 7 /**
8 8  *
9 9  * @Description TODO
1010  * @author biehl
1111  * @Date 2018年12月31日 下午5:38:10
1212  *
1313  */
1414 @Component
1515 public class EventHandle {
1616
1717     /**
1818      * 参数任意
1919      */
2020     @EventListener
2121     public void event(ApplicationEvent event) {
2222         System.out.println("EventHandle 接受到事件 : "  + event.getClass());
2323     }
2424 }
待续.......