
1、SpringBoot配置自定义监听器
实质上是在servlet3.0+的容器中,注册一个Servlet。
功能:监听对应的请求路径url-api
1@Slf4j
2@Configuration
3public class SpringBootAutoConfigure
4{
5    // 配置监听器
6    @Bean("xxxListener")
7    public ServletRegistrationBean<XxxServlet> createtListener()
8    {
9        log.info("监听请求的路径 /url-api...");
10        ServletRegistrationBean<XxxServlet> bean = new ServletRegistrationBean<>(
11        new XxxServlet());
12        //添加参数至LinkedHashMap
13        bean.addInitParameter("aaaController", "aaaController");
14        bean.addInitParameter("bbbController", "bbbController");
15        bean.addUrlMappings("/url-api");
16        return bean;
17    }
18}
19// 设置参数的方法
20public void setInitParameters(Map<String, String> initParameters) {
21    Assert.notNull(initParameters, "InitParameters must not be null");
22    this.initParameters = new LinkedHashMap<>(initParameters);
23}
2、如何注册Servlet
首先看看类和接口之间的依赖模型:
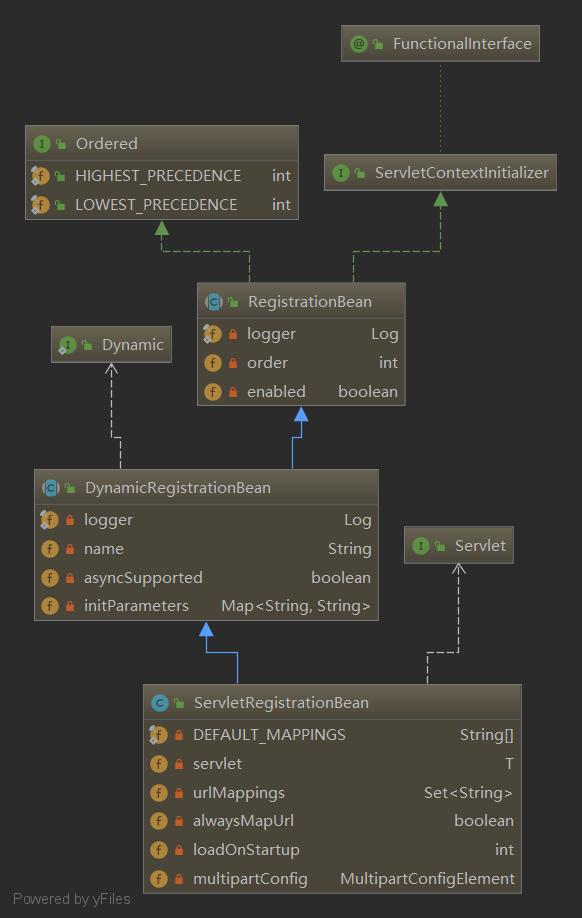
增加Servlet, ServletRegistrationBean使用泛型限定这个类是Servlet,通过构造函数参数为Servlet的对象,
注册在Servlet一个servlet3.0+的容器中。
1public ServletRegistrationBean(T servlet, String... urlMappings) {
2this(servlet, true, urlMappings);
3}
2.1 ServletRegistrationBean
Servlet的设置和获取,MapperURL的设置添加等等
1public class ServletRegistrationBean<T extends Servlet> extends DynamicRegistrationBean<ServletRegistration.Dynamic> {
2
3private static final String[] DEFAULT_MAPPINGS = { "/*" };
4private T servlet;
5private Set<String> urlMappings = new LinkedHashSet<>();
6private boolean alwaysMapUrl = true;
7private int loadOnStartup = -1;
8private MultipartConfigElement multipartConfig;
2.2 设置参数
1public abstract class DynamicRegistrationBean<D extends Registration.Dynamic> extends RegistrationBean {
2private static final Log logger = LogFactory.getLog(RegistrationBean.class);
3private String name;
4private boolean asyncSupported = true;
5private Map<String, String> initParameters = new LinkedHashMap<>();
2.3 RegistrationBean
可以设置Servlet的启动顺序,实现了ServletContextInitializer的类将会被SpringServletContainerInitializer监测到
1public abstract class RegistrationBean implements ServletContextInitializer, Ordered {
2
3private static final Log logger = LogFactory.getLog(RegistrationBean.class);
4private int order = Ordered.LOWEST_PRECEDENCE;
5private boolean enabled = true;
2.4 接口ServletContextInitializer和Ordered
1@FunctionalInterface
2public interface ServletContextInitializer {
3
4public interface Ordered {
5
6/**
7* Useful constant for the highest precedence value.
8* @see java.lang.Integer#MIN_VALUE
9*/
10int HIGHEST_PRECEDENCE = Integer.MIN_VALUE;
11
12/**
13* Useful constant for the lowest precedence value.
14* @see java.lang.Integer#MAX_VALUE
15*/
16int LOWEST_PRECEDENCE = Integer.MAX_VALUE;
3、常见的初始化接口
3.1 ServletContainerInitializer
org.springframework.web.SpringServletContainerInitializer is an implementation of javax.servlet.ServletContainerInitializer.
与传统基于web.xml的配置方式不同,Servlet3.0设计了ServletContainerInitializer,ServletContainerInitializer
支持通过Spring的WebApplicationInitializer SPI编写基于代码的Servlet容器配置。
3.2 WebApplicationInitializer接口几种配置ServletContext的方式
1 传统的web.xml,代码示例
1<servlet>
2<servlet-name>dispatcher</servlet-name>
3<servlet-class>
4org.springframework.web.servlet.DispatcherServlet
5</servlet-class>
6<init-param>
7<param-name>contextConfigLocation</param-name>
8<param-value>/WEB-INF/spring/dispatcher-config.xml</param-value>
9</init-param>
10<load-on-startup>1</load-on-startup>
11</servlet>
12
13<servlet-mapping>
14<servlet-name>dispatcher</servlet-name>
15<url-pattern>/</url-pattern>
16</servlet-mapping>
2 实现这个接口WebApplicationInitializer ,代码示例。主要复写onStartup方法。
1public class MyWebAppInitializer implements WebApplicationInitializer {
2@Override
3public void onStartup(ServletContext container) {
4XmlWebApplicationContext appContext = new XmlWebApplicationContext();
5appContext.setConfigLocation("/WEB-INF/spring/dispatcher-config.xml");
6
7ServletRegistration.Dynamic dispatcher =
8container.addServlet("dispatcher", new DispatcherServlet(appContext));
9dispatcher.setLoadOnStartup(1);
10dispatcher.addMapping("/");
11}
12}
3 基于代码方式的全配置,代码示例。
1public class MyWebAppInitializer implements WebApplicationInitializer {
2
3@Override
4public void onStartup(ServletContext container) {
5// Create the 'root' Spring application context
6AnnotationConfigWebApplicationContext rootContext =
7new AnnotationConfigWebApplicationContext();
8rootContext.register(AppConfig.class);
9
10// Manage the lifecycle of the root application context
11container.addListener(new ContextLoaderListener(rootContext));
12
13// Create the dispatcher servlet's Spring application context
14AnnotationConfigWebApplicationContext dispatcherContext =
15new AnnotationConfigWebApplicationContext();
16dispatcherContext.register(DispatcherConfig.class);
17
18// Register and map the dispatcher servlet
19ServletRegistration.Dynamic dispatcher =
20container.addServlet("dispatcher", new DispatcherServlet(dispatcherContext));
21dispatcher.setLoadOnStartup(1);
22dispatcher.addMapping("/");
23}
24}
3.3 org.springframework.boot.web.support.SpringBootServletInitializer (class)
这是一个通过传统的WAR包部署方式运行SpringApplication的WebApplicationInitializer实现。它可以将应用容器中的Servlet、
Filter和ServletContextInitializer相关的bean绑定到服务器(ServletContainer)。
3.4 org.springframework.boot.web.servlet.ServletContextInitializer (interface)
不同于WebApplicationInitializer,该接口的实现类不会被SpringServletContainerInitializer识别因此不会被Servlet容器自动执行。
ServletContextInitializers主要被Spring管理而不是Servlet容器。