Java BIO、NIO与AIO的介绍
因为netty是一个NIO的框架,所以在学习netty的过程中,开始之前。针对于BIO,NIO,AIO进行一个完整的学习。
学习资源分享:
Netty学习:https://www.bilibili.com/video/BV1DJ411m7NR?from=search&seid=8747534277052777648
Netty源码:https://www.bilibili.com/video/BV1cb411F7En?from=search&seid=12891183478905555151
数据结构和算法:https://www.bilibili.com/video/BV1E4411H73v?from=search&seid=9508506178445014356
java设计模式:https://www.bilibili.com/video/BV1G4411c7N4?from=search&seid=9508506178445014356
以上资源,均来源于网友发布在Bilibili的数据。
Java BIO编程
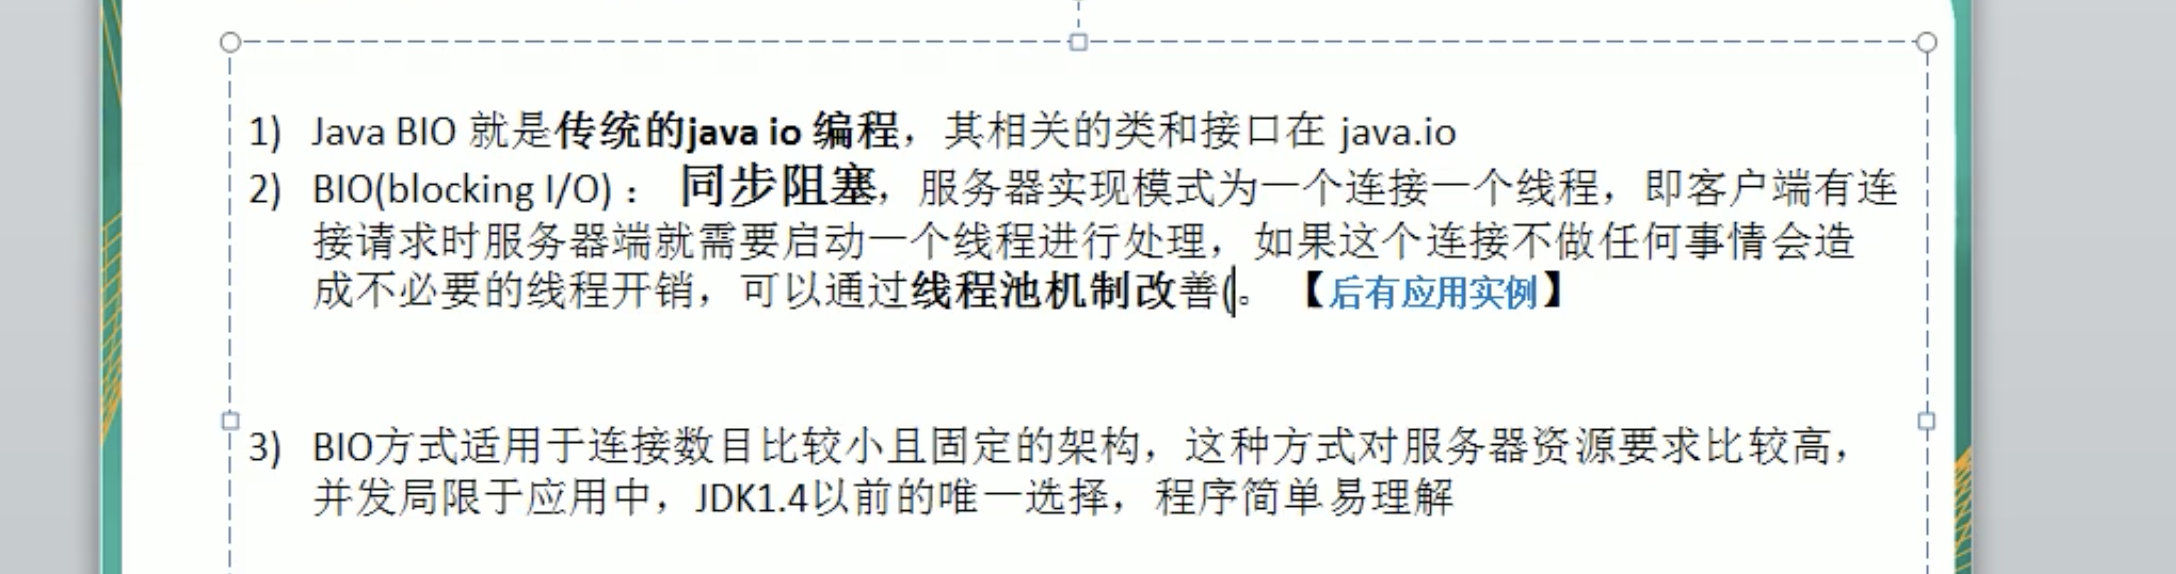
BIO - 阻塞IO。 即Java的远程IO
IO模型

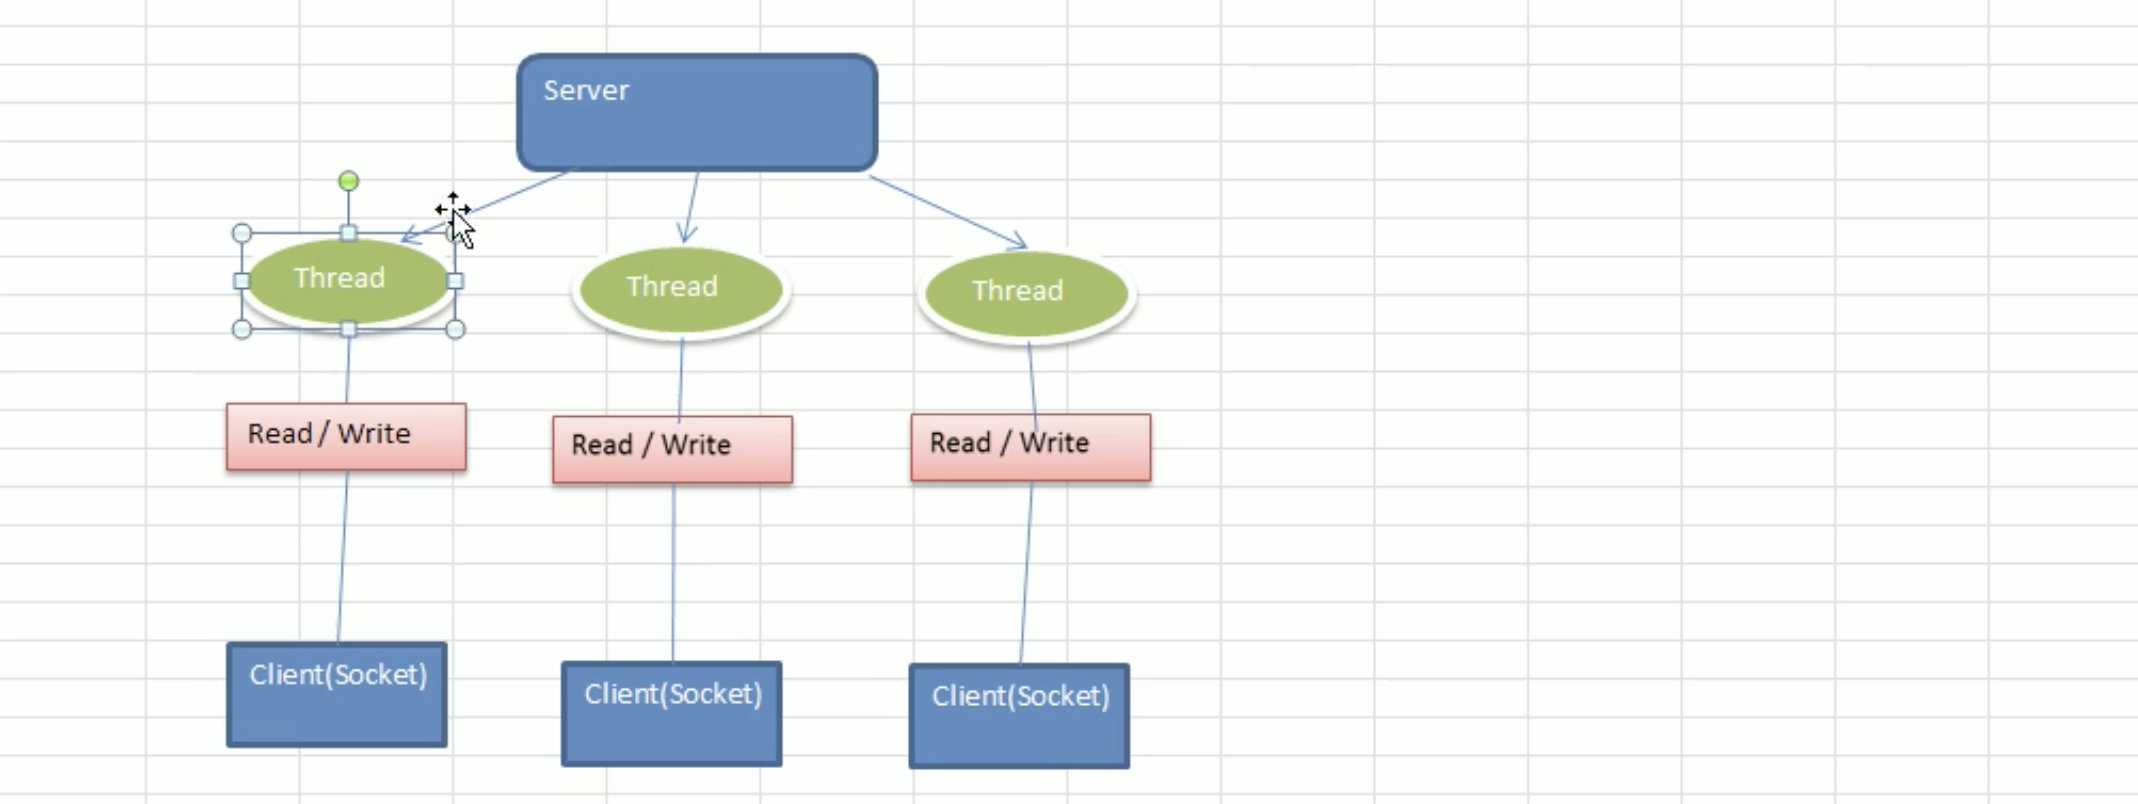
BIO线程模型:
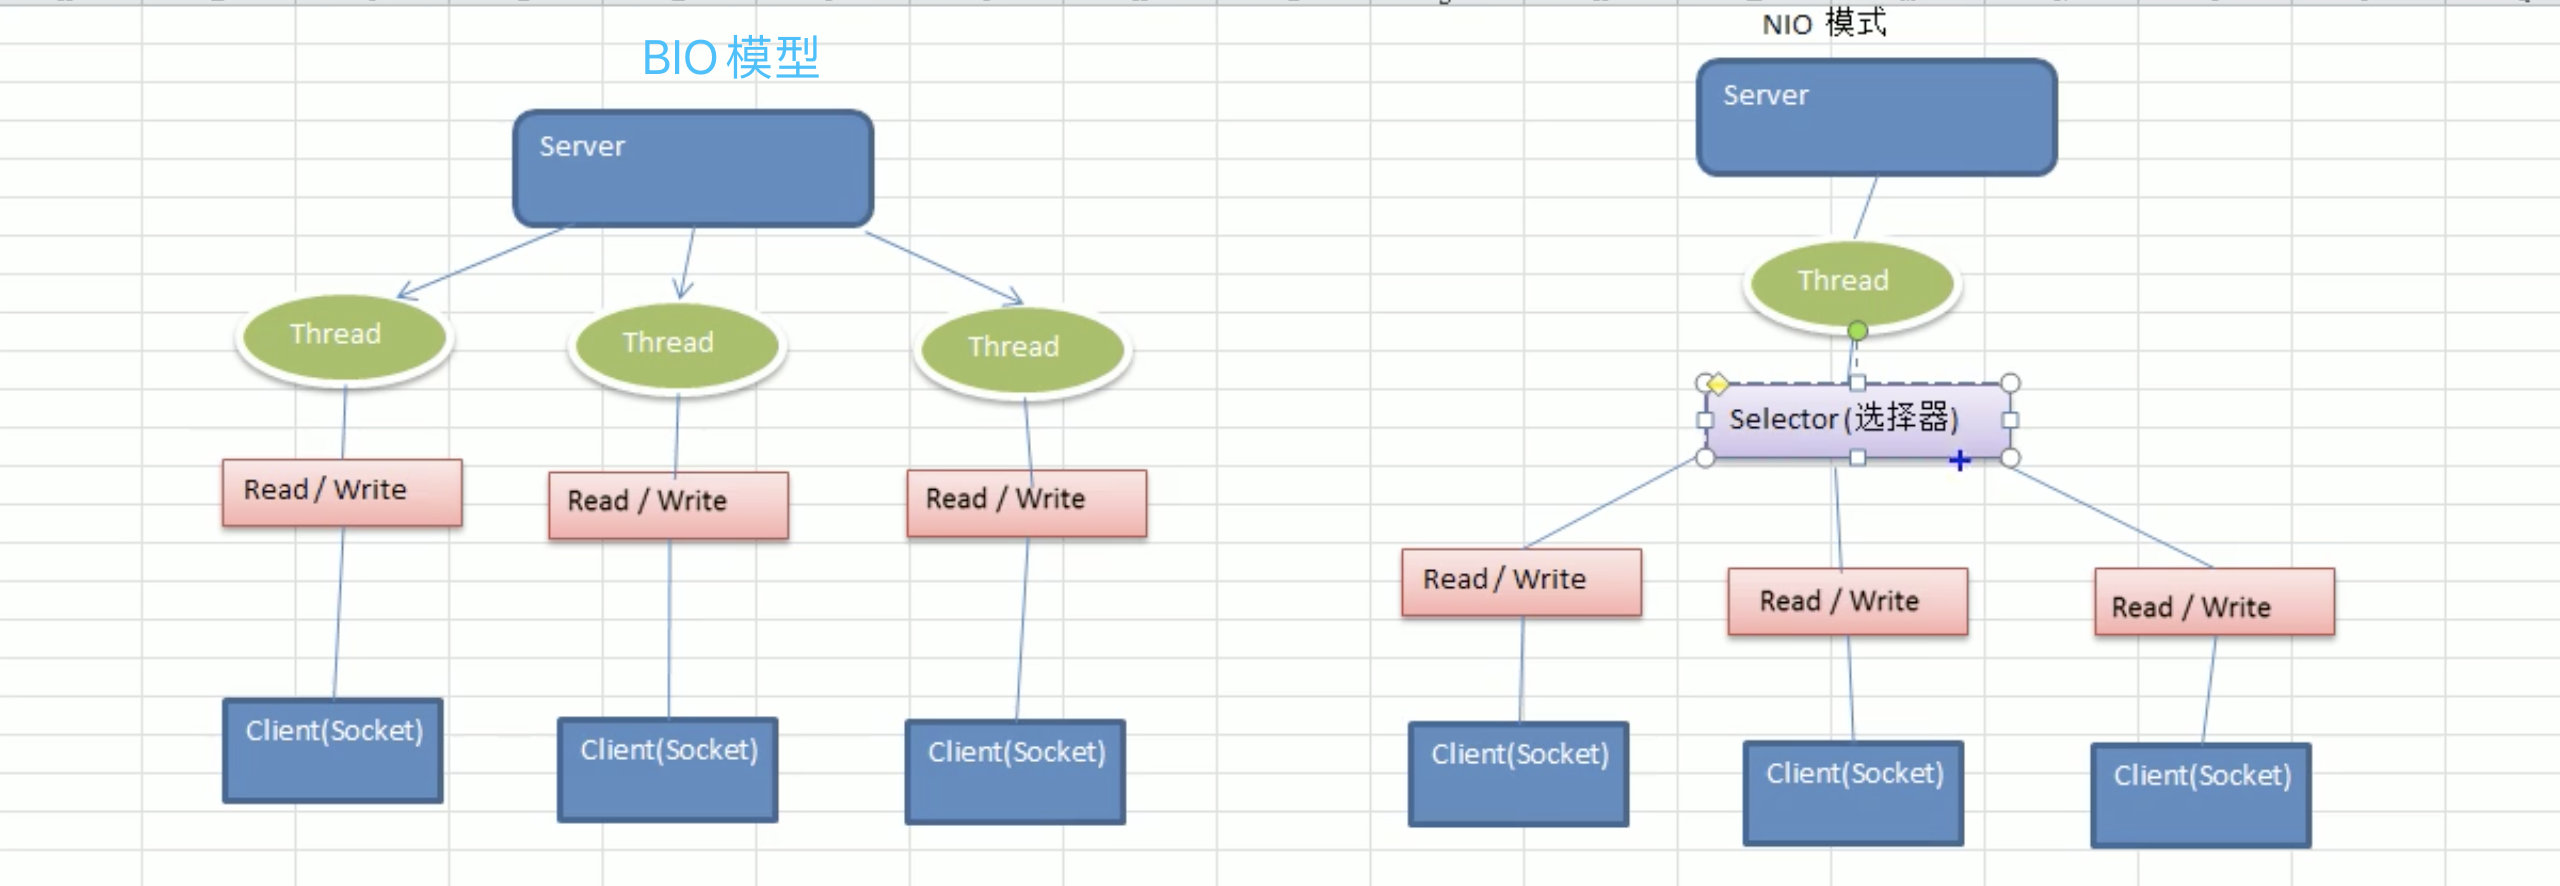
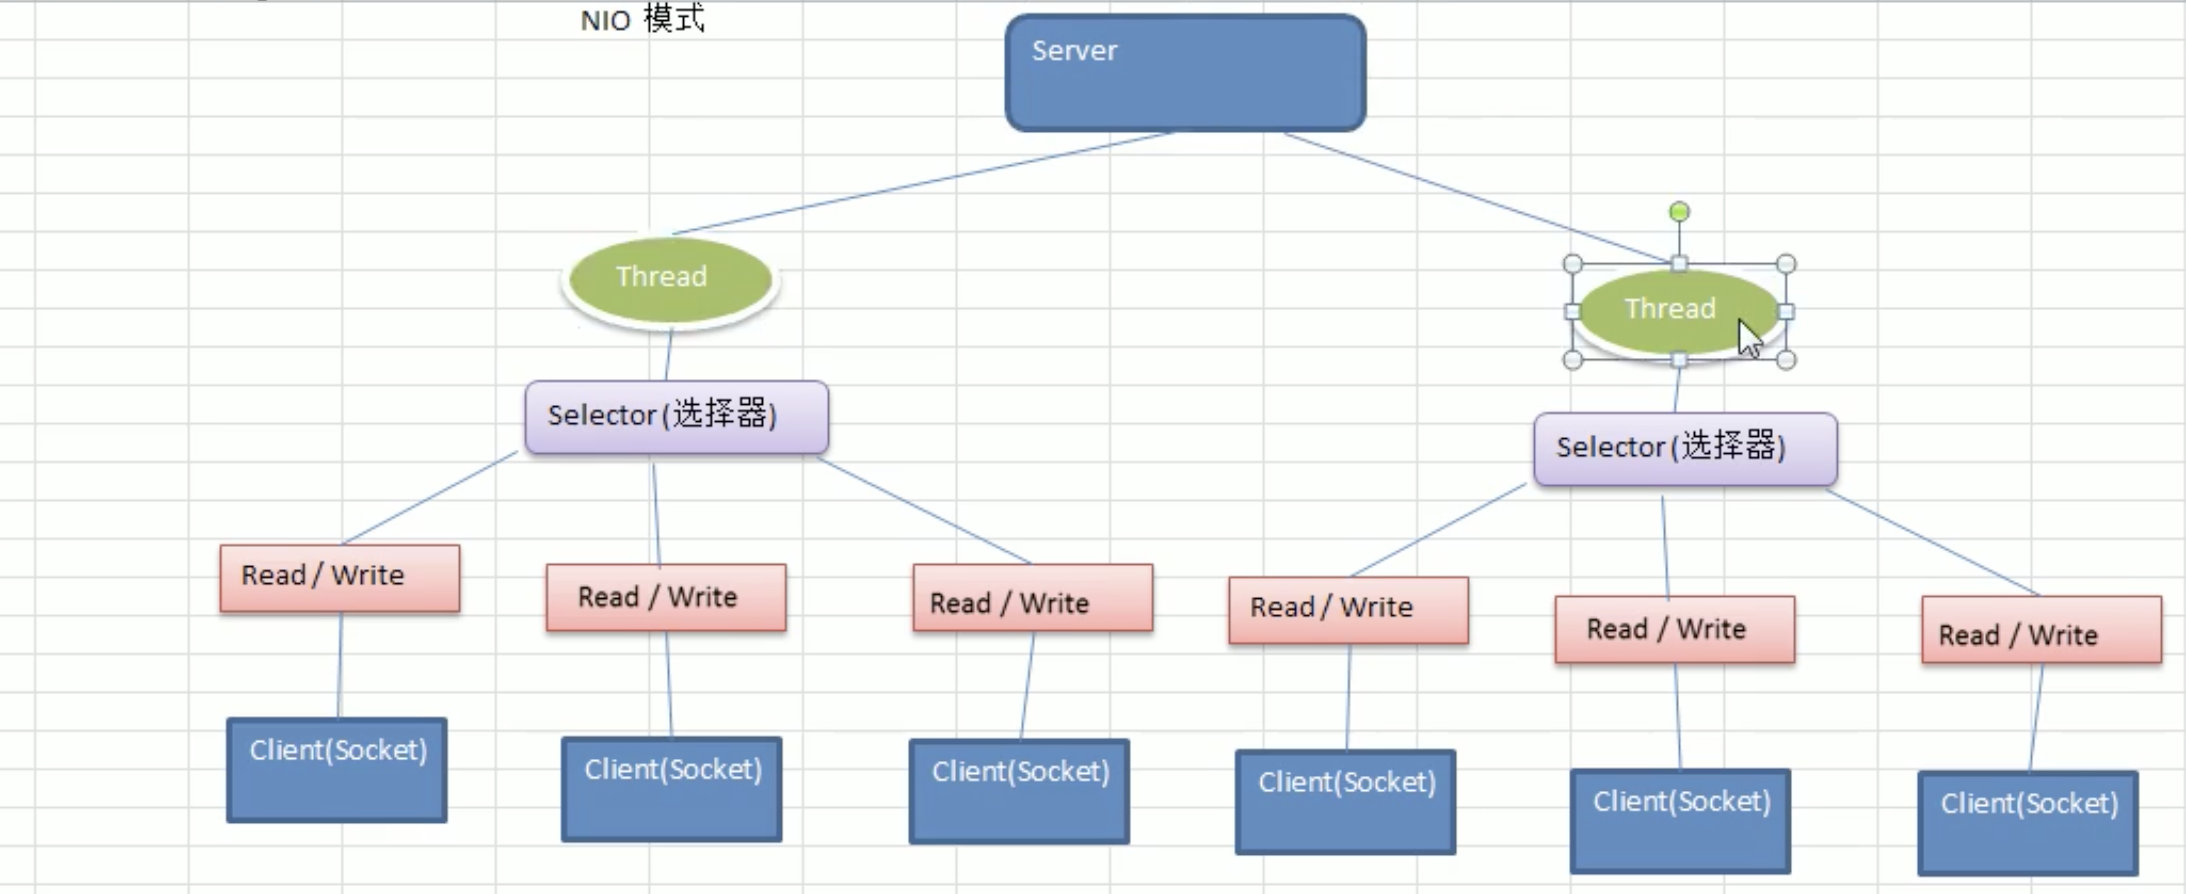
NIO模型(简单描述):
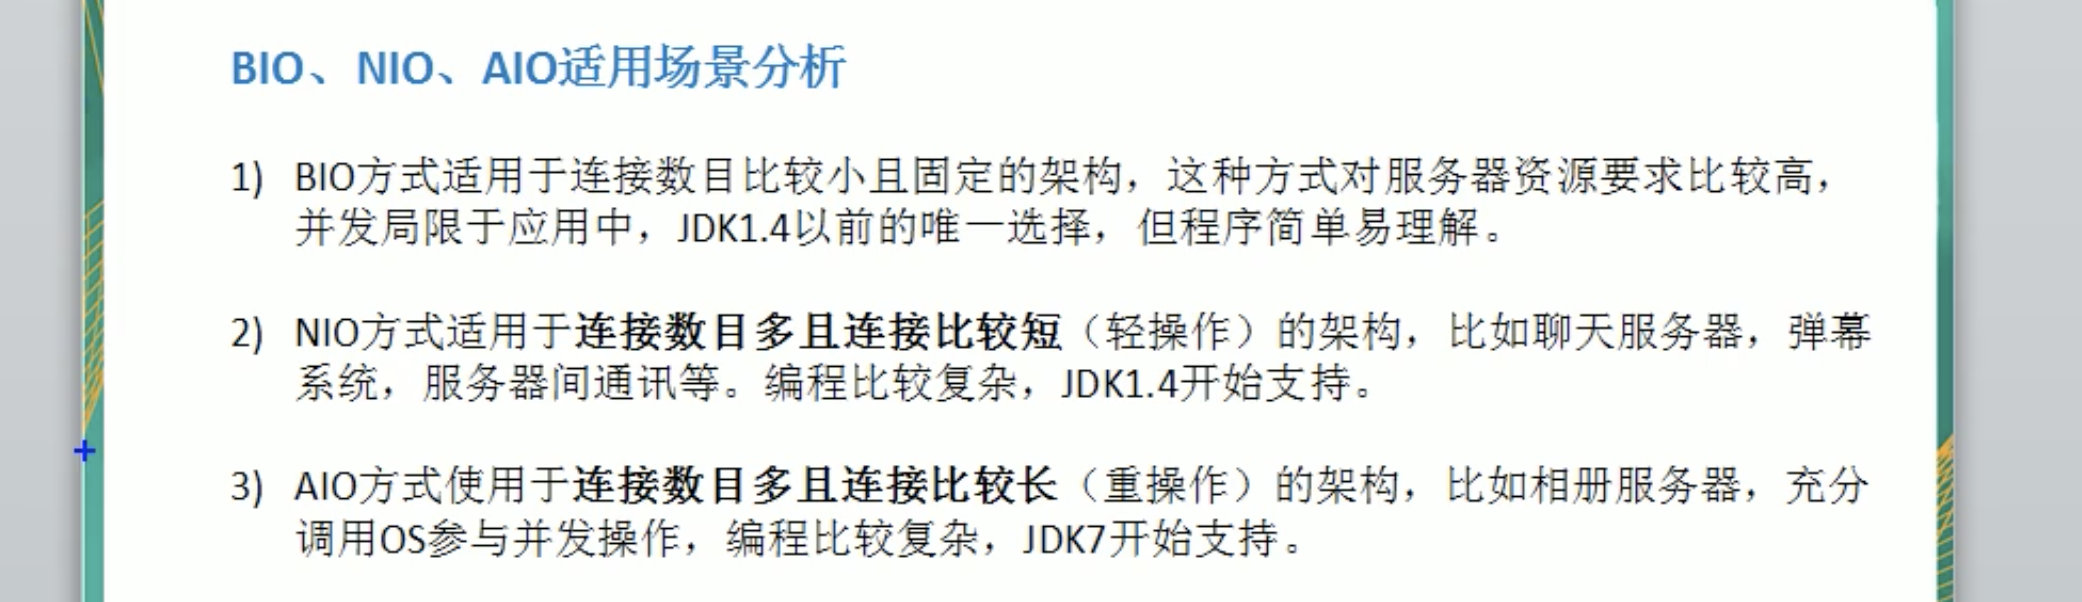
IO模型应用场景
Java BIO基本介绍
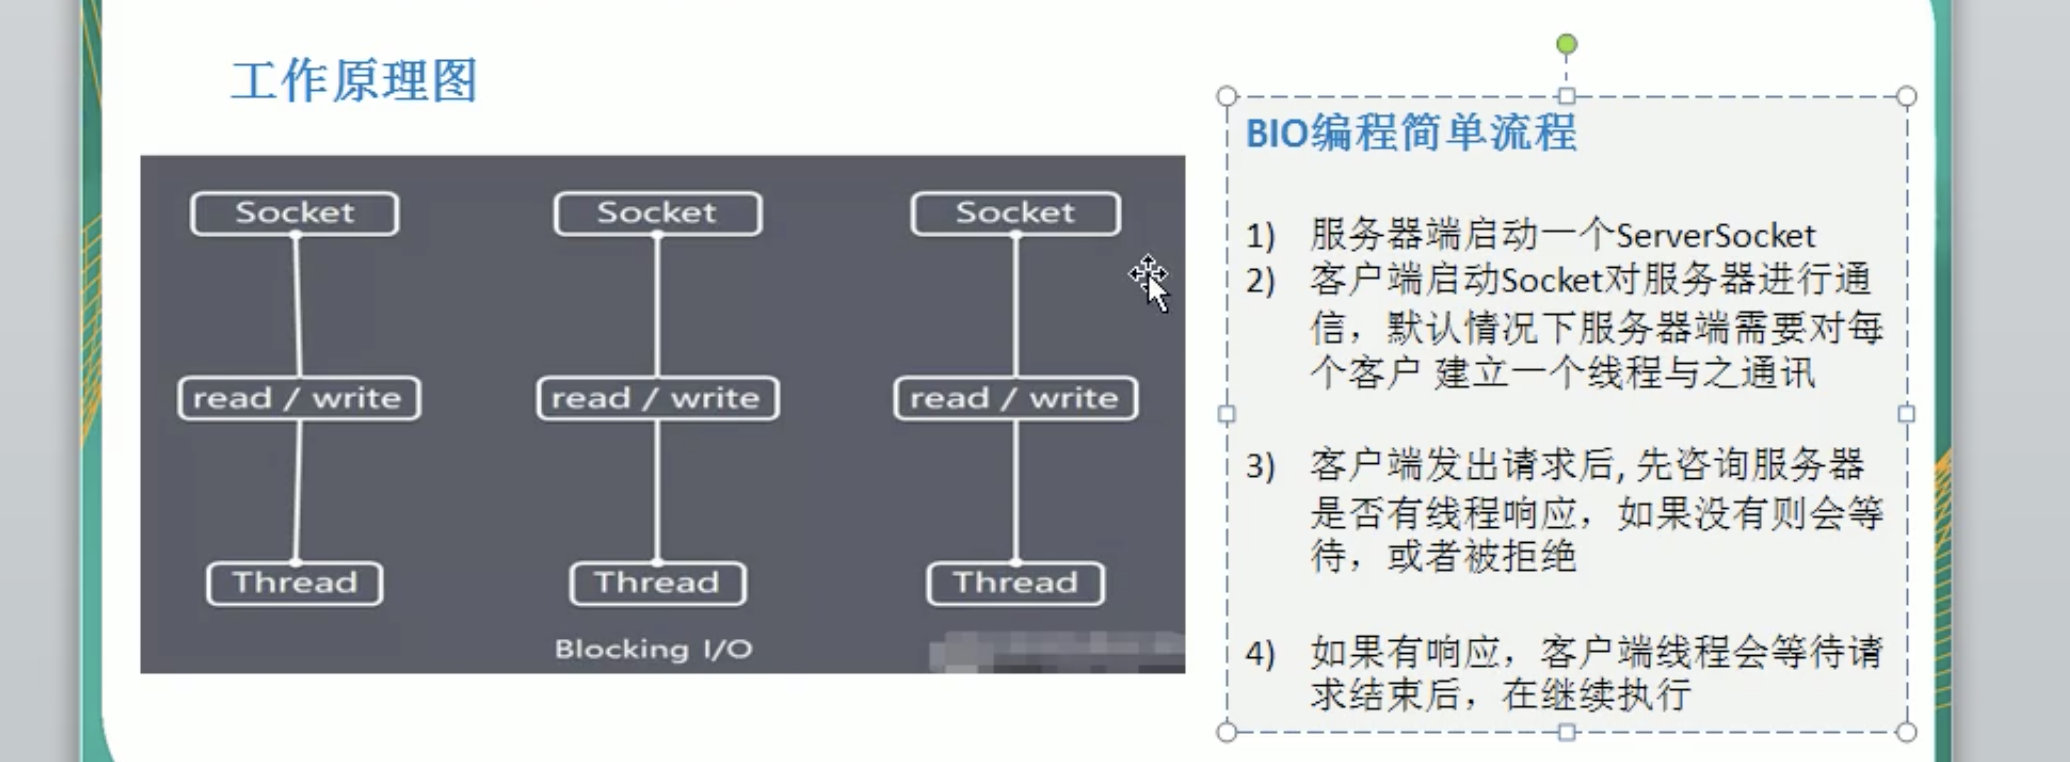
Java BIO 工作机制
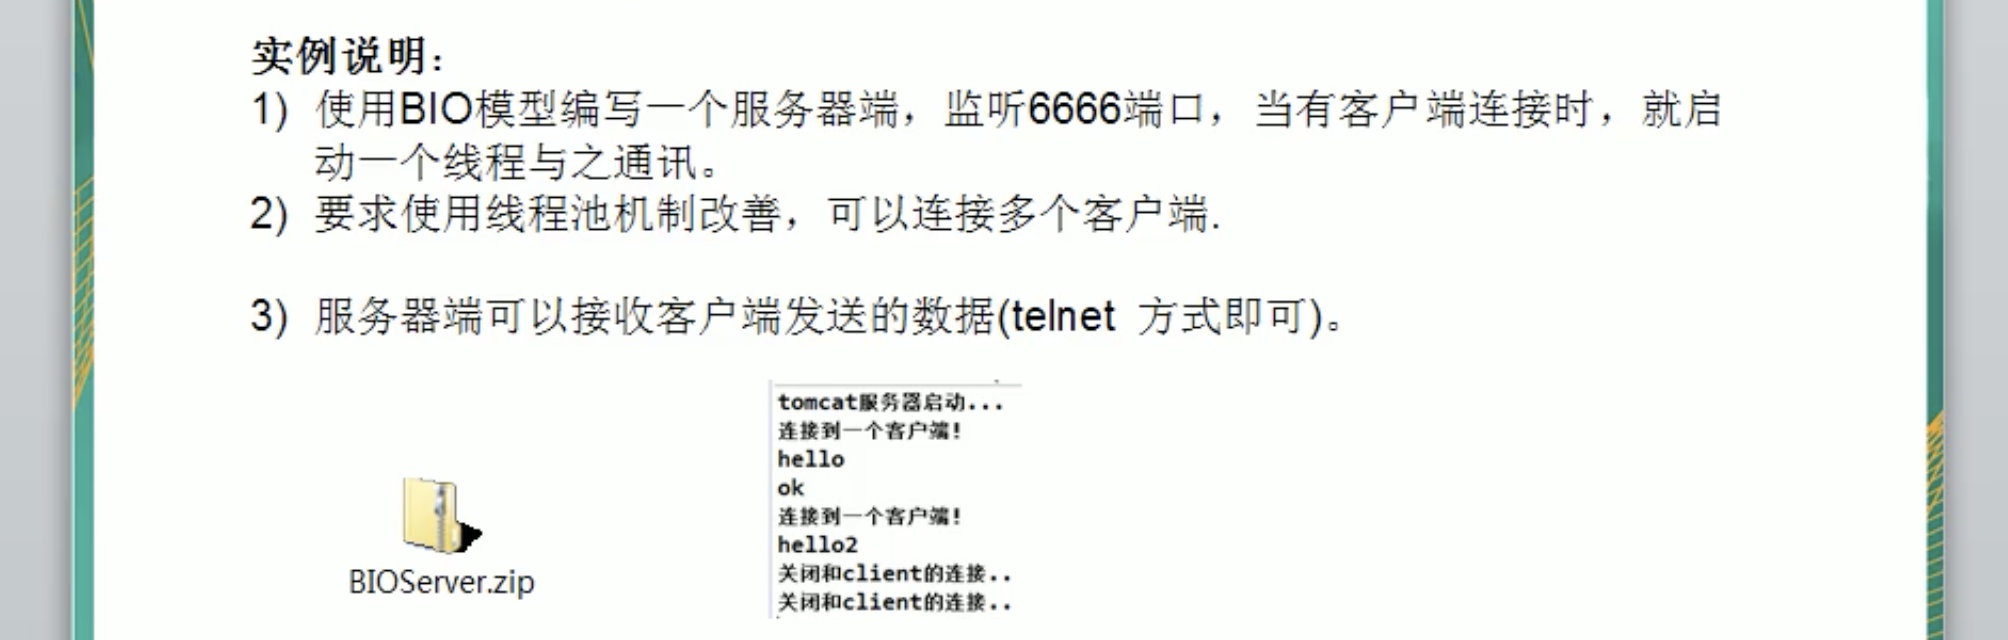
Java BIO 应用案例
1// 代码示例:
2public class BIOService {
3    public static void main(String[] args) throws IOException {
4        // 功能需求:
5        // 使用BIO模型编写一个服务器,监听6666窗口,当有客户端连接时,就启动一个客户端线程与之通信.
6        // 要求使用线程连接机制,可以连接多个客户端.
7        // 服务器端可以接受客户端发送的数据(telnet方式即可)
8
9        //1. 首先建立一个线程池.
10        ExecutorService newCachedThreadPool = Executors.newCachedThreadPool();
11
12        //2. 建立一个监听服务,来监听客户端连接
13        ServerSocket serverSocket = new ServerSocket(6666);
14        System.out.println("服务器启动成功");
15
16        while (true) {
17            // 监听,等待客户端连接
18            final Socket socket = serverSocket.accept();
19            System.out.println("客户端连接了.");
20            //连接了之后,给这个用户创建一个线程用于通信.
21            newCachedThreadPool.execute(new Runnable() {
22                public void run() {
23                    //从写run方法. 接受客户端发送的消息.打印到控制台.
24                    handler(socket);
25                }
26            });
27        }
28    }
29
30    private static void handler(Socket socket) {
31        byte[] bytes = new byte[1024];
32
33        try (InputStream inputStream = socket.getInputStream()) {
34            while (true) { //通过socket获取到输入流
35                int read = inputStream.read(bytes);
36                if (read != -1) { // 如果在读的过程中,打印出字节.
37                    System.out.println(Arrays.toString(bytes));
38                } else {//读完之后,退出循环
39                    break;
40                }
41            }
42        } catch (IOException e) {
43            e.printStackTrace();
44        } finally {
45            // 我试试会报错不会.不关闭流,但是实用的try- which - resource
46            System.out.println("关闭连接");
47        }
48
49    }
50}
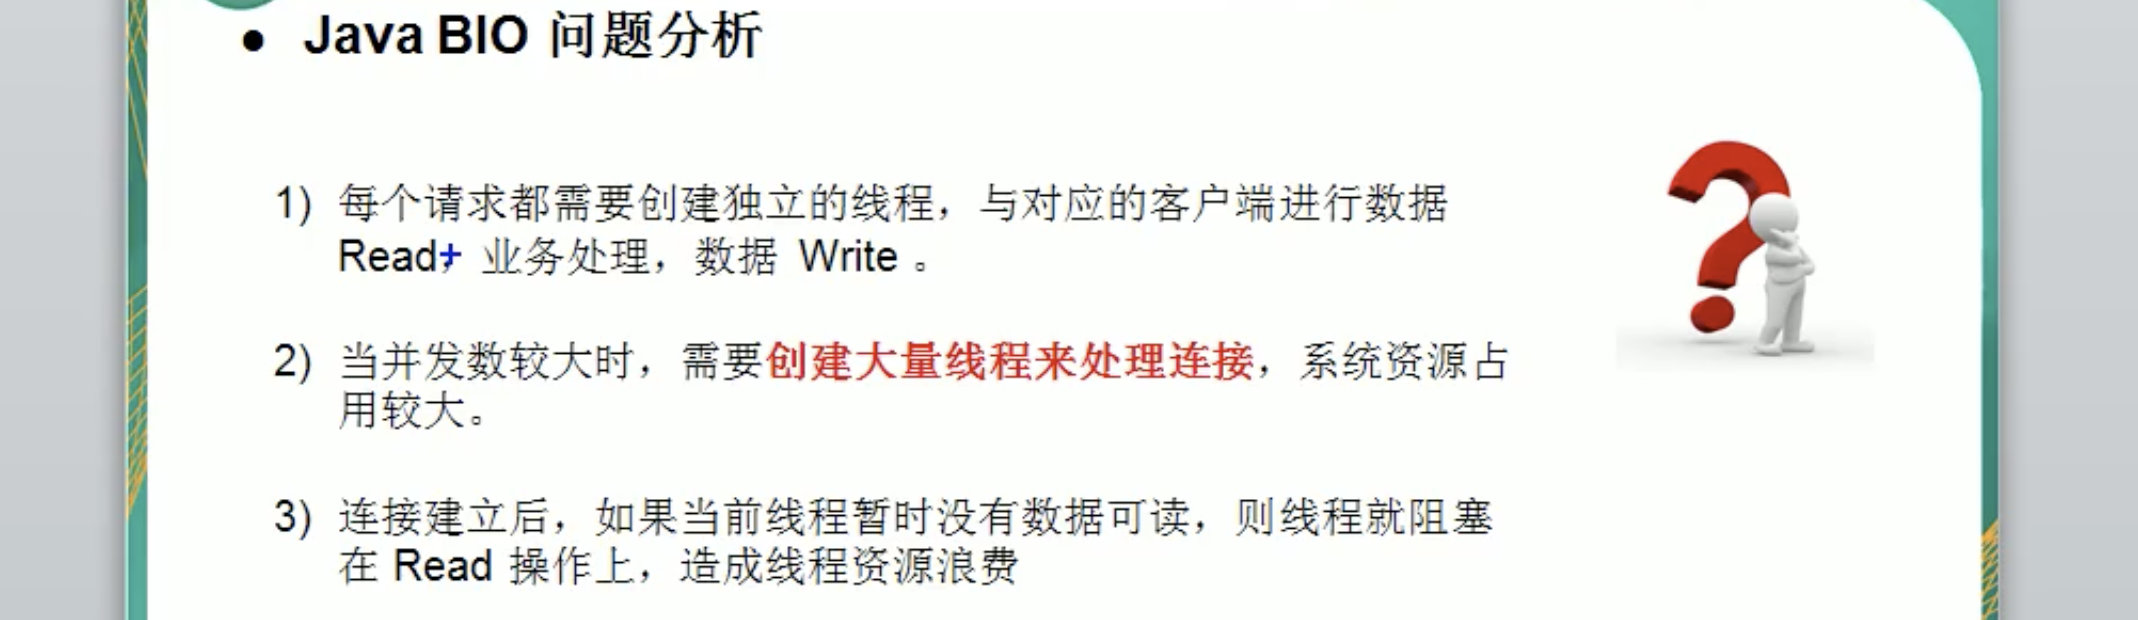
Java BIO问题分析
Java NIO编程
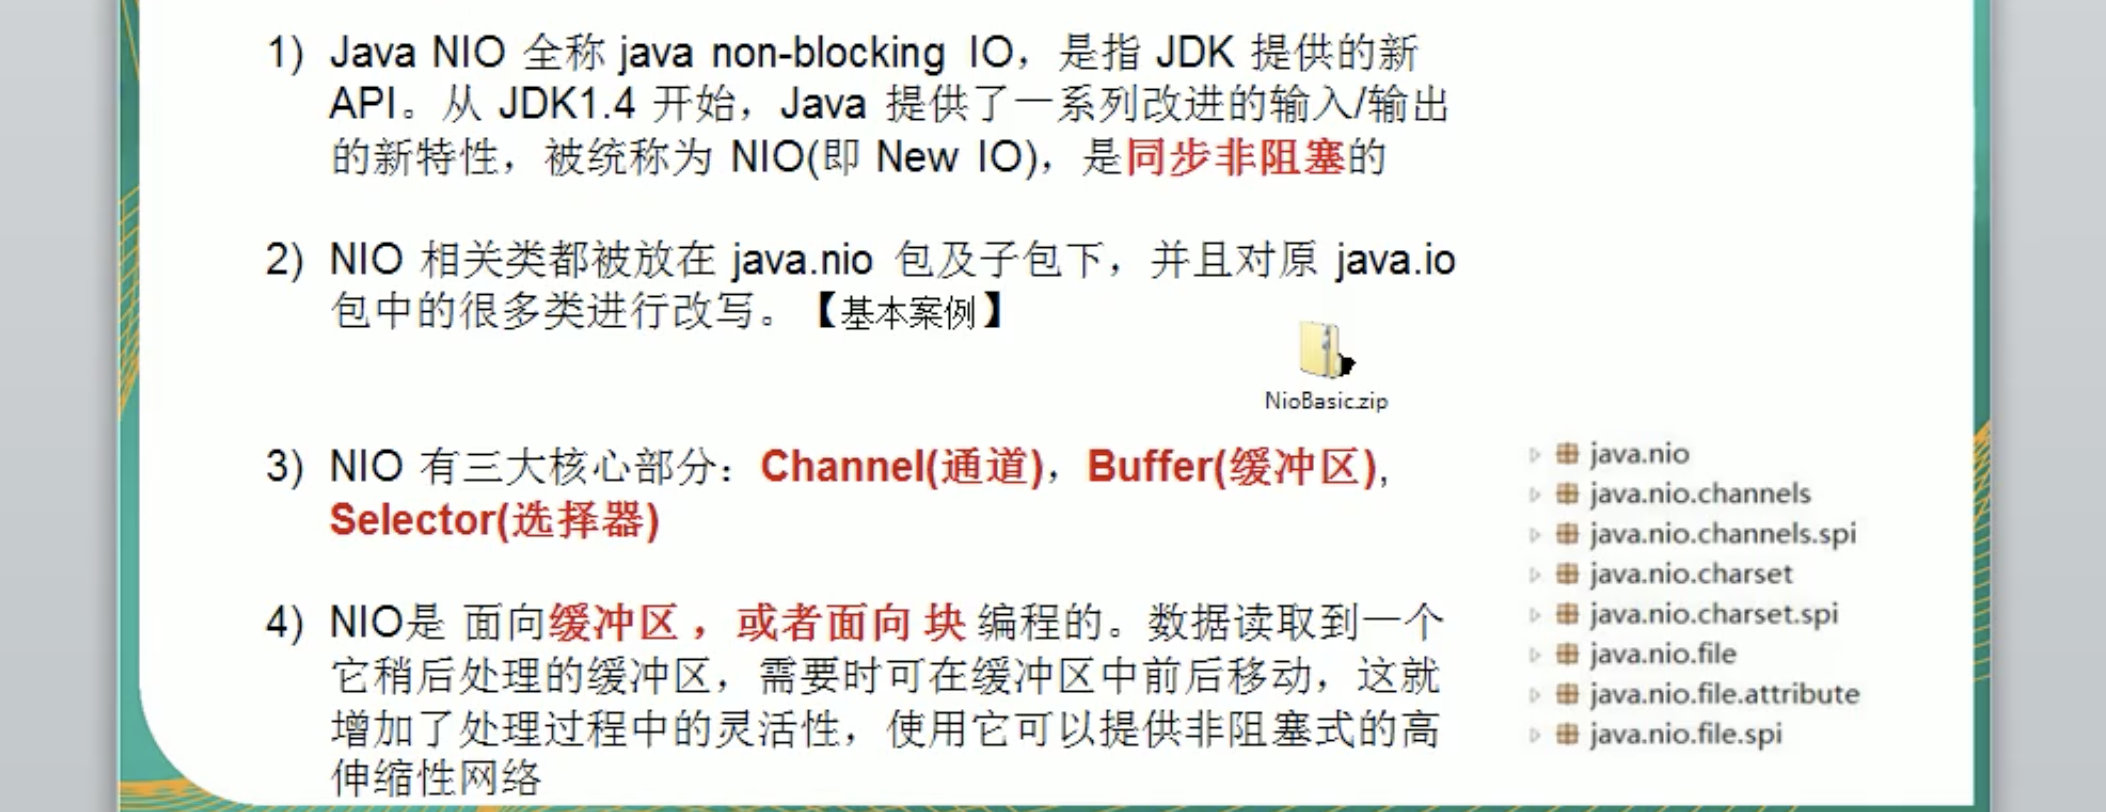
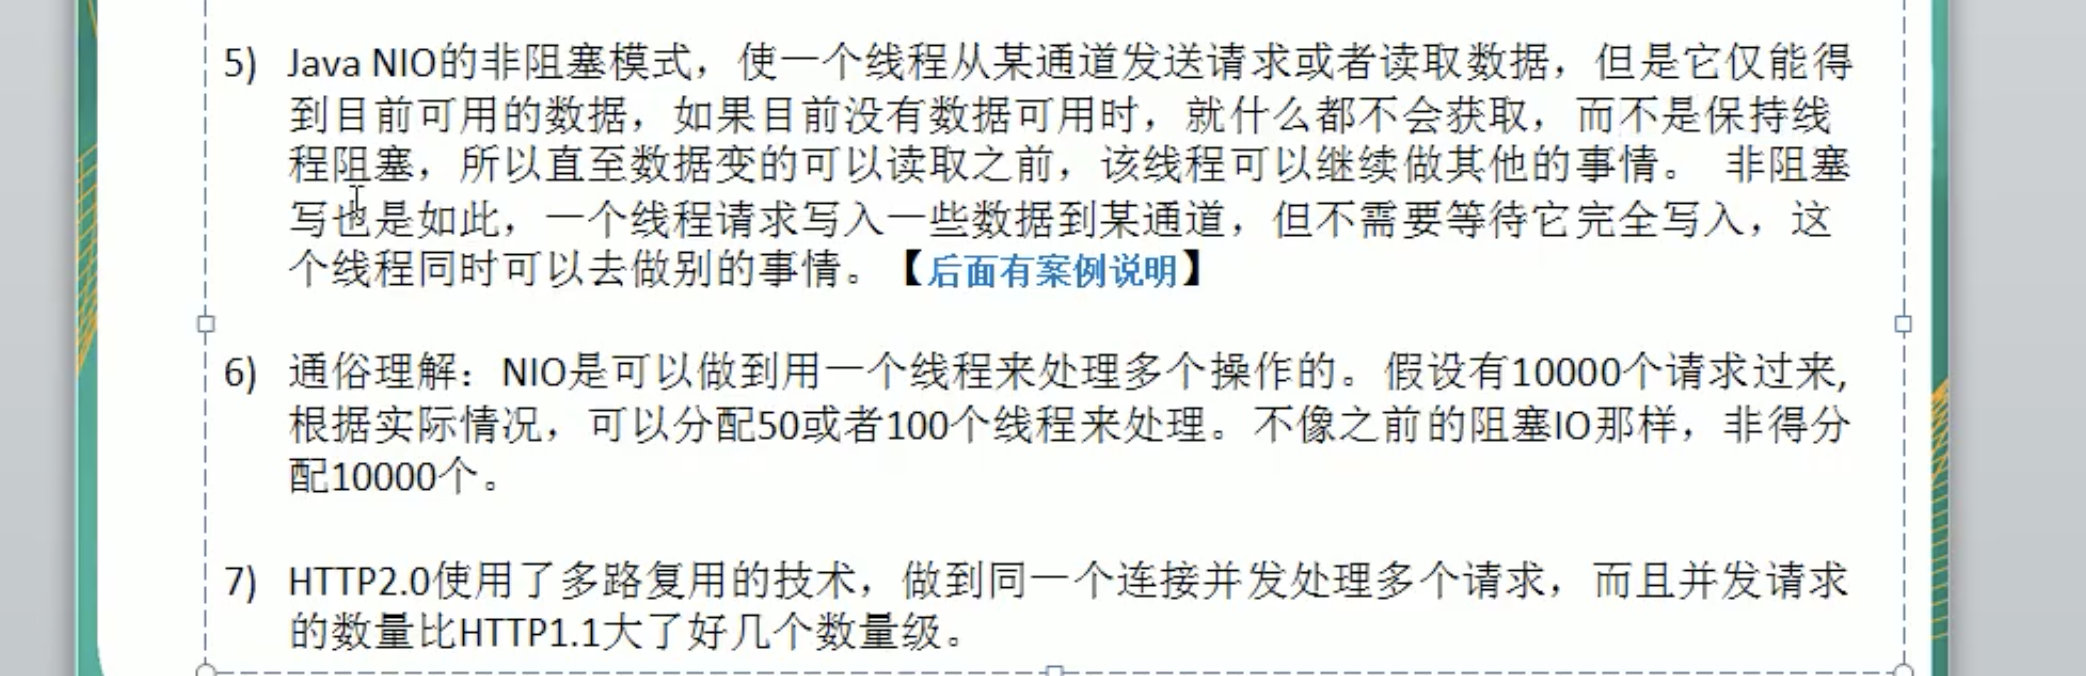
JavaNIO基本介绍
NIO中的Channel 相当于 BIO当中的serverSocket。 非阻塞 是通过Buffer实现的。
1NIO Buffer的基本使用 案例介绍:
2  public class BasicBuffer {
3    public static void main(String[] args) {
4
5        IntBuffer intBuffer = IntBuffer.allocate(5);
6        intBuffer.put(1);
7        intBuffer.put(2);
8        intBuffer.put(3);
9        intBuffer.put(4);
10        intBuffer.put(5);
11
12        intBuffer.flip();   // 转换读写操作.
13
14        while (intBuffer.hasRemaining()) {
15            int i = intBuffer.get();
16            System.out.println(i);
17        }
18    }
19}
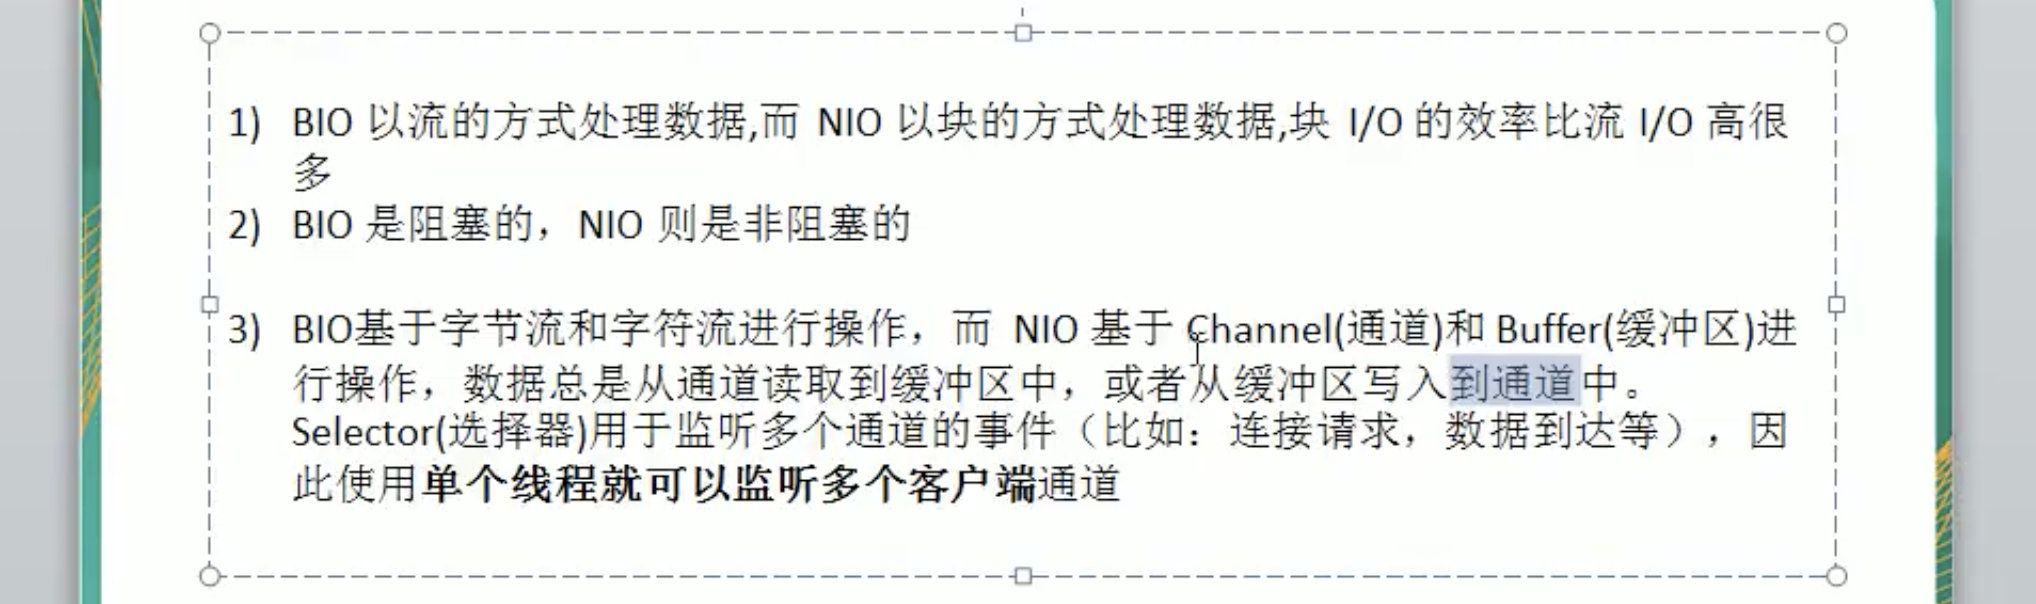
NIO和BIO的比较
NIO三大核心原理示意图
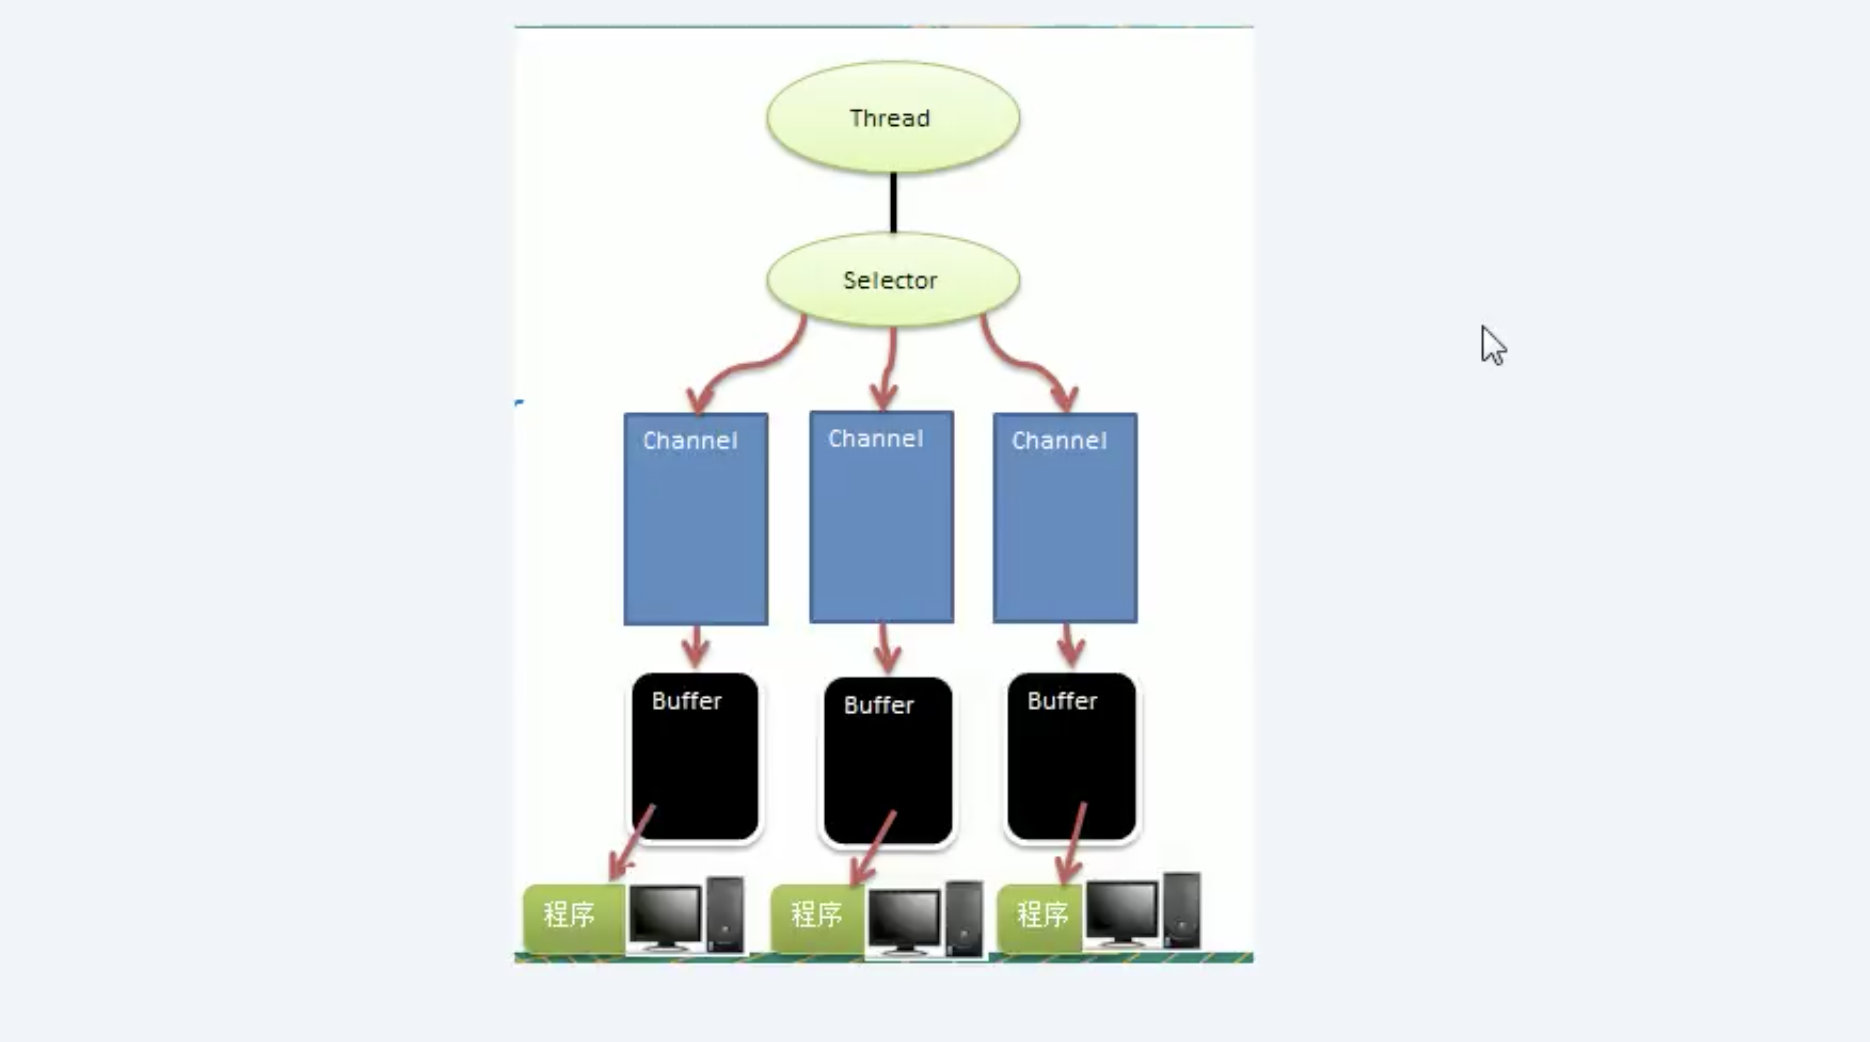
Selector 、 Channel 和Buffer的关系图的说明
- 每个channel都会对应一个Buffer
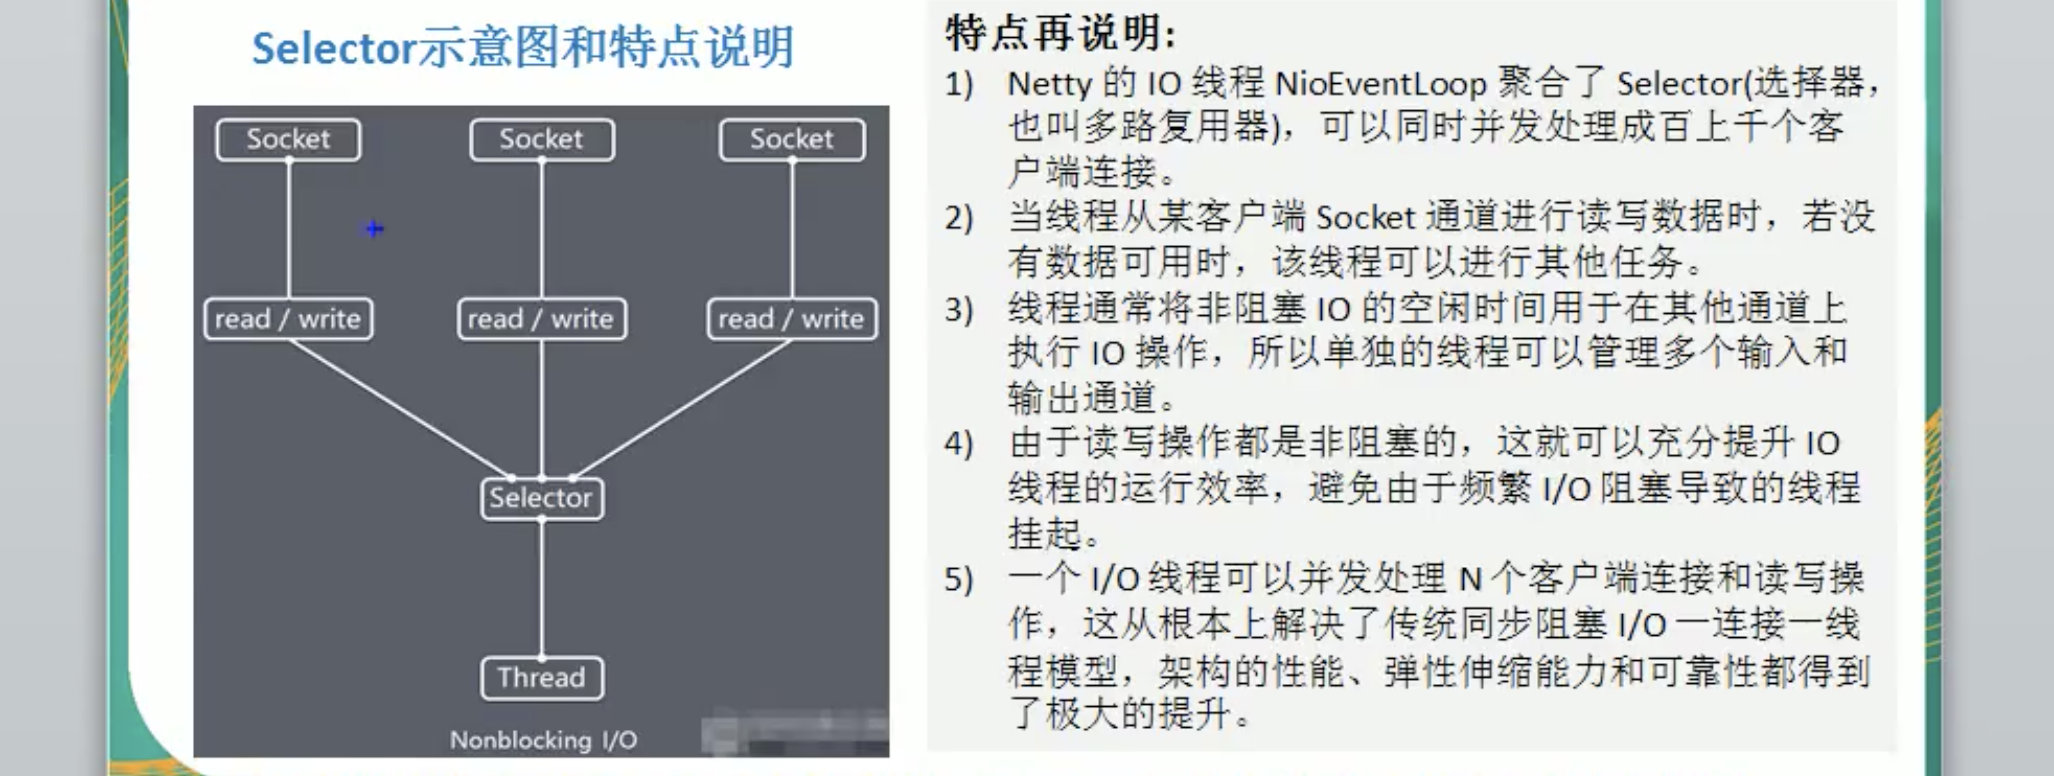
- Selector会对应一个线程。一个线程对应多个channel(连接)
- 该图反应了有三个channel注册到了该selector。
- 程序切换到哪个channel,是由事件决定的。Event是一个重要的概念。(后续会学习都有哪些事件)
- selector会根据不同的事件,在各个通道上切换。
- Buffer就是一个内存块,底层是有一个数组
- 数据的读取写入是通过Buffer,这个和BIO是有本质不同的。BIO中对于一个流而言,要么是输入流或者是输出流,不会是双向流动的。但是NIO的BUffer是可以读,也可以写的。但是需要使用flip()切换。
- Channel也是双向的。可以反应底层操作系统的情况。比如说Linux,底层的操作系统通到就是双向的。
NIO三大核心之—Buffer
Buffer基本介绍
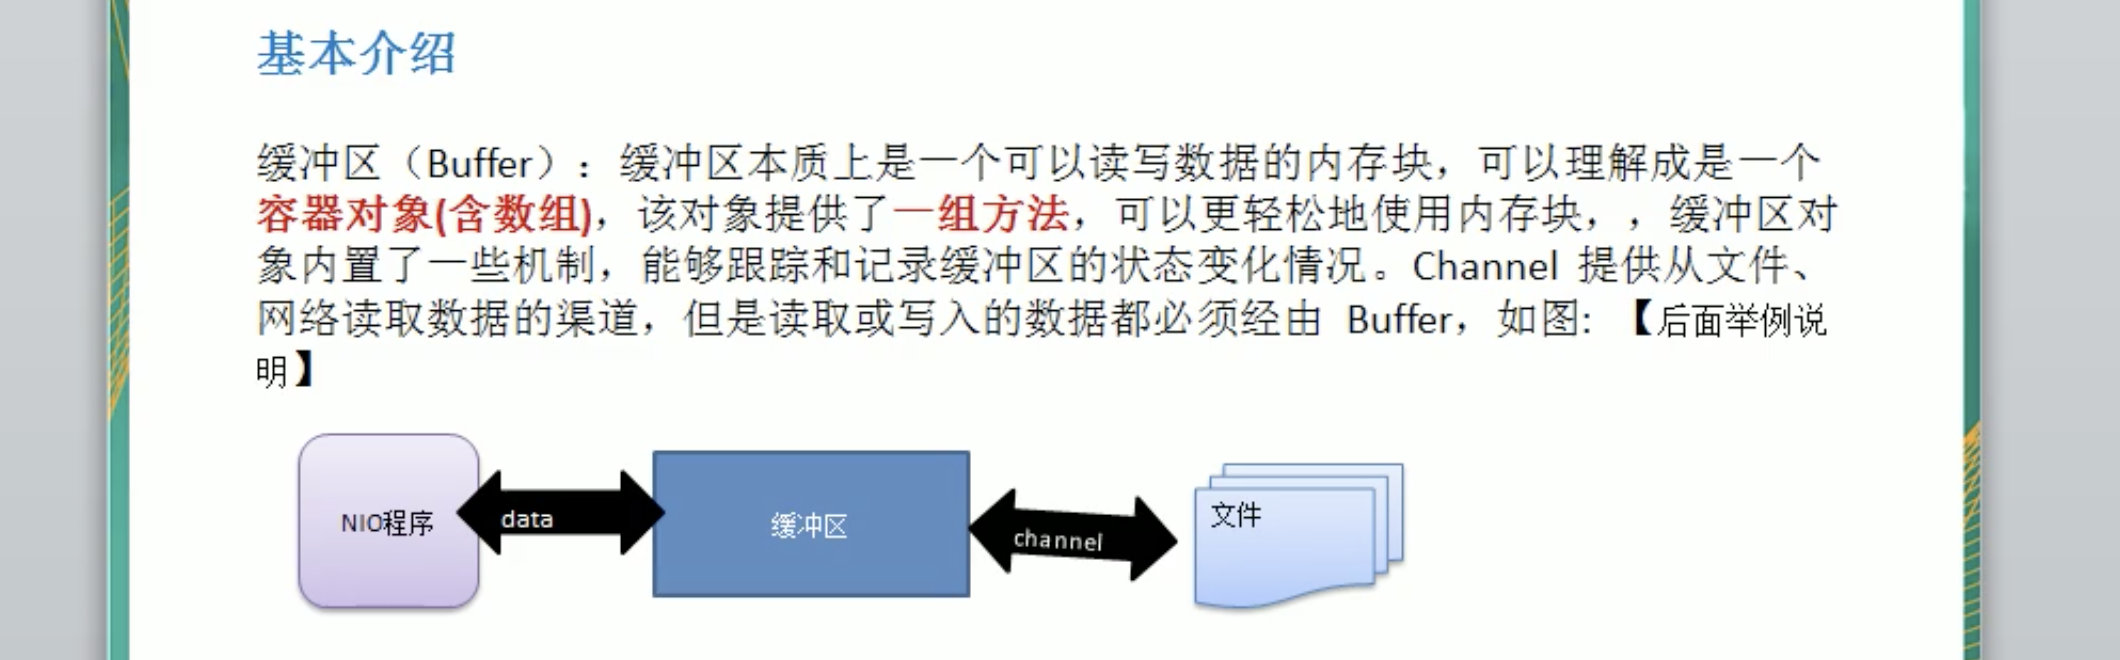
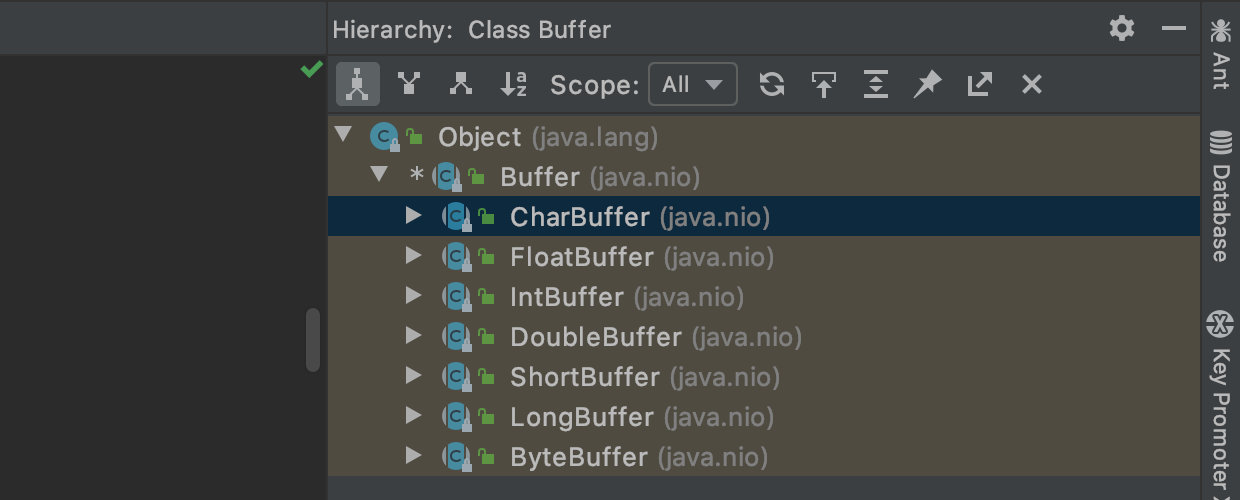
Buffer类及其子类 API
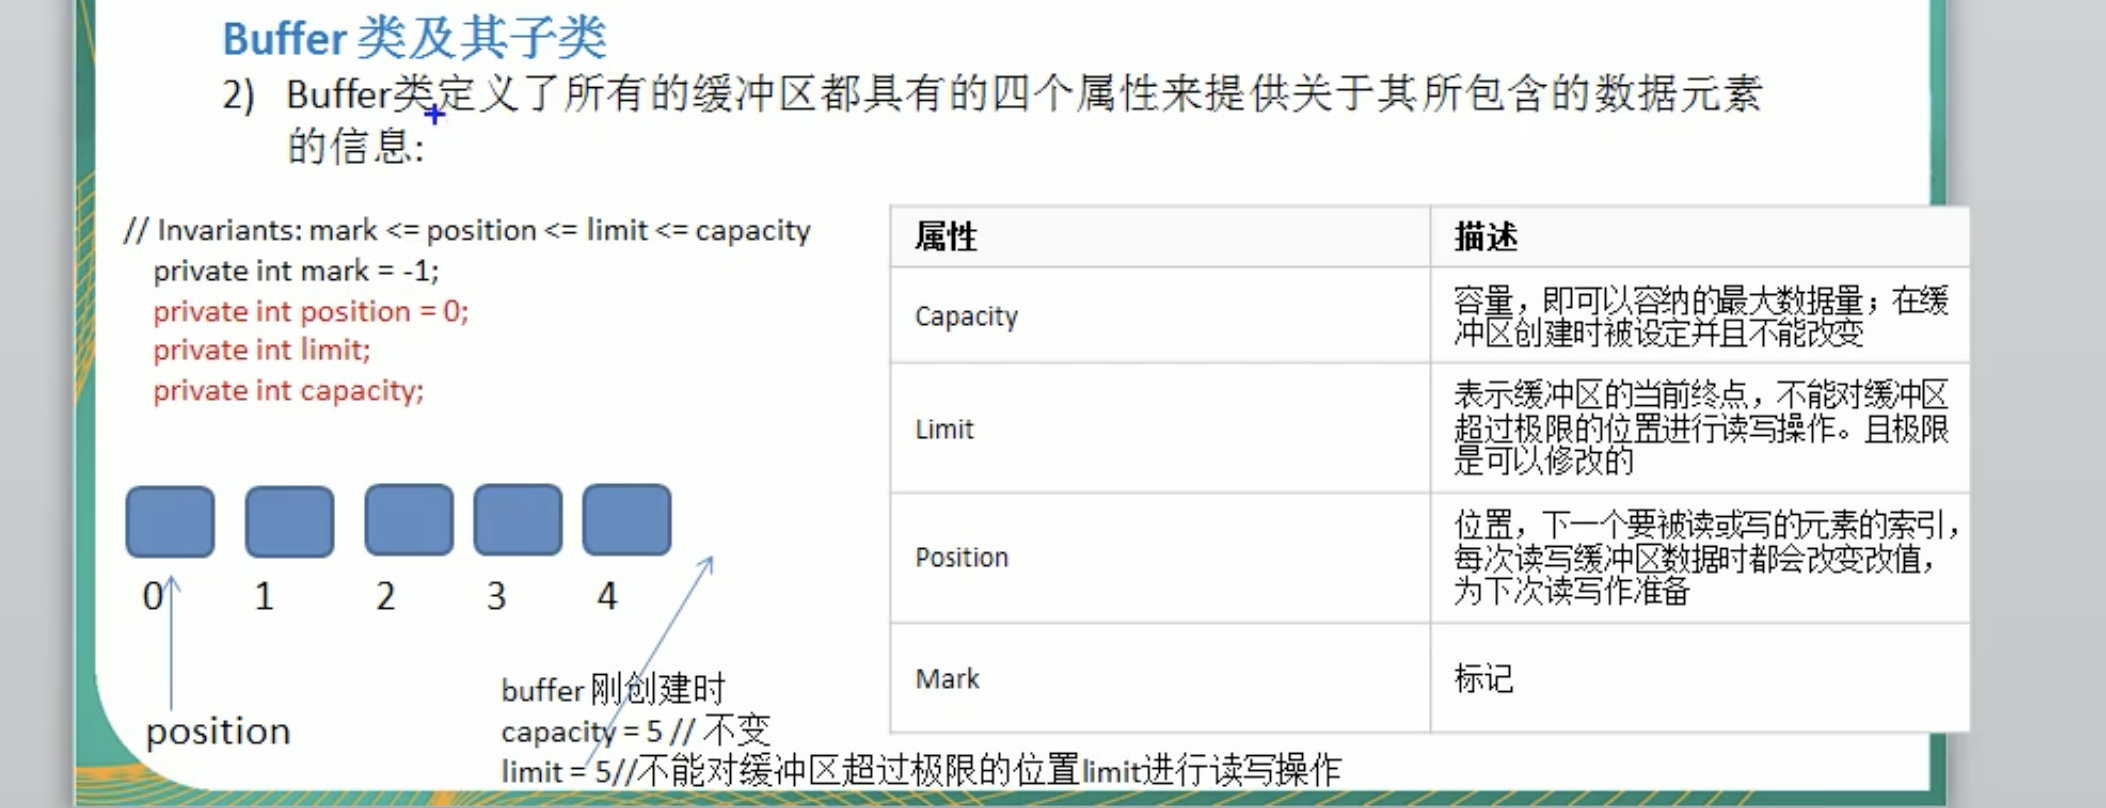
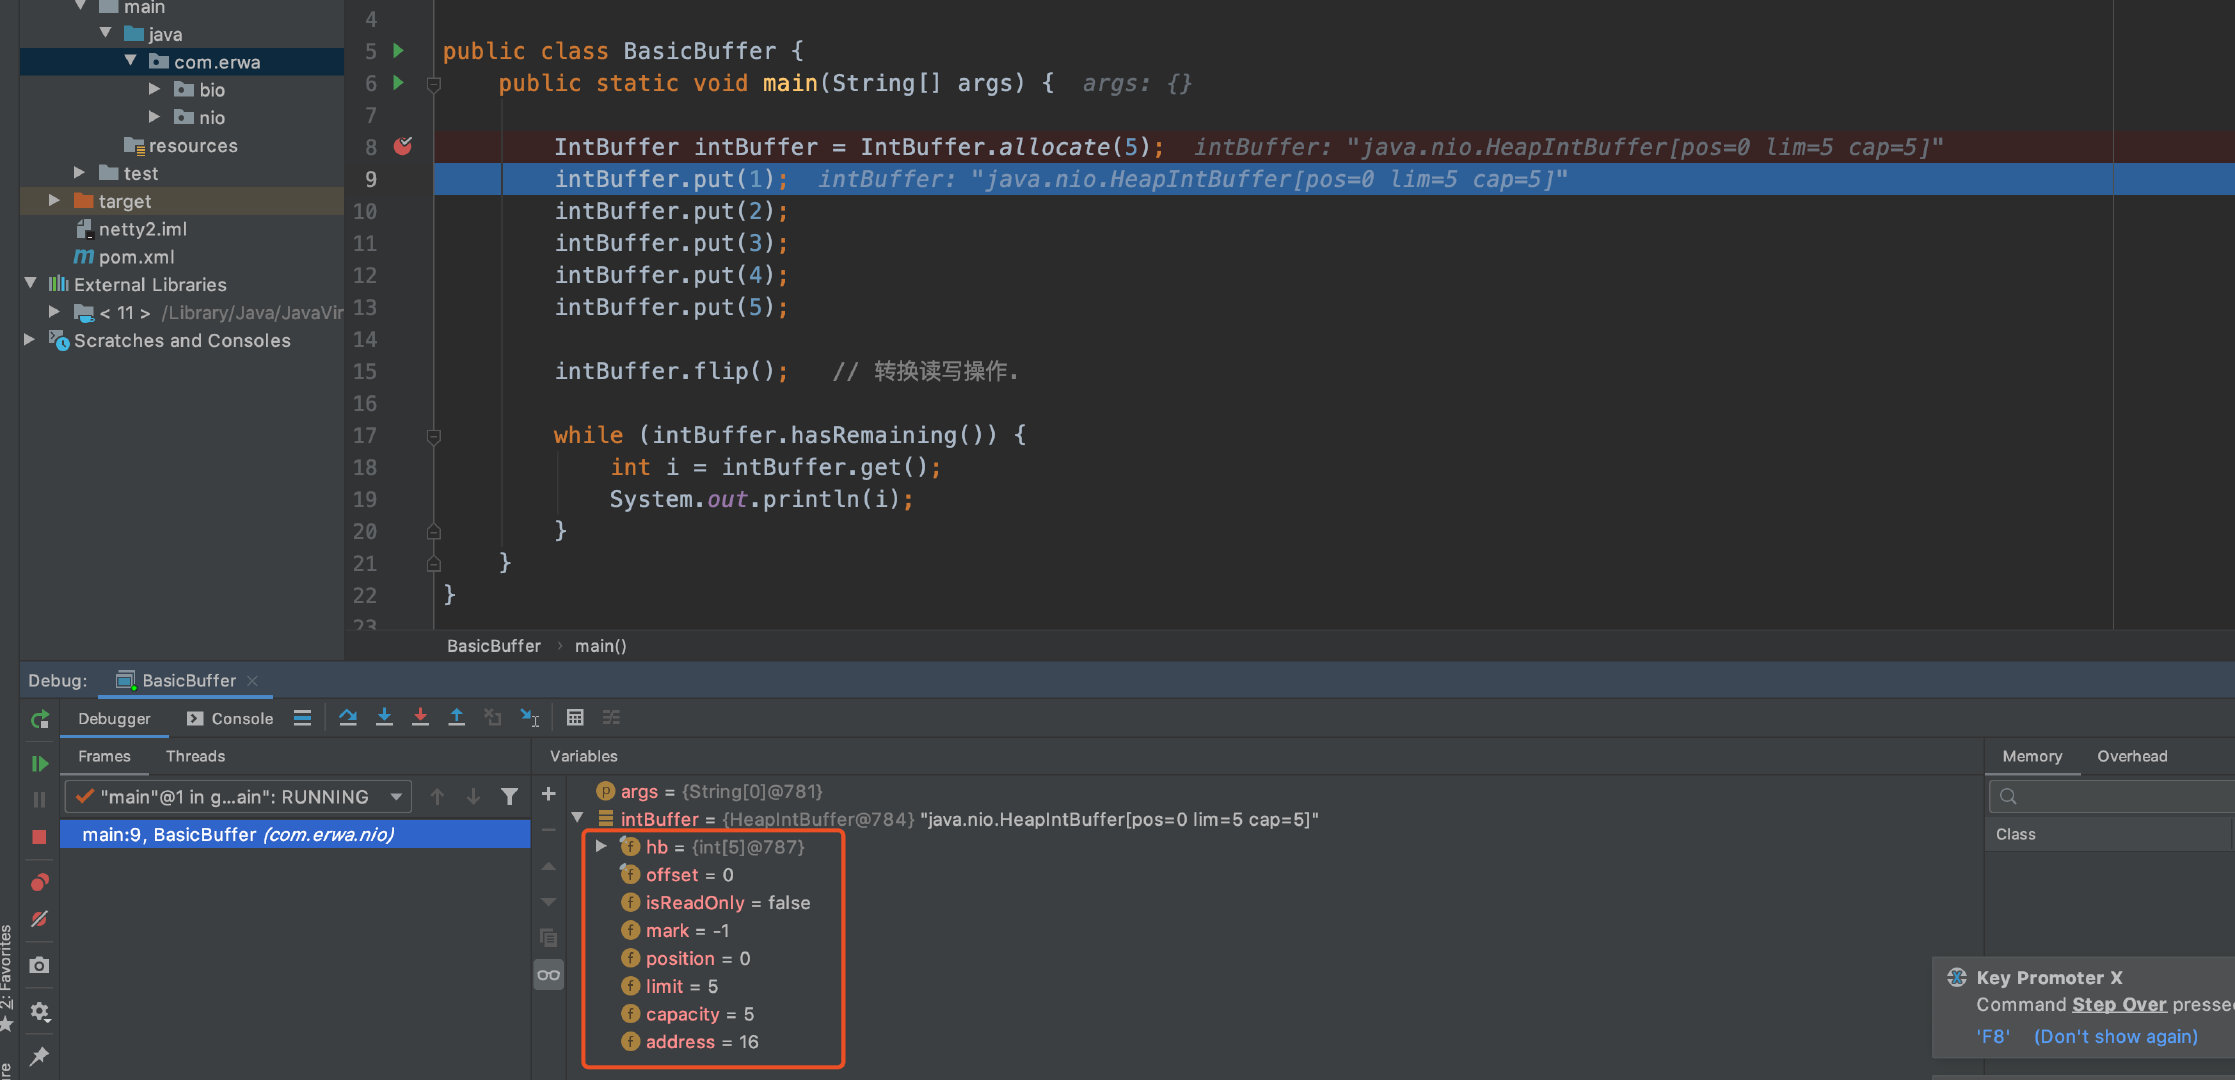
Buffer API
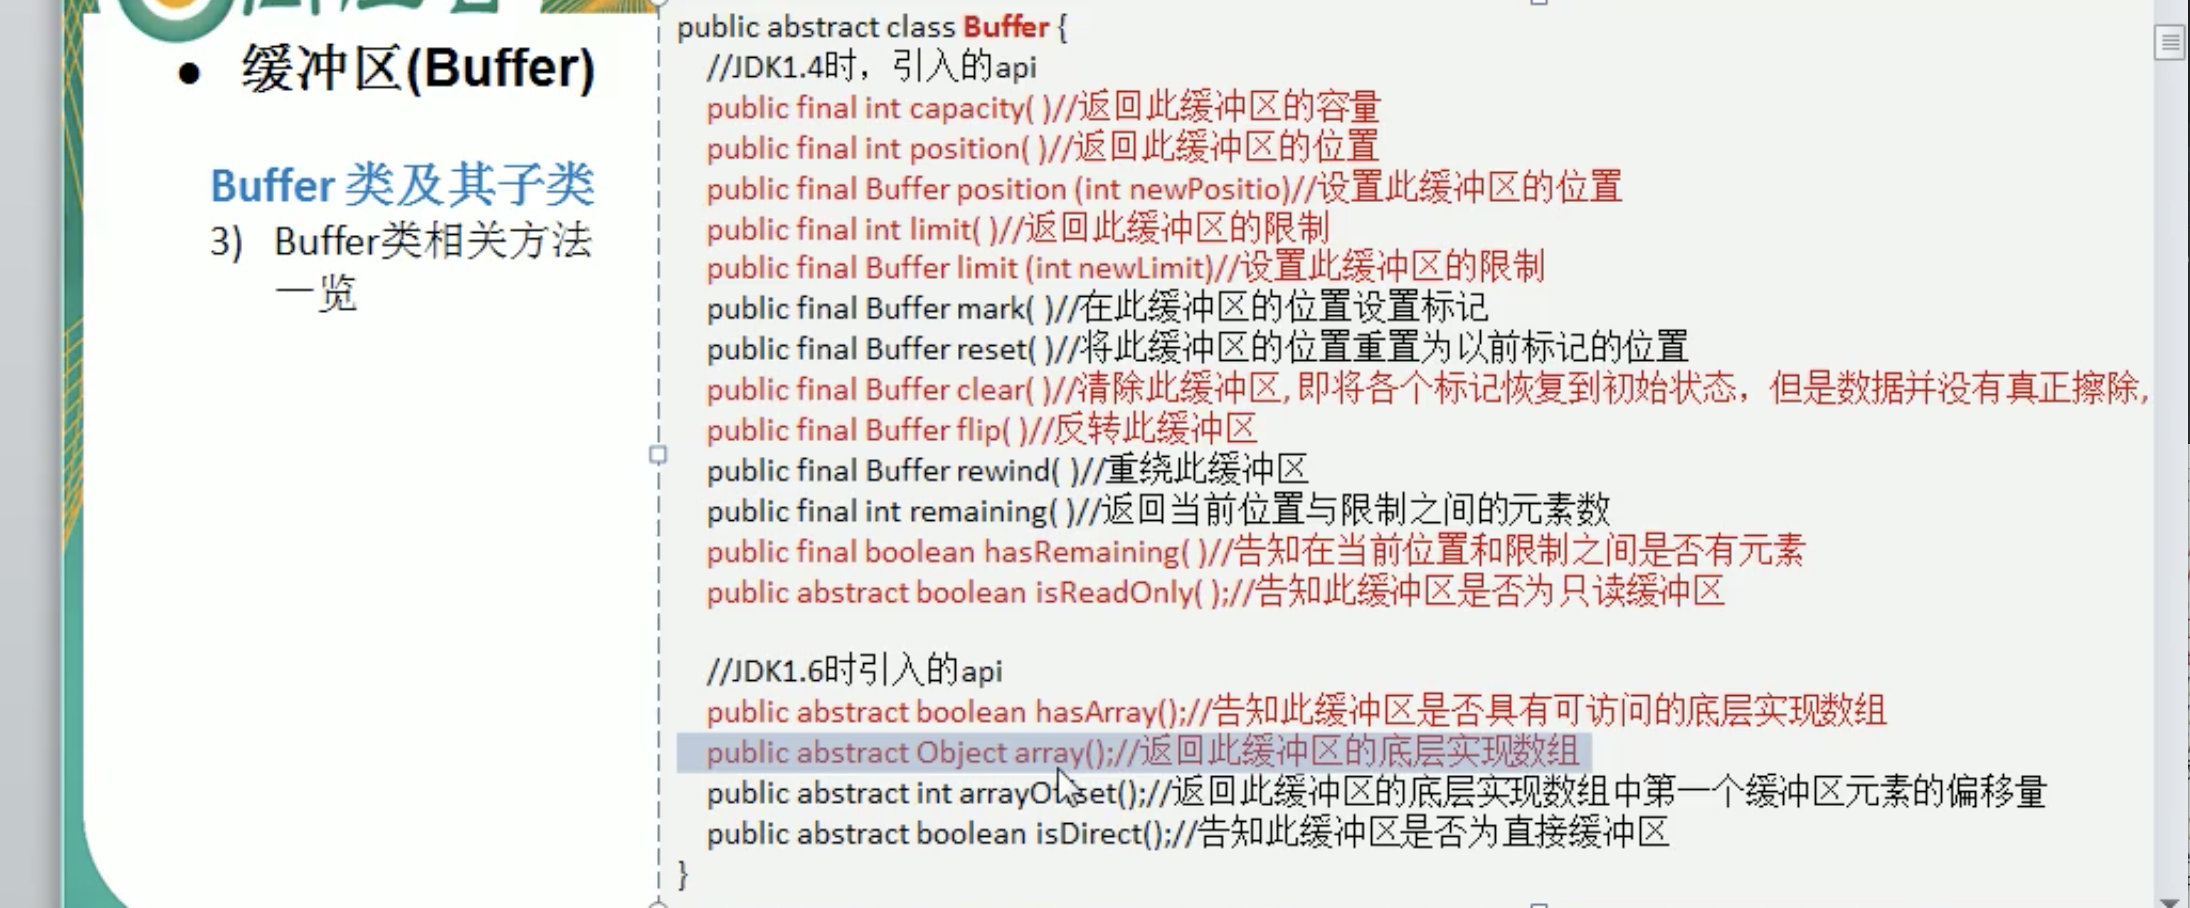
ByteBuffer API
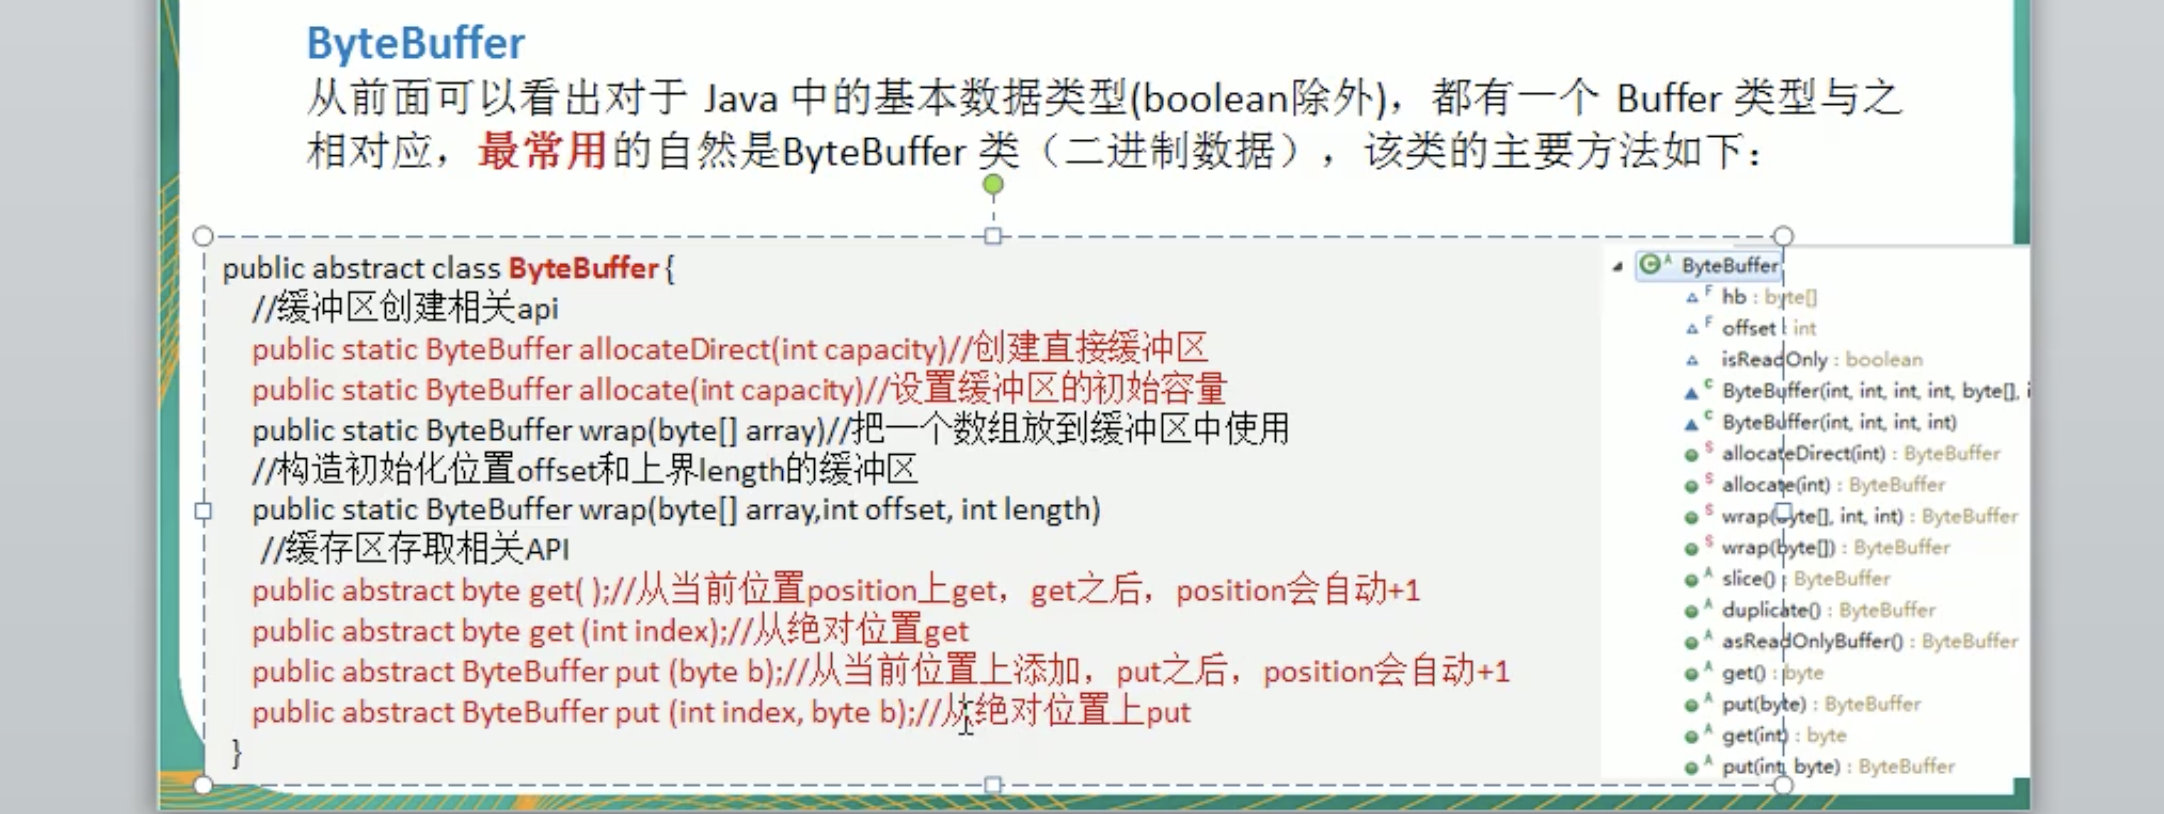
NIO三大核心之—Channel
基本介绍
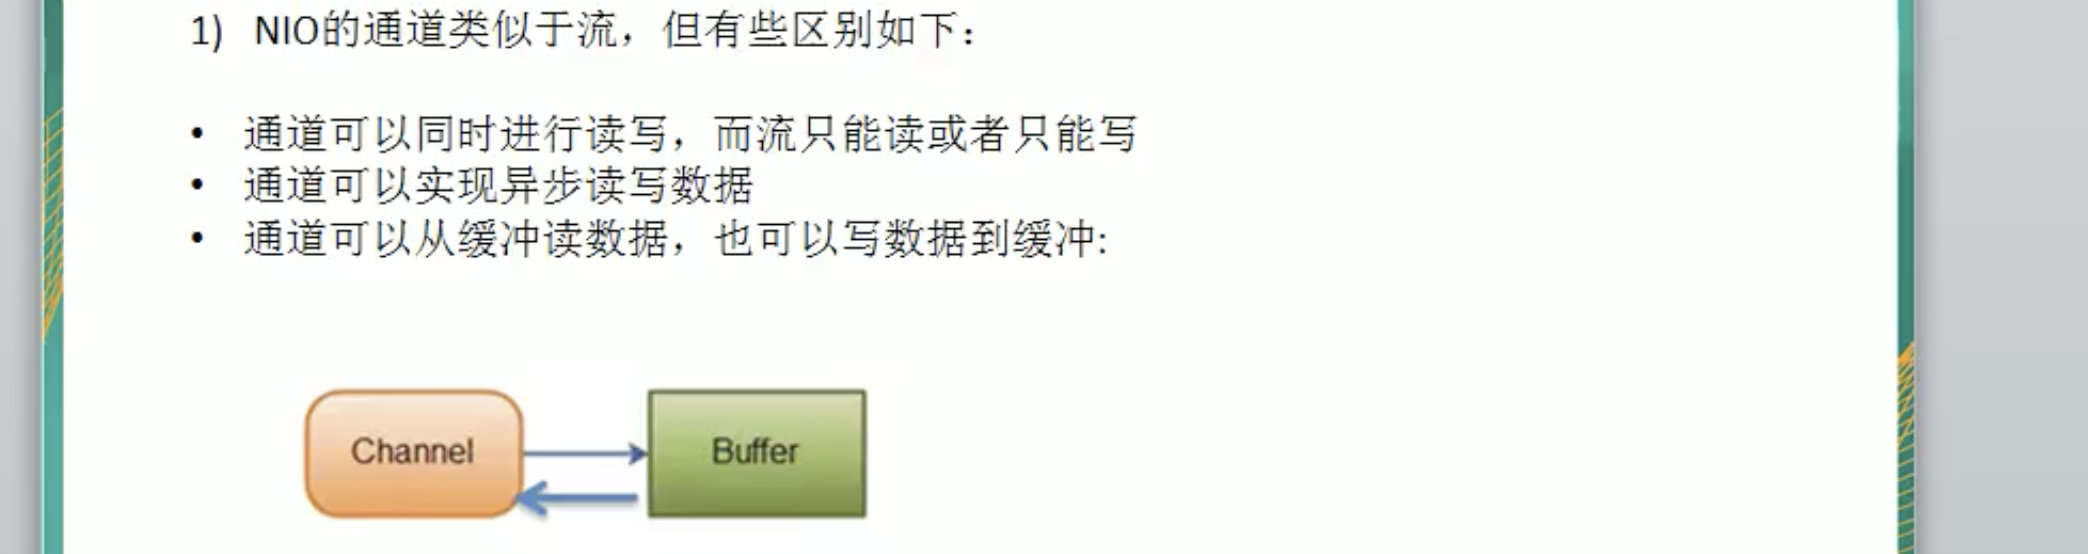
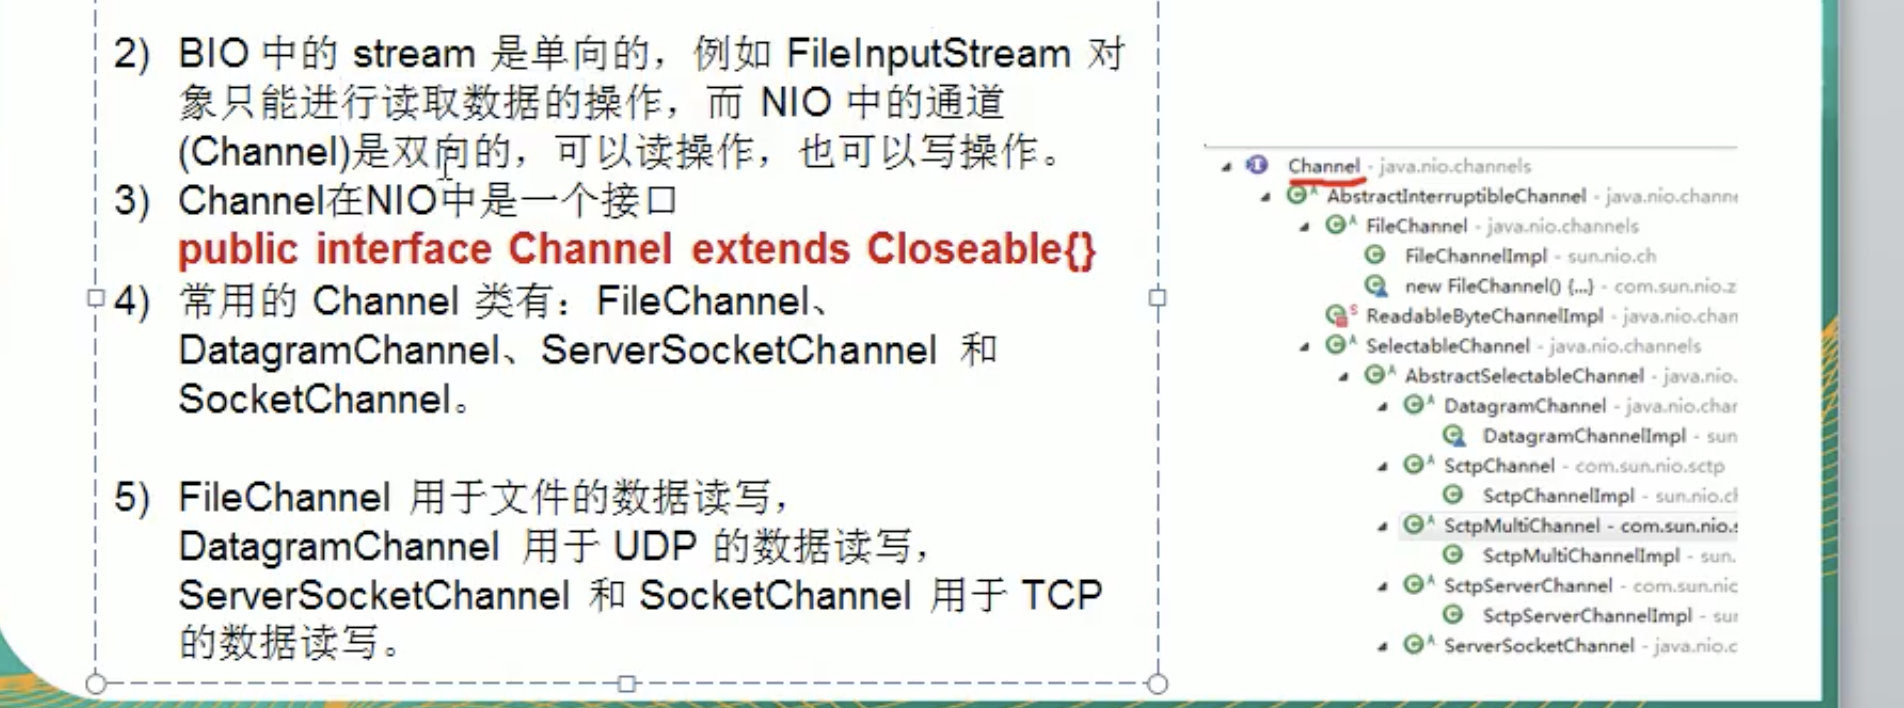
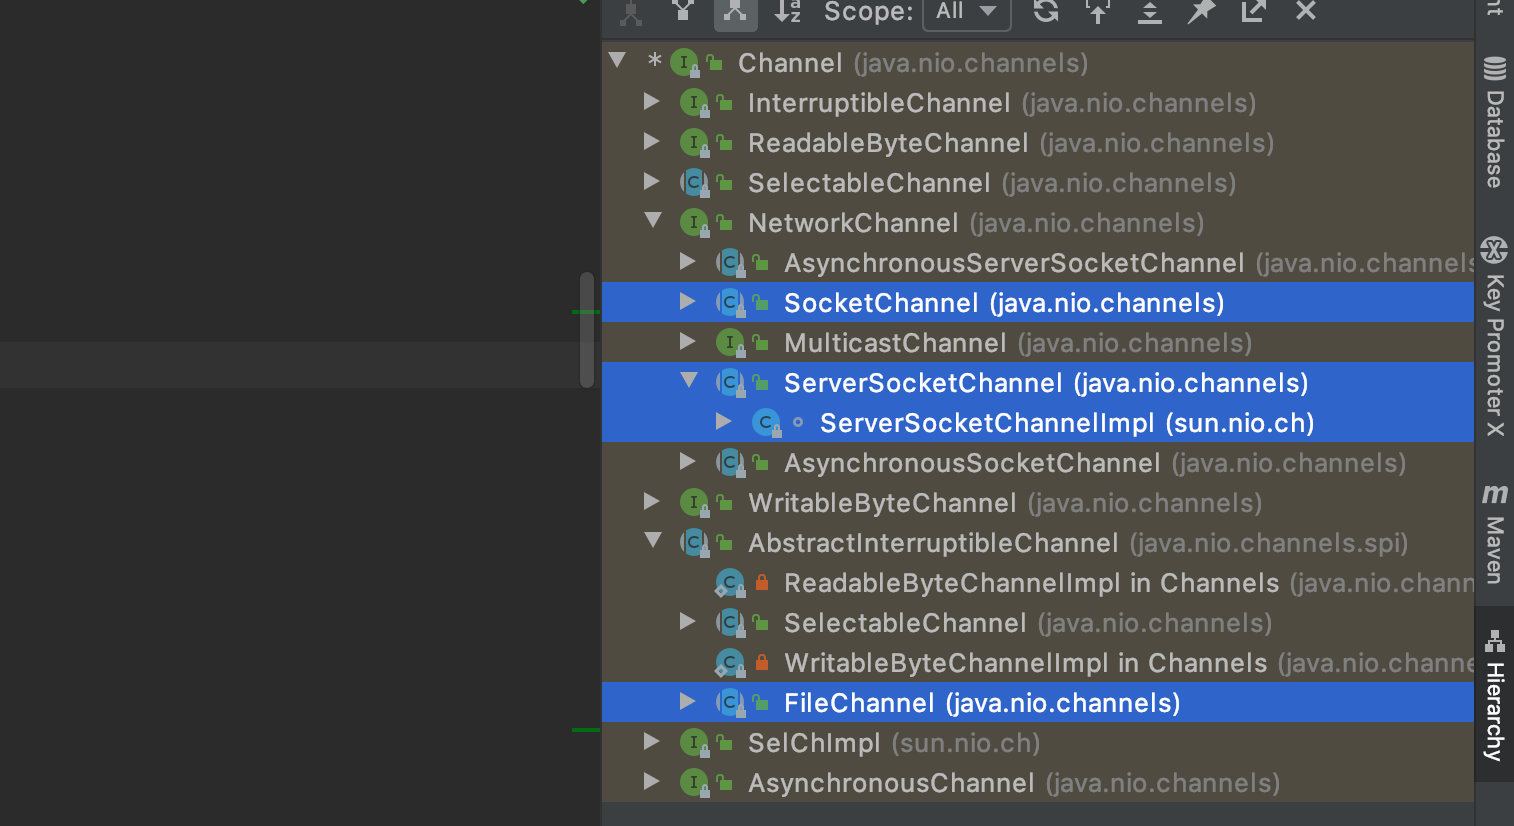
ServerSocketChannel 类似ServerSocket
ServerChannel类似Server
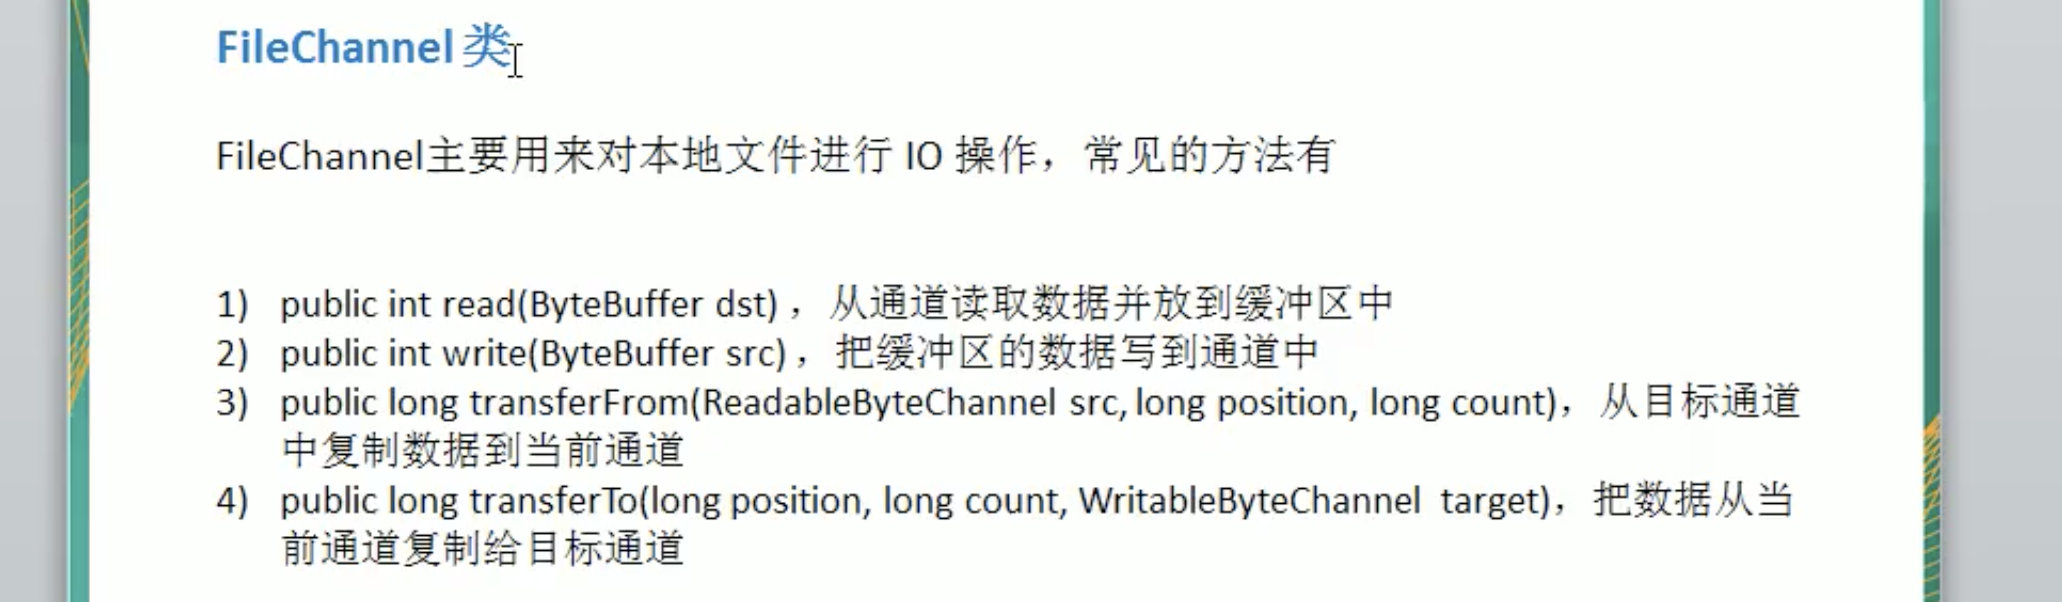
举例:FileChannel类

实现流程示意图:
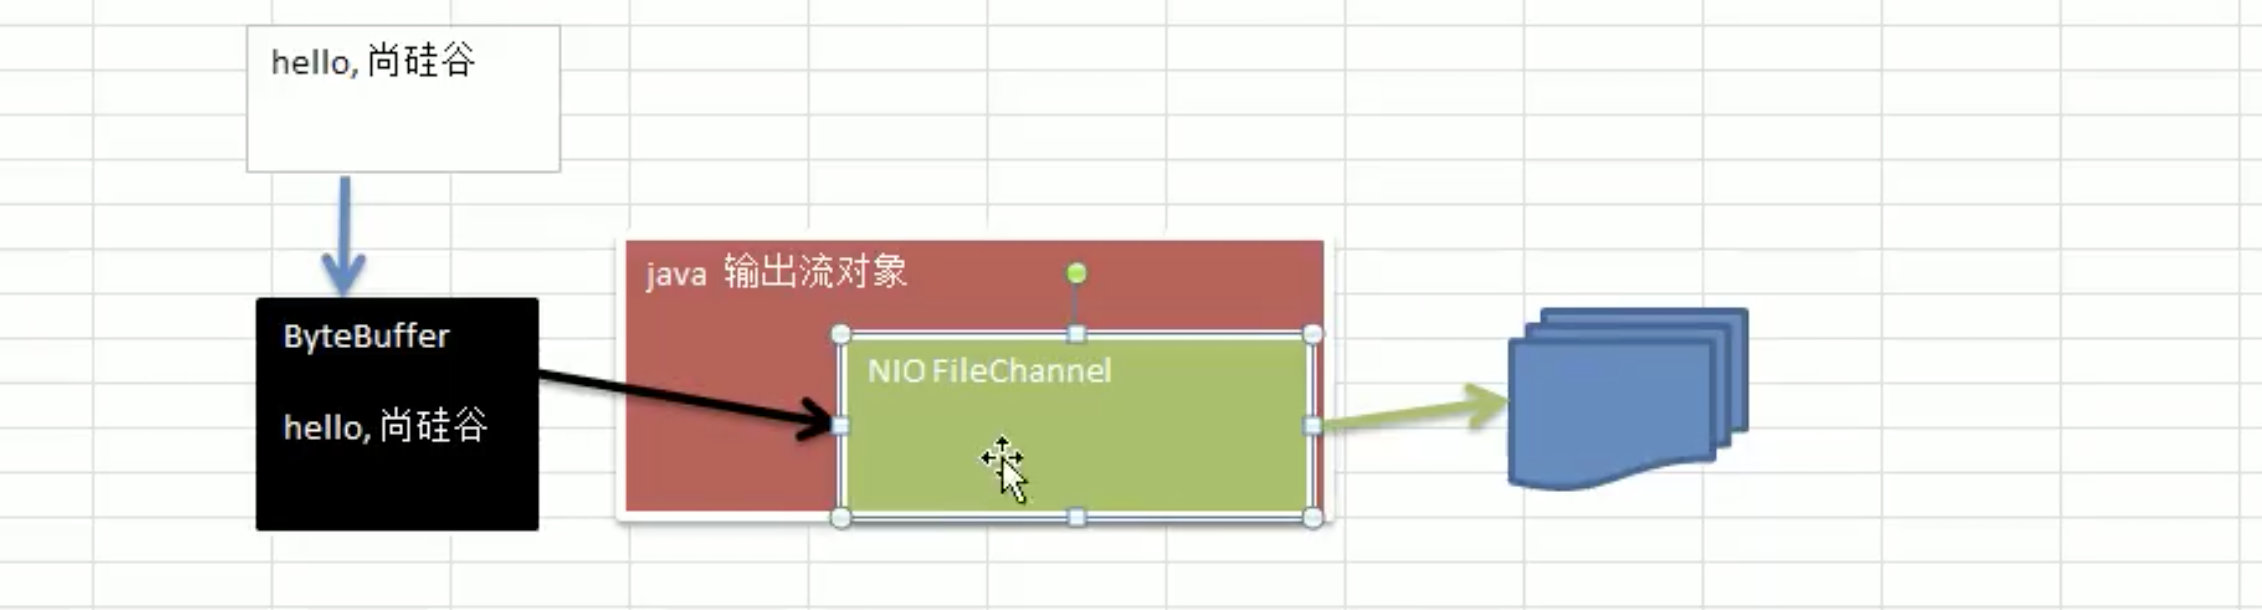
11. 应用实例: 本地文件写数据。 代码实现:
2  public class NIOFileBuffer {
3    public static void main(String[] args) throws IOException {
4        //将"hello,二娃"写入到hello.txt文件中
5        String str = "hello,二娃";
6
7        // 首先要创建一个输出流:
8        FileOutputStream fileOutputStream = new FileOutputStream("hello.txt");
9
10        //创建一个fileChannel通道
11        FileChannel fileOutputStreamChannel = fileOutputStream.getChannel();
12
13        //创建一个ByteBuffer,将字符串写入到Buffer中
14        ByteBuffer byteBuffer = ByteBuffer.allocate(1024);
15        byteBuffer.put(str.getBytes());
16
17        //要对byteBuffer进行一个翻转
18        byteBuffer.flip();
19
20        //将byteBuffer写入到fileChannel中
21        fileOutputStreamChannel.write(byteBuffer);
22
23        //关闭流
24        fileOutputStream.close();
25
26    }
27}
28
29
302. 本地文件读数据:
31
32  			//创建一个输入流,读取文件内容
33        File file = new File("hello.txt");
34        FileInputStream fileInputStream = new FileInputStream(file);
35
36        //获取到输入流通到
37        FileChannel fileInputStreamChannel = fileInputStream.getChannel();
38        //准备一个byteBuffer
39        ByteBuffer byteBuffer = ByteBuffer.allocate((int) file.length());
40
41        //将管道中的数据放入到byteBuffer中
42        fileInputStreamChannel.read(byteBuffer);
43
44        //输出内容
45        System.out.println(new String(byteBuffer.array()));
46        fileInputStream.close();
47
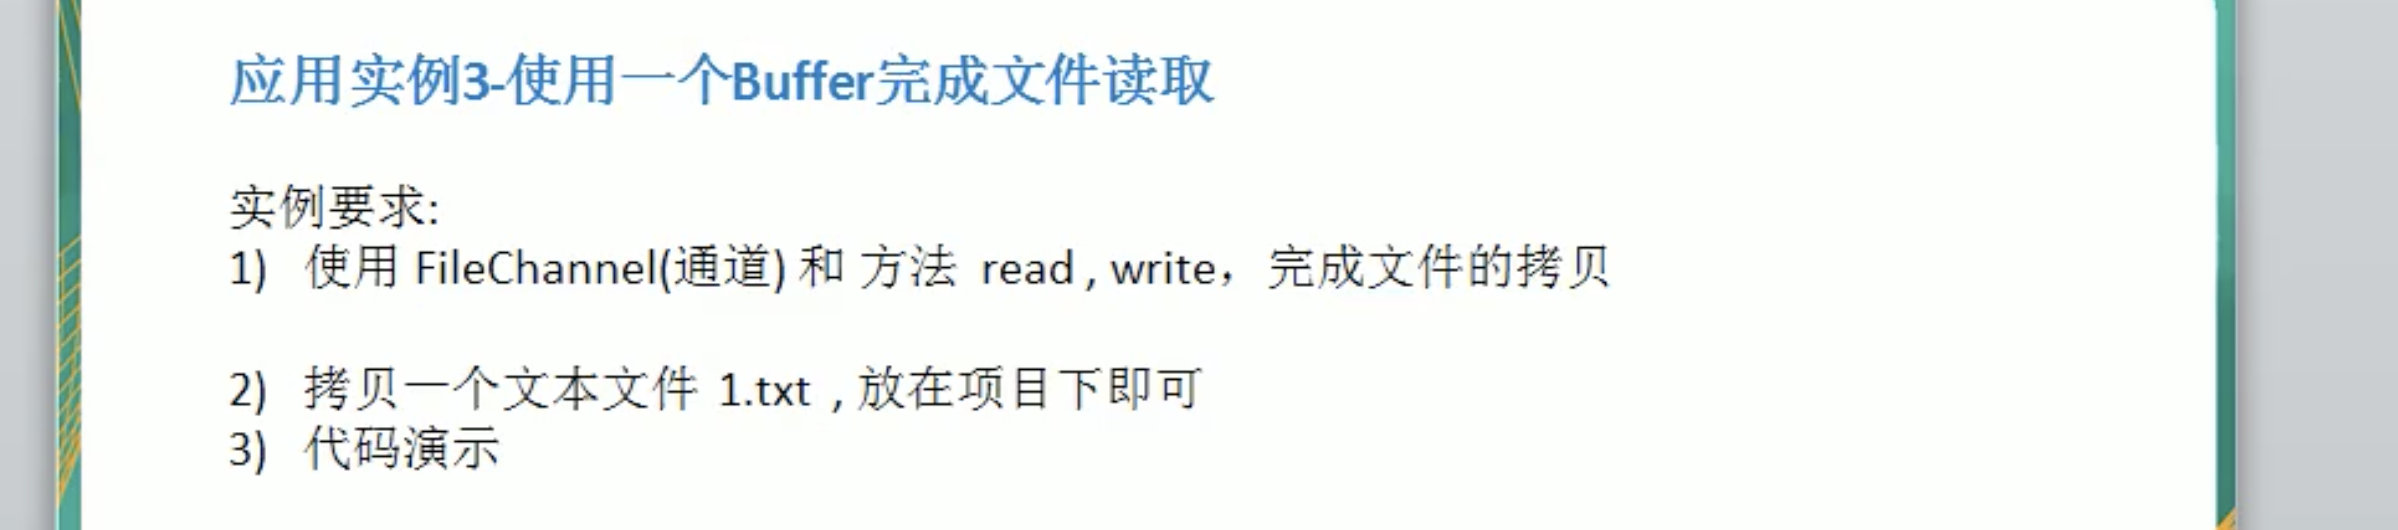

13. 使用一个Buffer完成文件的读取。   把文件A中的内容读取到,写入到文件B中。 示意图如上.代码如下:
2   //用一个Buffer完成文件的读写
3try (
4      FileInputStream fileInputStream = new FileInputStream(new File("hello.txt"));
5      FileChannel fileInputStreamChannel = fileInputStream.getChannel();
6
7      FileOutputStream fileOutputStream = new FileOutputStream(new File("hello2.txt"));
8      FileChannel fileOutputStreamChannel = fileOutputStream.getChannel();
9	) {
10            ByteBuffer byteBuffer = ByteBuffer.allocate(512);
11
12            while (true) {
13                byteBuffer.clear();
14                int read = fileInputStreamChannel.read(byteBuffer);
15                if (read == -1) {
16                    break;
17                }
18                byteBuffer.flip();
19                fileOutputStreamChannel.write(byteBuffer);
20            }
21        }
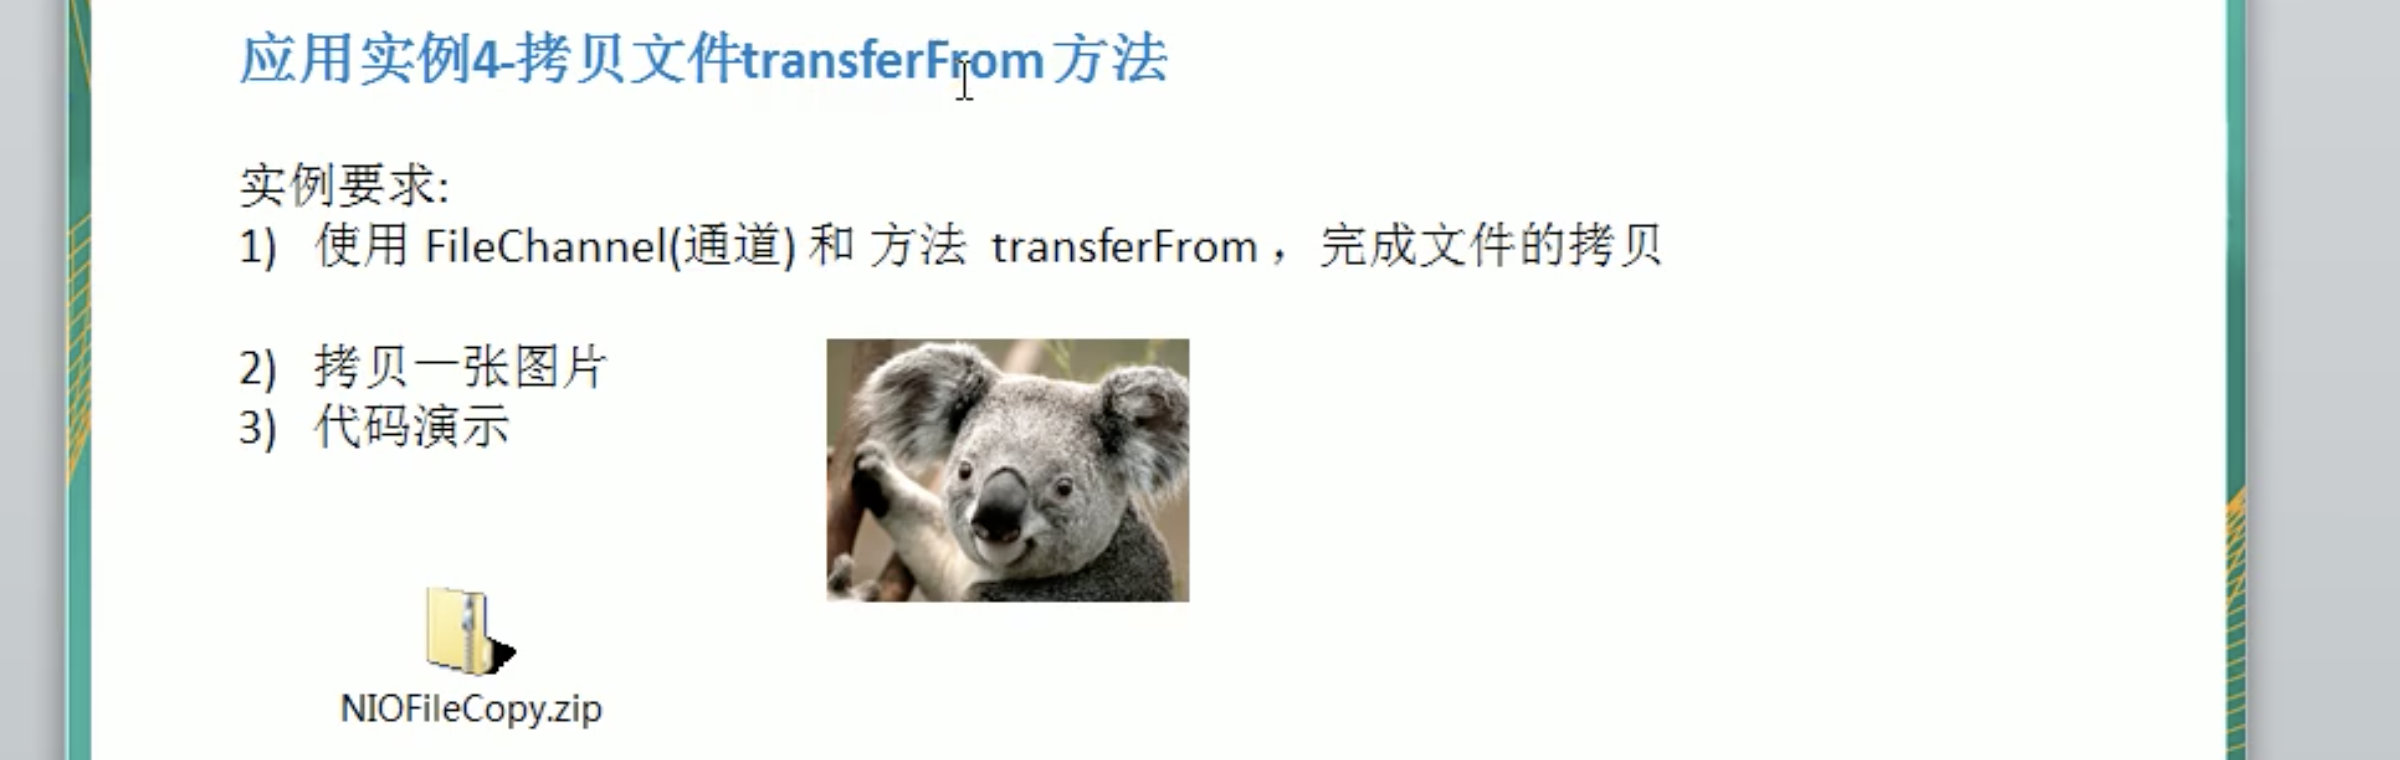
14. 拷贝文件。使用transferFrom方法
2  try(
3        // 使用拷贝方法,拷贝一个图片
4        FileInputStream fileInputStream = new FileInputStream(new File("hello.txt"));
5        FileChannel fileInputStreamChannel = fileInputStream.getChannel();
6
7        FileOutputStream fileOutputStream = new FileOutputStream(new File("hello2.txt"));
8        FileChannel fileOutputStreamChannel = fileOutputStream.getChannel();
9
10        ){
11          fileOutputStreamChannel.transferFrom(fileInputStreamChannel,0,fileInputStreamChannel.size());
12        }
13
关于Buffer和Channel的注意事项和细节
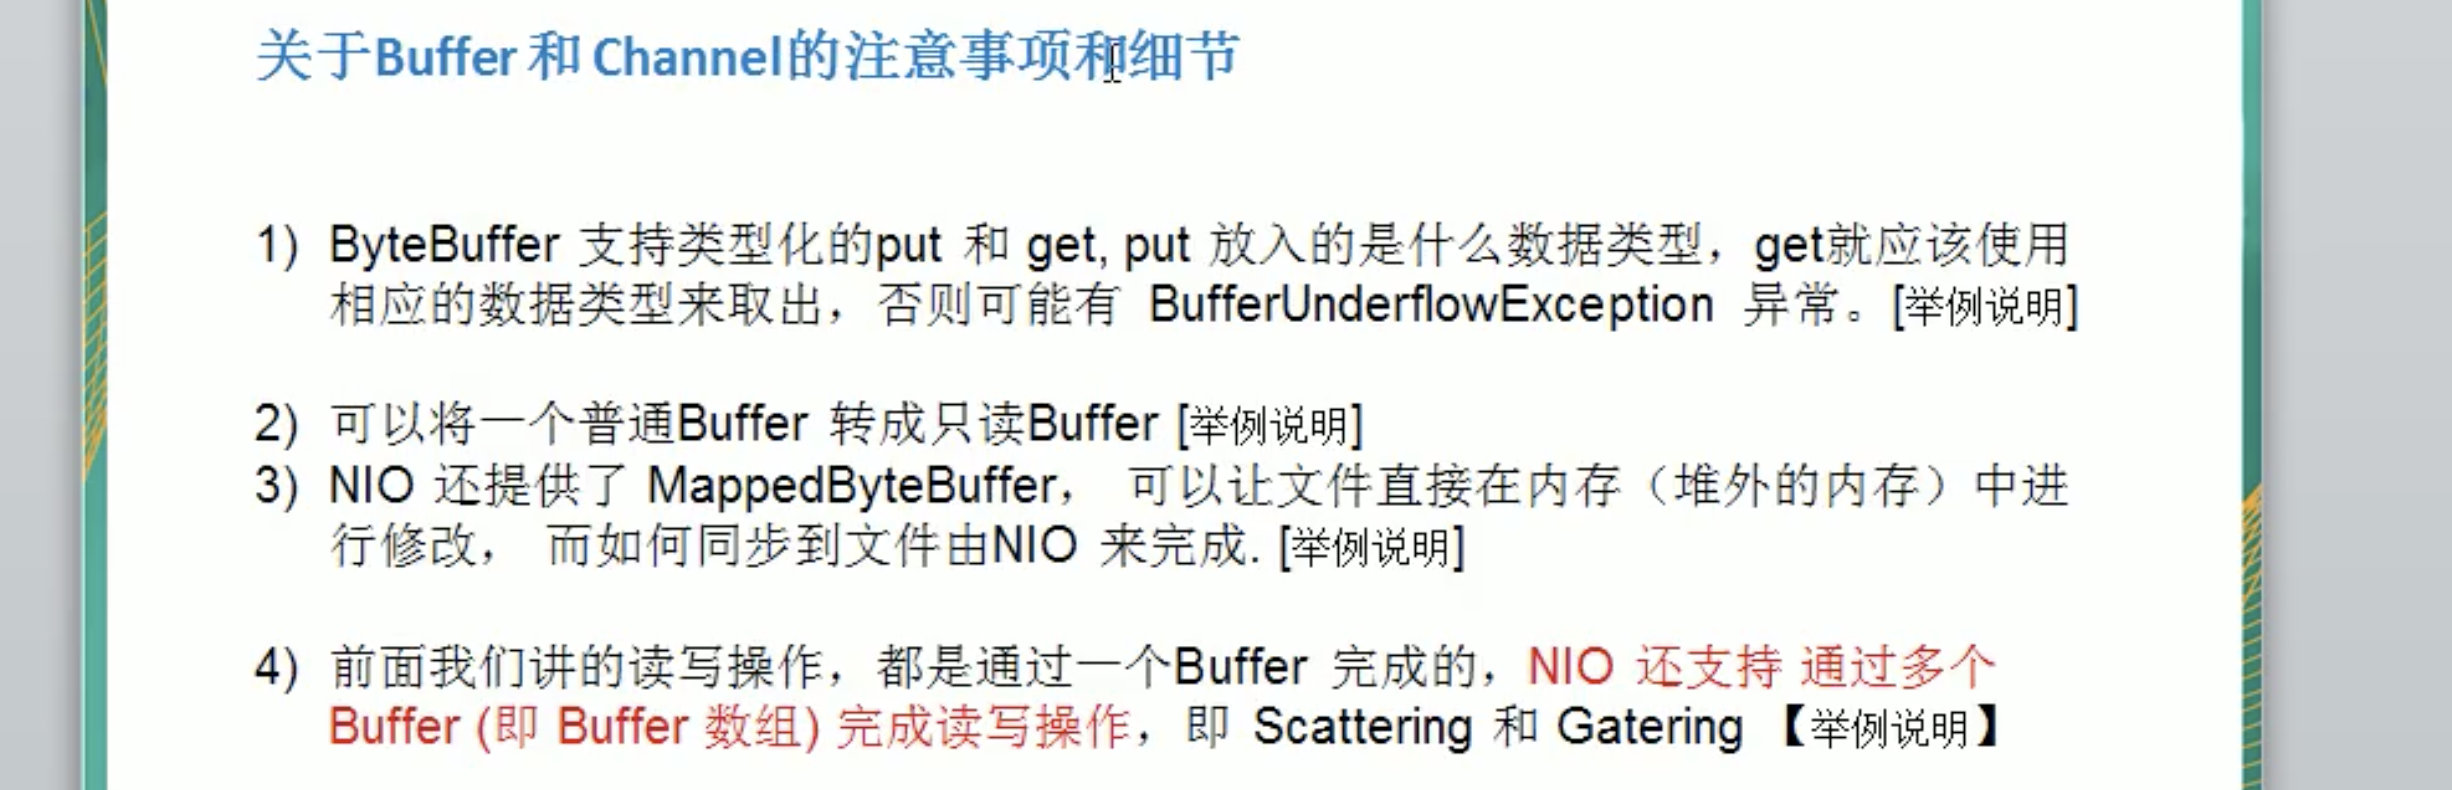
注意事项要注意。
11. Buffer支持类型化。 put的什么类型,读取的时候就要get相应的类型。 举例说明:
2   public static void main(String[] args) {
3
4        ByteBuffer byteBuffer = ByteBuffer.allocate(64);
5        byteBuffer.putInt(123);
6        byteBuffer.putChar('a');
7        byteBuffer.putLong(10L);
8        byteBuffer.putShort((short)234);
9
10        byteBuffer.flip();
11
12        System.out.println(byteBuffer.getInt());
13        System.out.println(byteBuffer.getChar());
14        System.out.println(byteBuffer.getLong());
15        System.out.println(byteBuffer.getShort());
16  //顺序如果不同,可能会导致程序抛出异常。java.nio.BufferUnderflowException
17
18 }
19
20
212. 可以将一个普通Buffer转成只读Buffer。只读Buffer只能读。写操作时会抛 ReadOnlyBufferException
22  举例说明:
23  public static void main(String[] args) {
24        ByteBuffer byteBuffer = ByteBuffer.allocate(32);
25        for (int i = 0; i < byteBuffer.capacity(); i++) {
26            byteBuffer.put((byte) i);
27        }
28        byteBuffer.flip();
29
30        ByteBuffer asReadOnlyBuffer = byteBuffer.asReadOnlyBuffer();
31        while (asReadOnlyBuffer.hasRemaining()) {
32            System.out.print(asReadOnlyBuffer.get()+ " ");
33        }
34
35        asReadOnlyBuffer.put((byte) 12); //已经转换成readBuffer。此时pur会抛异常ReadOnlyBufferException
36    }
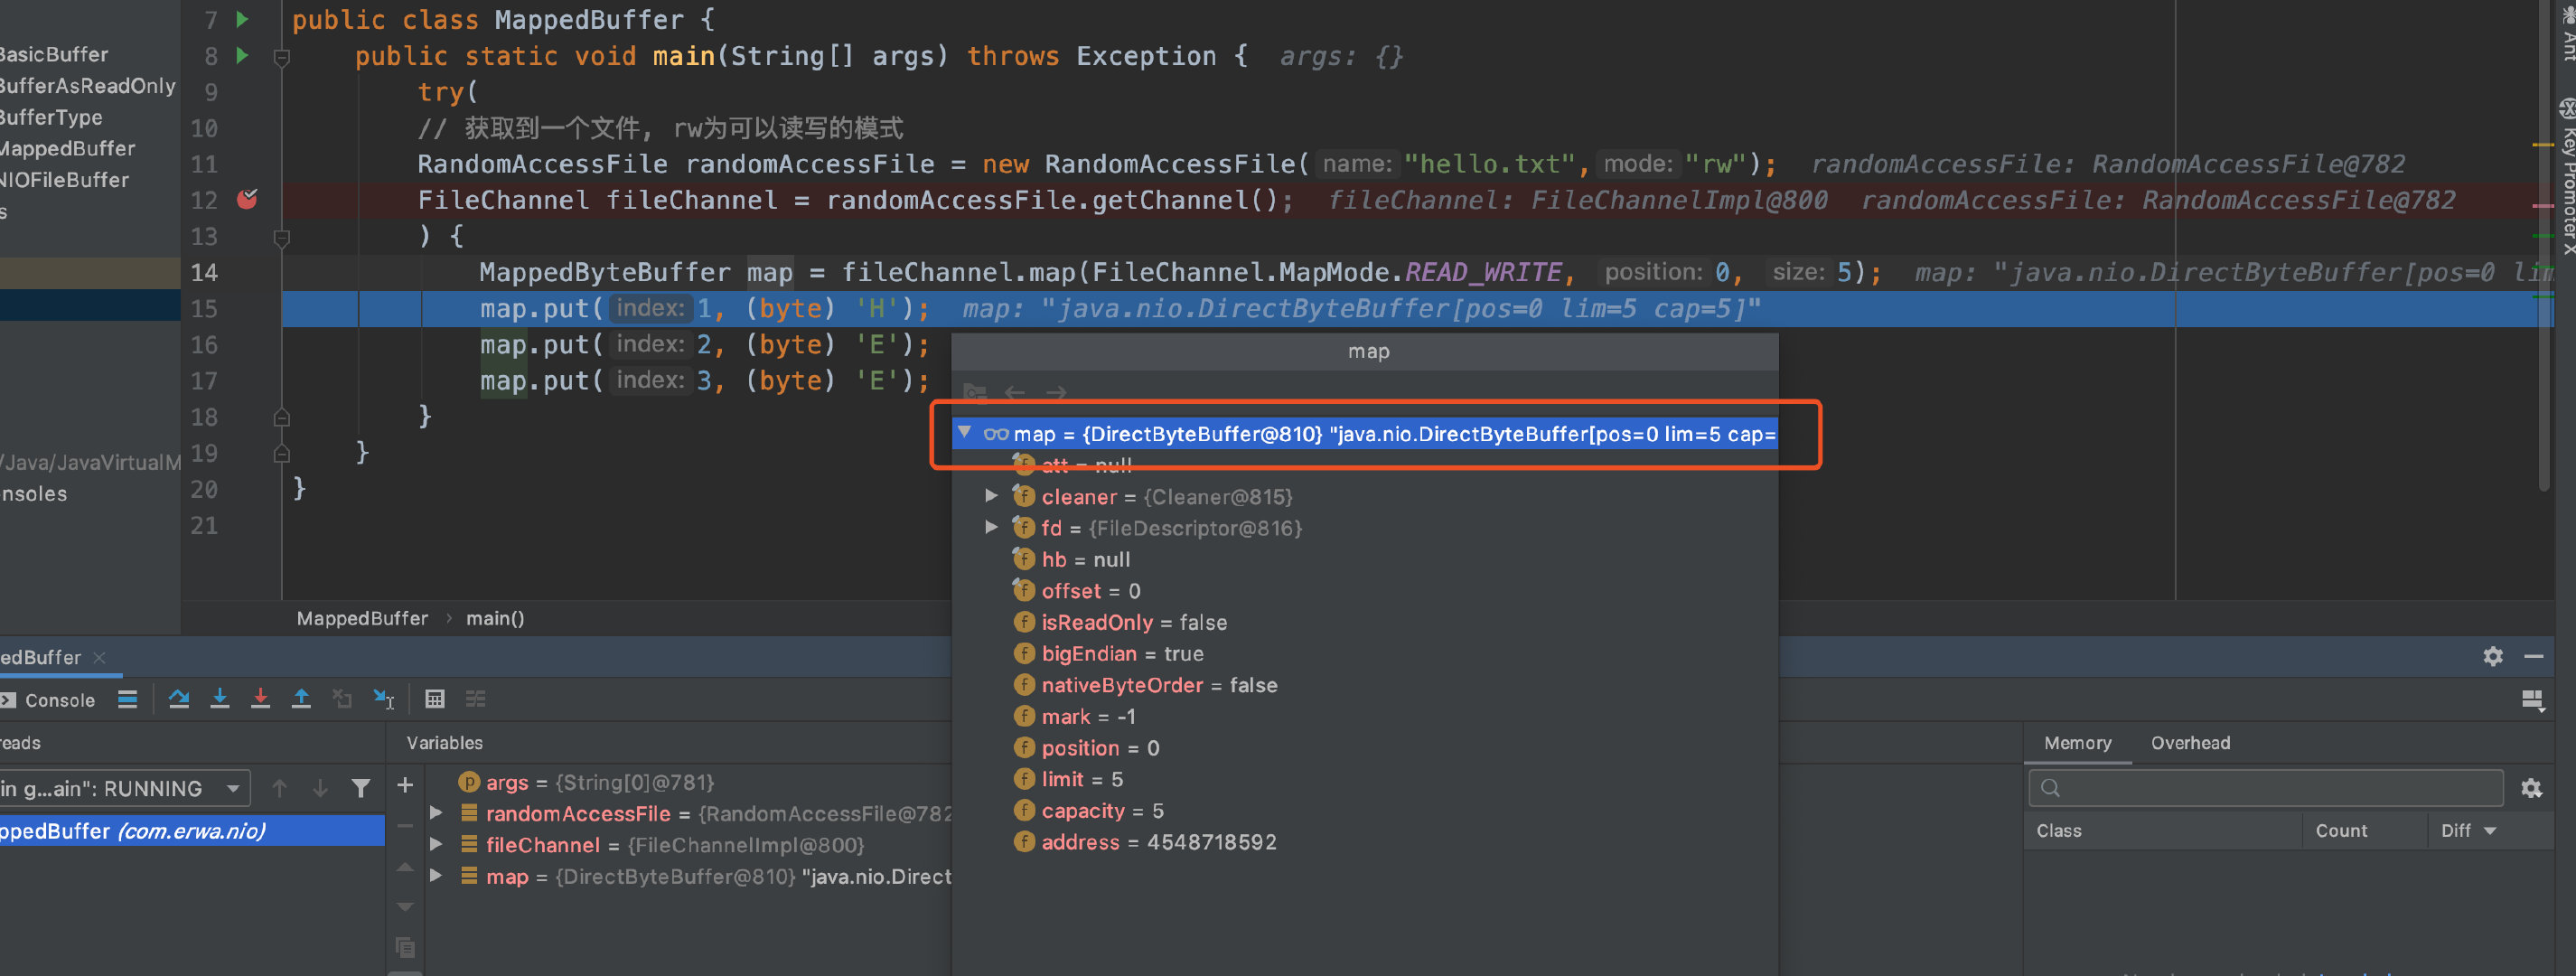
13. MappedByteBuffer
2  作用: 可让文件直接在内部(堆外内存)修改,操作系统不需要拷贝一次。
3
4  // 参数1. FileChannel.MapMode.READ_WRITE 使用的读写模式
5  // 参数2 : 0 可以直接修改的起始位置
6  // 参数3 : 5 是映射到内存的大小(不是索引位置)。即将1.txt的多少个字节映射到内存
7  //可以直接修改的范围就是0-5
8  // MappedByteBuffer 的实际类型是 DirectByteBuffer
9
10  public static void main(String[] args) throws Exception {
11        try(
12        // 获取到一个文件, rw为可以读写的模式
13        RandomAccessFile randomAccessFile = new RandomAccessFile("hello.txt","rw");
14        FileChannel fileChannel = randomAccessFile.getChannel();
15        ) {
16            MappedByteBuffer map = fileChannel.map(FileChannel.MapMode.READ_WRITE, 0, 5);
17            map.put(1, (byte) 'H');
18            map.put(2, (byte) 'E');
19            map.put(3, (byte) 'E');
20        }
21    }
22
23
244. Scattering 和 Gathering ; 分散和聚合。
25  之前我们都是使用一个Buffer来操作的。NIO还支持多个Buffer(即Buffer数组)来完成读写操作。即 分散和聚合。
26
27 //Scattering 将数据写入到Buffer时,可以采用Buffer数组,依次写入。[分散]
28 //Gathering  从Buffer读取数据时,可以采用Buffer数组,依次读【聚合】
29
30 //这次使用 ServerSocketChannel 和 SocketChannel 网络 来操作。
31
32   public static void main(String[] args) throws IOException {
33
34        ServerSocketChannel serverSocketChannel = ServerSocketChannel.open();
35        InetSocketAddress inetSocketAddress = new InetSocketAddress(7000);
36
37        // 绑定端口到socket ,并启动
38        serverSocketChannel.socket().bind(inetSocketAddress);
39        // 创建一个Buffer数组
40        ByteBuffer[] byteBuffers = new ByteBuffer[2];
41        byteBuffers[0] = ByteBuffer.allocate(5);
42        byteBuffers[1] = ByteBuffer.allocate(3);
43
44        //等待客户端连接(使用telnet)
45        SocketChannel socketChannel = serverSocketChannel.accept();
46        System.out.println("连接成功");
47        long messageLength = 8;
48
49        //连接成功,循环读取
50        while (true) {
51            int byteRead = 0;
52            while (byteRead < messageLength) {
53                long l = socketChannel.read(byteBuffers);
54                byteRead += l;
55                System.out.println("当前的byteRead: " + byteRead);
56
57                //使用流打印,打印出当前的Buffer中的  limit , position
58                Arrays.stream(byteBuffers).map(byteBuffer -> "position" + byteBuffer.position() + ", limit "
59                        + byteBuffer.limit()).forEach(System.out::println);
60            }
61
62            //将所有的Buffer进行flip
63            Arrays.stream(byteBuffers).map(ByteBuffer::flip);
64
65            //将数据读出返回给客户端
66            long byteWrite = 0;
67            while (byteWrite < messageLength) {
68                long write = socketChannel.write(byteBuffers);
69                byteWrite += write;
70            }
71
72            //将所有的BUffer进行clean
73            Arrays.stream(byteBuffers).map(ByteBuffer::clear);
74
75            System.out.println("readLength " + byteRead + "writeLength " + byteWrite);
76        }
77    }
NIO三大核心之—Selector
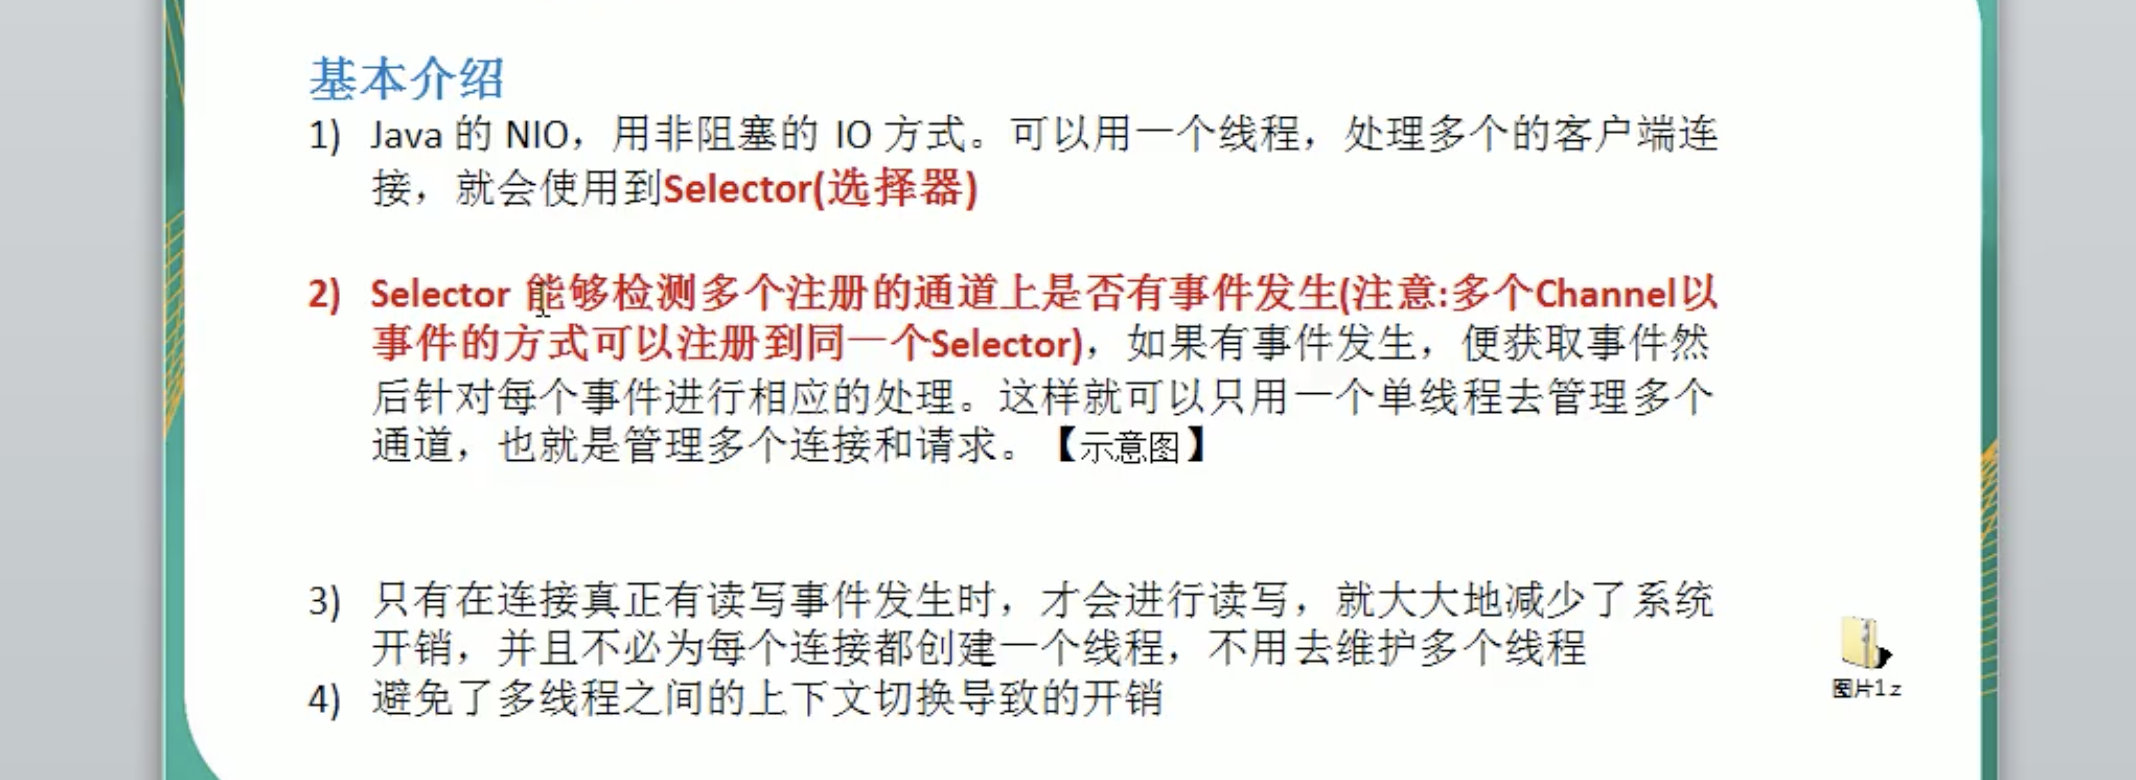
Selector基本介绍
selector API
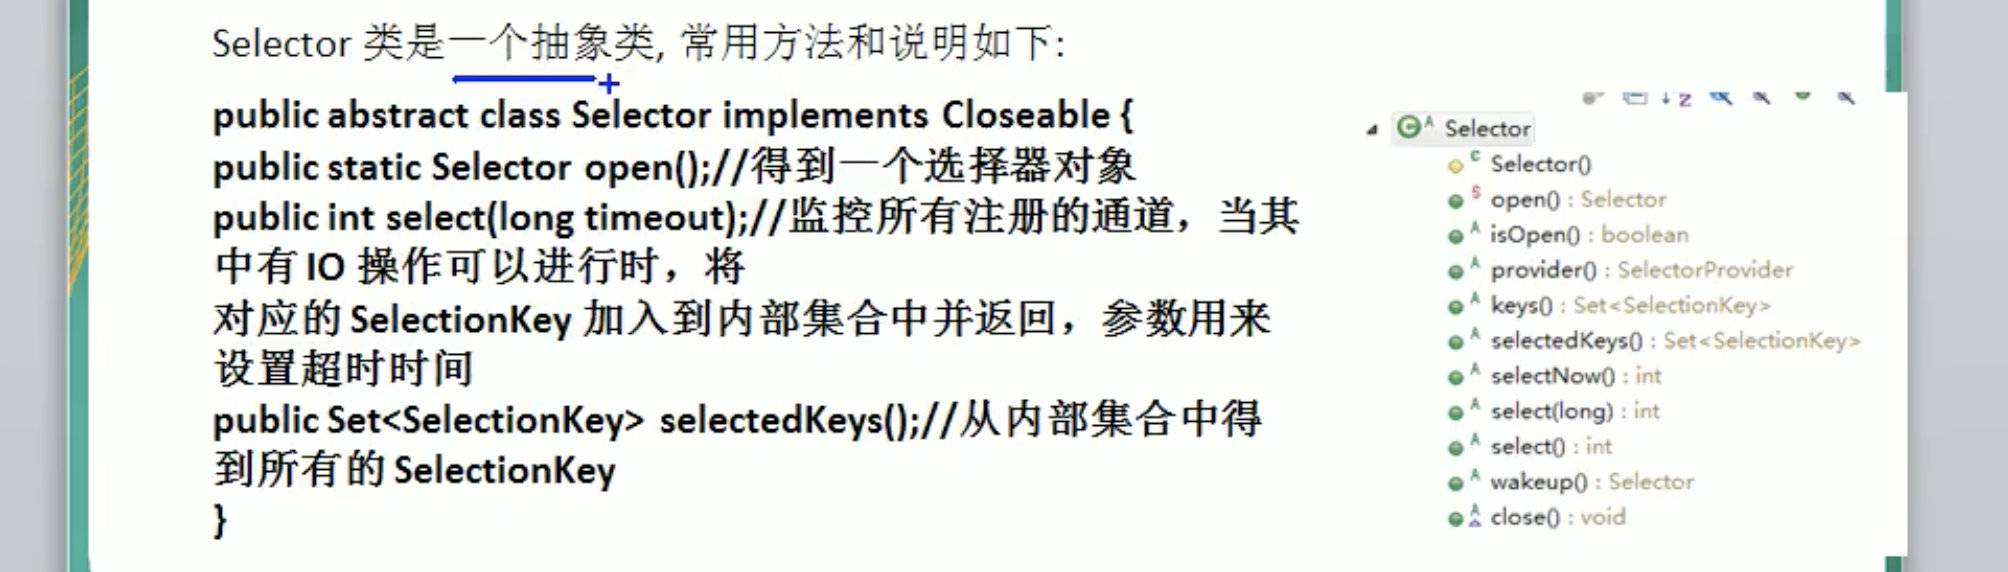
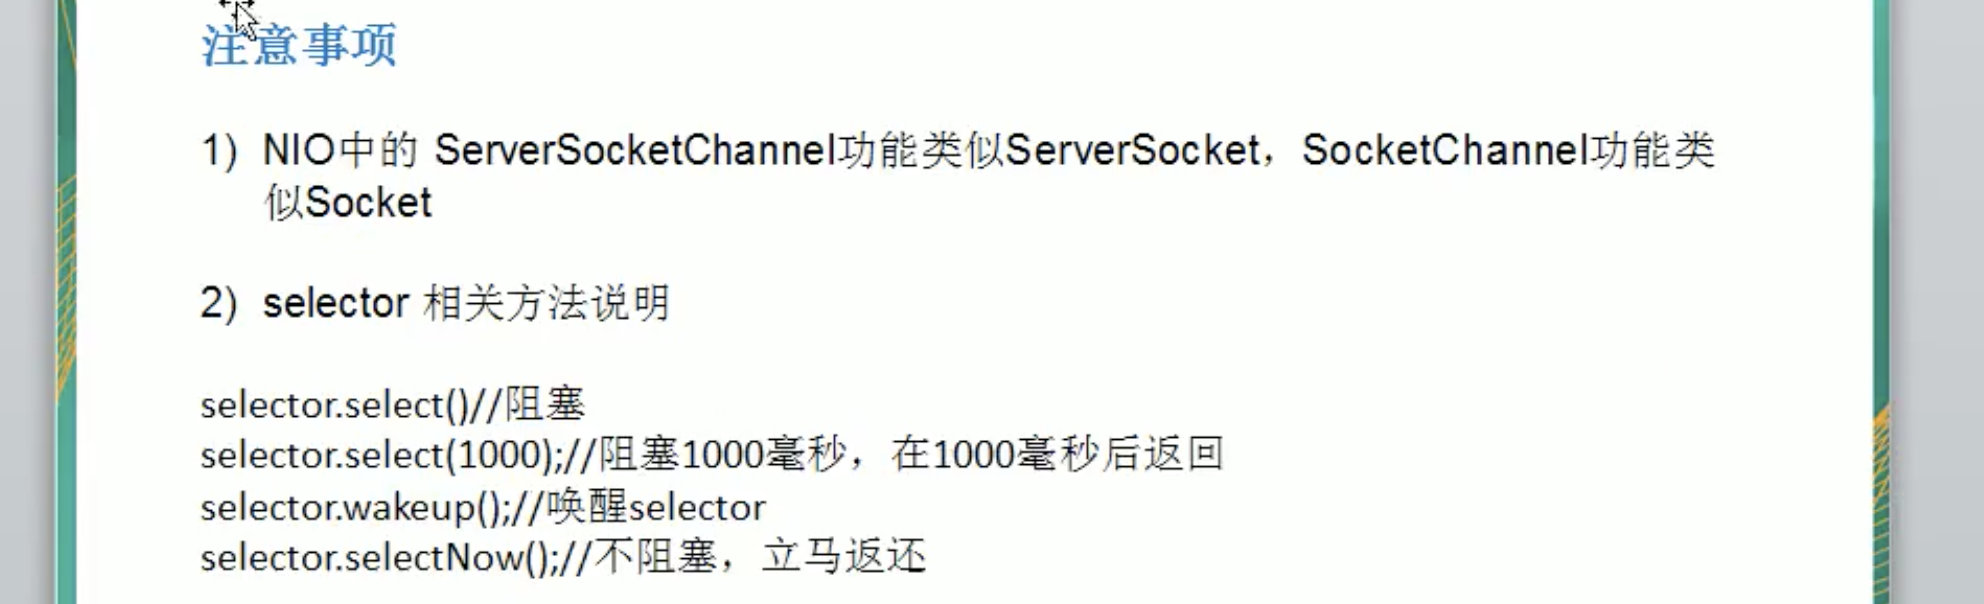
selector类中实现的方法及其方法功能的说明。列出来功能,更能方便的使用。
重点记着- open方法,返回一个selector。
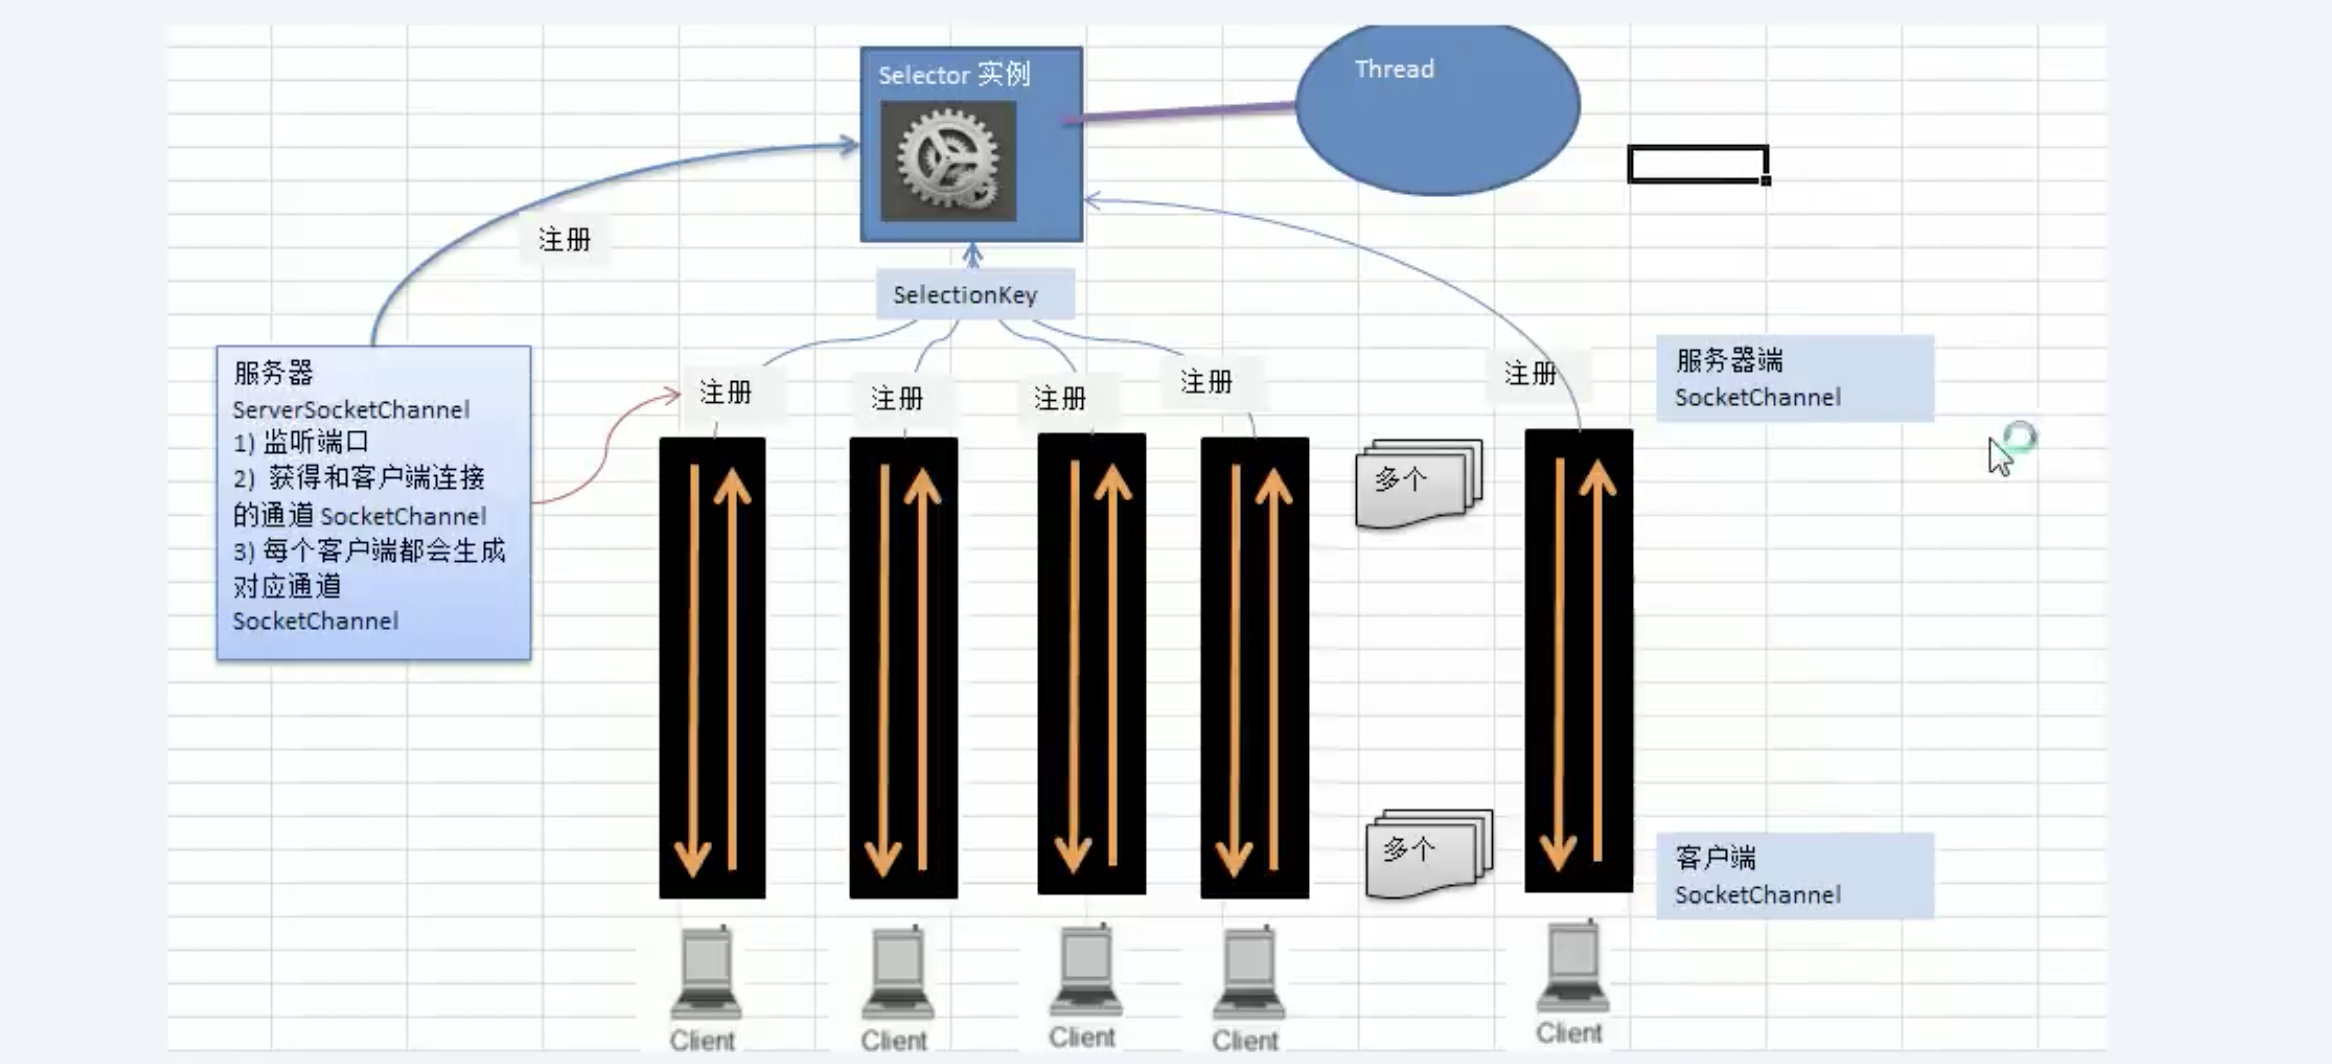
NIO 非阻塞网络编程原理分析图
对下图的说明:
- 当客户端连接时,会通过serverSocketChannel得到一个对应的SocketChannel
- Selector进行监听(使用Select方法),返回有事件发生的通道的个数。
- 将socketChannel注册到selector上。一个selector上可以注册多个socketChannel。(SelectableChannel.register(Selectoe sel, int ops))。ops参数的说明:有4个状态。
- 注册后返回一个SelectionKey,会和该selector关联(集合的方式关联)。
- 进一步得到各个SelectionKey(有事件发生的的SelectionKey)
- 再通过SelectionKey反向获取注册的socketChannel。(使用SelectionKey.channel()方法)
- 可以得到channel,完成业务处理。

1实例代码案例演示:   NIO非阻塞网络编程通讯
2
3服务器端:
4  public static void main(String[] args) throws IOException {
5        // NIO非阻塞网络编程通讯  -- 服务器端
6//        1. 创建serverSocketChannel
7        ServerSocketChannel serverSocketChannel = ServerSocketChannel.open();
8//        2. 得到一个Selector对象
9        Selector selector = Selector.open();
10//        3. 绑定一个端口6666, 在服务器端监听
11        serverSocketChannel.socket().bind(new InetSocketAddress(6666));
12//        4. 设置为非阻塞
13        serverSocketChannel.configureBlocking(false);
14//        5. 把serverSocketChannel注册到Selector,关心事件op_accept
15        serverSocketChannel.register(selector, SelectionKey.OP_ACCEPT);
16//        6. 循环等待客户端连接
17        while (true) {
18            // 等待一秒钟,如果没有客户端事件发生,不等待了。
19            if ((selector.select(1000) == 0)) {
20                //没有事件发生
21                System.out.println("服务器上一秒中,没有客户端连接");
22                continue;
23            }
24            // 如果返回的>0 ,就获取到相关的 selectionKeys集合。
25            Set<SelectionKey> selectionKeys = selector.selectedKeys();
26            Iterator<SelectionKey> selectionKeyIterator = selectionKeys.iterator();
27            // 通过selectionKeys反向获取通道,处理业务
28            while (selectionKeyIterator.hasNext()) {
29                // 获取selectionKey
30                SelectionKey selectionKey = selectionKeyIterator.next();
31                // 根据key对应的通道事件,做相应的处理
32                if (selectionKey.isAcceptable()) {
33                    //给此客户端分配一个socketChannel
34                    SocketChannel socketChannel = serverSocketChannel.accept();
35                    System.out.println("客户端连接了, " + selectionKey.hashCode());
36                    socketChannel.configureBlocking(false);
37                    //将此channel注册到 selector上, 关注read事件
38                    socketChannel.register(selector, SelectionKey.OP_READ, ByteBuffer.allocate(1024));
39                }
40                if (selectionKey.isReadable()) { //发生了 read事件
41                    //通过key,反向获取到对应的channel
42                    SocketChannel channel = (SocketChannel) selectionKey.channel();
43                    //获取到该key的buffer
44                    ByteBuffer byteBuffer = (ByteBuffer) selectionKey.attachment();
45                    channel.read(byteBuffer);
46                    System.out.println("from 客户端 : " + new String(byteBuffer.array()));
47                }
48                //手动移除key
49                selectionKeyIterator.remove();
50            }
51        }
52    }
53
54
55客户端:
56public static void main(String[] args) throws IOException {
57//        1. 得到一个网络通道
58        SocketChannel socketChannel = SocketChannel.open();
59//        2. 提供非阻塞
60        socketChannel.configureBlocking(false);
61//        3. 提供服务器端的IP和端口
62        InetSocketAddress inetSocketAddress = new InetSocketAddress("127.0.0.1", 6666);
63//        4. 连接服务器
64        if (!socketChannel.connect(inetSocketAddress)) {
65            //        连接不成功, 打印一句话,代表这时候不阻塞,可以去做别的事情
66            while (!socketChannel.finishConnect()) {
67                System.out.println("客户端连接未成功,先去干别的事情了");
68            }
69        }
70//        5. 如果连接成功,发送数据。 通过ByteBuffer.wrap (根据字节的大小自动放入到Buffer中。)
71        String str = "hello,二娃";
72        ByteBuffer byteBuffer = ByteBuffer.wrap(str.getBytes());
73//        6. 发送数据。将Buffer数据写入channel。
74        socketChannel.write(byteBuffer);
75
76        System.in.read();
77    }
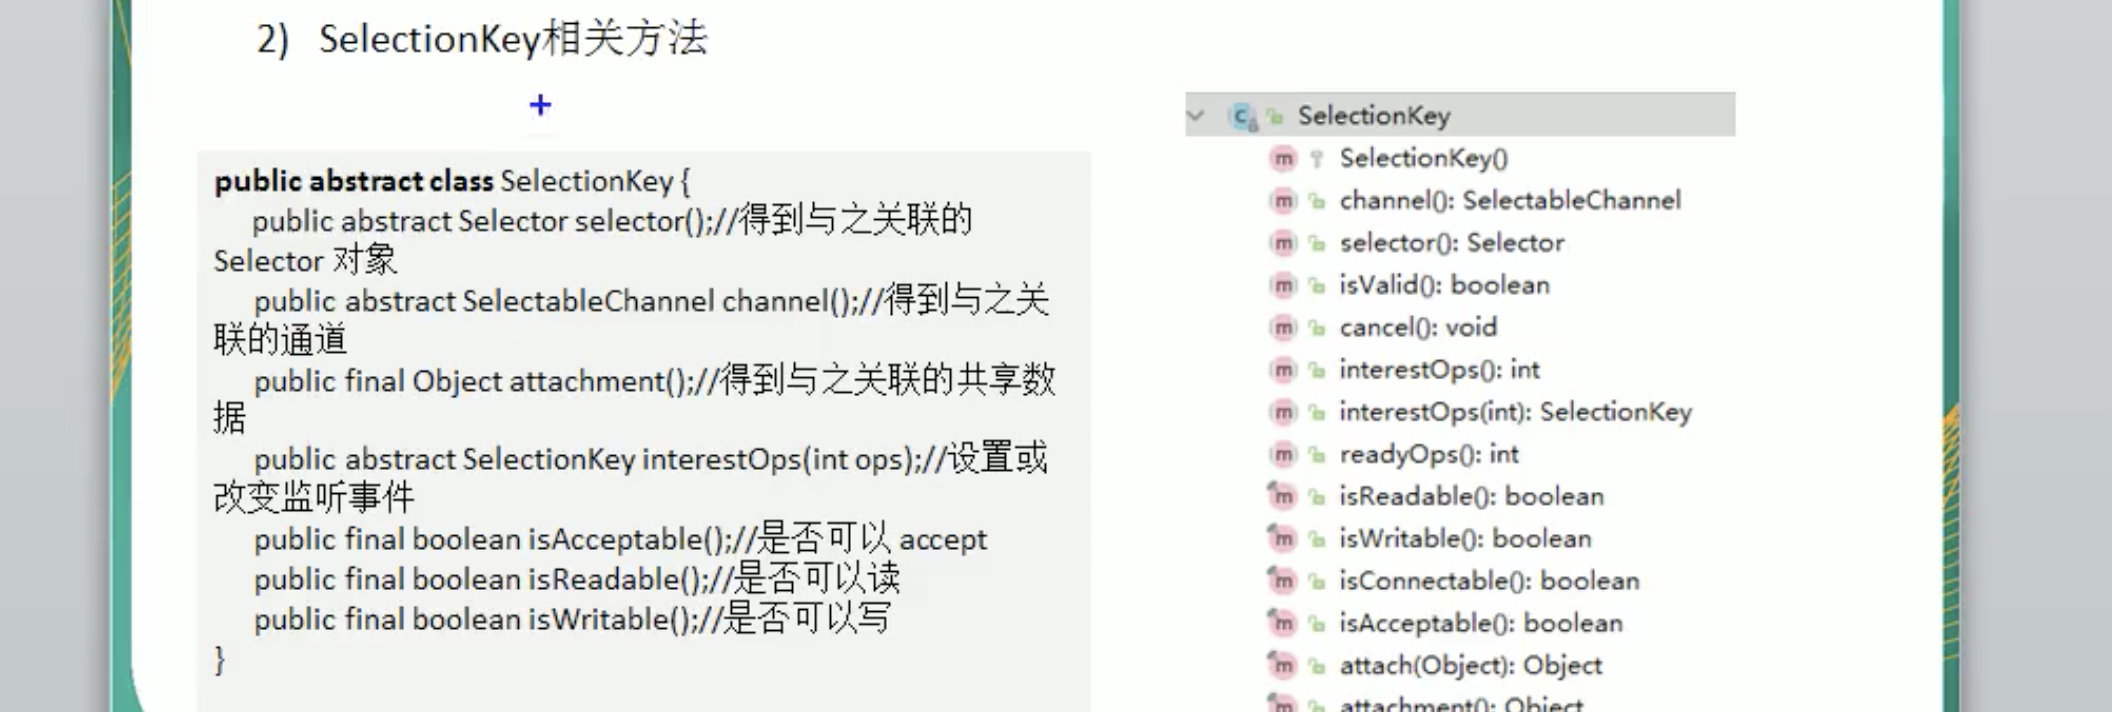
SelectionKey API
每注册一个客户端,会出现一个新的channel ,selectionkey.keys()就会增加1
selectionKeys.size() ; 活动的channel的个数。
selectionkeys.keys(); 总的channel的个数。

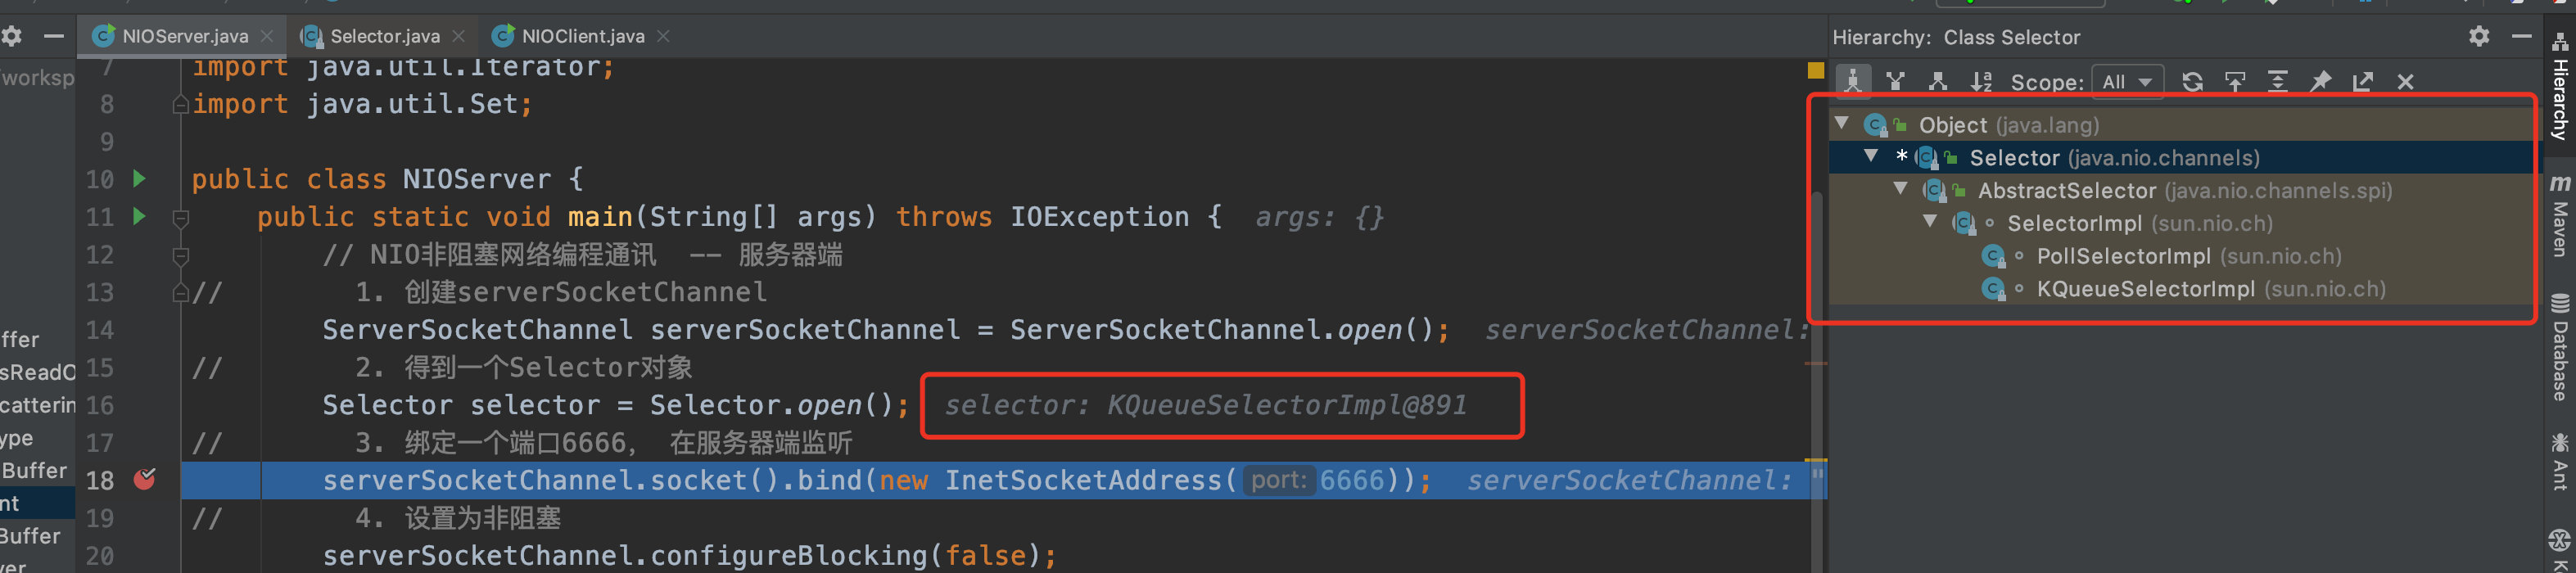
注意,这时候我看了一下源码, selector真正的实现方法已经和视频中老师的不一样了。
下图是老师视频中的 和 我自己的方法对比。 原因是 老师的电脑是Windows,我的是Mac

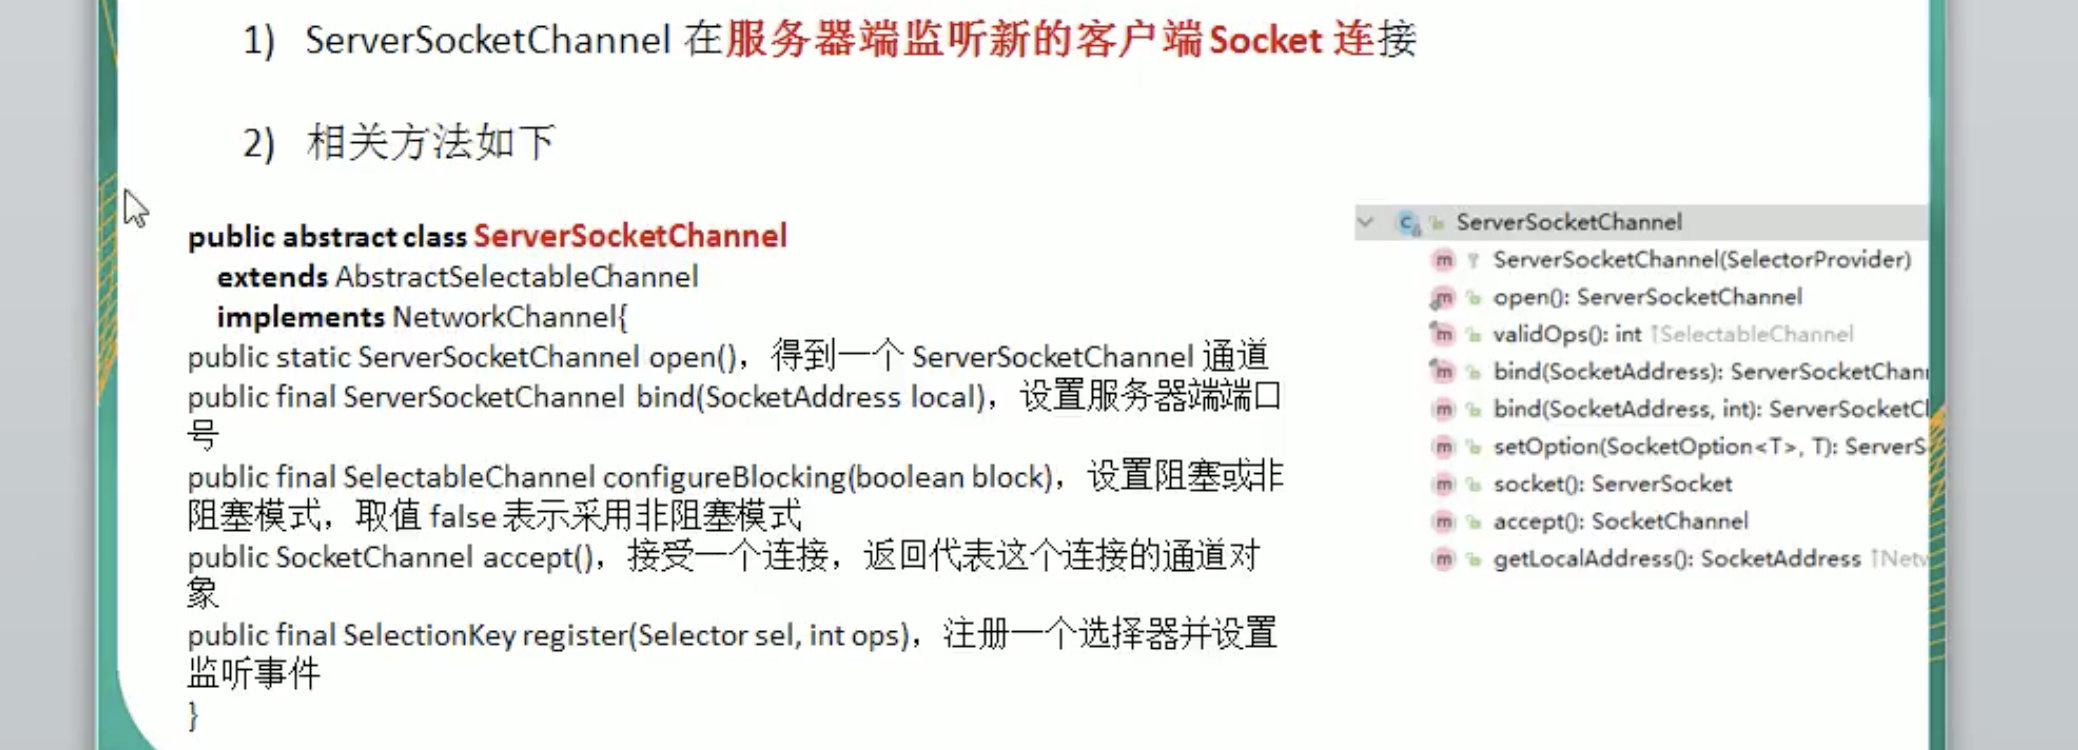
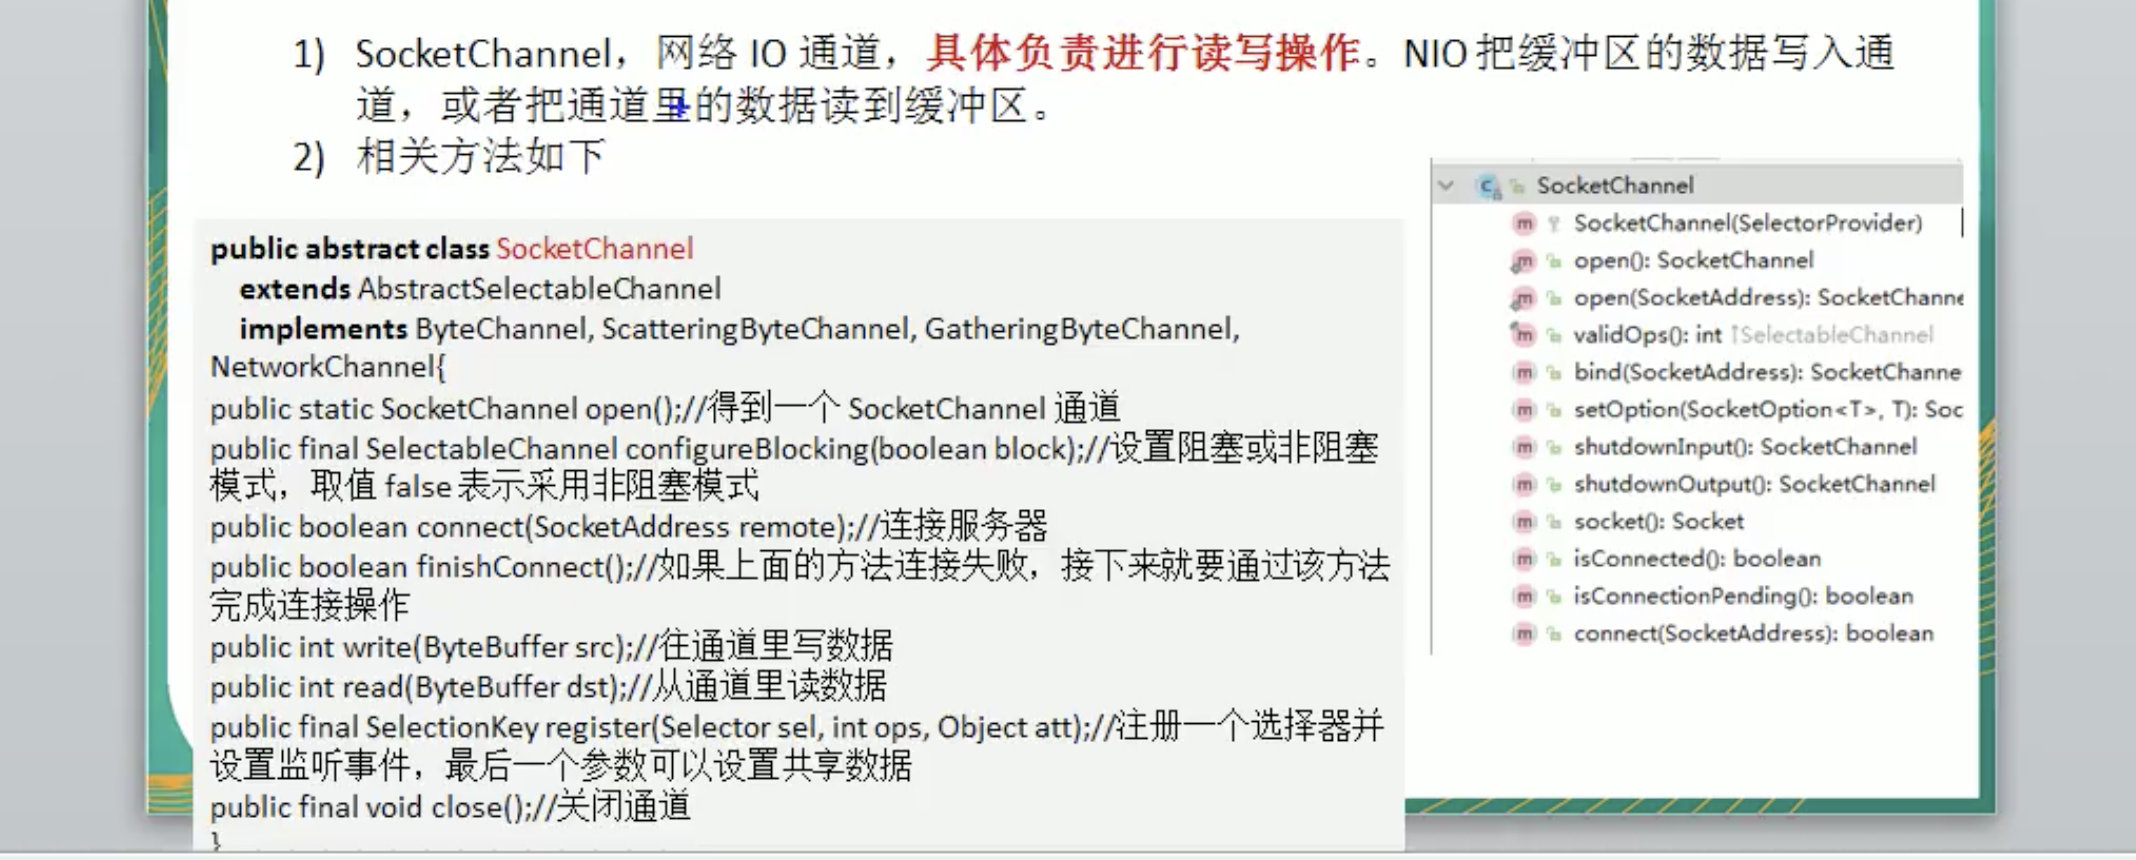
ServerSocketChannel API
SocketChannel API
NIO网络编程应用实例-群聊系统
完成这个群聊系统的代码案例
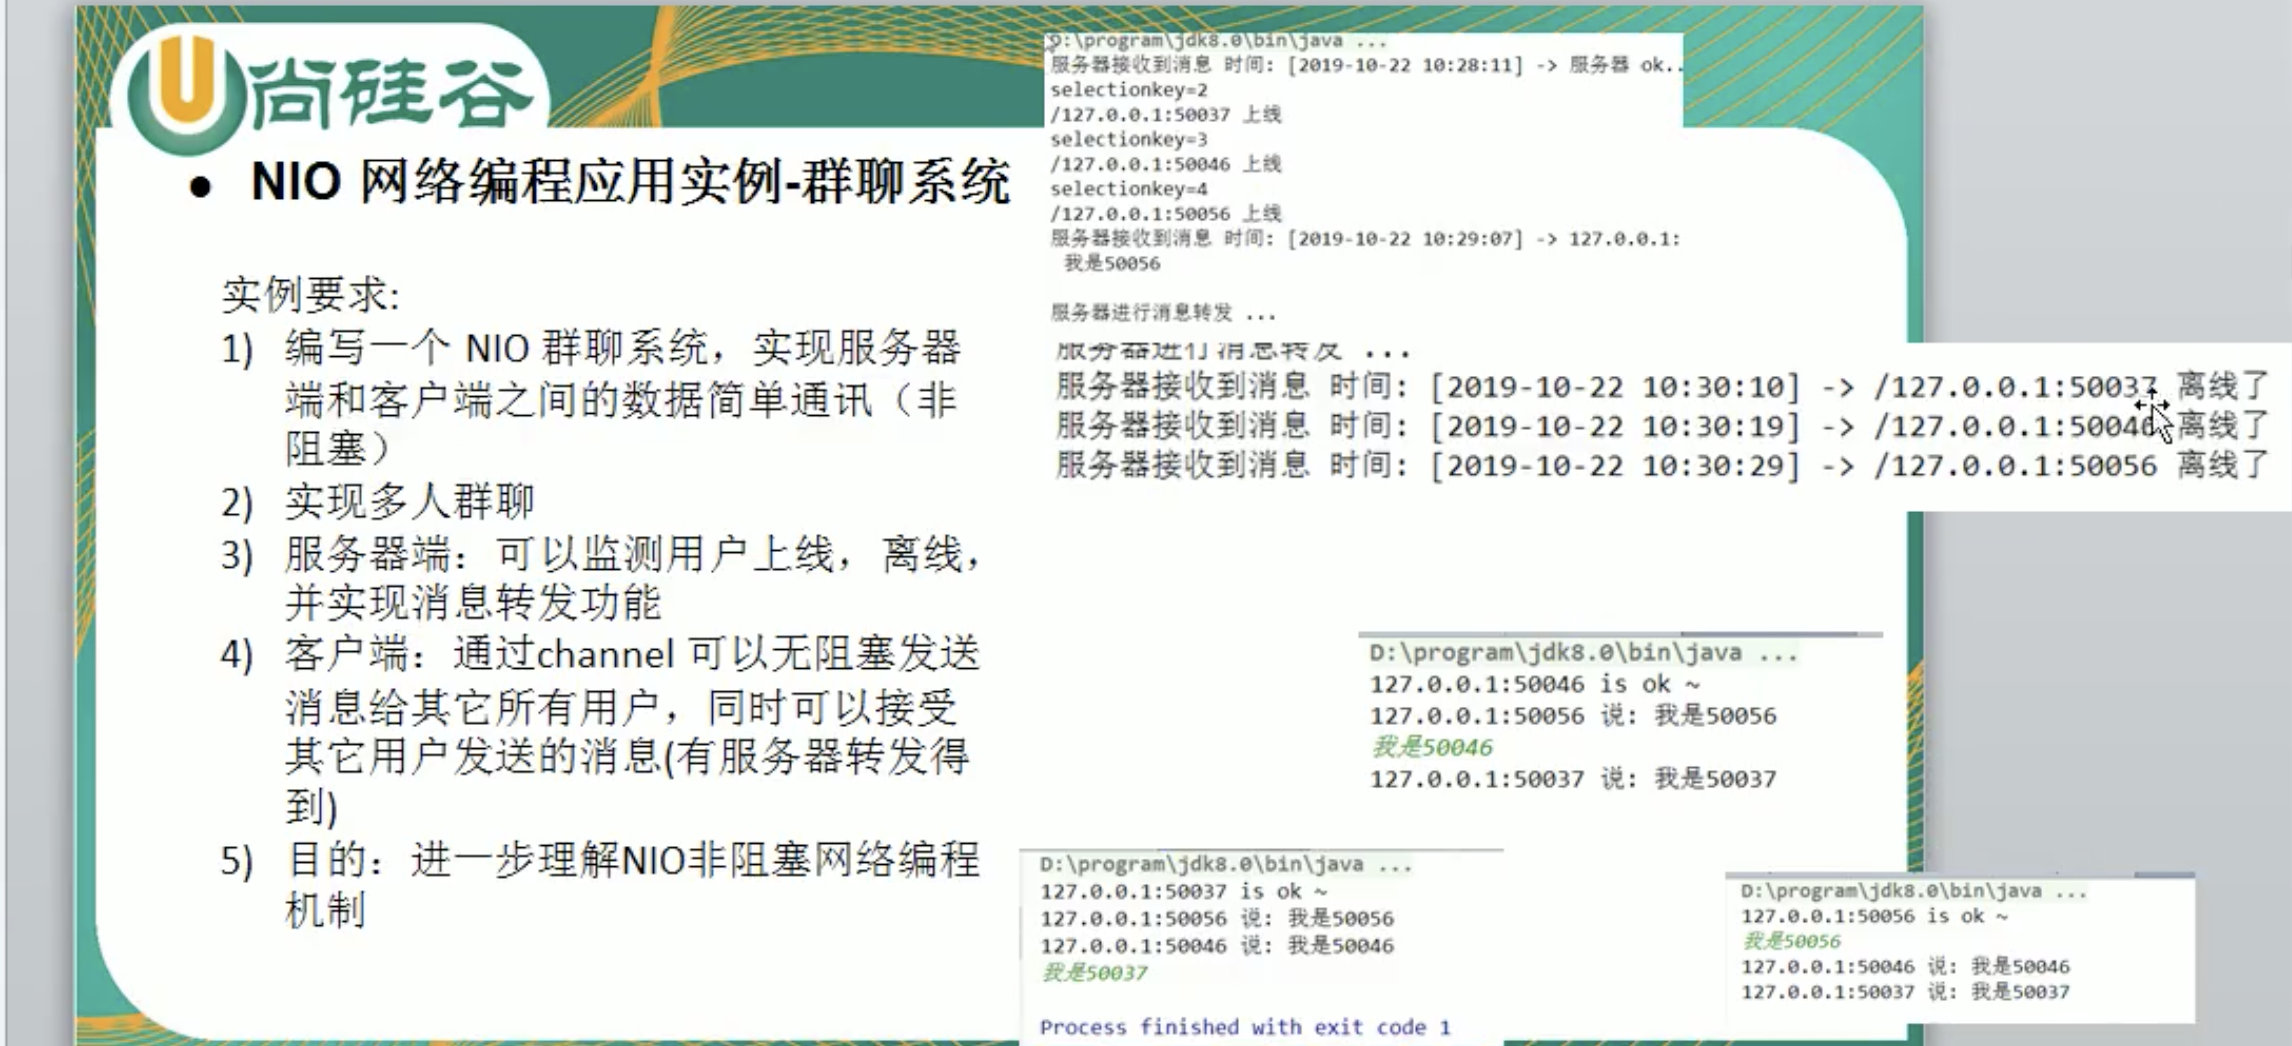
1开发流程:
21. 先编写服务器端
3  1.1 服务器启动并监听6667
4  1.2 服务器接受客户端信息,并实现转发【处理上线和离线】
52.编写客户端
6  2.1 连接服务器
7  2.2 发送消息
8  2.3 接受服务器的消息
9
10  1.初始化构造器,
11  2. 监听
12
13
14服务器端代码:
15
16/**
17 * weChat服务器端
18 * 1. 先编写服务器端
19 *   1.1 服务器启动并监听6667
20 *   1.2 服务器接受客户端信息,并实现转发【处理上线和离线】
21 */
22public class weCharServer {
23    private ServerSocketChannel listenSocketChannel ;
24    private Selector selector;
25    private static  final  int PORT = 6666;
26
27    public weCharServer() throws IOException {
28        //1. 得到选择器
29        selector = Selector.open();
30        //2. 得到 serverSocketChannel
31        listenSocketChannel = ServerSocketChannel.open();
32        //3. 绑定端口
33        listenSocketChannel.socket().bind(new InetSocketAddress(PORT));
34        //4. 设置非阻塞
35        listenSocketChannel.configureBlocking(false);
36        //5. 注册
37        listenSocketChannel.register(selector, SelectionKey.OP_ACCEPT);
38    }
39
40    /**
41     * 监听
42     */
43    public void listen(){
44        try {
45        while (true) {
46                int count = selector.select(2000);
47            if (count > 0) {
48                //有事件处理
49                //遍历得到selectionKeys集合
50                Iterator<SelectionKey> iterator = selector.selectedKeys().iterator();
51                while (iterator.hasNext()) {
52                    //取出selectionKey
53                    SelectionKey key = iterator.next();
54                    //监听到accept
55                    if (key.isAcceptable()) {
56                        SocketChannel sc = listenSocketChannel.accept();
57                        //将 该 SocketChannel注册到 selector 上
58                        sc.configureBlocking(false);
59                        sc.register(selector, SelectionKey.OP_READ);
60                        //提示上线
61                        System.out.println(sc.getRemoteAddress() + "上线了");
62                    }
63                    if (key.isReadable()) {
64                        //通道发送read事件,即通道是刻度的状态
65                        keyRead(key);
66                    }
67
68                    iterator.remove();
69                }
70            }
71
72        }
73
74        } catch (IOException e) {
75            e.printStackTrace();
76        }
77
78    }
79
80    private void keyRead(SelectionKey key) {
81        SocketChannel channel = null;
82        try {
83
84            //根据key得到channel
85            channel = (SocketChannel) key.channel();
86            //创建Buffer
87            ByteBuffer buffer = ByteBuffer.allocate(1024);
88            int read = channel.read(buffer);
89            //根据read只,做处理
90            if (read > 0) {
91                //把缓存区的数据转成字符串
92                String msg = new String(buffer.array());
93                System.out.println("from 客户端 : " + msg);
94                //向其他客户转发消息
95                sendInfoToOtherClient(msg,channel);
96            }
97        } catch (Exception e) {
98            try {
99                System.out.println(channel.getRemoteAddress() + " 离线了");
100            } catch (IOException ex) {
101                ex.printStackTrace();
102            }
103        }
104    }
105
106    private void sendInfoToOtherClient(String msg, SocketChannel self) throws IOException {
107        System.out.println("服务器转发消息中...");
108        //遍历所有注册到selector上的socketChannel,并排除self
109        for (SelectionKey key : selector.keys()) {
110            //通过key取出对应的socketChannel
111            SelectableChannel targetChannel = key.channel();
112            //排除自己
113            if (targetChannel instanceof SocketChannel && targetChannel != self) {
114                //将Buffer中的数据写入通道
115                ((SocketChannel) targetChannel).write(ByteBuffer.wrap(msg.getBytes()));
116            }
117
118        }
119    }
120
121    public static void main(String[] args) throws IOException {
122        weCharServer weCharServer = new weCharServer();
123        weCharServer.listen();
124    }
125}
126
127
128
129客户端代码:
130
131public class weChatClient {
132    private SocketChannel socketChannel;
133    private String username;
134    private Selector selector;
135
136    public weChatClient() throws IOException {
137        selector = Selector.open();
138        socketChannel = SocketChannel.open(new InetSocketAddress("127.0.0.1", 6666));
139        //设置为非阻塞
140        socketChannel.configureBlocking(false);
141        //注册
142        socketChannel.register(selector, SelectionKey.OP_READ);
143        username = socketChannel.getLocalAddress().toString().substring(1);
144        System.out.println("username : " + username);
145    }
146
147    //向服务器发送消息
148    public void senInfo(String info) {
149        info = username + " 说 : " + info;
150        try {
151            socketChannel.write(ByteBuffer.wrap(info.getBytes()));
152        } catch (IOException e) {
153            e.printStackTrace();
154        }
155    }
156
157    //从服务器读取消息
158    public  void readInfo(){
159        try {
160            int readChannels = selector.select();
161            if (readChannels > 0) {
162                //有可用的通道
163                Iterator<SelectionKey> iterator = selector.selectedKeys().iterator();
164                while (iterator.hasNext()) {
165                    SelectionKey key = iterator.next();
166                    if (key.isReadable()) { //读事件
167                        //得到相关的通道
168                        SocketChannel sc = (SocketChannel) key.channel();
169                        //得到一个缓冲区
170                        ByteBuffer allocate = ByteBuffer.allocate(1024);
171                        sc.read(allocate);
172                        //把读取的数据转换成字符换
173                        String msg = new String(allocate.array());
174                        System.out.println(msg.trim());
175                    }
176                }
177            }
178        } catch (Exception e) {
179            e.printStackTrace();
180        }
181    }
182
183    public static void main(String[] args) throws IOException {
184        //启动一个客户端
185        weChatClient chatClient = new weChatClient();
186        //启动一个线程,每三秒读取从服务器发送的数据
187        new Thread(() -> {
188            while (true) {
189                chatClient.readInfo();
190                try {
191                    Thread.currentThread().sleep(3000);
192                } catch (InterruptedException e) {
193                    e.printStackTrace();
194                }
195            }
196        }).start();
197
198        //发送消息给服务器端
199        Scanner scanner = new Scanner(System.in);
200        while (scanner.hasNextLine()) {
201            chatClient.senInfo(scanner.nextLine());
202        }
203    }
204
205}
206
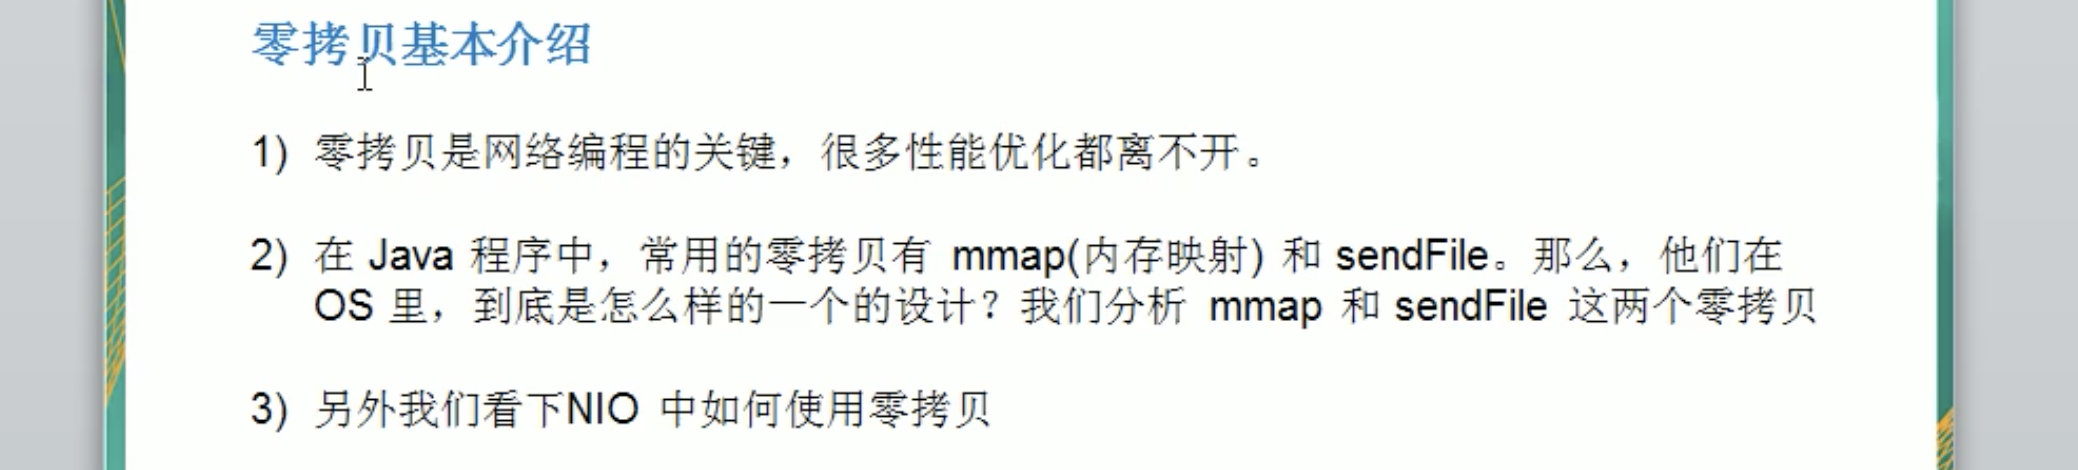
NIO与零拷贝
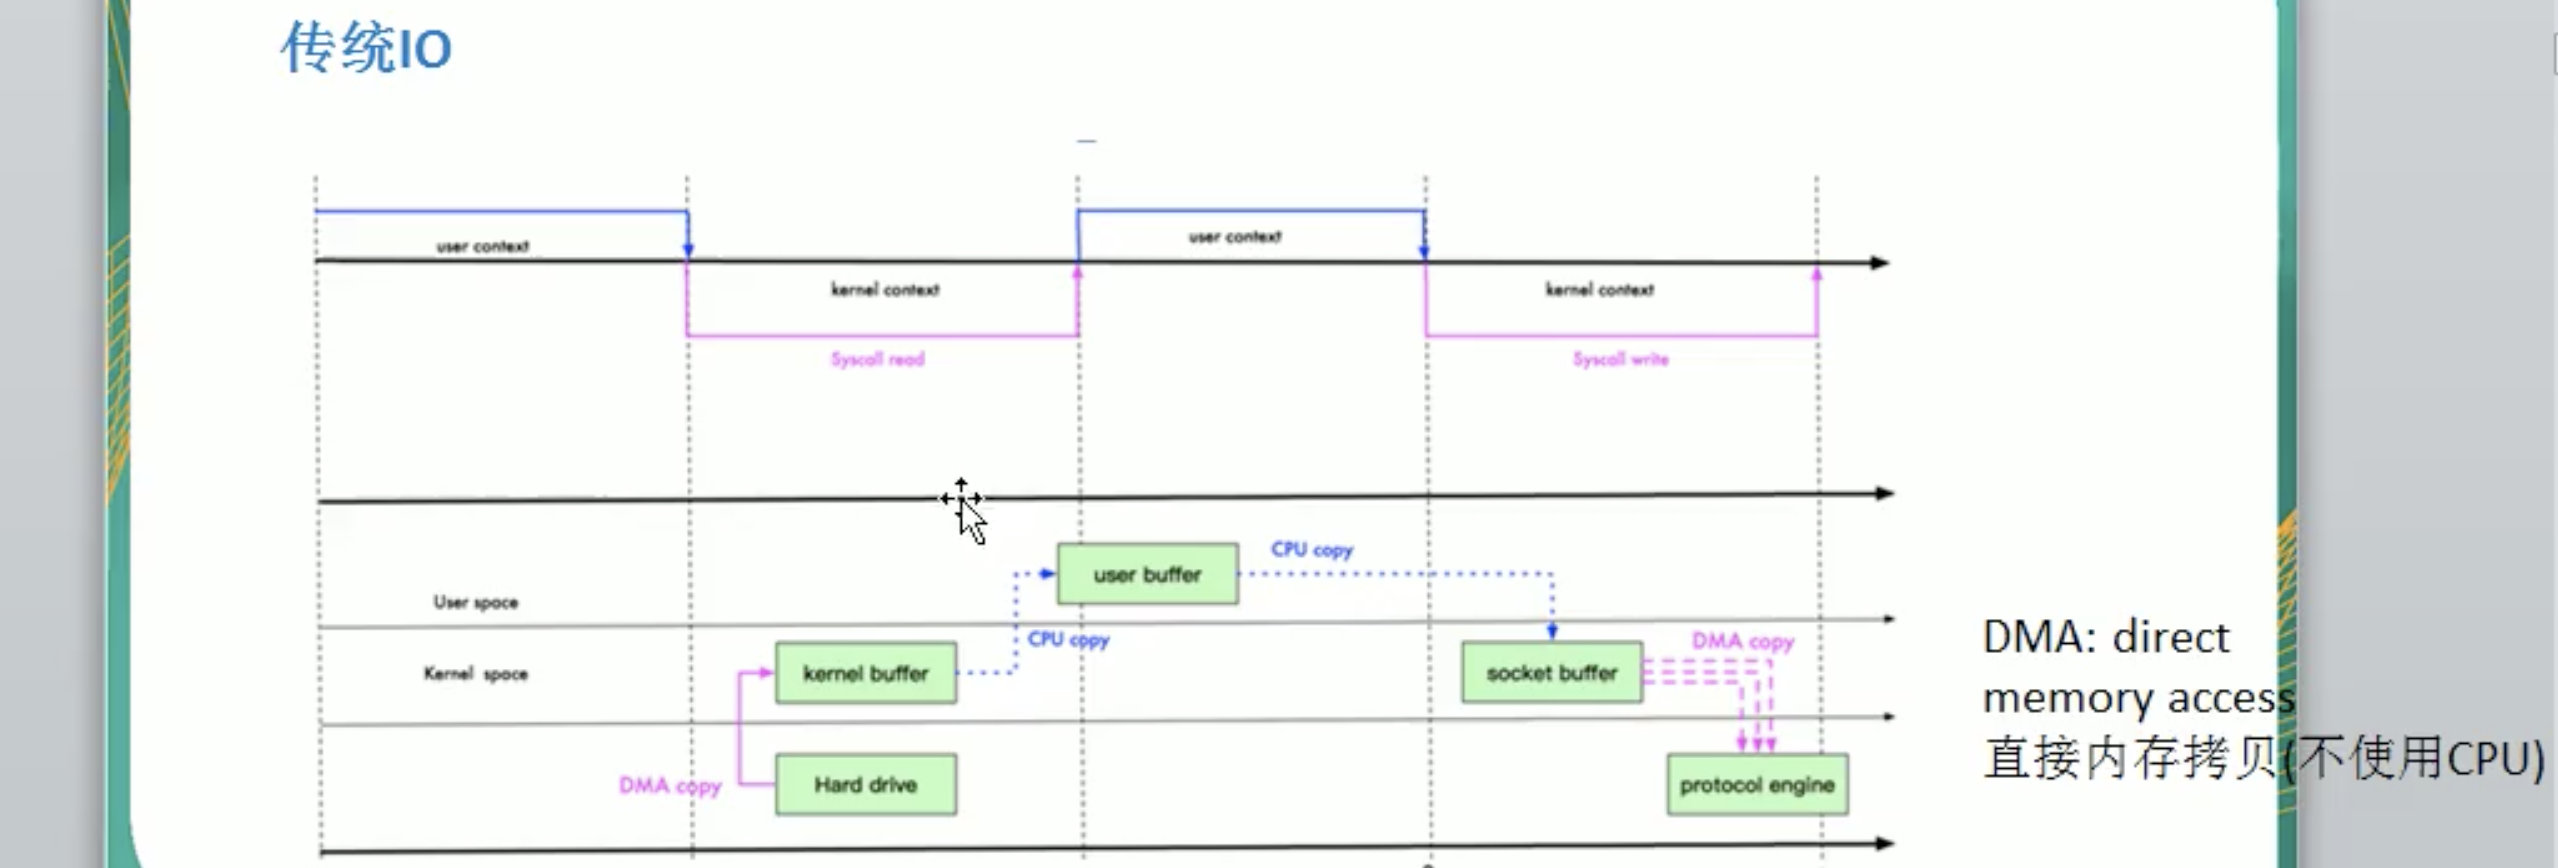
零拷贝,是指从操作系统看的,不经过CPU拷贝。
什么是DMA(direct memory access)? 直接内存拷贝(不适用CPU)。
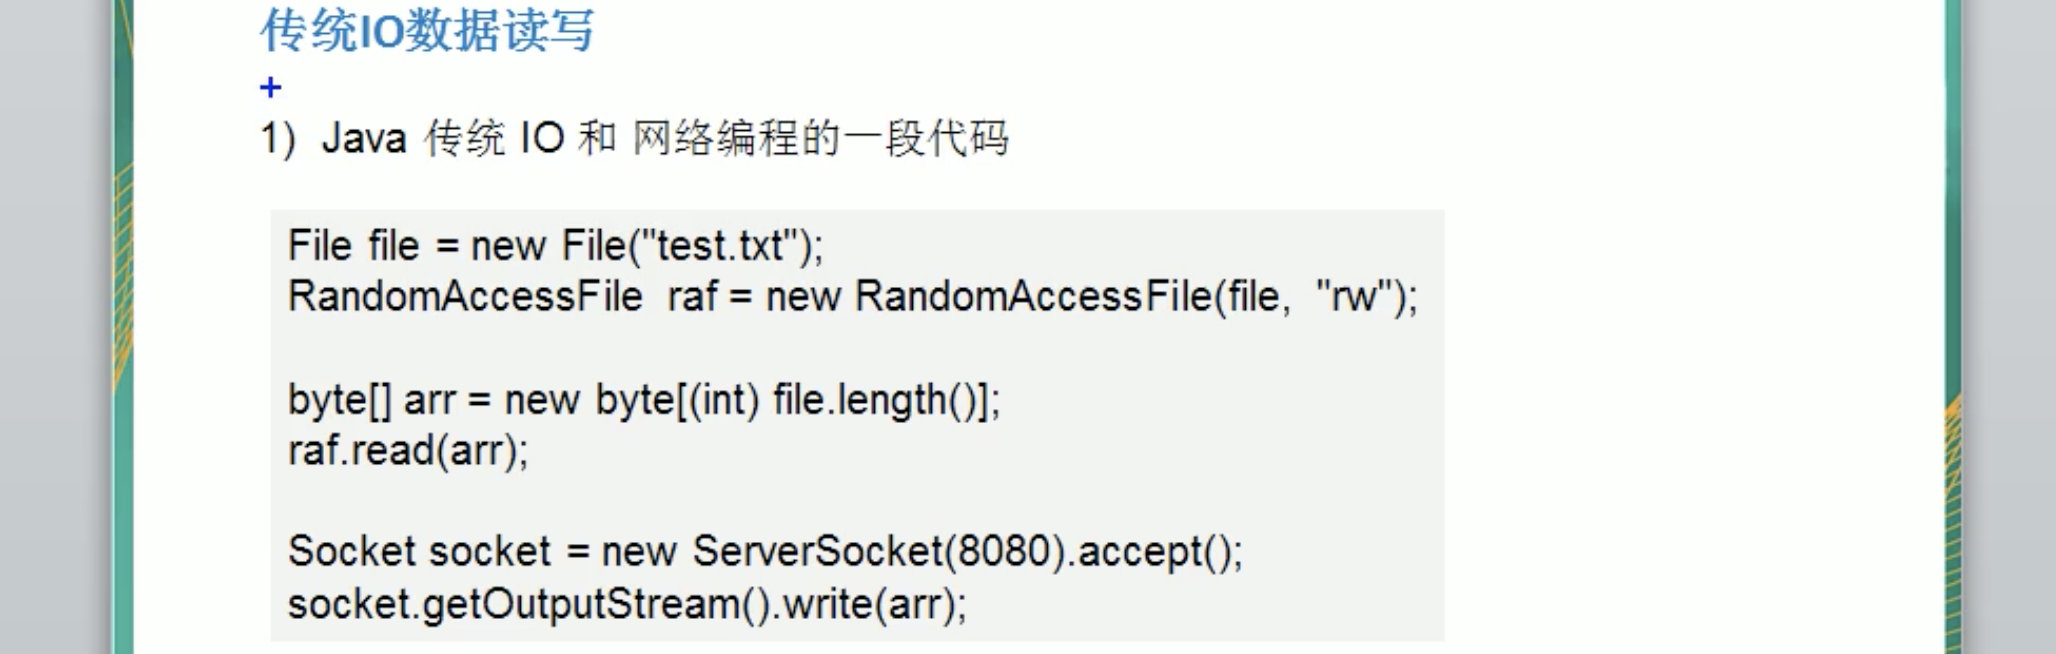
传统IO数据读写
什么是DMA(direct memory access)? 直接内存拷贝(不适用CPU)
传统的IO:使用了4次拷贝,3次状态的转换。
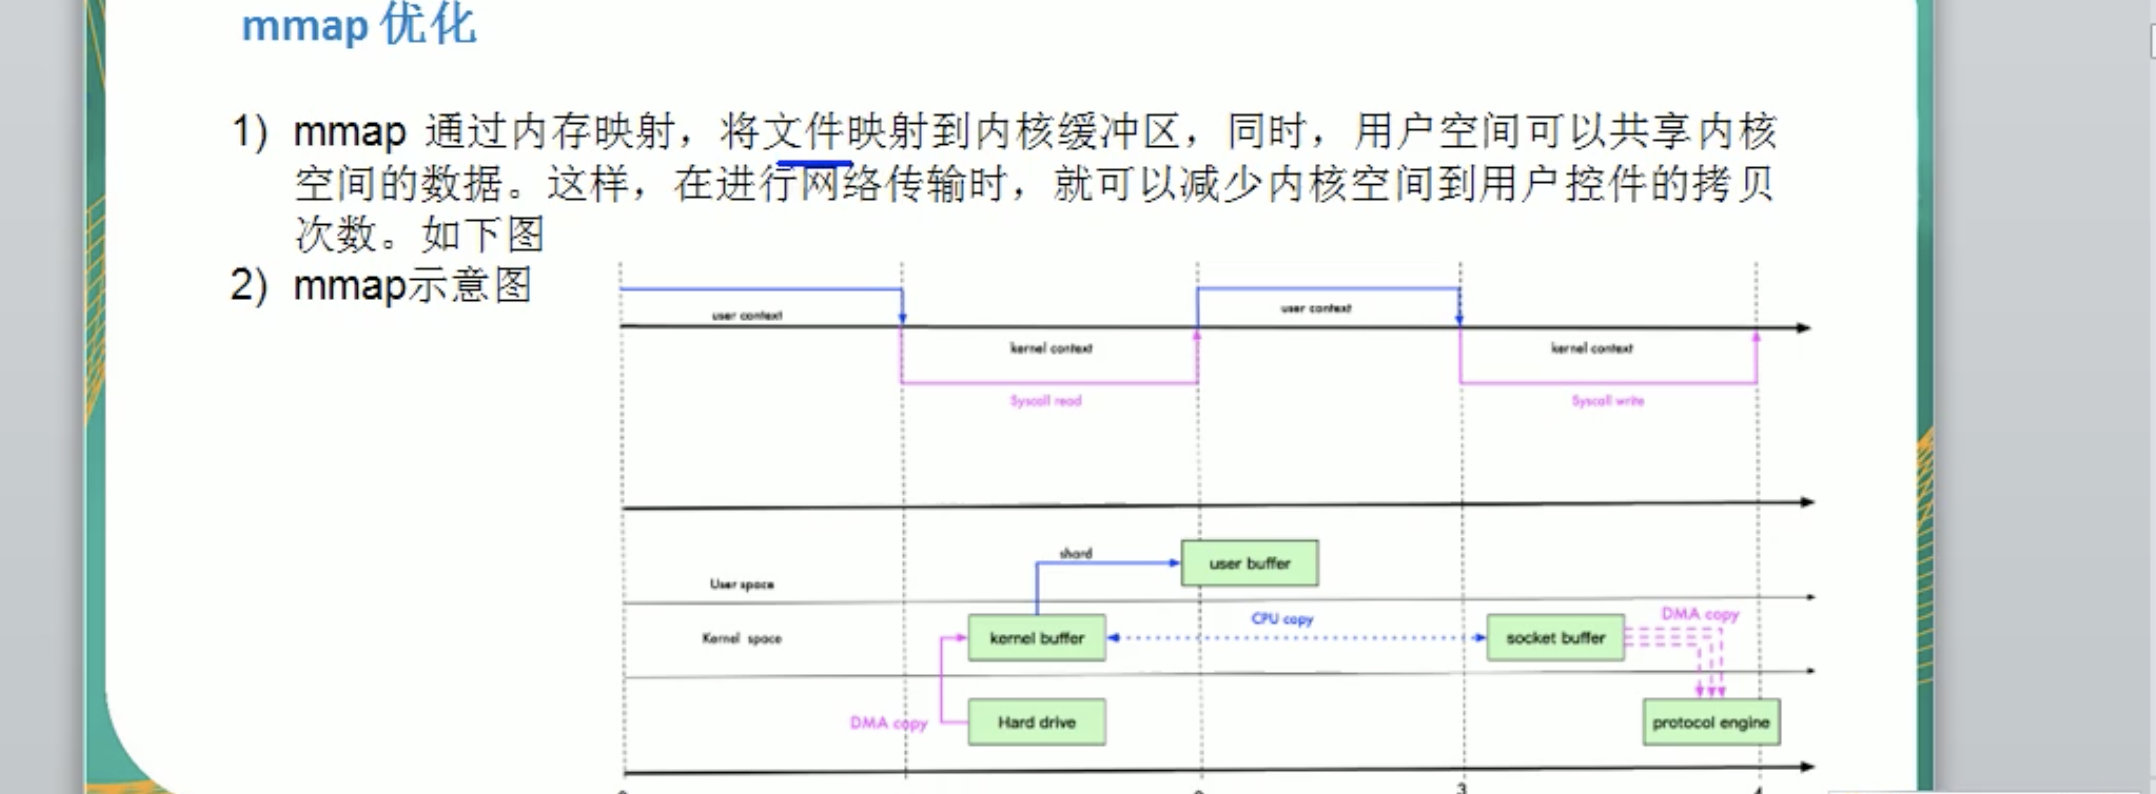
mmap优化
mmap优化:使用了3次拷贝,3次状态切换。
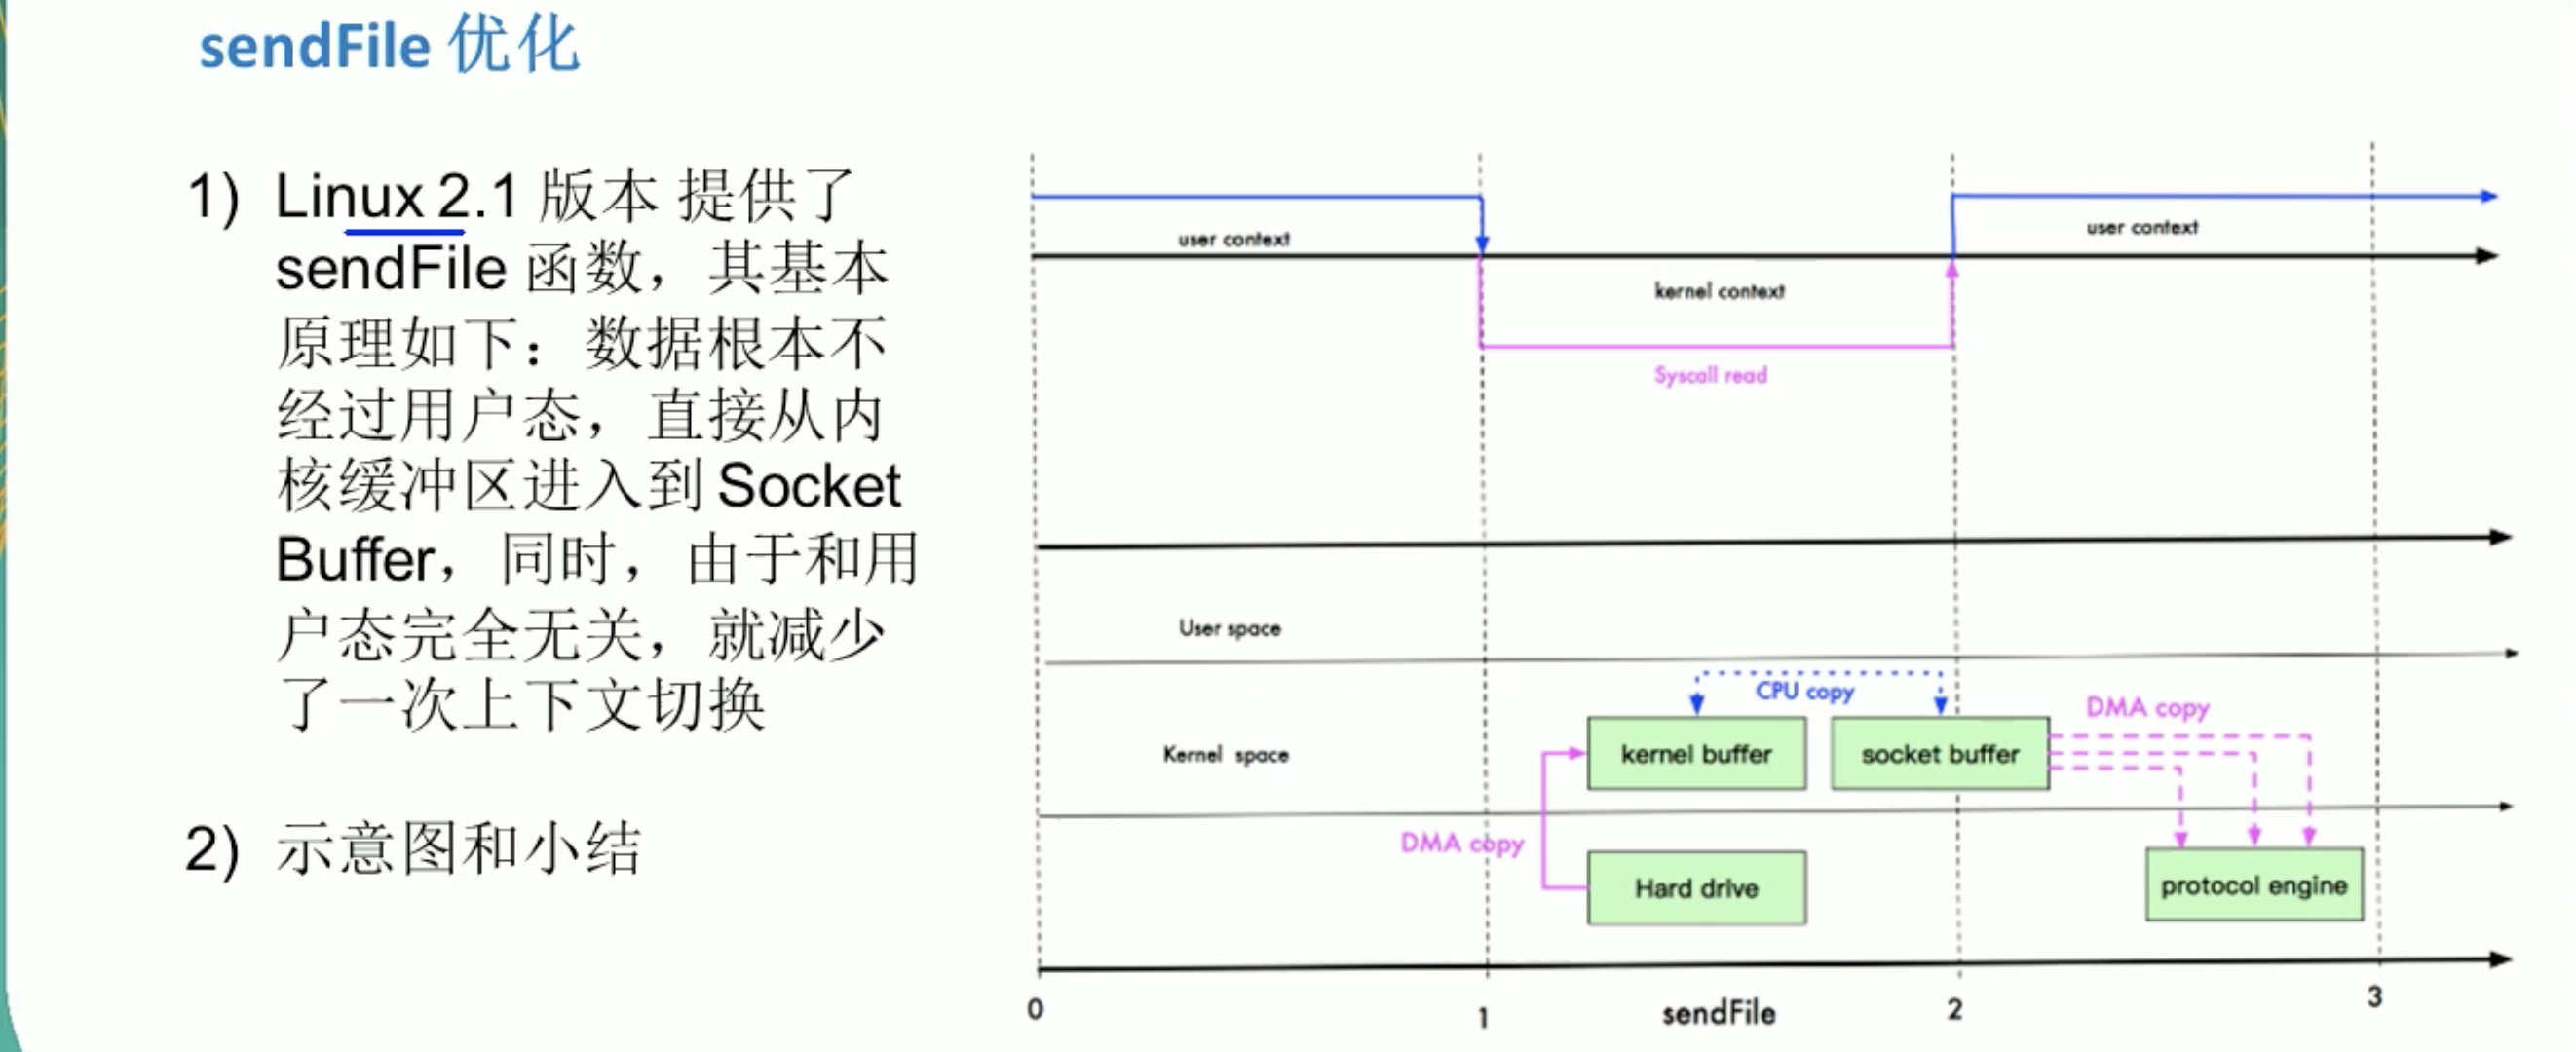
sendFile优化
sendFile 优化: 使用3次拷贝,2次状态切换。
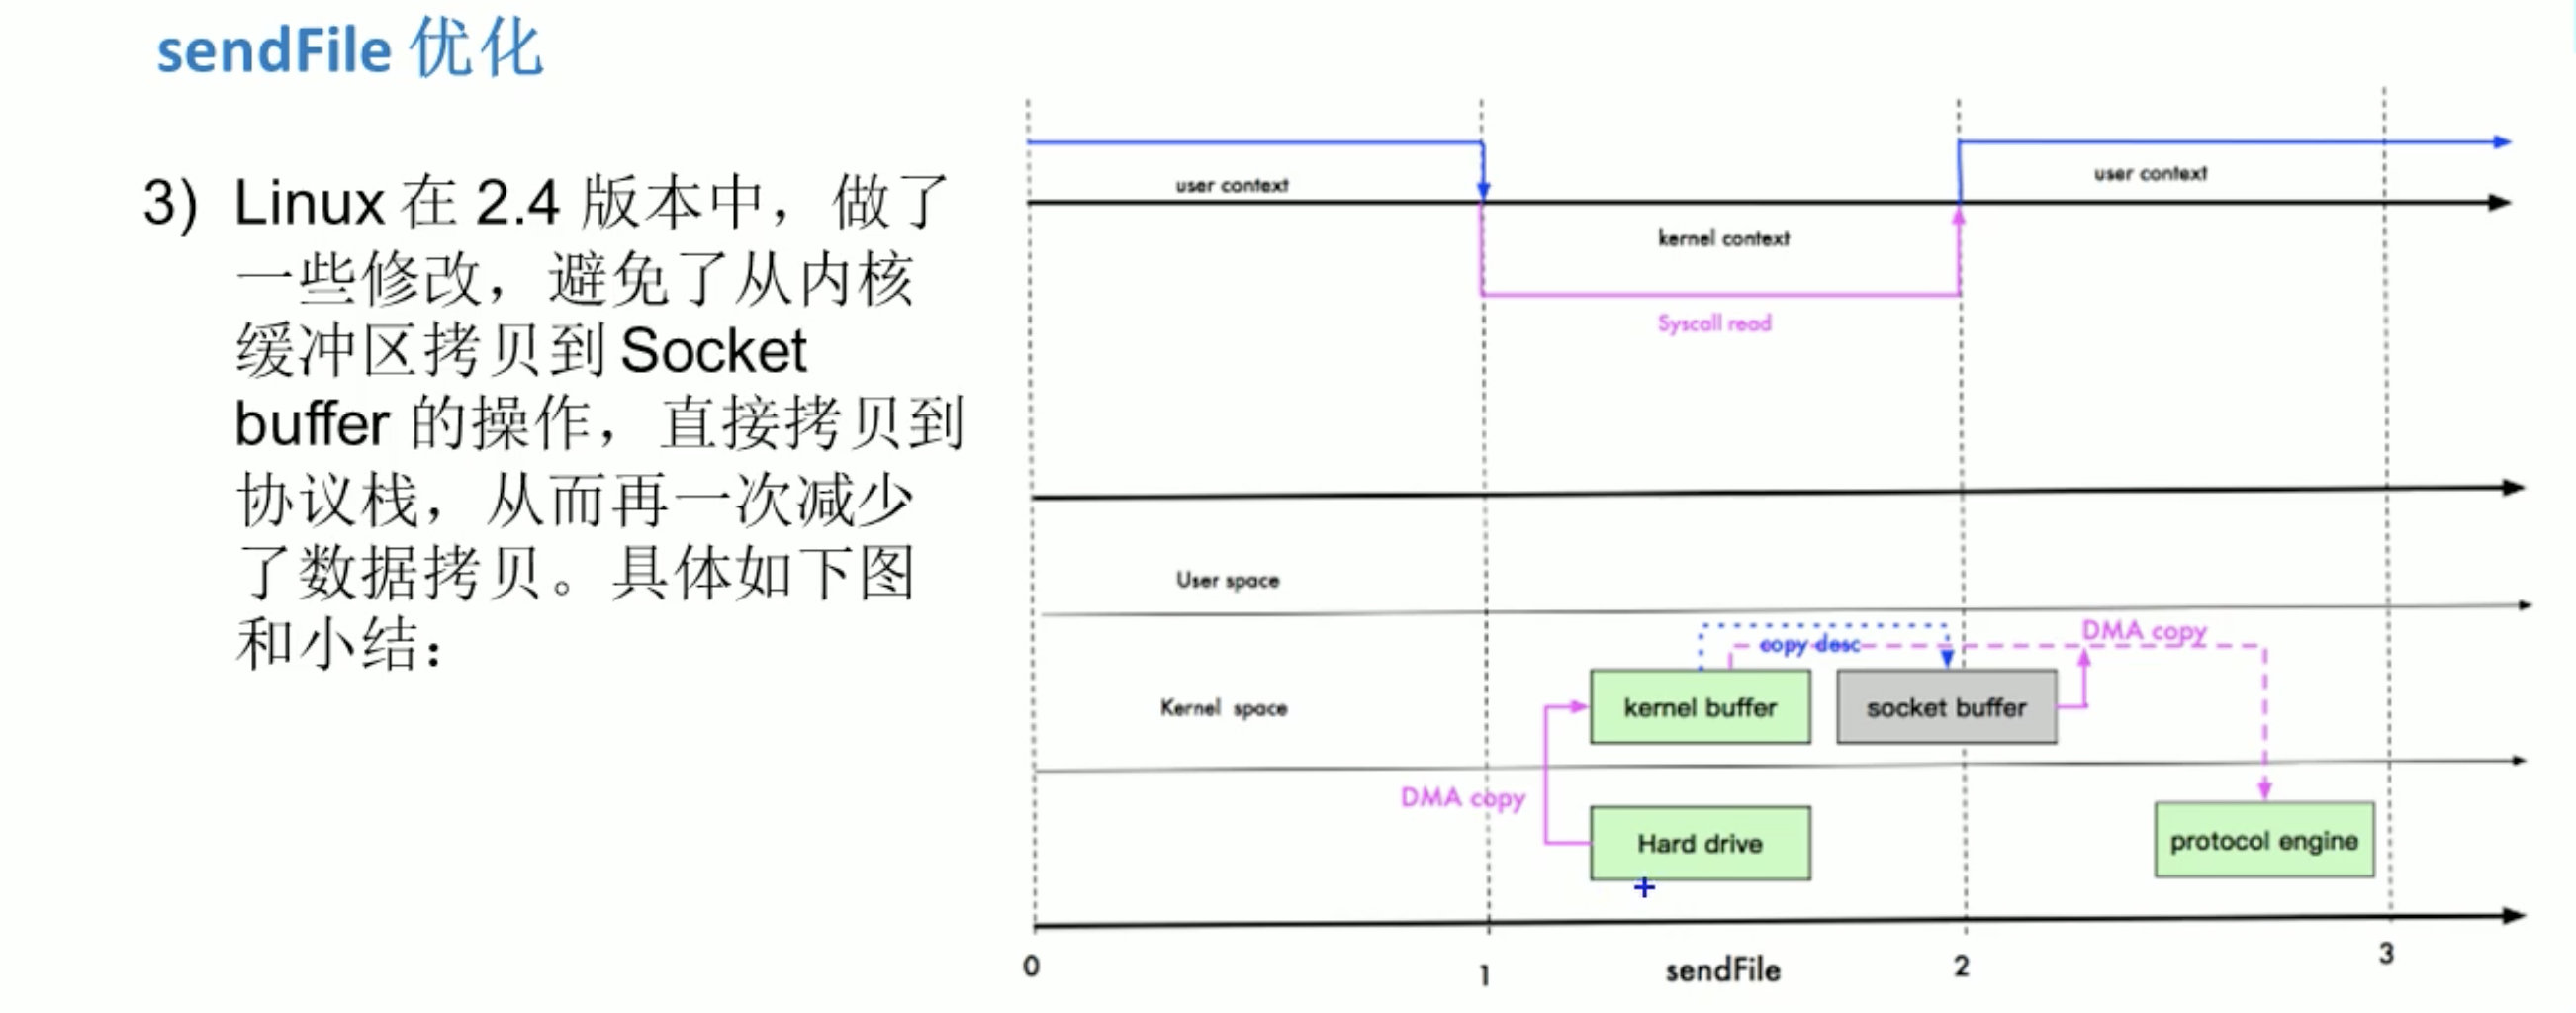
sendFile 进一步优化: 使用2次拷贝,2次上下文状态切换。
这里还是有一次CPU拷贝的。 从kernel buffer -> socket buffer . 但是拷贝的信息很少。比如 length ,offet ,消耗低,可以忽略。

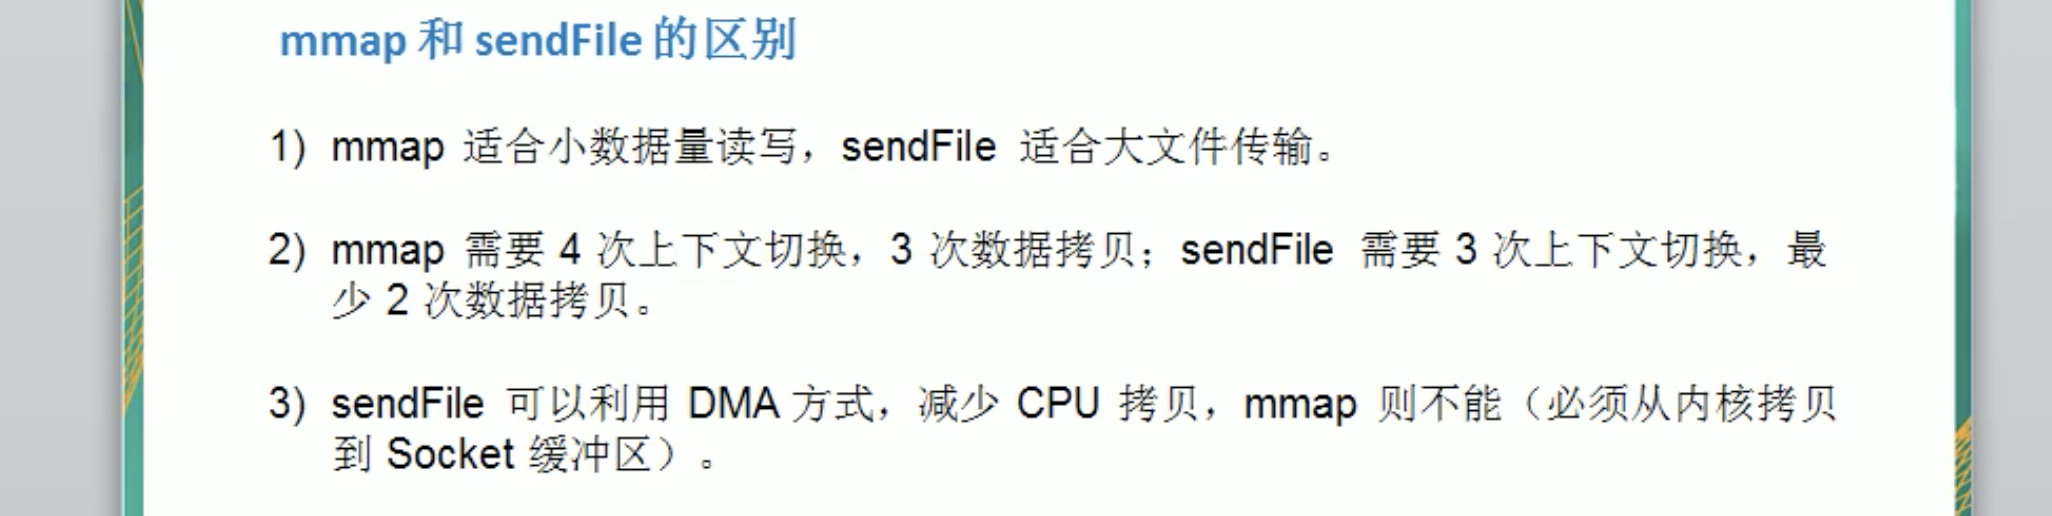
mmap 和 sendFile的区别
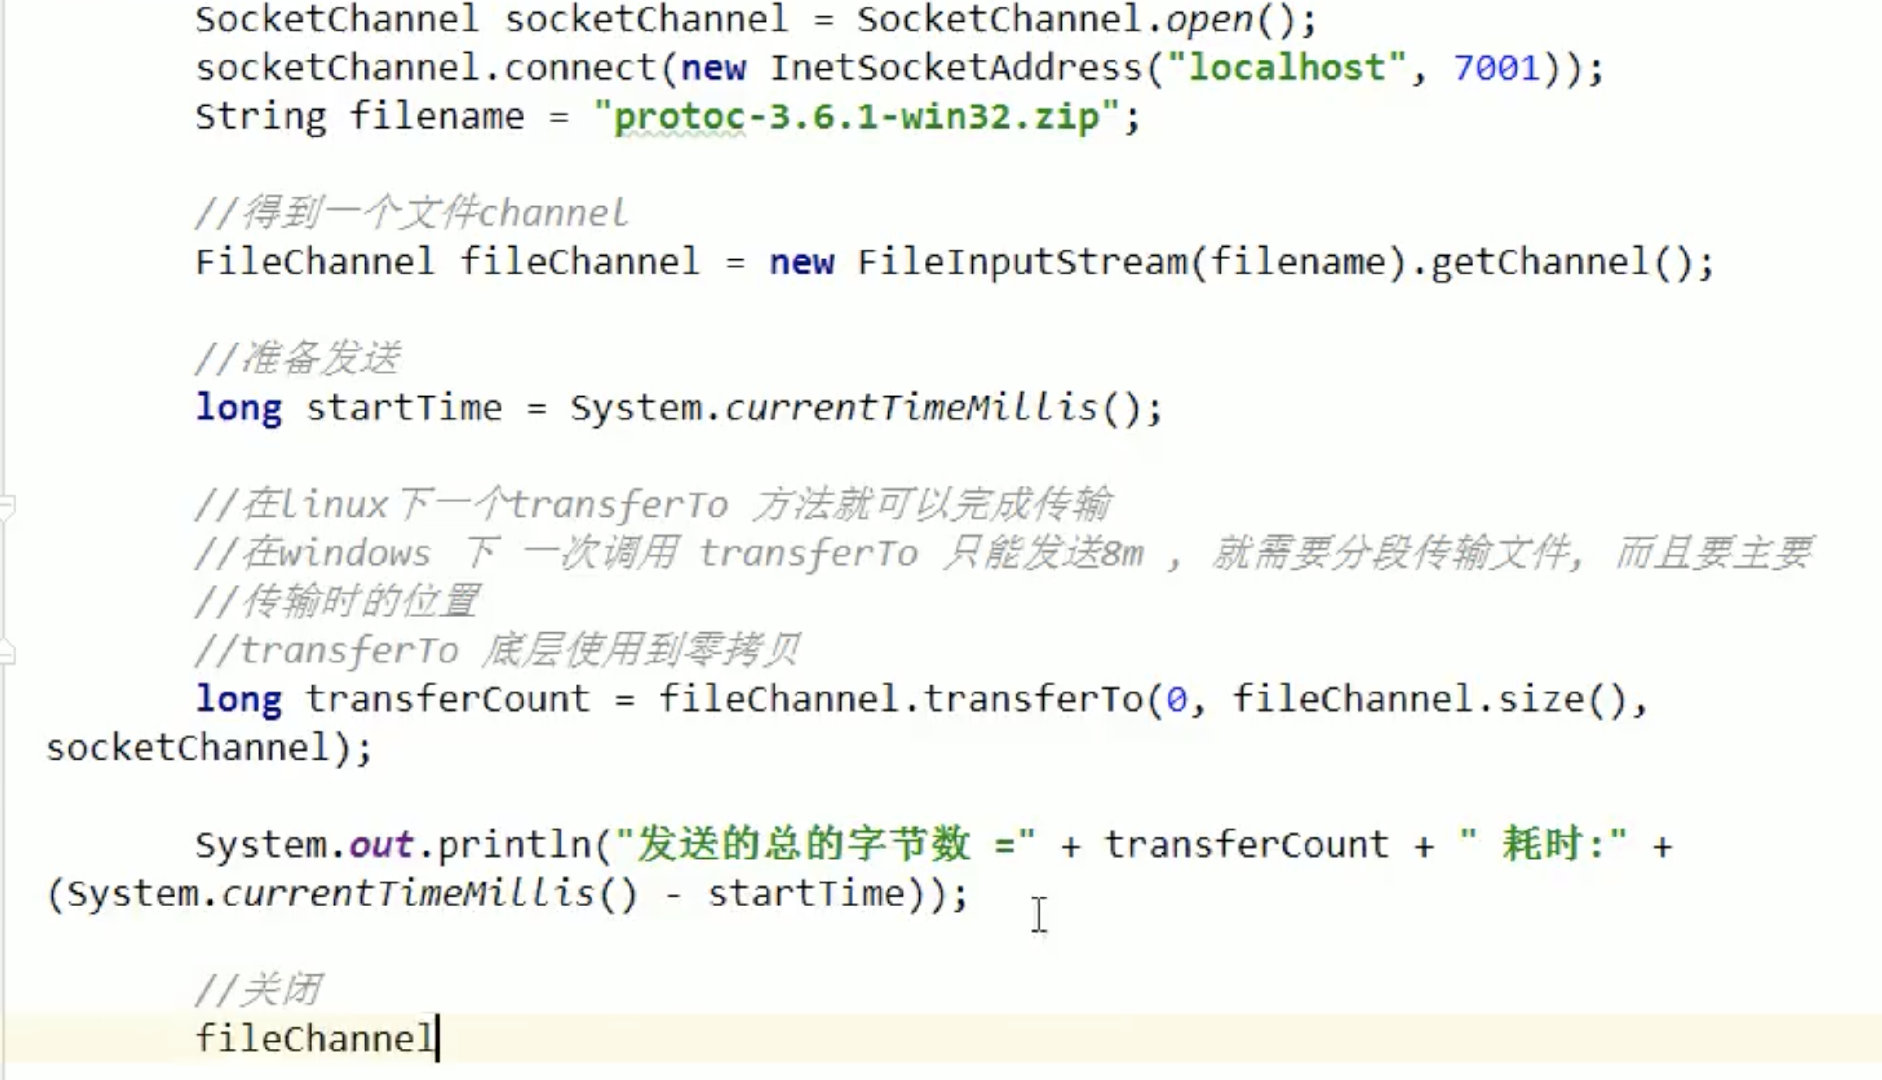
NIO零拷贝案例

1transferTo注意事项 :
2  1. 在Linux下,一个transferTo方法就可以传输完、
3  2. 在Windows下一次调用transferTo只能传输8M,而且要注意传输时的位置。
4
5  使用方法:
6  fileChannel.transferTo(0,fileChannel.size(),socketChannel); 从0开始传,传多少个。
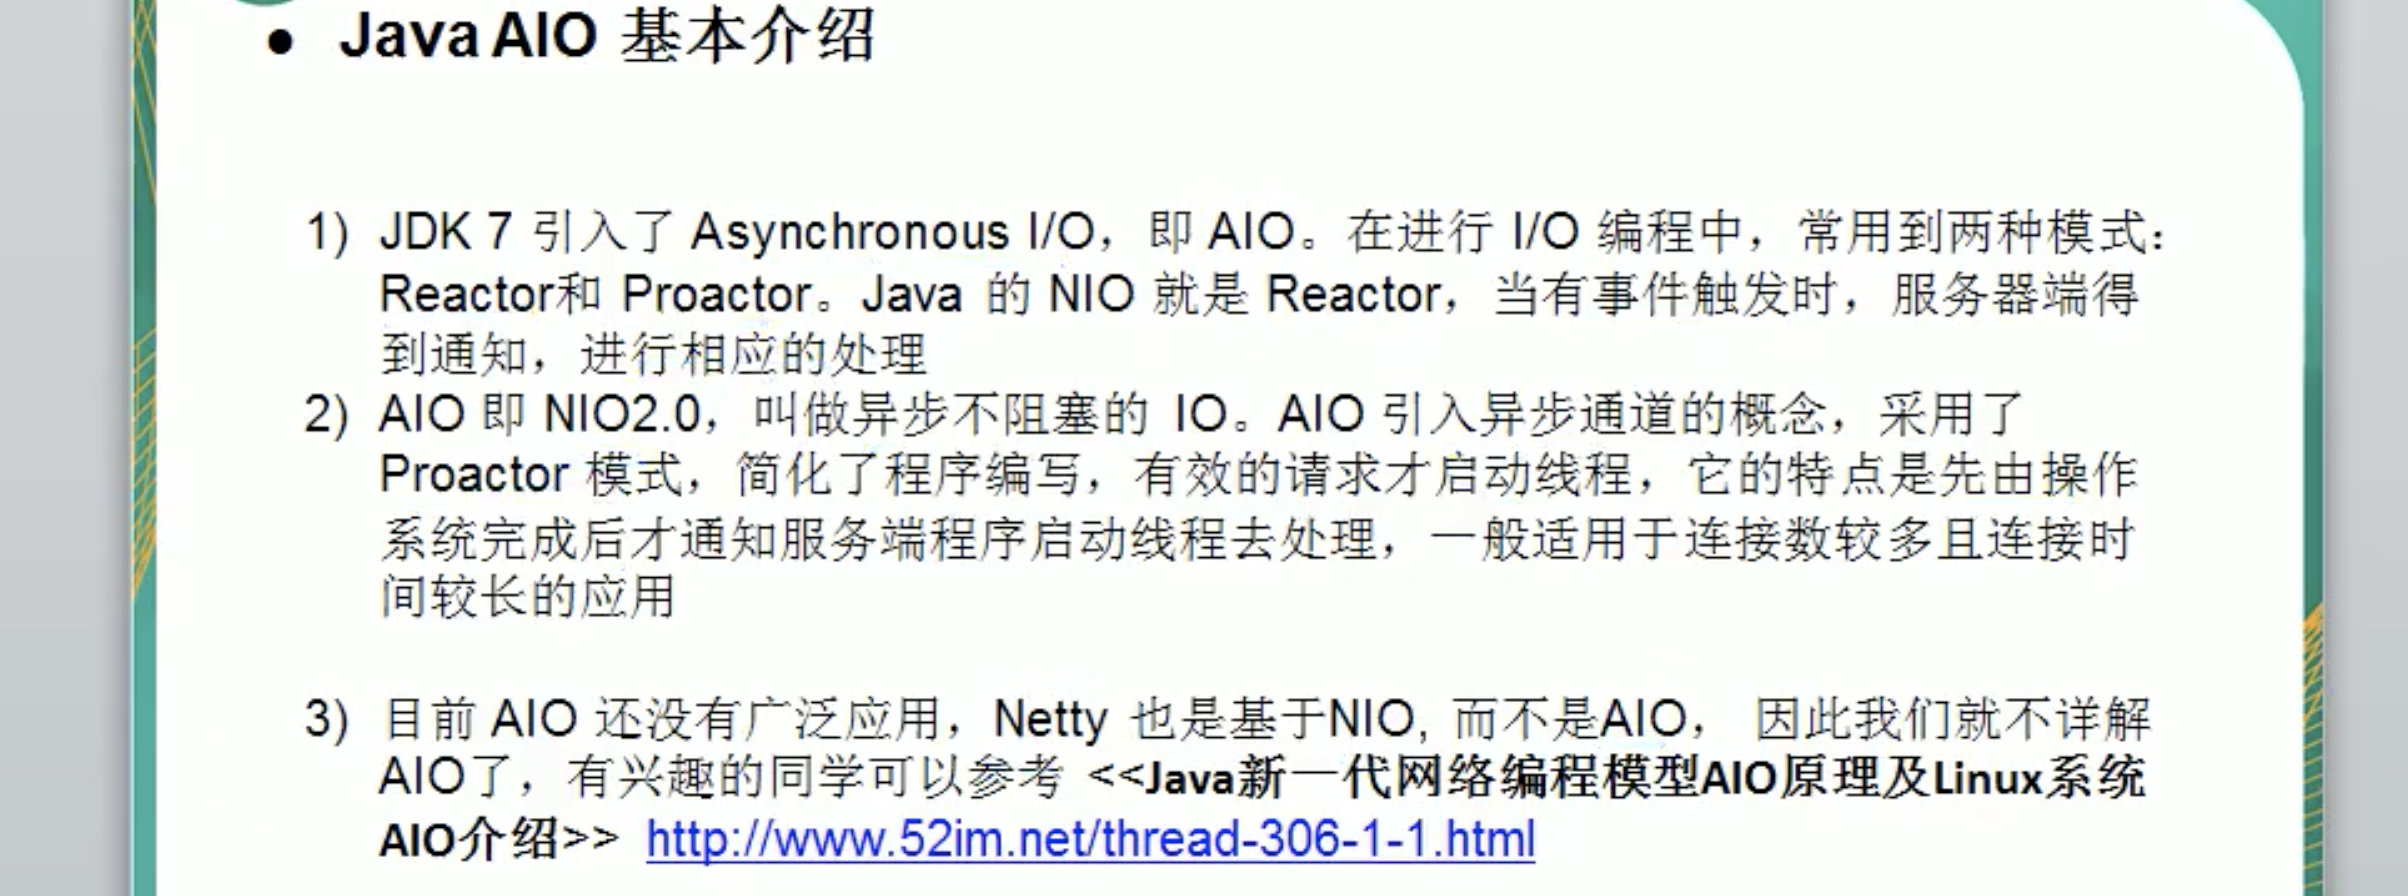
Java AIO编程
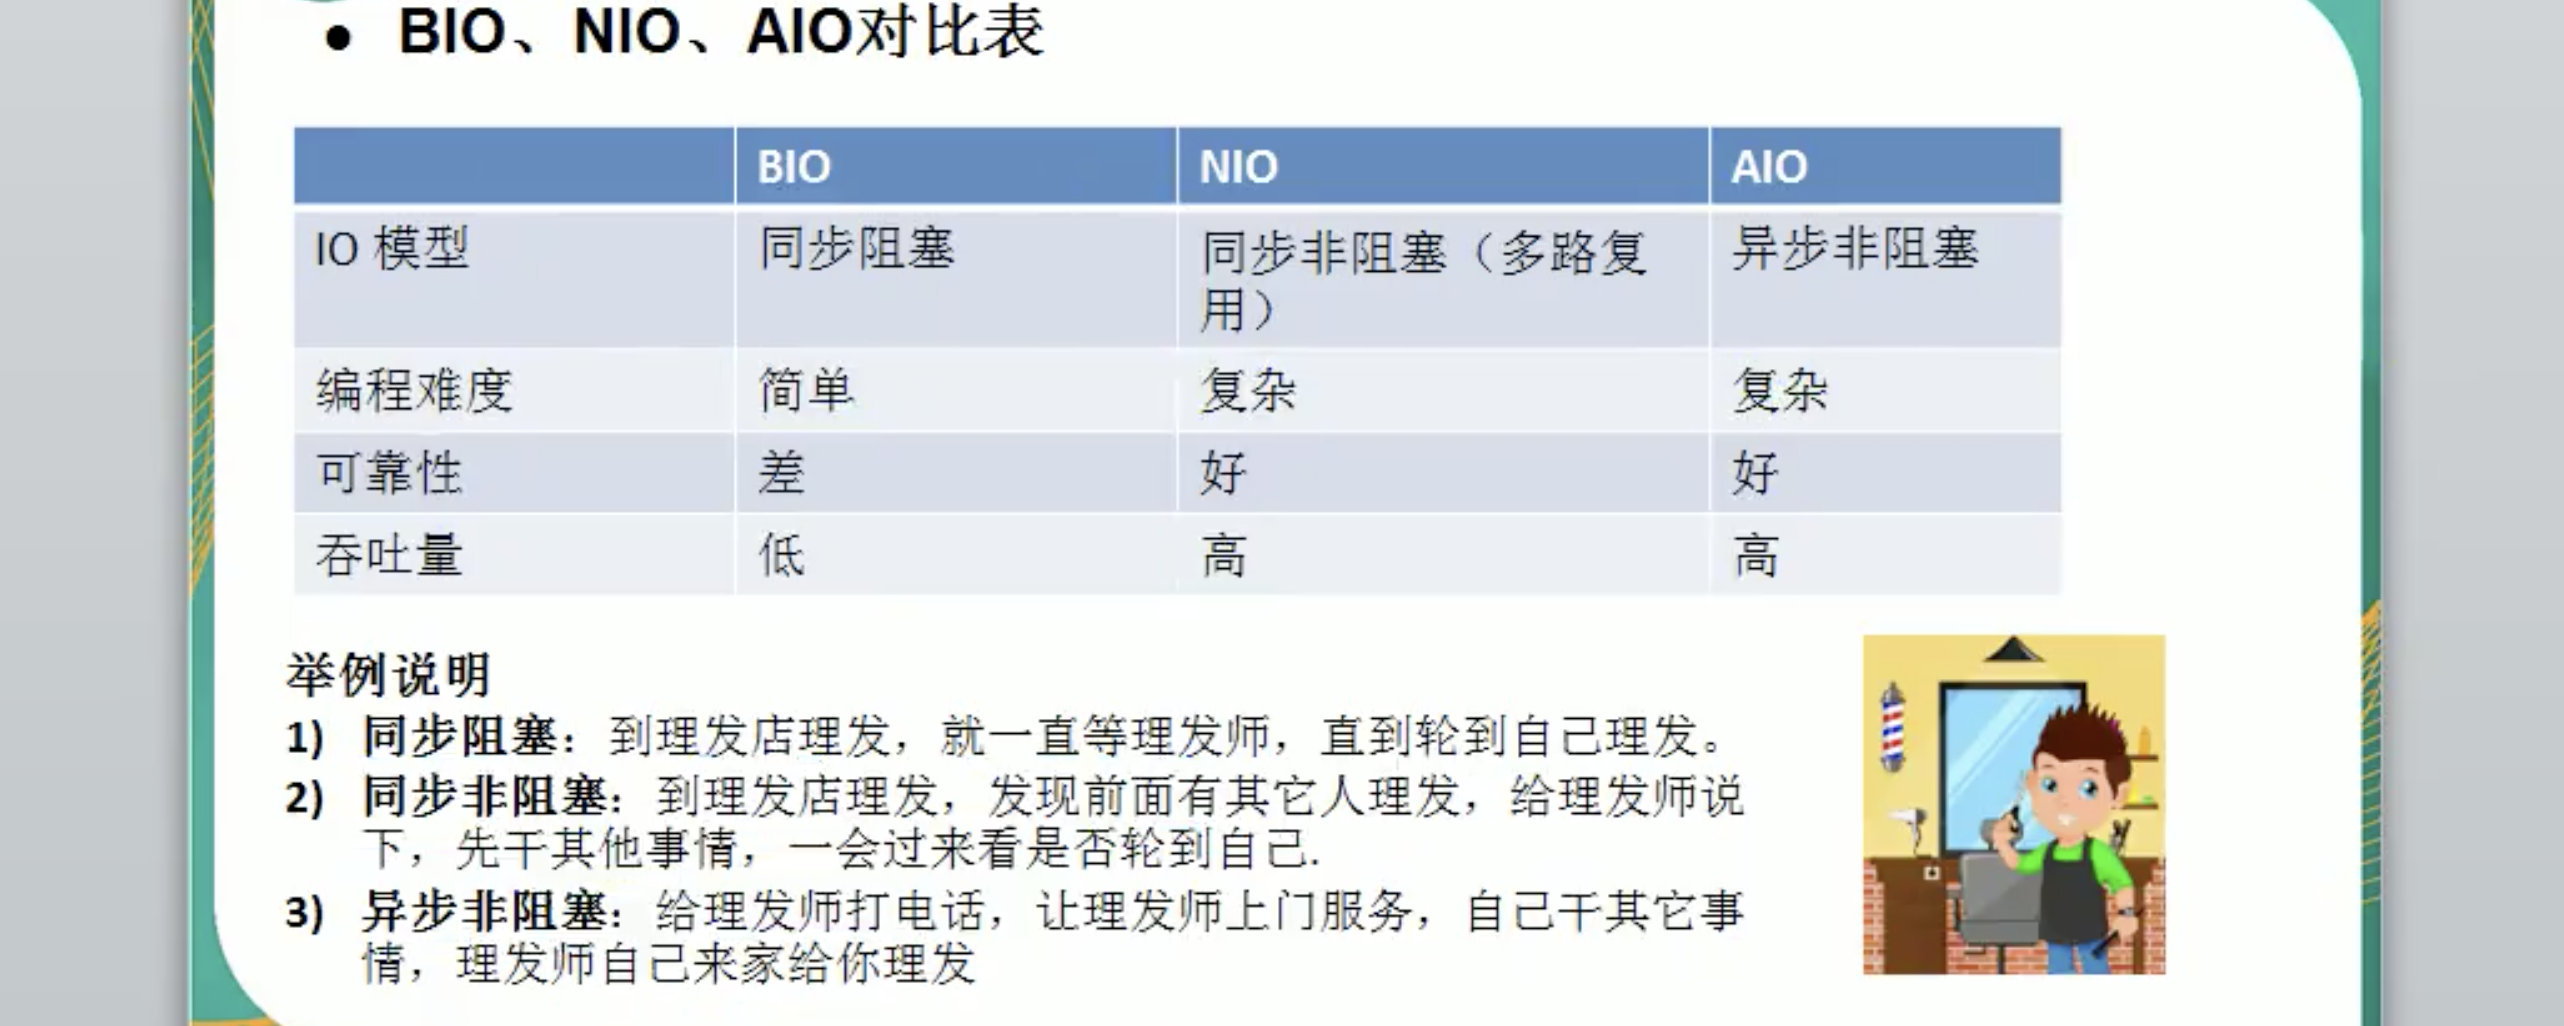
BIO、NIO、AIO对比