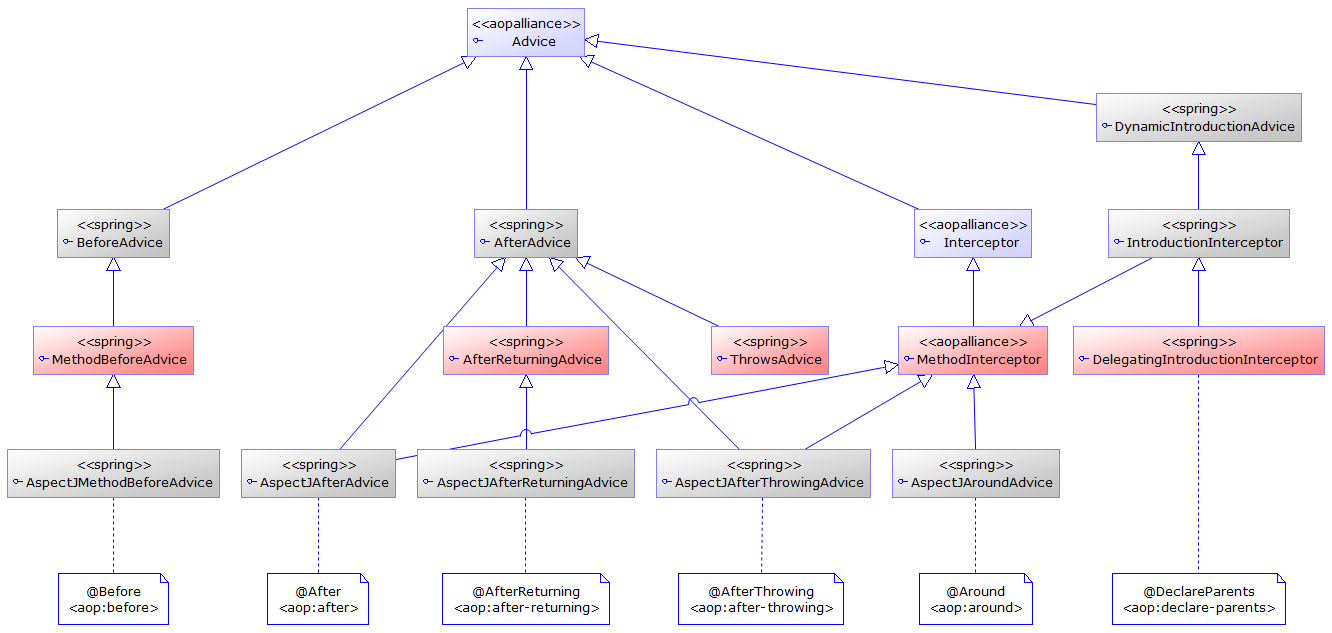
- Spring AOP:切面
之前谈到的 AOP 框架其实可以将它理解为一个拦截器框架,但这个拦截器似乎非常武断。比如说,如果它拦截了一个类,那么它就拦截了这个类中所有的方法。类似地,当我们在使用动态代理的时候,其实也遇到了这个问题。需要在代码中对所拦截的方法名加以判断,才能过滤出我们需要拦截的方法,想想这种做法确实不太优雅。在大量的真实项目中,似乎我们只需要拦截特定的方法就行了,没必要拦截所有的方法。于是,老罗同志借助了 AOP 的一个很重要的工具,Advisor(切面),来解决这个问题。它也是 AOP 中的核心!是我们关注的重点!
也就是说,我们可以通过切面,将增强类与拦截匹配条件组合在一起,然后将这个切面配置到 ProxyFactory 中,从而生成代理。
这里提到这个“拦截匹配条件”在 AOP 中就叫做 Pointcut(切点),其实说白了就是一个基于表达式的拦截条件罢了。
归纳一下,Advisor(切面)封装了 Advice(增强)与 Pointcut(切点 )。当您理解了这句话后,就往下看吧。
我在 GreetingImpl 类中故意增加了两个方法,都以“good”开头。下面要做的就是拦截这两个新增的方法,而对 sayHello() 方法不作拦截。
1@Component
2public class GreetingImpl implements Greeting {
3
4    @Override
5    public void sayHello(String name) {
6        System.out.println("Hello! " + name);
7    }
8
9    public void goodMorning(String name) {
10        System.out.println("Good Morning! " + name);
11    }
12
13    public void goodNight(String name) {
14        System.out.println("Good Night! " + name);
15    }
16}
在 Spring AOP 中,老罗已经给我们提供了许多切面类了,这些切面类我个人感觉最好用的就是基于正则表达式的切面类。看看您就明白了:
1<?xml version="1.0" encoding="UTF-8"?>
2<beans ...">
3
4    <context:component-scan base-package="aop.demo"/>
5
6    <!-- 配置一个切面 -->
7    <bean id="greetingAdvisor" class="org.springframework.aop.support.RegexpMethodPointcutAdvisor">
8        <property name="advice" ref="greetingAroundAdvice"/>            <!-- 增强 -->
9        <property name="pattern" value="aop.demo.GreetingImpl.good.*"/> <!-- 切点(正则表达式<SPAN></SPAN>) -->
10    </bean>
11
12    <!-- 配置一个代理 -->
13    <bean id="greetingProxy" class="org.springframework.aop.framework.ProxyFactoryBean">
14        <property name="target" ref="greetingImpl"/>                <!-- 目标类 -->
15        <property name="interceptorNames" value="greetingAdvisor"/> <!-- 切面 -->
16        <property name="proxyTargetClass" value="true"/>            <!-- 代理目标类 -->
17    </bean>
18
19</beans>
注意以上代理对象的配置中的 interceptorNames,它不再是一个增强,而是一个切面,因为已经将增强封装到该切面中了。此外,切面还定义了一个切点(正则表达式),其目的是为了只将满足切点匹配条件的方法进行拦截。
需要强调的是,这里的切点表达式是基于正则表达式的。示例中的“aop.demo.GreetingImpl.good.*”表达式后面的“.*”表示匹配所有字符,翻译过来就是“匹配 aop.demo.GreetingImpl 类中以 good 开头的方法”。
除了 RegexpMethodPointcutAdvisor 以外,在 Spring AOP 中还提供了几个切面类,比如:
- DefaultPointcutAdvisor:默认切面(可扩展它来自定义切面)
- NameMatchMethodPointcutAdvisor:根据方法名称进行匹配的切面
- StaticMethodMatcherPointcutAdvisor:用于匹配静态方法的切面
总的来说,让用户去配置一个或少数几个代理,似乎还可以接受,但随着项目的扩大,代理配置就会越来越多,配置的重复劳动就多了,麻烦不说,还很容易出错。能否让 Spring 框架为我们自动生成代理呢?
- Spring AOP:自动代理(扫描 Bean 名称)
Spring AOP 提供了一个可根据 Bean 名称来自动生成代理的工具,它就是 BeanNameAutoProxyCreator。是这样配置的:
1<?xml version="1.0" encoding="UTF-8"?>
2<beans ...>
3
4    ...
5
6    <bean class="org.springframework.aop.framework.autoproxy.BeanNameAutoProxyCreator">
7        <property name="beanNames" value="*Impl"/>                       <!-- 只为后缀是“Impl”的 Bean 生成代理 -->
8        <property name="interceptorNames" value="greetingAroundAdvice"/> <!-- 增强 -->
9        <property name="optimize" value="true"/>                         <!-- 是否对代理生成策略进行优化 -->
10    </bean>
11
12</beans>
以上使用 BeanNameAutoProxyCreator 只为后缀为“Impl”的 Bean 生成代理。需要注意的是,这个地方我们不能定义代理接口,也就是 interfaces 属性,因为我们根本就不知道这些 Bean 到底实现了多少接口。此时不能代理接口,而只能代理类。所以这里提供了一个新的配置项,它就是 optimize。若为 true 时,则可对代理生成策略进行优化(默认是 false 的)。也就是说,如果该类有接口,就代理接口(使用 JDK 动态代理);如果没有接口,就代理类(使用 CGLib 动态代理)。而并非像之前使用的 proxyTargetClass 属性那样,强制代理类,而不考虑代理接口的方式。可见 Spring AOP 确实为我们提供了很多很好地服务!
既然 CGLib 可以代理任何的类了,那为什么还要用 JDK 的动态代理呢?肯定您会这样问。
根据多年来实际项目经验得知:CGLib 创建代理的速度比较慢,但创建代理后运行的速度却非常快,而 JDK 动态代理正好相反。如果在运行的时候不断地用 CGLib 去创建代理,系统的性能会大打折扣,所以建议一般在系统初始化的时候用 CGLib 去创建代理,并放入 Spring 的 ApplicationContext 中以备后用。
以上这个例子只能匹配目标类,而不能进一步匹配其中指定的方法,要匹配方法,就要考虑使用切面与切点了。Spring AOP 基于切面也提供了一个自动代理生成器:DefaultAdvisorAutoProxyCreator。
11. Spring AOP:自动代理(扫描切面配置)
为了匹配目标类中的指定方法,我们仍然需要在 Spring 中配置切面与切点:
1<?xml version="1.0" encoding="UTF-8"?>
2<beans ...>
3
4    ...
5
6    <bean id="greetingAdvisor" class="org.springframework.aop.support.RegexpMethodPointcutAdvisor">
7        <property name="pattern" value="aop.demo.GreetingImpl.good.*"/>
8        <property name="advice" ref="greetingAroundAdvice"/>
9    </bean>
10
11    <bean class="org.springframework.aop.framework.autoproxy.DefaultAdvisorAutoProxyCreator">
12        <property name="optimize" value="true"/>
13    </bean>
14
15</beans>
这里无需再配置代理了,因为代理将会由 DefaultAdvisorAutoProxyCreator 自动生成。也就是说,这个类可以扫描所有的切面类,并为其自动生成代理。
看来不管怎样简化,老罗始终解决不了切面的配置,这件繁重的手工劳动。在 Spring 配置文件中,仍然会存在大量的切面配置。然而在有很多情况下 Spring AOP 所提供的切面类真的不太够用了,比如:想拦截指定注解的方法,我们就必须扩展 DefaultPointcutAdvisor 类,自定义一个切面类,然后在 Spring 配置文件中进行切面配置。不做不知道,做了您就知道相当麻烦了。
老罗的解决方案似乎已经掉进了切面类的深渊,这还真是所谓的“面向切面编程”了,最重要的是切面,最麻烦的也是切面。
必须要把切面配置给简化掉,Spring 才能有所突破!
神一样的老罗总算认识到了这一点,接受了网友们的建议,集成了 AspectJ,同时也保留了以上提到的切面与代理配置方式(为了兼容老的项目,更为了维护自己的面子)。将 Spring 与 AspectJ 集成与直接使用 AspectJ 是不同的,我们不需要定义 AspectJ 类(它是扩展了 Java 语法的一种新的语言,还需要特定的编译器),只需要使用 AspectJ 切点表达式即可(它是比正则表达式更加友好的表现形式)。
- Spring + AspectJ(基于注解:通过 AspectJ execution 表达式拦截方法)
下面以一个最简单的例子,实现之前提到的环绕增强。先定义一个 Aspect 切面类:
1@Aspect
2@Component
3public class GreetingAspect {
4
5    @Around("execution(* aop.demo.GreetingImpl.*(..))")
6    public Object around(ProceedingJoinPoint pjp) throws Throwable {
7        before();
8        Object result = pjp.proceed();
9        after();
10        return result;
11    }
12
13    private void before() {
14        System.out.println("Before");
15    }
16
17    private void after() {
18        System.out.println("After");
19    }
20}
注意:类上面标注的 @Aspect 注解,这表明该类是一个 Aspect(其实就是 Advisor)。该类无需实现任何的接口,只需定义一个方法(方法叫什么名字都无所谓),只需在方法上标注 @Around 注解,在注解中使用了 AspectJ 切点表达式。方法的参数中包括一个 ProceedingJoinPoint 对象,它在 AOP 中称为 Joinpoint(连接点), 可以通过该对象获取方法的任何信息,例如:方法名、参数等。
下面重点来分析一下这个切点表达式:
execution(* aop.demo.GreetingImpl.*(..))
- execution():表示拦截方法,括号中可定义需要匹配的规则。
- 第一个“*”:表示方法的返回值是任意的。
- 第二个“*”:表示匹配该类中所有的方法。
- (..):表示方法的参数是任意的。
是不是比正则表达式的可读性更强呢?如果想匹配指定的方法,只需将第二个“*”改为指定的方法名称即可。
如何配置呢?看看是有多简单吧:
1<?xml version="1.0" encoding="UTF-8"?> 2<beans xmlns="http://www.springframework.org/schema/beans" 3 xmlns:xsi="http://www.w3.org/2001/XMLSchema-instance" 4 xmlns:context="http://www.springframework.org/schema/context" 5 xmlns:aop="http://www.springframework.org/schema/aop" 6 xsi:schemaLocation="http://www.springframework.org/schema/beans 7 http://www.springframework.org/schema/beans/spring-beans.xsd 8 http://www.springframework.org/schema/context 9 http://www.springframework.org/schema/context/spring-context.xsd 10 http://www.springframework.org/schema/aop 11 http://www.springframework.org/schema/aop/spring-aop.xsd"> 12 13 <context:component-scan base-package="aop.demo"/> 14 15 <aop:aspectj-autoproxy proxy-target-class="true"/> 16 17</beans>
两行配置就行了,不需要配置大量的代理,更不需要配置大量的切面,真是太棒了!需要注意的是 proxy-target-class="true" 属性,它的默认值是 false,默认只能代理接口(使用 JDK 动态代理),当为 true 时,才能代理目标类(使用 CGLib 动态代理)。
Spring 与 AspectJ 结合的威力远远不止这些,我们来点时尚的吧,拦截指定注解的方法怎么样?
13. Spring + AspectJ(基于注解:通过 AspectJ @annotation 表达式拦截方法)
为了拦截指定的注解的方法,我们首先需要来自定义一个注解:
1@Target(ElementType.METHOD)
2@Retention(RetentionPolicy.RUNTIME)
3public @interface Tag {
4}
以上定义了一个 @Tag 注解,此注解可标注在方法上,在运行时生效。
只需将前面的 Aspect 类的切点表达式稍作改动:
1@Aspect
2@Component
3public class GreetingAspect {
4
5    @Around("@annotation(aop.demo.Tag)")
6    public Object around(ProceedingJoinPoint pjp) throws Throwable {
7        ...
8    }
9
10    ...
11}
这次使用了 @annotation() 表达式,只需在括号内定义需要拦截的注解名称即可。
直接将 @Tag 注解定义在您想要拦截的方法上,就这么简单:
1@Component
2public class GreetingImpl implements Greeting {
3
4    @Tag
5    @Override
6    public void sayHello(String name) {
7        System.out.println("Hello! " + name);
8    }
9}
以上示例中只有一个方法,如果有多个方法,我们只想拦截其中某些时,这种解决方案会更加有价值。
除了 @Around 注解外,其实还有几个相关的注解,稍微归纳一下吧:
- @Before:前置增强
- @After:后置增强
- @Around:环绕增强
- @AfterThrowing:抛出增强
- @DeclareParents:引入增强
此外还有一个 @AfterReturning(返回后增强),也可理解为 Finally 增强,相当于 finally 语句,它是在方法结束后执行的,也就说说,它比 @After 还要晚一些。
最后一个 @DeclareParents 竟然就是引入增强!为什么不叫做 @Introduction 呢?我也不知道为什么,但它干的活就是引入增强。
14. Spring + AspectJ(引入增强)
为了实现基于 AspectJ 的引入增强,我们同样需要定义一个 Aspect 类:
1@Aspect
2@Component
3public class GreetingAspect {
4
5    @DeclareParents(value = "aop.demo.GreetingImpl", defaultImpl = ApologyImpl.class)
6    private Apology apology;
7}
只需要在 Aspect 类中定义一个需要引入增强的接口,它也就是运行时需要动态实现的接口。在这个接口上标注了 @DeclareParents 注解,该注解有两个属性:
- value:目标类
- defaultImpl:引入接口的默认实现类
我们只需要对引入的接口提供一个默认实现类即可完成引入增强:
1public class ApologyImpl implements Apology {
2
3    @Override
4    public void saySorry(String name) {
5        System.out.println("Sorry! " + name);
6    }
7}
以上这个实现会在运行时自动增强到 GreetingImpl 类中,也就是说,无需修改 GreetingImpl 类的代码,让它去实现 Apology 接口,我们单独为该接口提供一个实现类(ApologyImpl),来做 GreetingImpl 想做的事情。
还是用一个客户端来尝试一下吧:
1public class Client {
2
3    public static void main(String[] args) {
4        ApplicationContext context = new ClassPathXmlApplicationContext("aop/demo/spring.xml");
5        Greeting greeting = (Greeting) context.getBean("greetingImpl");
6        greeting.sayHello("Jack");
7
8        Apology apology = (Apology) greeting; // 强制转型为 Apology 接口
9        apology.saySorry("Jack");
10    }
11}
从 Spring ApplicationContext 中获取 greetingImpl 对象(其实是个代理对象),可转型为自己静态实现的接口 Greeting,也可转型为自己动态实现的接口 Apology,切换起来非常方便。
使用 AspectJ 的引入增强比原来的 Spring AOP 的引入增强更加方便了,而且还可面向接口编程(以前只能面向实现类),这也算一个非常巨大的突破。
这一切真的已经非常强大也非常灵活了!但仍然还是有用户不能尝试这些特性,因为他们还在使用 JDK 1.4(根本就没有注解这个东西),怎么办呢?没想到 Spring AOP 为那些遗留系统也考虑到了。
- Spring + AspectJ(基于配置)
除了使用 @Aspect 注解来定义切面类以外,Spring AOP 也提供了基于配置的方式来定义切面类:
1<?xml version="1.0" encoding="UTF-8"?> 2<beans ..."> 3 4 <bean id="greetingImpl" class="aop.demo.GreetingImpl"/> 5 6 <bean id="greetingAspect" class="aop.demo.GreetingAspect"/> 7 8 <aop:config> 9 <aop:aspect ref="greetingAspect"> 10 <aop:around method="around" pointcut="execution(* aop.demo.GreetingImpl.*(..))"/> 11 </aop:aspect> 12 </aop:config> 13 14</beans>
使用 aop:config 元素来进行 AOP 配置,在其子元素中配置切面,包括增强类型、目标方法、切点等信息。
无论您是不能使用注解,还是不愿意使用注解,Spring AOP 都能为您提供全方位的服务。
好了,我所知道的比较实用的 AOP 技术都在这里了,当然还有一些更为高级的特性,由于个人精力有限,这里就不再深入了。
还是依照惯例,给一张牛逼的高清无码思维导图,总结一下以上各个知识点:
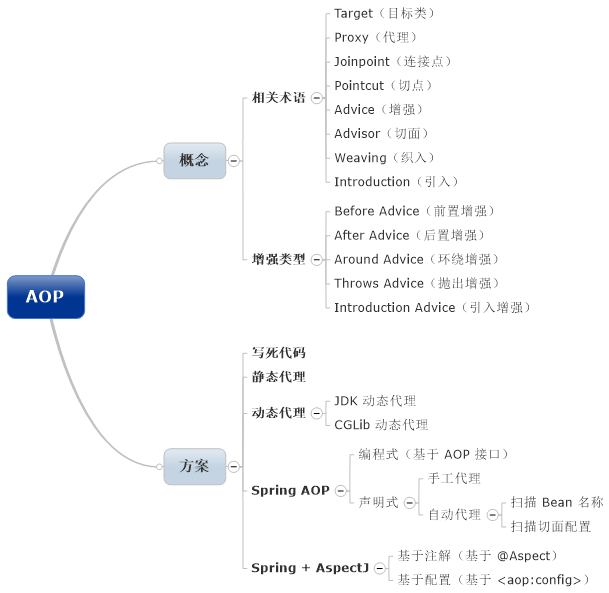
再来一张表格,总结一下各类增强类型所对应的解决方案:
增强类型
基于 AOP 接口
基于 @Aspect
基于 aop:config
Before Advice(前置增强)
MethodBeforeAdvice
@Before
AfterAdvice(后置增强)
AfterReturningAdvice
AroundAdvice(环绕增强)
MethodInterceptor
@Around
ThrowsAdvice(抛出增强
ThrowsAdvice
@AfterThrowing
IntroductionAdvice(引入增强)
DelegatingIntroductionInterceptor
@DeclareParents
最后给一张 UML 类图描述一下 Spring AOP 的整体架构: