
LAMP架构(Ⅰ)
一、LAMP架构介绍
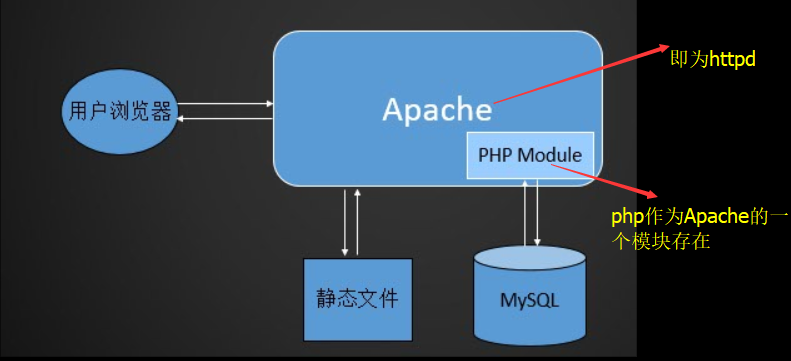
LAMP:Linux+Apache(httpd)+Maridb(Mysql)+PHP,常用来搭建动态网站或者服务器的开源软件。
习惯上,apache一般是指httpd,当然Apache还有很多的其他软件。Appache是最常用的web服务软件,而MYSQL是比较小型的数据库软件,MySQL存储用户名;密码和数据、图片之类的放在静态文件里。 这两个软件及PHP都可以安装到windows机器上。

Apache和PHP需要安装到同一台机器上,因为PHP是作为Apache的一个模块存在的,两个必须在一起
二、MySQL_MariaDB介绍
- MySQL是一个关系型数据库,由mysql ab公司开发,mysql在2008年被sun公司收购(10亿刀),2009年sun公司被oracle公司收购(74亿刀)
- MySQL官网https://www.mysql.com 最新版本5.7GA/8.0DMR
- MySQL5.6变化比较大,5.7性能上有很大提升
- Mariadb为MySQL的一个分支,官网https://mariadb.com/最新版本10.2
- MariaDB主要由SkySQL公司(现更名为MariaDB公司)维护,SkySQL公司由MySQL原作者带领大部分原班人马创立.
- Mariadb5.5版本对应MySQL的5.5,10.0对应MySQL5.6
- Community 社区版本,Enterprise 企业版,GA(Generally Available)指通用版本,在生产环境中用的,DMR(Development Milestone Release)开发里程碑发布版,RC(Release Candidate)发行候选版本,Beta开放测试版本,Alpha内部测试版本
三、MySQL安装
3.1下载MySQL软件包
1[root@ying01 ~]# uname -i
2x86_64
3[root@ying01 ~]# cd /usr/local/src/
4[root@ying01 src]# wget http://mirrors.sohu.com/mysql/MySQL-5.6/mysql-5.6.36-linux-glibc2.5-x86_64.tar.gz
5--2018-06-23 11:57:00--  http://mirrors.sohu.com/mysql/MySQL-5.6/mysql-5.6.36-linux-glibc2.5-x86_64.tar.gz
6正在解析主机 mirrors.sohu.com (mirrors.sohu.com)... 221.236.12.140
7正在连接 mirrors.sohu.com (mirrors.sohu.com)|221.236.12.140|:80... 已连接。
8已发出 HTTP 请求,正在等待回应... 200 OK
9长度:316320366 (302M) [application/octet-stream]
10正在保存至: “mysql-5.6.36-linux-glibc2.5-x86_64.tar.gz”
11
3.2 初始化Mysql
把之前下载的包,解压
1[root@ying01 src]# ls
2httpd-2.4.33  httpd-2.4.33.tar.gz  mysql-5.6.36-linux-glibc2.5-x86_64  mysql-5.6.36-linux-glibc2.5-x86_64.tar.gz
3[root@ying01 src]# tar zxf mysql-5.6.36-linux-glibc2.5-x86_64.tar.gz           //解压包
4[root@ying01 src]# ls /usr/local                                               //准备放到这个目录下
5bin  etc  games  include  lib  lib64  libexec  sbin  share  src
6[root@ying01 src]# mv mysql-5.6.36-linux-glibc2.5-x86_64 /usr/local/mysql      //移到usr/local下,且改为mysql名称
7[root@ying01 src]# cd /usr/local/mysql/
8[root@ying01 mysql]# ls
9bin  COPYING  data  docs  include  lib  man  mysql-test  README  scripts  share  sql-bench  support-files
10[root@ying01 mysql]# useradd mysql                                            //增加mysql用户
需要创建数据库目录,这里/data/已经存在,那就直接初始化;
1[root@ying01 mysql]# ls /data/                        //data目录存在,就不用再创建
2mariadb  mysql  wwwroot  yumdata
3[root@ying01 mysql]# ./scripts/mysql_install_db --user=mysql --datadir=/data/mysql   //初始化即是定义数据库目录
4FATAL ERROR: please install the following Perl modules before executing ./scripts/mysql_install_db:
5Data::Dumper
- ./scripts/mysql_install_db --user=mysql --datadir=/data/mysql
- --user=mysql 指定用户 ;
- --datadir=/data/mysql 指定数据库目录;
因此执行此步前,必须创建用户,指定目录;
发现上面有错误,缺少Perl模块,缺少Dumper的支持;谷歌查询安装如下包
1[root@ying01 mysql]# yum install -y perl-Data-Dumper
2已加载插件:fastestmirror
3
再次初始化mysql
1[root@ying01 mysql]# ./scripts/mysql_install_db --user=mysql --datadir=/data/mysql
2
3安装信息省略
4
5[root@ying01 mysql]# echo $?           //检查上步是否正确,0位正确
60
7
3.3 配置文件
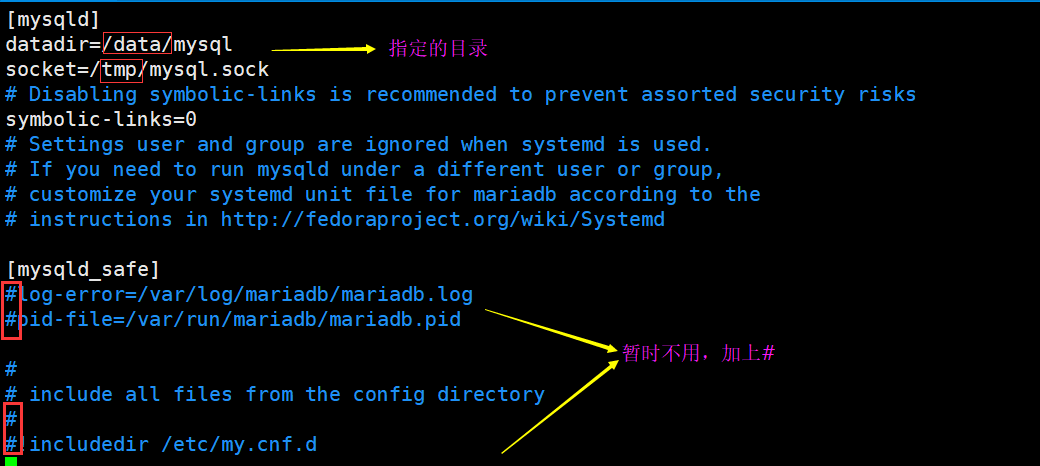
首先复制配置文件mysql的模板配置文件my-default.cnf,但是系统自带已经存在,我们只需要修改一下即可;
1[root@ying01 mysql]# ls support-files/                                 //放置配置文件和启动脚本的目录
2binary-configure  magic  my-default.cnf  mysqld_multi.server  mysql-log-rotate  mysql.server
3[root@ying01 mysql]# ls support-files/my-default.cnf                  //这个是mysql的模板配置文件
4support-files/my-default.cnf
5[root@ying01 mysql]# vim support-files/my-default.cnf
6[root@ying01 mysql]# cp support-files/my-default.cnf /etc/my.cnf^C    //按道理要复制到其他地方,但是已经存在,不执行,看下一步;
7[root@ying01 mysql]# ls /etc/my.cnf                                   //这里有自带的配置文件my.cnf
8/etc/my.cnf
9[root@ying01 mysql]# rpm -qf /etc/my.cnf                              //查看这个配置文件的来源
10mariadb-libs-5.5.56-2.el7.x86_64                                      //发现来自mariadb
11[root@ying01 mysql]# vim /etc/my.cnf
12
按下图更改配置文件my.cnf;
启动脚本
1[root@ying01 mysql]# ls support-files/                                    //mysql的启动脚本也在此目录下
2binary-configure  magic  my-default.cnf  mysqld_multi.server  mysql-log-rotate  mysql.server
3[root@ying01 mysql]# cp support-files/mysql.server /etc/init.d/mysqld     //把mysql.server复制到mysqld这个新目录
4[root@ying01 mysql]# vim !$                                               //编辑此脚本文件
5vim /etc/init.d/mysqld
6
7.....                          //下面为在编辑mysqld下
8
9basedir=/usr/local/mysql       //指定mysql 的程序目录
10datadir=/data/mysql            //指定日期目录
11
定义mysqld为755权限;
1[root@ying01 mysql]# ls -l !$                                           //查看权限是不是755
2ls -l /etc/init.d/mysqld
3-rwxr-xr-x 1 root root 10592 6月  24 08:16 /etc/init.d/mysqld
4
增加到系统列表服务:chkconfig --add mysqld
1[root@ying01 mysql]# chkconfig --add mysqld
2[root@ying01 mysql]# chkconfig --list                                        //查看系统列表
3
4注:该输出结果只显示 SysV 服务,并不包含
5原生 systemd 服务。SysV 配置数据
6可能被原生 systemd 配置覆盖。
7
8      要列出 systemd 服务,请执行 'systemctl list-unit-files'。
9      查看在具体 target 启用的服务请执行
10      'systemctl list-dependencies [target]'。
11
12mysqld         	0:关	1:关	2:开	3:开	4:开	5:开	6:关        //系统服务开启
13netconsole     	0:关	1:关	2:关	3:关	4:关	5:关	6:关
14network        	0:关	1:关	2:关	3:关	4:关	5:关	6:关
3.4 启动与关闭服务
**常规启动 **
- 启动:service mysqld start
- /etc/init.d/mysqld start- 关闭:service mysqld stop
1[root@ying01 mysql]# /etc/init.d/mysqld start^C
2[root@ying01 mysql]# service mysqld start
3Starting MySQL.Logging to '/data/mysql/ying01.err'.
4 SUCCESS!
5
用命令行启动
- /usr/local/mysql/bin/mysqld_safe --defaults-file=/etc/my.cnf --user=mysql --datadir=/data/mysql/
- --defaults-file=/etc/my.cnf 定义默认的配置文件
- --user=mysql 定义用户
- --datadir=/data/mysql/ 定义数据目录
1[root@ying01 mysql]# service mysqld stop      //关闭服务
2Shutting down MySQL.. SUCCESS!
3[root@ying01 mysql]# !ps                      //查看进程,已经关闭
4ps aux |grep mysql
5root      2932  0.0  0.0 112720   984 pts/0    S+   08:57   0:00 grep --color=auto mysql
6[root@ying01 mysql]# /usr/local/mysql/bin/mysqld_safe --defaults-file=/etc/my.cnf --user=mysql --datadir=/data/mysql/ &
7[1] 3018             //用命令行启动,需要加上&,把它放入后台
8[root@ying01 mysql]# 180624 09:05:50 mysqld_safe Logging to '/data/mysql/ying01.err'.
9180624 09:05:50 mysqld_safe Starting mysqld daemon with databases from /data/mysql
10[root@ying01 mysql]# !ps                      //查看进程,已经开启
11ps aux |grep mysql
12root      3018  0.0  0.0 113304  1604 pts/0    S    09:05   0:00 /bin/sh /usr/local/mysql/bin/mysqld_safe --defaults-file=/etc/my.cnf --user=mysql --datadir=/data/mysql/                  //此进程,为我们之前的命令行
13mysql     3143  0.4 23.9 1300828 449568 pts/0  Sl   09:05   0:00 /usr/local/mysql/bin/mysqld --defaults-file=/etc/my.cnf --basedir=/usr/local/mysql --datadir=/data/mysql --plugin-dir=/usr/local/mysql/lib/plugin --user=mysql --log-error=/data/mysql/ying01.err --pid-file=/data/mysql/ying01.pid --socket=/tmp/mysql.sock
14root      3175  0.0  0.0 112720   984 pts/0    R+   09:08   0:00 grep --color=auto mysql
15[root@ying01 mysql]# !net                     //查看网络链接,有3306端口,说明mysql启动成功
16netstat -lntp
17Active Internet connections (only servers)
18Proto Recv-Q Send-Q Local Address           Foreign Address         State       PID/Program name
19tcp        0      0 0.0.0.0:22              0.0.0.0:*               LISTEN      690/sshd
20tcp        0      0 127.0.0.1:25            0.0.0.0:*               LISTEN      928/master
21tcp6       0      0 :::22                   :::*                    LISTEN      690/sshd
22tcp6       0      0 ::1:25                  :::*                    LISTEN      928/master
23tcp6       0      0 :::3306                 :::*                    LISTEN      3143/mysqld
24
用killall 杀进程,尽量不要用kill PID
1[root@ying01 mysql]# killall mysqld       //杀死进程
2[root@ying01 mysql]# 180624 09:13:20 mysqld_safe mysqld from pid file /data/mysql/ying01.pid ended
3[root@ying01 mysql]# !ps
4ps aux |grep mysql
5root      3224  0.0  0.0 112720   984 pts/0    S+   09:14   0:00 grep --color=auto mysql
6[1]+  完成                  /usr/local/mysql/bin/mysqld_safe --defaults-file=/etc/my.cnf --user=mysql --datadir=/data/mysql/
7[root@ying01 mysql]# !ps                   //查看进程
8ps aux |grep mysql
9root      3226  0.0  0.0 112720   984 pts/0    S+   09:14   0:00 grep --color=auto mysql
10
mysql的引擎innodb和 myisam 先了解;
四、MariaDB安装
MariaDB和mysql同源,因此安装方式也是一模一样的;
下载MariaDB包
1[root@ying01 ~]# cd /usr/local/src/
2[root@ying01 src]# ls
3httpd-2.4.33  httpd-2.4.33.tar.gz  mysql-5.6.36-linux-glibc2.5-x86_64.tar.gz
4[root@ying01 src]# wget https://downloads.mariadb.com/MariaDB/mariadb-10.2.6/bintar-linux-glibc_214-x86_64/mariadb-10.2.6-linux-glibc_214-x86_64.tar.gz
5--2018-06-24 09:21:00--  https://downloads.mariadb.com/MariaDB/mariadb-10.2.6/bintar-linux-glibc_214-x86_64/mariadb-10.2.6-linux-glibc_214-x86_64.tar.gz
6正在解析主机 downloads.mariadb.com (downloads.mariadb.com)... 51.255.94.155, 2001:41d0:1004:249b::
7正在连接 downloads.mariadb.com (downloads.mariadb.com)|51.255.94.155|:443... 已连接。
8已发出 HTTP 请求,正在等待回应... 200 OK
9长度:541295045 (516M) [application/octet-stream]
10正在保存至: “mariadb-10.2.6-linux-glibc_214-x86_64.tar.gz”
11
12100%[===================================================================================================================>] 541,295,045  723KB/s 用时 12m 12s
13
142018-06-24 09:33:16 (722 KB/s) - 已保存 “mariadb-10.2.6-linux-glibc_214-x86_64.tar.gz” [541295045/541295045])
15
16[root@ying01 src]# ls
17httpd-2.4.33  httpd-2.4.33.tar.gz  mariadb-10.2.6-linux-glibc_214-x86_64.tar.gz  mysql-5.6.36-linux-glibc2.5-x86_64.tar.gz
18[root@ying01 src]#
19
解压,并移到/usr/local/mariadb下
1[root@ying01 src]# tar zxvf mariadb-10.2.6-linux-glibc_214-x86_64.tar.gz
2[root@ying01 src]# ls
3httpd-2.4.33         mariadb-10.2.6-linux-glibc_214-x86_64         mysql-5.6.36-linux-glibc2.5-x86_64.tar.gz
4httpd-2.4.33.tar.gz  mariadb-10.2.6-linux-glibc_214-x86_64.tar.gz
5[root@ying01 src]# mv mariadb-10.2.6-linux-glibc_214-x86_64 /usr/local/mariadb    //移到local下面
6[root@ying01 src]# cd !$
7cd /usr/local/mariadb
8[root@ying01 mariadb]# ls
9bin      COPYING.thirdparty  data         docs               include         lib  mysql-test  README-wsrep  share      support-files
10COPYING  CREDITS             DESTINATION  EXCEPTIONS-CLIENT  INSTALL-BINARY  man  README.md   scripts       sql-bench
初始化,此处和mysql一样
1[root@ying01 mariadb]# ./scripts/mysql_install_db --user=mysql --datadir=/data/mariadb
2
3安装省略......
4
5[root@ying01 mariadb]# echo $?          //检测上步正确
60
7
把mariadb的默认配置文件与启动脚本文件复制一份,并改如下名称;
1[root@ying01 mariadb]# cp support-files/my-small.cnf  /usr/local/mariadb/my.cnf  //配置文件,路径和mysql不一样,为了区分
2[root@ying01 mariadb]# cp support-files/mysql.server /etc/init.d/mariadb         //启动脚本文件
3
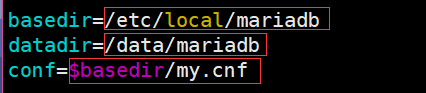
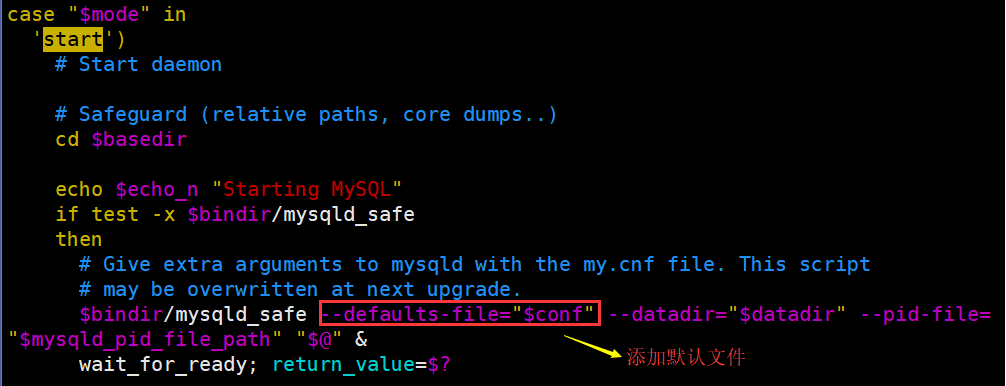
按下图编辑启动脚本文件: vim /etc/init.d/mariadb
启动mariadb服务:/etc/init.d/mariadb start
1[root@ying01 mariadb]# ps aux |grep mysql                                   //查看有没有mysql进程,两者会相冲突
2root      4324  0.0  0.0 112720   984 pts/0    S+   11:47   0:00 grep --color=auto mysql
3[root@ying01 mariadb]# /etc/init.d/mariadb start                            //启动服务
4Reloading systemd:                                         [  确定  ]
5Starting mariadb (via systemctl):                          [  确定  ]
6[root@ying01 mariadb]# ps aux |grep mariadb                                 //再次查看进程,确认启动
7root      6210  0.0  0.0 115432  1744 ?        S    17:36   0:00 /bin/sh /usr/local/mariadb/bin/mysqld_safe --defaults-file=/usr/local/mariadb/my.cnf --datadir=/data/mysql --pid-file=/data/mysql/ying01.pid
8mysql     6326  4.1  2.6 1583932 49724 ?       Sl   17:36   0:02 /usr/local/mariadb/bin/mysqld --defaults-file=/usr/local/mariadb/my.cnf --basedir=/usr/local/mariadb --datadir=/data/mysql --plugin-dir=/usr/local/mariadb/lib/plugin --user=mysql --log-error=/data/mysql/ying01.err --pid-file=/data/mysql/ying01.pid --socket=/tmp/mysql.sock --port=3306
9root      6383  0.0  0.0 112720   980 pts/1    R+   17:37   0:00 grep --color=auto mariadb
10[root@ying01 mariadb]#  netstat -lntp                                      //查看网络链接,有3306端口
11Active Internet connections (only servers)
12Proto Recv-Q Send-Q Local Address           Foreign Address         State       PID/Program name
13tcp        0      0 0.0.0.0:22              0.0.0.0:*               LISTEN      690/sshd
14tcp        0      0 127.0.0.1:25            0.0.0.0:*               LISTEN      928/master
15tcp6       0      0 :::22                   :::*                    LISTEN      690/sshd
16tcp6       0      0 ::1:25                  :::*                    LISTEN      928/master
17tcp6       0      0 :::3306                 :::*                    LISTEN      6326/mysqld
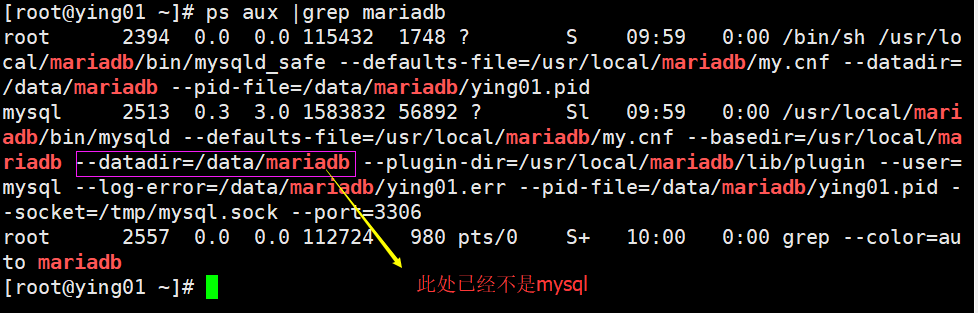
- 有个小问题:进程中:--datadir=/data/mysql 这里怎么还是mysql?而不是--datadir=/data/mariadb?
解决:那是因为刚才没有修改配置文件 /usr/local/mariadb/my.cnf;在那里面我们没有指定相应的目录;它会自动加载mysql的配置文件目录;
在配置文件按下图添加目录
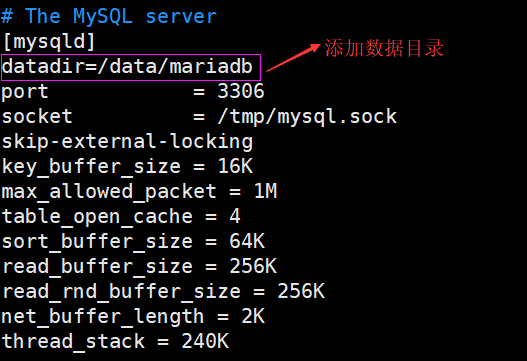
先停止服务,在杀掉mysqld进程,再次开启mariadb服务
1[root@ying01 ~]# /etc/init.d/mariadb stop
2Stopping mariadb (via systemctl):                          [  确定  ]
3[root@ying01 ~]# killall mysqld
4[root@ying01 ~]# ps aux |grep mariadb
5root      2368  0.0  0.0 112720   980 pts/0    S+   09:58   0:00 grep --color=auto mariadb
6[root@ying01 ~]# /etc/init.d/mariadb start
7Starting mariadb (via systemctl):                          [  确定  ]
8[root@ying01 ~]# ps aux |grep mariadb
9root      2394  0.2  0.0 115432  1748 ?        S    09:59   0:00 /bin/sh /usr/local/mariadb/bin/mysqld_safe --defaults-file=/usr/local/mariadb/my.cnf --datadir=/data/mariadb --pid-file=/data/mariadb/ying01.pid
10mysql     2513  3.8  2.9 1583832 55896 ?       Sl   09:59   0:00 /usr/local/mariadb/bin/mysqld --defaults-file=/usr/local/mariadb/my.cnf --basedir=/usr/local/mariadb --datadir=/data/mariadb --plugin-dir=/usr/local/mariadb/lib/plugin --user=mysql --log-error=/data/mariadb/ying01.err --pid-file=/data/mariadb/ying01.pid --socket=/tmp/mysql.sock --port=3306
11root      2549  0.0  0.0 112720   980 pts/0    R+   09:59   0:00 grep --color=auto mariadb
12[root@ying01 ~]#
13
请看下图方框,看到比较清楚:
五、Apache安装
5.1 安装前准备工作
分别下载:2.4.33源码包,apr-1.6.3,apr-util-1.6.1;后面两个是通用函数库;
1[root@ying01 ~]# cd /usr/local/src
2[root@ying01 src]# wget  http://mirrors.cnnic.cn/apache/httpd/httpd-2.4.33.tar.gz
3--2018-06-24 22:12:15--  http://mirrors.cnnic.cn/apache/httpd/httpd-2.4.33.tar.gz
4正在解析主机 mirrors.cnnic.cn (mirrors.cnnic.cn)... 101.6.8.193, 2402:f000:1:408:8100::1
5正在连接 mirrors.cnnic.cn (mirrors.cnnic.cn)|101.6.8.193|:80... 已连接。
6已发出 HTTP 请求,正在等待回应... 200 OK
7长度:9076901 (8.7M) [application/octet-stream]
8正在保存至: “httpd-2.4.33.tar.gz.1”
9
10100%[===================================================================================================================>] 9,076,901   3.37MB/s 用时 2.6s
11
122018-06-24 22:12:18 (3.37 MB/s) - 已保存 “httpd-2.4.33.tar.gz.1” [9076901/9076901])
13
14[root@ying01 src]# wget  http://mirrors.cnnic.cn/apache/apr/apr-1.6.3.tar.gz
15--2018-06-24 22:12:41--  http://mirrors.cnnic.cn/apache/apr/apr-1.6.3.tar.gz
16正在解析主机 mirrors.cnnic.cn (mirrors.cnnic.cn)... 101.6.8.193, 2402:f000:1:408:8100::1
17正在连接 mirrors.cnnic.cn (mirrors.cnnic.cn)|101.6.8.193|:80... 已连接。
18已发出 HTTP 请求,正在等待回应... 200 OK
19长度:1072661 (1.0M) [application/octet-stream]
20正在保存至: “apr-1.6.3.tar.gz”
21
22100%[===================================================================================================================>] 1,072,661   1.41MB/s 用时 0.7s
23
242018-06-24 22:12:42 (1.41 MB/s) - 已保存 “apr-1.6.3.tar.gz” [1072661/1072661])
25
26[root@ying01 src]# wget http://mirrors.cnnic.cn/apache/apr/apr-util-1.6.1.tar.bz2
27--2018-06-24 22:13:10--  http://mirrors.cnnic.cn/apache/apr/apr-util-1.6.1.tar.bz2
28正在解析主机 mirrors.cnnic.cn (mirrors.cnnic.cn)... 101.6.8.193, 2402:f000:1:408:8100::1
29正在连接 mirrors.cnnic.cn (mirrors.cnnic.cn)|101.6.8.193|:80... 已连接。
30已发出 HTTP 请求,正在等待回应... 200 OK
31长度:428595 (419K) [application/octet-stream]
32正在保存至: “apr-util-1.6.1.tar.bz2”
33
34100%[===================================================================================================================>] 428,595     1.01MB/s 用时 0.4s
35
362018-06-24 22:13:11 (1.01 MB/s) - 已保存 “apr-util-1.6.1.tar.bz2” [428595/428595])
37
下载完后,查看相应的包
1[root@ying01 src]# ls
2apr-1.6.3.tar.gz        httpd-2.4.33         httpd-2.4.33.tar.gz.1                         mysql-5.6.36-linux-glibc2.5-x86_64.tar.gz
3apr-util-1.6.1.tar.bz2  httpd-2.4.33.tar.gz  mariadb-10.2.6-linux-glibc_214-x86_64.tar.gz
4
依次解压包
1[root@ying01 src]# tar zxf httpd-2.4.33.tar.gz
2[root@ying01 src]# tar zxf apr-1.6.3.tar.gz
3[root@ying01 src]# tar jxf apr-util-1.6.1.tar.bz2            //注意此包解压方式与其他两个不同
4[root@ying01 src]# ls
5apr-1.6.3               httpd-2.4.33.tar.gz
6apr-1.6.3.tar.gz        httpd-2.4.33.tar.gz.1
7apr-util-1.6.1          mariadb-10.2.6-linux-glibc_214-x86_64.tar.gz
8apr-util-1.6.1.tar.bz2  mysql-5.6.36-linux-glibc2.5-x86_64.tar.gz
9httpd-2.4.33
10
5.2 安装apr-1.6.3
定义到apr-1.6.3目录下,
1[root@ying01 src]# cd apr-1.6.3/
2[root@ying01 apr-1.6.3]# ls
3apr-config.in  build-outputs.mk  helpers       misc           strings
4apr.dep        CHANGES           include       mmap           support
5apr.dsp        CMakeLists.txt    libapr.dep    network_io     tables
6apr.dsw        config.layout     libapr.dsp    NOTICE         test
7apr.mak        configure         libapr.mak    NWGNUmakefile  threadproc
8apr.pc.in      configure.in      libapr.rc     passwd         time
9apr.spec       docs              LICENSE       poll           tools
10atomic         dso               locks         random         user
11build          emacs-mode        Makefile.in   README
12buildconf      encoding          Makefile.win  README.cmake
13build.conf     file_io           memory        shmem
14
安装包: ./configure --prefix=/usr/local/apr
1[root@ying01 apr-1.6.3]# ./configure --prefix=/usr/local/apr
2
3省略 配置检测.....
4
5[root@ying01 apr-1.6.3]# echo $?                     //检查上步是否正确 0代表正确
60
7
执行 make && make install
1[root@ying01 apr-1.6.3]# make && make install
2
5.3 安装apr-util-1.6.1
1[root@ying01 apr-1.6.3]# ls /usr/local/apr/
2bin  build-1  include  lib
3[root@ying01 apr-1.6.3]# cd ../apr-util-1.6.1/
4[root@ying01 apr-util-1.6.1]# ./configure --prefix=/usr/local/apr-util --with-apr=/usr/local/apr
5
执行 make && make install
1[root@ying01 apr-util-1.6.1]# make && make install
2
此时发现错误,缺少expat.h包
1xml/apr_xml.c:35:19: 致命错误:expat.h:没有那个文件或目录
2 #include <expat.h>
3                   ^
4编译中断。
5make[1]: *** [xml/apr_xml.lo] 错误 1
6make[1]: 离开目录“/usr/local/src/apr-util-1.6.1”
7make: *** [all-recursive] 错误 1
8[root@ying01 apr-util-1.6.1]#
9
执行 yum install -y expat*
1[root@ying01 apr-util-1.6.1]# yum install -y expat*
2已加载插件:fastestmirror
3base
再次 make && make install
1[root@ying01 apr-util-1.6.1]# make && make install
2
3
4See any operating system documentation about shared libraries for
5more information, such as the ld(1) and ld.so(8) manual pages.
6----------------------------------------------------------------------
7/usr/bin/install -c -m 644 aprutil.exp /usr/local/apr-util/lib
8/usr/bin/install -c -m 755 apu-config.out /usr/local/apr-util/bin/apu-1-config
9[root@ying01 apr-util-1.6.1]# echo $?
100
11[root@ying01 apr-util-1.6.1]# ls /usr/local/apr-util/
12bin  include  lib
13
5.4 安装apache2.4
先定义到 httpd-2.4.33/目录下
1[root@ying01 apr-util-1.6.1]# cd ..
2[root@ying01 src]# ls
3apr-1.6.3         apr-util-1.6.1          httpd-2.4.33         httpd-2.4.33.tar.gz.1                         mysql-5.6.36-linux-glibc2.5-x86_64.tar.gz
4apr-1.6.3.tar.gz  apr-util-1.6.1.tar.bz2  httpd-2.4.33.tar.gz  mariadb-10.2.6-linux-glibc_214-x86_64.tar.gz
5[root@ying01 src]# cd httpd-2.4.33/
6
执行安装
1[root@ying01 httpd-2.4.33]# ./configure --prefix=/usr/local/apache2.4 --with-apr=/usr/local/apr --with-apr-util=/usr/local/apr-util --enable-so --enable-mods-shared=most
2
3省略....
4
5configure: error: pcre-config for libpcre not found. PCRE is required and available from http://pcre.org/
6[root@ying01 httpd-2.4.33]# echo $?          //报错
71
8
此处报错,按提示,我们查找安装包:yum list |grep pcre
1[root@ying01 httpd-2.4.33]# yum list |grep pcre
2pcre.x86_64                               8.32-17.el7                  @anaconda
3ghc-pcre-light.x86_64                     0.4-13.el7                   epel
4ghc-pcre-light-devel.x86_64               0.4-13.el7                   epel
5mingw32-pcre.noarch                       8.38-1.el7                   epel
6mingw32-pcre-static.noarch                8.38-1.el7                   epel
7mingw64-pcre.noarch                       8.38-1.el7                   epel
8mingw64-pcre-static.noarch                8.38-1.el7                   epel
9pcre.i686                                 8.32-17.el7                  base
10pcre-devel.i686                           8.32-17.el7                  base
11pcre-devel.x86_64                         8.32-17.el7                  base
12pcre-static.i686                          8.32-17.el7                  base
13pcre-static.x86_64                        8.32-17.el7                  base
14pcre-tools.x86_64                         8.32-17.el7                  base
15pcre2.i686                                10.23-2.el7                  base
16pcre2.x86_64                              10.23-2.el7                  base
17pcre2-devel.i686                          10.23-2.el7                  base
18pcre2-devel.x86_64                        10.23-2.el7                  base
19pcre2-static.i686                         10.23-2.el7                  base
20pcre2-static.x86_64                       10.23-2.el7                  base
21pcre2-tools.x86_64                        10.23-2.el7                  base
22pcre2-utf16.i686                          10.23-2.el7                  base
23pcre2-utf16.x86_64                        10.23-2.el7                  base
24pcre2-utf32.i686                          10.23-2.el7                  base
25pcre2-utf32.x86_64                        10.23-2.el7                  base
26
安装 yum install -y pcre-devel
1[root@ying01 httpd-2.4.33]# yum install -y pcre-devel
2已加载插件:fastestmirror
3Loading mirror speeds from cached hostfile
4 * base: mirrors.aliyun.com
5 * epel: mirror01.idc.hinet.net
6 * extras: mirrors.aliyun.com
7 * updates: centos.ustc.edu.cn
8
再次配置
1[root@ying01 httpd-2.4.33]# ./configure --prefix=/usr/local/apache2.4 --with-apr=/usr/local/apr --with-apr-util=/usr/local/apr-util --enable-so --enable-mods-shared=most
2
3
4省略.......
5
6    Server Version: 2.4.33
7    Install prefix: /usr/local/apache2.4
8    C compiler:     gcc -std=gnu99
9    CFLAGS:          -g -O2 -pthread
10    CPPFLAGS:        -DLINUX -D_REENTRANT -D_GNU_SOURCE
11    LDFLAGS:
12    LIBS:
13    C preprocessor: gcc -E
14
15[root@ying01 httpd-2.4.33]# echo $?        //配置成功
160
17
执行make
1[root@ying01 httpd-2.4.33]# make
2
执行make install
1[root@ying01 httpd-2.4.33]# make install
2
安装成功,查看apache2.4目录下的目录
1[root@ying01 httpd-2.4.33]# cd /usr/local/apache2.4/
2[root@ying01 apache2.4]# ls
3bin  build  cgi-bin  conf  error  htdocs  icons  include  logs  man  manual  modules
4[root@ying01 apache2.4]# ls bin/httpd
5bin/httpd
6[root@ying01 apache2.4]# ls -l bin/httpd
7-rwxr-xr-x 1 root root 2348432 6月  25 11:55 bin/httpd
8[root@ying01 apache2.4]# du -sh !$
9du -sh bin/httpd
102.3M	bin/httpd
11[root@ying01 apache2.4]# ls
12bin  build  cgi-bin  conf  error  htdocs  icons  include  logs  man  manual  modules
13[root@ying01 apache2.4]# ls conf/
14extra  httpd.conf  magic  mime.types  original
15[root@ying01 apache2.4]# ls htdocs/
16index.html
17[root@ying01 apache2.4]# ls logs/
18[root@ying01 apache2.4]# ls man
19man1  man8
20[root@ying01 apache2.4]# ls modules/                        //默认模板
21httpd.exp             mod_authz_dbd.so        mod_deflate.so              mod_log_config.so      mod_proxy_scgi.so      mod_socache_dbm.so
22mod_access_compat.so  mod_authz_dbm.so        mod_dir.so                  mod_log_debug.so       mod_proxy.so           mod_socache_memcache.so
23mod_actions.so        mod_authz_groupfile.so  mod_dumpio.so               mod_logio.so           mod_proxy_uwsgi.so     mod_socache_shmcb.so
24mod_alias.so          mod_authz_host.so       mod_env.so                  mod_macro.so           mod_proxy_wstunnel.so  mod_speling.so
25mod_allowmethods.so   mod_authz_owner.so      mod_expires.so              mod_mime.so            mod_ratelimit.so       mod_ssl.so
26mod_auth_basic.so     mod_authz_user.so       mod_ext_filter.so           mod_negotiation.so     mod_remoteip.so        mod_status.so
27mod_auth_digest.so    mod_autoindex.so        mod_file_cache.so           mod_proxy_ajp.so       mod_reqtimeout.so      mod_substitute.so
28mod_auth_form.so      mod_buffer.so           mod_filter.so               mod_proxy_balancer.so  mod_request.so         mod_unique_id.so
29mod_authn_anon.so     mod_cache_disk.so       mod_headers.so              mod_proxy_connect.so   mod_rewrite.so         mod_unixd.so
30mod_authn_core.so     mod_cache.so            mod_include.so              mod_proxy_express.so   mod_sed.so             mod_userdir.so
31mod_authn_dbd.so      mod_cache_socache.so    mod_info.so                 mod_proxy_fcgi.so      mod_session_cookie.so  mod_version.so
32mod_authn_dbm.so      mod_cgid.so             mod_lbmethod_bybusyness.so  mod_proxy_fdpass.so    mod_session_dbd.so     mod_vhost_alias.so
33mod_authn_file.so     mod_dav_fs.so           mod_lbmethod_byrequests.so  mod_proxy_ftp.so       mod_session.so         mod_watchdog.so
34mod_authn_socache.so  mod_dav.so              mod_lbmethod_bytraffic.so   mod_proxy_hcheck.so    mod_setenvif.so
35mod_authz_core.so     mod_dbd.so              mod_lbmethod_heartbeat.so   mod_proxy_http.so      mod_slotmem_shm.so
36
在/apache2.4/bin/目录下
1root@ying01 apache2.4]# ls /usr/local/apache2.4/bin/
2ab         apxs      dbmmanage  envvars-std  htcacheclean  htdigest  httpd      logresolve
3apachectl  checkgid  envvars    fcgistarter  htdbm         htpasswd  httxt2dbm  rotatelogs
4[root@ying01 apache2.4]# /usr/local/apache2.4/bin/httpd -M
5AH00558: httpd: Could not reliably determine the server's fully qualified domain name, using fe80::16dc:89c:b761:e115. Set the 'ServerName' directive globally to suppress this message
6Loaded Modules:
7 core_module (static)
8 so_module (static)
9 http_module (static)
10 mpm_event_module (static)
11 authn_file_module (shared)
12 authn_core_module (shared)
13 authz_host_module (shared)
14 authz_groupfile_module (shared)
15 authz_user_module (shared)
16 authz_core_module (shared)
17 access_compat_module (shared)
18 auth_basic_module (shared)
19 reqtimeout_module (shared)
20 filter_module (shared)
21 mime_module (shared)
22 log_config_module (shared)
23 env_module (shared)
24 headers_module (shared)
25 setenvif_module (shared)
26 version_module (shared)
27 unixd_module (shared)
28 status_module (shared)
29 autoindex_module (shared)
30 dir_module (shared)
31 alias_module (shared)
32
5.5 启动httpd服务
启动httpd服务:/usr/local/apache2.4/bin/apachectl start
1[root@ying01 apache2.4]# /usr/local/apache2.4/bin/apachectl start
2AH00558: httpd: Could not reliably determine the server's fully qualified domain name, using fe80::16dc:89c:b761:e115. Set the 'ServerName' directive globally to suppress this message
3
查看有关httpd的进程
1[root@ying01 apache2.4]# ps aux |grep httpd
2root     59382  0.0  0.1  95580  2524 ?        Ss   12:42   0:00 /usr/local/apache2.4/bin/httpd -k start
3daemon   59383  0.0  0.2 382408  4432 ?        Sl   12:42   0:00 /usr/local/apache2.4/bin/httpd -k start
4daemon   59384  0.0  0.2 382408  4432 ?        Sl   12:42   0:00 /usr/local/apache2.4/bin/httpd -k start
5daemon   59385  0.1  0.2 382408  4428 ?        Sl   12:42   0:00 /usr/local/apache2.4/bin/httpd -k start
6root     59484  0.0  0.0 112720   984 pts/0    R+   12:43   0:00 grep --color=auto httpd
7[root@ying01 apache2.4]# netstat -lntp               //80端口就是httpd
8Active Internet connections (only servers)
9Proto Recv-Q Send-Q Local Address           Foreign Address         State       PID/Program name
10tcp        0      0 0.0.0.0:22              0.0.0.0:*               LISTEN      664/sshd
11tcp        0      0 127.0.0.1:25            0.0.0.0:*               LISTEN      800/master
12tcp6       0      0 :::80                   :::*                    LISTEN      59382/httpd
13tcp6       0      0 :::22                   :::*                    LISTEN      664/sshd
14tcp6       0      0 ::1:25                  :::*                    LISTEN      800/mast
configure的命令格式也可以这样书写; \是转义字符,后面可以换行添加多行命令;
1[root@ying01 httpd-2.4.33]# ./configure \
2> --prefix=/usr/local/apache2.4 \
3> --with-apr=/usr/local/apr \
4> --with-apr-util=/usr/local/apr-util \
5> --enable-so \
6> --enable-mods-shared=most
7
六、安装PHP5
虽然目前最新版本的PHP为PHP7,但是还有批量的PHP5在使用,而且一些论坛软件不支持PHP7,因此也需要掌握PHP5和PHP7;
在/usr/local/src/目录下,下载源码
1[root@ying01 apache2.4]# cd /usr/local/src/
2[root@ying01 src]# wget http://cn2.php.net/distributions/php-5.6.32.tar.bz2
3
解压 php-5.6.32.tar.bz2
1[root@ying01 src]# ls
2apr-1.6.3         apr-util-1.6.1.tar.bz2  httpd-2.4.33.tar.gz.1                         php-5.6.32.tar.bz2
3apr-1.6.3.tar.gz  httpd-2.4.33            mariadb-10.2.6-linux-glibc_214-x86_64.tar.gz
4apr-util-1.6.1    httpd-2.4.33.tar.gz     mysql-5.6.36-linux-glibc2.5-x86_64.tar.gz
5[root@ying01 src]# du -sh php-5.6.32.tar.bz2
615M	php-5.6.32.tar.bz2
7[root@ying01 src]# tar -xjf php-5.6.32.tar.bz2
8
进入php-5.6.32 目录下,进行配置
1[root@ying01 src]# cd php-5.6.32/
2[root@ying01 php-5.6.32]# ./configure --prefix=/usr/local/php --with-apxs2=/usr/local/apache2.4/bin/apxs --with-config-file-path=/usr/local/php/etc --with-mysql=/usr/local/mysql --with-pdo-mysql=/usr/local/mysql --with-mysqli=/usr/local/mysql/bin/mysql_config --with-libxml-dir --with-gd --with-jpeg-dir --with-png-dir --with-freetype-dir --with-iconv-dir --with-zlib-dir --with-bz2 --with-openssl --with-mcrypt --enable-soap --enable-gd-native-ttf --enable-mbstring --enable-sockets --enable-exif
3
- –prefix=/usr/local/php 指定的安装目录;
- –with-apxs2=/usr/local/apache2/bin/apxs 该文件是Apache的一个工具,可以将扩展模块添加到Apache的module文件;
- –with-config-file-path=/usr/local/php/etc 指定配置文件所在路径;
- –with-mysql=/usr/local/mysql 指定mysql的路径;
- –with-mysqli=/usr/local/mysql/bin/mysql_config
- –with-pdo-mysql=/usr/local/mysql –with-mysqli=/usr/local/mysql/bin/mysql_config 上面两项参数是指定相关mysql库
- –with-libxml-dir –with-gd –with-jpeg-dir –with-png-dir –with-freetype-dir –with-iconv-dir –with-zlib-dir –with-bz2 –with-openssl –with-mcrypt –enable-soap –enable-gd-native-ttf –enable-mbstring –enable-sockets –enable-exif 以上参数是指定PHP相关的一些模块(通用)。
执行配置后,发现错误:error: jpeglib.h not found.
1checking for T1lib support... no
2checking whether to enable truetype string function in GD... yes
3checking whether to enable JIS-mapped Japanese font support in GD... no
4If configure fails try --with-vpx-dir=<DIR>
5configure: error: jpeglib.h not found.
6[root@ying01 php-5.6.32]# echo $?
71
8
安装 yum install -y libjpeg-devel;安装完后继续配置
1[root@ying01 php-5.6.32]# yum install -y libjpeg-devel
2
有出现错误:error: png.h not found.
1checking for jpeg_read_header in -ljpeg... yes
2configure: error: png.h not found.
3[root@ying01 php-5.6.32]#
4
继续按提示安装包;安装完后继续配置
1[root@ying01 php-5.6.32]# yum install -y libpng-devel
2
错误提示:缺少包
1If configure fails try --with-xpm-dir=<DIR>
2configure: error: freetype-config not found.
3[root@ying01 php-5.6.32]#
4
继续按提示安装包;安装完后继续配置
1[root@ying01 php-5.6.32]# yum install -y freetype-devel
2
又有错误
1configure: error: mcrypt.h not found. Please reinstall libmcrypt.
2[root@ying01 php-5.6.32]#
3
若没有安装扩展源,需要安装
[root@ying01 php-5.6.32]# yum install epel-release
已经安装 则,继续安装; 安装完后继续配置
[root@ying01 php-5.6.32]# yum install libmcrypt-devel
终于看到曙光了,出现下面的提示,说明配置成功;
1省略......
2
3Generating files
4configure: creating ./config.status
5creating main/internal_functions.c
6creating main/internal_functions_cli.c
7+--------------------------------------------------------------------+
8| License:                                                           |
9| This software is subject to the PHP License, available in this     |
10| distribution in the file LICENSE.  By continuing this installation |
11| process, you are bound by the terms of this license agreement.     |
12| If you do not agree with the terms of this license, you must abort |
13| the installation process at this point.                            |
14+--------------------------------------------------------------------+
15
16Thank you for using PHP.
17
18config.status: creating php5.spec
19config.status: creating main/build-defs.h
20config.status: creating scripts/phpize
21config.status: creating scripts/man1/phpize.1
22config.status: creating scripts/php-config
23config.status: creating scripts/man1/php-config.1
24config.status: creating sapi/cli/php.1
25config.status: creating sapi/cgi/php-cgi.1
26config.status: creating ext/phar/phar.1
27config.status: creating ext/phar/phar.phar.1
28config.status: creating main/php_config.h
29config.status: executing default commands
30[root@ying01 php-5.6.32]#
31[root@ying01 php-5.6.32]# echo $?                        //检测是否正确
320
33
然后安装 make 和make install
1[root@ying01 php-5.6.32]# make
2
3省略.....
4Build complete.
5Don't forget to run 'make test'.
6
7[root@ying01 php-5.6.32]# make install
8
-
查看php5下有哪些模块:/usr/local/php/bin/php -m
[root@ying01 php-5.6.32]# ls /usr/local/php/ bin etc include lib php [root@ying01 php-5.6.32]# ls /usr/local/php/bin/ pear peardev pecl phar phar.phar php php-cgi php-config phpize [root@ying01 php-5.6.32]# du -sh !$ du -sh /usr/local/php/bin/ 71M /usr/local/php/bin/ [root@ying01 php-5.6.32]# du -sh /usr/local/apache2.4/modules/libphp5.so 36M /usr/local/apache2.4/modules/libphp5.so [root@ying01 php-5.6.32]# /usr/local/php/bin/php -m //查看模块 [PHP Modules] bz2 Core ctype date dom ereg exif fileinfo filter gd hash iconv json libxml mbstring mcrypt mysql mysqli openssl pcre PDO pdo_mysql pdo_sqlite Phar posix Reflection session SimpleXML soap sockets SPL sqlite3 standard tokenizer xml xmlreader xmlwriter zlib
[Zend Modules]
-
前面已经讲过php作为httpd的模块存在;因此php 不需要启动;
我们查看httpd的模块;此时能看到 php5_module (shared)
1[root@ying01 php-5.6.32]# /usr/local/apache2.4/bin/httpd -M |tail -5
2AH00558: httpd: Could not reliably determine the server's fully qualified domain name, using fe80::16dc:89c:b761:e115. Set the 'ServerName' directive globally to suppress this message
3 status_module (shared)
4 autoindex_module (shared)
5 dir_module (shared)
6 alias_module (shared)
7 php5_module (shared)                      //作为httpd的模块
8
查看模块libphp5.so文件的权限
1[root@ying01 php-5.6.32]# ls -l /usr/local/apache2.4/modules/libphp5.so
2-rwxr-xr-x 1 root root 37743776 6月  25 13:56 /usr/local/apache2.4/modules/libphp5.so
3[root@ying01 php-5.6.32]# vim /usr/local/apache2.4/conf/httpd.conf      //进入httpd的配置文件
4
此时为配置文件里面的模块,增减#可以随用随取
1LoadModule dir_module modules/mod_dir.so
2#LoadModule actions_module modules/mod_actions.so
3#LoadModule speling_module modules/mod_speling.so
4#LoadModule userdir_module modules/mod_userdir.so
5LoadModule alias_module modules/mod_alias.so
6#LoadModule rewrite_module modules/mod_rewrite.so
7LoadModule php5_module        modules/libphp5.so               //能够看到libphp5.so
8
- php的参考配置文件
- php.ini-production 生产环境用
- php.ini-development 开发环境和测试环境下用
1[root@ying01 php-5.6.32]# /usr/local/php/bin/php -i |less
2[root@ying01 php-5.6.32]# ls /usr/local/php/etc
3pear.conf
4[root@ying01 php-5.6.32]# cp php.ini-production  /usr/local/php/etc/php.ini   //参考文件;production适合生产环境;de
5[root@ying01 php-5.6.32]# /usr/local/php/bin/php -i |less
6
此时我们能看到已经加载到此配置文件
1Virtual Directory Support => enabled
2Configuration File (php.ini) Path => /usr/local/php/etc
3Loaded Configuration File => /usr/local/php/etc/php.ini         //此时已经加载
4Scan this dir for additional .ini files => (none)
5Additional .ini files parsed => (none)
6
七、PHP7的安装
在/usr/local/src/目录下,下载php7源码
1[root@ying01 src]# wget http://cn2.php.net/distributions/php-7.1.6.tar.bz2
2
解压:tar jxf php-7.1.6.tar.bz2
[root@ying01 src]# tar jxf php-7.1.6.tar.bz2
进入php-7.1.6 目录下,进行配置
1[root@ying01 src]# cd php-7.1.6/
2[root@ying01 php-7.1.6]#./configure --prefix=/usr/local/php7 --with-apxs2=/usr/local/apache2.4/bin/apxs --with-config-file-path=/usr/local/php7/etc --with-pdo-mysql=/usr/local/mysql --with-mysqli=/usr/local/mysql/bin/mysql_config --with-libxml-dir --with-gd --with-jpeg-dir --with-png-dir --with-freetype-dir --with-iconv-dir --with-zlib-dir --with-bz2 --with-openssl --with-mcrypt --enable-soap --enable-gd-native-ttf --enable-mbstring --enable-sockets --enable-exif
3
配置完成后,make编译
1[root@ying01 php-5.6.32]# make
2
3省略.....
4
5
6Build complete.
7Don't forget to run 'make test'.
8
9
make install安装
1[root@ying01 php-7.1.6]# make install
2
查看php7的模块,和php5 一样
1[root@ying01 php-7.1.6]# ls /usr/local/apache2.4/modules/libphp7.so
2/usr/local/apache2.4/modules/libphp7.so
3[root@ying01 php-7.1.6]# du -sh !$
4du -sh /usr/local/apache2.4/modules/libphp7.so
537M	/usr/local/apache2.4/modules/libphp7.so
6[root@ying01 php-7.1.6]# /usr/local/php7/bin/php -m
7[PHP Modules]
8bz2
9Core
10ctype
11date
12dom
13exif
14fileinfo
15filter
16gd
17hash
18iconv
19json
20libxml
21mbstring
22mcrypt
23mysqli
24openssl
25pcre
26PDO
27pdo_mysql
28pdo_sqlite
29Phar
30posix
31Reflection
32session
33SimpleXML
34soap
35sockets
36SPL
37sqlite3
38standard
39tokenizer
40xml
41xmlreader
42xmlwriter
43zlib
44
45[Zend Modules]
46
47
查看httpd的模块;此时能看到 php5_module (shared)和 php7_module (shared);再次说明php是作为httpd的模块存在;
1[root@ying01 php-7.1.6]# /usr/local/apache2.4/bin/apachectl -M
2AH00558: httpd: Could not reliably determine the server's fully qualified domain name, using fe80::16dc:89c:b761:e115. Set the 'ServerName' directive globally to suppress this message
3Loaded Modules:
4 core_module (static)
5 so_module (static)
6 http_module (static)
7 mpm_event_module (static)
8 authn_file_module (shared)
9 authn_core_module (shared)
10 authz_host_module (shared)
11 authz_groupfile_module (shared)
12 authz_user_module (shared)
13 authz_core_module (shared)
14 access_compat_module (shared)
15 auth_basic_module (shared)
16 reqtimeout_module (shared)
17 filter_module (shared)
18 mime_module (shared)
19 log_config_module (shared)
20 env_module (shared)
21 headers_module (shared)
22 setenvif_module (shared)
23 version_module (shared)
24 unixd_module (shared)
25 status_module (shared)
26 autoindex_module (shared)
27 dir_module (shared)
28 alias_module (shared)
29 php5_module (shared)
30 php7_module (shared)
31
八、 Apache和PHP结合
Apache(httpd)的主配置文件:/usr/local/apache2.4/conf/httpd.conf
在启动httpd服务的时候,总会有以下警告;通过更改配置文件,可以取消;
1[root@ying01 php-7.1.6]# /usr/local/apache2.4/bin/apachectl start
2AH00558: httpd: Could not reliably determine the server's fully qualified domain name, using fe80::16dc:89c:b761:e115. Set the 'ServerName' directive globally to suppress this message                //提示,警告的意思
3httpd (pid 59382) already running
4[root@ying01 php-7.1.6]# ps aux |grep httpd                          //查看httpd进程
5root     56216  0.0  0.0 112720   984 pts/0    S+   17:06   0:00 grep --color=auto httpd
6root     59382  0.0  0.1  95580  2524 ?        Ss   12:42   0:01 /usr/local/apache2.4/bin/httpd -k start
7daemon   59383  0.0  0.2 382408  4432 ?        Sl   12:42   0:00 /usr/local/apache2.4/bin/httpd -k start
8daemon   59384  0.0  0.2 382408  4432 ?        Sl   12:42   0:00 /usr/local/apache2.4/bin/httpd -k start
9daemon   59385  0.0  0.2 382408  4428 ?        Sl   12:42   0:00 /usr/local/apache2.4/bin/httpd -k start
10[root@ying01 php-7.1.6]# vim /usr/local/apache2.4/conf/httpd.conf
按下图更改配置文件:/usr/local/apache2.4/conf/httpd.conf
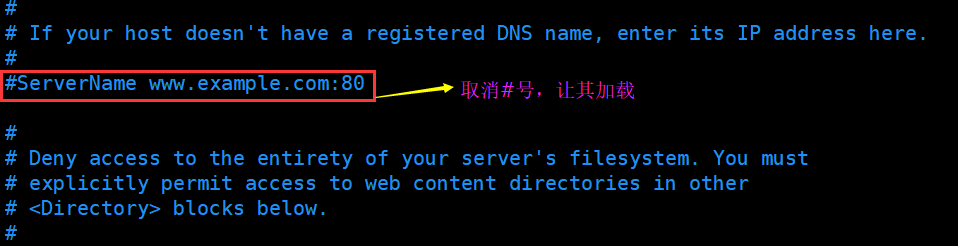
这个也需要不要让php7加载,因为不能同时调用两个php
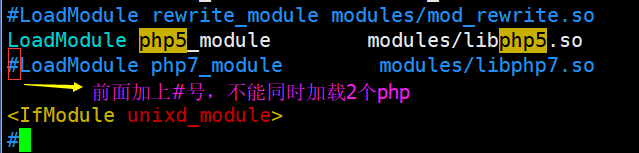
关闭服务,再次启动,就没有加载警告信息
1[root@ying01 php-7.1.6]# /usr/local/apache2.4/bin/apachectl stop
2[root@ying01 php-7.1.6]# /usr/local/apache2.4/bin/apachectl start
3
8.1 修改denied
此时我们无法网页192.168.112.136
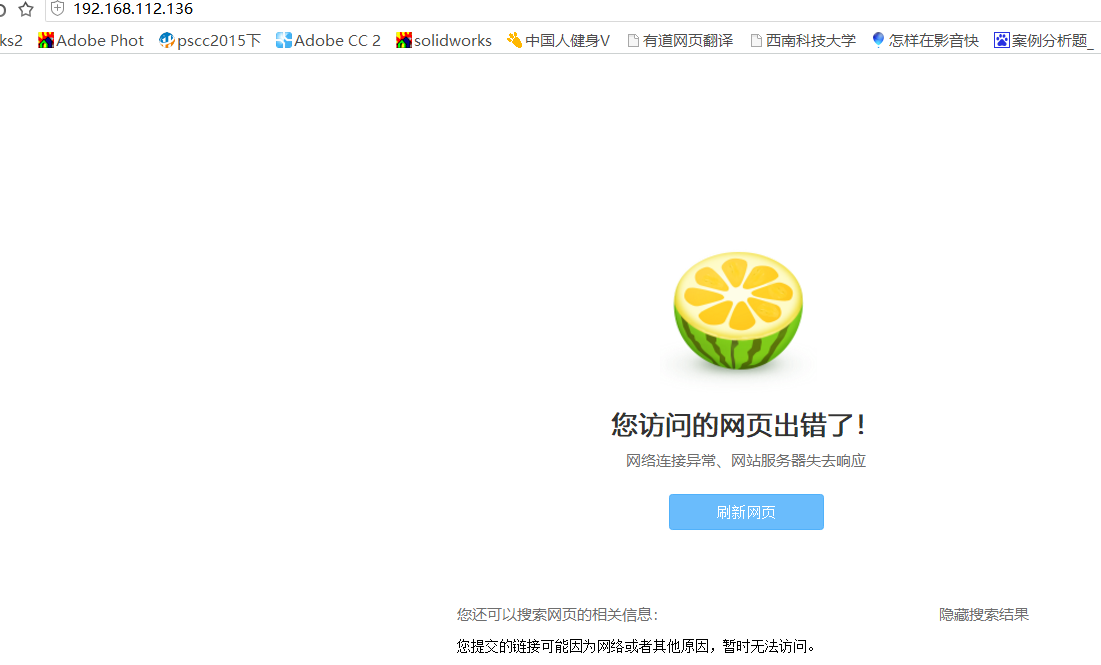
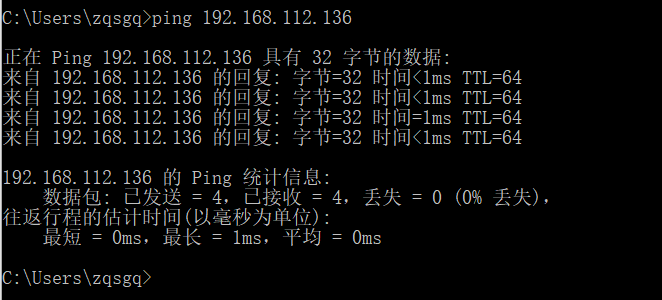
此时我们开始排查问题:
第一步:在windows上ping 192.168.112.168 是否通畅;
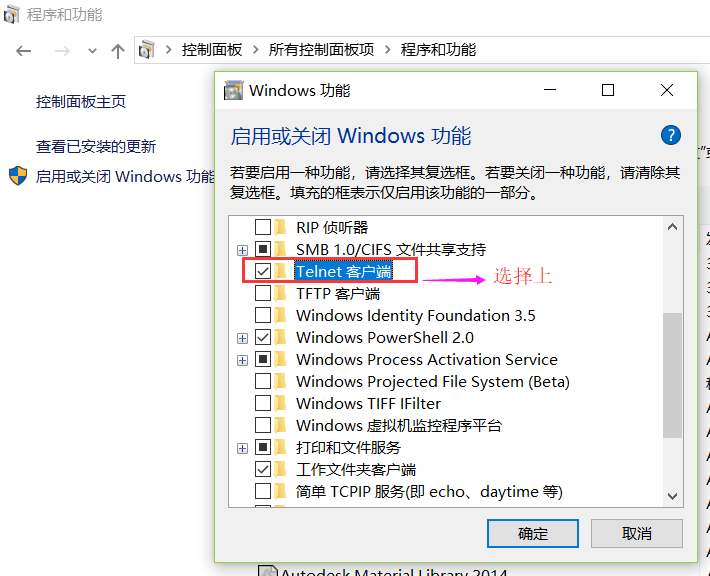
第二步:IP通畅,那么我们检查端口,先在window启用telnet,只选择客户端,服务端危险;
第三步:开始检查端口;

第四步:iptables -nvL查看无端口,指定80端口
[root@ying01 php-7.1.6]# iptables -I INPUT -p tcp --dport 80 -j ACCEPT
第五步:再次用telnet测试端口;
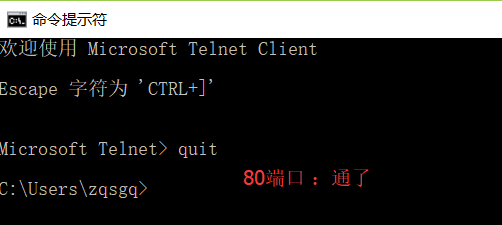
第六步:此时我们再浏览器再访问192.168.112.168

- 探索能够访问的原理
此时能够显示,那是因为在配置文件里面
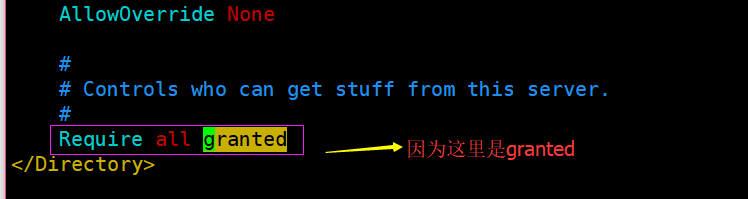
把 Require all granted 改为Require all denied;保存配置文件
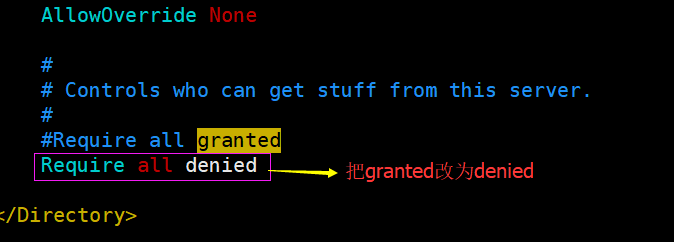
此时我们为了安全起见,不重启配置文件;用以下命令检测配置、加载配置验证;
1[root@ying01 php-7.1.6]# /usr/local/apache2.4/bin/apachectl -t          //检查更改配置是否语法错误
2Syntax OK
3[root@ying01 php-7.1.6]# /usr/local/apache2.4//bin/apachectl graceful   //加载配置成功
4
此时我们再浏览器再访问192.168.112.168,显示:禁止访问

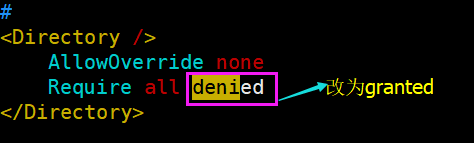
在 配置文件httpd.conf 还需要把此处更改为granted;否则会出现403状态码,一般为200;
8.2 解析php
检测配置,加载配置
1[root@ying01 php-7.1.6]# /usr/local/apache2.4/bin/apachectl -t
2Syntax OK
3[root@ying01 php-7.1.6]# /usr/local/apache2.4//bin/apachectl graceful
4
在配置文件里面增加如下内容,意思解析php
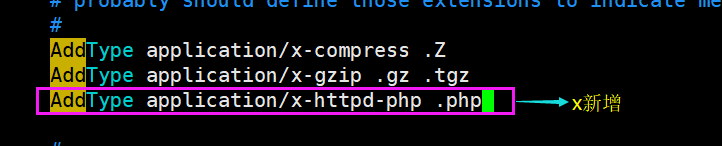
添加如下内容,就会直接跳转到主页

新建一个1.php
1[root@ying01 php-7.1.6]# vim /usr/local/apache2.4/htdocs/1.php
2
3以下为内容
4
5<?php
6   phpinfo();   //打印php的所有函数
7?>
8
此时我们再浏览器中,看是否解析PHP (在配置中增加内容,不需要重启php)
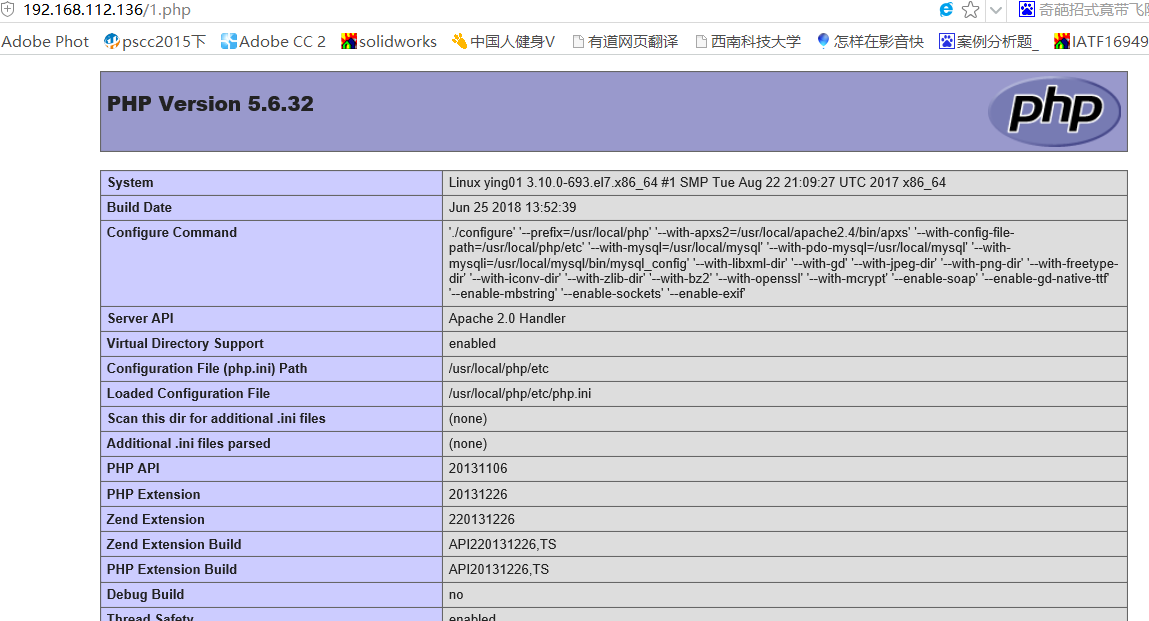
php能够支持解析;那么把它加上#,代表不加载
#AddType application/x-httpd-php .php
检查,加载配置文件httpd.conf
1[root@ying01 php-7.1.6]# /usr/local/apache2.4/bin/apachectl -t
2Syntax OK
3[root@ying01 php-7.1.6]# /usr/local/apache2.4/bin/apachectl graceful
4
此时打开浏览器,我们发现不解析php,只是源代码;
问题总结:
如果浏览器不能解析php,那么需要从以下几点来入手:
第一步:查看有没有加载php模块;
1[root@ying01 php-7.1.6]# /usr/local/apache2.4/bin/apachectl -M |tail -5
2 status_module (shared)
3 autoindex_module (shared)
4 dir_module (shared)
5 alias_module (shared)
6 php5_module (shared)
7
第二步:查看没有php模块文件
1[root@ying01 php-7.1.6]# ls /usr/local/apache2.4/modules/libphp5.so
2/usr/local/apache2.4/modules/libphp5.so
3[root@ying01 php-7.1.6]# vim /usr/local/apache2.4/conf/httpd.conf
4
第三步:前面两项有,在httpd.con的配置文件中,有加载模块;
1LoadModule php5_module        modules/libphp5.so
2
第四步:之前都有,在httpd.con的配置文件中,有没有此项;
1    AddType application/x-httpd-php .php
2
第五步:在httpd.con的配置文件中,下面加 index.php
1<IfModule dir_module>
2    DirectoryIndex index.html index.php       //能够跳转到索引页
3</IfModule>
4
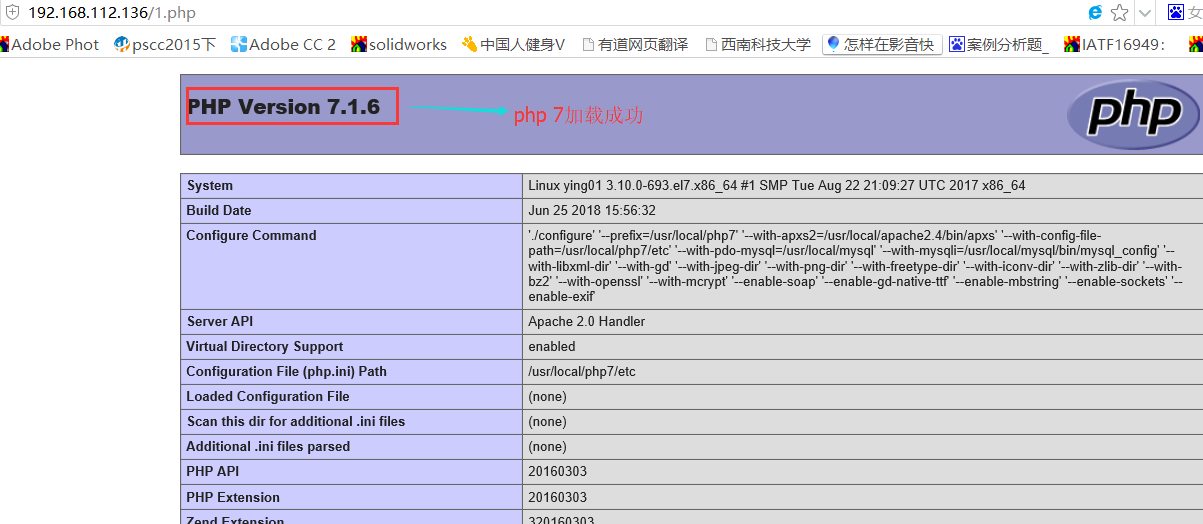
8.3 加载php7
因为php7与php5不能同时加载,此时需要在httpd.con的配置文件中,把php7模块加载,把php5注释掉;
1#LoadModule php5_module        modules/libphp5.so
2LoadModule php7_module        modules/libphp7.so
3
检查,加载配置文件httpd.conf
1[root@ying01 php-7.1.6]# /usr/local/apache2.4/bin/apachectl -t
2Syntax OK
3[root@ying01 php-7.1.6]# /usr/local/apache2.4/bin/apachectl graceful
4
此时再次通过浏览器,查看
九、Apache默认虚拟主机
一台服务器可以访问多个网站,每个网站都是一个虚拟主机 概念:域名(主机名)、DNS、解析域名、hosts 任何一个域名解析到这台机器,都可以访问的虚拟主机就是默认虚拟主机
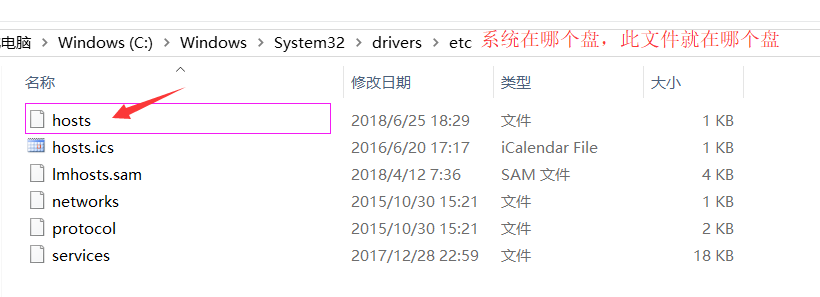
9.1 windows下host用法
第一步:按下图找到host文件
第二步:按下图添加域名;

第三步:ping 设置的域名是否通畅;
1Microsoft Windows [版本 10.0.17134.112]
2(c) 2018 Microsoft Corporation。保留所有权利。
3
4C:\Users\zqsgq>www.abc.com
5'www.abc.com' 不是内部或外部命令,也不是可运行的程序
6或批处理文件。
7
8C:\Users\zqsgq>ping www.abc.com
9
10正在 Ping www.abc.com [192.168.112.136] 具有 32 字节的数据:
11来自 192.168.112.136 的回复: 字节=32 时间<1ms TTL=64
12来自 192.168.112.136 的回复: 字节=32 时间<1ms TTL=64
13来自 192.168.112.136 的回复: 字节=32 时间<1ms TTL=64
14来自 192.168.112.136 的回复: 字节=32 时间<1ms TTL=64
15
16192.168.112.136 的 Ping 统计信息:
17    数据包: 已发送 = 4,已接收 = 4,丢失 = 0 (0% 丢失),
18往返行程的估计时间(以毫秒为单位):
19    最短 = 0ms,最长 = 0ms,平均 = 0ms
20
21C:\Users\zqsgq>ping test.com
22
23正在 Ping www.abc.com [192.168.112.136] 具有 32 字节的数据:
24来自 192.168.112.136 的回复: 字节=32 时间<1ms TTL=64
25来自 192.168.112.136 的回复: 字节=32 时间<1ms TTL=64
26来自 192.168.112.136 的回复: 字节=32 时间<1ms TTL=64
27来自 192.168.112.136 的回复: 字节=32 时间<1ms TTL=64
28
29192.168.112.136 的 Ping 统计信息:
30    数据包: 已发送 = 4,已接收 = 4,丢失 = 0 (0% 丢失),
31往返行程的估计时间(以毫秒为单位):
32    最短 = 0ms,最长 = 0ms,平均 = 0ms
33
34C:\Users\zqsgq>ping ying.com
35
36正在 Ping www.abc.com [192.168.112.136] 具有 32 字节的数据:
37来自 192.168.112.136 的回复: 字节=32 时间<1ms TTL=64
38来自 192.168.112.136 的回复: 字节=32 时间<1ms TTL=64
39来自 192.168.112.136 的回复: 字节=32 时间=1ms TTL=64
40来自 192.168.112.136 的回复: 字节=32 时间<1ms TTL=64
41
42192.168.112.136 的 Ping 统计信息:
43    数据包: 已发送 = 4,已接收 = 4,丢失 = 0 (0% 丢失),
44往返行程的估计时间(以毫秒为单位):
45    最短 = 0ms,最长 = 1ms,平均 = 0ms
46
47C:\Users\zqsgq>
48
第四步:在浏览器访问域名

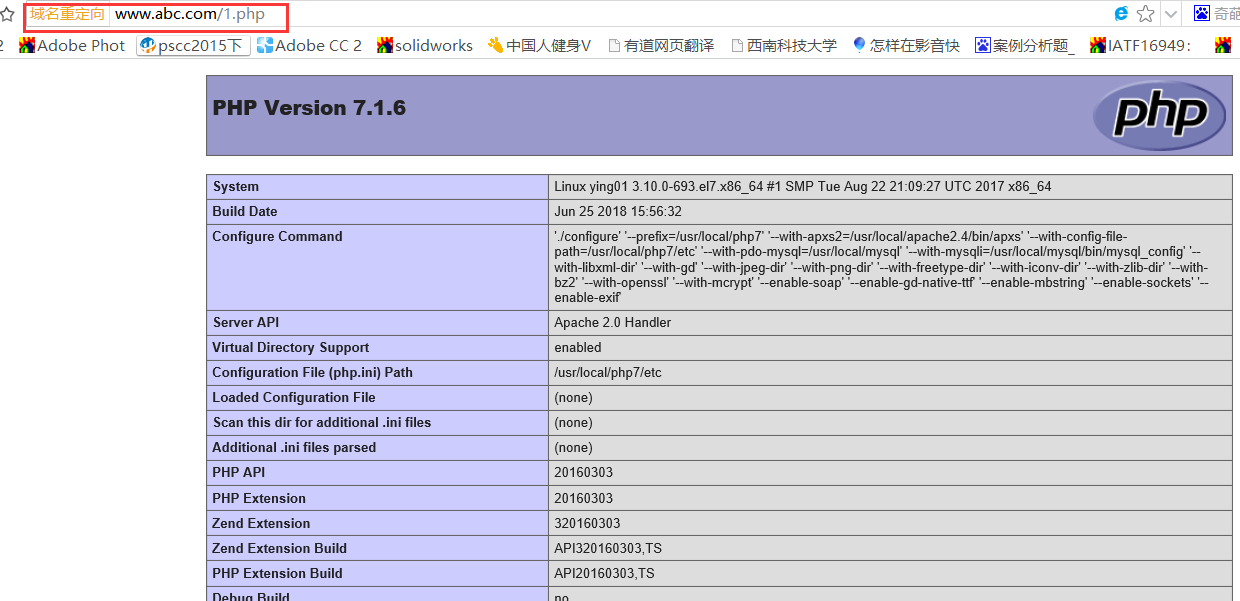
9.2 linux下配置虚拟主机
第一步:编辑配置文件httpd.conf,去掉以下的#号,使虚拟主机的配置文件生效
1# Virtual hosts
2Include conf/extra/httpd-vhosts.conf    //去掉#号    加载虚拟主机的配置文件
第二步:进入虚拟主机配置文件中;
以下内容需要更改
1<VirtualHost *:80>
2    ServerAdmin webmaster@dummy-host.example.com                            //定义管理员的邮箱
3    DocumentRoot "/usr/local/aprche2.4/docs/dummy-host.example.com"
4    ServerName dummy-host.example.com
5    ServerAlias www.dummy-host.example.com
6    ErrorLog "logs/dummy-host.example.com-error_log"
7    CustomLog "logs/dummy-host.example.com-access_log" common
8</VirtualHost>
9
10<VirtualHost *:80>
11    ServerAdmin webmaster@dummy-host2.example.com
12    DocumentRoot "/usr/local/aprche2.4/docs/dummy-host2.example.com"
13    ServerName dummy-host2.example.com
14    ErrorLog "logs/dummy-host2.example.com-error_log"
15    CustomLog "logs/dummy-host2.example.com-access_log" common
16</VirtualHost>
17
更改为以下内容:
1<VirtualHost *:80>
2    DocumentRoot "/data/wwwroot/abc.com"                //定义网站的根目录
3    ServerName abc.com                                  //定义域名,只能写1个
4    ServerAlias www.abc.com www.123.com                 //定义别名,可以写多个
5    ErrorLog "logs/abc.com-error_log"                   //定义错误日志
6    CustomLog "logs/abc.com-access_log" common          //定义访问日志
7</VirtualHost>
8
9<VirtualHost *:80>
10    DocumentRoot "/data/wwwroot/111.com"
11    ServerName 111.com
12    ServerAlias www.example.com
13    ErrorLog "logs/111.com-error_log"
14    CustomLog "logs/111.com-access_log" common
15</VirtualHost>
16
第三步: 创建和虚拟主机对应的站点根目录,以及新建相应index.php
1[root@ying01 php-7.1.6]# mkdir /data/wwwroot/
2[root@ying01 php-7.1.6]# mkdir /data/wwwroot/abc.com
3[root@ying01 php-7.1.6]# mkdir /data/wwwroot/111.com
4[root@ying01 php-7.1.6]# vim /data/wwwroot/abc.com/index.php
5[root@ying01 php-7.1.6]# vim /data/wwwroot/111.com/index.php
6[root@ying01 php-7.1.6]# /usr/local/apache2.4/bin/apachectl -t            //需要检查配置语法
7[root@ying01 php-7.1.6]# /usr/local/apache2.4/bin/apachectl graceful      //需要加载
8
第四步:ping 设置的www.abc.com,此时明显是外网的域名;
1[root@ying01 wwwroot]# ping www.abc.com
2PING abc.com (199.181.132.250) 56(84) bytes of data.
364 bytes from 199.181.132.250 (199.181.132.250): icmp_seq=1 ttl=128 time=176 ms
464 bytes from 199.181.132.250 (199.181.132.250): icmp_seq=2 ttl=128 time=160 ms
5^C
6--- abc.com ping statistics ---
73 packets transmitted, 2 received, 33% packet loss, time 8490ms
8rtt min/avg/max/mdev = 160.519/168.407/176.296/7.899 ms
第五步:用curl -x192.168.112.136:80 abc.com 来测试
1[root@ying01 wwwroot]# curl -x192.168.112.136:80 abc.com
2abc.com[root@ying01 wwwroot]# curl -x192.168.112.136:80 www.abc.com       //指向abc.com
3abc.com[root@ying01 wwwroot]# curl -x192.168.112.136:80 www.qq.com        //qq都指向abc.com
4abc.com[root@ying01 wwwroot]# curl -x192.168.112.136:80 www.126.com
5abc.com[root@ying01 wwwroot]# curl -x192.168.112.136:80 www.example.com   //这个别名,指向111.com
6111.com[root@ying01 wwwroot]# curl -x192.168.112.136:80 www.111.com       //www.111.com因为不是设置的所有指向abc.com
7abc.com[root@ying01 wwwroot]# curl -x192.168.112.136:80 111.com