
虽然现在流行SpringBoot了,但是对于以前的SSM配置地狱的框架搭建整合做一个简单的Demo
首先创建新的项目,选择Maven管理我们的依赖 如图所示:
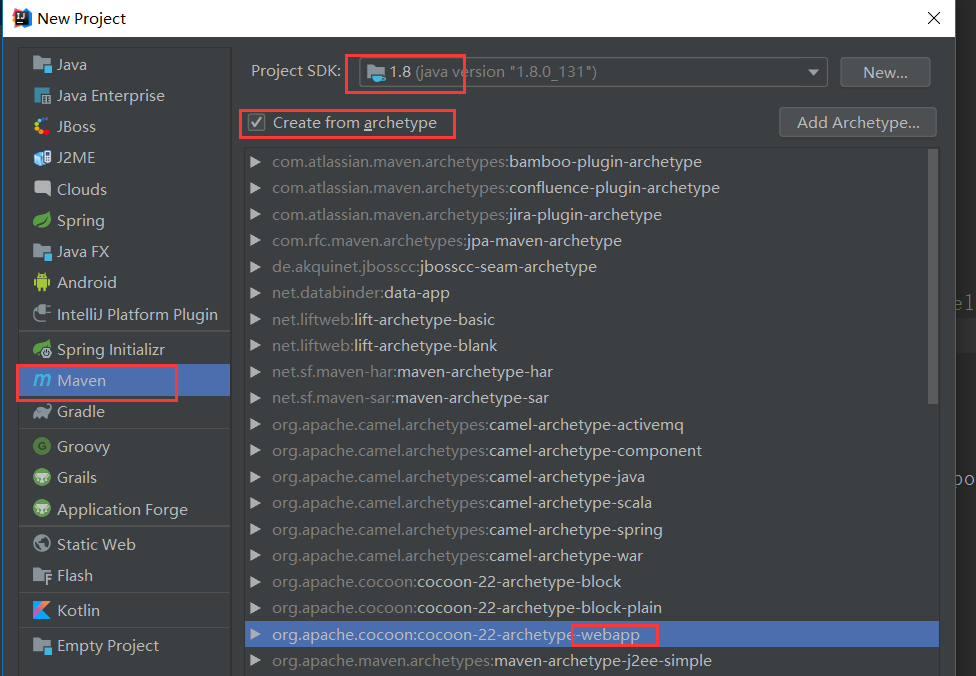
当然我是为了做列子,所以采用的中文,

然后选择自己的maven地址,这里稍微注意的是,Maven默认读取的是 .m2/setting.xml作为配置文件,
我改动了配置文件的相关下载和配置文件存储路径,所以我选用我自己的配置文件作为启动配置
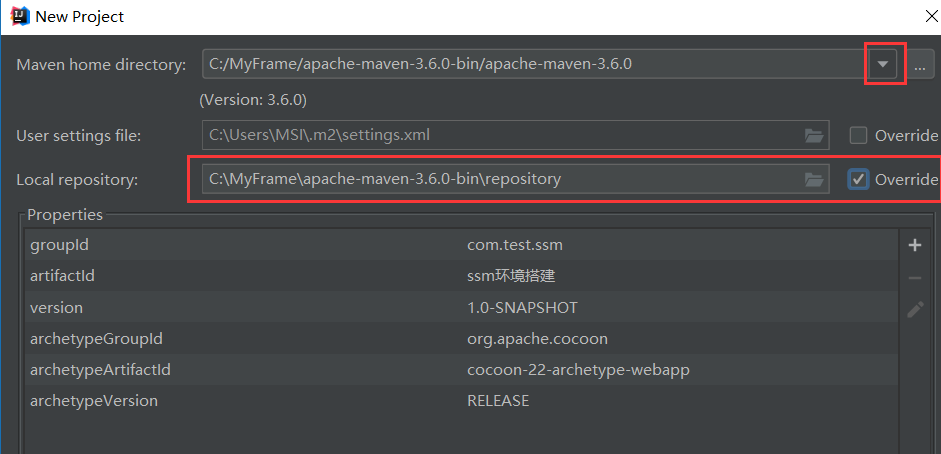
然后等待下载,下载完之后,项目构建如下:
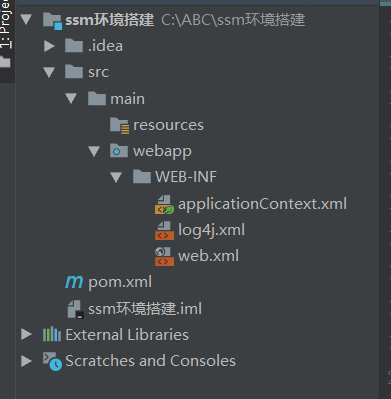
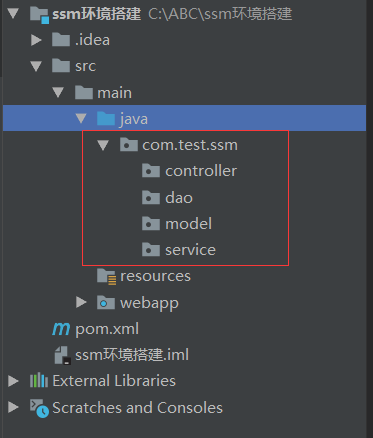
然后创建java 文件夹,作为我们存放代码的文件,并在下面创建出响应的 package 模块
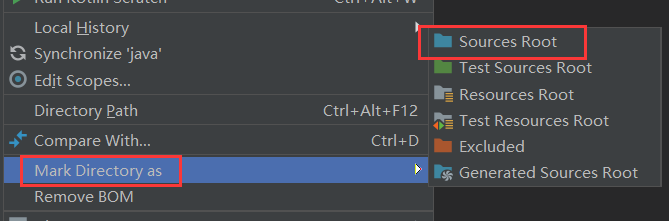
最后就是这样的
——————————前期的基本准备工作到此为止,下面开始搭建环境————————————
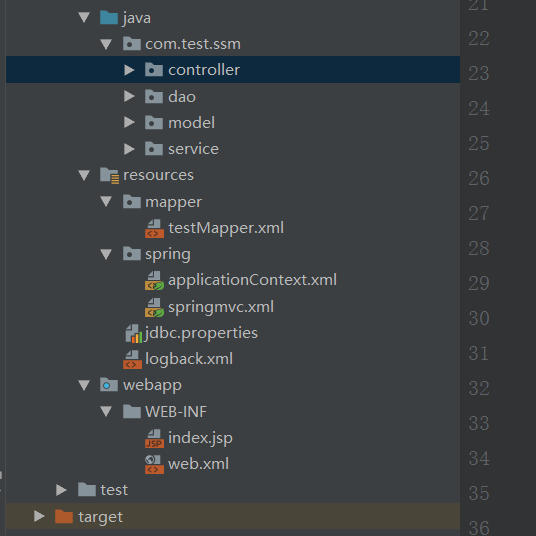
先把最后的样子贴出来,可以先把结构搭起来,再填充内容:
1:优先配置 maven的 pom.xml 导入相关依赖
1  1 <dependencies>
2  2   <!--Spring-->
3  3   <dependency>
4  4     <groupId>org.springframework</groupId>
5  5     <artifactId>spring-core</artifactId>
6  6    <version>5.1.5.RELEASE</version>
7  7   </dependency>
8  8   <dependency>
9  9     <groupId>org.springframework</groupId>
10 10     <artifactId>spring-beans</artifactId>
11 11     <version>5.1.5.RELEASE</version>
12 12   </dependency>
13 13   <dependency>
14 14     <groupId>org.springframework</groupId>
15 15     <artifactId>spring-context</artifactId>
16 16    <version>5.1.5.RELEASE</version>
17 17   </dependency>
18 18   <dependency>
19 19     <groupId>org.springframework</groupId>
20 20     <artifactId>spring-jdbc</artifactId>
21 21     <version>5.0.8.RELEASE</version>
22 22   </dependency>
23 23   <dependency>
24 24     <groupId>org.springframework</groupId>
25 25     <artifactId>spring-tx</artifactId>
26 26     <version>5.0.8.RELEASE</version>
27 27   </dependency>
28 28   <dependency>
29 29     <groupId>org.springframework</groupId>
30 30     <artifactId>spring-web</artifactId>
31 31     <version>5.0.8.RELEASE</version>
32 32   </dependency>
33 33   <dependency>
34 34     <groupId>org.springframework</groupId>
35 35     <artifactId>spring-webmvc</artifactId>
36 36     <version>5.0.8.RELEASE</version>
37 37   </dependency>
38 38   <dependency>
39 39     <groupId>org.springframework</groupId>
40 40     <artifactId>spring-test</artifactId>
41 41     <version>5.0.8.RELEASE</version>
42 42   </dependency>
43 43
44 44   <!--MyBatis 依赖-->
45 45   <dependency>
46 46     <groupId>org.mybatis</groupId>
47 47     <artifactId>mybatis</artifactId>
48 48     <version>3.4.6</version>
49 49   </dependency>
50 50   <dependency>
51 51     <groupId>org.mybatis</groupId>
52 52     <artifactId>mybatis-spring</artifactId>
53 53     <version>1.3.2</version>
54 54   </dependency>
55 55
56 56   <!--连接池 采用阿里的druid-->
57 57   <dependency>
58 58     <groupId>com.alibaba</groupId>
59 59     <artifactId>druid</artifactId>
60 60     <version>1.1.6</version>
61 61   </dependency>
62 62   <!--mysql-->
63 63   <dependency>
64 64     <groupId>mysql</groupId>
65 65     <artifactId>mysql-connector-java</artifactId>
66 66     <version>5.1.44</version>
67 67   </dependency>
68 68   <!--lombok 推荐使用这个依赖,注解解决掉set get...-->
69 69   <dependency>
70 70     <groupId>org.projectlombok</groupId>
71 71     <artifactId>lombok</artifactId>
72 72     <version>1.16.22</version>
73 73   </dependency>
74 74   <!--jackson-->
75 75   <dependency>
76 76     <groupId>com.fasterxml.jackson.core</groupId>
77 77     <artifactId>jackson-annotations</artifactId>
78 78     <version>2.9.7</version>
79 79   </dependency>
80 80   <!-- 通用mapper -->
81 81   <dependency>
82 82     <groupId>tk.mybatis</groupId>
83 83     <artifactId>mapper</artifactId>
84 84     <version>4.1.5</version>
85 85   </dependency>
86 86   <!--单元测试 Junit-->
87 87   <dependency>
88 88     <groupId>junit</groupId>
89 89     <artifactId>junit</artifactId>
90 90     <version>4.12</version>
91 91   </dependency>
92 92   <!--日志打印-->
93 93   <dependency>
94 94     <groupId>ch.qos.logback</groupId>
95 95     <artifactId>logback-core</artifactId>
96 96     <version>1.2.3</version>
97 97   </dependency>
98 98   <dependency>
99 99     <groupId>ch.qos.logback</groupId>
100100     <artifactId>logback-classic</artifactId>
101101     <version>1.2.3</version>
102102   </dependency>
103103   <dependency>
104104     <groupId>org.slf4j</groupId>
105105     <artifactId>slf4j-api</artifactId>
106106     <version>1.7.25</version>
107107   </dependency>
108108 </dependencies>
109109
110110 <build>
111111   <finalName>ChatRobot</finalName>
112112   <plugins>
113113     <plugin>
114114       <groupId>org.apache.maven.plugins</groupId>
115115       <artifactId>maven-compiler-plugin</artifactId>
116116       <configuration>
117117         <!-- 设置JDK版本 -->
118118         <source>1.8</source>
119119         <target>1.8</target>
120120       </configuration>
121121     </plugin>
122122   </plugins>
123123 </build>
124
125然后配置web.xml
126
127 <!-- 配置监听器加载spring -->
128  <listener>
129    <listener-class>org.springframework.web.context.ContextLoaderListener</listener-class>
130  </listener>
131
132  <!-- 配置SpringBeans的配置文件所在目录-->
133  <context-param>
134    <param-name>contextConfigLocation</param-name>
135    <param-value>classpath:spring/applicationContext.xml</param-value>
136  </context-param>
137
138  <!-- 配置 SpringMVC前端控制器 -->
139  <servlet>
140    <servlet-name>springMVC</servlet-name>
141    <servlet-class>org.springframework.web.servlet.DispatcherServlet</servlet-class>
142    <init-param>
143      <!-- 修改默认springmvc加载的配置文件路径 -->
144      <param-name>contextConfigLocation</param-name>
145      <param-value>classpath:spring/springmvc.xml</param-value>
146    </init-param>
147    <!-- 配置Spring的启动时机 >=0随着容器一起启动  <0第一次来请求时启动 -->
148    <load-on-startup>1</load-on-startup>
149  </servlet>
150  <servlet-mapping>
151    <servlet-name>springMVC</servlet-name>
152    <url-pattern>/</url-pattern>
153  </servlet-mapping>
154
155  <!-- 配置编码方式-->
156  <filter>
157    <filter-name>encodingFilter</filter-name>
158    <filter-class>org.springframework.web.filter.CharacterEncodingFilter</filter-class>
159    <init-param>
160      <param-name>encoding</param-name>
161      <param-value>UTF-8</param-value>
162    </init-param>
163  </filter>
164  <filter-mapping>
165    <filter-name>encodingFilter</filter-name>
166    <url-pattern>/*</url-pattern>
167  </filter-mapping>
168  <!--设置一个默认访问的页面-->
169  <welcome-file-list>
170    <welcome-file>/WEB-INF/index.jsp</welcome-file>
171  </welcome-file-list>
web.xml中指定的文件,我们按部就班的造出来
1依次为:applicationContext.xml
2
3<?xml version="1.0" encoding="UTF-8"?>
4<beans xmlns="http://www.springframework.org/schema/beans"
5       xmlns:xsi="http://www.w3.org/2001/XMLSchema-instance"
6       xmlns:context="http://www.springframework.org/schema/context"
7       xmlns:aop="http://www.springframework.org/schema/aop"
8       xmlns:tx="http://www.springframework.org/schema/tx"
9       xsi:schemaLocation="http://www.springframework.org/schema/beans
10        http://www.springframework.org/schema/beans/spring-beans-3.2.xsd
11        http://www.springframework.org/schema/context
12        http://www.springframework.org/schema/context/spring-context-3.2.xsd
13        http://www.springframework.org/schema/aop
14        http://www.springframework.org/schema/aop/spring-aop-3.2.xsd
15        http://www.springframework.org/schema/tx
16        http://www.springframework.org/schema/tx/spring-tx-3.2.xsd">
17
18    <!-- 配置注解扫描 -->
19    <context:component-scan base-package="com.test.ssm.service" />
20
21    <!-- 加载数据源所需要的参数配置文件 -->
22    <context:property-placeholder location="classpath:jdbc.properties"/>
23
24    <!-- 配置 数据源 -->
25    <bean id="dataSource" class="com.alibaba.druid.pool.DruidDataSource">
26        <property name="driverClassName" value="${jdbc.driver}" />
27        <property name="url" value="${jdbc.url}" />
28        <property name="username" value="${jdbc.username}" />
29        <property name="password" value="${jdbc.password}" />
30    </bean>
31
32    <!-- 让Spring管理myBatis的会话工厂 SqlsessionFactory -->
33    <bean id="sqlSessionFactory" class="org.mybatis.spring.SqlSessionFactoryBean" >
34       <!--注入数据库连接池-->
35        <property name="dataSource" ref="dataSource"/>
36        <!--扫描Model包,使用别名-->
37        <property name="typeAliasesPackage" value="com.test.ssm.model"/>
38        <!-- 扫描sql配置文件: mapper需要的xml文件 -->
39        <property name="mapperLocations" value="classpath:mapper/*.xml"/>
40    </bean>
41
42    <!-- 配置扫描Dao接口包,动态实现Dao接口,注入到spring容器中 -->
43    <bean class="org.mybatis.spring.mapper.MapperScannerConfigurer">
44        <!--注入Dao-->
45        <property name="basePackage" value="com.test.ssm.dao"/>
46        <!--注入sqlSession工厂-->
47        <property name="sqlSessionFactoryBeanName" value="sqlSessionFactory"/>
48    </bean>
49
50    <!--配置事务管理器-->
51    <bean id="trancationManager" class="org.springframework.jdbc.datasource.DataSourceTransactionManager">
52        <property name="dataSource" ref="dataSource"/>
53    </bean>
54    <!--开启声明式事务-->
55    <tx:annotation-driven transaction-manager="trancationManager"/>
56</beans>
57
58其次:springmvc.xml
59
60 1 <?xml version="1.0" encoding="UTF-8"?>
61 2 <beans xmlns="http://www.springframework.org/schema/beans"
62 3        xmlns:xsi="http://www.w3.org/2001/XMLSchema-instance" xmlns:mvc="http://www.springframework.org/schema/mvc"
63 4        xmlns:context="http://www.springframework.org/schema/context"
64 5        xmlns:aop="http://www.springframework.org/schema/aop" xmlns:tx="http://www.springframework.org/schema/tx"
65 6        xsi:schemaLocation="http://www.springframework.org/schema/beans
66 7       http://www.springframework.org/schema/beans/spring-beans-3.2.xsd
67 8       http://www.springframework.org/schema/mvc
68 9       http://www.springframework.org/schema/mvc/spring-mvc-3.2.xsd
6910       http://www.springframework.org/schema/context
7011       http://www.springframework.org/schema/context/spring-context-3.2.xsd">
7112
7213     <!-- 1.配置注解扫描位置 -->
7314     <context:component-scan base-package="com.test.ssm.controller" />
7415
7516     <!-- 2.配置注解处理映射 3.配置适配器-->
7617     <mvc:annotation-driven />
7718
7819     <!-- 4.配置springmvc视图解析器 视图解析器解析的视频路径为:前缀 + 后缀 -->
7920     <bean
8021             class="org.springframework.web.servlet.view.InternalResourceViewResolver">
8122         <property name="prefix" value="/WEB-INF/views" />
8223         <property name="suffix" value=".jsp" />
8324     </bean>
8425 </beans>
然后 applicationContext.xml 又依赖新的配置文件,逐一配置出来
jdbc.properties
jdbc.driver=com.mysql.jdbc.Driverjdbc.url=jdbc:mysql://localhost:3306/test?useUnicode=true&characterEncoding=utf8jdbc.username=rootjdbc.password=root
logback.xml
1 1 <?xml version="1.0" encoding="UTF-8"?>
2 2 <configuration debug="true">
3 3     <appender name="STDOUT" class="ch.qos.logback.core.ConsoleAppender">
4 4         <encoder>
5 5             <pattern>%d{HH:mm:ss.SSS} [%thread] %-5level %logger{36} - %msg%n</pattern>
6 6         </encoder>
7 7     </appender>
8 8     <root level="INFO">
9 9         <appender-ref ref="STDOUT"/>
1010     </root>
1111 </configuration>
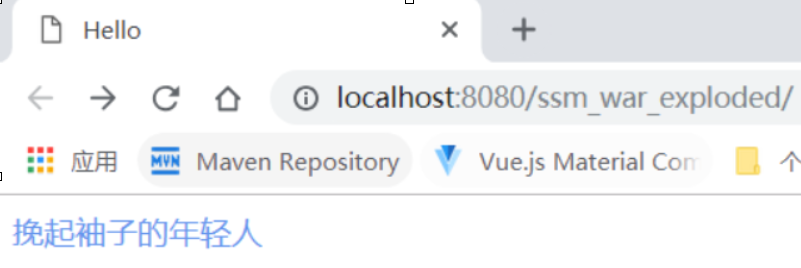
运行服务器,看看效果
自动跳转到了默认的index.jsp
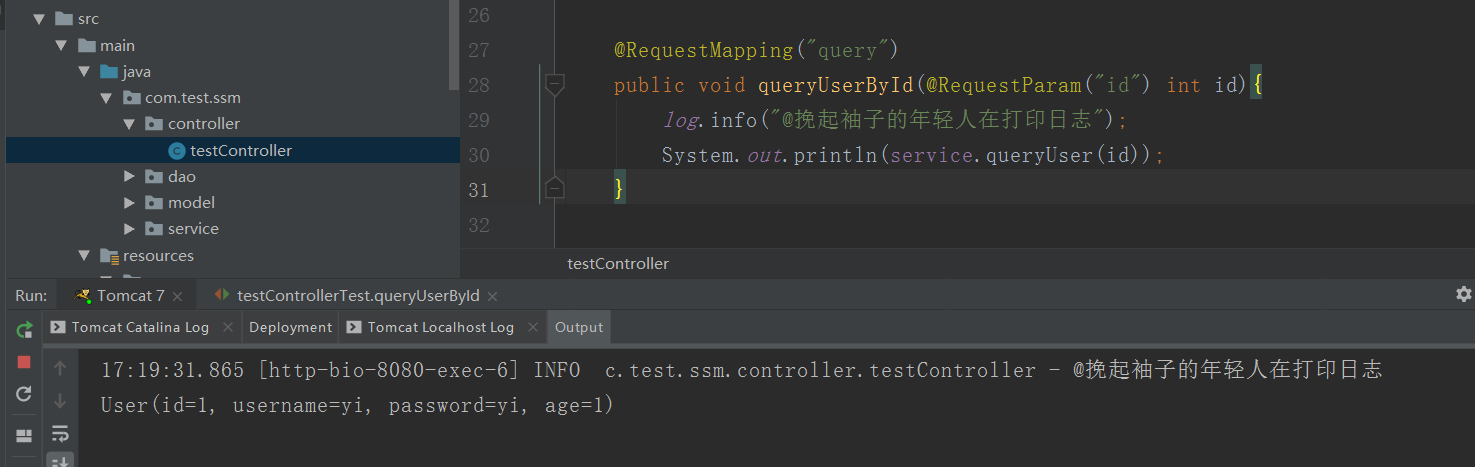
测试一下数据库,查询一点数据看看能否连通

发现自己都不太熟悉了,希望以后再也用不上!