
在消息通知时,我们经常用到两个组件Toast和Notification。特别是重要的和需要长时间显示的信息,用Notification就最 合适不过了。当有消息通知时,状态栏会显示通知的图标和文字,通过下拉状态栏,就可以看到通知信息了,Android这一创新性的UI组件赢得了用户的一 致好评,就连苹果也开始模仿了。今天我们就结合实例,探讨一下Notification具体的使用方法。
首先说明一下我们需要实现的功能是:在程序启动时,发出一个通知,这个通知在软件运行过程中一直存在,相当于qq的托盘一样;然后再演示一下普通的通知和自定义视图通知。
那我们就先建立一个名为notification的项目,然后编辑/res/layout/main.xml文件,代码如下:
[html] view plain copy
- <?xml version\="1.0" encoding\="utf-8"?>
- <LinearLayout xmlns:android="http://schemas.android.com/apk/res/android"
- android:orientation="vertical"
- android:layout_width="fill_parent"
- android:layout_height="fill_parent">
- <TextView
- android:layout_width="fill_parent"
- android:layout_height="wrap_content"
- android:gravity="center"
- android:text="点击按钮进入演示界面"/>
- <Button
- android:layout_width="fill_parent"
- android:layout_height="wrap_content"
- android:text="notify activity"
- android:onClick="notify"/>
- </LinearLayout>
然后编辑MainActivity.java文件,代码如下:
[java] view plain copy
-
package com.scott.notification;
-
import android.app.Activity;
-
import android.app.Notification;
-
import android.app.NotificationManager;
-
import android.app.PendingIntent;
-
import android.content.Context;
-
import android.content.Intent;
-
import android.os.Bundle;
-
import android.view.View;
-
public class MainActivity extends Activity {
-
private static final int ONGOING_ID = 0;
-
private NotificationManager mNotificationManager;
-
@Override
-
public void onCreate(Bundle savedInstanceState) {
-
super.onCreate(savedInstanceState);
-
setContentView(R.layout.main);
-
setUpNotification();
-
}
-
private void setUpNotification() {
-
Context context = this;
-
mNotificationManager = (NotificationManager) getSystemService(Context.NOTIFICATION_SERVICE);
-
int icon = R.drawable.ongoing;
-
CharSequence tickerText = "程序已启动";
-
long when = System.currentTimeMillis();
-
//新建一个Notification实例
-
Notification notification = new Notification(icon, tickerText, when);
-
// 把通知放置在"正在运行"栏目中
-
notification.flags |= Notification.FLAG_ONGOING_EVENT;
-
CharSequence contentTitle = "Notification示例";
-
CharSequence contentText = "程序正在运行中,点击此处跳到演示界面";
-
Intent intent = new Intent(context, NotifyActivity.class);
-
PendingIntent contentIntent = PendingIntent.getActivity(context, 0, intent, 0);
-
notification.setLatestEventInfo(context, contentTitle, contentText, contentIntent);
-
mNotificationManager.notify(ONGOING_ID, notification);
-
}
-
public void notify(View view) {
-
Intent intent = new Intent(this, NotifyActivity.class);
-
startActivity(intent);
-
}
-
@Override
-
public void onBackPressed() {
-
super.onBackPressed();
-
finish();
-
//取消一个通知
-
mNotificationManager.cancel(ONGOING_ID);
-
//结束进程
-
android.os.Process.killProcess(android.os.Process.myPid());
-
System.exit(0);
-
}
-
}
大 家看以看到,在程序主界面启动时会发出一个通知,并且将这个通知放置在“正在运行”栏目中,这样在软件运行过程中它就会始终存在;另外,在上面的代码中, 在用户按下回退按钮时,我们使用NotificationManager.cancel(int id)方法取消这个通知。
先来看一下运行效果如何:


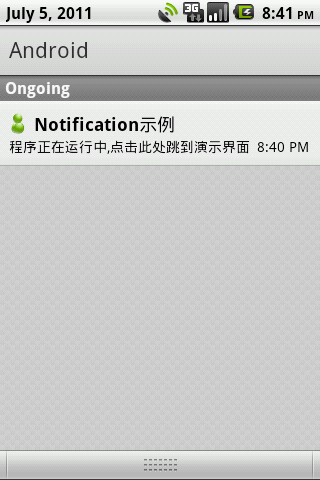
点击主界面的按钮和Ongoing栏目中的通知均能跳转到NotifyActivity界面,在这个界面中,我们主要演示一下普通通知和自定义视图通知的使用。
我们先要在/res/layout/目录下添加一个notify.xml布局文件,代码如下:
[html] view plain copy
- <?xml version\="1.0" encoding\="utf-8"?>
- <LinearLayout xmlns:android="http://schemas.android.com/apk/res/android"
- android:orientation="vertical"
- android:layout_width="fill_parent"
- android:layout_height="fill_parent">
- <Button
- android:layout_width="fill_parent"
- android:layout_height="wrap_content"
- android:text="normal notify"
- android:onClick="normalNotify"/>
- <Button
- android:layout_width="fill_parent"
- android:layout_height="wrap_content"
- android:text="custom notify"
- android:onClick="customNotify"/>
- </LinearLayout>
因为要演示自定义通知视图,我们需要定义一个自定义通知视图的布局文件,摆放我们自己的布局组件,因此在/res/layout/目录下添加一个custom_notification_layout.xml文件,代码如下:
[html] view plain copy
- <?xml version\="1.0" encoding\="utf-8"?>
- <LinearLayout xmlns:android="http://schemas.android.com/apk/res/android"
- android:orientation="horizontal"
- android:layout_width="fill_parent"
- android:layout_height="fill_parent"
- android:padding="3dp">
- <ImageView
- android:id="@+id/imageView"
- android:layout_width="wrap_content"
- android:layout_height="fill_parent"
- android:layout_marginRight="10dp"/>
- <TextView
- android:id="@+id/textView"
- android:layout_width="wrap_content"
- android:layout_height="fill_parent"
- android:textColor="#000"/>
- </LinearLayout>
然后就来看一下NotifyActivity.java的代码:
[java] view plain copy
-
package com.scott.notification;
-
import android.app.Activity;
-
import android.app.Notification;
-
import android.app.NotificationManager;
-
import android.app.PendingIntent;
-
import android.content.Context;
-
import android.content.Intent;
-
import android.os.Bundle;
-
import android.view.View;
-
import android.widget.RemoteViews;
-
public class NotifyActivity extends Activity {
-
//注意,如果不想覆盖前一个通知,需设置不同的ID
-
private static final int NORMAL_NOTIFY_ID = 1;
-
private static final int CUSTOM_NOTIFY_ID = 2;
-
@Override
-
protected void onCreate(Bundle savedInstanceState) {
-
super.onCreate(savedInstanceState);
-
setContentView(R.layout.notify);
-
}
-
// 普通通知事件
-
public void normalNotify(View view) {
-
Context context = this;
-
NotificationManager mNotificationManager = (NotificationManager) getSystemService(Context.NOTIFICATION_SERVICE);
-
int icon = android.R.drawable.stat_notify_voicemail;
-
CharSequence tickerText = "普通通知";
-
long when = System.currentTimeMillis();
-
Notification notification = new Notification(icon, tickerText, when);
-
// 设定声音
-
notification.defaults |= Notification.DEFAULT_SOUND;
-
//设定震动(需加VIBRATE权限)
-
notification.defaults |= Notification.DEFAULT_VIBRATE;
-
// 设定LED灯提醒
-
notification.defaults |= Notification.DEFAULT_LIGHTS;
-
// 设置点击此通知后自动清除
-
notification.flags |= Notification.FLAG_AUTO_CANCEL;
-
CharSequence contentTitle = "普通通知的标题";
-
CharSequence contentText = "通知的内容部分,一段长长的文字...";
-
Intent intent = new Intent(context, TargetActivity.class);
-
PendingIntent contentIntent = PendingIntent.getActivity(context, 0, intent, 0);
-
notification.setLatestEventInfo(context, contentTitle, contentText, contentIntent);
-
mNotificationManager.notify(NORMAL_NOTIFY_ID, notification);
-
}
-
// 个性化通知点击事件
-
public void customNotify(View view) {
-
Context context = this;
-
NotificationManager mNotificationManager = (NotificationManager) getSystemService(Context.NOTIFICATION_SERVICE);
-
int icon = android.R.drawable.stat_notify_voicemail;
-
CharSequence tickerText = "自定义通知";
-
long when = System.currentTimeMillis();
-
Notification notification = new Notification(icon, tickerText, when);
-
notification.flags |= Notification.FLAG_AUTO_CANCEL;
-
RemoteViews contentView = new RemoteViews(context.getPackageName(), R.layout.custom_notification_layout);
-
contentView.setImageViewResource(R.id.imageView, R.drawable.smile);
-
contentView.setTextViewText(R.id.textView, "这是一个个性化的通知视图,代替了系统默认的通知视图.");
-
// 指定个性化视图
-
notification.contentView = contentView;
-
Intent intent = new Intent(context, TargetActivity.class);
-
PendingIntent contentIntent = PendingIntent.getActivity(context, 0, intent, 0);
-
// 指定内容意图
-
notification.contentIntent = contentIntent;
-
mNotificationManager.notify(CUSTOM_NOTIFY_ID, notification);
-
}
-
}
注意,上边在添加一个普通通知时使用到了震动,所以需要在AndroidManifest.xml中加入相关权限:
[html] view plain copy
- <uses-permission android:name="android.permission.VIBRATE"/>
除了使用代码中的默认通知属性之外,用户也可以自定义属性值:
1.自定义声音:
[java] view plain copy
- notification.sound = Uri.parse("file:///sdcard/notification/ringer.mp3");
2.自定义震动方式:
[java] view plain copy
- long[] vibrate = {0, 100, 200, 300};
- notification.vibrate = vibrate;
这个数组定义了交替的震动和关闭,以毫秒为单位。第一个值是等待多久开始震动,第二个值是第一次震动的时间,第三个值是停止震动的时间,以此类推。定义多长时间都行,但是不能设置为重复。
3.自定义闪光方式:
[java] view plain copy
- notification.ledARGB = 0xff00ff00;
- notification.ledOnMS = 300;
- notification.ledOffMS = 1000;
- notification.flags |= Notification.FLAG_SHOW_LIGHTS;
上边几行代码表示绿灯先显示300毫秒然后关闭一秒钟。如果设备不支持指定的颜色,则会按照最接近的颜色显示。
如果全部都使用默认值时,可以用以下代码代替程序中的几行设定defaults的代码:
[java] view plain copy
- notification.defaults |= Notification.DEFAULT_ALL;
注意,在自定义以上属性时,如果defaults中与之相关的默认值已设置,则自定义属性就会失效。
然后再来介绍一下几种常用的flags:
1.FLAG_AUTO_CANCEL:在用户查看通知信息后自动关闭通知;
2.FLAG_INSISTENT:在用户响应之前一直重复;
3.FLAG_ONGOING_EVENT:放置在“正在运行”栏目中,表示程序正在运行,可见状态,或是后台运行;
4.FLAG_NO_CLEAR:查看通知后不会自动取消,对一直进行中的通知非常有用。
在上面的程序中,点击通知后跳转到TargetActivity界面,这个界面非常简单,就显示一串文字,这里就不必多说了。
最后让我们演示一下效果:
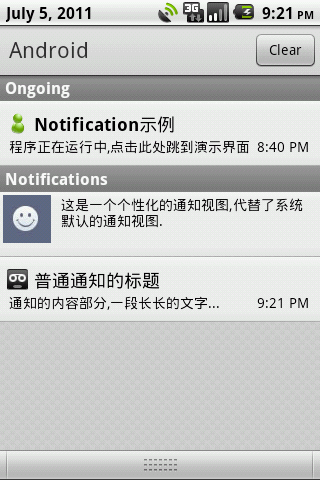

关于notification的相关知识,今天先介绍到这里,以后会继续介绍更深入的使用技巧。