前提条件:PHP拓展amqp协议和sockets要开启
使用方式:参见 队列
1、Composer 安装 laravel-queue-rabbitmq
composer require vladimir-yuldashev/laravel-queue-rabbitmq:v7.1.2(因为我使用laravel版本是5.6)
2、在 config/app.php 文件中,providers 中添加:
VladimirYuldashev\LaravelQueueRabbitMQ\LaravelQueueRabbitMQServiceProvider::class,
3、在 app/config/queue.php 配置文件中的 connections 数组中加入以下配置
1        'rabbitmq' => [
2
3            'driver' => 'rabbitmq',
4
5            'dsn' => env('RABBITMQ_DSN', null),
6
7            /*
8             * Could be one a class that implements \Interop\Amqp\AmqpConnectionFactory for example:
9             *  - \EnqueueAmqpExt\AmqpConnectionFactory if you install enqueue/amqp-ext
10             *  - \EnqueueAmqpLib\AmqpConnectionFactory if you install enqueue/amqp-lib
11             *  - \EnqueueAmqpBunny\AmqpConnectionFactory if you install enqueue/amqp-bunny
12             */
13
14            'factory_class' => Enqueue\AmqpLib\AmqpConnectionFactory::class,
15
16            'host' => env('RABBITMQ_HOST', '127.0.0.1'),
17            'port' => env('RABBITMQ_PORT', 5672),
18
19            'vhost' => env('RABBITMQ_VHOST', '/'),
20            'login' => env('RABBITMQ_LOGIN', 'guest'),
21            'password' => env('RABBITMQ_PASSWORD', 'guest'),
22
23            'queue' => env('RABBITMQ_QUEUE', 'default'),
24
25            'options' => [
26
27                'exchange' => [
28
29                    'name' => env('RABBITMQ_EXCHANGE_NAME'),
30
31                    /*
32                     * Determine if exchange should be created if it does not exist.
33                     */
34
35                    'declare' => env('RABBITMQ_EXCHANGE_DECLARE', true),
36
37                    /*
38                     * Read more about possible values at https://www.rabbitmq.com/tutorials/amqp-concepts.html
39                     */
40
41                    'type' => env('RABBITMQ_EXCHANGE_TYPE', \Interop\Amqp\AmqpTopic::TYPE_DIRECT),
42                    'passive' => env('RABBITMQ_EXCHANGE_PASSIVE', false),
43                    'durable' => env('RABBITMQ_EXCHANGE_DURABLE', true),
44                    'auto_delete' => env('RABBITMQ_EXCHANGE_AUTODELETE', false),
45                    'arguments' => env('RABBITMQ_EXCHANGE_ARGUMENTS'),
46                ],
47
48                'queue' => [
49
50                    /*
51                     * Determine if queue should be created if it does not exist.
52                     */
53
54                    'declare' => env('RABBITMQ_QUEUE_DECLARE', true),
55
56                    /*
57                     * Determine if queue should be binded to the exchange created.
58                     */
59
60                    'bind' => env('RABBITMQ_QUEUE_DECLARE_BIND', true),
61
62                    /*
63                     * Read more about possible values at https://www.rabbitmq.com/tutorials/amqp-concepts.html
64                     */
65
66                    'passive' => env('RABBITMQ_QUEUE_PASSIVE', false),
67                    'durable' => env('RABBITMQ_QUEUE_DURABLE', true),
68                    'exclusive' => env('RABBITMQ_QUEUE_EXCLUSIVE', false),
69                    'auto_delete' => env('RABBITMQ_QUEUE_AUTODELETE', false),
70                    'arguments' => env('RABBITMQ_QUEUE_ARGUMENTS'),
71                ],
72            ],
73
74            /*
75             * Determine the number of seconds to sleep if there's an error communicating with rabbitmq
76             * If set to false, it'll throw an exception rather than doing the sleep for X seconds.
77             */
78
79            'sleep_on_error' => env('RABBITMQ_ERROR_SLEEP', 5),
80
81            /*
82             * Optional SSL params if an SSL connection is used
83             * Using an SSL connection will also require to configure your RabbitMQ to enable SSL. More details can be founds here: https://www.rabbitmq.com/ssl.html
84             */
85
86            'ssl_params' => [
87                'ssl_on' => env('RABBITMQ_SSL', false),
88                'cafile' => env('RABBITMQ_SSL_CAFILE', null),
89                'local_cert' => env('RABBITMQ_SSL_LOCALCERT', null),
90                'local_key' => env('RABBITMQ_SSL_LOCALKEY', null),
91                'verify_peer' => env('RABBITMQ_SSL_VERIFY_PEER', true),
92                'passphrase' => env('RABBITMQ_SSL_PASSPHRASE', null),
93            ],
94
95        ],
4、修改 .env 文件
1QUEUE_CONNECTION=rabbitmq    #这个配置env一般会有先找到修改为这个
2以下是新增配置
3
4RABBITMQ_HOST=rabbitmq  #mq的服务器地址,我这里用的是laradock,具体的就具体修改咯
5RABBITMQ_PORT=5672  #mq的端口
6RABBITMQ_VHOST=/
7RABBITMQ_LOGIN=guest    #mq的登录名
8RABBITMQ_PASSWORD=guest   #mq的密码
9RABBITMQ_QUEUE=queue_name   #mq的队列名称
5、创建任务类
php artisan make:job Queue
执行之后会生成一个文件 app/Jobs/Queue.php
例子:
1<?php
2
3namespace App\Jobs;
4
5use Illuminate\Bus\Queueable;
6use Illuminate\Foundation\Bus\Dispatchable;
7use Illuminate\Queue\SerializesModels;
8use Illuminate\Queue\InteractsWithQueue;
9use Illuminate\Contracts\Queue\ShouldQueue;
10
11class Queue  implements ShouldQueue
12{
13    use Dispatchable, InteractsWithQueue, Queueable, SerializesModels;
14
15    private $data;
16
17    /**
18     * Queue constructor.
19     * @param $data
20     */
21    public function __construct($data)
22    {
23        $this->data = $data;
24    }
25
26    /**
27     * Execute the job.
28     *
29     * @return void
30     */
31    public function handle()
32    {
33        print_r($this->data);
34    }
35}
6、生产,把数据放进 mq 队列
1<?php
2
3namespace App\Http\Controllers;
4
5use App\Jobs\Queue;
6
7class IndexController extends Controller
8{
9
10    public function index()
11    {
12        $this->dispatch(new Queue(['code' => 200, 'message' => '发布消息']));
13        return "发送成功";
14    }
15
16}
7、消费队列
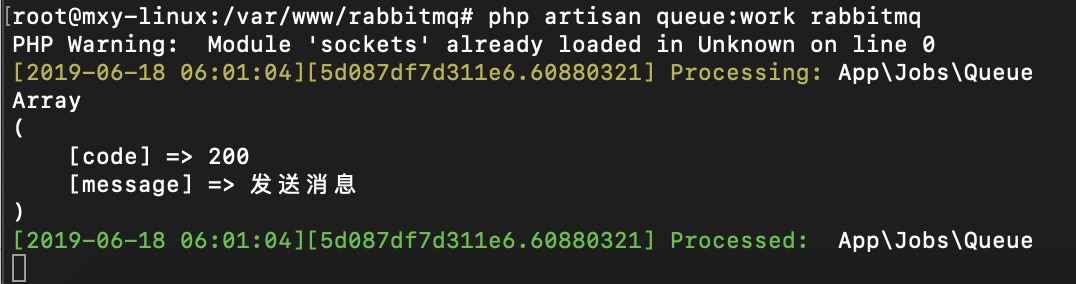
执行命令进行消费:
php artisan queue:work rabbitmq