前面介绍了ActiveMQ的基本安装使用,并写了简单的生产者、消费者。下面主要介绍ActiveMQ的消费者的Listener、Spring整合ActiveMQ。
一、消费者Listener
之前创建的消费者,接收消息的时候都是直接使用consumer.receive(),每次消费一条数据,启动一次获取一次,十分的木讷。实际开发工作中,基本不会使用此种方式,一般,消息的消费者都是持续监听目标队列Queue或者主题Topic,主要应用程序不主动关闭,会一直监听消费消息数据。
JMS listener的消费者:
1package com.cfang.mq.simpleCase;
2
3import javax.jms.Connection;
4import javax.jms.ConnectionFactory;
5import javax.jms.Destination;
6import javax.jms.JMSException;
7import javax.jms.Message;
8import javax.jms.MessageConsumer;
9import javax.jms.MessageListener;
10import javax.jms.Session;
11import javax.jms.TextMessage;
12
13import org.apache.activemq.ActiveMQConnectionFactory;
14
15public class ConsumerListener {
16
17	public static void main(String[] args) {
18		ConsumerListener consumerListener = new ConsumerListener();
19		consumerListener.listenMessage();
20	}
21
22	public void listenMessage() {
23		ConnectionFactory factory = null;
24		Connection connection = null;
25		Session session = null;
26		Destination destination = null;
27		MessageConsumer consumer = null;
28		try {
29			factory = new ActiveMQConnectionFactory("admin", "admin", "tcp://172.31.31.160:61616");
30			connection = factory.createConnection();
31			connection.start();
32			session = connection.createSession(false, Session.AUTO_ACKNOWLEDGE);
33			destination = session.createQueue("tp_simple_queue");
34			consumer = session.createConsumer(destination);
35			consumer.setMessageListener(new MessageListener() {
36				public void onMessage(Message message) {
37					try {
38						TextMessage textMessage = (TextMessage) message;
39						System.out.println(textMessage.getText());
40					} catch (JMSException e) {
41						e.printStackTrace();
42					}
43				}
44			});
45			//阻塞代码,模拟应用程序不关闭。如果关闭了,那监听也自动停止了
46			System.in.read();
47		} catch (Exception e) {
48			e.printStackTrace();
49		} finally {
50			if(consumer != null){
51				try {
52					consumer.close();
53				} catch (JMSException e) {
54					// TODO Auto-generated catch block
55					e.printStackTrace();
56				}
57			}
58			if(session != null){
59				try {
60					session.close();
61				} catch (JMSException e) {
62					// TODO Auto-generated catch block
63					e.printStackTrace();
64				}
65			}
66			if(connection != null){
67				try {
68					connection.close();
69				} catch (JMSException e) {
70					// TODO Auto-generated catch block
71					e.printStackTrace();
72				}
73			}
74		}
75	}
76}
二、Spring整合
Spring整合ActiveMQ非常的便捷,Spring提供了JmsTemplate对其进行操作,非常的方便,下面从配置文件到程序代码逐步介绍。
1、Spring-jms配置文件
1<?xml version="1.0" encoding="UTF-8"?>
2<beans xmlns="http://www.springframework.org/schema/beans"  xmlns:xsi="http://www.w3.org/2001/XMLSchema-instance"
3    xmlns:p="http://www.springframework.org/schema/p"
4    xmlns:context="http://www.springframework.org/schema/context"
5    xmlns:tx="http://www.springframework.org/schema/tx"
6    xmlns:aop="http://www.springframework.org/schema/aop"
7    xmlns:amq="http://activemq.apache.org/schema/core"
8    xsi:schemaLocation="http://www.springframework.org/schema/beans http://www.springframework.org/schema/beans/spring-beans-3.1.xsd
9		http://www.springframework.org/schema/context http://www.springframework.org/schema/context/spring-context-3.1.xsd
10		http://www.springframework.org/schema/tx http://www.springframework.org/schema/tx/spring-tx-3.1.xsd
11        http://www.springframework.org/schema/util http://www.springframework.org/schema/util/spring-util-3.1.xsd
12        http://www.springframework.org/schema/aop http://www.springframework.org/schema/aop/spring-aop.xsd
13        http://activemq.apache.org/schema/core http://activemq.apache.org/schema/core/activemq-core.xsd">
14
15	<context:component-scan base-package="com.cfang.amq">
16
17	</context:component-scan>
18
19	<!-- 配置ActiveMQConnectionFactory连接工厂对象 -->
20	<amq:connectionFactory id="amqConnectionFactory" brokerURL="tcp://172.31.31.160:61616" userName="admin" password="admin"/>
21	<!-- 配置connectionFactory的连接池信息 -->
22	<bean id="pooledConnectionFactory" class="org.apache.activemq.pool.PooledConnectionFactory">
23		<property name="connectionFactory" ref="amqConnectionFactory"></property>
24		<property name="maxConnections" value="10"></property>
25	</bean>
26	<!-- 带有缓存功能的连接工厂,Session缓存大小可配置 -->
27	<bean id="connectionFactory" class="org.springframework.jms.connection.CachingConnectionFactory">
28		<property name="targetConnectionFactory" ref="pooledConnectionFactory"></property>
29		<property name="sessionCacheSize" value="100"></property>
30	</bean>
31	<!-- 配置JmsTemplate -->
32	<bean id="template" class="org.springframework.jms.core.JmsTemplate">
33		<!-- 给定连接工厂, 必须是spring创建的连接工厂. -->
34		<property name="connectionFactory" ref="connectionFactory"></property>
35		<!-- 可选 - 默认目的地命名 -->
36		<property name="defaultDestinationName" value="tp_simple_queue"></property>
37	</bean>
38	<!-- 配置生产者Producer -->
39	<bean id="springProducer" class="com.cfang.amq.SpringProducer"/>
40
41	<!-- 配置消费listener -->
42	<bean  class="org.springframework.jms.listener.DefaultMessageListenerContainer">
43		<property name="connectionFactory" ref="connectionFactory"></property>
44		<property name="destinationName" value="tp_simple_queue"/>
45		<property name="messageListener" ref="springConsumer"></property>
46		<property name="concurrentConsumers" value="1"/>
47	</bean>
48	<!-- 消费者 -->
49	<bean id="springConsumer" class="com.cfang.amq.SpringConsumer"/>
50</beans>
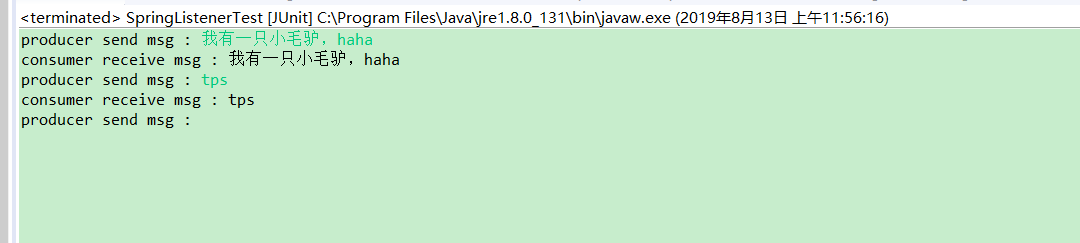
2、单元测试
1package com.cfang.prebo.activemq;
2
3import java.io.IOException;
4import java.util.Scanner;
5
6import org.junit.Test;
7import org.junit.runner.RunWith;
8import org.springframework.beans.factory.annotation.Autowired;
9import org.springframework.test.context.ContextConfiguration;
10import org.springframework.test.context.junit4.SpringJUnit4ClassRunner;
11
12import com.cfang.amq.SpringProducer;
13
14@RunWith(SpringJUnit4ClassRunner.class)
15@ContextConfiguration(locations = {"classpath:applicationContext-jms.xml" })
16public class SpringListenerTest {
17
18	@Autowired
19	private SpringProducer springConsumer;
20
21	@Test
22	public void start() throws Exception {
23		System.out.println("======start");
24
25		//发送消息
26		Scanner scanner = new Scanner(System.in);
27		while(true) {
28			System.out.print("producer send msg : ");
29			String line = scanner.nextLine();
30			if("exit".equals(line)) {
31				break;
32			}
33			springConsumer.sendMsg(null, line);
34		}
35
36		//阻塞
37//		System.in.read();
38	}
39
40}
3、运行结果: