
下面我们通过创建一个小示例来学习。
-
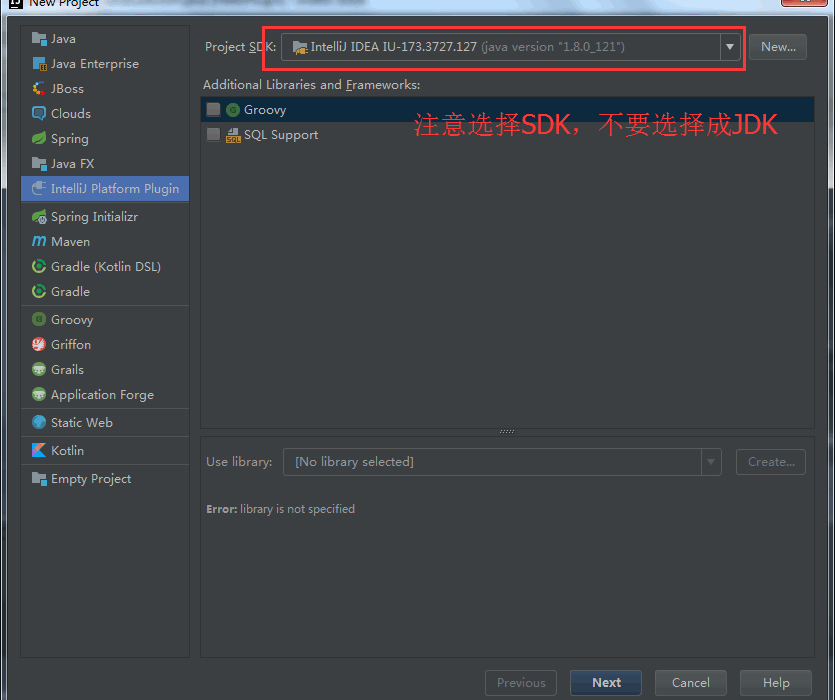
这里是列表文本打开IDEA,新建项目-->选择Idea Plateform Plugin,界面如下所示:
-
输入项目名称,点击finish创建完成后打开。会看到项目resources目录生成了一个plugin.xml文件,具体内容如下:
<idea-plugin> <id>com.your.company.unique.plugin.id</id> <name>Plugin display name here</name> <version>1.0</version> <vendor email="support@yourcompany.com" url="http://www.yourcompany.com">YourCompany</vendor><description><![CDATA[ Enter short description for your plugin here.<br> <em>most HTML tags may be used</em> ]]></description>
<change-notes><![CDATA[ Add change notes here.<br> <em>most HTML tags may be used</em> ]]> </change-notes>
<!-- please see http://www.jetbrains.org/intellij/sdk/docs/basics/getting_started/build_number_ranges.html for description --> <idea-version since-build="173.0"/> <!-- please see http://www.jetbrains.org/intellij/sdk/docs/basics/getting_started/plugin_compatibility.html on how to target different products --> <!-- uncomment to enable plugin in all products <depends>com.intellij.modules.lang</depends> --> <extensions defaultExtensionNs="com.intellij"> <!-- Add your extensions here --> </extensions> <actions> <!-- Add your actions here --> </actions> </idea-plugin>
配置文件主要包含了一些插件的说明信息和维护信息:
- name 插件名称
- version 版本号
- vendor 维护信息,当插件奔溃或出现问题时,方面使用者反馈信息
- description 对插件的简短描述
- change-notes 插件更新记录
- actions 是插件配置文件的重要组成部分,用于插件组件的注册。一般包含group等信息,具体后面会说到。
-
在src目录上右键-->New-->Plugin Dev Kit-->Action,创建一个action类,具体如图:
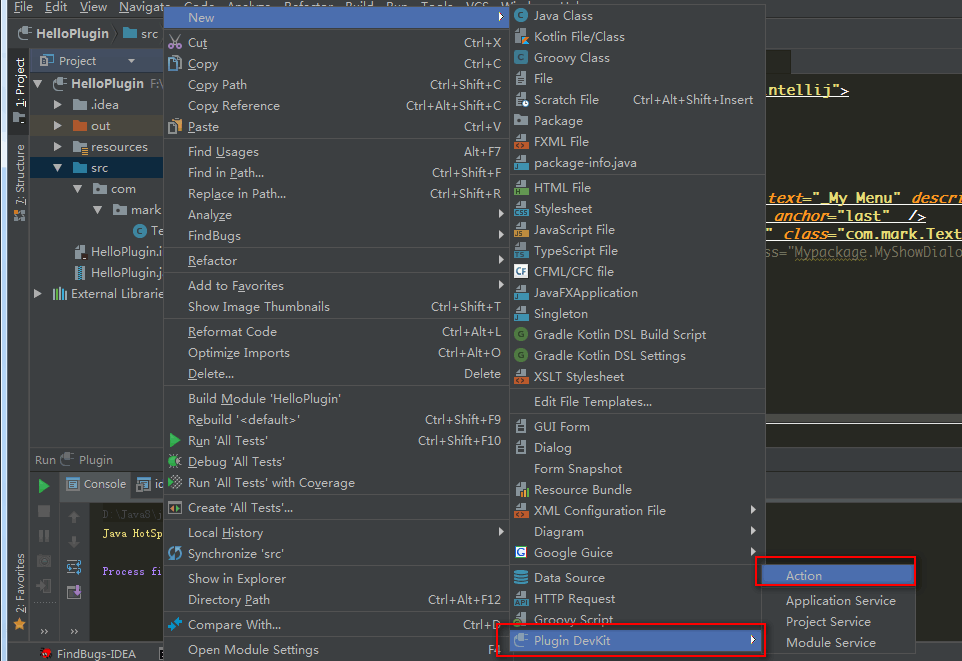 这个类需要继承AnAction。下面是我的action内容:
public class TextBoxAction extends AnAction {
1// If you register the action from Java code, this constructor is used to set the menu item name
2// (optionally, you can specify the menu description and an icon to display next to the menu item).
3// You can omit this constructor when registering the action in the plugin.xml file.
4public TextBoxAction() {
5    // Set the menu item name.
6    super("Test _Boxes");
7    // Set the menu item name, description and icon.
8    // super("Text _Boxes","Item description",IconLoader.getIcon("/Mypackage/icon.png"));
9}
10
11@Override
12public void actionPerformed(AnActionEvent event) {
13    // TODO: insert action logic here
14    Project project = event.getData(PlatformDataKeys.PROJECT);
15    String txt = Messages.showInputDialog(project, "What is your name?", "Input your name", Messages.getQuestionIcon());
16    Messages.showMessageDialog(project, "Hello, " + txt + "!\n I am glad to see you.", "Information", Messages.getInformationIcon());
17
18}
}
在actions节点中增加如下内容:
1<group id="HelloPlugin.SampleMenu" text="_My Menu" description="测试插件示例">
2      <add-to-group group-id="MainMenu" anchor="last"  />
3      <action id="HelloPlugin.Textboxes" class="com.mark.TextBoxAction" text="Text _Boxes" description="A test menu item" />
4    </group>
- action:是action关联配置,比如text是在开发工具的显示菜单名称,description是描述信息,id要保证唯一性
- add-to-group:表示添加到某个功能组,由group-id指定,示例中是在idea工具菜单栏添加了一个菜单选项,anchor指定菜单出现的位置。有before,first,after,last等选择。
- 调试(默认按键) 调试 Shift + F9. 运行 Shift + F10. 相当于会再启动一个IDE,此时已将我们自定义的功能加入。具体界面如下:

会发现,我们的菜单已经出现在菜单栏上了。 5. 打包插件或导出 一个插件写好肯定是需要和大家共享使用的,IDEA的插件发布很简单。具体如下:
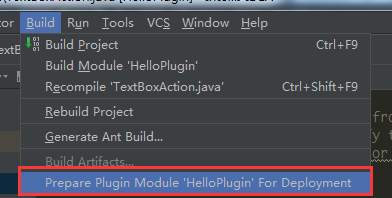
然后就可以在项目路径下看见我们打的jar。