
这篇博客是学习springboot整合各种三方框架后基本的CRUD操作。
1,整合jsp
注意springboot默认是不支持jsp的,所以我们利用springboot集成jsp时,一定要创建成一个war类型项目,同时要引入外部tomcat。
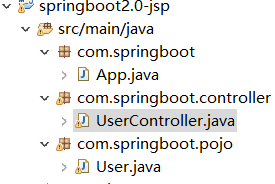
如项目结构:
pom.xml
1<project xmlns="http://maven.apache.org/POM/4.0.0" xmlns:xsi="http://www.w3.org/2001/XMLSchema-instance" xsi:schemaLocation="http://maven.apache.org/POM/4.0.0 http://maven.apache.org/xsd/maven-4.0.0.xsd">
2  <modelVersion>4.0.0</modelVersion>
3  <groupId>com.sb</groupId>
4  <artifactId>springboot2.0-jsp</artifactId>
5  <version>0.0.1-SNAPSHOT</version>
6  <packaging>war</packaging>
7
8   <parent>
9        <groupId>org.springframework.boot</groupId>
10        <artifactId>spring-boot-starter-parent</artifactId>
11        <version>2.0.0.RELEASE</version>
12    </parent>
13    <dependencies>
14        <!-- SpringBoot 对lombok 支持 -->
15        <dependency>
16            <groupId>org.projectlombok</groupId>
17            <artifactId>lombok</artifactId>
18        </dependency>
19
20        <!-- SpringBoot web 核心组件 -->
21        <dependency>
22            <groupId>org.springframework.boot</groupId>
23            <artifactId>spring-boot-starter-web</artifactId>
24        </dependency>
25        <dependency>
26            <groupId>org.springframework.boot</groupId>
27            <artifactId>spring-boot-starter-tomcat</artifactId>
28        </dependency>
29        <!-- SpringBoot 外部tomcat支持 -->
30        <dependency>
31            <groupId>org.apache.tomcat.embed</groupId>
32            <artifactId>tomcat-embed-jasper</artifactId>
33        </dependency>
34
35        <!-- springboot-log4j -->
36        <dependency>
37            <groupId>org.springframework.boot</groupId>
38            <artifactId>spring-boot-starter-log4j</artifactId>
39            <version>1.3.8.RELEASE</version>
40        </dependency>
41        <!-- springboot-aop 技术 -->
42        <dependency>
43            <groupId>org.springframework.boot</groupId>
44            <artifactId>spring-boot-starter-aop</artifactId>
45        </dependency>
46
47    </dependencies>
48</project>
User实体类:
1package com.springboot.pojo;
2
3import lombok.Data;
4import lombok.extern.slf4j.Slf4j;
5
6/**
7 * user实体类
8 * @author Administrator
9 *
10 */
11//该注解表示为当前类生产getter setter方法 是lombok的方法
12@Data
13//该注解表示打印日志信息
14@Slf4j
15public class User {
16
17    private Long id;
18    private String name;
19    private Integer age;
20
21    public User() {
22        // TODO Auto-generated constructor stub
23    }
24
25    public User(Long id, String name, Integer age) {
26        super();
27        this.id = id;
28        this.name = name;
29        this.age = age;
30    }
31
32
33}
控制层:
1package com.springboot.controller;
2
3import java.util.ArrayList;
4import java.util.List;
5
6import org.springframework.stereotype.Controller;
7import org.springframework.ui.Model;
8import org.springframework.web.bind.annotation.RequestMapping;
9import org.springframework.web.bind.annotation.ResponseBody;
10
11import com.springboot.pojo.User;
12
13/**
14 * User对象控制层
15 * @author Administrator
16 *
17 */
18@Controller
19public class UserController {
20
21    @RequestMapping("/getList")
22    public String getList(Model model){
23        List<User> list = new ArrayList<User>();
24        list.add(new User(1L, "东东", 15));
25        list.add(new User(2L, "南南", 11));
26        list.add(new User(3L, "西西", 16));
27        list.add(new User(4L, "贝贝", 12));
28        model.addAttribute("list", list);
29        return "index";
30    }
31
32    @RequestMapping("/getUser")
33    @ResponseBody
34    public String getUser(Long id){
35        String message = null;
36        if(1==id){
37            message = "查询成功";
38        }else{
39            message = "找不到指定对象";
40        }
41        return message;
42    }
43}
App.java
1package com.springboot;
2
3import org.springframework.boot.SpringApplication;
4import org.springframework.boot.autoconfigure.SpringBootApplication;
5
6@SpringBootApplication
7public class App {
8
9    public static void main(String[] args) {
10        SpringApplication.run(App.class, args);
11    }
12
13}
在resources目录下创建属性文件application.peroperties(这是springboot默认的配置文件最好不要改名字)
1###配置前后缀关系
2spring.mvc.view.prefix=/WEB-INF/jsp/
3spring.mvc.view.suffix=.jsp
相信前面这段代码大家都不默认。
最后
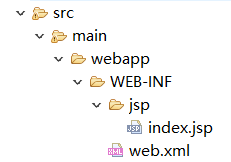
1<%@ page language="java" contentType="text/html; charset=UTF-8"
2    pageEncoding="UTF-8"%>
3<!DOCTYPE html PUBLIC "-//W3C//DTD HTML 4.01 Transitional//EN" "http://www.w3.org/TR/html4/loose.dtd">
4<html>
5<head>
6<meta http-equiv="Content-Type" content="text/html; charset=UTF-8">
7<title>Insert title here</title>
8</head>
9<body>
10  ${list}
11</body>
12</html>
通过App.java中的main函数启动程序
浏览器键入http://localhost:8080/getList
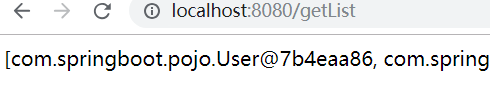
至此我们的springboot整合jsp就以及完成了,在接下来我会在此项目的基础上整合mybatis等一些其他常用框架。