
上一次,跟大家科普了小程序的自定义路由
routes,开启了路由之旅;今天,顺势就单页面应用路由,跟大家唠个五毛钱,如果唠得不好……退…一块钱?
单页面应用特征
假设: 在一个 web 页面中,有1个按钮,点击可跳转到站内其他页面。
多页面应用: 点击按钮,会从新加载一个html资源,刷新整个页面;
单页面应用: 点击按钮,没有新的html请求,只发生局部刷新,能营造出一种接近原生的体验,如丝般顺滑。
SPA 单页面应用为什么可以几乎无刷新呢?因为它的SP——single-page。在第一次进入应用时,即返回了唯一的html页面和它的公共静态资源,后续的所谓“跳转”,都不再从服务端拿html文件,只是DOM的替换操作,是模(jia)拟(zhuang)的。
那么js又是怎么捕捉到组件切换的时机,并且无刷新变更浏览器url呢?靠hash和HTML5History。
hash 路由
特征
- 类似
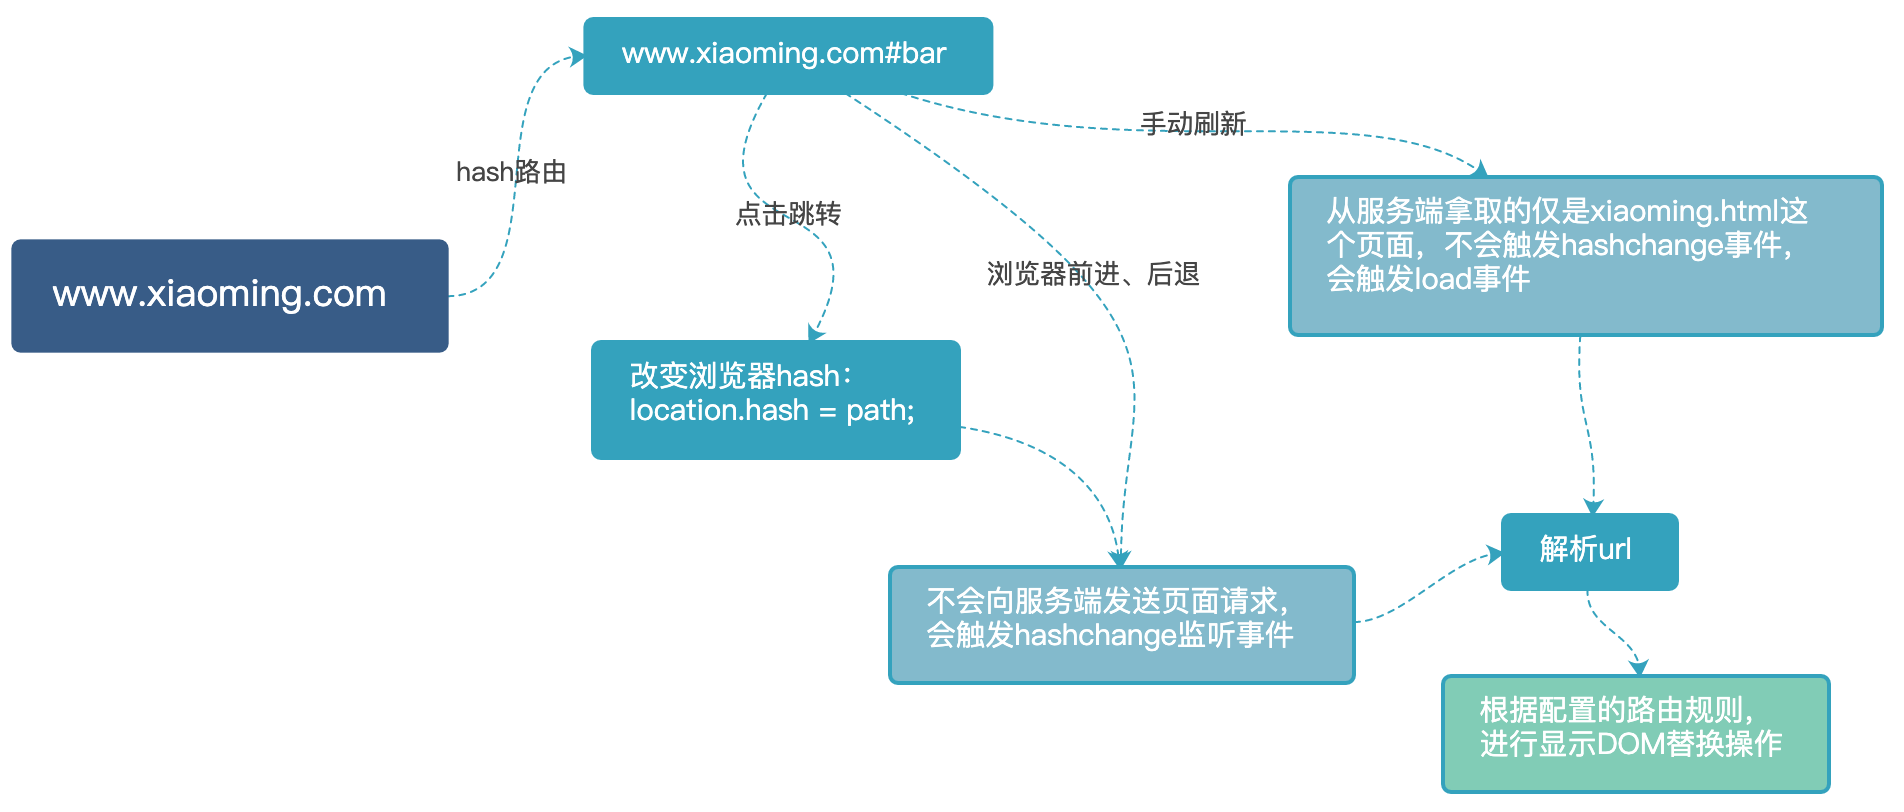
www.xiaoming.html#bar就是哈希路由,当#后面的哈希值发生变化时,不会向服务器请求数据,可以通过hashchange事件来监听到 URL 的变化,从而进行DOM操作来模拟页面跳转 - 不需要服务端配合
- 对 SEO 不友好
原理
HTML5History 路由
特征
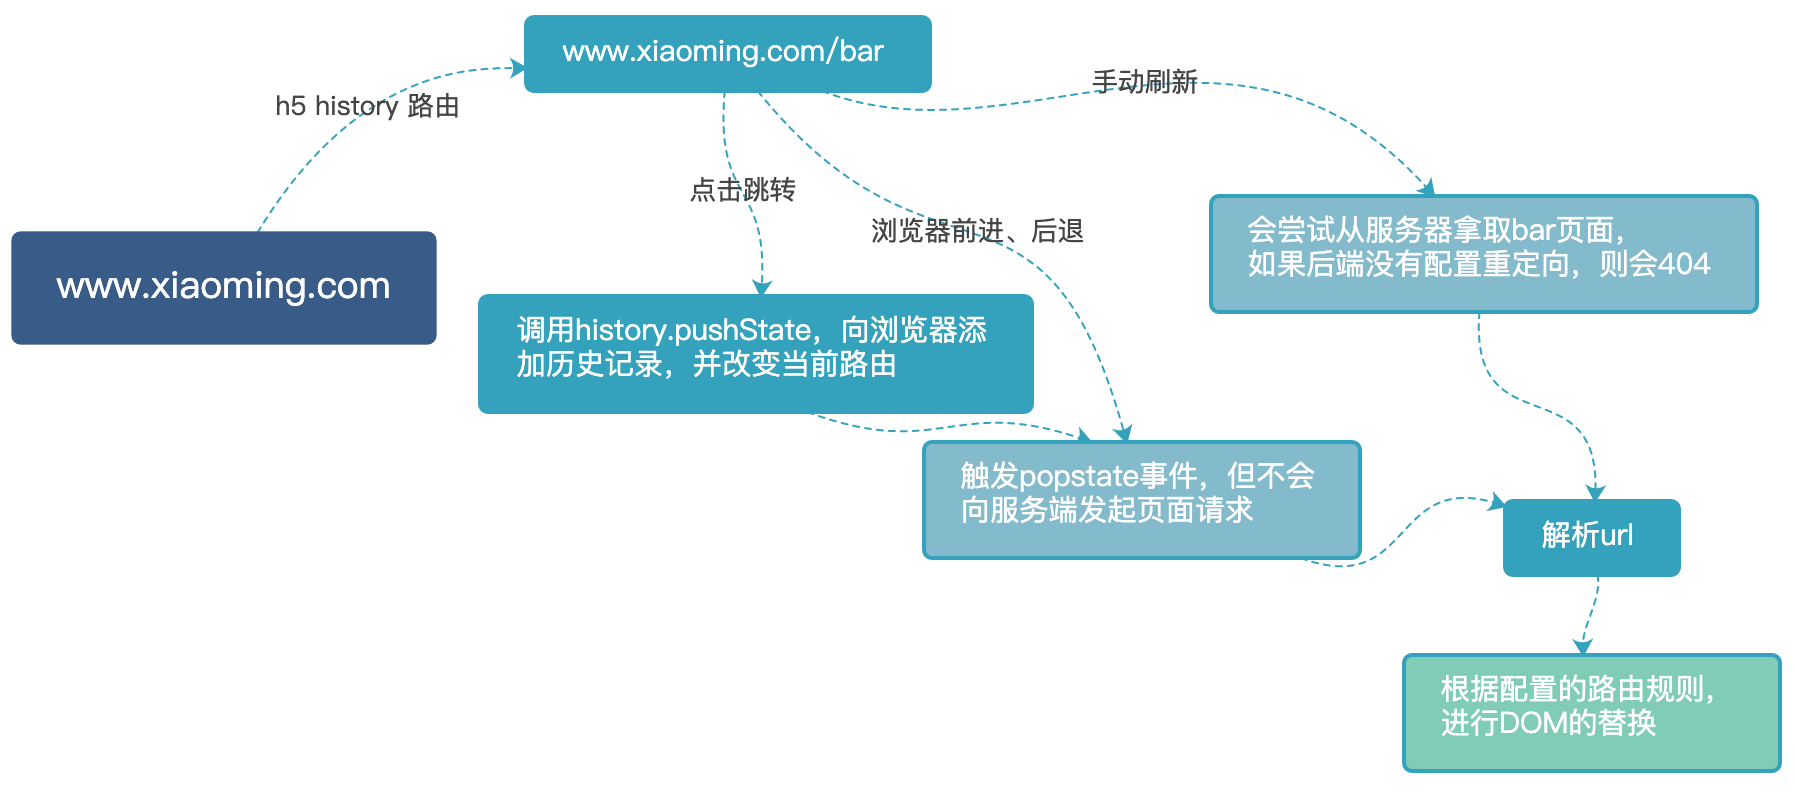
History模式是 HTML5 新推出的功能,比之 hash 路由的方式直观,长成类似这个样子www.xiaoming.html/bar,模拟页面跳转是通过history.pushState(state, title, url)来更新浏览器路由,路由变化时监听popstate事件来操作DOM- 需要后端配合,进行重定向
- 对 SEO 相对友好
原理
vue-router 源码解读
以 Vue 的路由vue-router为例,我们一起来撸一把它的源码。
Tips:因为,本篇的重点在于讲解单页面路由的两种模式,所以,下面只列举了一些关键代码,主要讲解:
- 注册插件
- VueRouter的构造函数,区分路由模式
- 全局注册组件
- hash / HTML5History模式的 push 和监听方法
- transitionTo 方法
注册插件
首先,作为一个插件,要有暴露一个install方法的自觉,给Vue爸爸去 use。
源码的install.js文件中,定义了注册安装插件的方法install,给每个组件的钩子函数混入方法,并在beforeCreate钩子执行时初始化路由:
1Vue.mixin({
2  beforeCreate () {
3    if (isDef(this.$options.router)) {
4      this._routerRoot = this
5      this._router = this.$options.router
6      this._router.init(this)
7      Vue.util.defineReactive(this, '_route', this._router.history.current)
8    } else {
9      this._routerRoot = (this.$parent && this.$parent._routerRoot) || this
10    }
11    registerInstance(this, this)
12  },
13  // 全文中以...来表示省略的方法
14  ...
15});
区分mode
然后,我们从index.js找到整个插件的基类 VueRouter,不难看出,它是在constructor中,根据不同mode 采用不同路由实例的。
1...
2import {install} from './install';
3import {HashHistory} from './history/hash';
4import {HTML5History} from './history/html5';
5...
6export default class VueRouter {
7  static install: () => void;
8  constructor (options: RouterOptions = {}) {
9    if (this.fallback) {
10      mode = 'hash'
11    }
12    if (!inBrowser) {
13      mode = 'abstract'
14    }
15    this.mode = mode
16
17    switch (mode) {
18      case 'history':
19        this.history = new HTML5History(this, options.base)
20        break
21      case 'hash':
22        this.history = new HashHistory(this, options.base, this.fallback)
23        break
24     case 'abstract':
25        this.history = new AbstractHistory(this, options.base)
26        break
27     default:
28      if (process.env.NODE_ENV !== 'production') {
29        assert(false, `invalid mode: ${mode}`)
30      }
31    }
32  }
33}
全局注册router-link组件
这个时候,我们也许会问:使用 vue-router 时, 常见的<router-link/>、 <router-view/>又是在哪里引入的呢?
回到install.js文件,它引入并全局注册了 router-view、router-link组件:
1import View from './components/view';
2import Link from './components/link';
3...
4Vue.component('RouterView', View);
5Vue.component('RouterLink', Link);
在 ./components/link.js 中,<router-link/>组件上默认绑定了click事件,点击触发handler方法进行相应的路由操作。
1const handler = e => {
2  if (guardEvent(e)) {
3    if (this.replace) {
4      router.replace(location, noop)
5    } else {
6      router.push(location, noop)
7    }
8 }
9};
就像最开始提到的,VueRouter构造函数中对不同mode初始化了不同模式的 History 实例,因而router.replace、router.push的方式也不尽相同。接下来,我们分别扒拉下这两个模式的源码。
hash模式
history/hash.js 文件中,定义了HashHistory 类,这货继承自 history/base.js 的 History 基类。
它的prototype上定义了push方法:在支持 HTML5History 模式的浏览器环境中(supportsPushState为 true),调用history.pushState来改变浏览器地址;其他浏览器环境中,则会直接用location.hash = path 来替换成新的 hash 地址。
其实最开始读到这里是有些疑问的,既然已经是 hash 模式为何还要判断supportsPushState?是为了支持scrollBehavior,history.pushState可以传参key过去,这样每个url历史都有一个key,用 key 保存了每个路由的位置信息。
同时,原型上绑定的setupListeners 方法,负责监听 hash 变更的时机:在支持 HTML5History 模式的浏览器环境中,监听popstate事件;而其他浏览器中,则监听hashchange。监听到变化后,触发handleRoutingEvent 方法,调用父类的transitionTo跳转逻辑,进行 DOM 的替换操作。
1import { pushState, replaceState, supportsPushState } from '../util/push-state'
2...
3export class HashHistory extends History {
4  setupListeners () {
5    ...
6    const handleRoutingEvent = () => {
7        const current = this.current
8        if (!ensureSlash()) {
9          return
10        }
11        // transitionTo调用的父类History下的跳转方法,跳转后路径会进行hash化
12        this.transitionTo(getHash(), route => {
13          if (supportsScroll) {
14            handleScroll(this.router, route, current, true)
15          }
16          if (!supportsPushState) {
17            replaceHash(route.fullPath)
18          }
19        })
20      }
21      const eventType = supportsPushState ? 'popstate' : 'hashchange'
22      window.addEventListener(
23        eventType,
24        handleRoutingEvent
25      )
26      this.listeners.push(() => {
27        window.removeEventListener(eventType, handleRoutingEvent)
28      })
29  }
30
31  push (location: RawLocation, onComplete?: Function, onAbort?: Function) {
32    const { current: fromRoute } = this
33    this.transitionTo(
34      location,
35      route => {
36        pushHash(route.fullPath)
37        handleScroll(this.router, route, fromRoute, false)
38        onComplete && onComplete(route)
39      },
40      onAbort
41    )
42  }
43}
44...
45
46// 处理传入path成hash形式的URL
47function getUrl (path) {
48  const href = window.location.href
49  const i = href.indexOf('#')
50  const base = i >= 0 ? href.slice(0, i) : href
51  return `${base}#${path}`
52}
53...
54
55// 替换hash
56function pushHash (path) {
57  if (supportsPushState) {
58    pushState(getUrl(path))
59  } else {
60    window.location.hash = path
61  }
62}
63
64// util/push-state.js文件中的方法
65export const supportsPushState =
66  inBrowser &&
67  (function () {
68    const ua = window.navigator.userAgent
69
70    if (
71      (ua.indexOf('Android 2.') !== -1 || ua.indexOf('Android 4.0') !== -1) &&
72      ua.indexOf('Mobile Safari') !== -1 &&
73      ua.indexOf('Chrome') === -1 &&
74      ua.indexOf('Windows Phone') === -1
75    ) {
76      return false
77    }
78    return window.history && typeof window.history.pushState === 'function'
79  })()
HTML5History模式
类似的,HTML5History 类定义在 history/html5.js 中。
定义push原型方法,调用history.pusheState修改浏览器的路径。
与此同时,原型setupListeners 方法对popstate进行了事件监听,适时做 DOM 替换。
1import {pushState, replaceState, supportsPushState} from '../util/push-state';
2...
3export class HTML5History extends History {
4
5  setupListeners () {
6
7    const handleRoutingEvent = () => {
8    const current = this.current;
9    const location = getLocation(this.base);
10    if (this.current === START && location === this._startLocation) {
11      return
12    }
13
14    this.transitionTo(location, route => {
15      if (supportsScroll) {
16        handleScroll(router, route, current, true)
17      }
18    })
19    }
20    window.addEventListener('popstate', handleRoutingEvent)
21    this.listeners.push(() => {
22      window.removeEventListener('popstate', handleRoutingEvent)
23    })
24  }
25  push (location: RawLocation, onComplete?: Function, onAbort?: Function) {
26    const { current: fromRoute } = this
27    this.transitionTo(location, route => {
28      pushState(cleanPath(this.base + route.fullPath))
29      handleScroll(this.router, route, fromRoute, false)
30      onComplete && onComplete(route)
31    }, onAbort)
32  }
33}
34
35...
36
37// util/push-state.js文件中的方法
38export function pushState (url?: string, replace?: boolean) {
39  saveScrollPosition()
40  const history = window.history
41  try {
42    if (replace) {
43      const stateCopy = extend({}, history.state)
44      stateCopy.key = getStateKey()
45      history.replaceState(stateCopy, '', url)
46    } else {
47      history.pushState({ key: setStateKey(genStateKey()) }, '', url)
48    }
49  } catch (e) {
50    window.location[replace ? 'replace' : 'assign'](url)
51  }
52}
transitionTo 处理路由变更逻辑
上面提到的两种路由模式,都在监听时触发了this.transitionTo,这到底是个啥呢?它其实是定义在 history/base.js 基类上的原型方法,用来处理路由的变更逻辑。 先通过const route = this.router.match(location, this.current)对传入的值与当前值进行对比,返回相应的路由对象;接着判断新路由是否与当前路由相同,相同的话直接返回;不相同,则在this.confirmTransition中执行回调更新路由对象,并对视图相关DOM进行替换操作。
1export class History {
2 ...
3 transitionTo (
4    location: RawLocation,
5    onComplete?: Function,
6    onAbort?: Function
7  ) {
8    const route = this.router.match(location, this.current)
9    this.confirmTransition(
10      route,
11      () => {
12        const prev = this.current
13        this.updateRoute(route)
14        onComplete && onComplete(route)
15        this.ensureURL()
16        this.router.afterHooks.forEach(hook => {
17          hook && hook(route, prev)
18        })
19
20        if (!this.ready) {
21          this.ready = true
22          this.readyCbs.forEach(cb => {
23            cb(route)
24          })
25        }
26      },
27      err => {
28        if (onAbort) {
29          onAbort(err)
30        }
31        if (err && !this.ready) {
32          this.ready = true
33          // https://github.com/vuejs/vue-router/issues/3225
34          if (!isRouterError(err, NavigationFailureType.redirected)) {
35            this.readyErrorCbs.forEach(cb => {
36              cb(err)
37            })
38          } else {
39            this.readyCbs.forEach(cb => {
40              cb(route)
41            })
42          }
43        }
44      }
45    )
46  }
47  ...
48}
最后
好啦,以上就是单页面路由的一些小知识,希望我们能一起从入门到永不放弃~~