
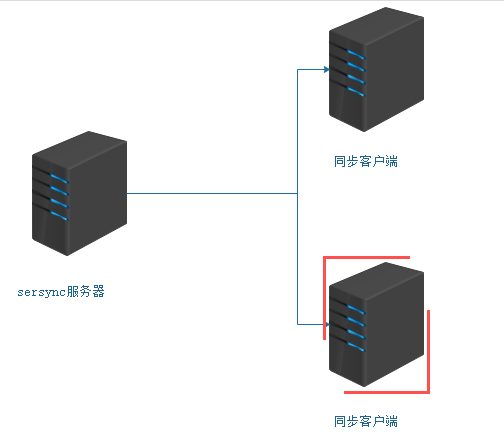
sersync其实是利用inotify和rsync两种软件技术来实现数据实时同步功能的,inotify是用于监听sersync所在服务器上的文件变化,结合rsync软件来进行数据同步,将数据实时同步给客户端服务器。
工作过程:在同步主服务器上开启sersync,负责监听文件系统的变化,然后调用rsync命令把更新的文件同步到目标服务器上,主服务器上安装sersync软件,目标服务器上安装rsync服务
1、客户端配置
1[root@localhost2 ~]# cat /etc/rsyncd.conf
2##created by cai at 2018-2-24
3uid=rsync
4gid=rsync
5use chroot = no
6max connections = 200
7timeout = 300
8pid file = /var/run/rsyncd.pid
9lock file = /var/run/rsync.lock
10log file = /var/log/rsyncd.log
11[data]
12path = /data/
13ignore errors
14read only = false
15list = false
16hosts allow = 192.168.181.128:52000/24
17hosts deny = 0.0.0.0/32
18auth users = rsync_body
19secrets file = /etc/rsync.password
[root@localhost2 ~]# ls -ld /data/
drwxrwxrwx. 3 rsync rsync 4096 Feb 24 16:58 /data/
[root@localhost2 ~]# cat /etc/rsync.password
rsync_body:admin
[root@localhost2 ~]# ls -ld /etc/rsync.password
-rw-------. 1 root root 17 Feb 24 16:26 /etc/rsync.password #600权限
[root@localhost2 ~]# netstat -lntup| grep "rsync"
tcp 0 0 0.0.0.0:873 0.0.0.0:* LISTEN 1497/rsync
tcp 0 0 :::873 :::* LISTEN 1497/rsync
2、主服务器配置
1[root@localhost1 ~]# cat /etc/rsync.password
2admin
3[root@localhost1 ~]# ls -ld /etc/rsync.password
4-rw------- 1 root root 6 Feb 24 03:54 /etc/rsync.password
3、安装sersync服务
采用inotify来对文件进行监控,当监控到文件有文件发生改变的时候,就会调用rsync实现触发式实时同步!
安装sersync(注意sersync是工作在rsync的源服务器上,也就是客户端上)
1[root@salt-client01 ~]# cd /usr/local/src/
2[root@salt-client01 src]# tar -zxvf sersync2.5.4_64bit_binary_stable_final.tar.gz  -C /usr/local/
3GNU-Linux-x86/
4GNU-Linux-x86/sersync2
5GNU-Linux-x86/confxml.xml
6[root@salt-client01 src]# cd /usr/local/
7[root@salt-client01 local]# mv GNU-Linux-x86 sersync
8[root@salt-client01 local]# cd sersync/
9[root@salt-client01 sersync]# mkdir conf bin log
10[root@salt-client01sersync]# mv confxml.xml conf
11[root@salt-client01sersync]# mv sersync2 bin/sersync
修改配置文件
1***********************************30行开始******************************
2   <commonParams params="-artuz"/>  #-artuz为rsync同步时的参数
3    <authstart="true" users="rsync的虚拟用户名(rsync_backup)" passwordfile="rsync的密码文件"/>
4   <userDefinedPort start="true"port="873"/><!-- port=874 -->
5   <timeout start="false" time="100"/><!--timeout=100 -->
6    <sshstart="false"/>
7       ************************************第36行***********************************
8       <failLogpath="自己定义的log文件夹(/usr/local/sersync/log)rsync_fail_log.sh"
9       timeToExecute="60"/><!--defaultevery 60mins execute once-->
10       *******************************************************************************
11       *注:若有多个目录备份可以穿件多个配置文件在启动时的-o参数中添加即可
12
13[root@salt-client01 conf]# diff confxml.xml confxml.xml.bak
1424,25c24,25
15<     <localpath watch="/data/">                          #data就是本地需要同步的文件夹到服务器端的目录
16<         <remote ip="192.168.91.166" name="data"/>       #data (server的模块名)是rsync 服务端的文件夹,也就是推送到服务器端的目标文件夹,可以配置多个,
17---
18>     <localpath watch="/opt/tongbu">
19>         <remote ip="127.0.0.1" name="tongbu1"/>
2031c31
21<         <auth start="true" users="rsync_body" passwordfile="/etc/rsync.password"/>   #true 才能生效,rsync_body同步时候虚拟账号,后面是密码文件
22---
23>         <auth start="false" users="root" passwordfile="/etc/rsync.pas"/>
2433c33
25<         <timeout start="true" time="100"/><!-- timeout=100 -->                    #true 才能生效
26---
27>         <timeout start="false" time="100"/><!-- timeout=100 -->
2836c36
29<     <failLog path="/usr/local/sersync/log/rsync_fail_log.sh" timeToExecute="60"/><!--default every 60mins execute once-->  #检测rsync进程判断,没有自动启
30---
31>     <failLog path="/tmp/rsync_fail_log.sh" timeToExecute="60"/><!--default evePry 60mins execute once-->
启动sersync
1[root@salt-client01 src]# echo 'export PATH=$PATH:/usr/local/sersync/bin'>>/etc/profile #声明环境变量
2[root@salt-client01 src]# source /etc/profile
3[root@salt-client01 src]# sersync2 -r -d -o /usr/local/sersync/conf/confxml.xml  #启动
4set the system param
5execute:echo 50000000 > /proc/sys/fs/inotify/max_user_watches
6execute:echo 327679 > /proc/sys/fs/inotify/max_queued_events
7parse the command param
8option: -r     rsync all the local files to the remote servers before the sersync work
9option: -d     run as a daemon
10option: -o     config xml name:  /usr/local/sersync/conf/confxml.xml
11daemon thread num: 10
12parse xml config file
13host ip : localhost    host port: 8008
14daemon start,sersync run behind the console
15use rsync password-file :
16user is    rsync_body
17passwordfile is     /etc/rsync.password
18config xml parse success
19please set /etc/rsyncd.conf max connections=0 Manually
20sersync working thread 12  = 1(primary thread) + 1(fail retry thread) + 10(daemon sub threads)
21Max threads numbers is: 22 = 12(Thread pool nums) + 10(Sub threads)
22please according your cpu ,use -n param to adjust the cpu rate
23------------------------------------------
24rsync the directory recursivly to the remote servers once
25working please wait...
26execute command: cd /data && rsync -artuz -R --delete ./  --timeout=100 rsync_body@192.168.91.166::data --password-file=/etc/rsync.password >/dev/null 2>&1
27run the sersync:
28watch path is: /data  #此时可以看出sersync已经启动成功了
29
30#检测脚本
31[root@salt-client01 log]# pwd
32/usr/local/sersync/log
33[root@salt-client01 log]# vim rsync_fail_log.sh
34[root@salt-client01 log]# chmod +x rsync_fail_log.sh
35[root@salt-client01 ~]# cat /usr/local/sersync/log/rsync_fail_log.sh
36#!/bin/bash
37#Purpose: Check sersync whether it is alive
38#Author: cai meng zhi
39SERSYNC="/usr/local/sersync/bin/sersync2"
40CONF_FILE="/usr/local/sersync/conf/confxml.xml"
41STATUS=$(ps aux |grep 'sersync2'|grep -v 'grep'|wc -l)
42if [ $STATUS -eq 0 ];
43then
44        $SERSYNC -d -r -o $CONF_FILE &
45else
46        exit 0;
47fi
48脚本写好以后,添加到计划任务中去
49*/1 * * * * /bin/bash /usr/local/sersync/log/rsync_fail_log.sh  > /dev/null 2>&1
50
51测试同步:
52客户端新增文件
53[root@salt-client01 data]# cp /etc/passwd 192.168.91.156.passwd
54[root@salt-client01 data]# ll
55total 4
56-rw-r--r-- 1 root root 1928 Nov 10 18:15 192.168.91.156.passwd
57-rw-r--r-- 1 root root    0 Nov 10 17:27 3
58服务端检测
59[root@salt-master data]# cd /data/
60[root@salt-master data]# ll
61total 8
62-rw-r--r-- 1 root root 1928 Nov 10 18:15 192.168.91.156.passwd  #说明已经同步过来了
63-rw-r--r-- 1 root root    0 Nov 10 17:27 3
64drwxr-xr-x 2 root root 4096 Nov 10 17:27 data
65
66客户端测试删除
67[root@salt-client01 data]# rm rf 192.168.91.156.passwd
68rm: cannot remove `rf': No such file or directory
69rm: remove regular file `192.168.91.156.passwd'? y
70[root@salt-client01 data]# ll
71total 0
72-rw-r--r-- 1 root root 0 Nov 10 17:27 3
73[root@salt-client01 data]#
74
75服务器端:
76[root@salt-master data]# ll
77total 4
78-rw-r--r-- 1 root root    0 Nov 10 17:27 3   #说明已经删除掉了
79drwxr-xr-x 2 root root 4096 Nov 10 17:27 data
4、常见错误汇总
1错误一:
2@ERROR: auth failed on module xxxxx
3rsync: connection unexpectedly closed(90 bytes read so far)
4rsync error: error in rsync protocoldata stream (code 12) at io.c(150)
5说明:这是因为密码设置错了,无法登入成功,检查一下rsync.pwd,看客服是否匹配。还有服务器端没启动rsync 服务也会出现这种情况。
6
7错误二:
8password file must not beother-accessible
9continuing without password file
10Password:
11说明:这是因为rsyncd.pwdrsyncd.sec的权限不对,应该设置为600。如:chmod600 rsyncd.pwd
12
13错误三:
14@ERROR: chroot failed
15rsync: connection unexpectedly closed(75 bytes read so far)
16rsync error: error in rsync protocoldata stream (code 12) at io.c(150)
17说明:这是因为你在 rsync.conf中设置的 path 路径不存在,要新建目录才能开启同步
18
19错误四:
20rsync: failed to connect to218.107.243.2: No route to host (113)
21rsync error: error in socket IO (code10) at clientserver.c(104) [receiver=2.6.9]
22说明:防火墙问题导致,这个最好先彻底关闭防火墙,排错的基本法就是这样,无论是S还是C,还有ignore errors选项问题也会导致
23
24错误五:
25@ERROR: access denied to www fromunknown (192.168.1.123)
26rsync: connection unexpectedly closed(0 bytes received so far) [receiver]
27rsync error: error in rsync protocoldata stream (code 12) at io.c(359)
28说明:此问题很明显,是配置选项hostallow的问题,初学者喜欢一个允许段做成一个配置,然后模块又是同一个,致使导致
29
30错误六:
31rsync error: received SIGINT,SIGTERM, or SIGHUP (code 20) at rsync.c(244) [generator=2.6.9]
32rsync error: received SIGUSR1 (code19) at main.c(1182) [receiver=2.6.9]
33说明:导致此问题多半是服务端服务没有被正常启动,到服务器上去查查服务是否有启动,然后查看下 /var/run/rsync.pid 文件是否存在,最干脆的方法是杀死已经启动了服务,然后再次启动服务或者让脚本加入系统启动服务级别然后shutdown -r now服务器
34
35错误七:
36rsync: read error: Connection resetby peer (104)
37rsync error: error in rsync protocoldata stream (code 12) at io.c(604) [sender=2.6.9]
38说明:原数据目录里没有数据存在