
1.导包:
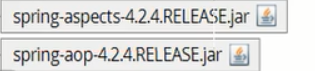
导入spring中的这两个包
再导入其他包(网上下载):

2.准备目标对象:


1package service;
2
3public class UserServiceImpl implements UserService {
4    @Override
5    public void save() {
6        System.out.println("保存用户!");
7    }
8    @Override
9    public void delete() {
10        System.out.println("删除用户!");
11    }
12    @Override
13    public void update() {
14        System.out.println("更新用户!");
15    }
16    @Override
17    public void find() {
18        System.out.println("查找用户!");
19    }
20}
View Code
3.准备通知:
1package springaop;
2
3import org.aspectj.lang.ProceedingJoinPoint;
4
5//通知类
6public class MyAdvice {
7
8    //前置通知
9//        |-目标方法运行之前调用
10    //后置通知(如果出现异常不会调用)
11//        |-在目标方法运行之后调用
12    //环绕通知
13//        |-在目标方法之前和之后都调用
14    //异常拦截通知
15//        |-如果出现异常,就会调用
16    //后置通知(无论是否出现 异常都会调用)
17//        |-在目标方法运行之后调用
18//----------------------------------------------------------------
19    //前置通知
20    public void before(){
21        System.out.println("这是前置通知!!");
22    }
23    //后置通知
24    public void afterReturning(){
25        System.out.println("这是后置通知(如果出现异常不会调用)!!");
26    }
27    //环绕通知
28    public Object around(ProceedingJoinPoint pjp) throws Throwable {
29        System.out.println("这是环绕通知之前的部分!!");
30        Object proceed = pjp.proceed();//调用目标方法
31        System.out.println("这是环绕通知之后的部分!!");
32        return proceed;
33    }
34    //异常通知
35    public void afterException(){
36        System.out.println("出现异常了!");
37    }
38    //后置通知
39    public void after(){
40        System.out.println("这是后置通知(出现异常也会调用)!");
41    }
42}
4.配置将通知织入目标对象
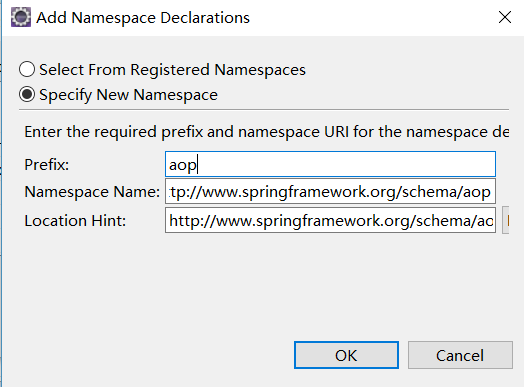
(导入aop约束)
bean包的user对象:
1package bean;
2
3import javax.annotation.PostConstruct;
4import javax.annotation.PreDestroy;
5import javax.annotation.Resource;
6
7import org.junit.validator.PublicClassValidator;
8import org.springframework.beans.factory.annotation.Autowired;
9import org.springframework.beans.factory.annotation.Qualifier;
10import org.springframework.beans.factory.annotation.Value;
11import org.springframework.context.annotation.Scope;
12import org.springframework.stereotype.Component;
13import org.springframework.stereotype.Controller;
14import org.springframework.stereotype.Repository;
15import org.springframework.stereotype.Service;
16
17//代替的配置文件内容<bean name="user" class="bean.User"/>
18//    @Component("user")//四种本质相同,为了方便理解建议使用以下三种
19//    @Service("user")//service层使用
20//    @Controller("user")//web层使用
21    @Repository("user")//dao层使用
22//指定对象的作用范围
23@Scope(scopeName="singleton")
24public class User {
25    @Value("Tom")//赋值
26    private String name;
27
28    private Integer age;
29
30    //@Autowired//对象赋值,自动装配
31    //存在问题:如果是多个类型一致的对象,无法分辨
32    @Resource(name="car")//这种方式可以明确指定(推荐)
33    private Car car;
34
35    public Car getCar() {
36        return car;
37    }
38    public void setCar(Car car) {
39        this.car = car;
40    }
41    public String getName() {
42        return name;
43    }
44    public void setName(String name) {
45        this.name = name;
46    }
47    public Integer getAge() {
48        return age;
49    }
50    @Value("20")//也可以在set方法赋值,效果一样,但不破坏封装性
51    public void setAge(Integer age) {
52        this.age = age;
53    }
54    @Override
55    public String toString() {
56        return "User [name=" + name + ", age=" + age + ", car=" + car + "]";
57    }
58
59    @PostConstruct//初始化方法,当相于配置文件中的init-mothod
60    public void init(){
61        System.out.println("初始化");
62    }
63    @PreDestroy//销毁方法
64    public void destory(){
65        System.out.println("销毁");
66    }
67
68}
xml配置文件:
1<?xml version="1.0" encoding="UTF-8"?>
2<beans xmlns:xsi="http://www.w3.org/2001/XMLSchema-instance" xmlns="http://www.springframework.org/schema/beans" xmlns:context="http://www.springframework.org/schema/context" xmlns:aop="http://www.springframework.org/schema/aop" xsi:schemaLocation="http://www.springframework.org/schema/beans http://www.springframework.org/schema/beans/spring-beans-4.2.xsd http://www.springframework.org/schema/context http://www.springframework.org/schema/context/spring-context-4.2.xsd http://www.springframework.org/schema/aop http://www.springframework.org/schema/aop/spring-aop-4.2.xsd ">
3
4<!-- 准备工作: 导入aop(约束)命名空间 -->
5<!-- 1.配置目标对象 -->
6    <bean name="userService" class="service.UserServiceImpl" ></bean>
7<!-- 2.配置通知对象 -->
8    <bean name="myAdvice" class="springaop.MyAdvice" ></bean>
9<!-- 3.配置将通知织入目标对象 -->
10    <aop:config>
11        <!-- 配置切入点
12            public void service.UserServiceImpl.save()   切点为save()方法
13            void service.UserServiceImpl.save()   public可以省略
14            * service.UserServiceImpl.save()   返回值不做要求,可以*代替
15            * service.UserServiceImpl.*()    为某类的所有空参方法
16
17            * service.*ServiceImpl.*(..)    最终形态:从某包下找以serviceimpl结尾的类的所有方法
18            * service..*ServiceImpl.*(..)
19        -->
20        <aop:pointcut expression="execution(* service.*ServiceImpl.*(..))" id="pc"/>
21        <aop:aspect ref="myAdvice" >
22            <!-- 指定名为before方法作为前置通知 -->
23            <aop:before method="before" pointcut-ref="pc" />
24            <!-- 后置 -->
25            <aop:after-returning method="afterReturning" pointcut-ref="pc" />
26            <!-- 环绕通知 -->
27            <aop:around method="around" pointcut-ref="pc" />
28            <!-- 异常拦截通知 -->
29            <aop:after-throwing method="afterException" pointcut-ref="pc"/>
30            <!-- 后置 -->
31            <aop:after method="after" pointcut-ref="pc"/>
32        </aop:aspect>
33    </aop:config>
34</beans>
测试类:
1package springaop;
2
3import javax.annotation.Resource;
4
5import org.junit.Test;
6import org.junit.runner.RunWith;
7import org.springframework.context.ApplicationContext;
8import org.springframework.context.support.ClassPathXmlApplicationContext;
9import org.springframework.test.context.ContextConfiguration;
10import org.springframework.test.context.junit4.SpringJUnit4ClassRunner;
11
12import bean.User;
13import service.UserService;
14@RunWith(SpringJUnit4ClassRunner.class)
15@ContextConfiguration("classpath:springaop/applicationContext.xml")
16public class Demo {
17    @Resource(name="userService")
18    private UserService us;
19
20    @Test
21    public void fun1(){
22        us.save();
23    }
24
25}
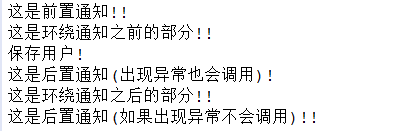
调用sava方法:控制台打印如下
补充(这种方式不推荐,了解即可):
可以不使用xml配置文件,改为注解
1package annotationaop;
2
3import org.aspectj.lang.ProceedingJoinPoint;
4import org.aspectj.lang.annotation.After;
5import org.aspectj.lang.annotation.AfterReturning;
6import org.aspectj.lang.annotation.AfterThrowing;
7import org.aspectj.lang.annotation.Around;
8import org.aspectj.lang.annotation.Aspect;
9import org.aspectj.lang.annotation.Before;
10import org.aspectj.lang.annotation.Pointcut;
11
12//通知类
13@Aspect
14//表示该类是一个通知类
15public class MyAdvice {
16    @Pointcut("execution(* service.*ServiceImpl.*(..))")
17    public void pc(){}
18    //前置通知
19    //指定该方法是前置通知,并制定切入点
20    @Before("MyAdvice.pc()")
21    public void before(){
22        System.out.println("这是前置通知!!");
23    }
24    //后置通知
25    @AfterReturning("MyAdvice.pc()")
26    public void afterReturning(){
27        System.out.println("这是后置通知(如果出现异常不会调用)!!");
28    }
29    //环绕通知
30    @Around("MyAdvice.pc()")
31    public Object around(ProceedingJoinPoint pjp) throws Throwable {
32        System.out.println("这是环绕通知之前的部分!!");
33        Object proceed = pjp.proceed();//调用目标方法
34        System.out.println("这是环绕通知之后的部分!!");
35        return proceed;
36    }
37    //异常通知
38    @AfterThrowing("MyAdvice.pc()")
39    public void afterException(){
40        System.out.println("出现异常了!");
41    }
42    //后置通知
43    @After("MyAdvice.pc()")
44    public void after(){
45        System.out.println("这是后置通知(出现异常也会调用)!!");
46    }
47}
配置文件做相应修改:
1<?xml version="1.0" encoding="UTF-8"?>
2<beans xmlns:xsi="http://www.w3.org/2001/XMLSchema-instance" xmlns="http://www.springframework.org/schema/beans" xmlns:context="http://www.springframework.org/schema/context" xmlns:aop="http://www.springframework.org/schema/aop" xsi:schemaLocation="http://www.springframework.org/schema/beans http://www.springframework.org/schema/beans/spring-beans-4.2.xsd http://www.springframework.org/schema/context http://www.springframework.org/schema/context/spring-context-4.2.xsd http://www.springframework.org/schema/aop http://www.springframework.org/schema/aop/spring-aop-4.2.xsd ">
3
4<!-- 准备工作: 导入aop(约束)命名空间 -->
5<!-- 1.配置目标对象 -->
6    <bean name="userService" class="service.UserServiceImpl" ></bean>
7<!-- 2.配置通知对象 -->
8    <bean name="myAdvice" class="annotationaop.MyAdvice" ></bean>
9<!-- 3.开启使用注解完成织入 -->
10    <aop:aspectj-autoproxy></aop:aspectj-autoproxy>
11
12</beans>