
Spring Cloud集成了Ribbon,结合Eureka,可实现客户端的负载均衡。
下面实现一个例子,结构下图所示。
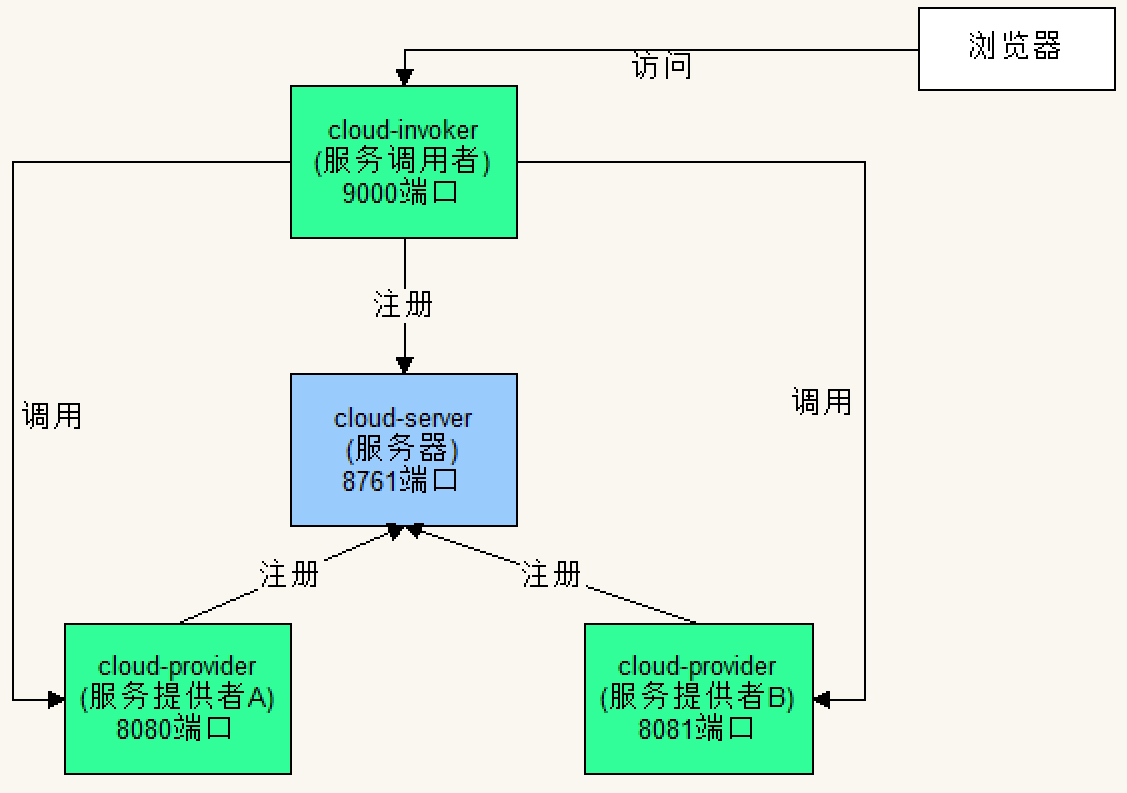
一、服务器端
1、创建项目
开发工具:IntelliJ IDEA 2019.2.3
IDEA中创建一个新的SpringBoot项目,名称为“cloud-server”,SpringBoot版本选择2.1.10,在选择Dependencies(依赖)的界面勾选Spring Cloud Discovery ->
Eureka Server,创建完成后的pom.xml配置文件自动添加SpringCloud最新稳定版本依赖,当前为Greenwich.SR3。
pom.xml完整内容如下:


1<?xml version="1.0" encoding="UTF-8"?>
2<project xmlns="http://maven.apache.org/POM/4.0.0" xmlns:xsi="http://www.w3.org/2001/XMLSchema-instance"
3         xsi:schemaLocation="http://maven.apache.org/POM/4.0.0 https://maven.apache.org/xsd/maven-4.0.0.xsd">
4    <modelVersion>4.0.0</modelVersion>
5    <parent>
6        <groupId>org.springframework.boot</groupId>
7        <artifactId>spring-boot-starter-parent</artifactId>
8        <version>2.1.10.RELEASE</version>
9        <relativePath/> <!-- lookup parent from repository -->
10    </parent>
11    <groupId>com.example</groupId>
12    <artifactId>cloud-server</artifactId>
13    <version>0.0.1-SNAPSHOT</version>
14    <name>cloud-server</name>
15    <description>Demo project for Spring Boot</description>
16
17    <properties>
18        <java.version>1.8</java.version>
19        <spring-cloud.version>Greenwich.SR3</spring-cloud.version>
20    </properties>
21
22    <dependencies>
23        <dependency>
24            <groupId>org.springframework.cloud</groupId>
25            <artifactId>spring-cloud-starter-netflix-eureka-server</artifactId>
26        </dependency>
27
28        <dependency>
29            <groupId>org.springframework.boot</groupId>
30            <artifactId>spring-boot-starter-test</artifactId>
31            <scope>test</scope>
32        </dependency>
33    </dependencies>
34
35    <dependencyManagement>
36        <dependencies>
37            <dependency>
38                <groupId>org.springframework.cloud</groupId>
39                <artifactId>spring-cloud-dependencies</artifactId>
40                <version>${spring-cloud.version}</version>
41                <type>pom</type>
42                <scope>import</scope>
43            </dependency>
44        </dependencies>
45    </dependencyManagement>
46
47    <build>
48        <plugins>
49            <plugin>
50                <groupId>org.springframework.boot</groupId>
51                <artifactId>spring-boot-maven-plugin</artifactId>
52            </plugin>
53        </plugins>
54    </build>
55
56</project>
View Code
2、修改配置application.yml
1server:
2  port: 8761
3eureka:
4  client:
5    register-with-eureka: false
6    fetch-registry: false
3、修改启动类代码CloudServerApplication.java
增加注解@EnableEurekaServer
1package com.example.cloudserver;
2
3import org.springframework.boot.SpringApplication;
4import org.springframework.boot.autoconfigure.SpringBootApplication;
5import org.springframework.cloud.netflix.eureka.server.EnableEurekaServer;
6
7@SpringBootApplication
8@EnableEurekaServer
9public class CloudServerApplication {
10
11    public static void main(String[] args) {
12        SpringApplication.run(CloudServerApplication.class, args);
13    }
14
15}
二、服务提供者
1、创建项目
IDEA中创建一个新的SpringBoot项目,除了名称为“cloud-provider”,其它步骤和上面创建服务器端一样。
2、修改配置application.yml
1spring:
2  application:
3    name: cloud-provider
4eureka:
5  instance:
6    hostname: localhost
7  client:
8    serviceUrl:
9      defaultZone: http://localhost:8761/eureka/
3、修改启动类代码CloudProviderApplication.java
增加注解@EnableEurekaClient;
让类在启动时读取控制台输入,决定使用哪个端口启动服务器;
增加一个测试用的控制器方法。
1package com.example.cloudprovider;
2
3//import org.springframework.boot.SpringApplication;
4import org.springframework.boot.autoconfigure.SpringBootApplication;
5import org.springframework.boot.builder.SpringApplicationBuilder;
6import org.springframework.cloud.netflix.eureka.EnableEurekaClient;
7import org.springframework.web.bind.annotation.RequestMapping;
8import org.springframework.web.bind.annotation.RestController;
9
10import javax.servlet.http.HttpServletRequest;
11import java.util.Scanner;
12
13@SpringBootApplication
14@EnableEurekaClient
15@RestController
16public class CloudProviderApplication {
17
18    public static void main(String[] args) {
19        //SpringApplication.run(CloudProviderApplication.class, args);
20        Scanner scan = new Scanner(System.in);
21        String port = scan.nextLine();
22        new SpringApplicationBuilder(CloudProviderApplication.class).properties("server.port=" + port).run(args);
23    }
24
25    @RequestMapping("/")
26    public String index(HttpServletRequest request) {
27        return request.getRequestURL().toString();
28    }
29}
三、服务调用者
1、创建项目
IDEA中创建一个新的SpringBoot项目,除了名称为“cloud-invoker”,其它步骤和上面创建服务器端一样。
2、修改配置application.yml
1server:
2  port: 9000
3spring:
4  application:
5    name: cloud-invoker
6eureka:
7  instance:
8    hostname: localhost
9  client:
10    serviceUrl:
11      defaultZone: http://localhost:8761/eureka/
3、修改启动类代码CloudInvokerApplication.java
增加注解@EnableDiscoveryClient。
1package com.example.cloudinvoker;
2
3import org.springframework.boot.SpringApplication;
4import org.springframework.boot.autoconfigure.SpringBootApplication;
5import org.springframework.cloud.client.discovery.EnableDiscoveryClient;
6
7@SpringBootApplication
8@EnableDiscoveryClient
9public class CloudInvokerApplication {
10
11    public static void main(String[] args) {
12        SpringApplication.run(CloudInvokerApplication.class, args);
13    }
14
15}
4、配置Ribbon有2种方式:使用代码、使用配置文件
方式一:使用代码
(1)新建一个自定义负载规则类MyRule.java
Ribbon的负载均衡器接口定义了服务器的操作,主要是用于进行服务器选择。
调用ILoadBalancer的getAllServers方法可以返回全部服务器,这里只返回第一个服务器。
1package com.example.cloudinvoker;
2
3import com.netflix.loadbalancer.ILoadBalancer;
4import com.netflix.loadbalancer.IRule;
5import com.netflix.loadbalancer.Server;
6
7import java.util.List;
8
9public class MyRule implements IRule {
10
11    private ILoadBalancer iLoadBalancer;
12
13    @Override
14    public Server choose(Object o) {
15        List<Server> servers = iLoadBalancer.getAllServers();
16        System.out.println("自定义服务器规则类,输出服务器信息:");
17        for(Server s: servers){
18            System.out.println(" " + s.getHostPort());
19        }
20        return servers.get(0);
21    }
22
23    @Override
24    public void setLoadBalancer(ILoadBalancer iLoadBalancer) {
25        this.iLoadBalancer = iLoadBalancer;
26    }
27
28    @Override
29    public ILoadBalancer getLoadBalancer() {
30        return this.iLoadBalancer;
31    }
32}
(2)新建一个Ping类MyPing.java
负载均衡器中提供了Ping机制,每隔一段时间去Ping服务器,判断服务器是否存活。
该工作由IPing接口的实现类负责。
1package com.example.cloudinvoker;
2
3import com.netflix.loadbalancer.IPing;
4import com.netflix.loadbalancer.Server;
5
6public class MyPing implements IPing {
7
8    @Override
9    public boolean isAlive(Server server) {
10        System.out.println("自定义Ping类,服务器信息:" + server.getHostPort() + ",状态:" + server.isAlive());
11        return true;
12    }
13}
(3)新建配置类MyConfig.java
1package com.example.cloudinvoker.config;
2
3import com.example.cloudinvoker.MyPing;
4import com.example.cloudinvoker.MyRule;
5import com.netflix.loadbalancer.IPing;
6import com.netflix.loadbalancer.IRule;
7import org.springframework.context.annotation.Bean;
8
9public class MyConfig {
10    @Bean
11    public IRule getRule(){
12        return new MyRule();
13    }
14    @Bean
15    public IPing getPing(){
16        return new MyPing();
17    }
18}
(4)新建配置类CloudProviderConfig.java
1package com.example.cloudinvoker.config;
2
3import org.springframework.cloud.netflix.ribbon.RibbonClient;
4
5@RibbonClient(name = "cloud-provider", configuration = MyConfig.class)
6public class CloudProviderConfig {
7}
方式二:使用配置文件
把方式一的两个配置类注释掉,在application.yml的最后面添加下面配置
1cloud-provider:
2  ribbon:
3    NFLoadBalancerRuleClassName: com.example.cloudinvoker.MyRule
4    NFLoadBalancerPingClassName: com.example.cloudinvoker.MyPing
5    listOfServers: http://localhost:8080/,http://localhost:8081/
5、添加控制器 InvokerController.java
1package com.example.cloudinvoker;
2
3import org.springframework.cloud.client.loadbalancer.LoadBalanced;
4import org.springframework.context.annotation.Bean;
5import org.springframework.context.annotation.Configuration;
6import org.springframework.http.MediaType;
7import org.springframework.web.bind.annotation.RequestMapping;
8import org.springframework.web.bind.annotation.RequestMethod;
9import org.springframework.web.bind.annotation.RestController;
10import org.springframework.web.client.RestTemplate;
11
12@RestController
13@Configuration
14public class InvokerController {
15
16    @LoadBalanced
17    @Bean
18    public RestTemplate getRestTemplate(){
19        return new RestTemplate();
20    }
21
22    @RequestMapping(value="/router", method = RequestMethod.GET,produces = MediaType.APPLICATION_JSON_VALUE)
23    public String router(){
24        RestTemplate restTemplate = getRestTemplate();
25        //根据名称调用服务
26        String json = restTemplate.getForObject("http://cloud-provider/", String.class);
27        return json;
28    }
29}
四、测试
1、启动服务器端。
2、启动两个服务提供者,在控制台中分别输入8080和8081启动。
3、启动服务调用者。
4、浏览器访问http://localhost:9000/router,多次刷新页面,结果都是:
http://localhost:8081/
服务调用者项目IDEA控制台定时输出:
1自定义服务器规则类,输出服务器信息:
2 localhost:8081
3 localhost:8080
4自定义Ping类,服务器信息:localhost:8081,状态:true
5自定义Ping类,服务器信息:localhost:8080,状态:true