
之前在项目中需要接入nessus扫描器,研究了一下nessus的api,现在将自己的成果分享出来。
Nessus提供了丰富的二次开发接口,无论是接入其他系统还是自己实现自动化扫描,都十分方便。
同时Nessus也提供了完备的API文档,可以在 Settings->My Account->API Keys->API documentation

nessus图片
认证
nessus提供两种认证方式,第一种采用常规的登录后获取token的方式,在https://localhost:8834/api#/resources/session条目中可以找到这种方式,它的接口定义如下:
1POST /session
2
3{
4    "username":{string},
5    "password":{string}
6}
输入正确的用户名和密码,登录成功后会返回一个token
···
{
"token": {string}
}
···
在后续请求中,将token放入请求头信息中请求头的key为X-Cookie,值为 token=xxxx,例如 :X-Cookie: token=5fa3d3fd97edcf40a41bb4dbdfd0b470ba45dde04ebc37f8;,下面是获取任务列表的例子
1import requests
2import json
3def get_token(ip, port, username, password):
4    url = "https://{0}:{1}/session".format(ip, port)
5    post_data = {
6        'username': username,
7        'password': password
8    }
9
10    respon = requests.post(url, data=post_data, verify=False)
11    if response.status_code == 200:
12        data = json.loads(response.text)
13        return data["token"]
14
15def get_scan_list()
16    # 这里ip和port可以从配置文件中读取或者从数据库读取,这里我省略了获取这些配置值得操作
17    url = "https://{ip}:{port}/scans".format(ip, port)
18    token = get_token(ip, port, username, password)
19    if token:
20        header = {
21            "X-Cookie":"token={0}".format(token),
22            "Content-Type":"application/json"
23        }
24        response = requests.get(url, headers=header, verify=False)
25        if response.status_code == 200:
26            result = json.loads(respon.text)
27            return result
第二种方式是使用Nessus生成的API Key,这里我们可以依次点击 Settings->My Account->API Keys-->Generate按钮,生成一个key,后续使用时填入头信息中,还是以获取扫描任务列表作为例子
1def get_scan_list()
2    accessKey = "XXXXXX" #此处填入真实的内容
3    secretKey = "XXXXXX" #此处填入真实内容
4
5    url = "https://{ip}:{port}/scans".format(ip, port)
6    token = get_token(ip, port, username, password)
7    if token:
8        header = {
9            'X-ApiKeys': 'accessKey={accesskey};secretKey={secretkey}'.format(accesskey=accessKey, secretkey=secretKey)
10            "Content-Type":"application/json"
11        }
12        response = requests.get(url, headers=header, verify=False)
13        if response.status_code == 200:
14            result = json.loads(respon.text)
15            return result
对比来看使用第二种明显方便一些,因此后续例子都采用第二种方式来呈现
策略模板配置
策略模板的接口文档在 https://localhost:8834/api#/resources/policies 中。
创建策略模板
创建策略模板使用的是 策略模板的create接口,它里面有一个必须填写的参数 uuid 这个参数是一个uuid值,表示以哪种现有模板进行创建。在创建之前需要先获取系统中可用的模板。获取的接口是 /editor/{type}/templates,type 可以选填policy或者scan。这里我们填policy
一般我们都是使用模板中的 Advanced 来创建,如下图
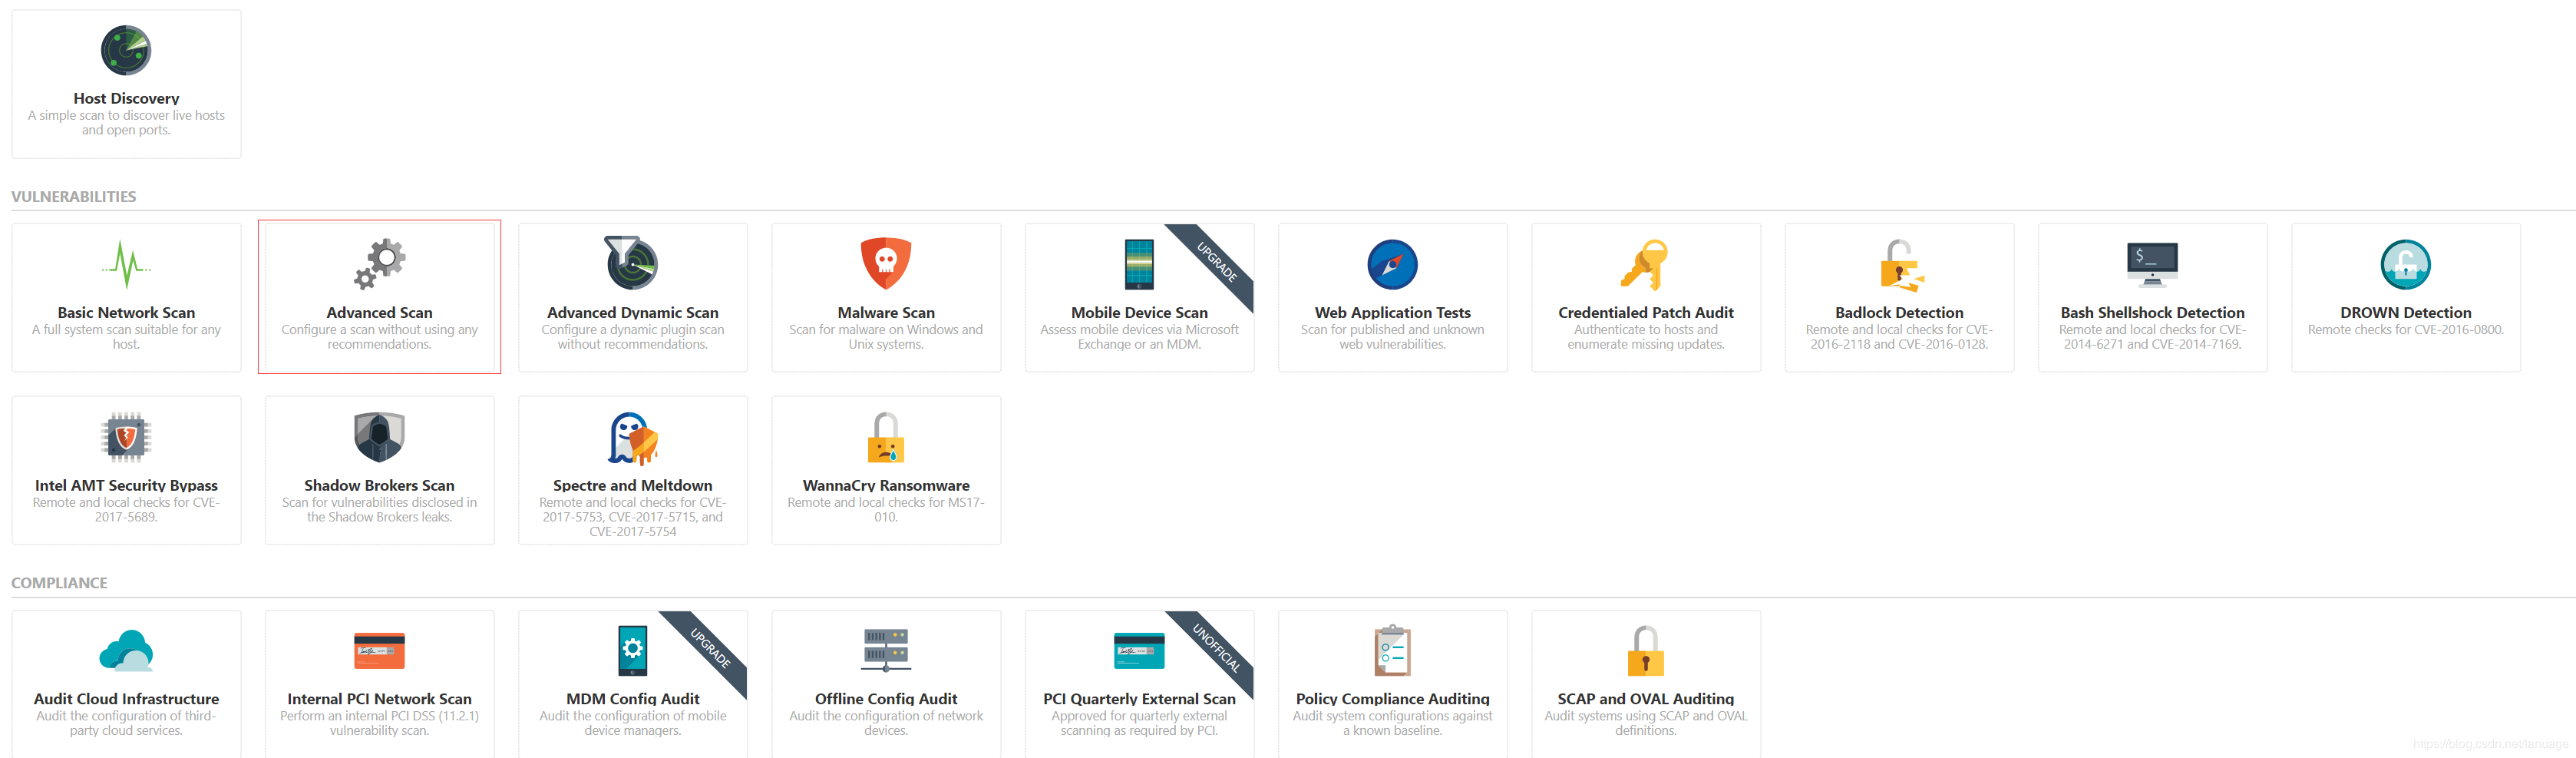
在这里插入图片描述
下面是获取该模板uuid的方法,主要思路是获取系统中所有模板,然后根据模板名称返回对应的uuid值
1def get_nessus_template_uuid(ip, port, template_name = "advanced"):
2    header = {
3        'X-ApiKeys': 'accessKey={accesskey};secretKey={secretkey}'.format(accesskey=accesskey,
4                                                                          secretkey=secretkey),
5        'Content-type': 'application/json',
6        'Accept': 'text/plain'}
7
8    api = "https://{ip}:{port}/editor/scan/templates".format(ip=ip, port=port)
9    response = requests.get(api, headers=header, verify=False)
10    templates = json.loads(response.text)['templates']
11
12    for template in templates:
13        if template['name'] == template_name:
14            return template['uuid']
15    return None
有了这个id之后,下面来创建策略模板,这个接口的参数较多,但是很多参数都是选填项。
这个部分文档写的很简陋,很多参数不知道是干嘛用的,当时我为了搞清楚每个参数的作用,一个个的尝试,然后去界面上看它的效果,最后终于把我感兴趣的给弄明白了。
它的主体部分如下:
1{
2   "uuid": {template_uuid},
3   "audits": {
4       "feed": {
5           "add": [
6               {
7                   "id": {audit_id},
8                   "variables": {
9                       "1": {audit_variable_value},
10                       "2": {audit_variable_value},
11                       "3": {audit_variable_value}
12                   }
13               }
14           ]
15       }
16   },
17   "credentials": {
18       "add": {
19           {credential_category}: {
20               {credential_name}: [
21                   {
22                       {credential_input_name}: {string}
23                   }
24               ]
25           }
26       }
27   },
28   "plugins": {
29       {plugin_family_name}: {
30           "status": {string},
31           "individual": {
32               {plugin_id}: {string}
33           }
34       }
35   },
36   "scap": {
37       "add": {
38           {scap_category}: [
39               {
40                   {scap_input_name}: {string}
41               }
42           ]
43       }
44   },
45   "settings": {
46       "acls": [
47           permission Resource
48       ],
49       //其他的减值对,这里我将他们都省略了
50}
他们与界面上配置的几个大项有对应关系,能对应的上的我给做了标记,但是有的部分对应不上。
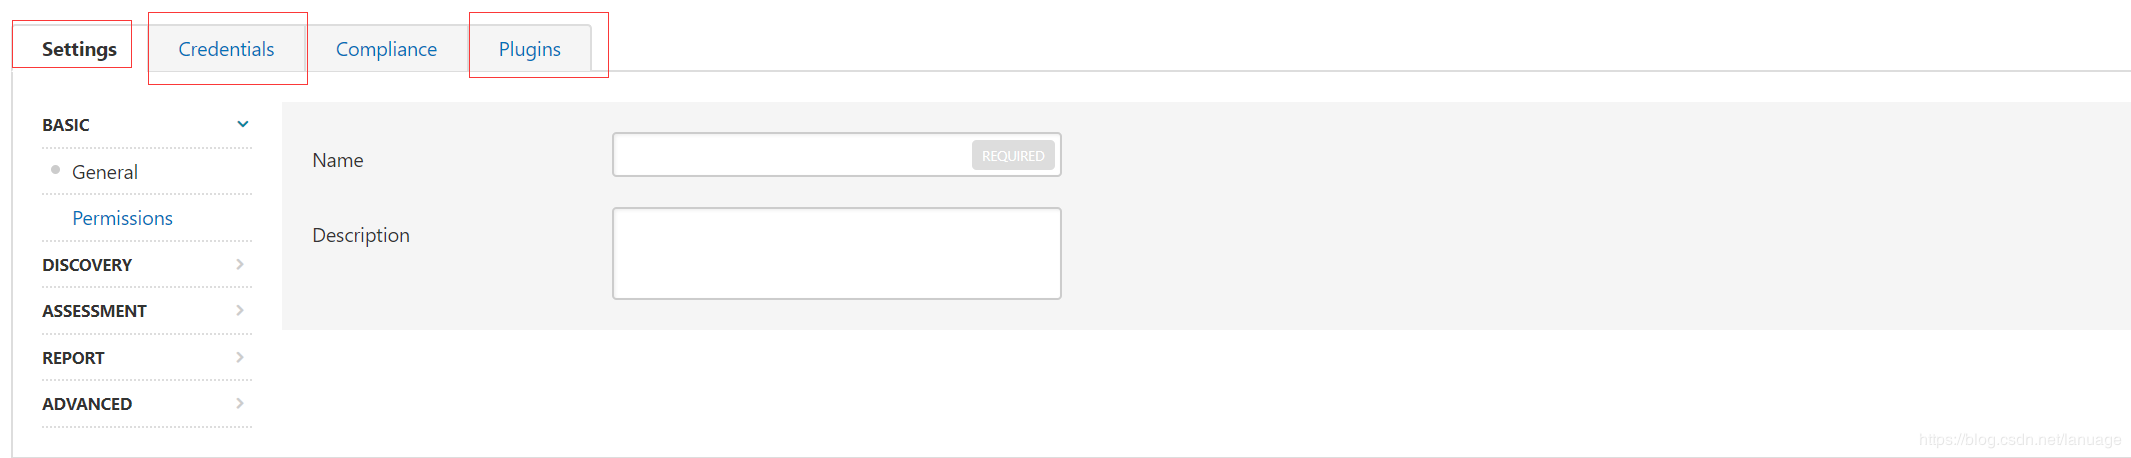
在这里插入图片描述
settings 是给策略模板做基础配置的,包括配置扫描的端口范围,服务检测范围等等。
credentials 是配置登录扫描的,主要包括 windows、ssh、telnet等等
plugins 配置扫描使用的插件,例如服务扫描版本漏洞等等
在settings中,对应关系如下图所示
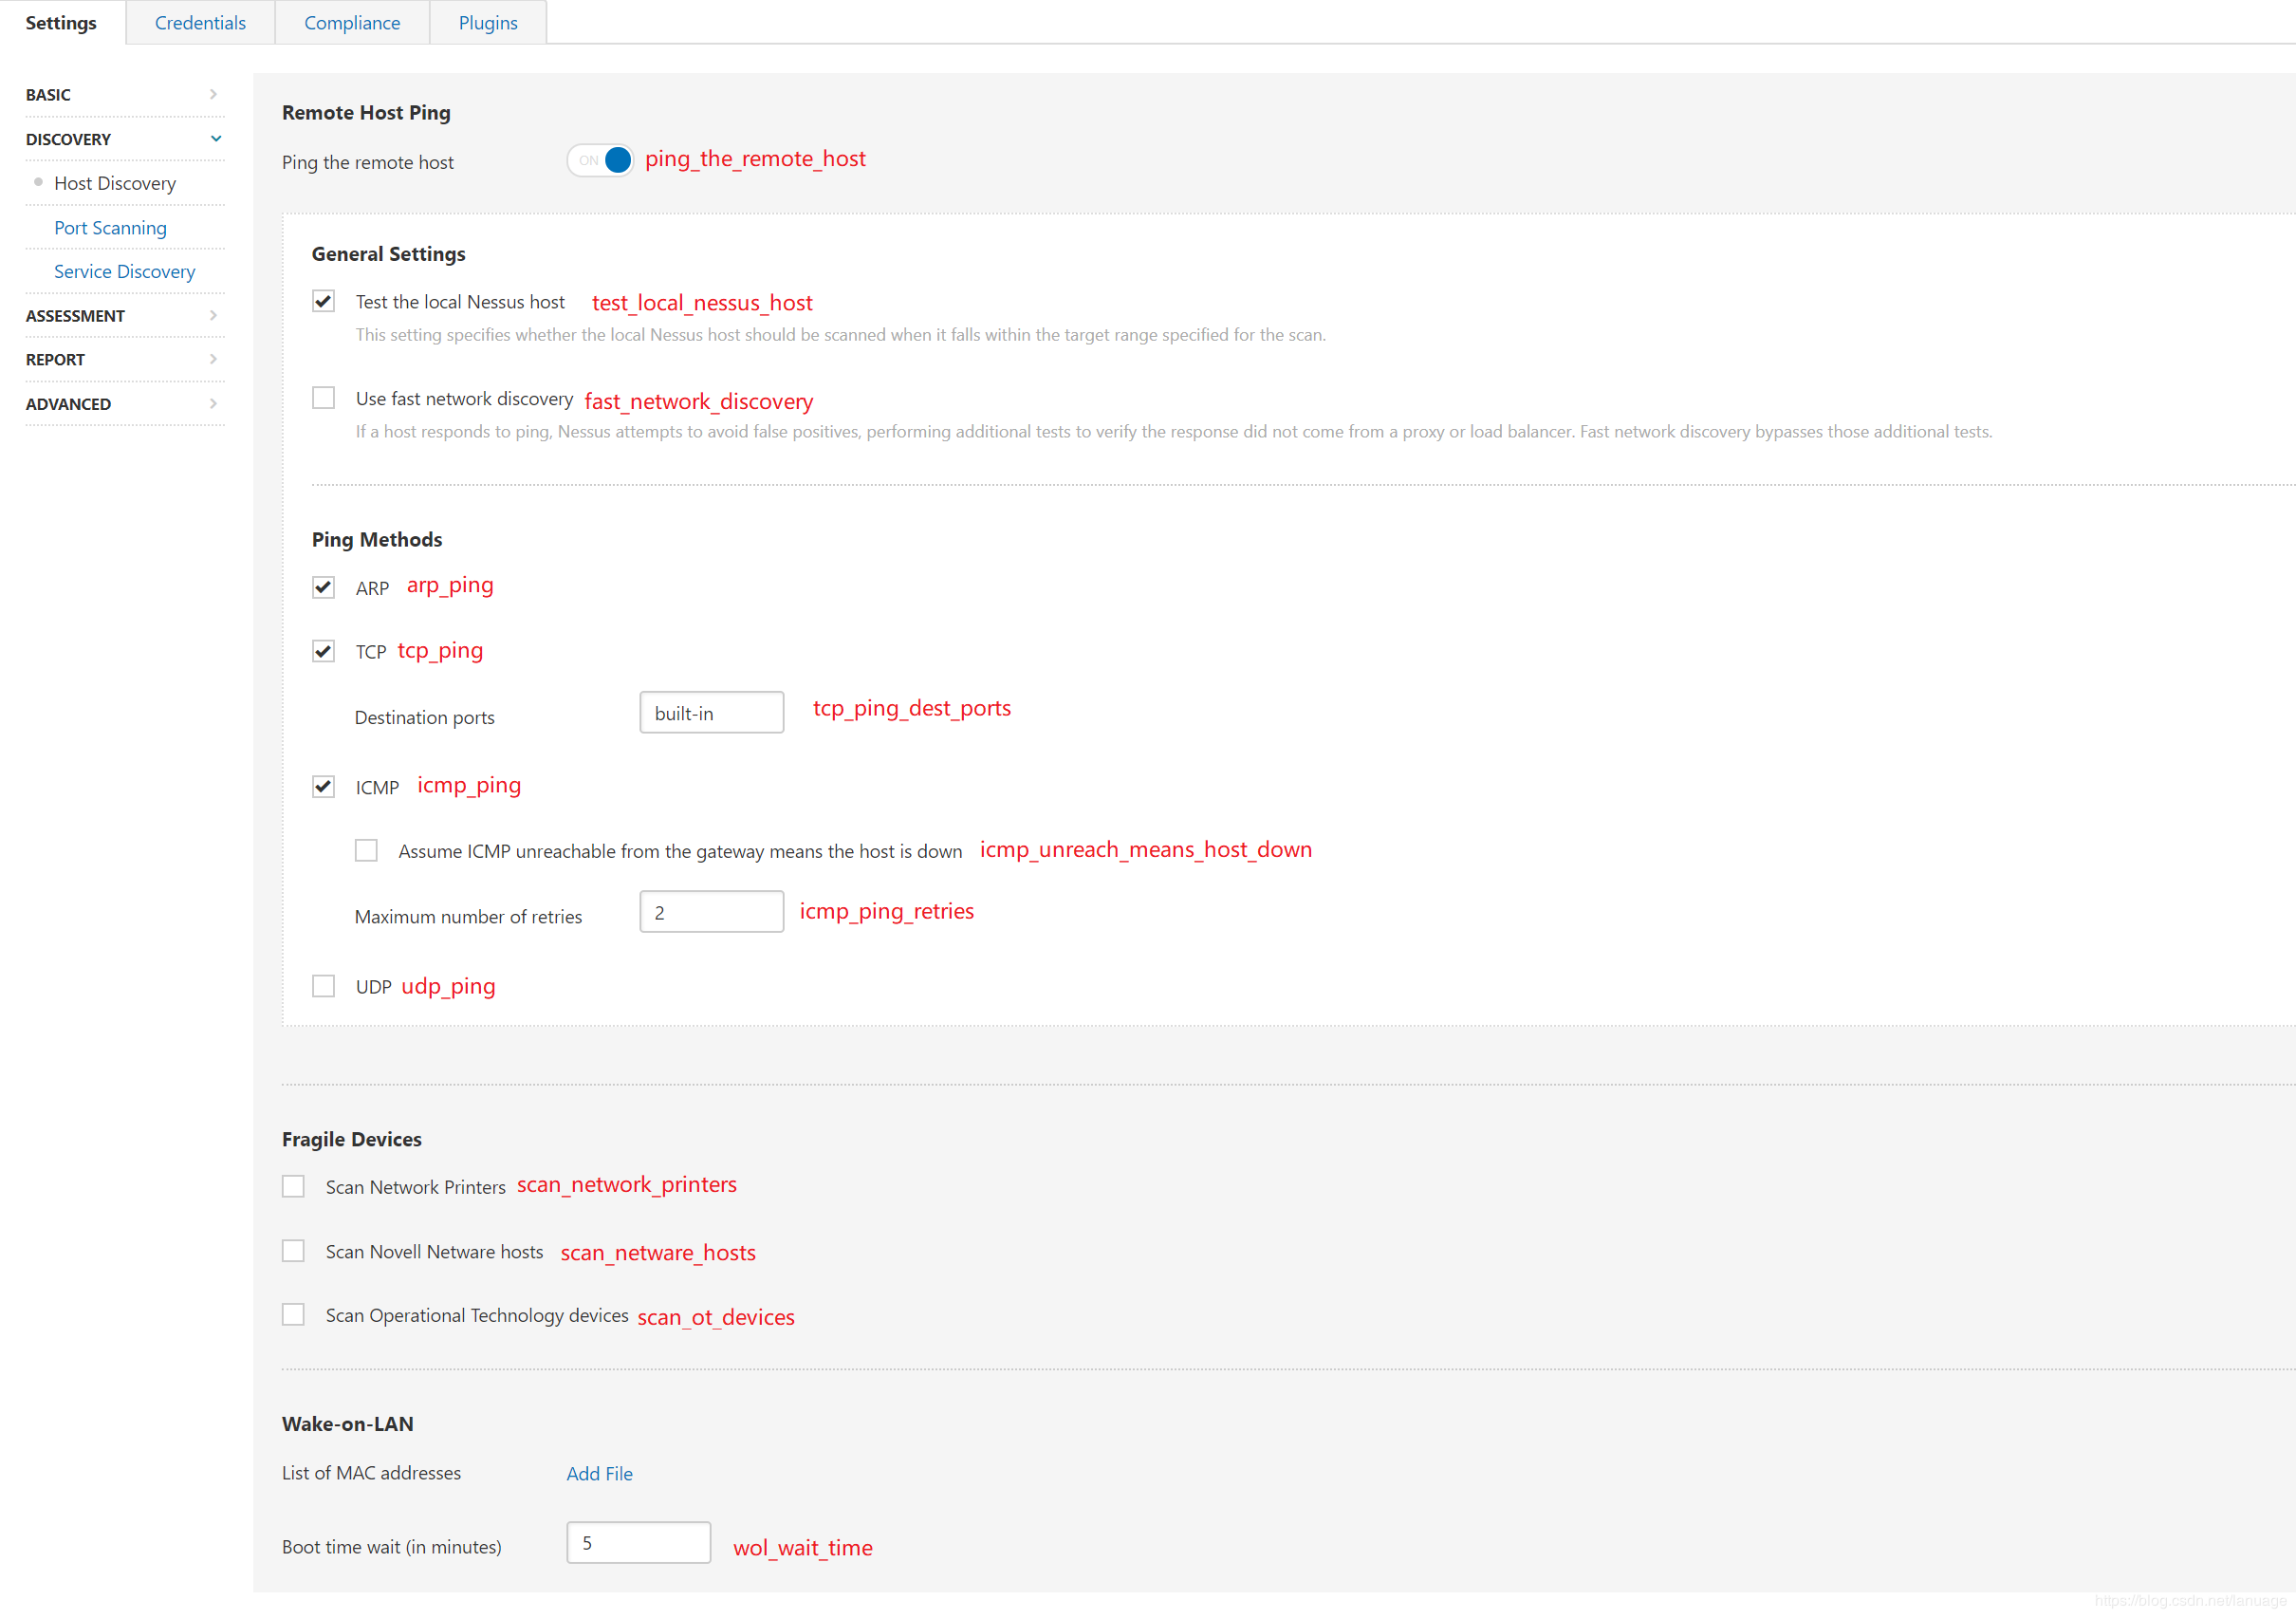
host scan
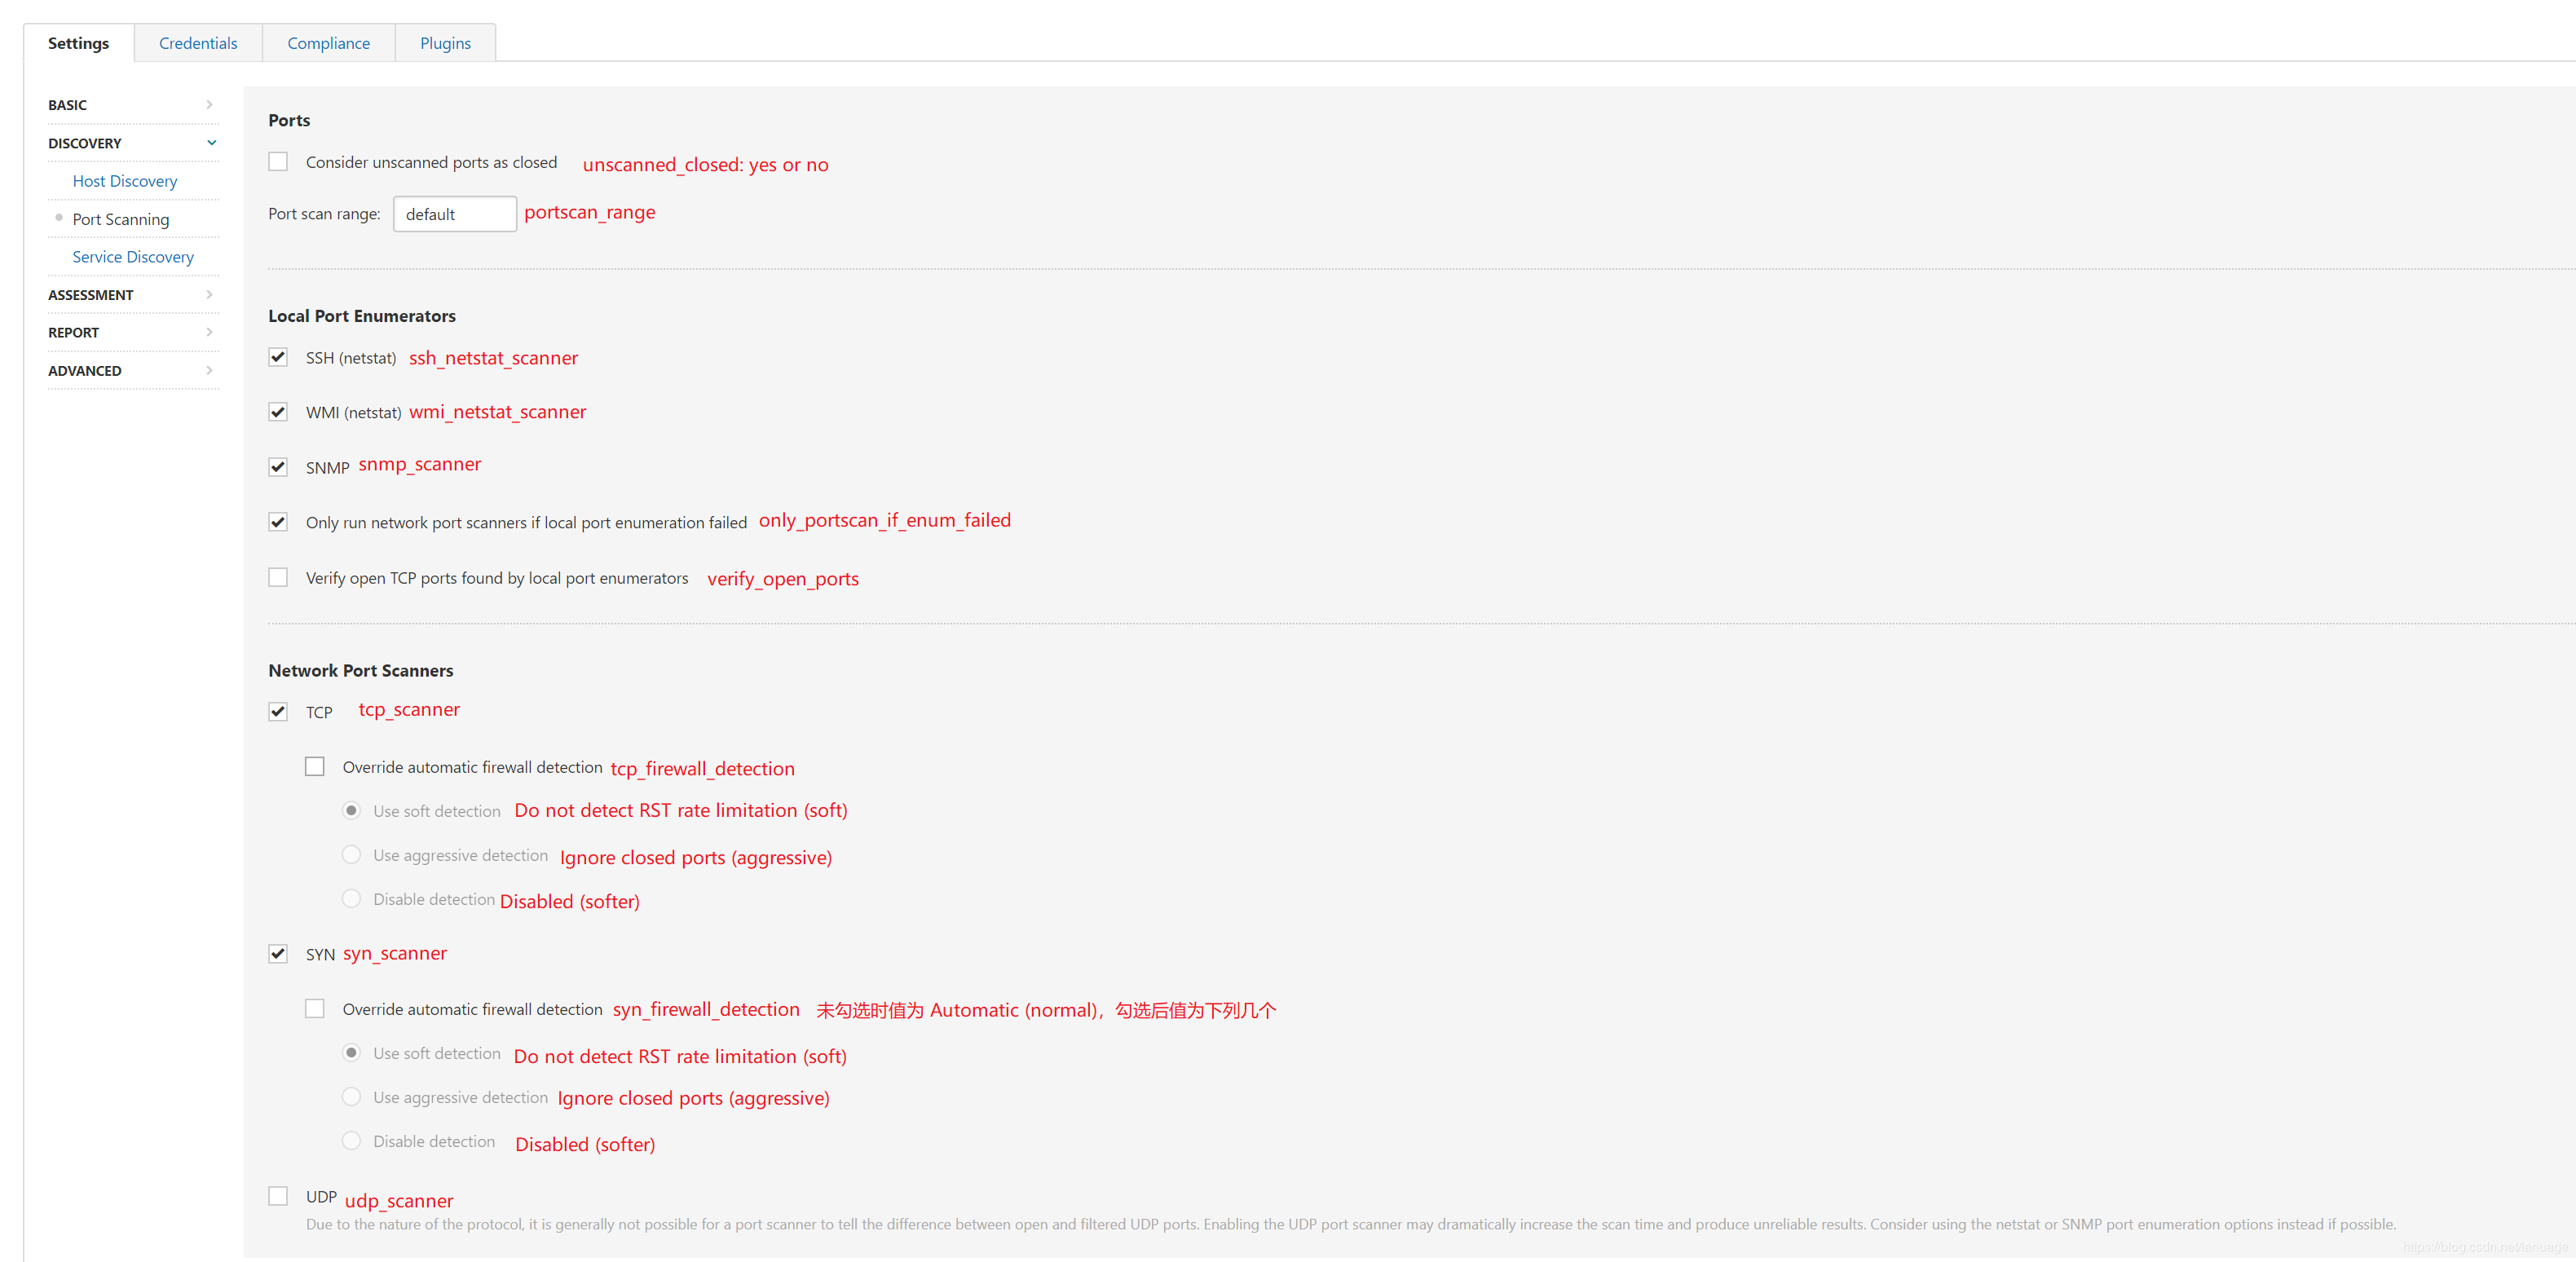
port scan
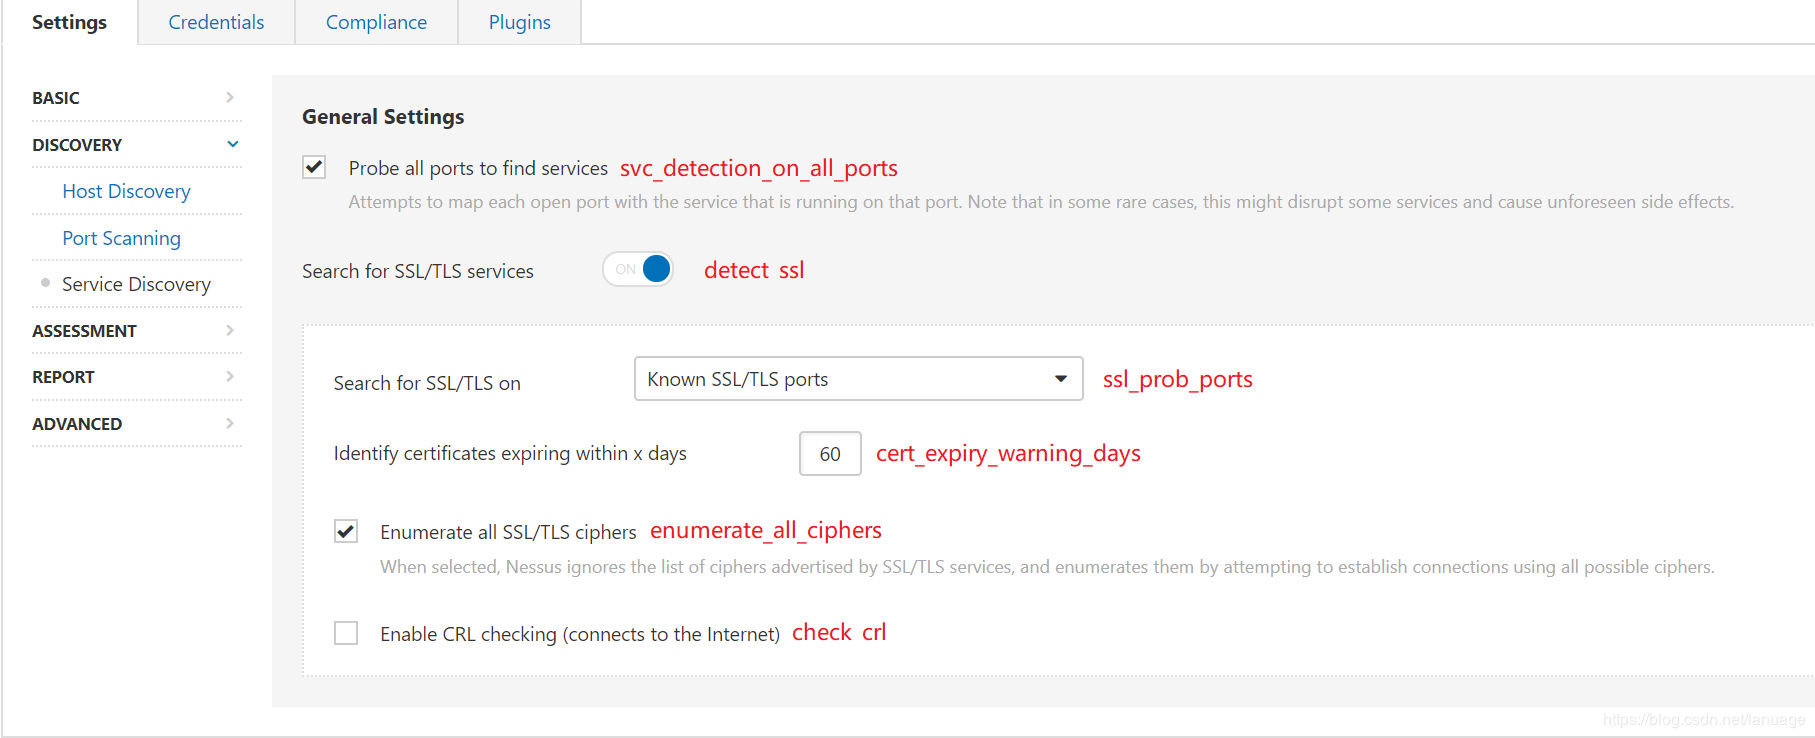
在这里插入图片描述
下面是创建扫描策略模板的实际例子:
1def create_template(ip, port, **kwargs): # kwargs 作为可选参数,用来配置settings和其他项
2    header = {
3        "X-ApiKeys": "accessKey={accesskey};secretKey={secretkey}".format(accesskey=accesskey,
4                                                                          secretkey=secretkey),
5        "Content-Type": "application/json",
6        "Accept": "text/plain"
7    }
8    policys = {}
9
10    # 这里 grouppolicy_set 存储的是策略模板中各个脚本名称以及脚本是否启用的信息
11    for policy in grouppolicy_set:
12        enabled = "enabled" if policy.enable else "disabled"
13        policys[policy.name] = {
14            "status": enabled
15        }
16
17    # settings里面的各小项必须得带上,否则会创建不成功
18    "settings": {
19        "name": template.name,
20        "watchguard_offline_configs": "",
21        "unixfileanalysis_disable_xdev": "no",
22        "unixfileanalysis_include_paths": "",
23        "unixfileanalysis_exclude_paths": "",
24        "unixfileanalysis_file_extensions": "",
25        "unixfileanalysis_max_size": "",
26        "unixfileanalysis_max_cumulative_size": "",
27        "unixfileanalysis_max_depth": "",
28        "unix_docker_scan_scope": "host",
29        "sonicos_offline_configs": "",
30        "netapp_offline_configs": "",
31        "junos_offline_configs": "",
32        "huawei_offline_configs": "",
33        "procurve_offline_configs": "",
34        "procurve_config_to_audit": "Saved/(show config)",
35        "fortios_offline_configs": "",
36        "fireeye_offline_configs": "",
37        "extremeos_offline_configs": "",
38        "dell_f10_offline_configs": "",
39        "cisco_offline_configs": "",
40        "cisco_config_to_audit": "Saved/(show config)",
41        "checkpoint_gaia_offline_configs": "",
42        "brocade_offline_configs": "",
43        "bluecoat_proxysg_offline_configs": "",
44        "arista_offline_configs": "",
45        "alcatel_timos_offline_configs": "",
46        "adtran_aos_offline_configs": "",
47        "patch_audit_over_telnet": "no",
48        "patch_audit_over_rsh": "no",
49        "patch_audit_over_rexec": "no",
50        "snmp_port": "161",
51        "additional_snmp_port1": "161",
52        "additional_snmp_port2": "161",
53        "additional_snmp_port3": "161",
54        "http_login_method": "POST",
55        "http_reauth_delay": "",
56        "http_login_max_redir": "0",
57        "http_login_invert_auth_regex": "no",
58        "http_login_auth_regex_on_headers": "no",
59        "http_login_auth_regex_nocase": "no",
60        "never_send_win_creds_in_the_clear": "yes" if kwargs["never_send_win_creds_in_the_clear"] else "no",
61        "dont_use_ntlmv1": "yes" if kwargs["dont_use_ntlmv1"] else "no",
62        "start_remote_registry": "yes" if kwargs["start_remote_registry"] else "no",
63        "enable_admin_shares": "yes" if kwargs["enable_admin_shares"] else "no",
64        "ssh_known_hosts": "",
65        "ssh_port": kwargs["ssh_port"],
66        "ssh_client_banner": "OpenSSH_5.0",
67        "attempt_least_privilege": "no",
68        "region_dfw_pref_name": "yes",
69        "region_ord_pref_name": "yes",
70        "region_iad_pref_name": "yes",
71        "region_lon_pref_name": "yes",
72        "region_syd_pref_name": "yes",
73        "region_hkg_pref_name": "yes",
74        "microsoft_azure_subscriptions_ids": "",
75        "aws_ui_region_type": "Rest of the World",
76        "aws_us_east_1": "",
77        "aws_us_east_2": "",
78        "aws_us_west_1": "",
79        "aws_us_west_2": "",
80        "aws_ca_central_1": "",
81        "aws_eu_west_1": "",
82        "aws_eu_west_2": "",
83        "aws_eu_west_3": "",
84        "aws_eu_central_1": "",
85        "aws_eu_north_1": "",
86        "aws_ap_east_1": "",
87        "aws_ap_northeast_1": "",
88        "aws_ap_northeast_2": "",
89        "aws_ap_northeast_3": "",
90        "aws_ap_southeast_1": "",
91        "aws_ap_southeast_2": "",
92        "aws_ap_south_1": "",
93        "aws_me_south_1": "",
94        "aws_sa_east_1": "",
95        "aws_use_https": "yes",
96        "aws_verify_ssl": "yes",
97        "log_whole_attack": "no",
98        "enable_plugin_debugging": "no",
99        "audit_trail": "use_scanner_default",
100        "include_kb": "use_scanner_default",
101        "enable_plugin_list": "no",
102        "custom_find_filepath_exclusions": "",
103        "custom_find_filesystem_exclusions": "",
104        "reduce_connections_on_congestion": "no",
105        "network_receive_timeout": "5",
106        "max_checks_per_host": "5",
107        "max_hosts_per_scan": "100",
108        "max_simult_tcp_sessions_per_host": "",
109        "max_simult_tcp_sessions_per_scan": "",
110        "safe_checks": "yes",
111        "stop_scan_on_disconnect": "no",
112        "slice_network_addresses": "no",
113        "allow_post_scan_editing": "yes",
114        "reverse_lookup": "no",
115        "log_live_hosts": "no",
116        "display_unreachable_hosts": "no",
117        "report_verbosity": "Normal",
118        "report_superseded_patches": "yes",
119        "silent_dependencies": "yes",
120        "scan_malware": "no",
121        "samr_enumeration": "yes",
122        "adsi_query": "yes",
123        "wmi_query": "yes",
124        "rid_brute_forcing": "no",
125        "request_windows_domain_info": "no",
126        "scan_webapps": "no",
127        "start_cotp_tsap": "8",
128        "stop_cotp_tsap": "8",
129        "modbus_start_reg": "0",
130        "modbus_end_reg": "16",
131        "hydra_always_enable": "yes" if kwargs["hydra_always_enable"] else "no",
132        "hydra_logins_file": "" if kwargs["hydra_logins_file"] else kwargs["hydra_logins_file"], # 弱口令文件需要事先上传,后面会提到上传文件接口
133        "hydra_passwords_file": "" if kwargs["hydra_passwords_file"] else kwargs["hydra_passwords_file"],
134        "hydra_parallel_tasks": "16",
135        "hydra_timeout": "30",
136        "hydra_empty_passwords": "yes",
137        "hydra_login_as_pw": "yes",
138        "hydra_exit_on_success": "no",
139        "hydra_add_other_accounts": "yes",
140        "hydra_postgresql_db_name": "",
141        "hydra_client_id": "",
142        "hydra_win_account_type": "Local accounts",
143        "hydra_win_pw_as_hash": "no",
144        "hydra_cisco_logon_pw": "",
145        "hydra_web_page": "",
146        "hydra_proxy_test_site": "",
147        "hydra_ldap_dn": "",
148        "test_default_oracle_accounts": "no",
149        "provided_creds_only": "yes",
150        "smtp_domain": "example.com",
151        "smtp_from": "nobody@example.com",
152        "smtp_to": "postmaster@[AUTO_REPLACED_IP]",
153        "av_grace_period": "0",
154        "report_paranoia": "Normal",
155        "thorough_tests": "no",
156        "detect_ssl": "yes",
157        "tcp_scanner": "no",
158        "tcp_firewall_detection": "Automatic (normal)",
159        "syn_scanner": "yes",
160        "syn_firewall_detection": "Automatic (normal)",
161        "wol_mac_addresses": "",
162        "wol_wait_time": "5",
163        "scan_network_printers": "no",
164        "scan_netware_hosts": "no",
165        "scan_ot_devices": "no",
166        "ping_the_remote_host": "yes",
167        "tcp_ping": "yes",
168        "icmp_unreach_means_host_down": "no",
169        "test_local_nessus_host": "yes",
170        "fast_network_discovery": "no",
171
172        "arp_ping": "yes" if kwargs["arp_ping"] else "no",
173        "tcp_ping_dest_ports": kwargs["tcp_ping_dest_ports"],
174        "icmp_ping": "yes" if kwargs["icmp_ping"] else "no",
175        "icmp_ping_retries": kwargs["icmp_ping_retries"],
176        "udp_ping": "yes" if kwargs["udp_ping"] else "no",
177        "unscanned_closed": "yes" if kwargs["unscanned_closed"] else "no",
178        "portscan_range": kwargs["portscan_range"],
179        "ssh_netstat_scanner": "yes" if kwargs["ssh_netstat_scanner"] else "no",
180        "wmi_netstat_scanner": "yes" if kwargs["wmi_netstat_scanner"] else "no",
181        "snmp_scanner": "yes" if kwargs["snmp_scanner"] else "no",
182        "only_portscan_if_enum_failed": "yes" if kwargs["only_portscan_if_enum_failed"] else "no",
183        "verify_open_ports": "yes" if kwargs["verify_open_ports"] else "no",
184        "udp_scanner": "yes" if kwargs["udp_scanner"] else "no",
185        "svc_detection_on_all_ports": "yes" if kwargs["svc_detection_on_all_ports"] else "no",
186        "ssl_prob_ports": "Known SSL ports" if kwargs["ssl_prob_ports"] else "All ports",
187        "cert_expiry_warning_days": kwargs["cert_expiry_warning_days"],
188        "enumerate_all_ciphers": "yes" if kwargs["enumerate_all_ciphers"] else "no",
189        "check_crl": "yes" if kwargs["check_crl"] else "no",
190   }
191
192    credentials = {
193            "add": {
194                "Host": {
195                    "SSH": [],
196                    "SNMPv3": [],
197                    "Windows": [],
198                },
199                "Plaintext Authentication": {
200                    "telnet/rsh/rexec": []
201                }
202            }
203        }
204        try:
205            if kwargs["snmpv3_username"] and kwargs["snmpv3_port"] and kwargs["snmpv3_level"]:
206                level = kwargs["snmpv3_level"]
207                if level == NessusSettings.LOW:
208                    credentials["add"]["Host"]["SNMPv3"].append({
209                        "security_level": "No authentication and no privacy",
210                        "username": kwargs["snmpv3_username"],
211                        "port": kwargs["snmpv3_port"]
212                    })
213                elif level == NessusSettings.MID:
214                    credentials["add"]["Host"]["SNMPv3"].append({
215                        "security_level": "Authentication without privacy",
216                        "username": kwargs["snmpv3_username"],
217                        "port": kwargs["snmpv3_port"],
218                        "auth_algorithm": NessusSettings.AUTH_ALG[kwargs["snmpv3_auth"][1]],
219                        "auth_password": kwargs["snmpv3_auth_psd"]
220                    })
221                elif level == NessusSettings.HIGH:
222                    credentials["add"]["Host"]["SNMPv3"].append({
223                        "security_level": "Authentication and privacy",
224                        "username": kwargs["snmpv3_username"],
225                        "port": kwargs["snmpv3_port"],
226                        "auth_algorithm": NessusSettings.AUTH_ALG[kwargs["snmpv3_auth"]][1],
227                        "auth_password": kwargs["snmpv3_auth_psd"],
228                        "privacy_algorithm": NessusSettings.PPIVACY_ALG[kwargs["snmpv3_hide"]][1],
229                        "privacy_password": kwargs["snmpv3_hide_psd"]
230                    })
231
232            if kwargs["ssh_username"] and kwargs["ssh_psd"]:
233                credentials["add"]["Host"]["SSH"].append(
234                    {
235                        "auth_method": "password",
236                        "username": kwargs["ssh_username"],
237                        "password": kwargs["ssh_psd"],
238                        "elevate_privileges_with": "Nothing",
239                        "custom_password_prompt": "",
240                    })
241
242            if kwargs["windows_username"] and kwargs["windows_psd"]:
243                credentials["add"]["Host"]["Windows"].append({
244                    "auth_method": "Password",
245                    "username": kwargs["windows_username"],
246                    "password": kwargs["windows_psd"],
247                    "domain": kwargs["ssh_host"]
248                })
249
250            if kwargs["telnet_username"] and kwargs["telnet_password"]:
251                credentials["add"]["Plaintext Authentication"]["telnet/rsh/rexec"].append({
252                    "username": kwargs["telnet_username"],
253                    "password": kwargs["telnet_password"]
254                })
255
256    data = {
257            "uuid": get_nessus_template_uuid(terminal, "advanced"),
258            "settings": settings,
259            "plugins": policys,
260            "credentials": credentials
261        }
262
263    api = "https://{0}:{1}/policies".format(ip, port)
264    response = requests.post(api, headers=header, data=json.dumps(data, ensure_ascii=False).encode("utf-8"), # 这里做一个转码防止在nessus端发生中文乱码
265                             verify=False)
266    if response.status_code == 200:
267        data = json.loads(response.text)
268        return data["policy_id"] # 返回策略模板的id,后续可以在创建任务时使用
269    else:
270        return None
策略还有copy、delete、config等操作,这里就不再介绍了,这个部分主要弄清楚各参数的作用,后面的这些接口使用的参数都是一样的
任务
任务部分的API 在https://localhost:8834/api#/resources/scans 中
创建任务
创建任务重要的参数如下说明如下:
- uuid: 创建任务时使用的模板id,这个id同样是我们上面说的系统自带的模板id
- name:任务名称
- policy_id:策略模板ID,这个是可选的,如果要使用上面我们自己定义的扫描模板,需要使用这个参数来指定,并且设置上面的uuid为
custom的uuid,这个值表示使用用户自定义模板;当然如果就想使用系统提供的,这个字段可以不填 - text_targets:扫描目标地址,这个参数是一个数组,可以填入多个目标地址,用来一次扫描多个主机
创建任务的例子如下:
1def create_task(task_name, policy_id, hosts): # host 是一个列表,存放的是需要扫描的多台主机
2    uuid = get_nessus_template_uuid(terminal, "custom") # 获取自定义策略的uuid
3    if uuid is None:
4        return False
5
6    data = {"uuid": uuid, "settings": {
7        "name": name,
8        "policy_id": policy_id,
9        "enabled": True,
10        "text_targets": hosts,
11        "agent_group_id": []
12    }}
13
14    header = {
15        'X-ApiKeys': 'accessKey={accesskey};secretKey={secretkey}'.format(accesskey=accesskey,
16                                                                          secretkey=secretkey),
17        'Content-type': 'application/json',
18        'Accept': 'text/plain'}
19
20    api = "https://{ip}:{port}/scans".format(ip=terminal.ip, port=terminal.port)
21    response = requests.post(api, headers=header, data=json.dumps(data, ensure_ascii=False).encode("utf-8"),
22                             verify=False)
23    if response.status_code == 200:
24        data = json.loads(response.text)
25        if data["scan"] is not None:
26            scan = data["scan"]
27            # 新增任务扩展信息记录
28
29            return scan["id"] # 返回任务id
启动/停止任务
启动任务的接口为 POST /scans/{scan_id}/launch scan_id 是上面创建任务返回的任务ID, 它有个可选参数 alt_targets,如果这个参数被指定,那么该任务可以扫描这个参数中指定的主机,而之前创建任务时指定的主机将被替代
停止任务的接口为: POST /scans/{scan_id}/stop
下面给出启动和停止任务的方法
1def start_task(task_id, hosts):
2    header = {
3        'X-ApiKeys': 'accessKey={accesskey};secretKey={secretkey}'.format(accesskey=accesskey,
4                                                                          secretkey=secretkey),
5        'Content-type': 'application/json',
6        'Accept': 'text/plain'}
7
8    data = {
9        "alt_targets": [hosts] # 重新指定扫描地址
10    }
11
12    api = "https://{ip}:{port}/scans/{scan_id}/launch".format(ip=ip, port=port, scan_id=scan_id)
13    response = requests.post(api, data=data, verify=False, headers=header)
14    if response.status_code != 200:
15        return False
16    else:
17        return True
18
19def stop_task(task_id):
20    header = {
21        'X-ApiKeys': 'accessKey={accesskey};secretKey={secretkey}'.format(accesskey=terminal.reserved1,
22                                                                          secretkey=terminal.reserved2),
23        'Content-type': 'application/json',
24        'Accept': 'text/plain'}
25
26    api = "https://{ip}:{port}/scans/{scan_id}/stop".format(ip=ip, port=port, task_id)
27    response = requests.post(api, headers=header, verify=False)
28    if response.status_code == 200 or response.status_code == 409: # 根据nessus api文档可以知道409 表示任务已结束
29        return True
30
31    return False
获取扫描结果
使用接口 GET /scans/{scan_id} 可以获取最近一次扫描的任务信息,从接口文档上看,它还可以获取某次历史扫描记录的信息,如果不填这个参数,接口中会返回所有历史记录的id。如果不填历史记录id,那么会返回最近一次扫描到的漏洞信息,也就是说新扫描到的信息会把之前的信息给覆盖
下面是返回信息的部分说明
1{
2    "info": {
3        "edit_allowed": {boolean},
4        "status": {string}, //当前状态 completed 字符串表示结束,cancel表示停止
5        "policy": {string},
6        "pci-can-upload": {boolean},
7        "hasaudittrail": {boolean},
8        "scan_start": {string},
9        "folder_id": {integer},
10        "targets": {string},
11        "timestamp": {integer},
12        "object_id": {integer},
13        "scanner_name": {string},
14        "haskb": {boolean},
15        "uuid": {string},
16        "hostcount": {integer},
17        "scan_end": {string},
18        "name": {string},
19        "user_permissions": {integer},
20        "control": {boolean}
21    },
22    "hosts": [ //按主机区分的漏洞信息
23        host Resource
24    ],
25    "comphosts": [
26        host Resource
27    ],
28    "notes": [
29        note Resource
30    ],
31    "remediations": {
32        "remediations": [
33            remediation Resource
34        ],
35        "num_hosts": {integer},
36        "num_cves": {integer},
37        "num_impacted_hosts": {integer},
38        "num_remediated_cves": {integer}
39    },
40    "vulnerabilities": [
41        vulnerability Resource //本次任务扫描到的漏洞信息
42    ],
43    "compliance": [
44        vulnerability Resource
45    ],
46    "history": [
47        history Resource //历史扫描信息,可以从这个信息中获取历史记录的id
48    ],
49    "filters": [
50        filter Resource
51    ]
52}
这个信息里面vulnerabilities和host里面都可以拿到漏洞信息,但是 vulnerabilities中是扫描到的所有漏洞信息,而host则需要根据id再次提交请求,也就是需要额外一次请求,但它是按照主机对扫描到的漏洞进行了分类。而使用vulnerabilities则需要根据漏洞信息中的host_id 手工进行分类
下面是获取任务状态的示例:
1def get_task_status(task_id):
2    header = {
3        "X-ApiKeys": "accessKey={accesskey};secretKey={secretkey}".format(accesskey=accesskey,
4                                                                          secretkey=secretkey),
5        "Content-Type": "application/json",
6        "Accept": "text/plain"
7    }
8
9    api = "https://{ip}:{port}/scans/{task_id}".format(ip=ip, port=port,
10                                                       task_id=task_id)
11    response = requests.get(api, headers=header, verify=False)
12    if response.status_code != 200:
13        return 2, "Data Error"
14
15    data = json.loads(response.text)
16    hosts = data["hosts"]
17    for host in hosts:
18        get_host_vulnerabilities(scan_id, host["host_id"]) # 按主机获取漏洞信息
19
20    if data["info"]["status"] == "completed" or data["info"]["status"] =='canceled':
21        # 已完成,此时更新本地任务状态
22    return 1, "OK"
获取漏洞信息
在获取任务信息中,已经得到了本次扫描中发现的弱点信息了,只需要我们解析这个json。它具体的内容如下:
1"host_id": {integer}, //主机id
2"host_index": {string},
3"hostname": {integer},//主机名称
4"progress": {string}, //扫描进度
5"critical": {integer}, //危急漏洞数
6"high": {integer}, //高危漏洞数
7"medium": {integer}, //中危漏洞数
8"low": {integer}, //低危漏洞数
9"info": {integer}, //相关信息数目
10"totalchecksconsidered": {integer},
11"numchecksconsidered": {integer},
12"scanprogresstotal": {integer},
13"scanprogresscurrent": {integer},
14"score": {integer}
根据主机ID可以使用 GET /scans/{scan_id}/hosts/{host_id} 接口获取主机信息,它需要两个参数,一个是扫描任务id,另一个是主机id。
下面列举出来的是返回值得部分内容,只列举了我们感兴趣的部分:
1{
2    "info": {
3        "host_start": {string},
4        "mac-address": {string},
5        "host-fqdn": {string},
6        "host_end": {string},
7        "operating-system": {string},
8        "host-ip": {string}
9    },
10
11    "vulnerabilities": [
12        {
13            "host_id": {integer}, //主机id
14            "hostname": {string}, //主机名称
15            "plugin_id": {integer}, //策略id
16            "plugin_name": {string}, //策略名称
17            "plugin_family": {string}, //所属策略组
18            "count": {integer}, //该种漏洞数
19            "vuln_index": {integer},
20            "severity_index": {integer},
21            "severity": {integer}
22        }
23    ],
24}
根据上面获取任务信息中得到的主机id和任务id,我们可以实现这个功能
1def get_host_vulnerabilities(scan_id, host_id):
2    header = {
3        "X-ApiKeys": "accessKey={accesskey};secretKey={secretkey}".format(accesskey=accesskey,
4                                                                          secretkey=secretkey),
5        "Content-Type": "application/json",
6        "Accept": "text/plain"
7    }
8
9    scan_history = ScanHistory.objects.get(id=scan_id)
10    api = "https://{ip}:{port}/scans/{task_id}/hosts/{host_id}".format(ip=ip, port=port, task_id=scan_id, host_id=host_id)
11    response = requests.get(api, headers=header, verify=False)
12    if response.status_code != 200:
13        return 2, "Data Error"
14
15    data = json.loads(response.text)
16    vulns = data["vulnerabilities"]
17    for vuln in vulns:
18        vuln_name = vuln["plugin_name"]
19        plugin_id = vuln["plugin_id"] #插件id,可以获取更详细信息,包括插件自身信息和扫描到漏洞的解决方案等信息
20        #保存漏洞信息
获取漏洞输出信息与漏洞知识库信息
我们在nessus web页面中可以看到每条被检测到的漏洞在展示时会有输出信息和知识库信息,这些信息也可以根据接口来获取
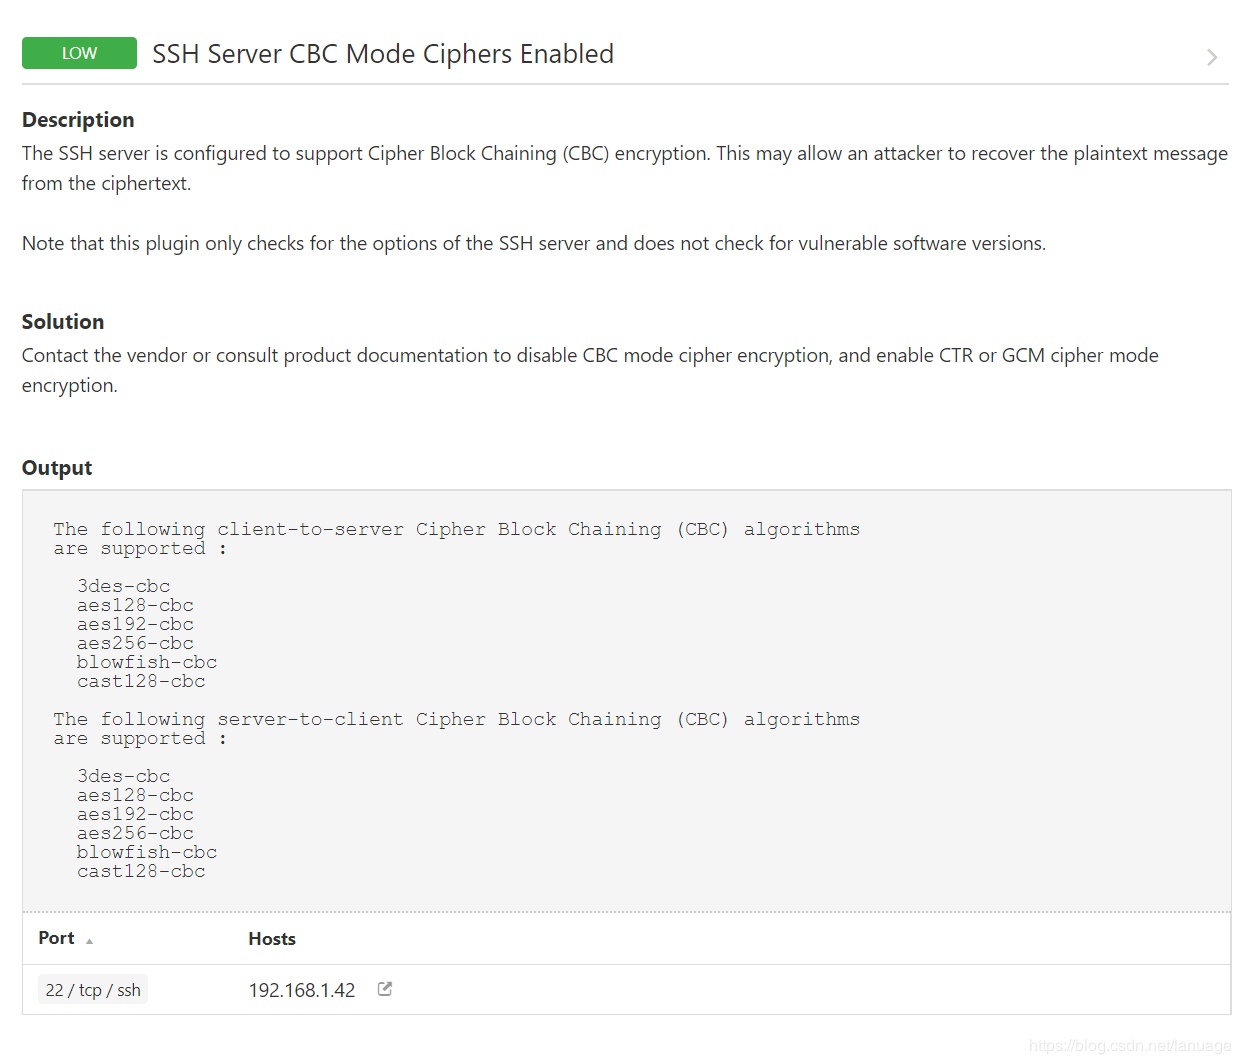
在这里插入图片描述
获取漏洞的知识库可以通过接口 GET /scans/{scan_id}/hosts/{host_id}/plugins/{plugin_id} , 它的路径为: https://localhost:8834/api#/resources/scans/plugin-output
它返回的值如下:
1{
2    "info": {
3        "plugindescription": {
4            "severity": {integer}, //危险等级,从info到最后的critical依次为1,2,3,4,5
5            "pluginname": {string},
6            "pluginattributes": {
7                "risk_information": {
8                    "risk_factor": {string}
9                },
10                "plugin_name": {string}, //插件名称
11                "plugin_information": {
12                    "plugin_id": {integer},
13                    "plugin_type": {string},
14                    "plugin_family": {string},
15                    "plugin_modification_date": {string}
16                },
17                "solution": {string}, //漏洞解决方案
18                "fname": {string},
19                "synopsis": {string},
20                "description": {string} //漏洞描述
21            },
22            "pluginfamily": {string},
23            "pluginid": {integer}
24        }
25    },
26    "output": [
27        plugin_output:{
28           "plugin_output": {string}, //输出信息
29           "hosts": {string}, //主机信息
30           "severity": {integer},
31           "ports": {} //端口信息
32        }
33    ]
34}
有了这些信息,我们可以通过下面的代码获取这些信息:
1def get_vuln_detail(scan_id, host_id, plugin_id)
2    header = {
3        "X-ApiKeys": "accessKey={accesskey};secretKey={secretkey}".format(accesskey=accesskey,
4                                                                          secretkey=secretkey),
5        "Content-Type": "application/json",
6        "Accept": "text/plain"
7    }
8
9    api = "https://{ip}:{port}/scans/{scan_id}/hosts/{host_id}/plugins/{plugin_id}".format(ip=ip, port=port, scan_id=scan_id, host_id=host_id, plugin_id=plugin_id)
10    response = requests.get(api, headers=header, verify=False)
11    data = json.loads(response.text)
12    outputs = data["outputs"]
13    return outputs
最后总结
这篇文章我们主要介绍了nessus API从扫描设置到扫描任务创建、启动、停止、以及结果的获取的内容,当然nessus的api不止这些,但是最重要的应该是这些,如果能帮助各位解决手头上的问题自然是极好的,如果不能或者说各位朋友需要更细致的控制,可以使用浏览器抓包的方式来分析它的请求和响应包。
在摸索时最好的两个帮手是浏览器 F12工具栏中的 network和nessus api文档页面上的test工具了。
我们可以先按 <kbd>f12</kbd> 打开工具并切换到network,然后在页面上执行相关操作,观察发包即可发现该如何使用这些API,因为Nessus Web端在操作时也是使用API。如下图:
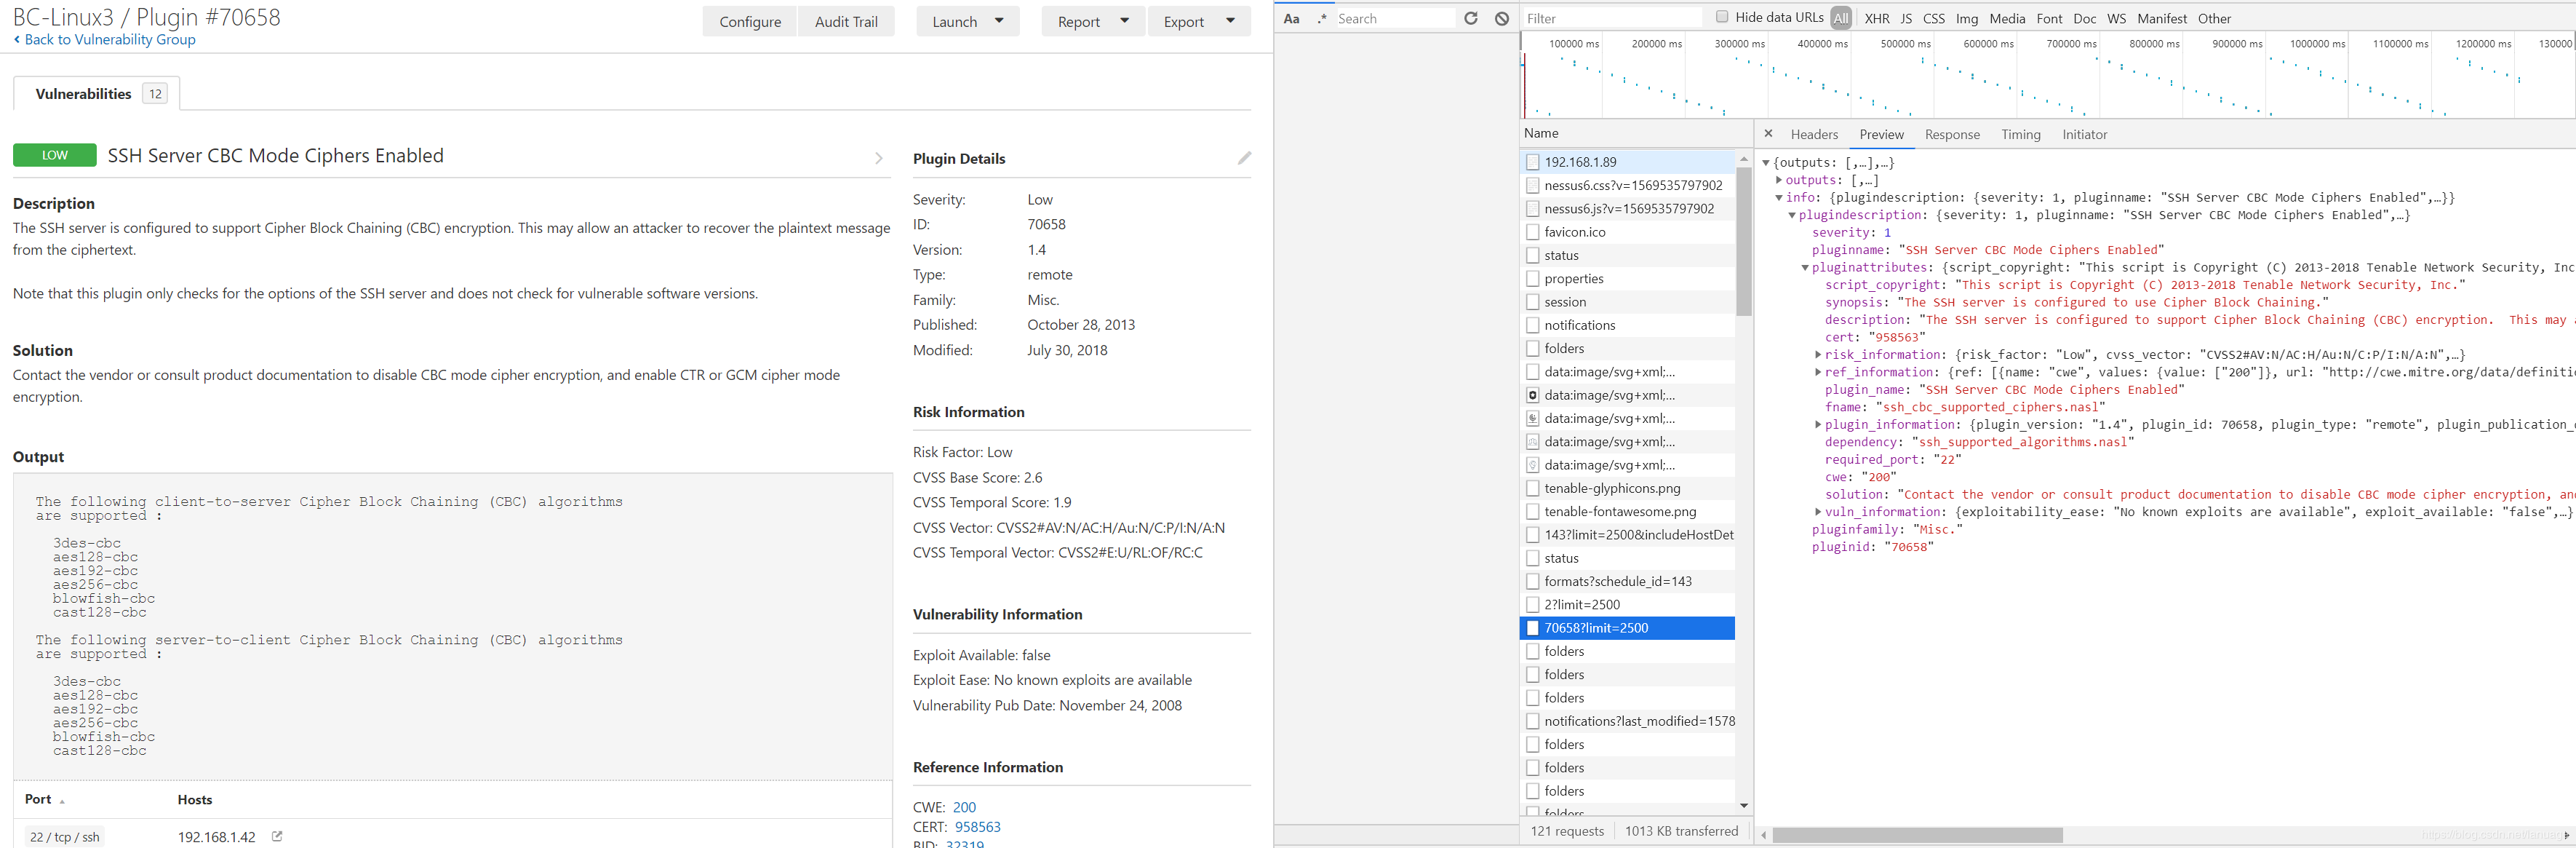
在这里插入图片描述
或者可以使用文档中的test工具,例如下面是测试 获取插件输出信息的接口
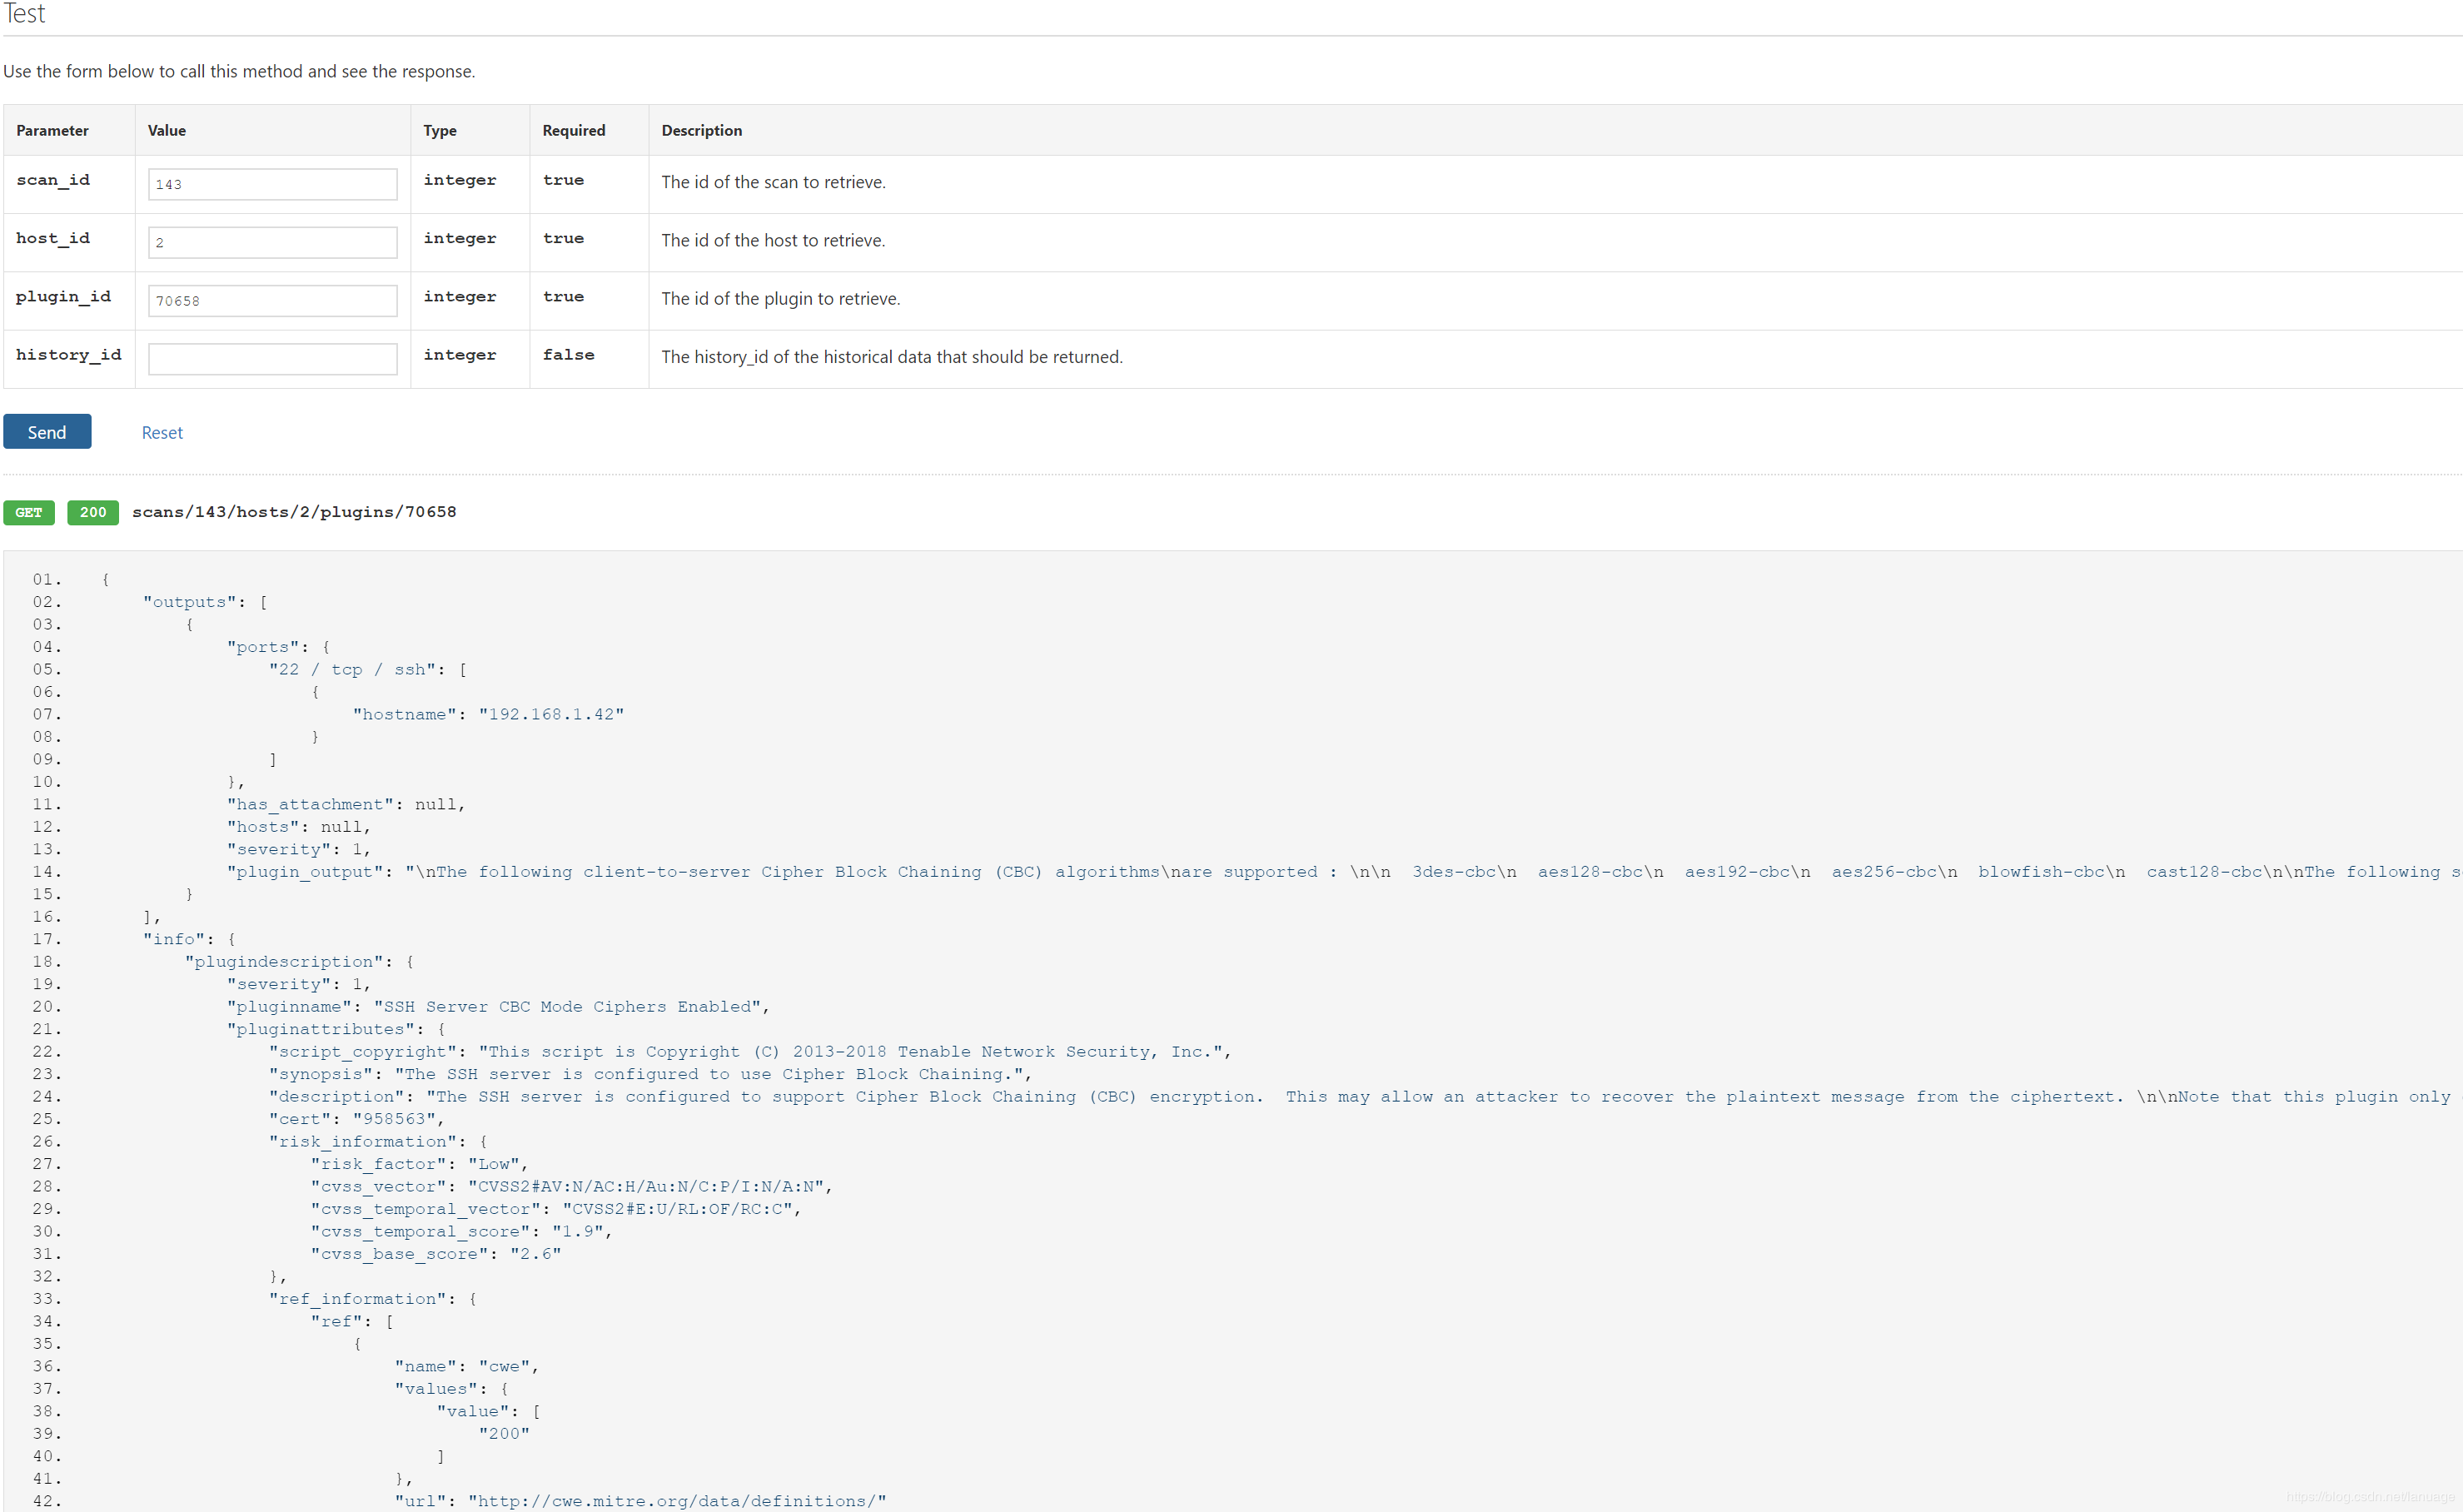
在这里插入图片描述
本文转自 https://www.jianshu.com/p/a4236809e11a,如有侵权,请联系删除。