
1 Eclipse下集成Maven
1.1 安装Maven
下载maven的bin,在apache官方网站可以下载。
下载下来之后,解压,找个路径放进去, 把bin的位置设在环境变量里,新建环境变量MAVEN_HOME

在PATH里加入maven的bin的路径

由于Maven依赖Java运行环境,因此使用Maven之前需要配置Java的运行环境。下载并安装JDK,配置JDK的环境变量JAVA_HOME,否则maven将无法使用.
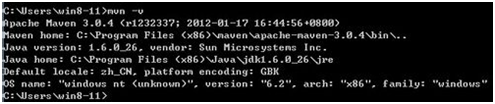
配置完毕后,在Windows命令提示符下,输入mvn -v测试一下,配置成功显示如图:
1.2 Eclipse集成Maven
1.2.1 修改Maven仓库位置
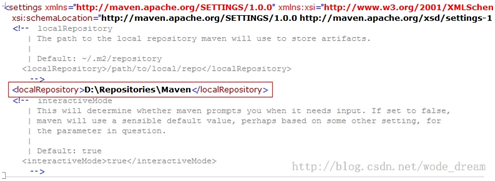
找到 Maven 下的 conf 下的 settings.xml 配置文件,我的是在 D:\Server\maven\conf\settings.xml

Maven 的仓库默认是放在本地用户的临时文件夹下面的 .m2 文件夹下的 repository 下,我的是在 C:\Users\admcnm\.m2\repository 目录下,现在我们来修改将它指定到我们自己的路径下,我现在要将仓库指定到 D:\Repositories\Maven 目录下,只需要将上面注销的本地仓库打开,然后把相应的路径值写到里面去就行了:
1.2.2 Eclipse配置 maven
检查 eclipse 的 maven 插件是否安装成功:Window-->Preferences。Eclipse kepler或者更高的版本自带内置集成了Maven插件
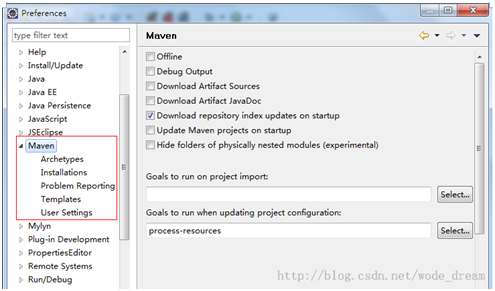
1. 点击 Add 按钮,选到你本机安装 maven 的路径值

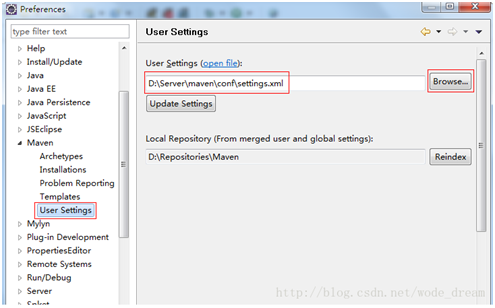
2. 点击 Browse 按钮,选到你 maven 的 setting.xml 配置文件,然后点击 OK,这样就完成了 eclipse maven 插件的配置。
1.2.3 配置Maven远程地址
a) 本地Maven****连接互联网
如果你的机器可以联网,Maven默认连接自己的仓库地址,需要其他仓库地址自行添加。
b) 本地Maven连接Nexus仓库
Nexus仓库可以连接外网,或者手动上传JAR到Nexus仓库,Maven再通过连接Nexus的方式实现下载JAR。
1.3 建立Maven Web项目
1.3.1 选择骨架类型
中间经过此步骤

1.3.2 将Maven web转换成
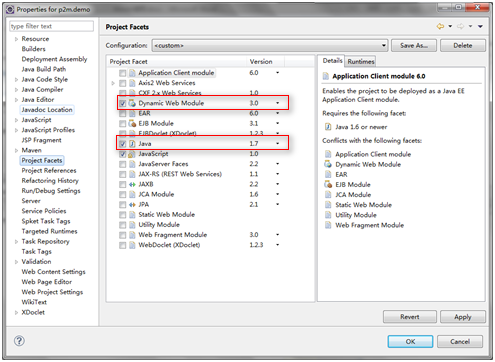
- cannot change version of project facet Dynamic Web Module to 3.0 该问题见文末尾总结。
1.4非mavn插件的Tomcat启动模式
1.4.1 更改编译目录

1.4.2 配置maven lib依赖

1.4.3 配置P0M同步JAR到WEB-INF/lib下
执行mvn:install(或者能出发执行pom.xml里面build逻辑的命令)
1<build>
2	<finalName>SpringActivemq</finalName>
3	<pluginManagement>
4            <plugins>
5                <plugin>
6                    <groupId>org.eclipse.m2e</groupId>
7                    <artifactId>lifecycle-mapping</artifactId>
8                    <version>1.0.0</version>
9                    <configuration>
10                        <lifecycleMappingMetadata>
11                            <pluginExecutions>
12                                <pluginExecution>
13                                    <pluginExecutionFilter>
14                                        <groupId>org.apache.maven.plugins</groupId>
15                                        <artifactId>maven-dependency-plugin</artifactId>
16                                        <versionRange>[2.0,)</versionRange>
17                                        <goals>
18                                            <goal>copy-dependencies</goal>
19                                        </goals>
20                                    </pluginExecutionFilter>
21                                    <action>
22                                        <ignore />
23                                    </action>
24                                </pluginExecution>
25                            </pluginExecutions>
26                        </lifecycleMappingMetadata>
27                    </configuration>
28                </plugin>
29            </plugins>
30        </pluginManagement>
31		<plugins>
32			<plugin>
33				<groupId>org.apache.maven.plugins</groupId>
34				<artifactId>maven-compiler-plugin</artifactId>
35				<version>3.1</version>
36				<configuration>
37					<source>1.7</source>
38					<target>1.7</target>
39					<encoding>UTF-8</encoding>
40					<showWarnings>true</showWarnings>
41				</configuration>
42			</plugin>
43			<!-- 同步jar到lib下 -->
44			<plugin>
45				<groupId>org.apache.maven.plugins</groupId>
46				<artifactId>maven-dependency-plugin</artifactId>
47				<executions>
48					<execution>
49						<id>copy-dependencies</id>
50						<phase>test</phase>
51						<goals>
52							<goal>copy-dependencies</goal>
53						</goals>
54						<configuration>
55							<outputDirectory>
56								src/main/webapp/WEB-INF/lib
57							</outputDirectory>
58						</configuration>
59					</execution>
60				</executions>
61			</plugin>
62		</plugins>
63	</build>
1.4.4 配置tomcat context

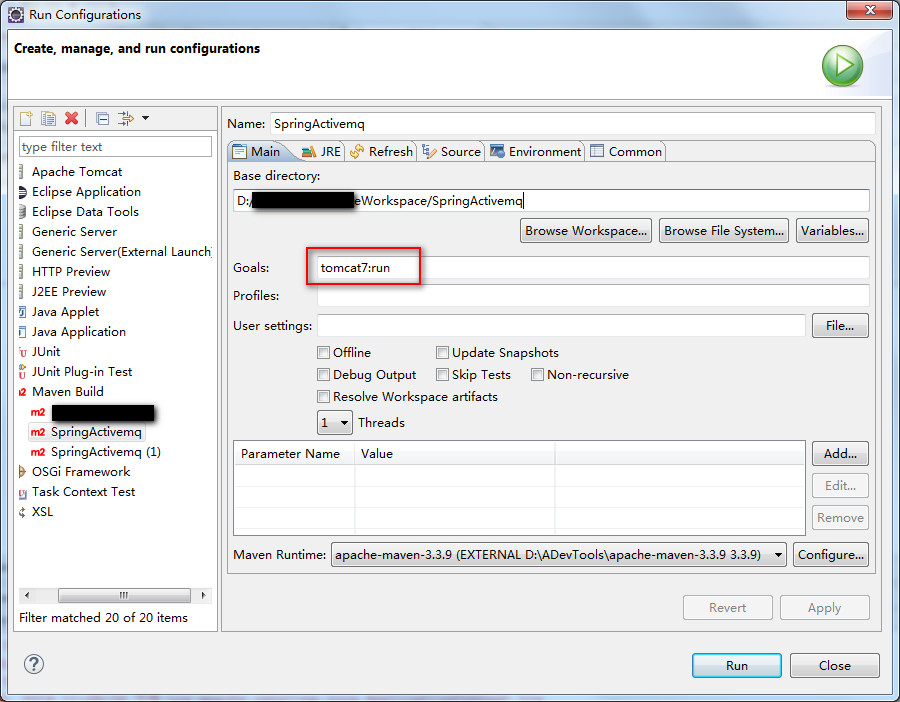
1.5 Mavn插件的Tomcat启动模式
1.不在需要引入tomcat(servlet-api.jar)

2.pom中配置引入servlet-api,期中注意<scope>provided</scope>(依赖servlet-api,打成war包会跟tomcat自带的包[servlet-api]冲突。所以用provided编译、测试时有用,打包发布不包含。)
1<project xmlns="http://maven.apache.org/POM/4.0.0" xmlns:xsi="http://www.w3.org/2001/XMLSchema-instance"
2	xsi:schemaLocation="http://maven.apache.org/POM/4.0.0 http://maven.apache.org/maven-v4_0_0.xsd">
3	<modelVersion>4.0.0</modelVersion>
4	<groupId>com.xxx</groupId>
5	<artifactId>xxxCommons</artifactId>
6	<packaging>war</packaging>
7	<version>0.0.1-SNAPSHOT</version>
8	<name>xxxCommons Maven Webapp</name>
9	<url>http://maven.apache.org</url>
10	<dependencies>
11		<dependency>
12			<groupId>junit</groupId>
13			<artifactId>junit</artifactId>
14			<version>3.8.1</version>
15			<scope>test</scope>
16		</dependency>
17		<!-- 配置servlet-api依赖 -- >
18		<dependency>
19			<groupId>javax.servlet</groupId>
20			<artifactId>javax.servlet-api</artifactId>
21			<version>3.1.0</version>
22			<scope>provided</scope>
23		</dependency>
24	</dependencies>
25	<build>
26		<finalName>HillCommons</finalName>
27		<plugins>
28		        <!-- tomcat启动插件 -->
29			<plugin>
30				<groupId>org.apache.tomcat.maven</groupId>
31				<artifactId>tomcat7-maven-plugin</artifactId>
32				<version>2.2</version>
33			</plugin>
34		</plugins>
35	</build>
36</project>
3.插件启动tomcat
1.6 Mavn插件Tomcat的部署
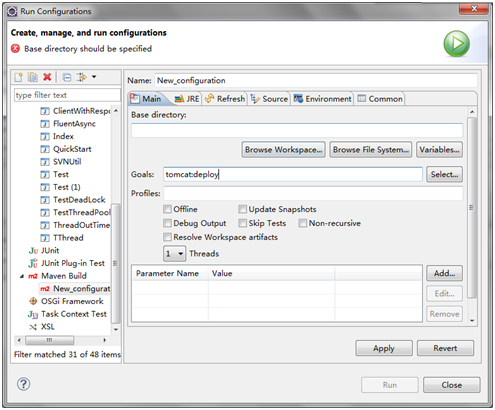
1.在tomcat中的conf的tomcat_users.xml中创建管理用户和密码,一般选manager-script,在pom.xml中的tomcat插件中用text,否则可能出现403错误
1 <role rolename="manager-gui"/>
2 <role rolename="manager-script"/>
3 <role rolename="manager-jmx"/>
4 <role rolename="manager-status"/>
5 <role rolename="manager-text"/>
6 <role rolename="admin-gui"/>
7 <user username="admin" password="admin" roles="manager-gui,manager-script,manager-jmx,manager-status,manager-text,admin-gui"/>
2.pom.xml 配置tomcat插件
1<dependencies>
2    <dependency>
3        <groupId>junit</groupId>
4        <artifactId>junit</artifactId>
5        <version>3.8.1</version>
6        <scope>test</scope>
7    </dependency>
8    <dependency>
9         <groupId>org.apache.tomcat.maven</groupId>
10         <artifactId>tomcat7-maven-plugin</artifactId>
11         <version>2.2</version>
12         <exclusions>
13               <exclusion>
14                    <artifactId>junit</artifactId>
15                    <groupId>junit</groupId>
16                </exclusion>
17         </exclusions>
18    </dependency>
19</dependencies>
20<build>
21    <finalName>maven-web-test</finalName>
22    <pluginManagement>
23        <plugins>
24            <plugin>
25                <groupId>org.apache.tomcat.maven</groupId>
26                <artifactId>tomcat7-maven-plugin</artifactId>
27                <version>2.2</version>
28                <configuration>
29                    <url>http://localhost:8080/manager/html</url>
30                    <username>admin</username>
31                    <password>admin</password>
32                </configuration>
33            </plugin>
34        </plugins>
35    </pluginManagement>
36</build>
3.配置tomcat部署命令
1.6 可能遇见的问题
1)问题描述:使用Eclipse自带的Maven插件创建Web****项目时报错
离线解决方式:
1.http://maven.oschina.net/content/groups/public/org/apache/maven/archetypes/maven-archetype-quickstart/ 下载最新版maven-archetype-quickstart-1.1.jar
2.命令行到下载目录下执行mvn install:install-file -DgroupId=org.apache.maven.archetypes -DartifactId=maven-archetype-quickstart -Dversion=1.1 -Dpackaging=jar -Dfile=maven-archetype-quickstart-1.1.jar
2)cannot change version of project facet Dynamic Web Module to 3.0
网上搜下:http://my.oschina.net/cloudcoder/blog/362949
3)eclipse中使用maven插件的时候,运行run as maven build****的时候报错-Dmaven.multiModuleProjectDirectory system propery is not set. Check $M2_HOME environment variable and mvn script match.
可以设一个环境变量M2_HOME指向你的maven安装目录MAVEN_HOME=D:\Program Files\apache-maven-3.3.3然后在Window->Preference->Java->Installed JREs->Edit在Default VM arguments中设置- Dmaven.multiModuleProjectDirectory=$MAVEN_HOME
4)两个不同版本开发IDE(例如两个不同版本Eclipse都自带集成的mavn插件,但他们由于集成的Mavn插件版本不同是的本地mavn plugins下的jar版本也不全相同,导致只有个Eclipse的mavn环境能正常使用,另一个jar版本不匹配)