
Netty服务端启动流程源码分析
前记
哈喽,自从上篇《Netty之旅二:口口相传的高性能Netty到底是什么?》后,迟迟两周才开启今天的Netty源码系列。源码分析的第一篇文章,下一篇我会分享客户端的启动过程源码分析。通过源码的阅读,我们将会知道,Netty 服务端启动的调用链是非常长的,同时肯定也会发现一些新的问题,随着我们源码阅读的不断深入,相信这些问题我们也会一一攻破。
废话不多说,直接上号!
一、从EchoServer示例入手
示例从哪里来?任何开源框架都会有自己的示例代码,Netty源码也不例外,如模块netty-example中就包括了最常见的EchoServer示例,下面通过这个示例进入服务端启动流程篇章。
1public final class EchoServer {
2
3    static final boolean SSL = System.getProperty("ssl") != null;
4    static final int PORT = Integer.parseInt(System.getProperty("port", "8007"));
5
6    public static void main(String[] args) throws Exception {
7        // Configure SSL.
8        final SslContext sslCtx;
9        if (SSL) {
10            SelfSignedCertificate ssc = new SelfSignedCertificate();
11            sslCtx = SslContextBuilder.forServer(ssc.certificate(), ssc.privateKey()).build();
12        } else {
13            sslCtx = null;
14        }
15
16        // 1. 声明Main-Sub Reactor模式线程池:EventLoopGroup
17        // Configure the server.
18        EventLoopGroup bossGroup = new NioEventLoopGroup(1);
19        EventLoopGroup workerGroup = new NioEventLoopGroup();
20        // 创建 EchoServerHandler 对象
21        final EchoServerHandler serverHandler = new EchoServerHandler();
22        try {
23            // 2. 声明服务端启动引导器,并设置相关属性
24            ServerBootstrap b = new ServerBootstrap();
25            b.group(bossGroup, workerGroup)
26             .channel(NioServerSocketChannel.class)
27             .option(ChannelOption.SO_BACKLOG, 100)
28             .handler(new LoggingHandler(LogLevel.INFO))
29             .childHandler(new ChannelInitializer<SocketChannel>() {
30                 @Override
31                 public void initChannel(SocketChannel ch) throws Exception {
32                     ChannelPipeline p = ch.pipeline();
33                     if (sslCtx != null) {
34                         p.addLast(sslCtx.newHandler(ch.alloc()));
35                     }
36                     //p.addLast(new LoggingHandler(LogLevel.INFO));
37                     p.addLast(serverHandler);
38                 }
39             });
40
41            // 3. 绑定端口即启动服务端,并同步等待
42            // Start the server.
43            ChannelFuture f = b.bind(PORT).sync();
44
45            // 4. 监听服务端关闭,并阻塞等待
46            // Wait until the server socket is closed.
47            f.channel().closeFuture().sync();
48        } finally {
49            // 5. 优雅地关闭两个EventLoopGroup线程池
50            // Shut down all event loops to terminate all threads.
51            bossGroup.shutdownGracefully();
52            workerGroup.shutdownGracefully();
53        }
54    }
55}
- [代码行18、19]声明
Main-Sub Reactor模式线程池:EventLoopGroup
创建两个 EventLoopGroup 对象。其中,bossGroup用于服务端接受客户端的连接,workerGroup用于进行客户端的 SocketChannel 的数据读写。
(<u>关于EventLoopGroup不是本文重点所以在后续文章中进行分析</u>)
- [代码行23-39]声明服务端启动引导器,并设置相关属性
AbstractBootstrap是一个帮助类,通过方法链(method chaining)的方式,提供了一个简单易用的方式来配置启动一个Channel。io.netty.bootstrap.ServerBootstrap ,实现 AbstractBootstrap 抽象类,用于 Server 的启动器实现类。io.netty.bootstrap.Bootstrap ,实现 AbstractBootstrap 抽象类,用于 Client 的启动器实现类。如下类图所示:
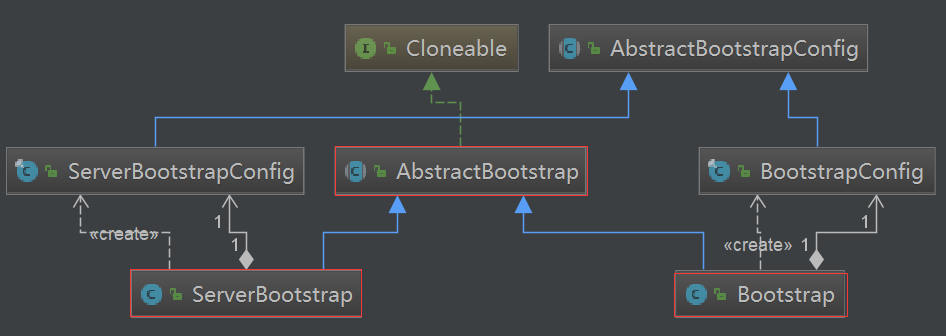
(<u>在EchoServer示例代码中,我们看到 ServerBootstrap 的 group、channel、option、childHandler 等属性链式设置都放到关于AbstractBootstrap体系代码中详细介绍。</u>)
- [代码行43]绑定端口即启动服务端,并同步等待
先调用 #bind(int port) 方法,绑定端口,后调用 ChannelFuture#sync() 方法,阻塞等待成功。对于bind操作就是本文要详细介绍的"服务端启动流程"。
- [代码行47]监听服务端关闭,并阻塞等待
先调用 #closeFuture() 方法,监听服务器关闭,后调用 ChannelFuture#sync() 方法,阻塞等待成功。 注意,此处不是关闭服务器,而是channel的监听关闭。
- [代码行51、52]优雅地关闭两个
EventLoopGroup线程池
finally代码块中执行说明服务端将最终关闭,所以调用 EventLoopGroup#shutdownGracefully() 方法,分别关闭两个EventLoopGroup对象,终止所有线程。
二、服务启动过程
在服务启动过程的源码分析之前,这里回顾一下我们在通过JDK NIO编程在服务端启动初始的代码:
1 serverSocketChannel = ServerSocketChannel.open();
2 serverSocketChannel.configureBlocking(false);
3 serverSocketChannel.socket().bind(new InetSocketAddress(port), 1024);
4 selector = Selector.open();
5 serverSocketChannel.register(selector, SelectionKey.OP_ACCEPT);
这5行代码标示一个最为熟悉的过程:
- 打开
serverSocketChannel - 配置非阻塞模式
- 为
channel的socket绑定监听端口 - 创建
Selector - 将
serverSocketChannel注册到selector
后面等分析完Netty的启动过程后,会对这些步骤有一个新的认识。在EchoServer示例中,进入 #bind(int port) 方法,AbstractBootstrap#bind()其实有多个方法,方便不同地址参数的传递,实际调用的方法是AbstractBootstrap#doBind(final SocketAddress localAddress) 方法,代码如下:
1private ChannelFuture doBind(final SocketAddress localAddress) {
2        final ChannelFuture regFuture = initAndRegister();
3        final Channel channel = regFuture.channel();
4        if (regFuture.cause() != null) {
5            return regFuture;
6        }
7
8        if (regFuture.isDone()) {
9            // At this point we know that the registration was complete and successful.
10            ChannelPromise promise = channel.newPromise();
11            doBind0(regFuture, channel, localAddress, promise);
12            return promise;
13        } else {
14            // Registration future is almost always fulfilled already, but just in case it's not.
15            final PendingRegistrationPromise promise = new PendingRegistrationPromise(channel);
16            regFuture.addListener(new ChannelFutureListener() {
17                @Override
18                public void operationComplete(ChannelFuture future) throws Exception {
19                    Throwable cause = future.cause();
20                    if (cause != null) {
21                        // Registration on the EventLoop failed so fail the ChannelPromise directly to not cause an
22                        // IllegalStateException once we try to access the EventLoop of the Channel.
23                        promise.setFailure(cause);
24                    } else {
25                        // Registration was successful, so set the correct executor to use.
26                        // See https://github.com/netty/netty/issues/2586
27                        promise.registered();
28
29                        doBind0(regFuture, channel, localAddress, promise);
30                    }
31                }
32            });
33            return promise;
34        }
35}
- [代码行2] :调用
#initAndRegister()方法,初始化并注册一个Channel对象。因为注册是异步的过程,所以返回一个ChannelFuture对象。详细解析,见 「initAndRegister()」。 - [代码行4-6]]:若发生异常,直接进行返回。
- [代码行9-34]:因为注册是异步的过程,有可能已完成,有可能未完成。所以实现代码分成了【第 10 至 14 行】和【第 15 至 36 行】分别处理已完成和未完成的情况。
- 核心在[第 11 、29行],调用
#doBind0(final ChannelFuture regFuture, final Channel channel, final SocketAddress localAddress, final ChannelPromise promise)方法,绑定 Channel 的端口,并注册 Channel 到SelectionKey中。 - 如果异步注册对应的
ChanelFuture未完成,则调用ChannelFuture#addListener(ChannelFutureListener)方法,添加监听器,在注册完成后,进行回调执行#doBind0(...)方法的逻辑。
- 核心在[第 11 、29行],调用
通过doBind方法可以知道服务端启动流程大致如下几个步骤:
1. 创建Channel
从#doBind(final SocketAddress localAddress)进入到initAndRegister():
1 final ChannelFuture initAndRegister() {
2     Channel channel = null;
3     try {
4         channel = channelFactory.newChannel();
5         init(channel);
6     } catch (Throwable t) {
7         if (channel != null) {
8             // channel can be null if newChannel crashed (eg SocketException("too many open files"))
9             channel.unsafe().closeForcibly();
10             // as the Channel is not registered yet we need to force the usage of the GlobalEventExecutor
11             return new DefaultChannelPromise(channel, GlobalEventExecutor.INSTANCE).setFailure(t);
12         }
13         // as the Channel is not registered yet we need to force the usage of the GlobalEventExecutor
14         return new DefaultChannelPromise(new FailedChannel(), GlobalEventExecutor.INSTANCE).setFailure(t);
15     }
16
17     ChannelFuture regFuture = config().group().register(channel);
18     if (regFuture.cause() != null) {
19         if (channel.isRegistered()) {
20             channel.close();
21         } else {
22             channel.unsafe().closeForcibly();
23         }
24     }
25
26     return regFuture;
27}
[代码行4]调用 ChannelFactory#newChannel() 方法,创建Channel对象。 ChannelFactory类继承如下:
可以在ChannelFactory注释看到@deprecated Use {@link io.netty.channel.ChannelFactory} instead.,这里只是包名的调整,对于继承结构不变。netty默认使用ReflectiveChannelFactory,我们可以看到重载方法:
1@Override
2public T newChannel() {
3    try {
4        return constructor.newInstance();
5    } catch (Throwable t) {
6        throw new ChannelException("Unable to create Channel from class " + constructor.getDeclaringClass(), t);
7    }
8}
很明显,正如其名是通过反射机制构造Channel对象实例的。constructor是在其构造方法初始化的:this.constructor = clazz.getConstructor();这个clazz按理说应该是我们要创建的Channel的Class对象。那Class对象是什么呢?我们接着看channelFactory是怎么初始化的。
首先在AbstractBootstrap找到如下代码:
1@Deprecated
2public B channelFactory(ChannelFactory<? extends C> channelFactory) {
3    ObjectUtil.checkNotNull(channelFactory, "channelFactory");
4    if (this.channelFactory != null) {
5        throw new IllegalStateException("channelFactory set already");
6    }
7
8    this.channelFactory = channelFactory;
9    return self();
10}
调用这个方法的递推向上看到:
1public B channel(Class<? extends C> channelClass) {
2    return channelFactory(new ReflectiveChannelFactory<C>(
3        ObjectUtil.checkNotNull(channelClass, "channelClass")
4    ));
5}
这个方法正是在EchoServer中ServerBootstrap链式设置时调用.channel(NioServerSocketChannel.class)的方法。我们看到,channelClass就是NioServerSocketChannel.class,channelFactory也是以ReflectiveChannelFactory作为具体实例,并且将NioServerSocketChannel.class作为构造参数传递初始化的,所以这回答了反射机制构造的是io.netty.channel.socket.nio.NioServerSocketChannel对象。
继续看NioServerSocketChannel构造方法逻辑做了什么事情,看之前先给出NioServerSocketChannel类继承关系:
NioServerSocketChannel与NioSocketChannel分别对应服务端和客户端,公共父类都是AbstractNioChannel和AbstractChannel,下面介绍创建过程可以参照这个Channel类继承图。进入NioServerSocketChannel构造方法:
1/**
2  * Create a new instance
3  */
4public NioServerSocketChannel() {
5    this(newSocket(DEFAULT_SELECTOR_PROVIDER));
6}
点击newSocket进去:
1private static ServerSocketChannel newSocket(SelectorProvider provider) {
2    try {
3        /**
4          *  Use the {@link SelectorProvider} to open {@link SocketChannel} and so remove condition in
5          *  {@link SelectorProvider#provider()} which is called by each ServerSocketChannel.open() otherwise.
6          *
7          *  See <a href="https://github.com/netty/netty/issues/2308">#2308</a>.
8          */
9        return provider.openServerSocketChannel();
10    } catch (IOException e) {
11        throw new ChannelException(
12            "Failed to open a server socket.", e);
13    }
14}
以上传进来的provider是DEFAULT_SELECTOR_PROVIDER即默认的java.nio.channels.spi.SelectorProvider,[代码行9]就是熟悉的jdk nio创建ServerSocketChannel。这样newSocket(DEFAULT_SELECTOR_PROVIDER)就返回了结果ServerSocketChannel,回到NioServerSocketChannel()#this()点进去:
1/**
2  * Create a new instance using the given {@link ServerSocketChannel}.
3  */
4public NioServerSocketChannel(ServerSocketChannel channel) {
5    super(null, channel, SelectionKey.OP_ACCEPT);
6    config = new NioServerSocketChannelConfig(this, javaChannel().socket());
7}
以上super代表父类AbstractNioMessageChannel构造方法,点进去看到:
1 /**
2   * @see AbstractNioChannel#AbstractNioChannel(Channel, SelectableChannel, int)
3   */
4protected AbstractNioMessageChannel(Channel parent, SelectableChannel ch, int readInterestOp) {
5    super(parent, ch, readInterestOp);
6}
以上super代表父类AbstractNioChannel构造方法,点进去看到:
1 protected AbstractNioChannel(Channel parent, SelectableChannel ch, int readInterestOp) {
2     super(parent);
3     this.ch = ch;
4     this.readInterestOp = readInterestOp;
5     try {
6         ch.configureBlocking(false);
7     } catch (IOException e) {
8         try {
9             ch.close();
10         } catch (IOException e2) {
11             if (logger.isWarnEnabled()) {
12                 logger.warn("Failed to close a partially initialized socket.", e2);
13             }
14         }
15
16         throw new ChannelException("Failed to enter non-blocking mode.", e);
17     }
18}
以上[代码行3]将ServerSocketChannel保存到了AbstractNioChannel#ch成员变量,在上面提到的NioServerSocketChannel构造方法的[代码行6]javaChannel()拿到的就是ch保存的ServerSocketChannel变量。
以上[代码行6]就是熟悉的jdk nio编程设置ServerSocketChannel非阻塞方式。这里还有super父类构造方法,点击进去看到:
1 protected AbstractChannel(Channel parent) {
2     this.parent = parent;
3     id = newId();
4     unsafe = newUnsafe();
5     pipeline = newChannelPipeline();
6}
以上构造方法中:
parent属性,代表父Channel对象。对于NioServerSocketChannel的parent为null。id属性,Channel编号对象。在构造方法中,通过调用#newId()方法进行创建。(<u>这里不细展开Problem-1</u>)unsafe属性,Unsafe对象。因为Channel真正的具体操作,是通过调用对应的Unsafe对象实施。所以需要在构造方法中,通过调用#newUnsafe()方法进行创建。这里的Unsafe并不是我们常说的jdk自带的sun.misc.Unsafe,而是io.netty.channel.Channel#Unsafe。(<u>这里不细展开Problem-2</u>)pipeline属性默认是DefaultChannelPipeline对象,赋值后在后面为channel绑定端口的时候会用到
通过以上创建channel源码过程分析,总结的流程时序图如下:
2. 初始化Channel
回到一开始创建Channel的initAndRegister()入口方法,在创建Channel后紧接着init(channel)进入初始化流程,因为是服务端初始化,所以是ServerBootstrap#init(Channel channel),代码如下:
1@Override
2void init(Channel channel) throws Exception {
3    final Map<ChannelOption<?>, Object> options = options0();
4    synchronized (options) {
5        setChannelOptions(channel, options, logger);
6    }
7
8    final Map<AttributeKey<?>, Object> attrs = attrs0();
9    synchronized (attrs) {
10        for (Entry<AttributeKey<?>, Object> e: attrs.entrySet()) {
11            @SuppressWarnings("unchecked")
12            AttributeKey<Object> key = (AttributeKey<Object>) e.getKey();
13            channel.attr(key).set(e.getValue());
14        }
15    }
16
17    ChannelPipeline p = channel.pipeline();
18
19    final EventLoopGroup currentChildGroup = childGroup;
20    final ChannelHandler currentChildHandler = childHandler;
21    final Entry<ChannelOption<?>, Object>[] currentChildOptions;
22    final Entry<AttributeKey<?>, Object>[] currentChildAttrs;
23    synchronized (childOptions) {
24        currentChildOptions = childOptions.entrySet().toArray(newOptionArray(0));
25    }
26    synchronized (childAttrs) {
27        currentChildAttrs = childAttrs.entrySet().toArray(newAttrArray(0));
28    }
29
30    p.addLast(new ChannelInitializer<Channel>() {
31        @Override
32        public void initChannel(final Channel ch) throws Exception {
33            final ChannelPipeline pipeline = ch.pipeline();
34            ChannelHandler handler = config.handler();
35            if (handler != null) {
36                pipeline.addLast(handler);
37            }
38
39            ch.eventLoop().execute(new Runnable() {
40                @Override
41                public void run() {
42                    pipeline.addLast(new ServerBootstrapAcceptor(
43                        ch, currentChildGroup, currentChildHandler, currentChildOptions, currentChildAttrs));
44                }
45            });
46        }
47    });
48}
-
[代码 3 - 6 行]:
options0()方法返回的options保存了用户在EchoServer中设置自定义的可选项集合,这样ServerBootstrap将配置的选项集合,设置到了Channel的可选项集合中。 -
[代码 8 - 15 行]:
attrs0()方法返回的attrs保存了用户在EchoServer中设置自定义的属性集合,这样ServerBootstrap将配置的属性集合,设置到了Channel的属性集合中。 -
[代码21-28行]:通过局部变量
currentChildOptions和currentChildAttrs保存了用户自定义的childOptions和childAttrs,用于[代码43行]ServerBootstrapAcceptor构造方法。 -
[代码30-47]]:创建
ChannelInitializer对象,添加到pipeline中,用于后续初始化ChannelHandler到pipeline中,包括用户在EchoServer配置的LoggingHandler和创建的创建ServerBootstrapAcceptor对象。-
[代码行34-37]:添加启动器配置的
LoggingHandler到pipeline中。 -
[代码行39-45]:创建
ServerBootstrapAcceptor对象,添加到pipeline中。从名字上就可以看出来,ServerBootstrapAcceptor也是一个ChannelHandler实现类,专门用于接受客户端的新连接请求,把新的请求扔给某个事件循环器,我们先不做过多分析。我们发现是使用EventLoop.execute执行添加的过程,这是为什么呢?同样记录问题(<u>Problem-</u>3) -
需要说明的是
pipeline在之前介绍Netty核心组件的时候提到是一个包含ChannelHandlerContext的双向链表,每一个context对于唯一一个ChannelHandler,这里初始化后,ChannelPipeline里就是如下一个结构:
-
3. 注册Channel
初始化Channel一些基本配置和属性完毕后,回到一开始创建Channel的initAndRegister()入口方法,在初始化Channel后紧接着[代码行17] ChannelFuture regFuture = config().group().register(channel);明显这里是通过EventLoopGroup进入注册流程(EventLoopGroup体系将在后续文章讲解)
在EchoServer中启动器同样通过ServerBootstrap#group()设置了NioEventLoopGroup,它继承自MultithreadEventLoopGroup,所以注册流程会进入MultithreadEventLoopGroup重载的register(Channel channel)方法,代码如下:
1@Override
2public ChannelFuture register(Channel channel) {
3    return next().register(channel);
4}
这里会调用 next() 方法选择出来一个 EventLoop 来注册 Channel,里面实际上使用的是一个叫做 EventExecutorChooser 的东西来选择,它实际上又有两种实现方式 ——PowerOfTwoEventExecutorChooser 和 GenericEventExecutorChooser,本质上就是从 EventExecutor 数组中选择一个 EventExecutor,我们这里就是 NioEventLoop,那么,它们有什么区别呢?(<u>Problem-4:在介绍EventLoopGroup体系的后续文章中将会详细讲解,这里简单地提一下,本质都是按数组长度取余数 ,不过,2 的 N 次方的形式更高效。</u>)
接着,来到 NioEventLoop 的 register(channel) 方法,你会不会问找不到该方法?提示NioEventLoop 继承SingleThreadEventLoop,所以父类方法:
1@Override
2public ChannelFuture register(Channel channel) {
3    return register(new DefaultChannelPromise(channel, this));
4}
5
6@Override
7public ChannelFuture register(final ChannelPromise promise) {
8    ObjectUtil.checkNotNull(promise, "promise");
9    promise.channel().unsafe().register(this, promise);
10    return promise;
11}
可以看到,先创建了一个叫做 ChannelPromise 的东西,它是 ChannelFuture 的子类。[代码行9]又调回了 Channel 的 Unsafe 的 register () 方法,这里第一个参数是 this,也就是 NioEventLoop,第二个参数是刚创建的 ChannelPromise。
点击 AbstractUnsafe#register(EventLoop eventLoop, final ChannelPromise promise) 方法进去,代码如下:
1 public final void register(EventLoop eventLoop, final ChannelPromise promise) {
2     if (eventLoop == null) {
3         throw new NullPointerException("eventLoop");
4     }
5     if (isRegistered()) {
6         promise.setFailure(new IllegalStateException("registered to an event loop already"));
7         return;
8     }
9     if (!isCompatible(eventLoop)) {
10         promise.setFailure(
11             new IllegalStateException("incompatible event loop type: " + eventLoop.getClass().getName()));
12         return;
13     }
14
15     AbstractChannel.this.eventLoop = eventLoop;
16
17     if (eventLoop.inEventLoop()) {
18         register0(promise);
19     } else {
20         try {
21             eventLoop.execute(new Runnable() {
22                 @Override
23                 public void run() {
24                     register0(promise);
25                 }
26             });
27         } catch (Throwable t) {
28             logger.warn(
29                 "Force-closing a channel whose registration task was not accepted by an event loop: {}",
30                 AbstractChannel.this, t);
31             closeForcibly();
32             closeFuture.setClosed();
33             safeSetFailure(promise, t);
34         }
35     }
36}
[代码行15]这行代码是设置 Channel 的 eventLoop 属性。这行前面的代码主要是在校验传入的 eventLoop 参数非空,校验是否有注册过以及校验 Channel 和 eventLoop 类型是否匹配。
[代码18、24]接着,跟踪到 AbstractUnsafe#register0(ChannelPromise promise) 方法中:
1private void register0(ChannelPromise promise) {
2    try {
3        // check if the channel is still open as it could be closed in the mean time when the register
4        // call was outside of the eventLoop
5        if (!promise.setUncancellable() || !ensureOpen(promise)) {
6            return;
7        }
8        boolean firstRegistration = neverRegistered;
9        doRegister();
10        neverRegistered = false;
11        registered = true;
12
13        // Ensure we call handlerAdded(...) before we actually notify the promise. This is needed as the
14        // user may already fire events through the pipeline in the ChannelFutureListener.
15        pipeline.invokeHandlerAddedIfNeeded();
16
17        safeSetSuccess(promise);
18        pipeline.fireChannelRegistered();
19        // Only fire a channelActive if the channel has never been registered. This prevents firing
20        // multiple channel actives if the channel is deregistered and re-registered.
21        if (isActive()) {
22            if (firstRegistration) {
23                pipeline.fireChannelActive();
24            } else if (config().isAutoRead()) {
25                // This channel was registered before and autoRead() is set. This means we need to begin read
26                // again so that we process inbound data.
27                //
28                // See https://github.com/netty/netty/issues/4805
29                beginRead();
30            }
31        }
32    } catch (Throwable t) {
33        // Close the channel directly to avoid FD leak.
34        closeForcibly();
35        closeFuture.setClosed();
36        safeSetFailure(promise, t);
37    }
38}
[代码行9]进入 AbstractNioChannel#doRegister() 方法:
1protected void doRegister() throws Exception {
2    boolean selected = false;
3    for (;;) {
4        try {
5            selectionKey = javaChannel().register(eventLoop().unwrappedSelector(), 0, this);
6            return;
7        } catch (CancelledKeyException e) {
8            if (!selected) {
9                // Force the Selector to select now as the "canceled" SelectionKey may still be
10                // cached and not removed because no Select.select(..) operation was called yet.
11                eventLoop().selectNow();
12                selected = true;
13            } else {
14                // We forced a select operation on the selector before but the SelectionKey is still cached
15                // for whatever reason. JDK bug ?
16                throw e;
17            }
18        }
19    }
20}
[代码行5]关键一行代码,将 Java 原生NIO Selector与 Java 原生 NIO 的 Channel 对象(ServerSocketChannel) 绑定在一起,并将当前 Netty 的Channel通过 attachment 的形式绑定到 SelectionKey 上:
- 调用
#unwrappedSelector()方法,返回 Java 原生NIO Selector对象,而且每个NioEventLoop与Selector唯一一对应。 - 调用
SelectableChannel#register(Selector sel, int ops, Object att)方法,注册 Java 原生NIO的Channel对象到NIO Selector对象上。
通过以上注册channel源码分析,总结流程的时序图如下:
4. 绑定端口
注册完Channel最后回到AbstractBootstrap#doBind() 方法,分析 Channel 的端口绑定逻辑。进入doBind0代码如下:
1private static void doBind0(
2    final ChannelFuture regFuture, final Channel channel,
3    final SocketAddress localAddress, final ChannelPromise promise) {
4
5    // This method is invoked before channelRegistered() is triggered.  Give user handlers a chance to set up
6    // the pipeline in its channelRegistered() implementation.
7    channel.eventLoop().execute(new Runnable() {
8        @Override
9        public void run() {
10            if (regFuture.isSuccess()) {
11                channel.bind(localAddress, promise).addListener(ChannelFutureListener.CLOSE_ON_FAILURE);
12            } else {
13                promise.setFailure(regFuture.cause());
14            }
15        }
16    });
17}
- [代码行7]:在前面
Channel注册成功的条件下,调用EventLoop执行Channel的端口绑定逻辑。但是,实际上当前线程已经是EventLoop所在的线程了,为何还要这样操作呢?答案在【第 5 至 6 行】的英语注释,这里作为一个问题记着(<u>Problem-5</u>)。 - [代码行11]:进入
AbstractChannel#bind(SocketAddress localAddress, ChannelPromise promise),同样立即异步返回并添加ChannelFutureListener.CLOSE_ON_FAILURE监听事件。 - [代码行13]:如果绑定端口之前的操作并没有成功,自然也就不能进行端口绑定操作了,通过promise记录异常原因。
AbstractChannel#bind(SocketAddress localAddress, ChannelPromise promise)方法如下:
1 public ChannelFuture bind(SocketAddress localAddress, ChannelPromise promise) {
2        return pipeline.bind(localAddress, promise);
3 }
pipeline是之前创建channel的时候创建的DefaultChannelPipeline,进入该方法:
1 public final ChannelFuture bind(SocketAddress localAddress, ChannelPromise promise) {
2        return tail.bind(localAddress, promise);
3 }
[在分析初始化流程的时候最后画一个DefaultChannelPipeline内部的结构,能够便于分析后面进入DefaultChannelPipeline一系列bind方法。]
首先,tail代表TailContext,进入AbstractChannelHandlerContext# bind(final SocketAddress localAddress, final ChannelPromise promise)方法:
1 public ChannelFuture bind(final SocketAddress localAddress, final ChannelPromise promise) {
2     //省略部分代码
3     final AbstractChannelHandlerContext next = findContextOutbound(MASK_BIND);
4     EventExecutor executor = next.executor();
5     if (executor.inEventLoop()) {
6         next.invokeBind(localAddress, promise);
7     } else {
8         safeExecute(executor, new Runnable() {
9             @Override
10             public void run() {
11                 next.invokeBind(localAddress, promise);
12             }
13         }, promise, null);
14     }
15     return promise;
16}
[代码行3]:findContextOutbound方法里主要是执行ctx = ctx.prev;那么得到的next就是绑定LoggingHandler的context
[代码行6]:进入invokeBind(localAddress, promise)方法并直接执行LoggingHandler#bind(this, localAddress, promise),进入后的方法如下:
1 public void bind(ChannelHandlerContext ctx, SocketAddress localAddress, ChannelPromise promise) throws Exception {
2     if (logger.isEnabled(internalLevel)) {
3         logger.log(internalLevel, format(ctx, "BIND", localAddress));
4     }
5     ctx.bind(localAddress, promise);
6 }
设置了LoggingHandler的日志基本级别为默认的INFO后,进行绑定操作的信息打印。接着,继续循环到AbstractChannelHandlerContext# bind(final SocketAddress localAddress, final ChannelPromise promise)方法执行ctx = ctx.prev取出HeadContext进入到bind方法:
1 public void bind(ChannelHandlerContext ctx, SocketAddress localAddress, ChannelPromise promise) {
2     unsafe.bind(localAddress, promise);
3 }
兜兜转转,最终跳出了pipeline轮回到AbstractUnsafe#bind(final SocketAddress localAddress, final ChannelPromise promise) 方法,Channel 的端口绑定逻辑。代码如下:
1public final void bind(final SocketAddress localAddress, final ChannelPromise promise) {
2    //此处有省略...
3    boolean wasActive = isActive();
4    try {
5        doBind(localAddress);
6    } catch (Throwable t) {
7        safeSetFailure(promise, t);
8        closeIfClosed();
9        return;
10    }
11    //此处有省略...
12}
做实事方法doBind进入后如下:
1@Override
2protected void doBind(SocketAddress localAddress) throws Exception {
3    if (PlatformDependent.javaVersion() >= 7) {
4        javaChannel().bind(localAddress, config.getBacklog());
5    } else {
6        javaChannel().socket().bind(localAddress, config.getBacklog());
7    }
8}
到了此处,服务端的 Java 原生 NIO ServerSocketChannel 终于绑定上了端口。
三、问题归纳
- Problem-1: 创建
Channel流程中AbstractChannel构造函数中为channel分配ID的算法如何实现? - Problem-2:
AbstractChannel内部类AbstractUnsafe的作用? - Problem-3: 初始化
channel流程中pipeline添加ServerBootstrapAcceptor是通过EventLoop.execute执行添加的过程,这是为什么呢? - Problem-4:注册
channel流程中PowerOfTwoEventExecutorChooser和GenericEventExecutorChooser的区别和优化原理? - Problem-5:绑定端口流程中调用
EventLoop执行Channel的端口绑定逻辑。但是,实际上当前线程已经是EventLoop所在的线程了,为何还要这样操作呢?
小结
通过对Netty服务端启动流程源码分析,我们发现了在使用NIO的模式下,服务端启动流程其实就是封装了JDK NIO编程在服务端启动的流程。只不过对原生JDK NIO进行了增强和优化,同时从架构设计上简化了服务端流程的编写。
最重要的是感谢彤哥、艿艿和俞超-闪电侠这些大佬前期的分享,能够让更多人学习源码的旅途少走很多弯路,谢谢!
欢迎关注: