
准备步骤
1. 安装Maven,下载解压即可。官网下载
2. 修改maven_home/conf/settings.xml中的<localRepository>D:/MavenRepo</localRepository>指定本地仓库位置,这个位置是本地计算机上用来存放所有jar包的地方。
3. 修改settings.xml中的<mirrors></mirrors>标签,添加常用的maven远程仓库地址。这些仓库地址就是用来下载jar包的时候用的。由于中央仓库的访问速度较慢(或者因为某些原因导致你根本不能访问),因此一般需要设置其他的仓库地址以提高访问速度。比如:
1<mirror>
2    <id>oschina</id>
3    <mirrorOf>central</mirrorOf>
4    <url>http://maven.oschina.net/content/groups/public/</url>
5</mirror>
6<mirror>
7    <id>repo2</id>
8    <mirrorOf>central</mirrorOf>
9    <url>http://repo2.maven.org/maven2/</url>
10</mirror>
11<mirror>
12    <id>net-cn</id>
13    <mirrorOf>central</mirrorOf>
14    <url>http://maven.net.cn/content/groups/public/</url>
15</mirror>
如果使用mvn命令行来创建、构建和运行maven项目,则需要配置环境变量,路径指向maven_home/bin即可。配置好后,可以查看mvn命令:
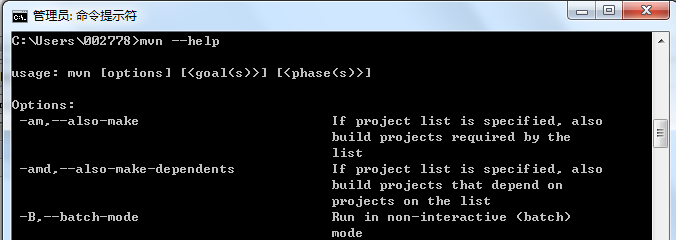
由于使用命令太麻烦而且难记,我直接使用Eclipse的maven插件来创建和运行maven项目。
4. 在Eclipse中集成Maven。
-
先安装Eclipse的maven插件(具体过程网上一大堆,比如:安装Eclipse Maven插件的几种方法)
-
在Eclipse中通过Windows->Preferences->Maven菜单下指定安装的maven:

并指定自己的配置文件settings.xml:

创建Maven项目
5. New->Maven Project->Next,选择webapp类型的项目结构。由于不同类型的项目有不同的项目结构,因此Maven自带了很多套项目骨架(archetype),这里我们选择webapp类型的骨架即可:

6. 输入Group ID, Artifact ID, Version和Package, Finish.
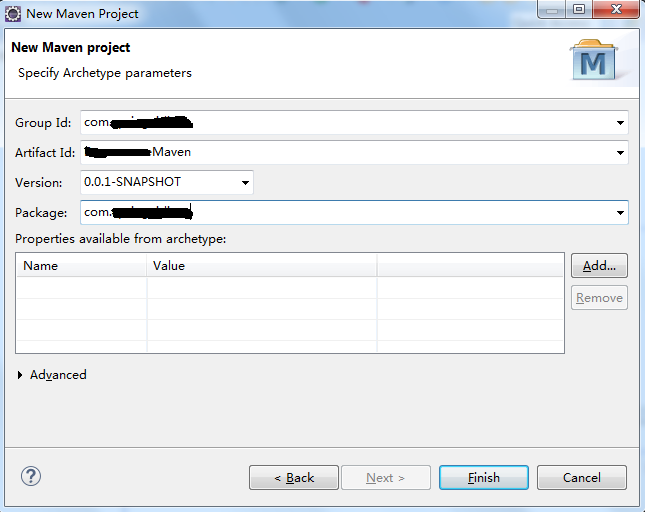
7. 创建好后如图,默认情况下已经将junit3.8导入到项目中:

8. 先把默认使用的JRE环境替换成当前Eclipse中使用的JRE环境。
9. 每个Maven项目都有一个pom.xml文件,这个文件描述了这个项目的依赖关系,以及自身的一些属性,包括properties的定义,以及Maven Modules的版本声明,父模块以及子模块的名字等。同时这个文件还包括了该项目在构建过程中做的事情的定义。现在打开这个pom.xml文件,先在<dependencies>标签上方添加该项目用到的属性定义(为了集中管理spring的版本,因此将其定义为属性,在依赖spring的jar包时直接使用这个属性即可):
1<properties>
2    <project.build.sourceEncoding>UTF-8</project.build.sourceEncoding>
3    <spring.version>4.0.0.RELEASE</spring.version>
4</properties>
并在<dependencies></dependencies>标签中添加如下依赖关系,其他的内容无需修改:
1<dependencies>
2    <!-- MyBatis相关 -->
3    <dependency>
4        <groupId>org.mybatis</groupId>
5        <artifactId>mybatis</artifactId>
6        <version>3.2.0</version>
7    </dependency>
8    <dependency>
9        <groupId>org.mybatis</groupId>
10        <artifactId>mybatis-spring</artifactId>
11        <version>1.2.0</version>
12    </dependency>
13
14    <!-- MySQL相关 -->
15    <dependency>
16        <groupId>mysql</groupId>
17        <artifactId>mysql-connector-java</artifactId>
18        <version>5.1.36</version>
19    </dependency>
20    <dependency>
21        <groupId>c3p0</groupId>
22        <artifactId>c3p0</artifactId>
23        <version>0.9.1.2</version>
24    </dependency>
25
26    <!-- Spring相关,这里的spring.version就是上方声明的版本号,这样引用更方便修改和维护 -->
27    <dependency>
28        <groupId>org.springframework</groupId>
29        <artifactId>spring-webmvc</artifactId>
30        <version>${spring.version}</version>
31    </dependency>
32    <dependency>
33        <groupId>org.springframework</groupId>
34        <artifactId>spring-web</artifactId>
35        <version>${spring.version}</version>
36    </dependency>
37    <dependency>
38        <groupId>org.springframework</groupId>
39        <artifactId>spring-test</artifactId>
40        <version>${spring.version}</version>
41    </dependency>
42    <dependency>
43        <groupId>org.springframework</groupId>
44        <artifactId>spring-ibatis</artifactId>
45        <version>2.0.8</version>
46    </dependency>
47    <dependency>
48        <groupId>org.springframework</groupId>
49        <artifactId>spring-jdbc</artifactId>
50        <version>${spring.version}</version>
51    </dependency>
52
53    <!-- 测试相关 -->
54    <dependency>
55        <groupId>junit</groupId>
56        <artifactId>junit</artifactId>
57        <version>4.10</version>
58        <scope>test</scope>
59    </dependency>
60
61    <!-- Servlet相关 -->
62    <dependency>
63        <groupId>tomcat</groupId>
64        <artifactId>servlet-api</artifactId>
65        <version>5.5.23</version>
66    </dependency>
67
68    <!-- Log相关 -->
69    <dependency>
70        <groupId>log4j</groupId>
71        <artifactId>log4j</artifactId>
72        <version>1.2.17</version>
73    </dependency>
74</dependencies>
10. 在Maven的世界中,每一个jar包都可以通过**Group ID, Artifact ID, Version这三个字段(一般简写为GAV)**来唯一定位,因此如果需要使用哪个jar包,只需要提供这三个字段即可。
如果不知道版本号或者GroupID,可以去公共的Maven仓库搜索关键字。比如搜索:log4j,即可出现仓库中已经收录的关于log4j的jar包:
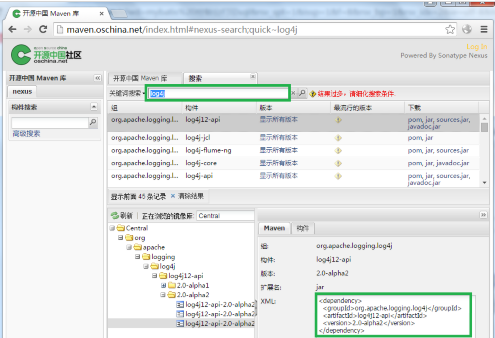
如图,我在oschina提供的maven库中搜索log4j,出现了一些可用的jar包列表(这里需要注意:有些jar包名称看上去很相近,因此需要注意区别,选择正确的jar包)。选择某一个,右下方会有该包的GAV属性。直接将这一段拷贝到maven项目pom.xml文件中即可。
还有一个很好用的maven仓库地址,推荐给大家:http://mvnrepository.com/
11. Jar包准备完毕后,开始项目接口的定义了。修改后的结构如图:

12. web.xml仅仅定义了基本的DispatchServlet,用于转发请求:
1<servlet>
2    <servlet-name>spring</servlet-name>
3    <servlet-class>org.springframework.web.servlet.DispatcherServlet</servlet-class>
4    <init-param>
5        <param-name>contextConfigLocation</param-name>
6        <param-value>classpath:spring.xml</param-value>
7    </init-param>
8    <load-on-startup>1</load-on-startup>
9</servlet>
10<servlet-mapping>
11    <servlet-name>spring</servlet-name>
12    <url-pattern>/*</url-pattern>
13</servlet-mapping>
13. spring.xml(xml头有点冗余,如果觉得用不到,可以删除相应的xmlns和schemaLocation声明)
1<?xml version="1.0" encoding="UTF-8"?>
2<beans xmlns="http://www.springframework.org/schema/beans"
3    xmlns:xsi="http://www.w3.org/2001/XMLSchema-instance"
4    xmlns:aop="http://www.springframework.org/schema/aop"
5    xmlns:tx="http://www.springframework.org/schema/tx"
6    xmlns:jdbc="http://www.springframework.org/schema/jdbc"
7    xmlns:context="http://www.springframework.org/schema/context"
8    xsi:schemaLocation="
9    http://www.springframework.org/schema/context
10    http://www.springframework.org/schema/context/spring-context-3.0.xsd
11    http://www.springframework.org/schema/beans
12    http://www.springframework.org/schema/beans/spring-beans-3.0.xsd
13    http://www.springframework.org/schema/jdbc
14    http://www.springframework.org/schema/jdbc/spring-jdbc-3.0.xsd
15    http://www.springframework.org/schema/tx
16    http://www.springframework.org/schema/tx/spring-tx-3.0.xsd
17    http://www.springframework.org/schema/aop
18    http://www.springframework.org/schema/aop/spring-aop-3.0.xsd">
19
20    <context:component-scan base-package="com.abc" />
21
22    <!-- 属性注入器,用于读取项目配置文件中的属性 -->
23    <bean id="PropertiesConfigurer"
24        class="org.springframework.beans.factory.config.PropertyPlaceholderConfigurer">
25        <property name="locations">
26            <list>
27                <value>classpath:log4j.properties</value>
28                <value>classpath:jdbc.properties</value>
29            </list>
30        </property>
31    </bean>
32
33    <!-- 数据源,不需要解释 -->
34    <bean id="dataSource" class="com.mchange.v2.c3p0.ComboPooledDataSource" destroy-method="close">
35        <property name="driverClass" value="${jdbc.driverClassName}" />
36        <property name="jdbcUrl" value="${jdbc.url}" />
37        <property name="user" value="${jdbc.username}" />
38        <property name="password" value="${jdbc.password}" />
39    </bean>
40
41    <!-- SqlSessionFactory -->
42    <bean id="sqlSessionFactory" class="org.mybatis.spring.SqlSessionFactoryBean">
43        <property name="dataSource" ref="dataSource" />
44        <!-- <property name="mapperLocations"
45            value="classpath*:com/abc/dao/*.xml" /> -->
46        <property name="configLocation" value="classpath:mybatis-config.xml" />
47    </bean>
48
49    <!-- Mybatis sql session -->
50    <bean id="sqlSession" class="org.mybatis.spring.SqlSessionTemplate">
51        <constructor-arg index="0" ref="sqlSessionFactory" />
52    </bean>
53
54    <!-- Mybatis mapper scanner, scans for java mapper -->
55    <bean class="org.mybatis.spring.mapper.MapperScannerConfigurer">
56        <property name="basePackage" value="com.abc.dao" />
57        <property name="sqlSessionTemplateBeanName" value="sqlSession" />
58    </bean>
59
60</beans>
14. log4j.properties,用于定义Log4j的日志输出内容及格式,我这里就不凑字数了。
jdbc.properties,上方的配置中引用到的关于数据库的配置,请在这个文件中配置。
1jdbc.driverClassName=com.mysql.jdbc.Driver
2jdbc.url=jdbc\:mysql\://192.168.12.1\:3306/abc?useUnicode\=true&characterEncoding\=UTF-8
3jdbc.username=abc
4jdbc.password=abc123_
15. mybatis-config.xml文件,这里面指定了哪些xml文件可以作为DAO接口的映射文件:
1<?xml version="1.0" encoding="UTF-8"?>
2<!DOCTYPE configuration PUBLIC
3    "-//mybatis.org//DTD Config 3.0//EN"
4    "http://mybatis.org/dtd/mybatis-3-config.dtd">
5
6<configuration>
7    <mappers>
8        <mapper resource="com/abc/entity/UserMap.xml"/>
9    </mappers>
10</configuration>
16. UserMap.xml文件定义了对于User对象的操作的sql语句:
1<?xml version="1.0" encoding="UTF-8"?>
2<!DOCTYPE mapper PUBLIC "-//mybatis.org//DTD Mapper 3.0//EN"
3"
4
5<mapper namespace="com.abc.dao.TestDao">
6    <resultMap id="UserResultMap" type="com.abc.entity.User">
7        <id column="id" jdbcType="INTEGER" property="id" />
8        <result column="userName" jdbcType="VARCHAR" property="name" />
9        <result column="userAge" jdbcType="INTEGER" property="age" />
10        <result column="userAddress" jdbcType="VARCHAR" property="address" />
11    </resultMap>
12
13    <select id="testQuery" resultMap="UserResultMap">
14        SELECT * FROM user
15    </select>
16</mapper>
17. Controller, Service和DAO的声明,都是很标准很简单的Controller调用Service,Service再调用DAO接口的过程。
TestDao(完成数据读写):
1package com.abc.dao;
2
3import java.util.List;
4import com.abc.entity.User;
5
6public interface TestDao {
7    public List<User> testQuery() throws Exception;
8}
TestService(接口编程,在面向多实现的时候非常有用):
1package com.abc.service;
2
3public interface TestService {
4    public String testQuery() throws Exception;
5}
TestServiceImpl(完成主要的业务逻辑):
1package com.abc.service.impl;
2
3import java.util.List;
4import org.springframework.beans.factory.annotation.Autowired;
5import org.springframework.stereotype.Service;
6import com.abc.dao.TestDao;
7import com.abc.entity.User;
8import com.abc.service.TestService;
9
10@Service
11public class TestServiceImpl implements TestService {
12
13    @Autowired
14    private TestDao dao;
15
16    public String testQuery() throws Exception {
17        List<User> users = dao.testQuery();
18        String res = "";
19        if (users != null && users.size() > 0) {
20            for (User user : users) {
21                res += user.toString() + "|";
22            }
23        } else {
24            res = "Not found.";
25        }
26        return res;
27    }
28}
TestController(完成请求转发,响应封装):
1package com.abc.controller;
2
3import java.io.IOException;
4
5import javax.servlet.http.HttpServletRequest;
6import javax.servlet.http.HttpServletResponse;
7import org.apache.log4j.Logger;
8import org.springframework.beans.factory.annotation.Autowired;
9import org.springframework.stereotype.Controller;
10import org.springframework.web.bind.annotation.RequestMapping;
11
12import com.abc.service.TestService;
13
14@Controller
15@RequestMapping("/testController")
16public class TestController {
17
18    public static final Logger LOGGER = Logger.getLogger(TestController.class);
19
20    @Autowired
21    private TestService testService;
22
23    @RequestMapping("/test")
24    public void test(HttpServletRequest request, HttpServletResponse response) {
25        try {
26            String result = testService.testQuery();
27            response.getWriter().print(result);
28        } catch (IOException e) {
29            e.printStackTrace();
30        } catch (Exception e) {
31            e.printStackTrace();
32        }
33    }
34}
代码部分到此就结束了。
构建和运行
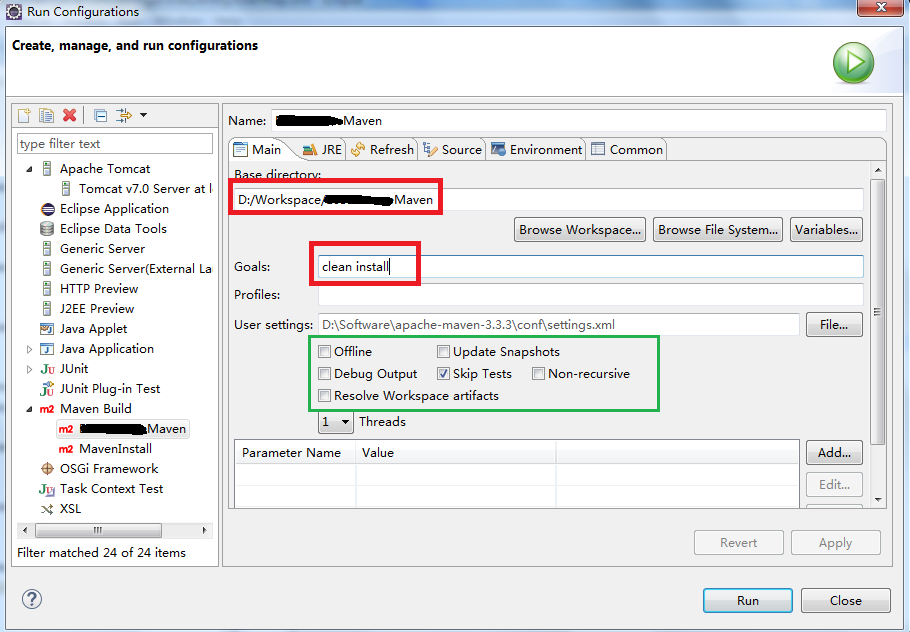
18. 编写好以后,在项目上右键->Run As->Maven Build…准备构建这个maven项目。

19. 在BaseDirectory中指定需要构建的项目(点击图中的Brose Workspace或Browse File System按钮可以选择),并在Goals框中指定构建的目标(Maven有自己的构建的阶段,有的地方又叫生命周期,如果不清楚的同学,可以参看Maven生命周期详解)。并可以选择一些附加的属性(绿色框中),如图:
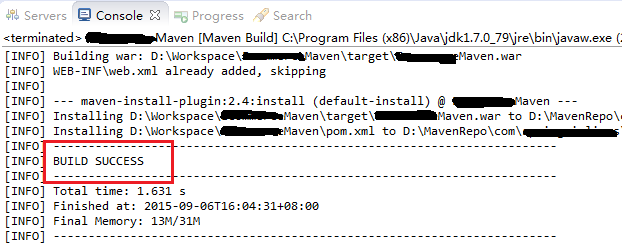
20. 如果构建成功,则会出现类似于下面的输出:
21. 当构建成功后,可以像普通的Web Project一样来运行这个项目。这里将其添加到Tomcat中,并启动之。

22. 先看看数据库的内容:

23. 在浏览器中访问指定的接口,查看结果(在我的实现类TestServiceImpl中,仅仅是打印了查询到的结果):

附:例子下载:AbcDemo.zip
链接: http://pan.baidu.com/s/1pJ3pSBT 密码: 3gpt