
首先加入springboot的邮箱依赖
1<!--邮箱依赖-->
2<!-- https://mvnrepository.com/artifact/org.springframework.boot/spring-boot-starter-mail -->
3<dependency>
4    <groupId>org.springframework.boot</groupId>
5    <artifactId>spring-boot-starter-mail</artifactId>
6</dependency>
邮件实体类
1 1 package com.xiaostudy.shiro_test1.entity;
2 2
3 3 import java.io.File;
4 4
5 5 /**
6 6  * Created with IntelliJ IDEA.
7 7  * User: xiaostudy
8 8  * Date: 2019/7/23
9 9  * Time: 21:28
1010  * Description: No Description
1111  */
1212 public class MailEntity {
1313     /**
1414      * 主题
1515      */
1616     private String subject;
1717     /**
1818      * 内容
1919      */
2020     private String content;
2121     /**
2222      * 邮箱
2323      */
2424     private String toAccount;
2525     /**
2626      * 附件
2727      */
2828     private File attachmentFile;
2929     /**
3030      * 附件文件名
3131      */
3232     private String attachmentFileName;
3333
3434     public String getSubject() {
3535         return subject;
3636     }
3737
3838     public void setSubject(String subject) {
3939         this.subject = subject;
4040     }
4141
4242     public String getContent() {
4343         return content;
4444     }
4545
4646     public void setContent(String content) {
4747         this.content = content;
4848     }
4949
5050     public String getToAccount() {
5151         return toAccount;
5252     }
5353
5454     public void setToAccount(String toAccount) {
5555         this.toAccount = toAccount;
5656     }
5757
5858     public File getAttachmentFile() {
5959         return attachmentFile;
6060     }
6161
6262     public void setAttachmentFile(File attachmentFile) {
6363         this.attachmentFile = attachmentFile;
6464     }
6565
6666     public String getAttachmentFileName() {
6767         return attachmentFileName;
6868     }
6969
7070     public void setAttachmentFileName(String attachmentFileName) {
7171         this.attachmentFileName = attachmentFileName;
7272     }
7373 }
spring获取bean工具类【不是service和controller层的不能注入bean】
1  1 package com.xiaostudy.shiro_test1.utils;
2  2
3  3 import org.springframework.beans.BeansException;
4  4 import org.springframework.beans.factory.NoSuchBeanDefinitionException;
5  5 import org.springframework.context.ApplicationContext;
6  6 import org.springframework.context.ApplicationContextAware;
7  7 import org.springframework.stereotype.Component;
8  8
9  9 import java.util.Map;
10 10
11 11 /**
12 12  * Spring Context 工具类:可以在其他地方通过静态方法获取Spring配置的Bean
13 13  *
14 14  */
15 15 @Component
16 16 public class SpringContextUtils implements ApplicationContextAware {
17 17     private static ApplicationContext applicationContext;
18 18
19 19     @Override
20 20     public void setApplicationContext(ApplicationContext applicationContext)
21 21             throws BeansException {
22 22         if (SpringContextUtils.applicationContext == null) {
23 23             SpringContextUtils.applicationContext = applicationContext;
24 24         }
25 25     }
26 26
27 27     public static ApplicationContext getApplicationContext() {
28 28         return applicationContext;
29 29     }
30 30
31 31     public static Object getBean(String name) {
32 32         return applicationContext.getBean(name);
33 33     }
34 34
35 35     /**
36 36      * 从静态变量applicationContext中取得Bean, 自动转型为所赋值对象的类型.
37 37      */
38 38     public static <T> T getBean(Class<T> requiredType) {
39 39 //        assertContextInjected();
40 40         if(null == applicationContext) {
41 41             return null;
42 42         }
43 43         return applicationContext.getBean(requiredType);
44 44     }
45 45
46 46     /**
47 47      * 从静态变量applicationContext中取得Bean, 自动转型为所赋值对象的类型.
48 48      */
49 49     public static <T> Map<String, T> getBeanOfMap(Class<T> requiredType) {
50 50 //        assertContextInjected();
51 51         if(null == applicationContext) {
52 52             return null;
53 53         }
54 54         return applicationContext.getBeansOfType(requiredType);
55 55     }
56 56
57 57     /**
58 58      * 检查ApplicationContext不为空.
59 59      */
60 60     /*private static void assertContextInjected() {
61 61         Validate.validState(applicationContext != null, "applicaitonContext属性未注入, 请在applicationContext.xml中定义SpringContextHolder.");
62 62     }*/
63 63
64 64     /***
65 65      * 类似于getBean(String name)只是在参数中提供了需要返回到的类型。
66 66      *
67 67      * @param name
68 68      * @param requiredType
69 69      * @return
70 70      * @throws BeansException
71 71      */
72 72     public static <T> T getBean(String name, Class<T> requiredType) {
73 73         return applicationContext.getBean(name, requiredType);
74 74     }
75 75
76 76     /**
77 77      * 如果BeanFactory包含一个与所给名称匹配的bean定义,则返回true
78 78      *
79 79      * @param name
80 80      * @return boolean
81 81      */
82 82     public static boolean containsBean(String name) {
83 83         return applicationContext.containsBean(name);
84 84     }
85 85
86 86     /**
87 87      * 判断以给定名字注册的bean定义是一个singleton还是一个prototype。
88 88      * 如果与给定名字相应的bean定义没有被找到,将会抛出一个异常(NoSuchBeanDefinitionException)
89 89      *
90 90      * @param name
91 91      * @return boolean
92 92      * @throws NoSuchBeanDefinitionException
93 93      */
94 94     public static boolean isSingleton(String name) {
95 95         return applicationContext.isSingleton(name);
96 96     }
97 97
98 98     public static Class<? extends Object> getType(String name) {
99 99         return applicationContext.getType(name);
100100     }
101101
102102     /**
103103      * 获取Spring装配的bean的名称
104104      */
105105     public static String[] getBeanNameAll() {
106106         return applicationContext.getBeanDefinitionNames();
107107     }
108108
109109     /***
110110      * 类似于获取同类型的BEAN
111111      * @param <T>
112112      * @param requiredType
113113      * @return
114114      * @throws BeansException
115115      */
116116     public static <T> Map<String, T> getBeansOfType(Class<T> requiredType) {
117117         return applicationContext.getBeansOfType(requiredType);
118118     }
119119 }
发邮件工具类
1 1 package com.xiaostudy.shiro_test1.utils;
2 2
3 3 import com.xiaostudy.shiro_test1.entity.MailEntity;
4 4 //import org.jasypt.encryption.StringEncryptor;
5 5 import org.springframework.beans.factory.annotation.Autowired;
6 6 import org.springframework.boot.autoconfigure.mail.MailProperties;
7 7 import org.springframework.mail.SimpleMailMessage;
8 8 import org.springframework.mail.javamail.JavaMailSender;
9 9 import org.springframework.mail.javamail.MimeMessageHelper;
1010 import org.springframework.stereotype.Component;
1111
1212 import javax.mail.MessagingException;
1313 import javax.mail.internet.MimeMessage;
1414
1515 /**
1616  * Created with IntelliJ IDEA.
1717  * User: xiaostudy
1818  * Date: 2019/7/23
1919  * Time: 21:25
2020  * Description: No Description
2121  */
2222 @Component
2323 public class MailUtils {
2424
2525     /**
2626      * 发送邮件,里面有判断是否发文件
2727      */
2828     public static void sendMail(MailEntity mailEntity) {
2929         if(null != mailEntity) {
3030             if(null != mailEntity.getAttachmentFile() && mailEntity.getAttachmentFile().exists()) {
3131                 if(null == mailEntity.getAttachmentFileName()) {
3232                     mailEntity.setAttachmentFileName(mailEntity.getAttachmentFile().getName());
3333                 }
3434                 sendMailAttachment(mailEntity);
3535             } else {
3636                 sendSimpleMail(mailEntity);
3737             }
3838         }
3939     }
4040
4141     /**
4242      * 发送邮件,这里只发内容,不发文件
4343      */
4444     public static void sendSimpleMail(MailEntity mailEntity) {
4545         SimpleMailMessage mimeMessage = new SimpleMailMessage();
4646         mimeMessage.setFrom(SpringContextUtils.getBean(MailProperties.class).getUsername());
4747         mimeMessage.setTo(mailEntity.getToAccount());
4848         mimeMessage.setSubject(mailEntity.getSubject());
4949         mimeMessage.setText(mailEntity.getContent());
5050         SpringContextUtils.getBean(JavaMailSender.class).send(mimeMessage);
5151     }
5252
5353     /**
5454      * 发送邮件-附件邮件
5555      *
5656      * @param mailEntity
5757      */
5858     public static boolean sendMailAttachment(MailEntity mailEntity) {
5959         JavaMailSender javaMailSender = SpringContextUtils.getBean(JavaMailSender.class);
6060         try {
6161             MimeMessage mimeMessage = javaMailSender.createMimeMessage();
6262             MimeMessageHelper helper = new MimeMessageHelper(mimeMessage, true);
6363             helper.setFrom(SpringContextUtils.getBean(MailProperties.class).getUsername());
6464             helper.setTo(mailEntity.getToAccount());
6565             helper.setSubject(mailEntity.getSubject());
6666             helper.setText(mailEntity.getContent(), true);
6767             // 增加附件名称和附件
6868             helper.addAttachment(mailEntity.getAttachmentFileName(), mailEntity.getAttachmentFile());
6969             javaMailSender.send(mimeMessage);
7070             return true;
7171         } catch (MessagingException e) {
7272             e.printStackTrace();
7373             return false;
7474         }
7575     }
7676 }
删除备份文件线程类
1 1 package com.xiaostudy.shiro_test1.thread;
2 2
3 3 import com.xiaostudy.shiro_test1.entity.LoginLogEntity;
4 4 import com.xiaostudy.shiro_test1.service.LoginLogService;
5 5 import com.xiaostudy.shiro_test1.utils.DateUtils;
6 6 import com.xiaostudy.shiro_test1.utils.IpUtil;
7 7 import com.xiaostudy.shiro_test1.utils.MakeMD5;
8 8 import com.xiaostudy.shiro_test1.utils.ShiroUtils;
9 9
1010 import java.io.File;
1111
1212 /**
1313  * Created with IntelliJ IDEA.
1414  * User: xiaostudy
1515  * Date: 2019/7/22
1616  * Time: 0:05
1717  * Description: No Description
1818  */
1919 public class RemoveBackupSqlFileThread implements Runnable {
2020
2121     private String filePath;
2222     private Long start;
2323
2424     public RemoveBackupSqlFileThread(String filePath) {
2525         this.filePath = filePath;
2626         this.start = System.currentTimeMillis();
2727     }
2828
2929     @Override
3030     public void run() {
3131         try {
3232             // 前让线程睡1分钟,保证邮件已经发送
3333             Thread.sleep(1000 * 60);
3434         } catch (InterruptedException e) {
3535             e.printStackTrace();
3636         }
3737         File file = new File(filePath);
3838         // 30分钟内,每1分钟删除备份文件,删除文件就结束线程
3939         while (System.currentTimeMillis() - this.start < 1000 * 60 * 30) {
4040             if(null != file && file.exists() && file.isFile() && file.delete()) {
4141                 break;
4242             }
4343             try {
4444                 Thread.sleep(1000 * 60);
4545             } catch (InterruptedException e) {
4646                 e.printStackTrace();
4747             }
4848         }
4949     }
5050 }
1、在win下备份mysql并发送邮件
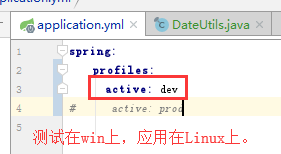
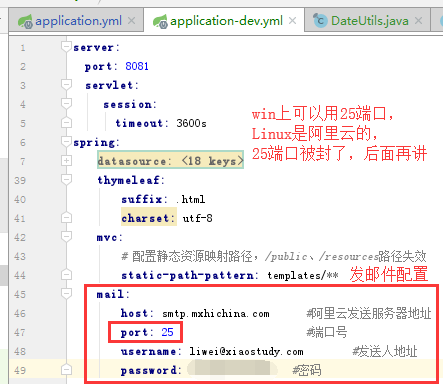
在spirng:后加,如下图
1mail:
2    host: smtp.mxhichina.com      #阿里云发送服务器地址
3    port: 25                      #端口号
4    username: 邮箱地址        #发送人地址
5    password: 密码  #密码
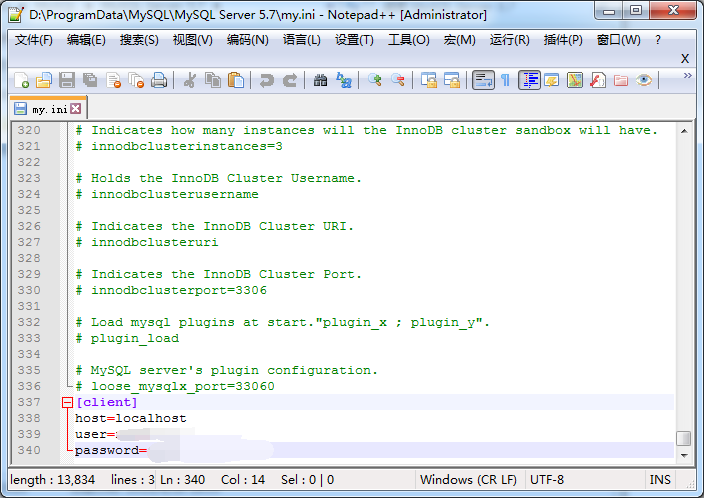
配置my.ini【因为java运行备份mysql的命令,不能直接用密码】
在最后添加
1[client]
2host=localhost
3user=用户名
4password=密码
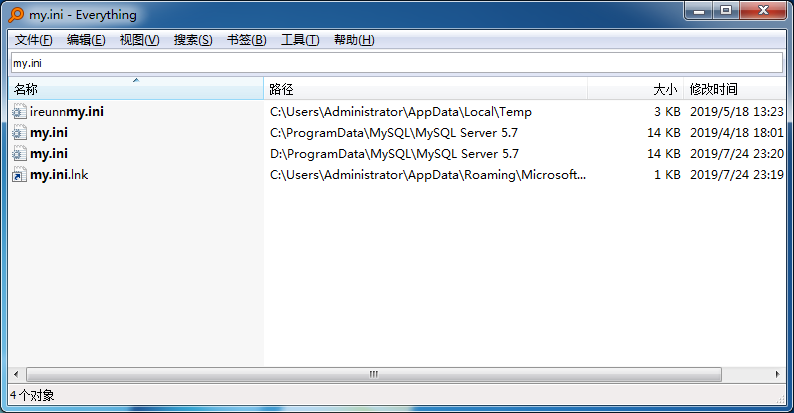
这里说明一下这个my.ini文件,有些是在安装mysql的目录下,有些不是在安装目录下,可以用工具Everything搜一下
备份的命令是
"D:/Program Files/MySQL/MySQL Server 5.7/bin/mysqldump.exe" --defaults-extra-file="D:/ProgramData/MySQL/MySQL Server 5.7/my.ini" -B 数据库名称>C:/temp/20190725.sql
上面为什么要用双引号呢,主要是文件夹名称有空格,cmd识别不了,加双引号就好了。
备份数据,发送邮件,删除备份文件
1@GetMapping("backup")
2@ResponseBody
3public Map backup(){
4    String thisDateTime = DateUtils.getDateTime("yyyyMMdd_HHmmss");
5    String filePath;
6    String shell;
7    String[] cmd;
8    // 通过获取系统名称是否包含windows来判断是win还是Linux
9    if(System.getProperties().getProperty("os.name").toUpperCase().indexOf("WINDOWS") != -1) {
10        filePath = "C:/temp/myLog_" + thisDateTime + ".sql";
11        shell = "\"D:/Program Files/MySQL/MySQL Server 5.7/bin/mysqldump.exe\" --defaults-extra-file=\"D:/ProgramData/MySQL/MySQL Server 5.7/my.ini\" -B my_log>" + filePath;
12        // java运行cmd命令要多加cmd空格/c空格
13        shell = "cmd /c " + shell;
14    } else {
15        filePath = "/home/backup/myLog_" + thisDateTime + ".sql";
16        shell = "/usr/local/mysql/bin/mysqldump --defaults-extra-file=/usr/local/mysql/my.cnf -B my_log>" + filePath;
17    }
18    System.out.println("shell:" + shell);
19    Runtime runTime = Runtime.getRuntime();
20    if (runTime == null) {
21        System.err.println("Create runtime false!");
22    }
23    try {
24        if(System.getProperties().getProperty("os.name").toUpperCase().indexOf("WINDOWS") != -1) {
25            runTime.exec(shell);
26        } else {
27            runTime.exec(new String[]{"/bin/sh", "-c", shell});
28        }
29    } catch (IOException e) {
30        e.printStackTrace();
31    }
32    MailEntity mailEntity = new MailEntity();
33    // 对方邮箱地址
34    mailEntity.setToAccount("手机号@163.com");
35    mailEntity.setSubject("备份mysql");
36    mailEntity.setContent("备份mysql的my_log数据库");
37    File file = null;
38    long thisTime = System.currentTimeMillis();
39    // 这里是处理备份的sql文件是否写入完成,这里是10秒
40    while (System.currentTimeMillis() - thisTime < 10*1000) {
41        file = new File(filePath);
42        if(file.exists() && file.isFile()) {
43            break;
44        } else {
45            try {
46                Thread.sleep(200);
47            } catch (InterruptedException e) {
48                e.printStackTrace();
49            }
50        }
51    }
52    mailEntity.setAttachmentFile(file);
53    MailUtils.sendMail(mailEntity);
54    // 删除备份文件
55    new Thread(new RemoveBackupSqlFileThread(filePath)).start();
56    Map map = new HashMap();
57    map.put("code", "0");
58    map.put("msg", "已发送至邮箱");
59    return map;
60}
注:如果win备份mysql文件大小为0,那么可以考虑用new String[]{"cmd", "/c", shell}。参考下面Linux运行命令方法
2、Linux下备份mysql并发送邮件
配置my.cnf文件
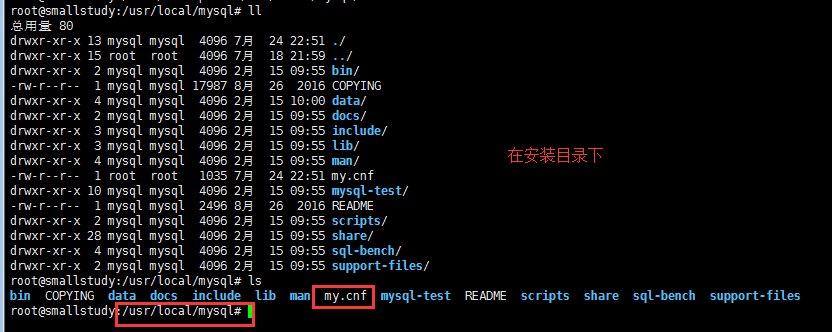
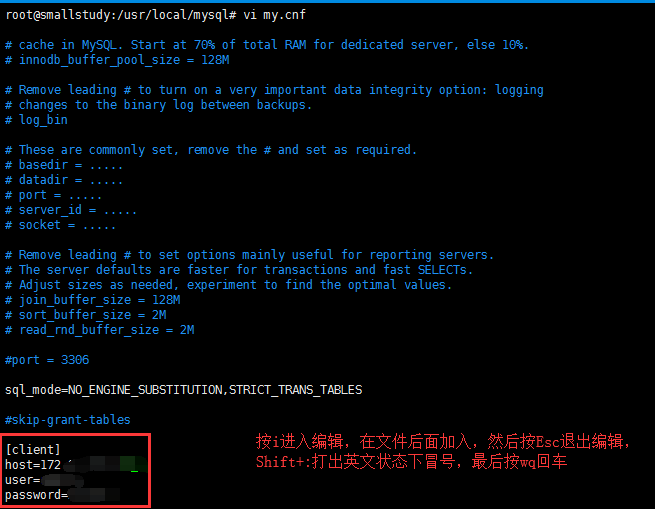
vi my.cnf打开文件【按i进入编辑状态,按Esc退出编辑,按:wq保存退出查看文件】
1[client]
2host=内网ip
3user=用户名
4password=密码
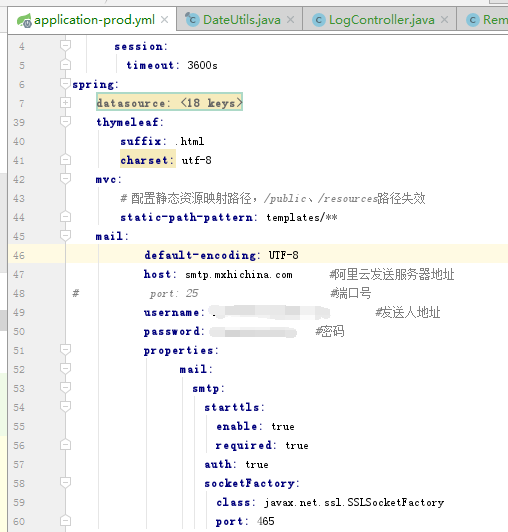
springboot的配置,阿里云服务器封了25端口,要用465端口
1 1 mail:
2 2         default-encoding: UTF-8
3 3         host: smtp.mxhichina.com      #阿里云发送服务器地址
4 4 #            port: 25                      #端口号
5 5         username: 邮箱地址        #发送人地址
6 6         password: 密码   #密码
7 7         properties:
8 8               mail:
9 9                 smtp:
1010                   starttls:
1111                     enable: true
1212                     required: true
1313                   auth: true
1414                   socketFactory:
1515                     class: javax.net.ssl.SSLSocketFactory
1616                     port: 465
备份数据,发送邮件,删除备份文件
1 1 @GetMapping("backup")
2 2 @ResponseBody
3 3 public Map backup(){
4 4     String thisDateTime = DateUtils.getDateTime("yyyyMMdd_HHmmss");
5 5     String filePath;
6 6     String shell;
7 7     // 通过获取系统名称是否包含windows来判断是win还是Linux
8 8     if(System.getProperties().getProperty("os.name").toUpperCase().indexOf("WINDOWS") != -1) {
9 9         filePath = "C:/temp/myLog_" + thisDateTime + ".sql";
1010         shell = "\"D:/Program Files/MySQL/MySQL Server 5.7/bin/mysqldump.exe\" --defaults-extra-file=\"D:/ProgramData/MySQL/MySQL Server 5.7/my.ini\" -B my_log>" + filePath;
1111         shell = "cmd /c " + shell;
1212     } else {
1313         filePath = "/home/backup/myLog_" + thisDateTime + ".sql";
1414         shell = "/usr/local/mysql/bin/mysqldump --defaults-extra-file=/usr/local/mysql/my.cnf -B my_log>" + filePath;
1515     }
1616     Runtime runTime = Runtime.getRuntime();
1717     Map map = new HashMap();
1818     if (null != runTime) {
1919         try {
2020             if(System.getProperties().getProperty("os.name").toUpperCase().indexOf("WINDOWS") != -1) {
2121                 runTime.exec(shell);
2222             } else {
2323                 // linux运行shell命令要加
2424                 runTime.exec(new String[]{"/bin/sh", "-c", shell});
2525             }
2626         } catch (IOException e) {
2727             e.printStackTrace();
2828         }
2929         MailEntity mailEntity = new MailEntity();
3030         mailEntity.setToAccount("对方邮箱地址");
3131         mailEntity.setSubject("备份mysql");
3232         mailEntity.setContent("备份mysql的my_log数据库");
3333         File file = null;
3434         long thisTime = System.currentTimeMillis();
3535         while (System.currentTimeMillis() - thisTime < 10*1000) {
3636             file = new File(filePath);
3737             if(file.exists() && file.isFile()) {
3838                 break;
3939             } else {
4040                 try {
4141                     Thread.sleep(200);
4242                 } catch (InterruptedException e) {
4343                     e.printStackTrace();
4444                 }
4545             }
4646         }
4747         mailEntity.setAttachmentFile(file);
4848         MailUtils.sendMail(mailEntity);
4949         // 删除备份文件
5050         new Thread(new RemoveBackupSqlFileThread(filePath)).start();
5151         map.put("code", "0");
5252         map.put("msg", "已发送至邮箱");
5353     } else {
5454         map.put("code", "1");
5555         map.put("msg", "获取Runtime为null,不能运行命令");
5656     }
5757     return map;
5858 }
后面测试定时备份数据和发送邮件