
1.概述
最近有人在问我要所有项目的代码,我在这里声明一下我不是这几个项目公司内部人员,之所以录视频和写博客也是喜欢与人分享和学习而已,最终所有的代码肯定会上传的,只不过会要等全部的效果以及设计模式搞完。在这里感谢内涵段子这个项目,感谢那些提供帮助的博客牛人,希望有一天也能和你们一样。
部分人看了视频的反馈某些地方没讲的很细,首先这肯定是我的问题,但是有很多东西其实是基础,比如我们用到了属性动画很多地方用到了canvas画图如果没怎么接触过可能会有点难度,我到后期也会去录制一些基础的视频,不过要等博客的访问量到达一定的数量,自己也需要去沉淀。
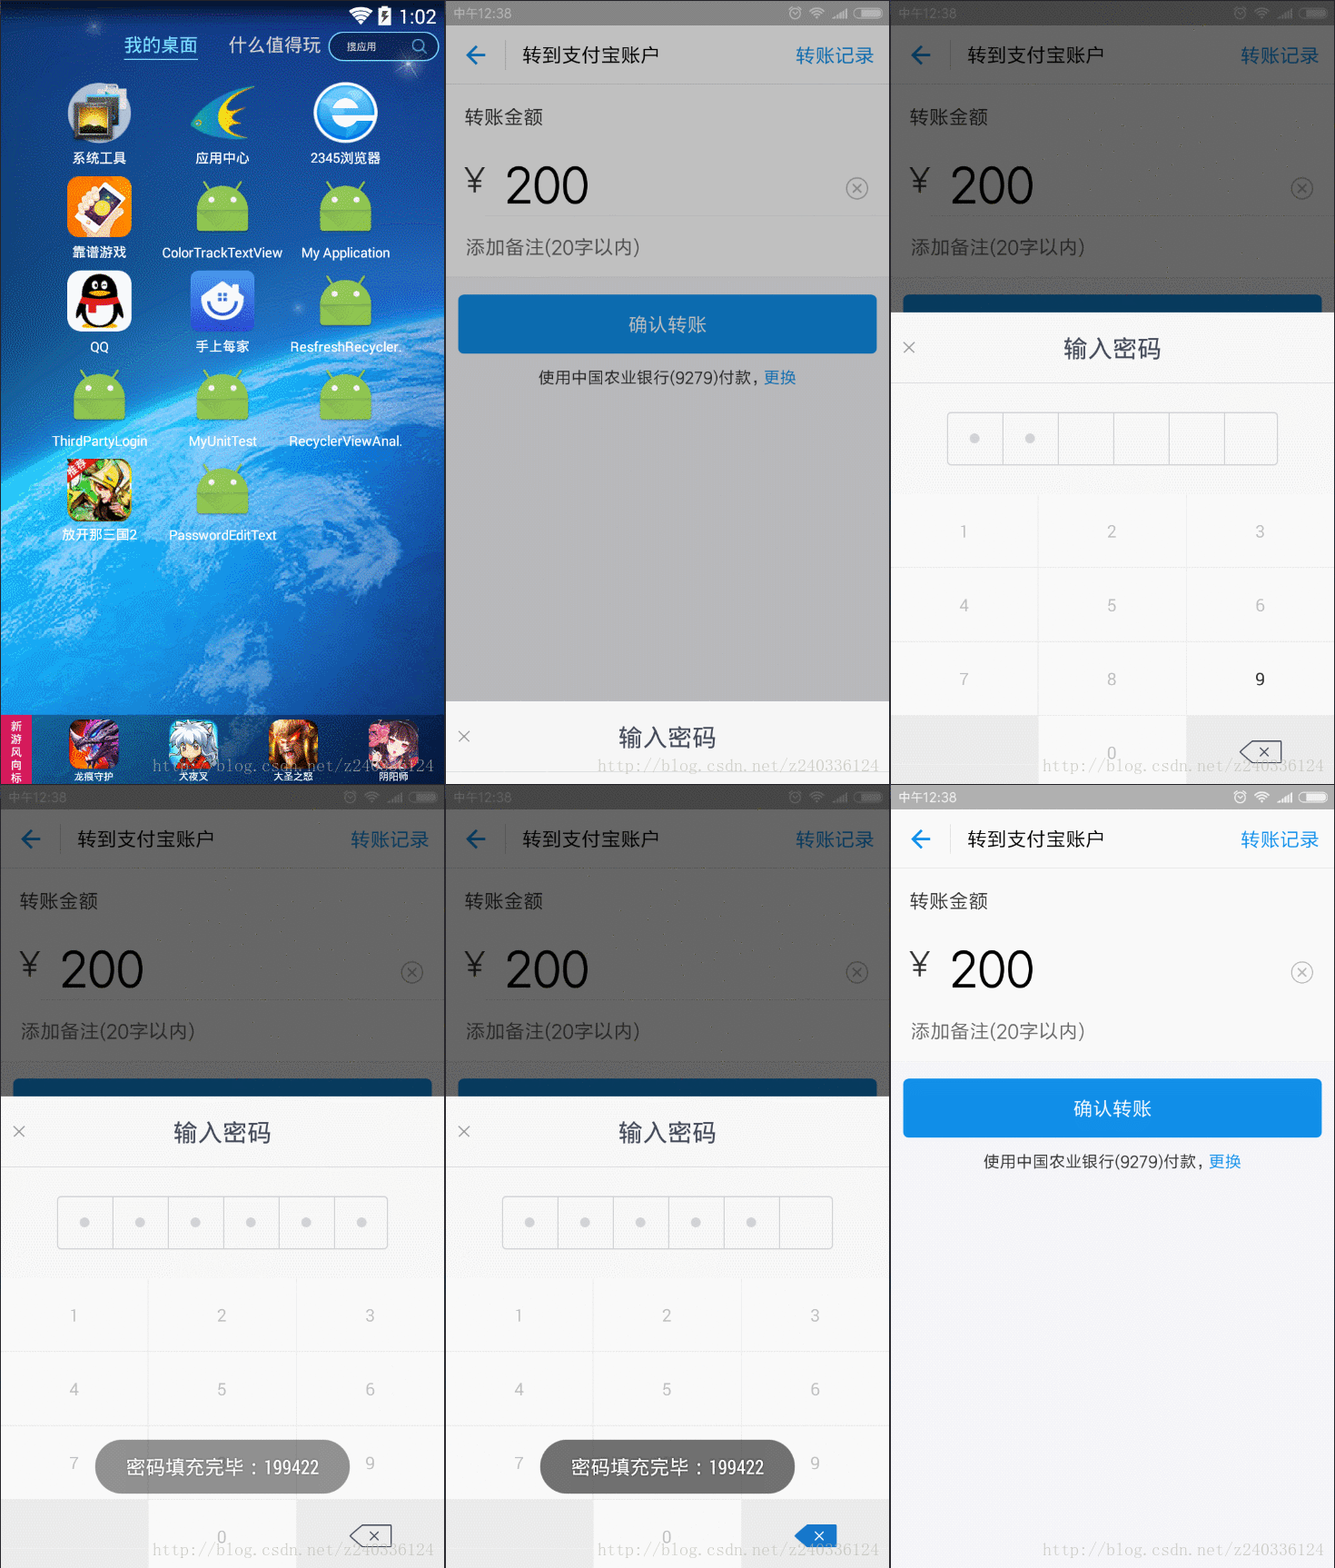
今天我们就来写一个相对简单的效果,就是仿淘宝确定收货和支付宝转账的自定义密码输入框和键盘。视频地址:https://pan.baidu.com/s/1bqgRu9p 密码:yr4d
这里写图片描述
2.效果实现
2.1 实现思路:
这个效果主要的实现就是Canvas画图,我们可以去搜搜看看别人怎么实现的,大部分都是自定义控件去绘制,还有一小部分是直接用LinearLayout写死了,直接就是用的代码去控制布局。我们这里使用自定义控件去实现
2.1.1 主要涉及到三个部分需要去绘制:背景、分割线、密码圆点
2.1.2 继承自谁都可以,最好还是不要继承自View,这样就需要多实现一个onMeasure()方法,这里考虑到可能有些地方不会使用自定义的键盘,所以决定继承EditText。
2.2 绘制:背景、分割线、密码圆点:
这里需要使用自定义属性,这个相信大家都比较了解就不做过多的讲解,大概涉及的属性有:背景圆角、背景边框大小、背景边框颜色、分割线大小、分割线颜色、密码圆点的颜色、密码圆点的半径大小。具体的attrs.xml就是:
1<?xml version="1.0" encoding="utf-8"?>
2<resources>
3    <declare-styleable name="PasswordEditText">
4        <!-- 密码的个数 -->
5        <attr name="passwordNumber" format="integer"/>
6        <!-- 密码圆点的半径 -->
7        <attr name="passwordRadius" format="dimension" />
8        <!-- 密码圆点的颜色 -->
9        <attr name="passwordColor" format="color" />
10        <!-- 分割线的颜色 -->
11        <attr name="divisionLineColor" format="color" />
12        <!-- 分割线的大小 -->
13        <attr name="divisionLineSize" format="color" />
14        <!-- 背景边框的颜色 -->
15        <attr name="bgColor" format="color" />
16        <!-- 背景边框的大小 -->
17        <attr name="bgSize" format="dimension" />
18        <!-- 背景边框的圆角大小 -->
19        <attr name="bgCorner" format="dimension"/>
20    </declare-styleable>
21</resources>
接下来我们就需要去绘制了,首先获取自定义属性,然后在onDraw()中去绘制
1/**
2 * Created by Darren on 2016/12/14.
3 * Email: 240336124@qq.com
4 * Description: 密码输入框
5 */
6
7public class PasswordEditText extends EditText {
8    // 画笔
9    private Paint mPaint;
10    // 一个密码所占的宽度
11    private int mPasswordItemWidth;
12    // 密码的个数默认为6位数
13    private int mPasswordNumber = 6;
14    // 背景边框颜色
15    private int mBgColor = Color.parseColor("#d1d2d6");
16    // 背景边框大小
17    private int mBgSize = 1;
18    // 背景边框圆角大小
19    private int mBgCorner = 0;
20    // 分割线的颜色
21    private int mDivisionLineColor = mBgColor;
22    // 分割线的大小
23    private int mDivisionLineSize = 1;
24    // 密码圆点的颜色
25    private int mPasswordColor = mDivisionLineColor;
26    // 密码圆点的半径大小
27    private int mPasswordRadius = 4;
28
29    public PasswordEditText(Context context) {
30        this(context, null);
31    }
32
33    public PasswordEditText(Context context, AttributeSet attrs) {
34        super(context, attrs);
35        initPaint();
36        initAttributeSet(context, attrs);
37        // 设置输入模式是密码
38        setInputType(EditorInfo.TYPE_TEXT_VARIATION_PASSWORD);
39        // 不显示光标
40        setCursorVisible(false);
41    }
42
43    /**
44     * 初始化属性
45     */
46    private void initAttributeSet(Context context, AttributeSet attrs) {
47        TypedArray array = context.obtainStyledAttributes(attrs, R.styleable.PasswordEditText);
48        // 获取大小
49        mDivisionLineSize = (int) array.getDimension(R.styleable.PasswordEditText_divisionLineSize, dip2px(mDivisionLineSize));
50        mPasswordRadius = (int) array.getDimension(R.styleable.PasswordEditText_passwordRadius, dip2px(mPasswordRadius));
51        mBgSize = (int) array.getDimension(R.styleable.PasswordEditText_bgSize, dip2px(mBgSize));
52        mBgCorner = (int) array.getDimension(R.styleable.PasswordEditText_bgCorner, 0);
53        // 获取颜色
54        mBgColor = array.getColor(R.styleable.PasswordEditText_bgColor, mBgColor);
55        mDivisionLineColor = array.getColor(R.styleable.PasswordEditText_divisionLineColor, mDivisionLineColor);
56        mPasswordColor = array.getColor(R.styleable.PasswordEditText_passwordColor, mDivisionLineColor);
57        array.recycle();
58    }
59
60    /**
61     * 初始化画笔
62     */
63    private void initPaint() {
64        mPaint = new Paint();
65        mPaint.setAntiAlias(true);
66        mPaint.setDither(true);
67    }
68
69    /**
70     * dip 转 px
71     */
72    private int dip2px(int dip) {
73        return (int) TypedValue.applyDimension(TypedValue.COMPLEX_UNIT_DIP,
74                dip, getResources().getDisplayMetrics());
75    }
76
77    @Override
78    protected void onDraw(Canvas canvas) {
79        int passwordWidth = getWidth() - (mPasswordNumber - 1) * mDivisionLineSize;
80        mPasswordItemWidth = passwordWidth / mPasswordNumber;
81        // 绘制背景
82        drawBg(canvas);
83        // 绘制分割线
84        drawDivisionLine(canvas);
85        // 绘制密码
86        drawHidePassword(canvas);
87    }
88
89    /**
90     * 绘制背景
91     */
92    private void drawBg(Canvas canvas) {
93        mPaint.setColor(mBgColor);
94        // 设置画笔为空心
95        mPaint.setStyle(Paint.Style.STROKE);
96        mPaint.setStrokeWidth(mBgSize);
97        RectF rectF = new RectF(mBgSize, mBgSize, getWidth() - mBgSize, getHeight() - mBgSize);
98        // 如果没有设置圆角,就画矩形
99        if (mBgCorner == 0) {
100            canvas.drawRect(rectF, mPaint);
101        } else {
102            // 如果有设置圆角就画圆矩形
103            canvas.drawRoundRect(rectF, mBgCorner, mBgCorner, mPaint);
104        }
105    }
106
107    /**
108     * 绘制隐藏的密码
109     */
110    private void drawHidePassword(Canvas canvas) {
111        int passwordLength = getText().length();
112        mPaint.setColor(mPasswordColor);
113        // 设置画笔为实心
114        mPaint.setStyle(Paint.Style.FILL);
115        for (int i = 0; i < passwordLength; i++) {
116            int cx = i * mDivisionLineSize + i * mPasswordItemWidth + mPasswordItemWidth / 2 + mBgSize;
117            canvas.drawCircle(cx, getHeight() / 2, mPasswordRadius, mPaint);
118        }
119    }
120
121    /**
122     * 绘制分割线
123     */
124    private void drawDivisionLine(Canvas canvas) {
125        mPaint.setStrokeWidth(mDivisionLineSize);
126        mPaint.setColor(mDivisionLineColor);
127        for (int i = 0; i < mPasswordNumber - 1; i++) {
128            int startX = (i + 1) * mDivisionLineSize + (i + 1) * mPasswordItemWidth + mBgSize;
129            canvas.drawLine(startX, mBgSize, startX, getHeight() - mBgSize, mPaint);
130        }
131    }
132}
目前的效果就是点击之后会弹出系统的键盘,实现了基本的效果,接下来我们再加入监听也就说当密码输入完成我们需要回调监听。

这里写图片描述
2.2 自定义键盘:
接下来我们看看自定义键盘吧,自定义键盘我们可以使用GridView或是RecyclerView去显示,最好还是不要去画了,采用自定义View加载一个layout布局,给每个按钮一个点击事件然后回调出去即可。
1 /**
2 * Created by Darren on 2016/12/14.
3 * Email: 240336124@qq.com
4 * Description: 自定义键盘
5 */
6
7public class CustomerKeyboard extends LinearLayout implements View.OnClickListener {
8    private CustomerKeyboardClickListener mListener;
9
10    public CustomerKeyboard(Context context) {
11        this(context, null);
12    }
13
14    public CustomerKeyboard(Context context, AttributeSet attrs) {
15        this(context, attrs, 0);
16    }
17
18    public CustomerKeyboard(Context context, AttributeSet attrs, int defStyleAttr) {
19        super(context, attrs, defStyleAttr);
20        inflate(context, R.layout.ui_customer_keyboard, this);
21        setChildViewOnclick(this);
22    }
23
24    /**
25     * 设置键盘子View的点击事件
26     */
27    private void setChildViewOnclick(ViewGroup parent) {
28        int childCount = parent.getChildCount();
29        for (int i = 0; i < childCount; i++) {
30            // 不断的递归设置点击事件
31            View view = parent.getChildAt(i);
32            if (view instanceof ViewGroup) {
33                setChildViewOnclick((ViewGroup) view);
34                continue;
35            }
36            view.setOnClickListener(this);
37        }
38    }
39
40    @Override
41    public void onClick(View v) {
42        View clickView = v;
43        if (clickView instanceof TextView) {
44            // 如果点击的是TextView
45            String number = ((TextView) clickView).getText().toString();
46            if (!TextUtils.isEmpty(number)) {
47                if (mListener != null) {
48                    // 回调
49                    mListener.click(number);
50                }
51            }
52        } else if (clickView instanceof ImageView) {
53            // 如果是图片那肯定点击的是删除
54            if (mListener != null) {
55                mListener.delete();
56            }
57        }
58    }
59
60    /**
61     * 设置键盘的点击回调监听
62     */
63    public void setOnCustomerKeyboardClickListener(CustomerKeyboardClickListener listener) {
64        this.mListener = listener;
65    }
66
67    /**
68     * 点击键盘的回调监听
69     */
70    public interface CustomerKeyboardClickListener {
71        public void click(String number);
72        public void delete();
73    }
74}
2.3. 自定义密码输入框配套自定义键盘
自定义密码输入框写好了,自定义键盘也完成了,最后就是需要把他们两个套在一起。首先密码输入框点击再也不能弹系统键盘,点击键盘的时候需要往密码输入框里面塞密码,还需要删除,所以密码输入框还得提供两个方法
1 /**
2 * Created by Darren on 2016/12/14.
3 * Email: 240336124@qq.com
4 * Description: 密码输入框
5 */
6
7public class PasswordEditText extends EditText {
8    // 省略之前的代码...
9    /**
10     * 添加密码
11     */
12    public void addPassword(String number) {
13        number = getText().toString().trim() + number;
14        if (number.length() > mPasswordNumber) {
15            return;
16        }
17        setText(number);
18    }
19
20    /**
21     * 删除最后一位密码
22     */
23    public void deleteLastPassword() {
24        String currentText = getText().toString().trim();
25        if (TextUtils.isEmpty(currentText)) {
26            return;
27        }
28        currentText = currentText.substring(0, currentText.length() - 1);
29        setText(currentText);
30    }
31}
2.4. 最后的测试
1/**
2 * Created by Darren on 2016/12/14.
3 * Email: 240336124@qq.com
4 * Description: 自定义键盘和自定义密码输入框测试
5 */
6public class MainActivity extends Activity implements CustomerKeyboard.CustomerKeyboardClickListener,
7        PasswordEditText.PasswordFullListener{
8
9    private CustomerKeyboard mCustomerKeyboard;
10    private PasswordEditText mPasswordEditText;
11
12    @Override
13    protected void onCreate(Bundle savedInstanceState) {
14        super.onCreate(savedInstanceState);
15        setContentView(R.layout.activity_main);
16        mPasswordEditText = (PasswordEditText) findViewById(R.id.password_et);
17        mCustomerKeyboard = (CustomerKeyboard) findViewById(R.id.custom_key_board);
18        // 设置监听
19        mCustomerKeyboard.setOnCustomerKeyboardClickListener(this);
20        mPasswordEditText.setOnPasswordFullListener(this);
21    }
22
23    /**
24     * 键盘数字点击监听回调方法
25     */
26    @Override
27    public void click(String number) {
28        mPasswordEditText.addPassword(number);
29    }
30
31    /**
32     * 键盘删除点击监听回调方法
33     */
34    @Override
35    public void delete() {
36        mPasswordEditText.deleteLastPassword();
37    }
38
39    /**
40     * 密码输入完毕回调方法
41     */
42    @Override
43    public void passwordFull(String password) {
44        Toast.makeText(this, "密码填充完毕:" + password, Toast.LENGTH_SHORT).show();
45    }
46}
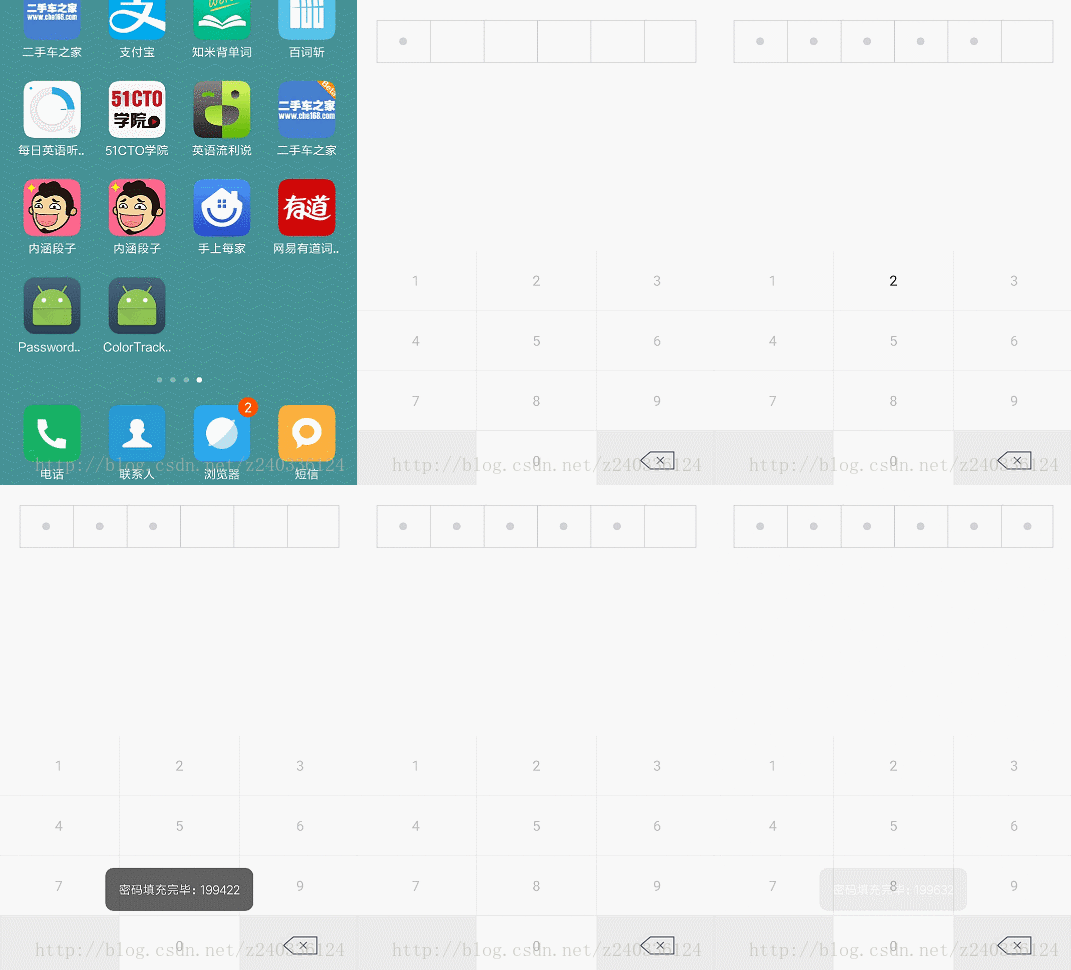
这里写图片描述
最后我们整合到Dialog中就好了,Dialog我们也需要利用Builder设计模式自己去封装通用的效果,因为系统的太过于麻烦,这里就不做介绍我们后面再说吧,具体请看视频讲解:https://pan.baidu.com/s/1bqgRu9p 密码:yr4d