
HttpClient
HttpClient是Dart SDK中提供的标准的访问网络的接口类,是HTTP1.1/RFC2616协议在Dart SDK上的具体实现,用于客户端发送HTTP/S 请求。HttpClient 包含了一组方法,可以发送 HttpClientRequest 到Http服务器, 并接收 HttpClientResponse 作为服务器的响应。 例如, 我们可以用 get, getUrl, post, 和 postUrl 方法分别发送 GET 和 POST 请求。
例如,一个简单的使用场景如下:
1import "dart:io";
2import 'dart:convert';
3main() async {
4  var baidu = "http://www.baidu.com";
5  var httpClient = HttpClient();
6  // Step 1: get HttpClientRequest
7  HttpClientRequest request = await httpClient.getUrl(Uri.parse(baidu));
8  // Step2: get HttpClientResponse
9  HttpClientResponse response = await request.close();
10 // Step3: consume HttpClientResponse
11  var responseBody = await response.transform(Utf8Decoder()).join();
12// Step4: close connection.
13  httpClient.close();
14}
代码解释:
- 步骤一:新建HttpClient对象,通过 getUrl方法获取 HttpClientRequest;
- 步骤二:通过HttpClientRequest.close(),发起Http请求, 获取 HttpClientResponse;
- 步骤三:HttpClientResponse是一个Stream对象,通过Utf8Decoder解码,然后join操作符转换成String对象,可以打印出HttpClientResponse 的字符串。
- 步骤四:关闭HttpClient.
本文从源码角度简单理解上述代码执行过程,从而更好的(避免掉坑的)使用HttpClient。
背景知识
- Dart 异步编程框架:
Dart IO库中大量使用了Future,Stream,IOSink等异步处理方法和流处理的方法,为了对源码有更好的理解,读者应具备这方面相关知识,限于篇幅,相关知识请参考相关API文档。https://api.flutter.dev/flutter/dart-async/dart-async-library.html - 源码路径:/dart-sdk/sdk/sdk/lib/io; /dart-sdk/sdk/sdk/lib/_http;
下载代码 https://github.com/dart-lang/sdk
编译指导 https://github.com/dart-lang/sdk/wiki/Building
编译debug 版本
1cd dart-sdk/sdk
2./tools/build.py --mode debug --arch x64 create_sdk
- 本文源码基于Dart 2.5
1dart --version
2Dart VM version: 2.5.0-dev.1.0 (Unknown timestamp) on "linux_x64"
一、流程分析
0. 顶层流程:
HttpClient 及相关模块实际上实现的是TCP/IP的Http协议栈,例如下图所示的Http部分:
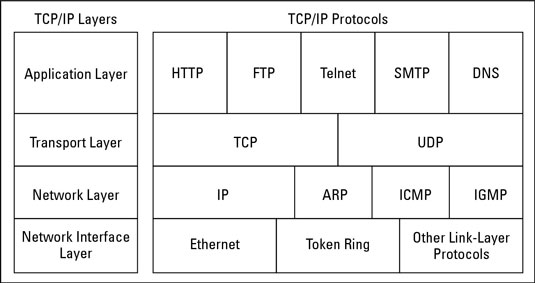
tcp_ip.jpg
模块对上层应用暴露的接口就是HttpClient,客户端可以通过API发起Http请求并接收Http响应。
模块下层依赖的是TCP协议栈,从代码实现上而言就是依赖Socket/SecureSocket,因为在操作系统上Sockt封装了TCP/IP的所有操作,便于上层协议处理。
因此,本文开始提供的demo,用流程图可以简单描述为HttpClient, Socket和Server之间的关系,如下图所示:

HttpClient_level0.png
最左侧流程就是本文将详细分析的代码流程。
顶层流程分析:
- Step 1: HttpClient getUrl 获取 HttpClientRequest的过程:
这个过程实质上是sockt建立TCP链接的过程:
- sockt需要通过DNS解析把域名转换为ip地址
- 然后通过TCP的三次握手,建立socket链接,Dart中用HttpClientConnection保存这个链接。
- 构建一个HttpClientRequest对象,并返回客户端。客户端可以在这个对象中添加更多应用相关的Http包头字段,等待发送。
注意到这个过程仅仅是建立socket链路,并没有实际发送数据。
- Step 2: HttpClientRequest.close 表明HttpClientRequest已经构建完成,socket发送Http请求。收到响应后返回给客户端。
- Step 3: HttpClientRsponse被消费后,HttpClient关闭链接。socket发送TCP四次挥手信息,关闭传输,并释放所有资源。
1. Step1 详细分析 HttpClient.openUrl流程:
openUrl两个工作:建立链接,获取HttpClientRequest对象:
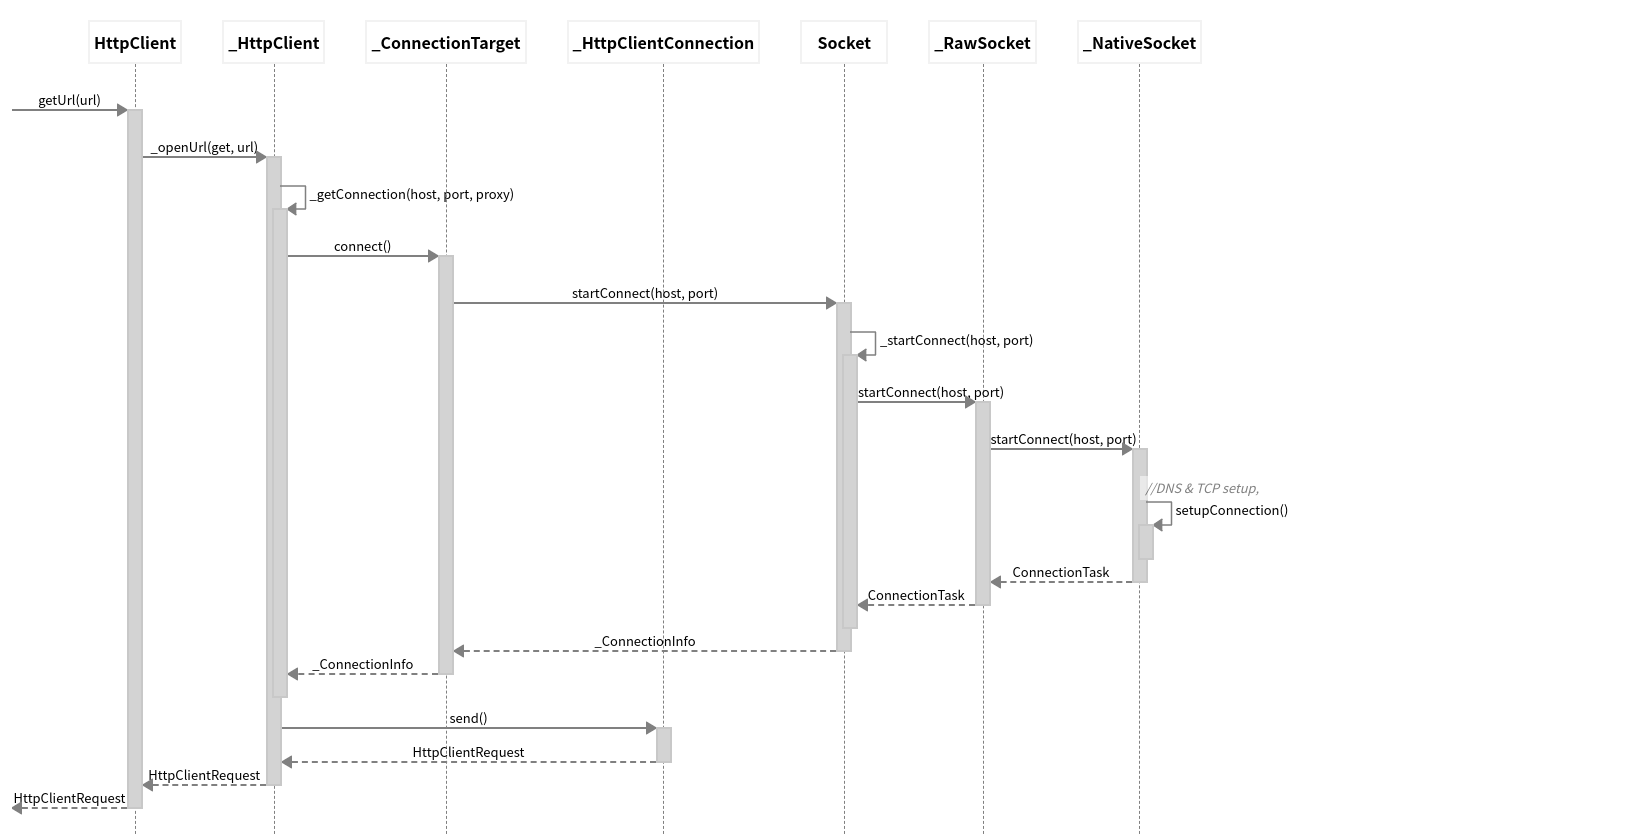
step1_getUrl.png
- 1.1 HttpClient 作为library暴露的API,定义在
/dart-sdk/lib/_http/http.dart,通过工厂方法调用实现类_HttpClient;
所以HttpClient.getUrl 调用的是 _HttpClient.getUrl;
1 factory HttpClient({SecurityContext context}) {
2    HttpOverrides overrides = HttpOverrides.current;
3    if (overrides == null) {
4      return new _HttpClient(context);
5    }
6    return overrides.createHttpClient(context);
7  }
- 1.2 API 封装了常用的get,post,put,delete,head,patch等方法,统一由_HttpClient._openUrl 处理
1 Future<HttpClientRequest> openUrl(String method, Uri url) => _openUrl(method, url);
2  Future<HttpClientRequest> get(String host, int port, String path) => open("get", host, port, path);
3  Future<HttpClientRequest> getUrl(Uri url) => _openUrl("get", url);
4  Future<HttpClientRequest> post(String host, int port, String path) => open("post", host, port, path);
5  Future<HttpClientRequest> postUrl(Uri url) => _openUrl("post", url);
6  Future<HttpClientRequest> put(String host, int port, String path) => open("put", host, port, path);
7  Future<HttpClientRequest> putUrl(Uri url) => _openUrl("put", url);
8  Future<HttpClientRequest> delete(String host, int port, String path) =>open("delete", host, port, path);
9  Future<HttpClientRequest> deleteUrl(Uri url) => _openUrl("delete", url);
10  Future<HttpClientRequest> head(String host, int port, String path) => open("head", host, port, path);
11  Future<HttpClientRequest> headUrl(Uri url) => _openUrl("head", url);
12  Future<HttpClientRequest> patch(String host, int port, String path) => open("patch", host, port, path);
13  Future<HttpClientRequest> patchUrl(Uri url) => _openUrl("patch", url);
- 1.3 _HttpClient._openUrl 首先需要获取一个_HttpClientConnection对象,然后通过这个_HttpClientConnection对象的send方法获取一个HttpClientRequest对象,返回给调用方。
解释两点:
1.由于_getConnection是异步调用,这里用到了Future.then方法获取_ConnectionInfo对象,_HttpClientConnection包含在_ConnectionInfo对象成员变量中,如果使用到了代理,代理信息也会保存在_ConnectionInfo对象中。
2.Dart中匿名函数也是一个对象,此对象也可以定义自己的方法。例如下面代码中send就是定义在匿名对象中的方法。具体请参考language-tour#lexical-scope
1 return _getConnection(uri.host, port, proxyConf, isSecure)
2        .then((_ConnectionInfo info) {
3      _HttpClientRequest send(_ConnectionInfo info) {
4        return info.connection
5            .send(uri, port, method.toUpperCase(), info.proxy);
6      }、
7      return send(info);
8    });
- 1.4 _HttpClient._openUrl第一步,首先分析_HttpClient._getConnection 建立链接并获取_HttpClientConnection的过程;
- 1.4.1 _getConnectionTarget 根据host port target信息,从缓存的Map中,获取一个_ConnectionTarget,如果没有就新建一个。然后调用_ConnectionTarget.connect方法建立链接。如果建立成功就返回一个_ConnectionInfo对象。
1 // Get a new _HttpClientConnection, from the matching _ConnectionTarget.
2  Future<_ConnectionInfo> _getConnection(String uriHost, int uriPort,
3      _ProxyConfiguration proxyConf, bool isSecure) {
4    Iterator<_Proxy> proxies = proxyConf.proxies.iterator;
5
6    Future<_ConnectionInfo> connect(error) {
7      if (!proxies.moveNext()) return new Future.error(error);
8      _Proxy proxy = proxies.current;
9      String host = proxy.isDirect ? uriHost : proxy.host;
10      int port = proxy.isDirect ? uriPort : proxy.port;
11      return _getConnectionTarget(host, port, isSecure)
12          .connect(uriHost, uriPort, proxy, this)
13          // On error, continue with next proxy.
14          .catchError(connect);
15    }
16
17    return connect(new HttpException("No proxies given"));
18  }
- 1.4.2 _ConnectionTarget.connect 根据是否使用代理,是否使用https分别建立不同的链接。
本文案例先分析最简单场景:不使用代理,建立http链接。
因此_ConnectionTarget通过socket接口直接和目标地址建立链接:
1// simplified codes
2Future<ConnectionTask> connectionTask =  Socket.startConnect(host, port));
一旦socket发起链接,connectionTask就会执行到then 方法,socket建立链接后,会新建立一个_HttpClientConnection对象,包含这个socket,并且封装成_ConnectionInfo, 返回给调用者
1 var connection = new _HttpClientConnection(key, socket, client, false, context);
2......
3return new _ConnectionInfo(connection, proxy);
调用者就是1.3 节_HttpClient._openUrl._getConnection的地方,获取后可以执行then操作。
- 1.4.3 Socket.startConnect的流程包含了DNS解析和tcp链路建立两个过程,代码在sdk/lib/io目录下, 限于篇幅,在此不再详细展开。
- 1.5 获取_HttpClientConnection 建立链接后,_HttpClient._openUrl执行第二步,通过_HttpClientConnection.send,获取 HttpClientRequest;
1 _HttpClientRequest send(Uri uri, int port, String method, _Proxy proxy) {
2......
3    var outgoing = new _HttpOutgoing(_socket);
4    // Create new request object, wrapping the outgoing connection.
5    var request =
6        new _HttpClientRequest(outgoing, uri, method, proxy, _httpClient, this);
7    _streamFuture = outgoing.done.then<Socket>((Socket s) {
8        _nextResponseCompleter.future.then((incoming) {
9                incoming.dataDone.then((closing) {
10                 ......
11                }
12        }
13    }
14    return request;
15......
16}
这里将建立的HttpOutgoing对象就是客户端 HttpRequest 的Buffer,_socket和HttpOutgoing关联,后续发送时通过这个socket直接发送。
_streamFuture 部分代码注册了一系列的回调,后续发送完Http的Request,接收到的数据及后续操作就在这里处理。
- 到此,_HttpClient._openUrl 就获取到了_HttpClientRequest对象,demo程序的第一步流程全部结束:
1 // Step 1: get HttpClientRequest
2  HttpClientRequest request = await httpClient.getUrl(Uri.parse(baidu));
2. Step2 详细分析 HttpClientRequest.close 流程:
-
2.1 HttpClientRequest.close触发socket 发送的过程:
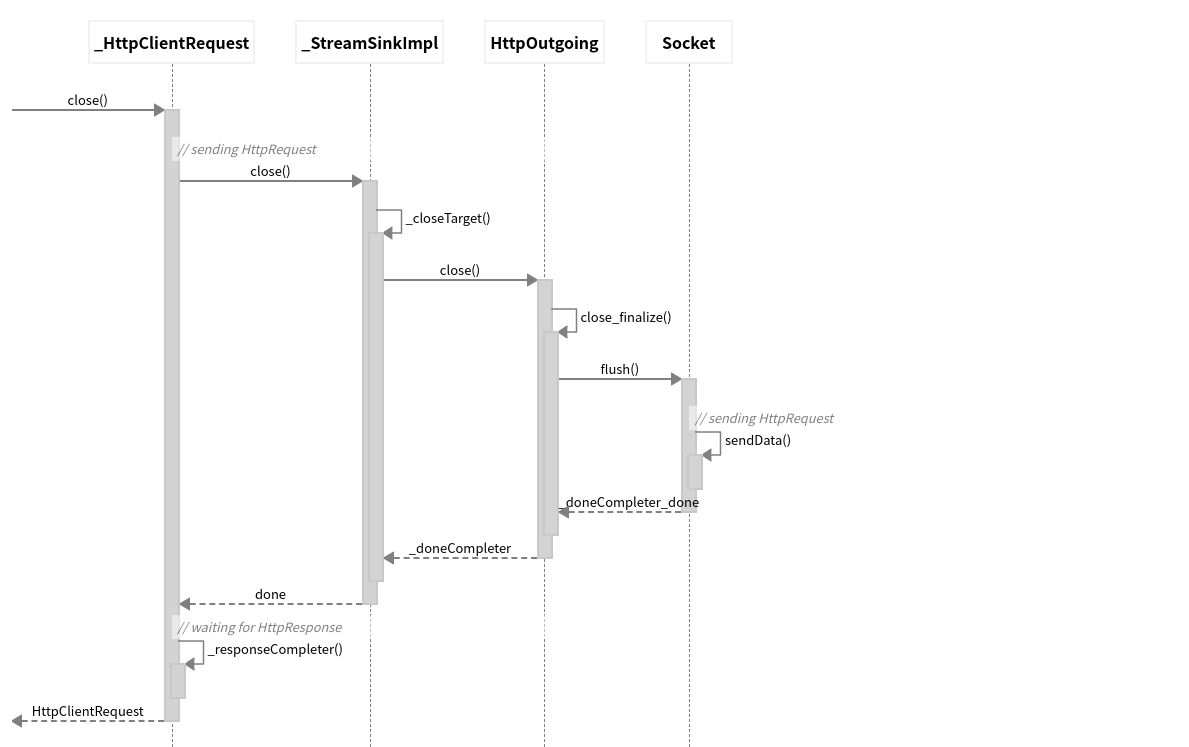
step2-1.png
HttpClientRequest.close 首先调用父类_StreamSinkImpl<T>的close(), 最终会触发_HttpOutgoing.close完成发送。
然后,再返回一个done对象。done对象完成需要等待两个返回条件,一个是HttpRequest发送完成,一个是收到服务器的HttpResponse,这里是用Future.wait方式实现的。Future.wait可以类比为Java中的CyclicBarrier,当Future队列中各个任务都完成时,Future.then方法才会被调用。
1 Future<HttpClientResponse> get done {
2    if (_response == null) {
3      _response =
4          Future.wait([_responseCompleter.future, super.done], eagerError: true)
5              .then((list) => list[0]);
6    }
7    return _response;
8  }
9
10  Future<HttpClientResponse> close() {
11    super.close();
12    return done;
13  }
- 2.1.1 首先分析_HttpOutgoing 的发送过程。
HttpClientRequest 被设计为一个实现了IOSink接口的类
abstract class HttpClientRequest implements IOSink {}
因此,调用者可以通过write的方式往这个流里面写数据。
1 HttpClientRequest request = ...
2     request.headers.contentType
3         = new ContentType("application", "json", charset: "utf-8");
4     request.write(...);  // Strings written will be UTF-8 encoded.
在写完所有数据后,需要调用request.close() 发送这个HttpRequest。本节会分析这个发送HttpRequest并收到对应的HttpResponse的过程。
在1.5节 _HttpClientConnection.send 新建_HttpClientRequest对象时,第一个构造函数传入了一个_HttpOutgoing对象。
1 var outgoing = new _HttpOutgoing(_socket);
2    // Create new request object, wrapping the outgoing connection.
3    var request =  new _HttpClientRequest(outgoing, uri, method, proxy, _httpClient, this);
根据继承关系,_HttpClientRequest继承了_StreamSinkImpl<T>,这个对象包含一个_target成员,而_HttpOutgoing 继承 StreamConsumer,并且构造的时候被注册为一个target。
1class _StreamSinkImpl<T> implements StreamSink<T> {
2  final StreamConsumer<T> _target;
因此,_HttpClientRequest.close() 时,_StreamSinkImpl会closeTarget,因此调用_HttpOutgoing.close
1 Future close() {
2    if (_isBound) {
3      throw new StateError("StreamSink is bound to a stream");
4    }
5    if (!_isClosed) {
6      _isClosed = true;
7      if (_controllerInstance != null) {
8        _controllerInstance.close();
9      } else {
10        ********* closed here ************
11        _closeTarget();
12      }
13    }
14    return done;
15  }
最终在finalize 方法中,通过socket.flush发送数据。一旦发送完成,通过_doneCompleter通知发送完成。
1 return socket.flush().then((_) {
2        print('socket.flush().then  _doneCompleter.complete');
3        _doneCompleter.complete(socket);
4        return outbound;
5      }
HttpClientRequest.close done的第一个条件完成。
-
2.2 HttpClientRequest 收到服务端HttpResponse的过程:
HttpClientRequest.close done 完成的第二个条件是,收到服务端响应,也就是_responseCompleter.future完成。此条件完成的流程如下图所示: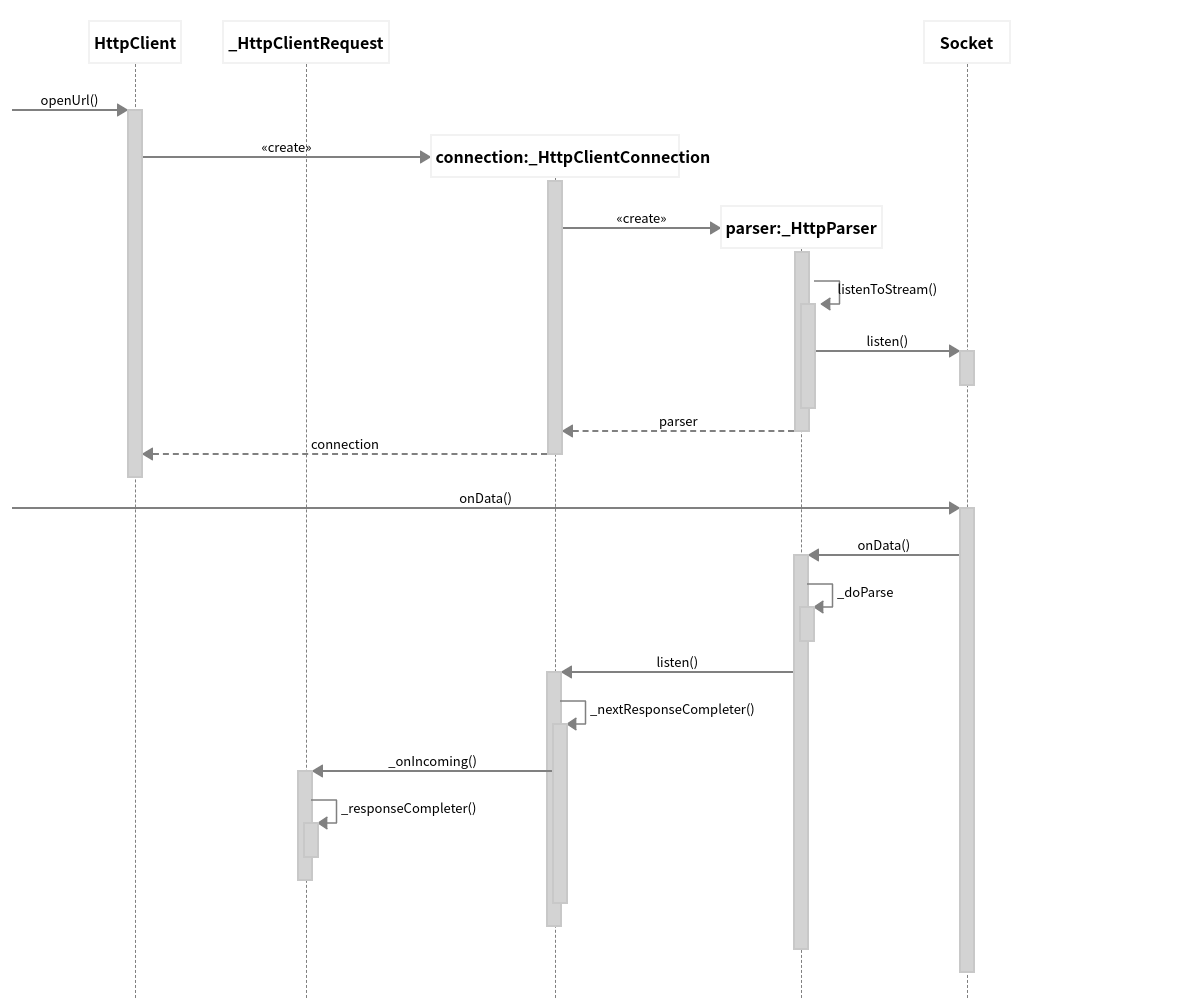
step2-2.png
流程分析:
在openUrl时创建了_HttpClientConnection对象,构造函数为Socket注册了onData事件的回调,即_HttpParser。因此每当Socket有数据进来时,都会触发_HttpParser的onData进行处理。
1 _HttpClientConnection(this.key, this._socket, this._httpClient,
2      [this._proxyTunnel = false, this._context])
3      : _httpParser = new _HttpParser.responseParser() {
4    _httpParser.listenToStream(_socket);
5
6    // Set up handlers on the parser here, so we are sure to get 'onDone' from
7    // the parser.
8    _subscription = _httpParser.listen((incoming) {......}
最终处理完成后,层层调用_HttpClientRequest的_responseCompleter。HttpClientRequest.close done的第二个条件完成。最终获取HttpClientResponse对象。
3. Step3 HttpClient.close 流程:
此流程比较简单,最终调用socket的close,TCP四次挥手断开链接。这里就不展开了。需要指出的是,如果不主动调用HttpClient.close,socket不会立即释放,链接会保留一段时间超时退出,因此存在资源泄漏的风险。
总结:
到此为之,HttpClient发起一个get http请求并获取响应的流程分析完毕。
简单而言客户端需要两个Future对象,
- 第一个通过getUrl建立链接,获取HttpClientRequest对象。
- 第二个通过HttpClientRequest.close 获取 HttpClientResponse对象。
Dart这个模块大量使用了Future和Completer等异步处理工具,代码逻辑比较复杂,跟踪时需要非常仔细。
另外,我之所以要分析HttpClient,是因为遇到了一个flutter pub get的问题 FLUTTER填坑笔记:从flutter pub get error 开始,定位Dart SDK问题,使用代理时HttpClient崩溃。通过代理进行Http通信的过程有更多的交互,流程也更为复杂,后续再补充这个过程的分析。