
前段时间练习过的一个小项目,今天再看看,记录一下~
开发工具准备:
-
开发工具:PyCharm
-
Python内置模块:sys、os、base64、json、collections
-
第三方模块:PyQt5、requests、pandas、Pillow(PIL)、phone、pyecharts
PyQt5模块:实现项目窗体设计
pyecharts模块:绘制分布饼图
项目组织结构:
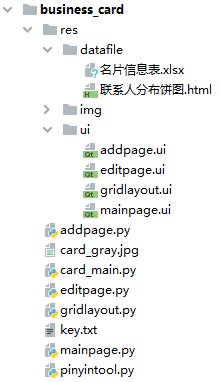
说明:
- res文件夹:是资源文件夹,里面包含三个文件夹。datafile文件夹保存的是联系人的信息表和联系人分布饼图;img文件夹是保存图片的;ui文件夹保存的是使用Qt Designer工具设计的各种窗体ui文件。Qt Designer的配置参考https://blog.csdn.net/wang_hugh/article/details/88775868
- addpage.py、editpage.py、gridlayout.py、mainpage.py文件都是由对应的.ui文件使用Pyuic工具转换而来的。其中addpage.ui是添加联系人信息界面;editpage.ui是编辑联系人信息界面;gridlayout.ui是联系人信息展示界面;mainpage.ui是主窗体设计文件
- card_gray.jpg文件:是名片识别的灰度图
- card_main.py文件:程序主文件
- key.txt文件:申请汉王云名片识别接口的key
- pinyintool.py文件:判断汉字首字母模块文件
项目实现的功能:
- 添加联系人:两种方法添加联系人,一种是通过识别名片添加联系人信息,另一种是通过手动添加联系人信息;然后将联系人信息写到文档里
- 搜索联系人:两种方式搜索,一是关键词搜索,二是按照首字母搜索
- 编辑联系人信息
- 删除联系人信息
- 查看联系人分布:生成饼状图
系统窗体以及添加联系人信息页面的实现
通过Qt Designer工具设计四个界面,效果如下:
①AI智能联系人管理主页面

② 添加联系人信息页面

③编辑联系人信息界面

④展示联系人信息界面
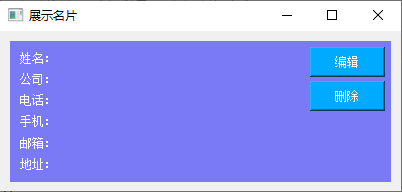
创建card_main.py文件,初始化页面主页并显示,代码如下:(显示Qt Designer工具设计的界面基本都是这个写法)
1#主窗体页面
2import sys
3
4from PyQt5.QtWidgets import QWidget, QApplication
5
6import mainpage
7
8
9class parentWindow(QWidget,mainpage.Ui_Form):
10    # 初始化方法
11    def __init__(self):
12        # 找到父类主窗体页面
13        super(parentWindow,self).__init__()
14        # 初始化页面方法
15        self.setupUi(self)
16
17
18if __name__=='__main__':
19    # 每一个 PyQt5应用都必须创建一个应用对象
20    app=QApplication(sys.argv)
21
22    # 初始化页面
23    window=parentWindow()
24    # 显示主窗体
25    window.show()
26
27    # 项目结束调用
28    sys.exit(app.exec_())
点击主窗体的“添加”按钮,显示添加联系人界面。在card_main.py文件中新建childWindow类,初始化页面并建立OPEN()方法,用于显示添加联系人界面,然后在主方法中初始化childWindow类,并且为“添加”按钮添加事件,代码如下:
1#主窗体页面
2import sys
3
4from PyQt5.QtWidgets import QWidget, QApplication
5
6import addpage
7import mainpage
8
9
10class parentWindow(QWidget,mainpage.Ui_Form):
11    # 初始化方法
12    def __init__(self):
13        # 找到父类主窗体页面
14        super(parentWindow,self).__init__()
15        # 初始化页面方法
16        self.setupUi(self)
17
18#添加联系人页面
19class childWindow(QWidget,addpage.Ui_Form):
20    def __init__(self):
21        # 找到父类 添加联系人页面
22        super(childWindow,self).__init__()
23        # 初始化页面
24        self.setupUi(self)
25
26
27    #显示添加联系人页面
28    def OPEN(self):
29        #显示页面
30        self.show()
31
32
33
34if __name__=='__main__':
35    # 每一个 PyQt5应用都必须创建一个应用对象
36    app=QApplication(sys.argv)
37
38    # 初始化页面
39    window=parentWindow()
40    # 显示主窗体
41    window.show()
42
43    child = childWindow()  # 添加页面
44    window.pushButton_2.clicked.connect(child.OPEN)  # 添加按钮事件
45
46    # 项目结束调用
47    sys.exit(app.exec_())
48
运行效果如图:

创建保存数据文件:(pandas模块)
智能停车场车牌识别系统(一)也有这一部分的实现,写法基本类似。
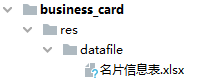
该项目需要创建一个用于保存联系人信息的表,主要用到pandas模块和os模块。关键代码如下:
1import os
2import pandas as pd
3
4cdir=os.getcwd()
5path=cdir+'/res/datafile/'
6#建立名片信息表
7if not os.path.exists(path):
8    # 建立文件夹
9    os.makedirs(path)
10    # 姓名 公司 电话 手机 邮件 地址 城市 分类
11    cardfile=pd.DataFrame(columns=['name','comp','tel','mobile','email','addr','city','type'])
12    # 生成.xlsx文件
13    cardfile.to_excel(path+'名片信息表.xlsx',sheet_name='data',index=None)
运行效果如图:
识别名片:(核心功能)
申请汉王云名片识别接口key
-
汉王云名片接口 API申请地址:http://developer.hanvon.com/。进入官网,点击右上角进行登录或注册
-
登录成功之后,依次点击【开发中心】→【应用管理】,点击右上角的【创建应用】
-
里面填写的内容参考如下:

-
再进入到【开发中心】→【应用管理】,点击右边的【Key管理】,进入之后点击【生成服务器key】,点击之后直接点里面的【生成】按钮,不用填写里面的 服务器IP地址白名单。
-
完成之后会生成Key,界面如下:

将申请的key写到项目根目录下的key.txt文件中。
实现识别名片功能
在childWindow类中创建openfile()方法,该方法是点击添加名片界面里面的“选择名片”按钮触发的方法。先通过QFileDialog.getOpenFileName()方法打开选择文件对话框,选择要识别的名片图片,再调用recg()方法识别名片图片,返回识别结果。如果返回的结果中’code’为0的话,说明返回正确信息,再调用dcontent()方法把信息显示到对应的文本框里面。openfile()方法代码如下:
1# 选择名片的按钮执行方法
2def openfile(self):
3    # 启动选择文件对话框,查找jpg以及png图片
4    self.download_path = QFileDialog.getOpenFileName(self, "选择要识别的名片图片", "./res/img",
5                                                     "Image Files(*.jpg *.png)")
6
7    if not self.download_path[0].strip():  # 判断是否选择图片
8        # 消息对话框 information 提问对话框 question 警告对话框 warning
9        # 严重错误对话框 critical 关于对话框 about
10        QMessageBox.information(self, '提示信息', '没有选择名片图片')
11    else:
12        pixmap = QPixmap(self.download_path[0])  # self.download_path[0]为图片路径,pixmap解析图片
13        # print(pixmap)
14        self.label.setPixmap(pixmap)  # 设置图片
15        self.label.setScaledContents(True)  # 让图片自适应大小
16        try:
17            content = self.recg()  # 识别名片图片,返回识别结果
18        except:
19            QMessageBox.information(self, '提示信息', '识别错误,请重新选择图片!')
20        cjson = json.loads(content)
21        print(cjson)
22        if cjson['code'] == '0':  # 判断是否正确返回内容
23            self.dcontent(1, cjson)  # 名称
24            self.dcontent(2, cjson)  # 公司
25            self.dcontent(3, cjson)  # 电话
26            self.dcontent(4, cjson)  # 手机
27            self.dcontent(5, cjson)  # 邮件
28            self.dcontent(6, cjson)  # 地址
29        else:
30            QMessageBox.information(self, '提示信息', '信息码-' + cjson[
31                'code'] + ' 请去官网http://developer.hanvon.com/api/toAPIinfo.do?id=2&num= 查看原因')
在childWindow类中创建recg()方法,这个方法主要用于处理对选择的图片进行图片识别,返回联系人信息。汉王云官网会有代码示例,网址为:http://developer.hanvon.com/api/toAPIinfo.do?id=2,里面有很多内容,还可以在线体验。该项目的请求接口选择的是多语言带坐标。代码如下:
1#识别名片图片
2def recg(self):
3    with open('key.txt','r') as file:
4        key=file.readline()  #读取写到key.txt文件中的您申请的key
5        #print(key)
6        url='http://api.hanvon.com/rt/ws/v1/ocr/bcard/recg?key=%s&code=cf22e3bb-d41c-47e0-aa44-a92984f5829d' % key
7        img=Image.open(self.download_path[0])
8        img2=img.convert('L')
9        _w=img2.width
10        _h=img2.height
11        img2=img2.resize((int(_w),int(_h)),Image.ANTIALIAS)
12        img2.save('card_gray.jpg')
13
14        base64img=base64.b64encode(open('card_gray.jpg','rb').read()).decode()
15        data={"lang":'auto',"color":'gray',"image":base64img}
16        headers={"Content-Type":"application/octet-stream"}
17
18        resp=requests.post(url,data=json.dumps(data),headers=headers)
19
20        return resp.text
21
card_main.py整体代码如下:
1#主窗体页面
2import base64
3import json
4import sys
5import os
6
7import pandas as pd
8import requests
9from PIL import Image
10
11# qt5模块
12from PyQt5.QtWidgets import *
13from PyQt5.QtGui import *
14
15import addpage
16import mainpage
17
18
19cdir=os.getcwd()
20path=cdir+'/res/datafile/'
21#建立名片信息表
22if not os.path.exists(path):
23    # 建立文件夹
24    os.makedirs(path)
25    # 姓名 公司 电话 手机 邮件 地址 城市 分类
26    cardfile=pd.DataFrame(columns=['name','comp','tel','mobile','email','addr','city','type'])
27    # 生成.xlsx文件
28    cardfile.to_excel(path+'名片信息表.xlsx',sheet_name='data',index=None)
29
30
31class parentWindow(QWidget,mainpage.Ui_Form):
32    # 初始化方法
33    def __init__(self):
34        # 找到父类主窗体页面
35        super(parentWindow,self).__init__()
36        # 初始化页面方法
37        self.setupUi(self)
38
39#添加联系人页面
40class childWindow(QWidget,addpage.Ui_Form):
41    def __init__(self):
42        # 找到父类 添加联系人页面
43        super(childWindow,self).__init__()
44        # 初始化页面
45        self.setupUi(self)
46        self.pushButton.clicked.connect(self.openfile)  # 给选择名片按钮添加事件
47
48    # 显示添加联系人页面
49    def OPEN(self):
50        self.label.setPixmap(QPixmap(""))  # 移除控件上图片
51        # 移除输入框内容
52        self.lineEdit_1.setText("")
53        self.lineEdit_2.setText("")
54        self.lineEdit_3.setText("")
55        self.lineEdit_4.setText("")
56        self.lineEdit_5.setText("")
57        self.lineEdit_6.setText("")
58        # 显示页面
59        self.show()
60
61    # 选择名片的按钮执行方法
62    def openfile(self):
63        # 启动选择文件对话框,查找jpg以及png图片
64        self.download_path = QFileDialog.getOpenFileName(self, "选择要识别的名片图片", "./res/img",
65                                                         "Image Files(*.jpg *.png)")
66
67        if not self.download_path[0].strip():  # 判断是否选择图片
68            # 消息对话框 information 提问对话框 question 警告对话框 warning
69            # 严重错误对话框 critical 关于对话框 about
70            QMessageBox.information(self, '提示信息', '没有选择名片图片')
71        else:
72            pixmap = QPixmap(self.download_path[0])  # self.download_path[0]为图片路径,pixmap解析图片
73            # print(pixmap)
74            self.label.setPixmap(pixmap)  # 设置图片
75            self.label.setScaledContents(True)  # 让图片自适应大小
76            try:
77                content = self.recg()  # 识别名片图片,返回识别结果
78            except:
79                QMessageBox.information(self, '提示信息', '识别错误,请重新选择图片!')
80            cjson = json.loads(content)
81            print(cjson)
82            if cjson['code'] == '0':  # 判断是否正确返回内容
83                self.dcontent(1, cjson)  # 名称
84                self.dcontent(2, cjson)  # 公司
85                self.dcontent(3, cjson)  # 电话
86                self.dcontent(4, cjson)  # 手机
87                self.dcontent(5, cjson)  # 邮件
88                self.dcontent(6, cjson)  # 地址
89            else:
90                QMessageBox.information(self, '提示信息', '信息码-' + cjson[
91                    'code'] + ' 请去官网http://developer.hanvon.com/api/toAPIinfo.do?id=2&num= 查看原因')
92
93    # 识别名片图片
94    def recg(self):
95        with open('key.txt', 'r') as file:
96            key = file.readline()  # 读取写到key.txt文件中的您申请的key
97            # print(key)
98            url = 'http://api.hanvon.com/rt/ws/v1/ocr/bcard/recg?key=%s&code=cf22e3bb-d41c-47e0-aa44-a92984f5829d' % key
99            img = Image.open(self.download_path[0])
100            img2 = img.convert('L')
101            _w = img2.width
102            _h = img2.height
103            img2 = img2.resize((int(_w), int(_h)), Image.ANTIALIAS)
104            img2.save('card_gray.jpg')
105
106            base64img = base64.b64encode(open('card_gray.jpg', 'rb').read()).decode()
107            data = {"lang": 'auto', "color": 'gray', "image": base64img}
108            headers = {"Content-Type": "application/octet-stream"}
109
110            resp = requests.post(url, data=json.dumps(data), headers=headers)
111
112            return resp.text
113
114    # 设置识别显示的内容
115    def dcontent(self, k, count):
116        try:
117            if k == 1:
118                self.lineEdit_1.setText(count['name'][0])
119            elif k == 2:
120                self.lineEdit_2.setText(count['comp'][0])
121            elif k == 3:
122                self.lineEdit_3.setText(count['tel'][0])
123            elif k == 4:
124                self.lineEdit_4.setText(count['mobile'][0])
125            elif k == 5:
126                self.lineEdit_5.setText(count['email'][0])
127            elif k == 6:
128                self.lineEdit_6.setText(count['addr'][0])
129        except:
130            pass
131
132
133
134if __name__=='__main__':
135    # 每一个 PyQt5应用都必须创建一个应用对象
136    app=QApplication(sys.argv)
137
138    # 初始化页面
139    window=parentWindow()
140    # 显示主窗体
141    window.show()
142
143    child = childWindow()  # 添加页面
144    window.pushButton_2.clicked.connect(child.OPEN)  # 添加按钮事件
145
146    # 项目结束调用
147    sys.exit(app.exec_())
148
运行效果如图:

名片识别成功后,返回的内容如下:
{'code': '0', 'result': None, 'rotatedAngle': '0.0', 'name': ['赵云帆', '466', '224', '796', '313'], 'title': ['总经理', '549', '362', '708', '402'], 'tel': ['0109959179', '374', '460', '642', '485'], 'mobile': [], 'fax': ['0109959176', '372', '497', '642', '523'], 'email': ['zhaoyunfan@hanwang.com', '373', '537', '869', '565'], 'comp': ['汉王科技股份有限公司', '254', '58', '864', '117'], 'dept': [], 'degree': [], 'addr': ['中关村软件园汉王科技', '372', '572', '739', '598'], 'post': [], 'mbox': [], 'htel': [], 'web': [], 'im': [], 'numOther': [], 'other': [], 'extTel': []}
保存名片信息到文件中
上面已经实现了对名片的识别,识别之后需要保存。对信息的保存,主要是保存名片信息到文档中。添加完名片信息之后,点击“保存”按钮,会把名片信息保存到 名片信息表.xlsx 文件中。在childWindow类中创建keep()方法,首先获取输入框内容,根据手机号判断所属区域;接着判断姓名不能为空,根据姓名获取首字母拼音(后面要实现根据首字母进行搜索);最后将名片信息添加到 名片信息表.xlsx 文件中。keep()方法代码如下:
1# 保存名片信息到文档
2def keep(self):
3    pi_table = pd.read_excel(path + '名片信息表.xlsx', sheet_name='data')
4    # 获取输入框内容
5    name = self.lineEdit_1.text()
6    comp = self.lineEdit_2.text()
7    tel = self.lineEdit_3.text()
8    mobile = self.lineEdit_4.text()
9    email = self.lineEdit_5.text()
10    addr = self.lineEdit_6.text()
11    # 判断电话是否为空
12    if mobile.strip():
13        info = phone.Phone().find(int(mobile))  # 根据电话号判断区域
14        # print(info)
15        if info == None:
16            city = '其他'
17        else:
18            city = info['province']
19    else:
20        city = '其他'
21    # 判断姓名是否为空
22    if name.strip():
23        type = pinyintool.getPinyin(name[0])  # 获取首字母拼音
24        # 添加数据
25        data = pi_table.append({'name': name,
26                                'comp': comp,
27                                'tel': tel,
28                                'mobile': mobile,
29                                'email': email,
30                                'addr': addr,
31                                'city': city,
32                                'type': type, }, ignore_index=True)
33        # 更新xlsx文件
34        DataFrame(data).to_excel(path + '名片信息表.xlsx', sheet_name='data', index=False)
35        window.dataall()  # 主窗体显示全部数据
36        self.close()  # 关闭添加页面
37    else:
38        QMessageBox.information(self, '提示信息', '姓名不能为空')
39
pinyintool.py代码如下:(通过姓名获取首字母大写)
1def single_get_first(unicode1):
2    str1 = unicode1.encode('gbk')
3    try:
4        ord(str1)
5        return str1
6    except:
7        asc = str1[0] * 256 + str1[1] - 65536
8        if asc >= -20319 and asc <= -20284:
9            return 'A'
10        if asc >= -20283 and asc <= -19776:
11            return 'B'
12        if asc >= -19775 and asc <= -19219:
13            return 'C'
14        if asc >= -19218 and asc <= -18711:
15            return 'D'
16        if asc >= -18710 and asc <= -18527:
17            return 'E'
18        if asc >= -18526 and asc <= -18240:
19            return 'F'
20        if asc >= -18239 and asc <= -17923:
21            return 'G'
22        if asc >= -17922 and asc <= -17418:
23            return 'H'
24        if asc >= -17417 and asc <= -16475:
25            return 'J'
26        if asc >= -16474 and asc <= -16213:
27            return 'K'
28        if asc >= -16212 and asc <= -15641:
29            return 'L'
30        if asc >= -15640 and asc <= -15166:
31            return 'M'
32        if asc >= -15165 and asc <= -14923:
33            return 'N'
34        if asc >= -14922 and asc <= -14915:
35            return 'O'
36        if asc >= -14914 and asc <= -14631:
37            return 'P'
38        if asc >= -14630 and asc <= -14150:
39            return 'Q'
40        if asc >= -14149 and asc <= -14091:
41            return 'R'
42        if asc >= -14090 and asc <= -13319:
43            return 'S'
44        if asc >= -13318 and asc <= -12839:
45            return 'T'
46        if asc >= -12838 and asc <= -12557:
47            return 'W'
48        if asc >= -12556 and asc <= -11848:
49            return 'X'
50        if asc >= -11847 and asc <= -11056:
51            return 'Y'
52        if asc >= -11055 and asc <= -10247:
53            return 'Z'
54        return ''
55
56def getPinyin(string):
57    if string == None:
58        return None
59    if not '\u4e00' <= string <= '\u9fff':
60        return None
61    lst = list(string)
62    charLst = []
63    for l in lst:
64        charLst.append(single_get_first(l))
65    return ''.join(charLst)
66
在childWindow类中的 _ _ init _ _( self ) 方法中要给“保存”按钮添加keep事件:
self.pushButton_2.clicked.connect(self.keep) # 给保存按钮添加事件
把上面识别的名片信息保存之后,内容如下:

主窗体显示联系人信息
上面内容已经把名片信息保存到了文件中,根据名片信息表的内容与设计的展示名片信息的列表控件,实现主窗体显示联系人信息的功能。首先新建griditem类,主要用于初始化列表样式页面,然后在页面初始化类parentWindow中创建dataall()方法,用于读取联系人信息,并显示到页面上。在dataall()方法里面,每次先循环删除管理器中的组件,然后读取文件内容,循环显示到页面中,每行三个。card_main.py整体代码如下:
1# qt5模块
2from PyQt5.QtWidgets import *
3from PyQt5.QtGui import *
4#  自定义模块
5import gridlayout
6import mainpage
7import addpage
8import pinyintool
9# 内置模块
10import sys
11import requests, base64, json
12import os
13
14# 第三方模块
15import pandas as pd
16from pandas import DataFrame
17from PIL import Image
18import phone
19
20
21
22cdir=os.getcwd()
23path=cdir+'/res/datafile/'
24#建立名片信息表
25if not os.path.exists(path):
26    # 建立文件夹
27    os.makedirs(path)
28    # 姓名 公司 电话 手机 邮件 地址 城市 分类
29    cardfile=pd.DataFrame(columns=['name','comp','tel','mobile','email','addr','city','type'])
30    # 生成.xlsx文件
31    cardfile.to_excel(path+'名片信息表.xlsx',sheet_name='data',index=None)
32
33
34#主窗体列表样式
35class griditem(QWidget,gridlayout.Ui_Form):
36    def __init__(self):  #初始化方法
37        super(griditem,self).__init__()  #找到父类主窗体页面
38        self.setupUi(self)  #初始化页面方法
39
40
41#主窗体页面
42class parentWindow(QWidget,mainpage.Ui_Form):
43    # 初始化方法
44    def __init__(self):
45        # 找到父类主窗体页面
46        super(parentWindow,self).__init__()
47        # 初始化页面方法
48        self.setupUi(self)
49        self.dataall()
50
51    # 显示全部数据
52    def dataall(self):
53        # 每次先循环删除管理器的组件
54        while self.gridLayout.count():
55            item = self.gridLayout.takeAt(0)  # 获取第一个组件
56            widget = item.widget()
57            widget.deleteLater()  # 删除组件
58        i = -1
59        pi_table = pd.read_excel(path + '名片信息表.xlsx', sheet_name='data')  # 读取文件内容
60        cardArray = pi_table.values  # 获取所有数据
61        for n in range(len(cardArray)):
62            x = n % 3  # x确定每行显示的个数0,1,2,每行三个
63            if x == 0:  # 当x为0的时候设置换行即行数+1
64                i += 1
65            item = griditem()  # 创建  主窗体列表样式 类 的实例
66            item.label_1.setText('姓名:' + str(cardArray[n][0]))
67            item.label_2.setText('公司:' + str(cardArray[n][1]))
68            item.label_3.setText('电话:' + str(cardArray[n][2]))
69            item.label_4.setText('手机:' + str(cardArray[n][3]))
70            item.label_5.setText('邮箱:' + str(cardArray[n][4]))
71            item.label_6.setText('地址:' + str(cardArray[n][5]))
72            # 设置名称 为获取项目行数
73            item.pushButton.setObjectName(str(pi_table.index.tolist()[n]))
74            item.pushButton_1.setObjectName(str(pi_table.index.tolist()[n]))
75            # 为按钮绑定事件
76            #item.pushButton.clicked.connect(self.edit)  # 编辑
77            #item.pushButton_1.clicked.connect(self.deletedata)  # 删除
78
79            self.gridLayout.addWidget(item, i, x)  # 动态添加控件到gridLayout
80
81        self.scrollAreaWidgetContents.setMinimumHeight(i * 200)  # 设置上下滑动控件可以滑动
82        self.scrollAreaWidgetContents.setLayout(self.gridLayout)  # 设置gridLayout到滑动控件中
83
84
85#添加联系人页面
86class childWindow(QWidget,addpage.Ui_Form):
87    def __init__(self):
88        # 找到父类 添加联系人页面
89        super(childWindow,self).__init__()
90        # 初始化页面
91        self.setupUi(self)
92        self.pushButton.clicked.connect(self.openfile)  # 给选择名片按钮添加事件
93        self.pushButton_2.clicked.connect(self.keep)  # 给保存按钮添加事件
94
95    # 显示添加联系人页面
96    def OPEN(self):
97        self.label.setPixmap(QPixmap(""))  # 移除控件上图片
98        # 移除输入框内容
99        self.lineEdit_1.setText("")
100        self.lineEdit_2.setText("")
101        self.lineEdit_3.setText("")
102        self.lineEdit_4.setText("")
103        self.lineEdit_5.setText("")
104        self.lineEdit_6.setText("")
105        # 显示页面
106        self.show()
107
108    # 选择名片的按钮执行方法
109    def openfile(self):
110        # 启动选择文件对话框,查找jpg以及png图片
111        self.download_path = QFileDialog.getOpenFileName(self, "选择要识别的名片图片", "./res/img",
112                                                         "Image Files(*.jpg *.png)")
113
114        if not self.download_path[0].strip():  # 判断是否选择图片
115            # 消息对话框 information 提问对话框 question 警告对话框 warning
116            # 严重错误对话框 critical 关于对话框 about
117            QMessageBox.information(self, '提示信息', '没有选择名片图片')
118        else:
119            pixmap = QPixmap(self.download_path[0])  # self.download_path[0]为图片路径,pixmap解析图片
120            # print(pixmap)
121            self.label.setPixmap(pixmap)  # 设置图片
122            self.label.setScaledContents(True)  # 让图片自适应大小
123            try:
124                content = self.recg()  # 识别名片图片,返回识别结果
125            except:
126                QMessageBox.information(self, '提示信息', '识别错误,请重新选择图片!')
127            cjson = json.loads(content)
128            print(cjson)
129            if cjson['code'] == '0':  # 判断是否正确返回内容
130                self.dcontent(1, cjson)  # 名称
131                self.dcontent(2, cjson)  # 公司
132                self.dcontent(3, cjson)  # 电话
133                self.dcontent(4, cjson)  # 手机
134                self.dcontent(5, cjson)  # 邮件
135                self.dcontent(6, cjson)  # 地址
136            else:
137                QMessageBox.information(self, '提示信息', '信息码-' + cjson[
138                    'code'] + ' 请去官网http://developer.hanvon.com/api/toAPIinfo.do?id=2&num= 查看原因')
139
140    # 识别名片图片
141    def recg(self):
142        with open('key.txt', 'r') as file:
143            key = file.readline()  # 读取写到key.txt文件中的您申请的key
144            # print(key)
145            url = 'http://api.hanvon.com/rt/ws/v1/ocr/bcard/recg?key=%s&code=cf22e3bb-d41c-47e0-aa44-a92984f5829d' % key
146            img = Image.open(self.download_path[0])
147            img2 = img.convert('L')
148            _w = img2.width
149            _h = img2.height
150            img2 = img2.resize((int(_w), int(_h)), Image.ANTIALIAS)
151            img2.save('card_gray.jpg')
152
153            base64img = base64.b64encode(open('card_gray.jpg', 'rb').read()).decode()
154            data = {"lang": 'auto', "color": 'gray', "image": base64img}
155            headers = {"Content-Type": "application/octet-stream"}
156
157            resp = requests.post(url, data=json.dumps(data), headers=headers)
158
159            return resp.text
160
161    # 设置识别显示的内容
162    def dcontent(self, k, count):
163        try:
164            if k == 1:
165                self.lineEdit_1.setText(count['name'][0])
166            elif k == 2:
167                self.lineEdit_2.setText(count['comp'][0])
168            elif k == 3:
169                self.lineEdit_3.setText(count['tel'][0])
170            elif k == 4:
171                self.lineEdit_4.setText(count['mobile'][0])
172            elif k == 5:
173                self.lineEdit_5.setText(count['email'][0])
174            elif k == 6:
175                self.lineEdit_6.setText(count['addr'][0])
176        except:
177            pass
178
179    # 保存名片信息到文档
180    def keep(self):
181        pi_table = pd.read_excel(path + '名片信息表.xlsx', sheet_name='data')
182        # 获取输入框内容
183        name = self.lineEdit_1.text()
184        comp = self.lineEdit_2.text()
185        tel = self.lineEdit_3.text()
186        mobile = self.lineEdit_4.text()
187        email = self.lineEdit_5.text()
188        addr = self.lineEdit_6.text()
189        # 判断电话是否为空
190        if mobile.strip():
191            info = phone.Phone().find(int(mobile))  # 根据电话号判断区域
192            # print(info)
193            if info == None:
194                city = '其他'
195            else:
196                city = info['province']
197        else:
198            city = '其他'
199        # 判断姓名是否为空
200        if name.strip():
201            type = pinyintool.getPinyin(name[0])  # 获取首字母拼音
202            # 添加数据
203            data = pi_table.append({'name': name,
204                                    'comp': comp,
205                                    'tel': tel,
206                                    'mobile': mobile,
207                                    'email': email,
208                                    'addr': addr,
209                                    'city': city,
210                                    'type': type, }, ignore_index=True)
211            # 更新xlsx文件
212            DataFrame(data).to_excel(path + '名片信息表.xlsx', sheet_name='data', index=False)
213            window.dataall()  # 主窗体显示全部数据
214            self.close()  # 关闭添加页面
215        else:
216            QMessageBox.information(self, '提示信息', '姓名不能为空')
217
218
219
220if __name__=='__main__':
221    # 每一个 PyQt5应用都必须创建一个应用对象
222    app=QApplication(sys.argv)
223
224    # 初始化页面
225    window=parentWindow()
226    # 显示主窗体
227    window.show()
228
229    child = childWindow()  # 添加页面
230    window.pushButton_2.clicked.connect(child.OPEN)  # 添加按钮事件
231
232    # 项目结束调用
233    sys.exit(app.exec_())
234
运行效果如图:

再识别其他名片之后,点击“保存”按钮,主窗体会显示刚才识别的名片信息:


此时该项目的核心内容已经实现了,感觉篇幅有些长了。其他内容在下一篇实现!
链接:AI智能联系人管理系统(二)
转载请注明链接出处,谢谢!
自己完成的一个小项目,记录一下吧。
有什么问题或者需要源代码的,可以评论。我看到的就会回复!!!