
Android CircularFloatingActionMenu:作为系统级按钮悬浮桌面弹出菜单使用(3)
Android CircularFloatingActionMenu另外一个不同寻常的地方是,Android CircularFloatingActionMenu可以写在服务Service里面,然后通过上层一个Activity启动这个服务,然后就可以作为Android系统级悬浮按钮悬浮在系统的桌面上使用,这在一些常见的安全软件中很常见,比如,一些安全软件常驻桌面,为用户实时提供流量监控等等这些数据检测或者开关按钮。
现在使用Android CircularFloatingActionMenu实现该功能。
Java代码,其实这里只是写一个后台Service即可,该Service将被其他组件调用:
1import android.app.Service;
2import android.content.Intent;
3import android.os.Binder;
4import android.os.IBinder;
5//import android.util.Log;
6import android.view.View;
7import android.view.WindowManager;
8import android.widget.FrameLayout;
9import android.widget.ImageView;
10//import android.widget.TextView;
11
12import com.oguzdev.circularfloatingactionmenu.library.FloatingActionButton;
13import com.oguzdev.circularfloatingactionmenu.library.FloatingActionMenu;
14import com.oguzdev.circularfloatingactionmenu.library.SubActionButton;
15
16public class SystemOverlayMenuService extends Service {
17
18    private final IBinder mBinder = new LocalBinder();
19
20    //下方白色+号小按钮
21    private FloatingActionButton rightLowerButton;
22
23    //顶部中心位置的大红色星号按钮
24    private FloatingActionButton topCenterButton;
25
26    private FloatingActionMenu rightLowerMenu;
27    private FloatingActionMenu topCenterMenu;
28
29    private boolean serviceWillBeDismissed;
30
31    public SystemOverlayMenuService() {
32    }
33
34    public class LocalBinder extends Binder {
35        SystemOverlayMenuService getService() {
36            // Return this instance of LocalService so clients can call public methods
37            return SystemOverlayMenuService.this;
38        }
39    }
40
41    @Override
42    public IBinder onBind(Intent intent) {
43        return mBinder;
44    }
45
46    @Override
47    public void onCreate() {
48        super.onCreate();
49
50        serviceWillBeDismissed = false;
51
52        // Set up the white button on the lower right corner
53        // more or less with default parameter
54        ImageView fabIconNew = new ImageView(this);
55        fabIconNew.setImageDrawable(getResources().getDrawable(R.drawable.ic_action_new_light));
56        WindowManager.LayoutParams params = FloatingActionButton.Builder.getDefaultSystemWindowParams(this);
57
58        //右边下方小按钮
59        rightLowerButton = new FloatingActionButton.Builder(this)
60                .setContentView(fabIconNew)
61                .setSystemOverlay(true) //使该按钮作为系统悬浮按钮显示在设备屏幕上
62                .setLayoutParams(params)
63                .build();
64
65        SubActionButton.Builder rLSubBuilder = new SubActionButton.Builder(this);
66        ImageView rlIcon1 = new ImageView(this);
67        ImageView rlIcon2 = new ImageView(this);
68        ImageView rlIcon3 = new ImageView(this);
69        ImageView rlIcon4 = new ImageView(this);
70
71        rlIcon1.setImageDrawable(getResources().getDrawable(R.drawable.ic_action_chat_light));
72        rlIcon2.setImageDrawable(getResources().getDrawable(R.drawable.ic_action_camera_light));
73        rlIcon3.setImageDrawable(getResources().getDrawable(R.drawable.ic_action_video_light));
74        rlIcon4.setImageDrawable(getResources().getDrawable(R.drawable.ic_action_place_light));
75
76        // Build the menu with default options: light theme, 90 degrees, 72dp radius.
77        // Set 4 default SubActionButtons
78        SubActionButton rlSub1 = rLSubBuilder.setContentView(rlIcon1).build();
79        SubActionButton rlSub2 = rLSubBuilder.setContentView(rlIcon2).build();
80        SubActionButton rlSub3 = rLSubBuilder.setContentView(rlIcon3).build();
81        SubActionButton rlSub4 = rLSubBuilder.setContentView(rlIcon4).build();
82        rightLowerMenu = new FloatingActionMenu.Builder(this, true)
83                .addSubActionView(rlSub1, rlSub1.getLayoutParams().width, rlSub1.getLayoutParams().height)
84                .addSubActionView(rlSub2, rlSub2.getLayoutParams().width, rlSub2.getLayoutParams().height)
85                .addSubActionView(rlSub3, rlSub3.getLayoutParams().width, rlSub3.getLayoutParams().height)
86                .addSubActionView(rlSub4, rlSub4.getLayoutParams().width, rlSub4.getLayoutParams().height)
87                .setStartAngle(180)
88                .setEndAngle(270)
89                .attachTo(rightLowerButton)
90                .build();
91
92
93
94        //创建居于设备顶部居中的大红色按钮
95
96        // Set up the large red button on the top center side
97        // With custom button and content sizes and margins
98        int redActionButtonSize = getResources().getDimensionPixelSize(R.dimen.red_action_button_size);
99        int redActionButtonMargin = getResources().getDimensionPixelOffset(R.dimen.action_button_margin);
100        int redActionButtonContentSize = getResources().getDimensionPixelSize(R.dimen.red_action_button_content_size);
101        int redActionButtonContentMargin = getResources().getDimensionPixelSize(R.dimen.red_action_button_content_margin);
102        int redActionMenuRadius = getResources().getDimensionPixelSize(R.dimen.red_action_menu_radius);
103        int blueSubActionButtonSize = getResources().getDimensionPixelSize(R.dimen.blue_sub_action_button_size);
104        int blueSubActionButtonContentMargin = getResources().getDimensionPixelSize(R.dimen.blue_sub_action_button_content_margin);
105
106        ImageView fabIconStar = new ImageView(this);
107        fabIconStar.setImageDrawable(getResources().getDrawable(R.drawable.ic_action_important));
108
109        FloatingActionButton.LayoutParams fabIconStarParams = new FloatingActionButton.LayoutParams(redActionButtonContentSize, redActionButtonContentSize);
110        fabIconStarParams.setMargins(redActionButtonContentMargin,
111                redActionButtonContentMargin,
112                redActionButtonContentMargin,
113                redActionButtonContentMargin);
114
115        WindowManager.LayoutParams params2 = FloatingActionButton.Builder.getDefaultSystemWindowParams(this);
116        params2.width = redActionButtonSize;
117        params2.height = redActionButtonSize;
118
119        topCenterButton = new FloatingActionButton.Builder(this)
120                .setSystemOverlay(true)
121                .setContentView(fabIconStar, fabIconStarParams)
122                .setBackgroundDrawable(R.drawable.button_action_red_selector)
123                .setPosition(FloatingActionButton.POSITION_TOP_CENTER) //顶部中心位置
124                .setLayoutParams(params2)
125                .build();
126
127        //为顶部中心位置的大红色按钮增加弹出的子菜单
128        // Set up customized SubActionButtons for the right center menu
129        SubActionButton.Builder tCSubBuilder = new SubActionButton.Builder(this);
130        tCSubBuilder.setBackgroundDrawable(getResources().getDrawable(R.drawable.button_action_blue_selector));
131
132        //小红色关闭叉子那个按钮Builder
133        SubActionButton.Builder tCRedBuilder = new SubActionButton.Builder(this);
134        tCRedBuilder.setBackgroundDrawable(getResources().getDrawable(R.drawable.button_action_red_selector));
135
136        FrameLayout.LayoutParams blueContentParams = new FrameLayout.LayoutParams(FrameLayout.LayoutParams.MATCH_PARENT, FrameLayout.LayoutParams.MATCH_PARENT);
137        blueContentParams.setMargins(blueSubActionButtonContentMargin,
138                blueSubActionButtonContentMargin,
139                blueSubActionButtonContentMargin,
140                blueSubActionButtonContentMargin);
141
142        // Set custom layout params
143        FrameLayout.LayoutParams blueParams = new FrameLayout.LayoutParams(blueSubActionButtonSize, blueSubActionButtonSize);
144        tCSubBuilder.setLayoutParams(blueParams);
145        tCRedBuilder.setLayoutParams(blueParams);
146
147        ImageView tcIcon1 = new ImageView(this);
148        ImageView tcIcon2 = new ImageView(this);
149        ImageView tcIcon3 = new ImageView(this);
150        ImageView tcIcon4 = new ImageView(this);
151        ImageView tcIcon5 = new ImageView(this);
152        ImageView tcIcon6 = new ImageView(this);
153
154        tcIcon1.setImageDrawable(getResources().getDrawable(R.drawable.ic_action_camera));
155        tcIcon2.setImageDrawable(getResources().getDrawable(R.drawable.ic_action_picture));
156        tcIcon3.setImageDrawable(getResources().getDrawable(R.drawable.ic_action_video));
157        tcIcon4.setImageDrawable(getResources().getDrawable(R.drawable.ic_action_location_found));
158        tcIcon5.setImageDrawable(getResources().getDrawable(R.drawable.ic_action_headphones));
159        tcIcon6.setImageDrawable(getResources().getDrawable(R.drawable.ic_action_cancel));
160
161        SubActionButton tcSub1 = tCSubBuilder.setContentView(tcIcon1, blueContentParams).build();
162        SubActionButton tcSub2 = tCSubBuilder.setContentView(tcIcon2, blueContentParams).build();
163        SubActionButton tcSub3 = tCSubBuilder.setContentView(tcIcon3, blueContentParams).build();
164        SubActionButton tcSub4 = tCSubBuilder.setContentView(tcIcon4, blueContentParams).build();
165        SubActionButton tcSub5 = tCSubBuilder.setContentView(tcIcon5, blueContentParams).build();
166        SubActionButton tcSub6 = tCRedBuilder.setContentView(tcIcon6, blueContentParams).build();
167
168
169        // Build another menu with custom options
170        topCenterMenu = new FloatingActionMenu.Builder(this, true)
171                .addSubActionView(tcSub1, tcSub1.getLayoutParams().width, tcSub1.getLayoutParams().height)
172                .addSubActionView(tcSub2, tcSub2.getLayoutParams().width, tcSub2.getLayoutParams().height)
173                .addSubActionView(tcSub3, tcSub3.getLayoutParams().width, tcSub3.getLayoutParams().height)
174                .addSubActionView(tcSub4, tcSub4.getLayoutParams().width, tcSub4.getLayoutParams().height)
175                .addSubActionView(tcSub5, tcSub5.getLayoutParams().width, tcSub5.getLayoutParams().height)
176                .addSubActionView(tcSub6, tcSub6.getLayoutParams().width, tcSub6.getLayoutParams().height)
177                .setRadius(redActionMenuRadius)
178                .setStartAngle(0)
179                .setEndAngle(180)
180                .attachTo(topCenterButton)
181                .build();
182
183        topCenterMenu.setStateChangeListener(new FloatingActionMenu.MenuStateChangeListener() {
184            @Override
185            public void onMenuOpened(FloatingActionMenu menu) {
186
187            }
188
189            @Override
190            public void onMenuClosed(FloatingActionMenu menu) {
191                if(serviceWillBeDismissed) {
192                    SystemOverlayMenuService.this.stopSelf();
193                    serviceWillBeDismissed = false;
194                }
195            }
196        });
197
198        // make the red button terminate the service
199        tcSub6.setOnClickListener(new View.OnClickListener() {
200            @Override
201            public void onClick(View v) {
202                serviceWillBeDismissed = true; // the order is important
203                topCenterMenu.close(true);
204            }
205        });
206    }
207
208    @Override
209    public void onDestroy() {
210        if(rightLowerMenu != null && rightLowerMenu.isOpen()) rightLowerMenu.close(false);
211        if(topCenterMenu != null && topCenterMenu.isOpen()) topCenterMenu.close(false);
212        if(rightLowerButton != null) rightLowerButton.detach();
213        if(topCenterButton != null) topCenterButton.detach();
214
215        super.onDestroy();
216    }
217}
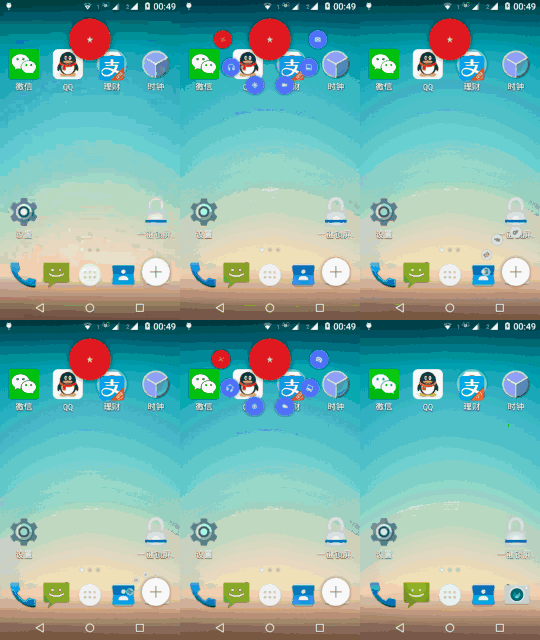
代码运行效果(作为Service启动),此时Activity已经退出,但Service启动后的这两个按钮一直常驻设备桌面,如动图展示:
代码中涉及到的更多自定义属性可以在该项目的代码包里具体查看。
附录相关文章:
A、《Android CircularFloatingActionMenu (1)》链接地址:http://blog.csdn.net/zhangphil/article/details/50257149
B、《Android CircularFloatingActionMenu在ScrollView这样的滚动View中使用(2)》链接地址:http://blog.csdn.net/zhangphil/article/details/50270271
C、《Android第三方开源FloatingActionButton(com.getbase.floatingactionbutton)【1】》链接地址:http://blog.csdn.net/zhangphil/article/details/50166715
D、《Android第三方开源FloatingActionButton(com.getbase.floatingactionbutton)【2】》链接地址:http://blog.csdn.net/zhangphil/article/details/50166929
E、《Android第三方开源FloatingActionButton(com.getbase.floatingactionbutton): FloatingActionsMenu【3】》链接地址:http://blog.csdn.net/zhangphil/article/details/50167609
F、《Android FloatingActionButton: FloatingActionsMenu向下伸展弹出及删除包含的FloatingActionButton【4】》链接地址:http://blog.csdn.net/zhangphil/article/details/50182019
G、《Android Material Design的FloatingActionButton,Snackbar和CoordinatorLayout》链接地址:http://blog.csdn.net/zhangphil/article/details/48861371
H、《Android第三方FloatingActionButton:伴随ListView、RecyclerView、ScrollView滚动滑入滑出》链接地址:http://blog.csdn.net/zhangphil/article/details/50135707
I,Android CircularFloatingActionMenu在github上的项目主页:https://github.com/oguzbilgener/CircularFloatingActionMenu