
Requests唯一的一个非转基因的Python HTTP库,人类可以安全享用。
警告:非专业使用其他HTTP库会导致危险的副作用,包括:安全缺陷症、冗余代码症、重新发明轮子症、啃文档症、抑郁、头疼、甚至死亡。1
环境准备:
1# 新建Python3.x虚拟环境
2> mkvirtualenv Py3_requests
3
4# 安装request库
5(Py3_requests) > pip install requests
6
7# 环境
8(Py3_requests) > python --version
9Python 3.7.1
10
11(Py3_requests) > pip list
12Package      Version
13------------ ----------
14certifi    2018.11.29
15chardet    3.0.4
16idna       2.8
17pip        19.0.2
18requests   2.21.0
19setuptools 40.8.0
20urllib3    1.24.1
21wheel      0.33.0
22
23(Py3_requests) >
Requests类库官方中文文档: http://docs.python-requests.org/zh_CN/latest/index.html
Requests类库GitHub源码:https://github.com/kennethreitz/requests
Requests类库作者Kenneth Reitz博客: https://www.kennethreitz.org
HTTP协议简介
什么是http协议?
- HyperText Transfer Protocol 超文本传输协议
- The Hypertext Transfer Protocol(HTTP) is a stateless(无状态)
application-level protocol for distributed(分布式),
collaborative(协作式), hypertext information systems(超文本信息系统).
curl命令
在Linux中curl是一个利用URL规则在命令行下工作的文件传输工具,可以说是一款很强大的http命令行工具。它支持文件的上传和下载,是综合传输工具,但按传统,习惯称url为下载工具。
语法:$ curl [option] [url]
常用参数:
-v 参数可以显示一次http通信的整个过程,包括端口连接和http request头信息。
1(Py3_requests)  > curl --help
2# ... 省略
3
4(Py3_requests)  > curl -v http://www.baidu.com > tmp.txt
5* Rebuilt URL to: http://www.baidu.com/
6  % Total    % Received % Xferd  Average Speed   Time    Time     Time  Current
7                                 Dload  Upload   Total   Spent    Left  Speed
8  0     0    0     0    0     0      0      0 --:--:-- --:--:-- --:--:--     0*   Trying 14.215.177.39...
9* TCP_NODELAY set
10* Connected to www.baidu.com (14.215.177.39) port 80 (#0)
11> GET / HTTP/1.1
12> Host: www.baidu.com
13> User-Agent: curl/7.55.1
14> Accept: */*
15>
16< HTTP/1.1 200 OK
17< Accept-Ranges: bytes
18< Cache-Control: private, no-cache, no-store, proxy-revalidate, no-transform
19< Connection: Keep-Alive
20< Content-Length: 2381
21< Content-Type: text/html
22< Date: Sun, 17 Feb 2019 11:18:49 GMT
23< Etag: "588604d8-94d"
24< Last-Modified: Mon, 23 Jan 2017 13:27:52 GMT
25< Pragma: no-cache
26< Server: bfe/1.0.8.18
27< Set-Cookie: BDORZ=27315; max-age=86400; domain=.baidu.com; path=/
28<
29{ [1040 bytes data]
30100  2381  100  2381    0     0   2381      0  0:00:01 --:--:--  0:00:01  5850
31* Connection #0 to host www.baidu.com left intact
32
33(Py3_requests)  >
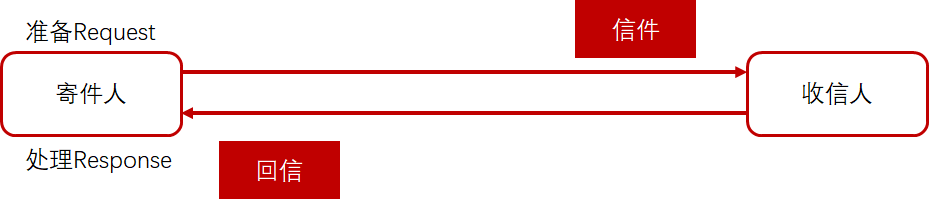
Request
Start Line: 方法 地址 协议
Headers: key:value
1> GET / HTTP/1.1  # ... Start Line
2# ... Headers
3> Host: www.baidu.com
4> User-Agent: curl/7.55.1
5> Accept: */*
6>
Response
Start Line: 协议 状态码 具体解释
Headers: key:value
1< HTTP/1.1 200 OK # ... Start Line
2# ... Headers
3< Accept-Ranges: bytes
4< Cache-Control: private, no-cache, no-store, proxy-revalidate, no-transform
5< Connection: Keep-Alive
6< Content-Length: 2381
7< Content-Type: text/html
8< Date: Sun, 17 Feb 2019 11:18:49 GMT
9< Etag: "588604d8-94d"
10< Last-Modified: Mon, 23 Jan 2017 13:27:52 GMT
11< Pragma: no-cache
12< Server: bfe/1.0.8.18
13< Set-Cookie: BDORZ=27315; max-age=86400; domain=.baidu.com; path=/
14<
Message Body
打开刚才的tmp.txt文件,html代码已经格式化:
1<!DOCTYPE html> 2<!--STATUS OK--> 3<html> 4 <head> 5 <meta http-equiv="content-type" content="text/html;charset=utf-8" /> 6 <meta http-equiv="X-UA-Compatible" content="IE=Edge" /> 7 <meta content="always" name="referrer" /> 8 <link rel="stylesheet" type="text/css" href="http://s1.bdstatic.com/r/www/cache/bdorz/baidu.min.css" /> 9 <title>百度一下,你就知道</title> 10 </head> 11 <body link="#0000cc"> 12 <div id="wrapper"> 13 <div id="head"> 14 <div class="head_wrapper"> 15 <div class="s_form"> 16 <div class="s_form_wrapper"> 17 <div id="lg"> 18 <img hidefocus="true" src="//www.baidu.com/img/bd_logo1.png" width="270" height="129" /> 19 </div> 20 <form id="form" name="f" action="//www.baidu.com/s" class="fm"> 21 <input type="hidden" name="bdorz_come" value="1" /> 22 <input type="hidden" name="ie" value="utf-8" /> 23 <input type="hidden" name="f" value="8" /> 24 <input type="hidden" name="rsv_bp" value="1" /> 25 <input type="hidden" name="rsv_idx" value="1" /> 26 <input type="hidden" name="tn" value="baidu" /> 27 <span class="bg s_ipt_wr"><input id="kw" name="wd" class="s_ipt" value="" maxlength="255" autocomplete="off" autofocus="" /></span> 28 <span class="bg s_btn_wr"><input type="submit" id="su" value="百度一下" class="bg s_btn" /></span> 29 </form> 30 </div> 31 </div> 32 <div id="u1"> 33 <a href="http://news.baidu.com" name="tj_trnews" class="mnav">新闻</a> 34 <a href="http://www.hao123.com" name="tj_trhao123" class="mnav">hao123</a> 35 <a href="http://map.baidu.com" name="tj_trmap" class="mnav">地图</a> 36 <a href="http://v.baidu.com" name="tj_trvideo" class="mnav">视频</a> 37 <a href="http://tieba.baidu.com" name="tj_trtieba" class="mnav">贴吧</a> 38 <noscript> 39 <a href="http://www.baidu.com/bdorz/login.gif?login&tpl=mn&u=http%3A%2F%2Fwww.baidu.com%2f%3fbdorz_come%3d1" name="tj_login" class="lb">登录</a> 40 </noscript> 41 <script>document.write('<a href="http://www.baidu.com/bdorz/login.gif?login&tpl=mn&u='+ encodeURIComponent(window.location.href+ (window.location.search === "" ? "?" : "&")+ "bdorz_come=1")+ '" name="tj_login" class="lb">登录</a>');</script> 42 <a href="//www.baidu.com/more/" name="tj_briicon" class="bri" style="display: block;">更多产品</a> 43 </div> 44 </div> 45 </div> 46 <div id="ftCon"> 47 <div id="ftConw"> 48 <p id="lh"> <a href="http://home.baidu.com">关于百度</a> <a href="http://ir.baidu.com">About Baidu</a> </p> 49 <p id="cp">©2017 Baidu <a href="http://www.baidu.com/duty/">使用百度前必读</a> <a href="http://jianyi.baidu.com/" class="cp-feedback">意见反馈</a> 京ICP证030173号 <img src="//www.baidu.com/img/gs.gif" /> </p> 50 </div> 51 </div> 52 </div> 53 </body> 54</html>
本地服务端
http://httpbin.org/ 是Requests作者自己写的服务端,这个网站能测试HTTP请求和响应的各种信息,比如cookie、ip、headers和登录验证等,且支持GET、POST等多种方法,对web开发和测试很有帮助。它用Python+Flask编写,是一个开源项目2。
注意:
Will it work with windows? - No.3
由于windows平台不支持gunicorn,gunicorn安装成功后,启动会出现ModuleNotFoundError: No module named 'fcntl'。
本地启动服务端程序,注意重新开一个concle。Linux下部署:
1$ pip3 install httpbin
2$ pip3 install gunicorn
3
4# 启动服务
5$ gunicorn -b :80 httpbin:app
启动之后可以看到
1root@xxx:~# gunicorn -b :80 httpbin:app
2[2019-02-19 10:29:26 +0800] [5110] [INFO] Starting gunicorn 19.9.0
3[2019-02-19 10:29:26 +0800] [5110] [INFO] Listening at: http://0.0.0.0:80 (5110)
4[2019-02-19 10:29:26 +0800] [5110] [INFO] Using worker: sync
5[2019-02-19 10:29:26 +0800] [5114] [INFO] Booting worker with pid: 5114
然后访问就行了,这里将ip和域名进行了映射:

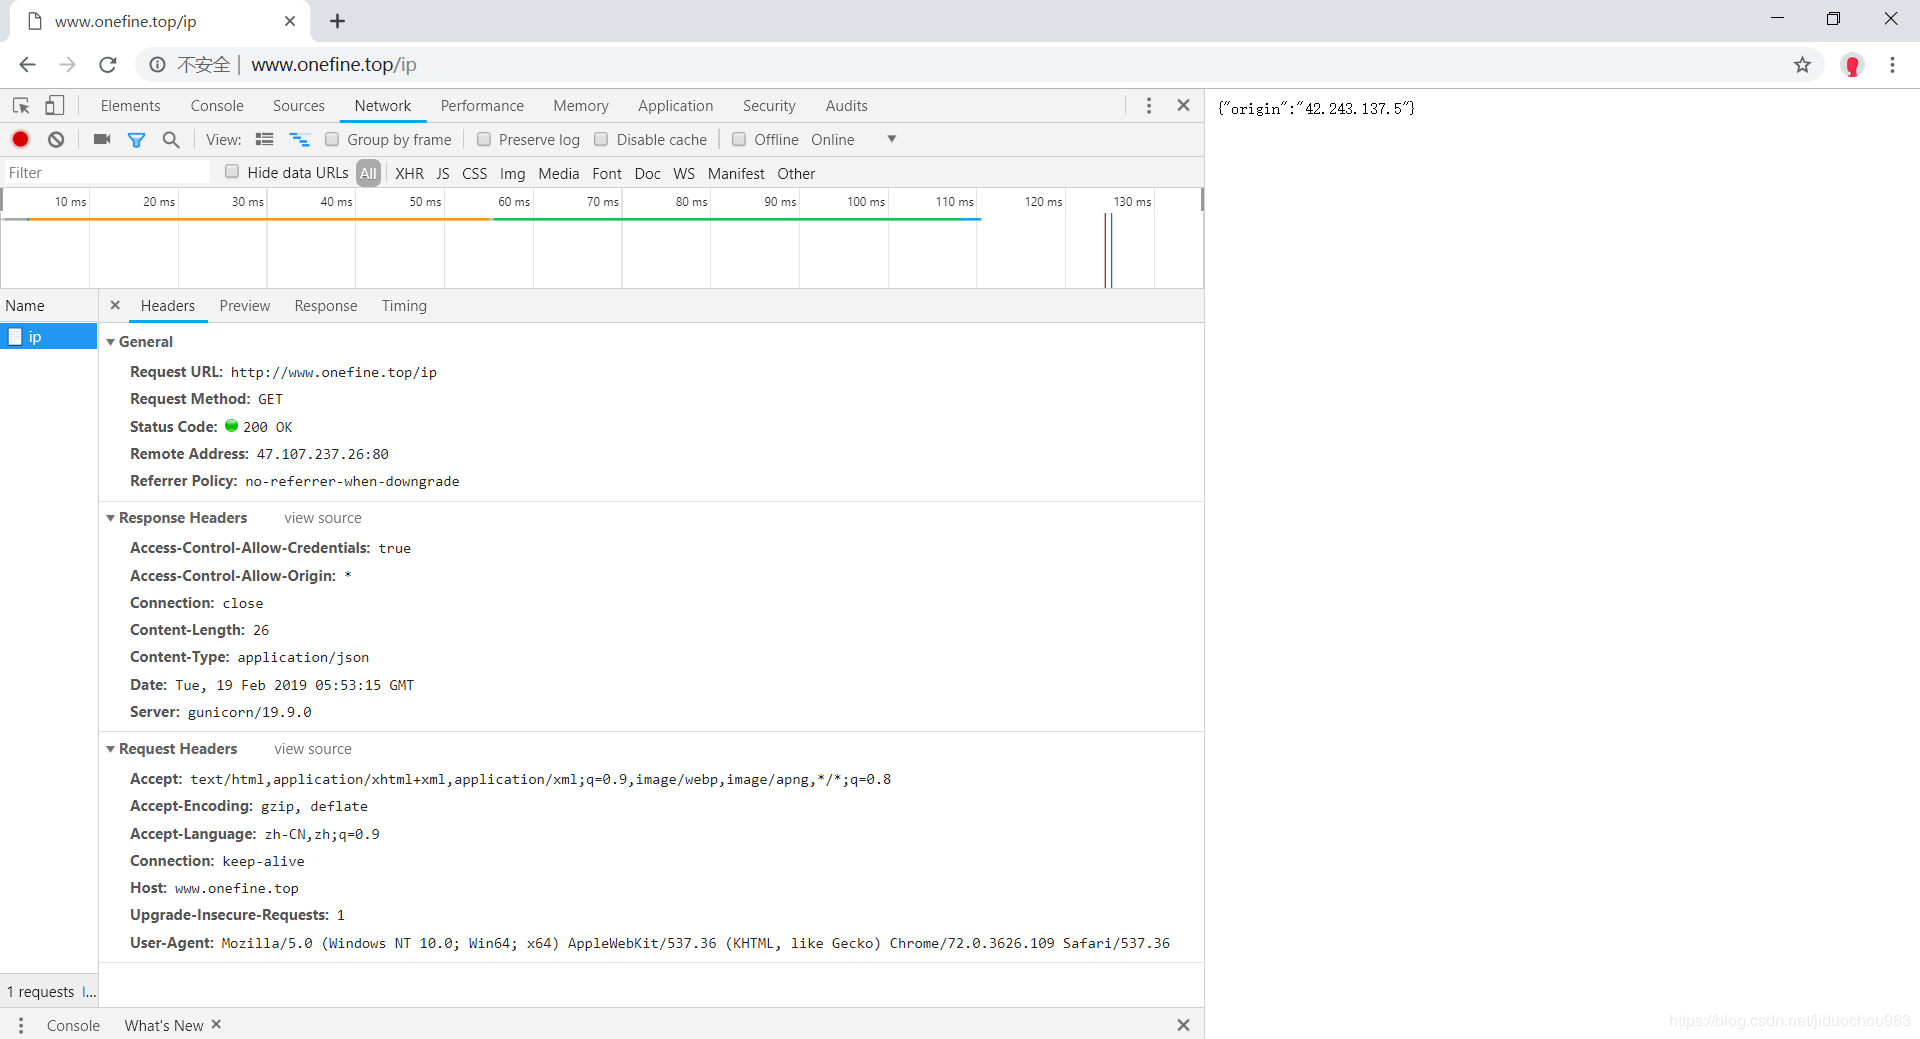
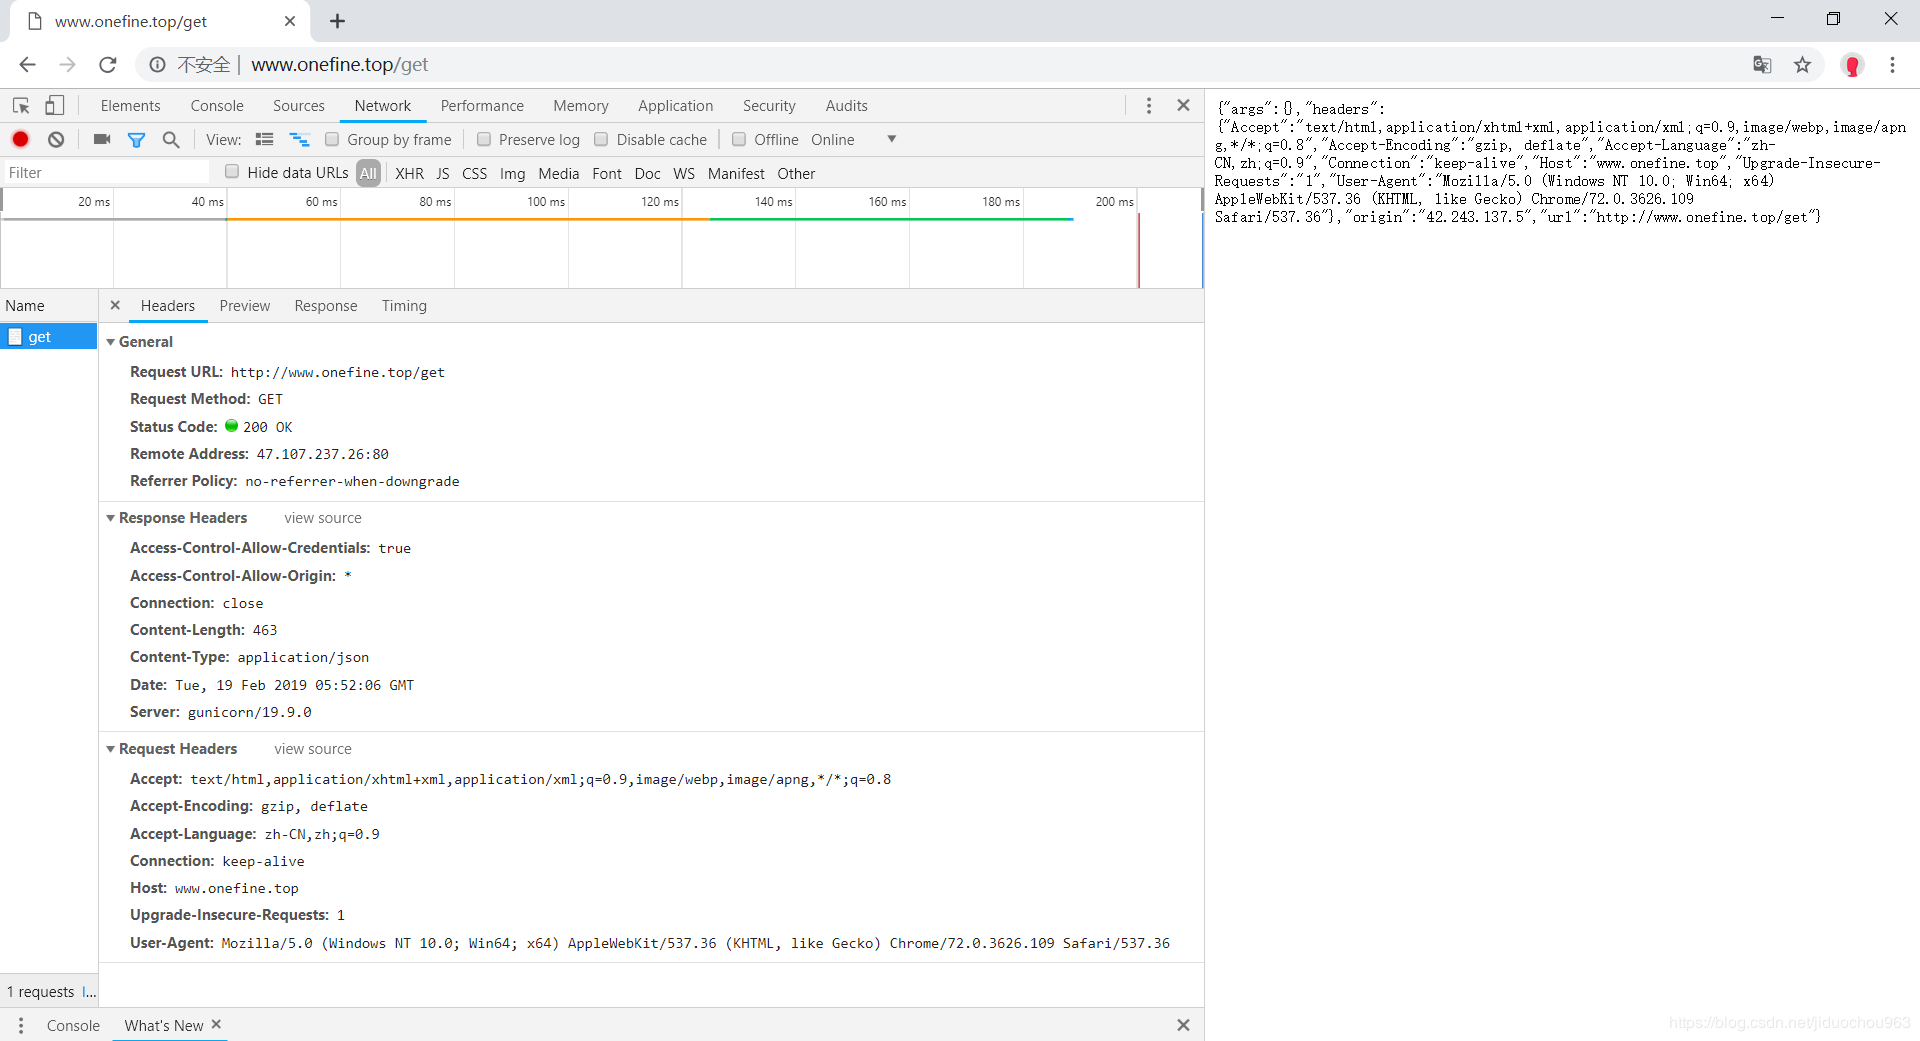
安装到本地后能加快访问速度,更高效帮助我们本地做测试。
1、使用urllib系列4
这里只做简单的介绍。
urllib,urllib2,urllib3是进化关系吗?
- urllib和urllib2是相互独立的模块(Python2.x中),Python3.x将两个模块进行了整合,整合之后的模块为urllib。
- urllib3提供线程安全连接池和文件post等支持,与urllib及urllib2的关系不大。
- requests库使用了urllib3,这样的好处是多次请求使用同一个socket。
注:这里在Python2.7环境
1# -*- coding: utf-8 -*-
2import urllib
3import urllib2
4
5URL_IP = 'http://www.onefine.top/ip'
6URL_GET = 'http://www.onefine.top/get'
7
8
9def use_simple_urllib2():
10    response = urllib2.urlopen(URL_IP)
11    print '>>>>Response Headers:'
12    print response.info()  # 读取headers
13    print '>>>>Response body:'
14    print ''.join([line for line in response.readlines()])  # 读取body
15
16
17def use_params_urllib2():
18    # GET请求,构建请求参数
19    params = urllib.urlencode({'param1': 'hello', 'param2': 'world'})
20    print '>>>Request params:'
21    print params
22    # 发送请求
23    response = urllib2.urlopen('?'.join([URL_GET, '%s']) % params)
24    # 处理响应
25    print '>>>>Response Headers:'
26    print response.info()
27    print '>>>>Status Code:'
28    print response.getcode()
29    print '>>>>Request body:'
30    print ''.join([line for line in response.readlines()])
31
32
33if __name__ == '__main__':
34    print '>>>Use simple urllib2:'
35    use_simple_urllib2()
36    print ''
37    print '>>>Use params urllib2:'
38    use_params_urllib2()
执行结果:
1>>>Use simple urllib2: 2>>>>Response Headers: 3Server: gunicorn/19.9.0 4Date: Tue, 19 Feb 2019 05:28:11 GMT 5Connection: close 6Content-Type: application/json 7Content-Length: 26 8Access-Control-Allow-Origin: * 9Access-Control-Allow-Credentials: true 10 11>>>>Response body: 12{"origin":"42.243.137.5"} 13 14 15>>>Use params urllib2: 16>>>Request params: 17param2=world¶m1=hello 18>>>>Response Headers: 19Server: gunicorn/19.9.0 20Date: Tue, 19 Feb 2019 05:28:11 GMT 21Connection: close 22Content-Type: application/json 23Content-Length: 250 24Access-Control-Allow-Origin: * 25Access-Control-Allow-Credentials: true 26 27>>>>Status Code: 28200 29>>>>Request body: 30{"args":{"param1":"hello","param2":"world"},"headers":{"Accept-Encoding":"identity","Connection":"close","Host":"www.onefine.top","User-Agent":"Python-urllib/2.7"},"origin":"42.243.137.5","url":"http://www.onefine.top/get?param2=world¶m1=hello"}
2、使用requests
这里回到Python3.x环境:
1# -*- coding: utf-8 -*-
2
3import requests
4
5URL_IP = 'http://www.onefine.top/ip'
6URL_GET = 'http://www.onefine.top/get'
7
8
9def use_simple_requests():
10    # get/post/options/put/delete
11    response = requests.get(URL_IP)
12    print('>>>>Response Headers:')
13    print(response.headers)
14    print('>>>>Response body:')
15    print(response.text) # 不需考虑编码等问题
16
17
18def use_params_requests():
19    params = {'param1': 'hello', 'param2': 'world'}
20    response = requests.get(URL_GET, params=params)
21    print('>>>>Response Headers:')
22    print(response.headers)
23    print('>>>>Status Code:')
24    print(response.status_code)
25    print('>>>>Reason:')
26    print(response.reason)
27    print('>>>>Request body:')
28    print(response.text)
29
30
31if __name__ == '__main__':
32    print('>>>Use simple requests:')
33    use_simple_requests()
34    print('')
35    print('>>>Use params requests:')
36    use_params_requests()
执行结果为:
1>>>Use simple requests: 2>>>>Response Headers: 3{'Server': 'gunicorn/19.9.0', 'Date': 'Tue, 19 Feb 2019 05:38:00 GMT', 'Connection': 'close', 'Content-Type': 'application/json', 'Content-Length': '26', 'Access-Control-Allow-Origin': '*', 'Access-Control-Allow-Credentials': 'true'} 4>>>>Response body: 5{"origin":"42.243.137.5"} 6 7 8>>>Use params requests: 9>>>>Response Headers: 10{'Server': 'gunicorn/19.9.0', 'Date': 'Tue, 19 Feb 2019 05:38:00 GMT', 'Connection': 'close', 'Content-Type': 'application/json', 'Content-Length': '280', 'Access-Control-Allow-Origin': '*', 'Access-Control-Allow-Credentials': 'true'} 11>>>>Status Code: 12200 13>>>>Reason: 14OK 15>>>>Request body: 16{"args":{"param1":"hello","param2":"world"},"headers":{"Accept":"*/*","Accept-Encoding":"gzip, deflate","Connection":"keep-alive","Host":"www.onefine.top","User-Agent":"python-requests/2.21.0"},"origin":"42.243.137.5","url":"http://www.onefine.top/get?param1=hello¶m2=world"}
我们对比一下使用urllib和requests的demo的响应头:
1# urllib
2"headers": {
3    "Accept-Encoding": "identity",
4    "Connection": "close",
5    "Host": "www.onefine.top",
6    "User-Agent": "Python-urllib/2.7"
7},
8
9# requests
10"headers": {
11    "Accept": "*/*",
12    "Accept-Encoding": "gzip, deflate",
13    "Connection": "keep-alive",
14    "Host": "www.onefine.top",
15    "User-Agent": "python-requests/2.21.0"
16},
requests库有urllib3的支持,所以将connection状态置为keep-alive,多次请求使用一个连接,消耗更小的资源。
参考:
python中urllib, urllib2,urllib3, httplib,httplib2, request的区别 http://www.cnblogs.com/arxive/p/6194368.html
Python网络请求urllib和urllib3详解 https://www.jianshu.com/p/f05d33475c78
guicorn 是什么 https://www.cnblogs.com/ifkite/p/5460328.html
Linux curl命令详解 https://www.cnblogs.com/duhuo/p/5695256.html
curl 的使用 https://www.jianshu.com/p/f05bbd5007d9
-
Request类库官方文档 ↩︎
-
关于urllib的更多介绍,请参阅: https://blog.csdn.net/jiduochou963/article/details/87564467 ↩︎