一、OAuth 2 介绍
1、什么是 OAuth 2?
- OAuth 是一个开放标准,该标准允许用户让第三方应用访问该用户在某一网站上存储的私密资源(如头像、照片、视频等),而在这个过程中无须将用户名和密码提供给第三方应用。实现这一功能是通过提供一个令牌(token),而不是用户名和密码来访问他们存放在特定服务提供者的数据。
- 每一个令牌授权一个特定的网站在特定的时段内访问特定的资源。这样,OAuth 让用户可以授权第三方网站灵活地访问存储在另外一些资源服务器的特定信息,而非所有内容。目前主流的 qq,微信等第三方授权登录方式都是基于 OAuth2 实现的。
- OAuth 2 是 OAuth 协议的下一版本,但不向下兼容 OAuth 1.0。OAuth 2 关注客户端开发者的简易性,同时为 Web 应用、桌面应用、移动设备、起居室设备提供专门的认证流程。
- 传统的 Web 开发登录认证一般都是基于 Session 的,但是在前后端分离的架构中继续使用 Session 会有许多不便,因为移动端(Android、iOS、微信小程序等)要么不支持Cookie(微信小程序),要么使用非常不便,对于这些问题,使用 OAuth 2 认证都能解决。
2、OAuth 2 角色
OAuth 2 标准中定义了以下几种角色:
- 资源所有者(Resource Owner):即代表授权客户端访问本身资源信息的用户,客户端访问用户帐户的权限仅限于用户授权的“范围”。
- 客户端(Client):即代表意图访问受限资源的第三方应用。在访问实现之前,它必须先经过用户者授权,并且获得的授权凭证将进一步由授权服务器进行验证。
- 授权服务器(Authorization Server):授权服务器用来验证用户提供的信息是否正确,并返回一个令牌给第三方应用。
- 资源服务器(Resource Server):资源服务器是提供给用户资源的服务器,例如头像、照片、视频等。
注意:一般来说,授权服务器和资源服务器可以是同一台服务器。
3、OAuth 2 授权流程
下面是 OAuth 2 一个大致的授权流程图:
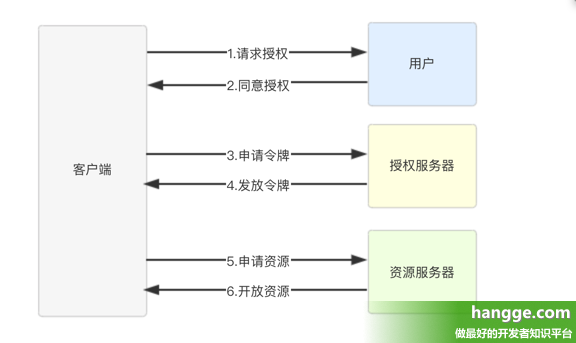
- 步骤1:客户端(第三方应用)向用户请求授权。
- 步骤2:用户单击客户端所呈现的服务授权页面上的同意授权按钮后,服务端返回一个授权许可凭证给客户端。
- 步骤3:客户端拿着授权许可凭证去授权服务器申请令牌。
- 步骤4:授权服务器验证信息无误后,发放令牌给客户端。
- 步骤5:客户端拿着令牌去资源服务器访问资源。
- 步骤6:资源服务器验证令牌无误后开放资源。
4、OAuth 2 授权模式
OAuth 协议的授权模式共分为 4 种,分别说明如下:
- 授权码模式:授权码模式(authorization code)是功能最完整、流程最严谨的授权模式。它的特点就是通过客户端的服务器与授权服务器进行交互,国内常见的第三方平台登录功能基本 都是使用这种模式。
- 简化模式:简化模式不需要客户端服务器参与,直接在浏览器中向授权服务器中请令牌,一般若网站是纯静态页面,则可以采用这种方式。
- 密码模式:密码模式是用户把用户名密码直接告诉客户端,客户端使用这些信息向授权服务器中请令牌。这需要用户对客户端高度信任,例如客户端应用和服务提供商是同一家公司。
- 客户端模式:客户端模式是指客户端使用自己的名义而不是用户的名义向服务提供者申请授权。严格来说,客户端模式并不能算作 OAuth 协议要解决的问题的一种解决方案,但是,对于开发者而言,在一些前后端分离应用或者为移动端提供的认证授权服务器上使用这种模式还是非常方便的。
二、使用样例
由于本样例演示的是如何在前后端分离应用(或者为移动端、微信小程序等)提供的认证服务器中如何搭建 OAuth 服务,因此主要介绍密码模式。
1、添加依赖
由于 Spring Boot 中的 OAuth 协议是在 Spring Security 基础上完成的。因此首先编辑 pom.xml,添加 Spring Security 以及 OAuth 依赖。
1<dependency>
2    <groupId>org.springframework.boot</groupId>
3    <artifactId>spring-boot-starter-security</artifactId>
4</dependency>
5<dependency>
6    <groupId>org.springframework.security.oauth</groupId>
7    <artifactId>spring-security-oauth2</artifactId>
8    <version>2.3.3.RELEASE</version>
9</dependency>
2、配置授权服务器
授权服务器和资源服务器可以是同一台服务器,也可以是不同服务器,本案例中假设是同一台服务器,通过不同的配置开启授权服务器和资源服务器。
下面是授权服务器配置代码。创建一个自定义类继承自 AuthorizationServerConfigurerAdapter,完成对授权服务器的配置,然后通@EnableAuthorizationServer 注解开启授权服务器:
注意:authorizedGrantTypes("password", "refresh_token") 表示 OAuth 2 中的授权模式为“password”和“refresh_token”两种。在标准的 OAuth 2 协议中,授权模式并不包括“refresh_token”,但是在 Spring Security 的实现中将其归为一种,因此如果需要实现 access_token 的刷新,就需要这样一种授权模式。
1@Configuration
2@EnableAuthorizationServer
3public class AuthorizationServerConfig extends AuthorizationServerConfigurerAdapter {
4
5    // 该对象用来支持 password 模式
6    @Autowired
7    AuthenticationManager authenticationManager;
8
9    // 该对象用来将令牌信息存储到内存中
10    @Autowired(required = false)
11    TokenStore inMemoryTokenStore;
12
13    // 该对象将为刷新token提供支持
14    @Autowired
15    UserDetailsService userDetailsService;
16
17    // 指定密码的加密方式
18    @Bean
19    PasswordEncoder passwordEncoder() {
20        // 使用BCrypt强哈希函数加密方案(密钥迭代次数默认为10)
21        return new BCryptPasswordEncoder();
22    }
23
24    // 配置 password 授权模式
25    @Override
26    public void configure(ClientDetailsServiceConfigurer clients)
27            throws Exception {
28        clients.inMemory()
29            .withClient("password")
30            .authorizedGrantTypes("password", "refresh_token") //授权模式为password和refresh_token两种
31            .accessTokenValiditySeconds(1800) // 配置access_token的过期时间
32            .resourceIds("rid") //配置资源id
33            .scopes("all")
34            .secret("$2a$10$RMuFXGQ5AtH4wOvkUqyvuecpqUSeoxZYqilXzbz50dceRsga.WYiq"); //123加密后的密码
35    }
36
37    @Override
38    public void configure(AuthorizationServerEndpointsConfigurer endpoints) {
39        endpoints.tokenStore(inMemoryTokenStore) //配置令牌的存储(这里存放在内存中)
40                .authenticationManager(authenticationManager)
41                .userDetailsService(userDetailsService);
42    }
43
44    @Override
45    public void configure(AuthorizationServerSecurityConfigurer security) {
46        // 表示支持 client_id 和 client_secret 做登录认证
47        security.allowFormAuthenticationForClients();
48    }
49}
3、配置资源服务器
接下来配置资源服务器。自定义类继承自 ResourceServerConfigurerAdapter,并添加 @EnableResourceServer 注解开启资源服务器配置。
1@Configuration
2@EnableResourceServer
3public class ResourceServerConfig extends ResourceServerConfigurerAdapter {
4
5    @Override
6    public void configure(ResourceServerSecurityConfigurer resources) {
7
8        resources.resourceId("rid") // 配置资源id,这里的资源id和授权服务器中的资源id一致
9                .stateless(true); // 设置这些资源仅基于令牌认证
10    }
11
12    // 配置 URL 访问权限
13    @Override
14    public void configure(HttpSecurity http) throws Exception {
15        http.authorizeRequests()
16                .antMatchers("/admin/**").hasRole("admin")
17                .antMatchers("/user/**").hasRole("user")
18                .anyRequest().authenticated();
19    }
20}
4、配置 Security
这里 Spring Security 的配置与传统的 Security 大体相同,不同在于:
- 这里多了两个 Bean,这两个 Bean 将注入授权服务器配置类中使用。
- 另外,这里的 HttpSecurity 配置主要是配置“oauth/**”模式的 URL,这一类的请求直接放行。
注意:在这个 Spring Security 配置和上面的资源服务器配置中,都涉及到了 HttpSecurity。其中 Spring Security 中的配置优先级高于资源服务器中的配置,即请求地址先经过 Spring Security 的 HttpSecurity,再经过资源服务器的 HttpSecurity。
1@Configuration
2public class WebSecurityConfig extends WebSecurityConfigurerAdapter {
3    @Bean
4    @Override
5    public AuthenticationManager authenticationManagerBean() throws Exception {
6        return super.authenticationManagerBean();
7    }
8
9    @Bean
10    @Override
11    protected UserDetailsService userDetailsService() {
12
13        return super.userDetailsService();
14    }
15
16    @Override
17    protected void configure(AuthenticationManagerBuilder auth) throws Exception {
18        auth.inMemoryAuthentication()
19                .withUser("admin")
20                .password("$2a$10$RMuFXGQ5AtH4wOvkUqyvuecpqUSeoxZYqilXzbz50dceRsga.WYiq") //123
21                .roles("admin")
22                .and()
23                .withUser("sang")
24                .password("$2a$10$RMuFXGQ5AtH4wOvkUqyvuecpqUSeoxZYqilXzbz50dceRsga.WYiq") //123
25                .roles("user");
26    }
27
28    @Override
29    protected void configure(HttpSecurity http) throws Exception {
30        http.antMatcher("/oauth/**").authorizeRequests()
31                .antMatchers("/oauth/**").permitAll()
32                .and().csrf().disable();
33    }
34}
5、添加测试接口
接着在 Conctoller 中添加如下三个接口用于测试,它们分别需要 admin 角色、use 角色以及登录后访问。
1@RestController
2public class HelloController {
3
4    @GetMapping("/admin/hello")
5    public String admin() {
6        return "hello admin";
7    }
8
9    @GetMapping("/user/hello")
10    public String user() {
11        return "hello user";
12    }
13
14    @GetMapping("/hello")
15    public String hello() {
16        return "hello";
17    }
18}
6、开始测试
(1)启动项目,首先通过 POST 请求获取 token:
- 请求地址:oauth/token
- 请求参数:用户名、密码、授权模式、客户端 id、scope、以及客户端密码
- 返回结果:access_token 表示获取其它资源是要用的令牌,refresh_token 用来刷新令牌,expires_in 表示 access_token 过期时间。

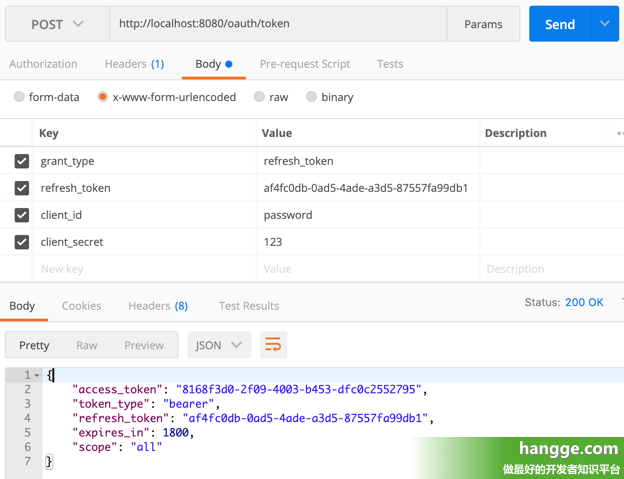
(2)当 access_token 过期后,可以使用 refresh_token 重新获取新的 access_token(前提是 access_token 未过期),这里也是 POST 请求:
- 请求地址:oauth/token(不变)
- 请求参数:授权模式(变成了 refresh_token)、refresh_token、客户端 id、以及客户端密码
- 返回结果:与获取前面登录获取 token 返回的内容项一样。不过每次请求,access_token 和 access_token有效期都会变化。
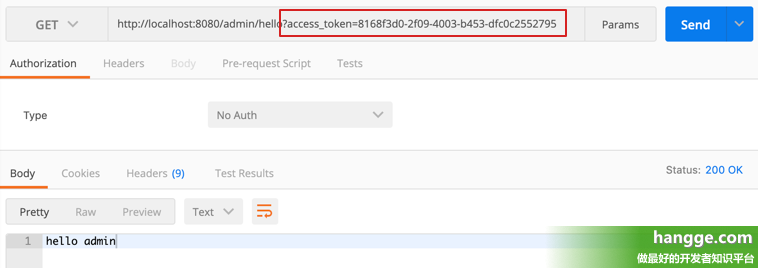
(3)访问资源时,我们只需要携带上 access_token 参数即可:
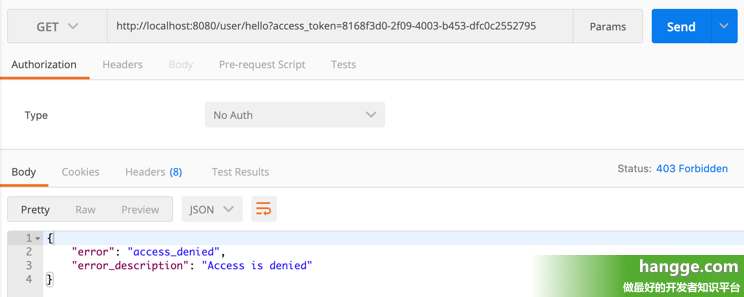
(4)如果非法访问一个资源,比如 admin 用户访问“user/hello”接口,结果如下:
附:将令牌保存到 Redis 缓存服务器上
在上面的样例中,令牌(Access Token)是存储在内存中,这种方式在单服务上可以体现出很好特效(即并发量不大,并且它在失败的时候不会进行备份)
我们也可以将令牌保存到数据库或者 Redis 缓存服务器上。使用这中方式,可以在多个服务之间实现令牌共享。下面我通过样例演示如何将令牌存储在 Redis 缓存服务器上,同时 Redis 具有过期等功能,很适合令牌的存储。
1、增加依赖
(1)首先编辑 pom.xml 文件,在前面的基础上增加 Redis 相关依赖:
1<!-- spring security OAuth2 相关  -->
2<dependency>
3    <groupId>org.springframework.boot</groupId>
4    <artifactId>spring-boot-starter-security</artifactId>
5</dependency>
6<dependency>
7    <groupId>org.springframework.security.oauth</groupId>
8    <artifactId>spring-security-oauth2</artifactId>
9    <version>2.3.3.RELEASE</version>
10</dependency>
11
12<!-- redis  -->
13<dependency>
14    <groupId>org.springframework.boot</groupId>
15    <artifactId>spring-boot-starter-data-redis</artifactId>
16    <exclusions>
17        <exclusion>
18            <groupId>io.lettuce</groupId>
19            <artifactId>lettuce-core</artifactId>
20        </exclusion>
21    </exclusions>
22</dependency>
23<dependency>
24    <groupId>redis.clients</groupId>
25    <artifactId>jedis</artifactId>
26</dependency>
(2)接着在 application.properties 中配置 Redis 连接信息:
1# 基本连接信息配置
2spring.redis.database=0
3spring.redis.host=192.168.60.133
4spring.redis.port=6379
5spring.redis.password=123
6# 连接池信息配置
7spring.redis.jedis.pool.max-active=8
8spring.redis.jedis.pool.max-idle=8
9spring.redis.jedis.pool.max-wait=-1ms
10spring.redis.jedis.pool.min-idle=0
2、修改授权服务器配置
最后我们修改授权服务器配置 AuthorizationServerConfig 中令牌保存相关代码,将其改成保存到 Redis 上即可。
1@Configuration
2@EnableAuthorizationServer
3public class AuthorizationServerConfig extends AuthorizationServerConfigurerAdapter {
4
5    // 该对象用来支持 password 模式
6    @Autowired
7    AuthenticationManager authenticationManager;
8
9    // 该对象用来将令牌信息存储到Redis中
10    @Autowired
11    RedisConnectionFactory redisConnectionFactory;
12
13    // 该对象将为刷新token提供支持
14    @Autowired
15    UserDetailsService userDetailsService;
16
17    // 指定密码的加密方式
18    @Bean
19    PasswordEncoder passwordEncoder() {
20        // 使用BCrypt强哈希函数加密方案(密钥迭代次数默认为10)
21        return new BCryptPasswordEncoder();
22    }
23
24    // 配置 password 授权模式
25    @Override
26    public void configure(ClientDetailsServiceConfigurer clients)
27            throws Exception {
28        clients.inMemory()
29            .withClient("password")
30            .authorizedGrantTypes("password", "refresh_token") //授权模式为password和refresh_token两种
31            .accessTokenValiditySeconds(1800) // 配置access_token的过期时间
32            .resourceIds("rid") //配置资源id
33            .scopes("all")
34            .secret("$2a$10$RMuFXGQ5AtH4wOvkUqyvuecpqUSeoxZYqilXzbz50dceRsga.WYiq"); //123加密后的密码
35    }
36
37    @Override
38    public void configure(AuthorizationServerEndpointsConfigurer endpoints) {
39        endpoints.tokenStore(new RedisTokenStore(redisConnectionFactory)) //配置令牌存放在Redis中
40                .authenticationManager(authenticationManager)
41                .userDetailsService(userDetailsService);
42    }
43
44    @Override
45    public void configure(AuthorizationServerSecurityConfigurer security) {
46        // 表示支持 client_id 和 client_secret 做登录认证
47        security.allowFormAuthenticationForClients();
48    }
49}
3、运行测试
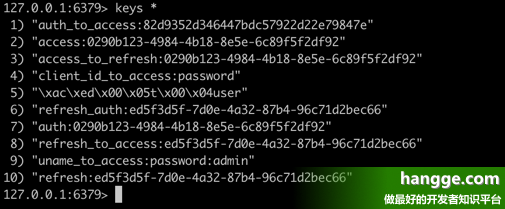
启动项目,再次通过 /oauth/token 接口获取令牌。然后查看下 Redis 中的数据,可以发现令牌确实以及保存在 Redis 上了: