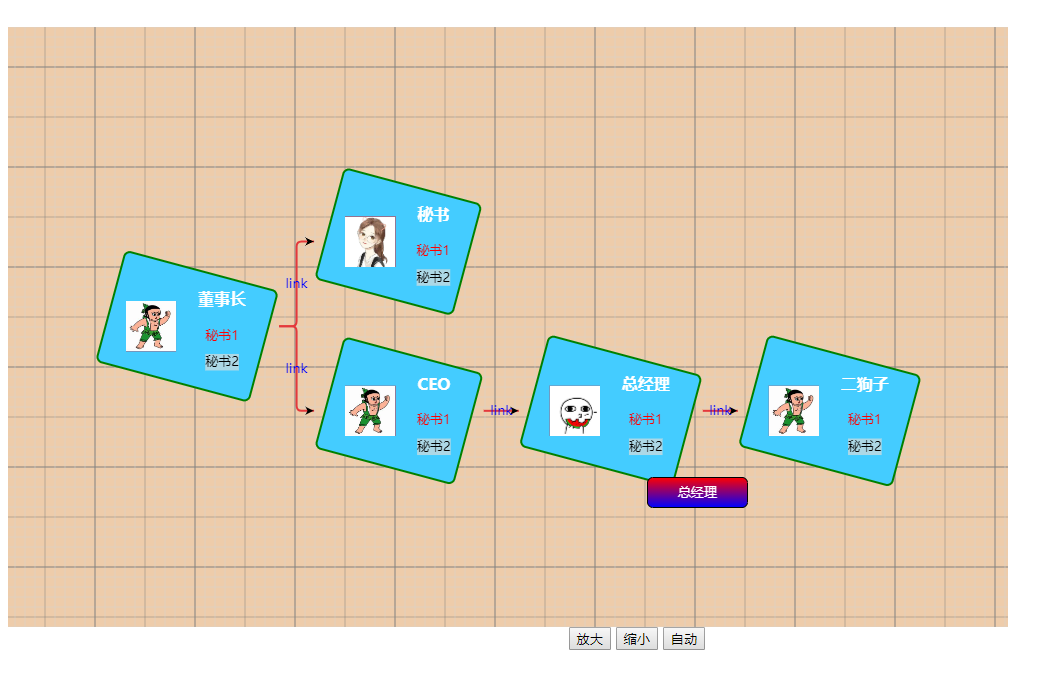
在vue项目中需要展示工作流进度,可以使用的流程图插件很多
-
flowchart.js http://adrai.github.io/flowchart.js/ , 基于SVG创建Flow Chart
-
go.js http://www.gojs.net/latest/index.html go.js 提供一整套的JS工具 ,支持各种交互式图表的创建。有免费版和收费版
-
joint.js http://www.jointjs.com/ joint.js 是另一个创建图标库的工具,也提供免费版和商业版
-
jsPlumb http://www.jsplumb.org/ jsPlumb是一套开源的流程图创建工具 ,小巧精悍,使用简单
-
d3 http://d3js.org 在html5领域,d3可谓是最好的可视化基础库,提供方面的DOM操作,非常强大
最终选用了gojs,API文档介绍的很细致,在vue项目中使用也比较方便,一下只是哥简单的学习示例。
API文档地址:https://gojs.net/latest/intro/sizedGroups.html
一、引入gojs
npm install gojs --save
import go from'gojs'//引入gojs
二、开始使用
在mounted中调用gojs,以为在vue实例挂载完成后才可以拿到容器元素
模板如下:
1<template>
2  <div class="goDemo">
3    <div id="mygoChart" style="width:1000px; height:600px; background-color: #ECA;"></div>
4    <button @click="toBig">放大</button>
5    <button @click="toSmall">缩小</button>
6    <button @click="toFilt">自动</button>
7  </div>
8</template>
mounted钩子函数如下:
1mounted(){
2    var mySelf = this;
3    const MAKE = go.GraphObject.make;
4      mySelf.myDiagram  = MAKE(go.Diagram, "mygoChart",{
5      initialContentAlignment: go.Spot.Center, // 居中显示
6      "undoManager.isEnabled": true ,// 支持 Ctrl-Z 和 Ctrl-Y 操作
7      "toolManager.hoverDelay": 100,//tooltip提示显示延时
8      "toolManager.toolTipDuration": 10000,//tooltip持续显示时间
9      //isReadOnly:true,//只读
10      "grid.visible":true,//显示网格
11      allowMove:true,//允许拖动
12      // allowDragOut:true,
13      allowDelete:false,
14      allowCopy:false,
15      allowClipboard:false,
16      "toolManager.mouseWheelBehavior": go.ToolManager.WheelZoom,//有鼠标滚轮事件放大和缩小,而不是向上和向下滚动
17      layout:MAKE(go.TreeLayout,{
18        angle: 0,
19        layerSpacing: 35
20        })
21      });//构建gojs对象
22      console.log(mySelf.myDiagram);
23      mySelf.myDiagram.addDiagramListener("ObjectSingleClicked",function (e) {
24        debugger
25        console.log(e.subject.part);
26
27      });
28
29      mySelf.myDiagram.addDiagramListener("BackgroundSingleClicked",function (e) {
30        debugger
31        console.log("Double-clicked at" + e.diagram.lastInput.documentPoint);
32      });
33
34      mySelf.myDiagram.addDiagramListener("ClipboardPasted",function (e) {
35        debugger
36        console.log("Pasted" + e.diagram.selection.count + "parts");
37      });
38
39    // define a simple Node template
40    // 定义个简单的 Node 模板
41    mySelf.myDiagram.nodeTemplate =
42      MAKE(go.Node,
43      new go.Binding("location", "loc", go.Point.parse),
44      MAKE(go.Shape, "RoundedRectangle", { fill: "#44CCFF",stroke: 'green',strokeWidth:2,angle:15 }),
45      "Auto",//Vertical,Auto,Horizontal
46        // 为整个Node背景设置为浅蓝色
47        // { background: "#44CCFF" },
48
49        // MAKE(go.Picture,
50        //   // Pictures 应该指定宽高.
51        //   // 当没有图片时显示红色的背景
52        //   // 或者当图片为透明的时候也是.
53        //   { source:"../assets/img/01.png",margin: 10, width: 50, height: 50, background: "red" },
54        //   // Picture.source参数值与模型数据中的"source"字段绑定
55        //   new go.Binding("source")),
56        // MAKE(go.TextBlock,
57        //   "Default Text",  // 初始化默认文本
58        //   // 文字周围的空隙, 大号字体, 白色笔画:
59        //   { margin: 12, stroke: "white", font: "bold 16px sans-serif",
60        //     width:75,
61        //     wrap: go.TextBlock.WrapDesiredSize
62        //   },
63        //   // TextBlock.text参数值与模型数据中的"name"字段绑定
64        //   new go.Binding("text", "name1")),
65          MAKE(go.Panel, "Horizontal",{padding:5},
66            MAKE(go.Panel, "Vertical",
67              MAKE(go.Picture,
68                { margin: 10, width: 50, height: 50, background: "red" },
69                new go.Binding("source","img")
70              )
71            ),
72            MAKE(go.Panel, "Vertical",
73              MAKE(go.TextBlock, "Default Text", {margin: 12, stroke: "white", font: "bold 16px sans-serif",},new go.Binding("text", "name1")),
74              MAKE(go.TextBlock, { stroke: "red" },{margin: 5},new go.Binding("text", "name2")),
75              MAKE(go.TextBlock, { background: "lightblue" },{margin: 5,},new go.Binding("text", "name3")),
76            ),
77          ),
78          {
79            mouseEnter:function(e,node,prev){
80              console.log('mouseEnter');
81            },
82            mouseLeave:function(e,node,prev){
83              mySelf.detailShow = false;
84            },
85          },
86          {
87            toolTip:MAKE(go.Adornment, "Spot",
88              //{background:"transparent" },
89              MAKE(go.Shape,"RoundedRectangle", {
90                // fill: "blue" ,
91                  height:30,
92                  fill: MAKE(go.Brush, "Linear", { 0.0: "blue", 1.0: "red", start: go.Spot.Bottom, end: go.Spot.Top })
93                }),
94              MAKE(go.TextBlock,
95              //{alignment:go.Spot.Top,alignmentFocus:go.Spot.Bottom,stroke:"red" },
96              { margin: 4,stroke: "white" },new go.Binding("text", "name1"))
97            )  // end of Adornment
98          }
99      );
100      mySelf.myDiagram.linkTemplate = MAKE(go.Link,
101        //{ curve: go.Link.Bezier },  // 贝塞尔曲线
102        { routing: go.Link.Orthogonal, corner: 5 },
103        MAKE(go.Shape, { strokeWidth: 2, stroke: "#e4393c" }),
104        MAKE(go.Shape, { toArrow:"Standard",fill:"#000",stroke:null }),//箭头
105        MAKE(go.TextBlock,
106          {
107            //margin: 20,
108            stroke: "blue",
109            //font: "14px sans-serif",
110            //width:50,
111            //wrap: go.TextBlock.WrapDesiredSize
112          },
113          new go.Binding("text", "linktext")),
114          {
115            toolTip:MAKE(go.Adornment, "Auto",
116              MAKE(go.Shape, { fill: "#FFFFCC" }),
117              MAKE(go.TextBlock, { margin: 4 },new go.Binding("text", "name1"))
118            )  // end of Adornment
119          }
120        );// the link shape
121    // let myModel = MAKE(go.Model);//如果不需要连线可以用这样的方法创建model
122    // let myModel = MAKE(go.GraphLinksModel);//也可以创建link model;需要配置myModel.linkDataArray 如下
123    let myModel = MAKE(go.TreeModel);
124    myModel.nodeDataArray =
125    [ // note that each node data object holds whatever properties it needs;
126      // for this app we add the "name" and "source" properties
127      {key:"1", name1: "董事长",name2: "秘书1", name3: "秘书2", img: require("../assets/img/01.png"), },
128      {key:"2", parent:"1", name1: "秘书", name2: "秘书1", name3: "秘书2", linktext:"link", img: require("../assets/img/03.png") },
129      {key:"3", parent:"1", name1: "CEO",  name2: "秘书1", name3: "秘书2", linktext:"link", img: require("../assets/img/01.png") },
130      {key:"4", parent:"3", name1: "总经理",  name2: "秘书1", name3: "秘书2", linktext:"link", img: require("../assets/img/02.png") },
131      {key:"5", parent:"4", name1: "二狗子",  name2: "秘书1", name3: "秘书2", linktext:"link", img: require("../assets/img/01.png") },
132    ];
133    // myModel.linkDataArray = [
134    //   {from:"1",to:"2"},
135    //   {from:"1",to:"3"},
136    //   {from:"1",to:"4"},
137    //   {from:"1",to:"5"},
138    // ];
139    // function diagramInfo(myModel) {
140    //   return "myModel:\n" + myModel.nodeDataArray.length + " nodes, " +myModel.linkDataArray.length + " links";
141    // }
142    // mySelf.myDiagram.toolTip = MAKE(go.Adornment, "Auto",
143    //   MAKE(go.Shape, { fill: "#CCFFCC" }),
144    //   MAKE(go.TextBlock, { margin: 4 },
145    //     // use a converter to display information about the diagram model
146    //     new go.Binding("text", "", diagramInfo))
147    // );
148    mySelf.myDiagram.model = myModel;
149
150  }
效果图: