
前言:授人以鱼不如授人以渔.先学会用,在学原理,在学创造,可能一辈子用不到这种能力,但是不能不具备这种能力。这篇文章主要是介绍算法入门Helloword之手写图片识别模型java中如何实现以及部分解释。目前大家对于人工智能-机器学习-神经网络的文章都是基于python语言的,对于擅长java的后端小伙伴想要去了解就不是特别友好,所以这里给大家介绍一下如何在java中实现,打开新世界的大门。以下为本人个人理解如有错误欢迎指正
一、目标:使用MNIST数据集训练手写数字图片识别模型
在实现一个模型的时候我们要准备哪些知识体系:
1.机器学习基础:包括监督学习、无监督学习、强化学习等基本概念。
2.数据处理与分析:数据清洗、特征工程、数据可视化等。
3.编程语言:如Python,用于实现机器学习算法。
4.数学基础:线性代数、概率统计、微积分等数学知识。
5.机器学习算法:线性回归、决策树、神经网络、支持向量机等算法。
6.深度学习框架:如TensorFlow、PyTorch等,用于构建和训练深度学习模型。
7.模型评估与优化:交叉验证、超参数调优、模型评估指标等。
8.实践经验:通过实际项目和竞赛积累经验,不断提升模型学习能力。
这里的机器学习HelloWorld是手写图片识别用的是TensorFlow框架
主要需要:
1.理解手写图片的数据集,训练集是什么样的数据(60000,28,28) 、训练集的标签是什么样的(1)
2.理解激活函数的作用
3.正向传递和反向传播的作用以及实现
4.训练模型和保存模型
5.加载保存的模型使用
二、java代码与python代码对比分析
因为python代码解释网上已经有很多了,这里不在重复解释
1.数据集的加载
python中
1def load_data(dpata_folder):
2    files = ["train-labels-idx1-ubyte.gz", "train-images-idx3-ubyte.gz",
3             "t10k-labels-idx1-ubyte.gz", "t10k-images-idx3-ubyte.gz"]
4    paths = []
5    for fname in files:
6        paths.append(os.path.join(data_folder, fname))
7    with gzip.open(paths[0], 'rb') as lbpath:
8        train_y = np.frombuffer(lbpath.read(), np.uint8, offset=8)
9    with gzip.open(paths[1], 'rb') as imgpath:
10        train_x = np.frombuffer(imgpath.read(), np.uint8, offset=16).reshape(len(train_y), 28, 28)
11    with gzip.open(paths[2], 'rb') as lbpath:
12        test_y = np.frombuffer(lbpath.read(), np.uint8, offset=8)
13    with gzip.open(paths[3], 'rb') as imgpath:
14        test_x = np.frombuffer(imgpath.read(), np.uint8, offset=16).reshape(len(test_y), 28, 28)
15    return (train_x, train_y), (test_x, test_y)
16(train_x, train_y), (test_x, test_y) = load_data("mnistDataSet/")
17print('\n train_x:%s, train_y:%s, test_x:%s, test_y:%s' % (train_x.shape, train_y.shape, test_x.shape, test_y.shape))
18print(train_x.ndim)  # 数据集的维度
19print(train_x.shape)  # 数据集的形状
20print(len(train_x))  # 数据集的大小
21print(train_x)  # 数据集
22print("---查看单个数据")
23print(train_x[0])
24print(len(train_x[0]))
25print(len(train_x[0][1]))
26print(train_x[0][6])
27print("---查看单个数据")
28print(train_y[3])
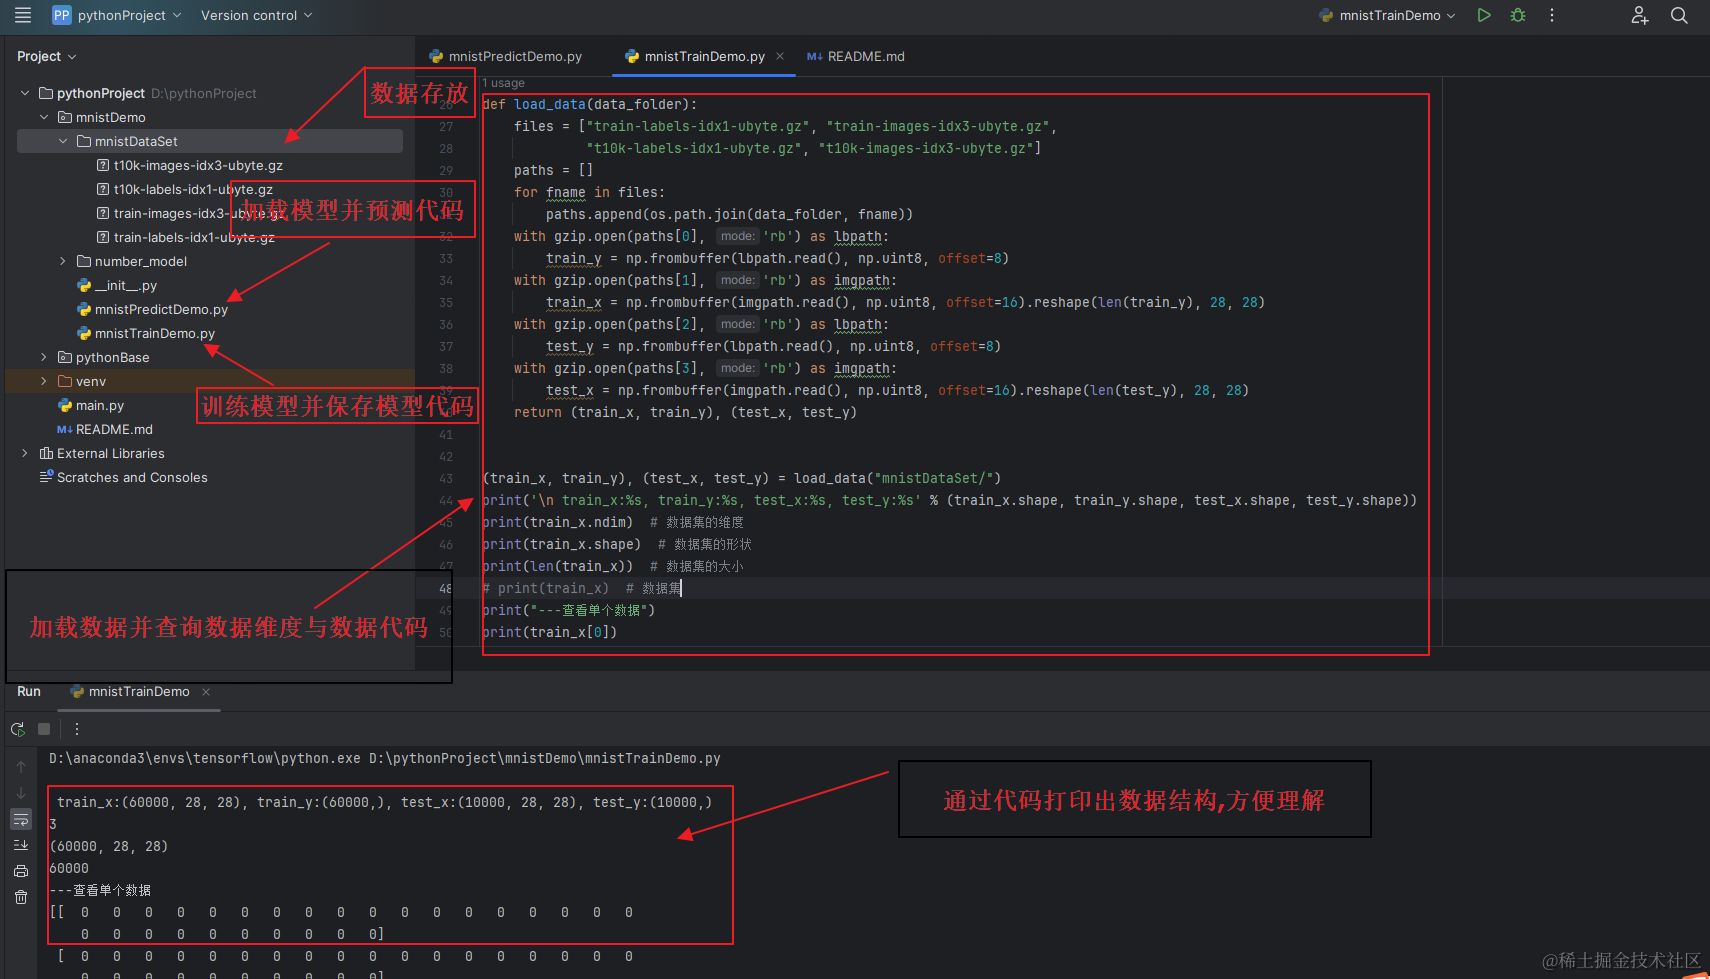
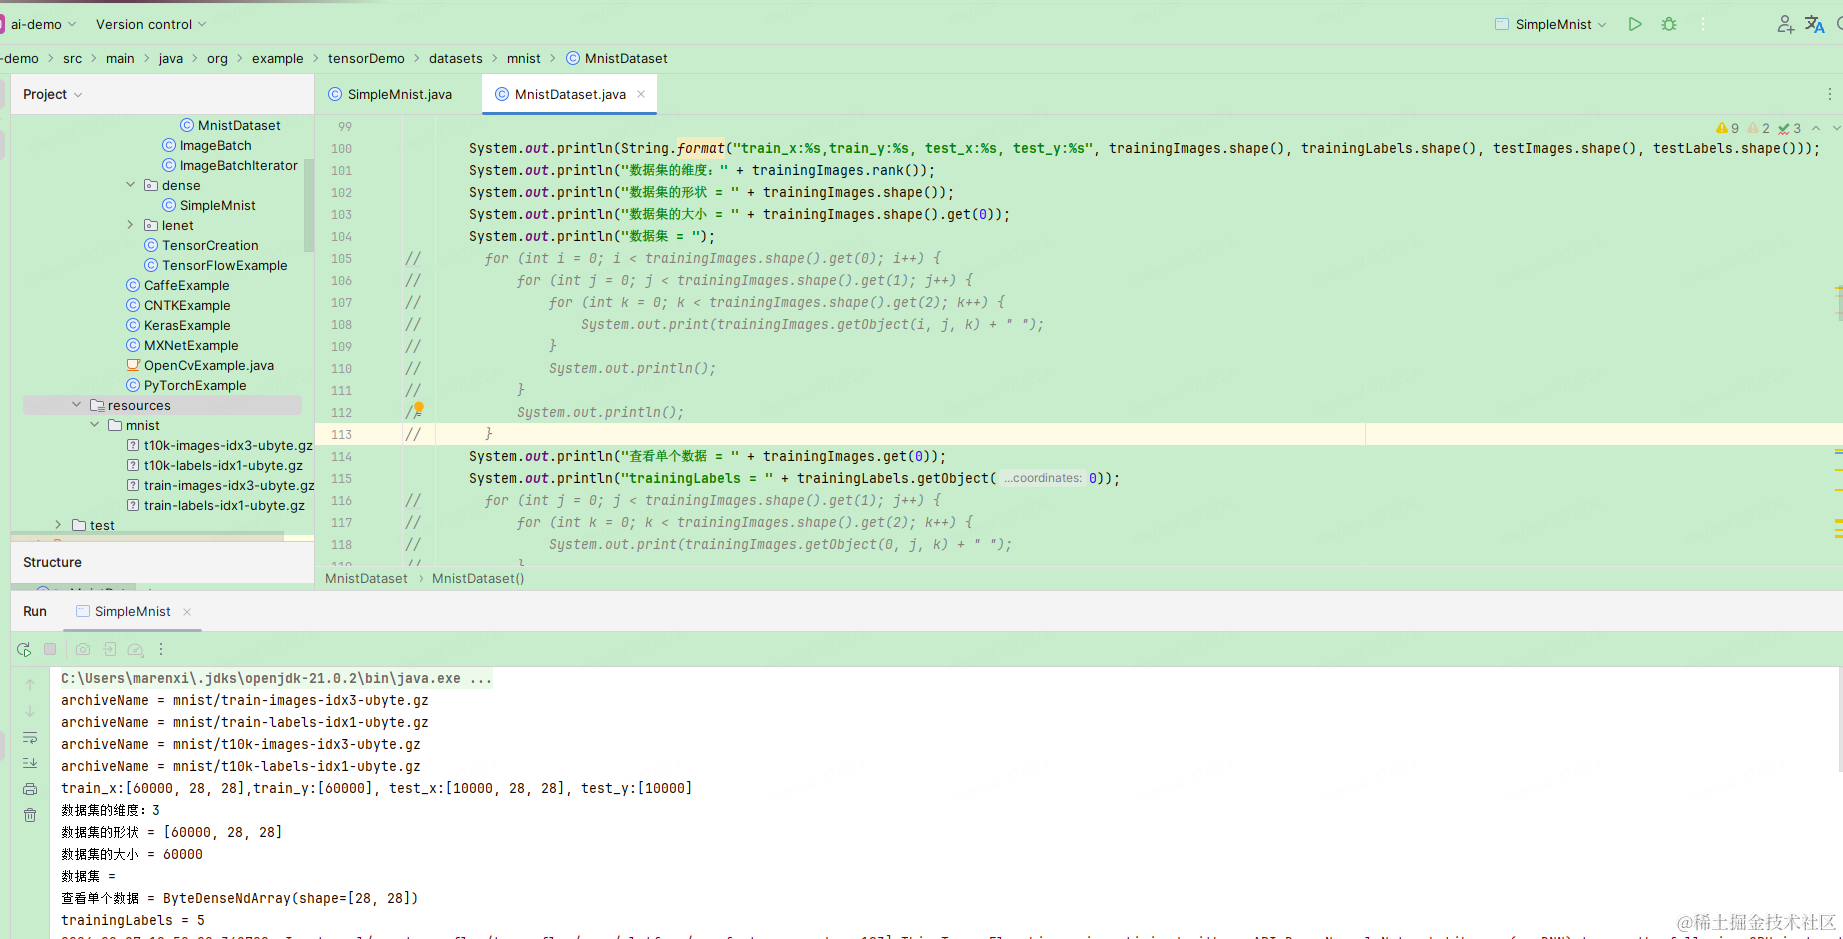
java中
SimpleMnist.class
1 private static final String TRAINING_IMAGES_ARCHIVE = "mnist/train-images-idx3-ubyte.gz";
2    private static final String TRAINING_LABELS_ARCHIVE = "mnist/train-labels-idx1-ubyte.gz";
3    private static final String TEST_IMAGES_ARCHIVE = "mnist/t10k-images-idx3-ubyte.gz";
4    private static final String TEST_LABELS_ARCHIVE = "mnist/t10k-labels-idx1-ubyte.gz";
5//加载数据
6MnistDataset validationDataset = MnistDataset.getOneValidationImage(3, TRAINING_IMAGES_ARCHIVE, TRAINING_LABELS_ARCHIVE,TEST_IMAGES_ARCHIVE, TEST_LABELS_ARCHIVE);
MnistDataset.class
1  /**
2     * @param trainingImagesArchive 训练图片路径
3     * @param trainingLabelsArchive 训练标签路径
4     * @param testImagesArchive     测试图片路径
5     * @param testLabelsArchive     测试标签路径
6     */
7    public static MnistDataset getOneValidationImage(int index, String trainingImagesArchive, String trainingLabelsArchive,String testImagesArchive, String testLabelsArchive) {
8        try {
9            ByteNdArray trainingImages = readArchive(trainingImagesArchive);
10            ByteNdArray trainingLabels = readArchive(trainingLabelsArchive);
11            ByteNdArray testImages = readArchive(testImagesArchive);
12            ByteNdArray testLabels = readArchive(testLabelsArchive);
13            trainingImages.slice(sliceFrom(0));
14            trainingLabels.slice(sliceTo(0));
15            // 切片操作
16            Index range = Indices.range(index, index + 1);// 切片的起始和结束索引
17            ByteNdArray validationImage = trainingImages.slice(range); // 执行切片操作
18            ByteNdArray validationLable = trainingLabels.slice(range); // 执行切片操作
19            if (index >= 0) {
20                return new MnistDataset(trainingImages,trainingLabels,validationImage,validationLable,testImages,testLabels);
21            } else {
22                return null;
23            }
24        } catch (IOException e) {
25            throw new AssertionError(e);
26        }
27    }
28    private static ByteNdArray readArchive(String archiveName) throws IOException {
29        System.out.println("archiveName = " + archiveName);
30        DataInputStream archiveStream = new DataInputStream(new GZIPInputStream(MnistDataset.class.getClassLoader().getResourceAsStream(archiveName))
31        );
32        archiveStream.readShort(); // first two bytes are always 0
33        byte magic = archiveStream.readByte();
34        if (magic != TYPE_UBYTE) {
35            throw new IllegalArgumentException(""" + archiveName + "" is not a valid archive");
36        }
37        int numDims = archiveStream.readByte();
38        long[] dimSizes = new long[numDims];
39        int size = 1;  // for simplicity, we assume that total size does not exceeds Integer.MAX_VALUE
40        for (int i = 0; i < dimSizes.length; ++i) {
41            dimSizes[i] = archiveStream.readInt();
42            size *= dimSizes[i];
43        }
44        byte[] bytes = new byte[size];
45        archiveStream.readFully(bytes);
46        return NdArrays.wrap(Shape.of(dimSizes), DataBuffers.of(bytes, false, false));
47    }
48    /**
49     * Mnist 数据集构造器
50     */
51    private MnistDataset(ByteNdArray trainingImages, ByteNdArray trainingLabels,ByteNdArray validationImages,ByteNdArray validationLabels,ByteNdArray testImages,ByteNdArray testLabels
52    ) {
53        this.trainingImages = trainingImages;
54        this.trainingLabels = trainingLabels;
55        this.validationImages = validationImages;
56        this.validationLabels = validationLabels;
57        this.testImages = testImages;
58        this.testLabels = testLabels;
59        this.imageSize = trainingImages.get(0).shape().size();
60        System.out.println(String.format("train_x:%s,train_y:%s, test_x:%s, test_y:%s", trainingImages.shape(), trainingLabels.shape(), testImages.shape(), testLabels.shape()));
61        System.out.println("数据集的维度:" + trainingImages.rank());
62        System.out.println("数据集的形状 = " + trainingImages.shape());
63        System.out.println("数据集的大小 = " + trainingImages.shape().get(0));
64        System.out.println("查看单个数据 = " + trainingImages.get(0));
65    }
2.模型构建
python中
1model = tensorflow.keras.Sequential()
2model.add(tensorflow.keras.layers.Flatten(input_shape=(28, 28)))  # 添加Flatten层说明输入数据的形状
3model.add(tensorflow.keras.layers.Dense(128, activation='relu'))  # 添加隐含层,为全连接层,128个节点,relu激活函数
4model.add(tensorflow.keras.layers.Dense(10, activation='softmax'))  # 添加输出层,为全连接层,10个节点,softmax激活函数
5print("打印模型结构")
6# 使用 summary 打印模型结构
7print('\n', model.summary())  # 查看网络结构和参数信息
8model.compile(optimizer='adam', loss='sparse_categorical_crossentropy', metrics=['sparse_categorical_accuracy'])
java中
SimpleMnist.class
1        Ops tf = Ops.create(graph);
2        // Create placeholders and variables, which should fit batches of an unknown number of images
3        //创建占位符和变量,这些占位符和变量应适合未知数量的图像批次
4        Placeholder<TFloat32> images = tf.placeholder(TFloat32.class);
5        Placeholder<TFloat32> labels = tf.placeholder(TFloat32.class);
6
7        // Create weights with an initial value of 0
8        // 创建初始值为 0 的权重
9        Shape weightShape = Shape.of(dataset.imageSize(), MnistDataset.NUM_CLASSES);
10        Variable<TFloat32> weights = tf.variable(tf.zeros(tf.constant(weightShape), TFloat32.class));
11
12        // Create biases with an initial value of 0
13        //创建初始值为 0 的偏置
14        Shape biasShape = Shape.of(MnistDataset.NUM_CLASSES);
15        Variable<TFloat32> biases = tf.variable(tf.zeros(tf.constant(biasShape), TFloat32.class));
16
17        // Predict the class of each image in the batch and compute the loss
18        //使用 TensorFlow 的 tf.linalg.matMul 函数计算图像矩阵 images 和权重矩阵 weights 的矩阵乘法,并加上偏置项 biases。
19        //wx+b
20        MatMul<TFloat32> matMul = tf.linalg.matMul(images, weights);
21        Add<TFloat32> add = tf.math.add(matMul, biases);
22        //Softmax 是一个常用的激活函数,它将输入转换为表示概率分布的输出。对于输入向量中的每个元素,Softmax 函数会计算指数,
23        //并对所有元素求和,然后将每个元素的指数除以总和,最终得到一个概率分布。这通常用于多分类问题,以输出每个类别的概率
24        Softmax<TFloat32> softmax = tf.nn.softmax(add);
25
26        // 创建一个计算交叉熵的Mean对象
27        Mean<TFloat32> crossEntropy =
28                tf.math.mean(  // 计算张量的平均值
29                        tf.math.neg(  // 计算张量的负值
30                                tf.reduceSum(  // 计算张量的和
31                                        tf.math.mul(labels, tf.math.log(softmax)),  //计算标签和softmax预测的对数乘积
32                                        tf.array(1)  // 在指定轴上求和
33                                )
34                        ),
35                        tf.array(0)  // 在指定轴上求平均值
36                );
37
38        // Back-propagate gradients to variables for training
39        //使用梯度下降优化器来最小化交叉熵损失函数。首先,创建了一个梯度下降优化器 optimizer,然后使用该优化器来最小化交叉熵损失函数 crossEntropy。
40        Optimizer optimizer = new GradientDescent(graph, LEARNING_RATE);
41        Op minimize = optimizer.minimize(crossEntropy);
3.训练模型
python中
history = model.fit(train_x, train_y, batch_size=64, epochs=5, validation_split=0.2)
java中
SimpleMnist.class
1            // Train the model
2            for (ImageBatch trainingBatch : dataset.trainingBatches(TRAINING_BATCH_SIZE)) {
3                try (TFloat32 batchImages = preprocessImages(trainingBatch.images());
4                     TFloat32 batchLabels = preprocessLabels(trainingBatch.labels())) {
5                    // 创建会话运行器
6                    session.runner()
7                            // 添加要最小化的目标
8                            .addTarget(minimize)
9                            // 通过feed方法将图像数据输入到模型中
10                            .feed(images.asOutput(), batchImages)
11                            // 通过feed方法将标签数据输入到模型中
12                            .feed(labels.asOutput(), batchLabels)
13                            // 运行会话
14                            .run();
15                }
16            }
4.模型评估
python中
1test_loss, test_acc = model.evaluate(test_x, test_y)
2model.evaluate(test_x, test_y, verbose=2)  # 每次迭代输出一条记录,来评价该模型是否有比较好的泛化能力
3print('Test 损失: %.3f' % test_loss)
4print('Test 精确度: %.3f' % test_acc)
java中
SimpleMnist.class
1   // Test the model
2            ImageBatch testBatch = dataset.testBatch();
3            try (TFloat32 testImages = preprocessImages(testBatch.images());
4                 TFloat32 testLabels = preprocessLabels(testBatch.labels());
5                 // 定义一个TFloat32类型的变量accuracyValue,用于存储计算得到的准确率值
6                 TFloat32 accuracyValue = (TFloat32) session.runner()
7                         // 从会话中获取准确率值
8                         .fetch(accuracy)
9                         .fetch(predicted)
10                         .fetch(expected)
11                         // 将images作为输入,testImages作为数据进行喂养
12                         .feed(images.asOutput(), testImages)
13                         // 将labels作为输入,testLabels作为数据进行喂养
14                         .feed(labels.asOutput(), testLabels)
15                         // 运行会话并获取结果
16                         .run()
17                         // 获取第一个结果并存储在accuracyValue中
18                         .get(0)) {
19                System.out.println("Accuracy: " + accuracyValue.getFloat());
20            }
5.保存模型
python中
1# 使用save_model保存完整模型
2# save_model(model, '/media/cfs/用户ERP名称/ea/saved_model', save_format='pb')
3save_model(model, 'D:\pythonProject\mnistDemo\number_model', save_format='pb')
java中
SimpleMnist.class
1            // 保存模型
2            SavedModelBundle.Exporter exporter = SavedModelBundle.exporter("D:\ai\ai-demo").withSession(session);
3            Signature.Builder builder = Signature.builder();
4            builder.input("images", images);
5            builder.input("labels", labels);
6            builder.output("accuracy", accuracy);
7            builder.output("expected", expected);
8            builder.output("predicted", predicted);
9            Signature signature = builder.build();
10            SessionFunction sessionFunction = SessionFunction.create(signature, session);
11            exporter.withFunction(sessionFunction);
12            exporter.export();
6.加载模型
python中
1 # 加载.pb模型文件
2    global load_model
3    load_model = load_model('D:\pythonProject\mnistDemo\number_model')
4    load_model.summary()
5    demo = tensorflow.reshape(test_x, (1, 28, 28))
6    input_data = np.array(demo)  # 准备你的输入数据
7    input_data = tensorflow.convert_to_tensor(input_data, dtype=tensorflow.float32)
8    predictValue = load_model.predict(input_data)
9    print("predictValue")
10    print(predictValue)
11    y_pred = np.argmax(predictValue)
12    print('标签值:' + str(test_y) + '\n预测值:' + str(y_pred))
13    return y_pred, test_y,
java中
SimpleMnist.class
1	//加载模型并预测
2    public void loadModel(String exportDir) {
3        // load saved model
4        SavedModelBundle model = SavedModelBundle.load(exportDir, "serve");
5        try {
6            printSignature(model);
7        } catch (Exception e) {
8            throw new RuntimeException(e);
9        }
10        ByteNdArray validationImages = dataset.getValidationImages();
11        ByteNdArray validationLabels = dataset.getValidationLabels();
12        TFloat32 testImages = preprocessImages(validationImages);
13        System.out.println("testImages = " + testImages.shape());
14        TFloat32 testLabels = preprocessLabels(validationLabels);
15        System.out.println("testLabels = " + testLabels.shape());
16        Result run = model.session().runner()
17                .feed("Placeholder:0", testImages)
18                .feed("Placeholder_1:0", testLabels)
19                .fetch("ArgMax:0")
20                .fetch("ArgMax_1:0")
21                .fetch("Mean_1:0")
22                .run();
23        // 处理输出
24        Optional<Tensor> tensor1 = run.get("ArgMax:0");
25        Optional<Tensor> tensor2 = run.get("ArgMax_1:0");
26        Optional<Tensor> tensor3 = run.get("Mean_1:0");
27        TInt64 predicted = (TInt64) tensor1.get();
28        Long predictedValue = predicted.getObject(0);
29        System.out.println("predictedValue = " + predictedValue);
30        TInt64 expected = (TInt64) tensor2.get();
31        Long expectedValue = expected.getObject(0);
32        System.out.println("expectedValue = " + expectedValue);
33        TFloat32 accuracy = (TFloat32) tensor3.get();
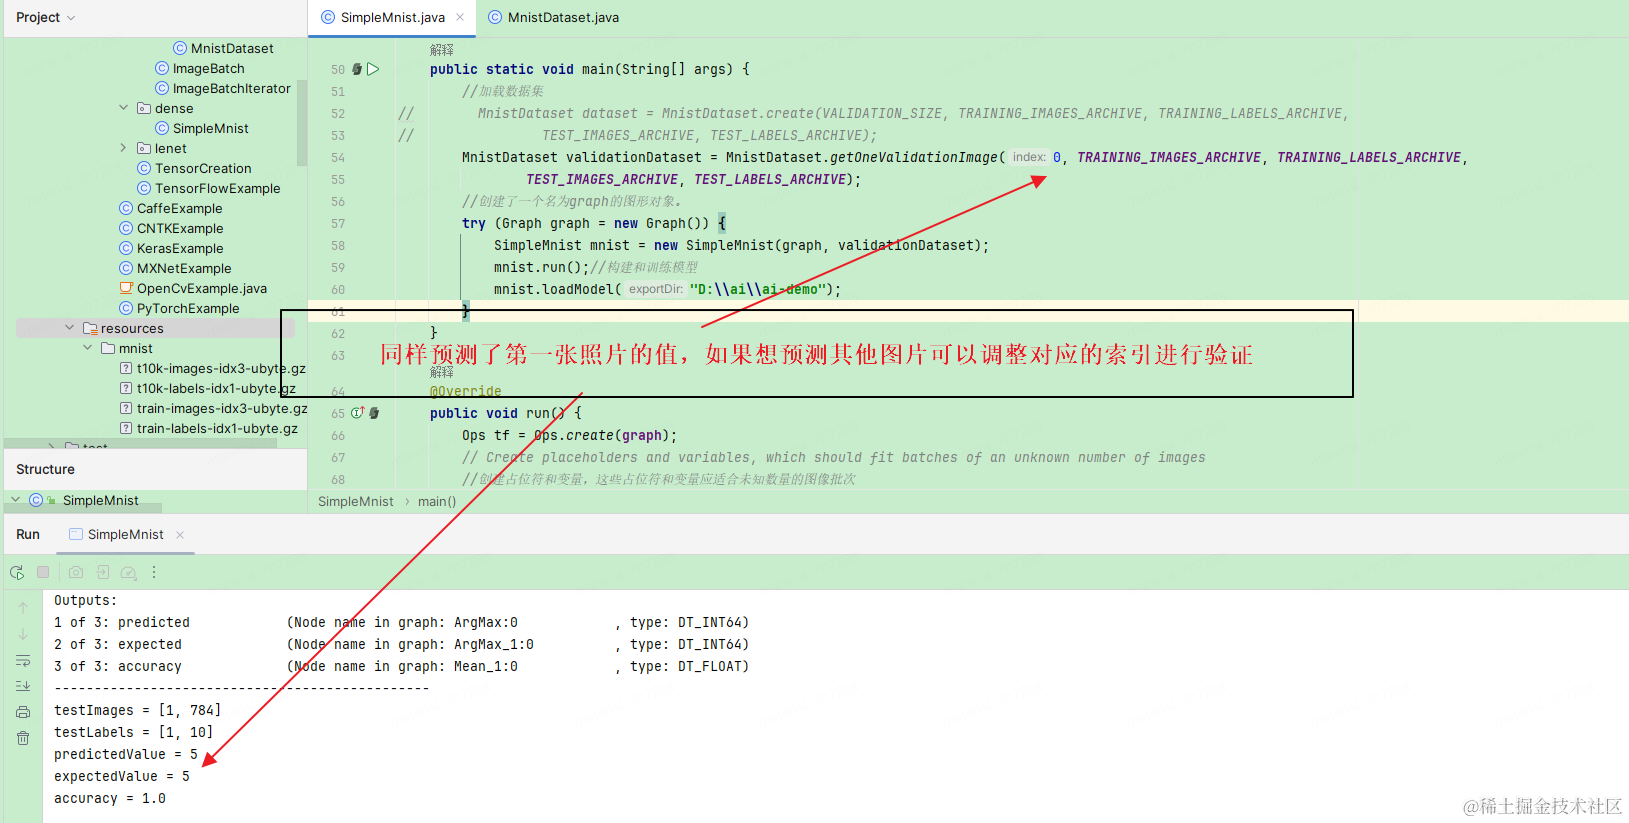
34        System.out.println("accuracy = " + accuracy.getFloat());
35    }
36    //打印模型信息
37    private static void printSignature(SavedModelBundle model) throws Exception {
38        MetaGraphDef m = model.metaGraphDef();
39        SignatureDef sig = m.getSignatureDefOrThrow("serving_default");
40        int numInputs = sig.getInputsCount();
41        int i = 1;
42        System.out.println("MODEL SIGNATURE");
43        System.out.println("Inputs:");
44        for (Map.Entry<String, TensorInfo> entry : sig.getInputsMap().entrySet()) {
45            TensorInfo t = entry.getValue();
46            System.out.printf(
47                    "%d of %d: %-20s (Node name in graph: %-20s, type: %s)\n",
48                    i++, numInputs, entry.getKey(), t.getName(), t.getDtype());
49        }
50        int numOutputs = sig.getOutputsCount();
51        i = 1;
52        System.out.println("Outputs:");
53        for (Map.Entry<String, TensorInfo> entry : sig.getOutputsMap().entrySet()) {
54            TensorInfo t = entry.getValue();
55            System.out.printf(
56                    "%d of %d: %-20s (Node name in graph: %-20s, type: %s)\n",
57                    i++, numOutputs, entry.getKey(), t.getName(), t.getDtype());
58        }
59    }
三、完整的python代码
本工程使用环境为
Python: 3.7.9
https://www.python.org/downloads/windows/
Anaconda: Python 3.11 Anaconda3-2023.09-0-Windows-x86_64
https://www.anaconda.com/download#downloads
tensorflow:2.0.0
直接从anaconda下安装
mnistTrainDemo.py
1import gzip
2import os.path
3import tensorflow as tensorflow
4from tensorflow import keras
5# 可视化 image
6import matplotlib.pyplot as plt
7import numpy as np
8from tensorflow.keras.models import save_model
9
10# 加载数据
11# mnist = keras.datasets.mnist
12# mnistData = mnist.load_data() #Exception: URL fetch failure on https://storage.googleapis.com/tensorflow/tf-keras-datasets/mnist.npz: None -- unknown url type: https
13"""
14这里可以直接使用
15mnist = keras.datasets.mnist
16mnistData = mnist.load_data() 加载数据,但是有的时候不成功,所以使用本地加载数据
17"""
18def load_data(data_folder):
19    files = ["train-labels-idx1-ubyte.gz", "train-images-idx3-ubyte.gz",
20             "t10k-labels-idx1-ubyte.gz", "t10k-images-idx3-ubyte.gz"]
21    paths = []
22    for fname in files:
23        paths.append(os.path.join(data_folder, fname))
24
25    with gzip.open(paths[0], 'rb') as lbpath:
26        train_y = np.frombuffer(lbpath.read(), np.uint8, offset=8)
27
28    with gzip.open(paths[1], 'rb') as imgpath:
29        train_x = np.frombuffer(imgpath.read(), np.uint8, offset=16).reshape(len(train_y), 28, 28)
30
31    with gzip.open(paths[2], 'rb') as lbpath:
32        test_y = np.frombuffer(lbpath.read(), np.uint8, offset=8)
33
34    with gzip.open(paths[3], 'rb') as imgpath:
35        test_x = np.frombuffer(imgpath.read(), np.uint8, offset=16).reshape(len(test_y), 28, 28)
36
37    return (train_x, train_y), (test_x, test_y)
38
39(train_x, train_y), (test_x, test_y) = load_data("mnistDataSet/")
40print('\n train_x:%s, train_y:%s, test_x:%s, test_y:%s' % (train_x.shape, train_y.shape, test_x.shape, test_y.shape))
41print(train_x.ndim)  # 数据集的维度
42print(train_x.shape)  # 数据集的形状
43print(len(train_x))  # 数据集的大小
44print(train_x)  # 数据集
45print("---查看单个数据")
46print(train_x[0])
47print(len(train_x[0]))
48print(len(train_x[0][1]))
49print(train_x[0][6])
50# 可视化image图片、一副image的数据
51# plt.imshow(train_x[0].reshape(28, 28), cmap="binary")
52# plt.show()
53print("---查看单个数据")
54print(train_y[0])
55
56# 数据预处理
57# 归一化、并转换为tensor张量,数据类型为float32.  ---归一化也可能造成识别率低
58# train_x, test_x = tensorflow.cast(train_x / 255.0, tensorflow.float32), tensorflow.cast(test_x / 255.0,
59#                                                                                         tensorflow.float32),
60# train_y, test_y = tensorflow.cast(train_y, tensorflow.int16), tensorflow.cast(test_y, tensorflow.int16)
61# print("---查看单个数据归一后的数据")
62# print(train_x[0][6])  # 30/255=0.11764706  ---归一化每个值除以255
63# print(train_y[0])
64
65# Step2: 配置网络 建立模型
66'''
67以下的代码判断就是定义一个简单的多层感知器,一共有三层,
68两个大小为100的隐层和一个大小为10的输出层,因为MNIST数据集是手写0到9的灰度图像,
69类别有10个,所以最后的输出大小是10。最后输出层的激活函数是Softmax,
70所以最后的输出层相当于一个分类器。加上一个输入层的话,
71多层感知器的结构是:输入层-->>隐层-->>隐层-->>输出层。
72激活函数 https://zhuanlan.zhihu.com/p/337902763
73'''
74# 构造模型
75# model = keras.Sequential([
76#     # 在第一层的网络中,我们的输入形状是28*28,这里的形状就是图片的长度和宽度。
77#     keras.layers.Flatten(input_shape=(28, 28)),
78#     # 所以神经网络有点像滤波器(过滤装置),输入一组28*28像素的图片后,输出10个类别的判断结果。那这个128的数字是做什么用的呢?
79#     # 我们可以这样想象,神经网络中有128个函数,每个函数都有自己的参数。
80#     # 我们给这些函数进行一个编号,f0,f1…f127 ,我们想的是当图片的像素一一带入这128个函数后,这些函数的组合最终输出一个标签值,在这个样例中,我们希望它输出09 。
81#     # 为了得到这个结果,计算机必须要搞清楚这128个函数的具体参数,之后才能计算各个图片的标签。这里的逻辑是,一旦计算机搞清楚了这些参数,那它就能够认出不同的10个类别的事物了。
82#     keras.layers.Dense(100, activation=tensorflow.nn.relu),
83#     # 最后一层是10,是数据集中各种类别的代号,数据集总共有10类,这里就是10 。
84#     keras.layers.Dense(10, activation=tensorflow.nn.softmax)
85# ])
86
87model = tensorflow.keras.Sequential()
88model.add(tensorflow.keras.layers.Flatten(input_shape=(28, 28)))  # 添加Flatten层说明输入数据的形状
89model.add(tensorflow.keras.layers.Dense(128, activation='relu'))  # 添加隐含层,为全连接层,128个节点,relu激活函数
90model.add(tensorflow.keras.layers.Dense(10, activation='softmax'))  # 添加输出层,为全连接层,10个节点,softmax激活函数
91print("打印模型结构")
92# 使用 summary 打印模型结构
93# print(model.summary())
94print('\n', model.summary())  # 查看网络结构和参数信息
95
96'''
97接着是配置模型,在这一步,我们需要指定模型训练时所使用的优化算法与损失函数,
98此外,这里我们也可以定义计算精度相关的API。
99优化器https://zhuanlan.zhihu.com/p/27449596
100'''
101# 配置模型  配置模型训练方法
102# 设置神经网络的优化器和损失函数。# 使用Adam算法进行优化   # 使用CrossEntropyLoss 计算损失 # 使用Accuracy 计算精度
103# model.compile(optimizer=tensorflow.optimizers.Adam(), loss='sparse_categorical_crossentropy', metrics=['accuracy'])
104# adam算法参数采用keras默认的公开参数,损失函数采用稀疏交叉熵损失函数,准确率采用稀疏分类准确率函数
105model.compile(optimizer='adam', loss='sparse_categorical_crossentropy', metrics=['sparse_categorical_accuracy'])
106
107# Step3:模型训练
108# 开始模型训练
109# model.fit(x_train,  # 设置训练数据集
110#           y_train,
111#           epochs=5,  # 设置训练轮数
112#           batch_size=64,  # 设置 batch_size
113#           verbose=1)  # 设置日志打印格式
114# 批量训练大小为64,迭代5次,测试集比例0.2(48000条训练集数据,12000条测试集数据)
115history = model.fit(train_x, train_y, batch_size=64, epochs=5, validation_split=0.2)
116
117# STEP4: 模型评估
118# 评估模型,不输出预测结果输出损失和精确度. test_loss损失,test_acc精确度
119test_loss, test_acc = model.evaluate(test_x, test_y)
120model.evaluate(test_x, test_y, verbose=2)  # 每次迭代输出一条记录,来评价该模型是否有比较好的泛化能力
121# model.evaluate(test_dataset, verbose=1)
122print('Test 损失: %.3f' % test_loss)
123print('Test 精确度: %.3f' % test_acc)
124# 结果可视化
125print(history.history)
126loss = history.history['loss']  # 训练集损失
127val_loss = history.history['val_loss']  # 测试集损失
128acc = history.history['sparse_categorical_accuracy']  # 训练集准确率
129val_acc = history.history['val_sparse_categorical_accuracy']  # 测试集准确率
130
131plt.figure(figsize=(10, 3))
132plt.subplot(121)
133plt.plot(loss, color='b', label='train')
134plt.plot(val_loss, color='r', label='test')
135plt.ylabel('loss')
136plt.legend()
137
138plt.subplot(122)
139plt.plot(acc, color='b', label='train')
140plt.plot(val_acc, color='r', label='test')
141plt.ylabel('Accuracy')
142plt.legend()
143
144# 暂停5秒关闭画布,否则画布一直打开的同时,会持续占用GPU内存
145# plt.ion()  # 打开交互式操作模式
146# plt.show()
147# plt.pause(5)
148# plt.close()
149# plt.show()
150
151# Step5:模型预测 输入测试数据,输出预测结果
152for i in range(1):
153    num = np.random.randint(1, 10000)  # 在1~10000之间生成随机整数
154    plt.subplot(2, 5, i + 1)
155    plt.axis('off')
156    plt.imshow(test_x[num], cmap='gray')
157    demo = tensorflow.reshape(test_x[num], (1, 28, 28))
158    y_pred = np.argmax(model.predict(demo))
159    plt.title('标签值:' + str(test_y[num]) + '\n预测值:' + str(y_pred))
160# plt.show()
161
162'''
163保存模型
164训练好的模型可以用于加载后对新输入数据进行预测,所以需要先进行保存已训练模型
165'''
166#使用save_model保存完整模型
167save_model(model, 'D:\pythonProject\mnistDemo\number_model', save_format='pb')
mnistPredictDemo.py
1import numpy as np
2import tensorflow as tensorflow
3import gzip
4import os.path
5from tensorflow.keras.models import load_model
6# 预测
7def predict(test_x, test_y):
8    test_x, test_y = test_x, test_y
9    '''
10    五、模型评估
11    需要先加载已训练模型,然后用其预测新的数据,计算评估指标
12    '''
13    # 模型加载
14    # 加载.pb模型文件
15    global load_model
16    # load_model = load_model('./saved_model')
17    load_model = load_model('D:\pythonProject\mnistDemo\number_model')
18    load_model.summary()
19    # make a prediction
20    print("test_x")
21    print(test_x)
22    print(test_x.ndim)
23    print(test_x.shape)
24
25    demo = tensorflow.reshape(test_x, (1, 28, 28))
26    input_data = np.array(demo)  # 准备你的输入数据
27    input_data = tensorflow.convert_to_tensor(input_data, dtype=tensorflow.float32)
28    # test_x = tensorflow.cast(test_x / 255.0, tensorflow.float32)
29    # test_y = tensorflow.cast(test_y, tensorflow.int16)
30    predictValue = load_model.predict(input_data)
31    print("predictValue")
32    print(predictValue)
33    y_pred = np.argmax(predictValue)
34    print('标签值:' + str(test_y) + '\n预测值:' + str(y_pred))
35    return y_pred, test_y,
36
37def load_data(data_folder):
38    files = ["train-labels-idx1-ubyte.gz", "train-images-idx3-ubyte.gz",
39             "t10k-labels-idx1-ubyte.gz", "t10k-images-idx3-ubyte.gz"]
40    paths = []
41    for fname in files:
42        paths.append(os.path.join(data_folder, fname))
43    with gzip.open(paths[0], 'rb') as lbpath:
44        train_y = np.frombuffer(lbpath.read(), np.uint8, offset=8)
45    with gzip.open(paths[1], 'rb') as imgpath:
46        train_x = np.frombuffer(imgpath.read(), np.uint8, offset=16).reshape(len(train_y), 28, 28)
47    with gzip.open(paths[2], 'rb') as lbpath:
48        test_y = np.frombuffer(lbpath.read(), np.uint8, offset=8)
49    with gzip.open(paths[3], 'rb') as imgpath:
50        test_x = np.frombuffer(imgpath.read(), np.uint8, offset=16).reshape(len(test_y), 28, 28)
51    return (train_x, train_y), (test_x, test_y)
52
53(train_x, train_y), (test_x, test_y) = load_data("mnistDataSet/")
54print(train_x[0])
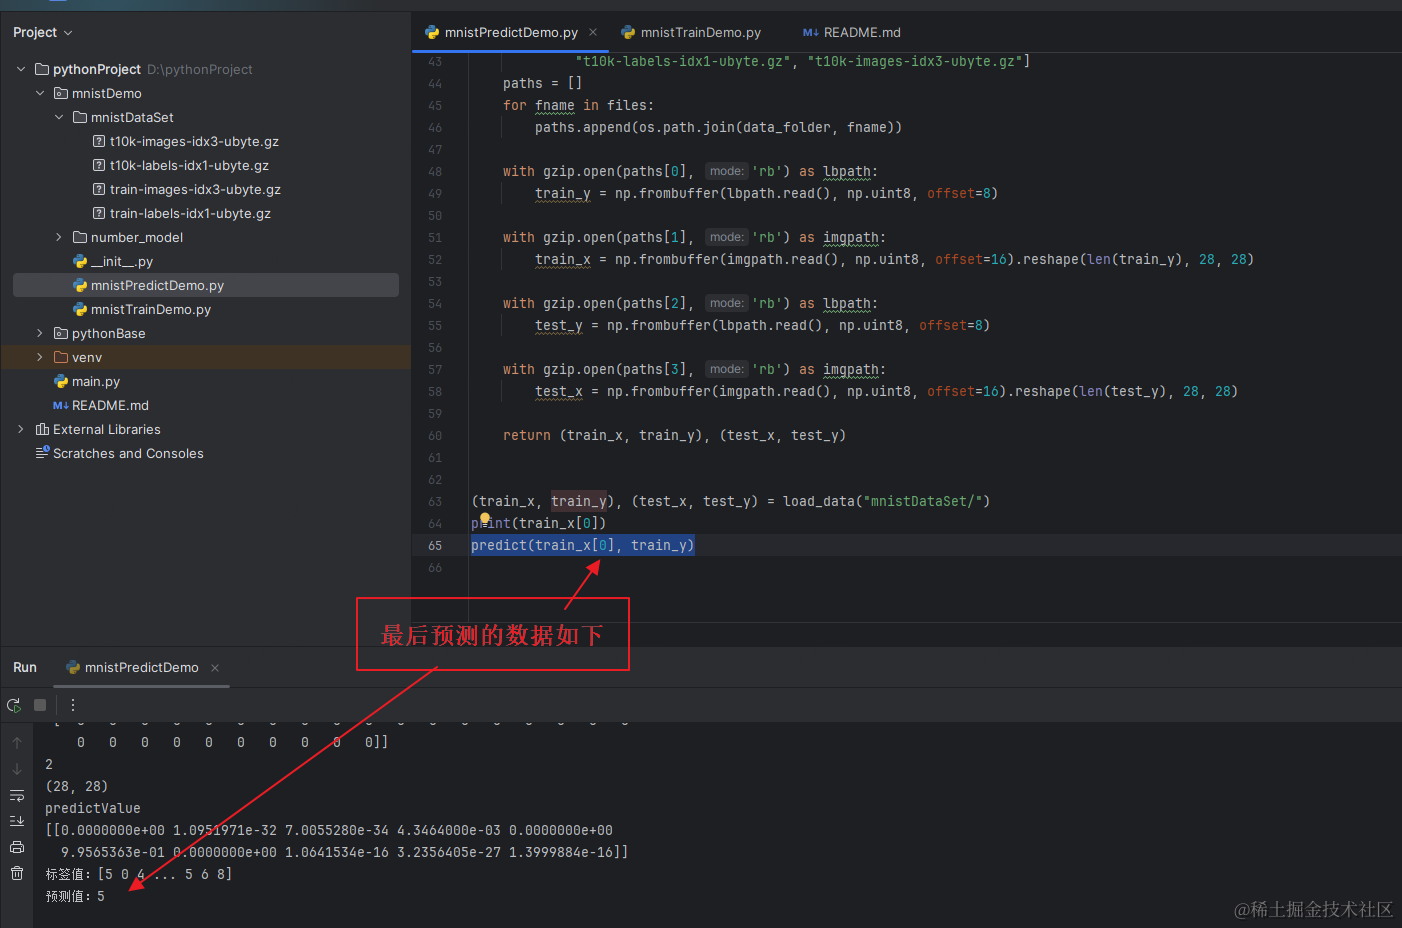
55predict(train_x[0], train_y)
四、完整的java代码
tensorflow 需要的java 版本对应表: https://github.com/tensorflow/java/#tensorflow-version-support
本工程使用环境为
jdk版本:openjdk-21
pom依赖如下:
1
2        <dependency>
3            <groupId>org.tensorflow</groupId>
4            <artifactId>tensorflow-core-platform</artifactId>
5            <version>0.6.0-SNAPSHOT</version>
6        </dependency>
7
8        <dependency>
9            <groupId>org.tensorflow</groupId>
10            <artifactId>tensorflow-framework</artifactId>
11            <version>0.6.0-SNAPSHOT</version>
12        </dependency>
13    </dependencies>
14
15    <repositories>
16        <repository>
17            <id>tensorflow-snapshots</id>
18            <url>https://oss.sonatype.org/content/repositories/snapshots/</url>
19            <snapshots>
20                <enabled>true</enabled>
21            </snapshots>
22        </repository>
23    </repositories>
数据集创建和解析类
MnistDataset.class
1package org.example.tensorDemo.datasets.mnist;
2
3import org.example.tensorDemo.datasets.ImageBatch;
4import org.example.tensorDemo.datasets.ImageBatchIterator;
5import org.tensorflow.ndarray.*;
6import org.tensorflow.ndarray.buffer.DataBuffers;
7import org.tensorflow.ndarray.index.Index;
8import org.tensorflow.ndarray.index.Indices;
9
10import java.io.DataInputStream;
11import java.io.IOException;
12import java.util.zip.GZIPInputStream;
13
14import static org.tensorflow.ndarray.index.Indices.sliceFrom;
15import static org.tensorflow.ndarray.index.Indices.sliceTo;
16
17
18
19public class MnistDataset {
20    public static final int NUM_CLASSES = 10;
21
22    private static final int TYPE_UBYTE = 0x08;
23
24    /**
25     * 训练图片字节类型的多维数组
26     */
27    private final ByteNdArray trainingImages;
28
29    /**
30     * 训练标签字节类型的多维数组
31     */
32    private final ByteNdArray trainingLabels;
33
34    /**
35     * 验证图片字节类型的多维数组
36     */
37    public final ByteNdArray validationImages;
38
39    /**
40     * 验证标签字节类型的多维数组
41     */
42    public final ByteNdArray validationLabels;
43
44    /**
45     * 测试图片字节类型的多维数组
46     */
47    private final ByteNdArray testImages;
48
49    /**
50     * 测试标签字节类型的多维数组
51     */
52    private final ByteNdArray testLabels;
53
54    /**
55     * 图片的大小
56     */
57    private final long imageSize;
58
59
60    /**
61     * Mnist 数据集构造器
62     */
63    private MnistDataset(
64            ByteNdArray trainingImages,
65            ByteNdArray trainingLabels,
66            ByteNdArray validationImages,
67            ByteNdArray validationLabels,
68            ByteNdArray testImages,
69            ByteNdArray testLabels
70    ) {
71        this.trainingImages = trainingImages;
72        this.trainingLabels = trainingLabels;
73        this.validationImages = validationImages;
74        this.validationLabels = validationLabels;
75        this.testImages = testImages;
76        this.testLabels = testLabels;
77        //第一个图像的形状,并返回其尺寸大小。每一张图片包含28X28个像素点 所以应该为784
78        this.imageSize = trainingImages.get(0).shape().size();
79//        System.out.println("imageSize = " + imageSize);
80
81
82//        System.out.println(String.format("train_x:%s,train_y:%s, test_x:%s, test_y:%s", trainingImages.shape(), trainingLabels.shape(), testImages.shape(), testLabels.shape()));
83//        System.out.println("数据集的维度:" + trainingImages.rank());
84//        System.out.println("数据集的形状 = " + trainingImages.shape());
85//        System.out.println("数据集的大小 = " + trainingImages.shape().get(0));
86//        System.out.println("数据集 = ");
87//        for (int i = 0; i < trainingImages.shape().get(0); i++) {
88//            for (int j = 0; j < trainingImages.shape().get(1); j++) {
89//                for (int k = 0; k < trainingImages.shape().get(2); k++) {
90//                    System.out.print(trainingImages.getObject(i, j, k) + " ");
91//                }
92//                System.out.println();
93//            }
94//            System.out.println();
95//        }
96//        System.out.println("查看单个数据 = " + trainingImages.get(0));
97//        for (int j = 0; j < trainingImages.shape().get(1); j++) {
98//            for (int k = 0; k < trainingImages.shape().get(2); k++) {
99//                System.out.print(trainingImages.getObject(0, j, k) + " ");
100//            }
101//            System.out.println();
102//        }
103//        System.out.println("查看单个数据大小 = " + trainingImages.get(0).size());
104//        System.out.println("查看trainingImages三维数组下的第一个元素的第二个二维数组大小 = " + trainingImages.get(0).get(1).size());
105//        System.out.println("查看trainingImages三维数组下的第一个元素的第7个二维数组的第8个元素 = " + trainingImages.getObject(0, 6, 8));
106//        System.out.println("trainingLabels = " + trainingLabels.getObject(1));
107    }
108
109    /**
110     * @param validationSize        验证的数据
111     * @param trainingImagesArchive 训练图片路径
112     * @param trainingLabelsArchive 训练标签路径
113     * @param testImagesArchive     测试图片路径
114     * @param testLabelsArchive     测试标签路径
115     */
116    public static MnistDataset create(int validationSize, String trainingImagesArchive, String trainingLabelsArchive,
117                                      String testImagesArchive, String testLabelsArchive) {
118        try {
119            ByteNdArray trainingImages = readArchive(trainingImagesArchive);
120            ByteNdArray trainingLabels = readArchive(trainingLabelsArchive);
121            ByteNdArray testImages = readArchive(testImagesArchive);
122            ByteNdArray testLabels = readArchive(testLabelsArchive);
123
124            if (validationSize > 0) {
125                return new MnistDataset(
126                        trainingImages.slice(sliceFrom(validationSize)),
127                        trainingLabels.slice(sliceFrom(validationSize)),
128                        trainingImages.slice(sliceTo(validationSize)),
129                        trainingLabels.slice(sliceTo(validationSize)),
130                        testImages,
131                        testLabels
132                );
133            }
134            return new MnistDataset(trainingImages, trainingLabels, null, null, testImages, testLabels);
135
136        } catch (IOException e) {
137            throw new AssertionError(e);
138        }
139    }
140
141    /**
142     * @param trainingImagesArchive 训练图片路径
143     * @param trainingLabelsArchive 训练标签路径
144     * @param testImagesArchive     测试图片路径
145     * @param testLabelsArchive     测试标签路径
146     */
147    public static MnistDataset getOneValidationImage(int index, String trainingImagesArchive, String trainingLabelsArchive,
148                                                     String testImagesArchive, String testLabelsArchive) {
149        try {
150            ByteNdArray trainingImages = readArchive(trainingImagesArchive);
151            ByteNdArray trainingLabels = readArchive(trainingLabelsArchive);
152            ByteNdArray testImages = readArchive(testImagesArchive);
153            ByteNdArray testLabels = readArchive(testLabelsArchive);
154            trainingImages.slice(sliceFrom(0));
155            trainingLabels.slice(sliceTo(0));
156            // 切片操作
157            Index range = Indices.range(index, index + 1);// 切片的起始和结束索引
158            ByteNdArray validationImage = trainingImages.slice(range); // 执行切片操作
159            ByteNdArray validationLable = trainingLabels.slice(range); // 执行切片操作
160
161
162            if (index >= 0) {
163                return new MnistDataset(
164                        trainingImages,
165                        trainingLabels,
166                        validationImage,
167                        validationLable,
168                        testImages,
169                        testLabels
170                );
171            } else {
172                return null;
173            }
174        } catch (IOException e) {
175            throw new AssertionError(e);
176        }
177    }
178
179    private static ByteNdArray readArchive(String archiveName) throws IOException {
180        System.out.println("archiveName = " + archiveName);
181        DataInputStream archiveStream = new DataInputStream(
182                //new GZIPInputStream(new java.io.FileInputStream("src/main/resources/"+archiveName))
183                new GZIPInputStream(MnistDataset.class.getClassLoader().getResourceAsStream(archiveName))
184        );
185        //todo 不知道怎么读取和实际的内部结构
186        archiveStream.readShort(); // first two bytes are always 0
187        byte magic = archiveStream.readByte();
188        if (magic != TYPE_UBYTE) {
189            throw new IllegalArgumentException(""" + archiveName + "" is not a valid archive");
190        }
191        int numDims = archiveStream.readByte();
192        long[] dimSizes = new long[numDims];
193        int size = 1;  // for simplicity, we assume that total size does not exceeds Integer.MAX_VALUE
194        for (int i = 0; i < dimSizes.length; ++i) {
195            dimSizes[i] = archiveStream.readInt();
196            size *= dimSizes[i];
197        }
198        byte[] bytes = new byte[size];
199        archiveStream.readFully(bytes);
200        return NdArrays.wrap(Shape.of(dimSizes), DataBuffers.of(bytes, false, false));
201    }
202
203    public Iterable<ImageBatch> trainingBatches(int batchSize) {
204        return () -> new ImageBatchIterator(batchSize, trainingImages, trainingLabels);
205    }
206
207    public Iterable<ImageBatch> validationBatches(int batchSize) {
208        return () -> new ImageBatchIterator(batchSize, validationImages, validationLabels);
209    }
210
211    public Iterable<ImageBatch> testBatches(int batchSize) {
212        return () -> new ImageBatchIterator(batchSize, testImages, testLabels);
213    }
214
215    public ImageBatch testBatch() {
216        return new ImageBatch(testImages, testLabels);
217    }
218
219    public long imageSize() {
220        return imageSize;
221    }
222
223    public long numTrainingExamples() {
224        return trainingLabels.shape().size(0);
225    }
226
227    public long numTestingExamples() {
228        return testLabels.shape().size(0);
229    }
230
231    public long numValidationExamples() {
232        return validationLabels.shape().size(0);
233    }
234
235    public ByteNdArray getValidationImages() {
236        return validationImages;
237    }
238
239    public ByteNdArray getValidationLabels() {
240        return validationLabels;
241    }
242}
SimpleMnist.class
1package org.example.tensorDemo.dense;
2import org.example.tensorDemo.datasets.ImageBatch;
3import org.example.tensorDemo.datasets.mnist.MnistDataset;
4import org.tensorflow.*;
5import org.tensorflow.framework.optimizers.GradientDescent;
6import org.tensorflow.framework.optimizers.Optimizer;
7import org.tensorflow.ndarray.ByteNdArray;
8import org.tensorflow.ndarray.Shape;
9import org.tensorflow.op.Op;
10import org.tensorflow.op.Ops;
11import org.tensorflow.op.core.Placeholder;
12import org.tensorflow.op.core.Variable;
13import org.tensorflow.op.linalg.MatMul;
14import org.tensorflow.op.math.Add;
15import org.tensorflow.op.math.Mean;
16import org.tensorflow.op.nn.Softmax;
17import org.tensorflow.proto.framework.MetaGraphDef;
18import org.tensorflow.proto.framework.SignatureDef;
19import org.tensorflow.proto.framework.TensorInfo;
20import org.tensorflow.types.TFloat32;
21import org.tensorflow.types.TInt64;
22import java.io.IOException;
23import java.util.Map;
24import java.util.Optional;
25
26public class SimpleMnist implements Runnable {
27    private static final String TRAINING_IMAGES_ARCHIVE = "mnist/train-images-idx3-ubyte.gz";
28    private static final String TRAINING_LABELS_ARCHIVE = "mnist/train-labels-idx1-ubyte.gz";
29    private static final String TEST_IMAGES_ARCHIVE = "mnist/t10k-images-idx3-ubyte.gz";
30    private static final String TEST_LABELS_ARCHIVE = "mnist/t10k-labels-idx1-ubyte.gz";
31
32    public static void main(String[] args) {
33        //加载数据集
34//        MnistDataset dataset = MnistDataset.create(VALIDATION_SIZE, TRAINING_IMAGES_ARCHIVE, TRAINING_LABELS_ARCHIVE,
35//                TEST_IMAGES_ARCHIVE, TEST_LABELS_ARCHIVE);
36        MnistDataset validationDataset = MnistDataset.getOneValidationImage(3, TRAINING_IMAGES_ARCHIVE, TRAINING_LABELS_ARCHIVE,
37                TEST_IMAGES_ARCHIVE, TEST_LABELS_ARCHIVE);
38        //创建了一个名为graph的图形对象。
39        try (Graph graph = new Graph()) {
40            SimpleMnist mnist = new SimpleMnist(graph, validationDataset);
41            mnist.run();//构建和训练模型
42            mnist.loadModel("D:\ai\ai-demo");
43        }
44    }
45
46    @Override
47    public void run() {
48        Ops tf = Ops.create(graph);
49        // Create placeholders and variables, which should fit batches of an unknown number of images
50        //创建占位符和变量,这些占位符和变量应适合未知数量的图像批次
51        Placeholder<TFloat32> images = tf.placeholder(TFloat32.class);
52        Placeholder<TFloat32> labels = tf.placeholder(TFloat32.class);
53
54        // Create weights with an initial value of 0
55        // 创建初始值为 0 的权重
56        Shape weightShape = Shape.of(dataset.imageSize(), MnistDataset.NUM_CLASSES);
57        Variable<TFloat32> weights = tf.variable(tf.zeros(tf.constant(weightShape), TFloat32.class));
58
59        // Create biases with an initial value of 0
60        //创建初始值为 0 的偏置
61        Shape biasShape = Shape.of(MnistDataset.NUM_CLASSES);
62        Variable<TFloat32> biases = tf.variable(tf.zeros(tf.constant(biasShape), TFloat32.class));
63
64        // Predict the class of each image in the batch and compute the loss
65        //使用 TensorFlow 的 tf.linalg.matMul 函数计算图像矩阵 images 和权重矩阵 weights 的矩阵乘法,并加上偏置项 biases。
66        //wx+b
67        MatMul<TFloat32> matMul = tf.linalg.matMul(images, weights);
68        Add<TFloat32> add = tf.math.add(matMul, biases);
69
70        //Softmax 是一个常用的激活函数,它将输入转换为表示概率分布的输出。对于输入向量中的每个元素,Softmax 函数会计算指数,
71        //并对所有元素求和,然后将每个元素的指数除以总和,最终得到一个概率分布。这通常用于多分类问题,以输出每个类别的概率
72        //激活函数
73        Softmax<TFloat32> softmax = tf.nn.softmax(add);
74
75        // 创建一个计算交叉熵的Mean对象
76        //损失函数
77        Mean<TFloat32> crossEntropy =
78                tf.math.mean(  // 计算张量的平均值
79                        tf.math.neg(  // 计算张量的负值
80                                tf.reduceSum(  // 计算张量的和
81                                        tf.math.mul(labels, tf.math.log(softmax)),  //计算标签和softmax预测的对数乘积
82                                        tf.array(1)  // 在指定轴上求和
83                                )
84                        ),
85                        tf.array(0)  // 在指定轴上求平均值
86                );
87
88        // Back-propagate gradients to variables for training
89        //使用梯度下降优化器来最小化交叉熵损失函数。首先,创建了一个梯度下降优化器 optimizer,然后使用该优化器来最小化交叉熵损失函数 crossEntropy。
90        //梯度下降 https://www.cnblogs.com/guoyaohua/p/8542554.html
91        Optimizer optimizer = new GradientDescent(graph, LEARNING_RATE);
92        Op minimize = optimizer.minimize(crossEntropy);
93
94        // Compute the accuracy of the model
95        //使用 argMax 函数找出在给定轴上张量中最大值的索引,
96        Operand<TInt64> predicted = tf.math.argMax(softmax, tf.constant(1));
97        Operand<TInt64> expected = tf.math.argMax(labels, tf.constant(1));
98        //使用 equal 函数比较模型预测的标签和实际标签是否相等,再用 cast 函数将布尔值转换为浮点数,最后使用 mean 函数计算准确率。
99        Operand<TFloat32> accuracy = tf.math.mean(tf.dtypes.cast(tf.math.equal(predicted, expected), TFloat32.class), tf.array(0));
100
101        // Run the graph
102        try (Session session = new Session(graph)) {
103            // Train the model
104            for (ImageBatch trainingBatch : dataset.trainingBatches(TRAINING_BATCH_SIZE)) {
105                try (TFloat32 batchImages = preprocessImages(trainingBatch.images());
106                     TFloat32 batchLabels = preprocessLabels(trainingBatch.labels())) {
107                    System.out.println("batchImages = " + batchImages.shape());
108                    System.out.println("batchLabels = " + batchLabels.shape());
109                    // 创建会话运行器
110                    session.runner()
111                            // 添加要最小化的目标
112                            .addTarget(minimize)
113                            // 通过feed方法将图像数据输入到模型中
114                            .feed(images.asOutput(), batchImages)
115                            // 通过feed方法将标签数据输入到模型中
116                            .feed(labels.asOutput(), batchLabels)
117                            // 运行会话
118                            .run();
119                }
120            }
121
122            // Test the model
123            ImageBatch testBatch = dataset.testBatch();
124            try (TFloat32 testImages = preprocessImages(testBatch.images());
125                 TFloat32 testLabels = preprocessLabels(testBatch.labels());
126                 // 定义一个TFloat32类型的变量accuracyValue,用于存储计算得到的准确率值
127                 TFloat32 accuracyValue = (TFloat32) session.runner()
128                         // 从会话中获取准确率值
129                         .fetch(accuracy)
130                         .fetch(predicted)
131                         .fetch(expected)
132                         // 将images作为输入,testImages作为数据进行喂养
133                         .feed(images.asOutput(), testImages)
134                         // 将labels作为输入,testLabels作为数据进行喂养
135                         .feed(labels.asOutput(), testLabels)
136                         // 运行会话并获取结果
137                         .run()
138                         // 获取第一个结果并存储在accuracyValue中
139                         .get(0)) {
140                System.out.println("Accuracy: " + accuracyValue.getFloat());
141            }
142            // 保存模型
143            SavedModelBundle.Exporter exporter = SavedModelBundle.exporter("D:\ai\ai-demo").withSession(session);
144            Signature.Builder builder = Signature.builder();
145            builder.input("images", images);
146            builder.input("labels", labels);
147            builder.output("accuracy", accuracy);
148            builder.output("expected", expected);
149            builder.output("predicted", predicted);
150            Signature signature = builder.build();
151            SessionFunction sessionFunction = SessionFunction.create(signature, session);
152            exporter.withFunction(sessionFunction);
153            exporter.export();
154        } catch (IOException e) {
155            throw new RuntimeException(e);
156        }
157
158    }
159
160    private static final int VALIDATION_SIZE = 5;
161    private static final int TRAINING_BATCH_SIZE = 100;
162    private static final float LEARNING_RATE = 0.2f;
163
164    private static TFloat32 preprocessImages(ByteNdArray rawImages) {
165        Ops tf = Ops.create();
166        // Flatten images in a single dimension and normalize their pixels as floats.
167        long imageSize = rawImages.get(0).shape().size();
168        return tf.math.div(
169                tf.reshape(
170                        tf.dtypes.cast(tf.constant(rawImages), TFloat32.class),
171                        tf.array(-1L, imageSize)
172                ),
173                tf.constant(255.0f)
174        ).asTensor();
175    }
176
177    private static TFloat32 preprocessLabels(ByteNdArray rawLabels) {
178        Ops tf = Ops.create();
179        // Map labels to one hot vectors where only the expected predictions as a value of 1.0
180        return tf.oneHot(
181                tf.constant(rawLabels),
182                tf.constant(MnistDataset.NUM_CLASSES),
183                tf.constant(1.0f),
184                tf.constant(0.0f)
185        ).asTensor();
186    }
187
188    private final Graph graph;
189    private final MnistDataset dataset;
190
191    private SimpleMnist(Graph graph, MnistDataset dataset) {
192        this.graph = graph;
193        this.dataset = dataset;
194    }
195
196    public void loadModel(String exportDir) {
197        // load saved model
198        SavedModelBundle model = SavedModelBundle.load(exportDir, "serve");
199        try {
200            printSignature(model);
201        } catch (Exception e) {
202            throw new RuntimeException(e);
203        }
204        ByteNdArray validationImages = dataset.getValidationImages();
205        ByteNdArray validationLabels = dataset.getValidationLabels();
206        TFloat32 testImages = preprocessImages(validationImages);
207        System.out.println("testImages = " + testImages.shape());
208        TFloat32 testLabels = preprocessLabels(validationLabels);
209        System.out.println("testLabels = " + testLabels.shape());
210        Result run = model.session().runner()
211                .feed("Placeholder:0", testImages)
212                .feed("Placeholder_1:0", testLabels)
213                .fetch("ArgMax:0")
214                .fetch("ArgMax_1:0")
215                .fetch("Mean_1:0")
216                .run();
217        // 处理输出
218        Optional<Tensor> tensor1 = run.get("ArgMax:0");
219        Optional<Tensor> tensor2 = run.get("ArgMax_1:0");
220        Optional<Tensor> tensor3 = run.get("Mean_1:0");
221        TInt64 predicted = (TInt64) tensor1.get();
222        Long predictedValue = predicted.getObject(0);
223        System.out.println("predictedValue = " + predictedValue);
224        TInt64 expected = (TInt64) tensor2.get();
225        Long expectedValue = expected.getObject(0);
226        System.out.println("expectedValue = " + expectedValue);
227        TFloat32 accuracy = (TFloat32) tensor3.get();
228        System.out.println("accuracy = " + accuracy.getFloat());
229    }
230
231    private static void printSignature(SavedModelBundle model) throws Exception {
232        MetaGraphDef m = model.metaGraphDef();
233        SignatureDef sig = m.getSignatureDefOrThrow("serving_default");
234        int numInputs = sig.getInputsCount();
235        int i = 1;
236        System.out.println("MODEL SIGNATURE");
237        System.out.println("Inputs:");
238        for (Map.Entry<String, TensorInfo> entry : sig.getInputsMap().entrySet()) {
239            TensorInfo t = entry.getValue();
240            System.out.printf(
241                    "%d of %d: %-20s (Node name in graph: %-20s, type: %s)\n",
242                    i++, numInputs, entry.getKey(), t.getName(), t.getDtype());
243        }
244        int numOutputs = sig.getOutputsCount();
245        i = 1;
246        System.out.println("Outputs:");
247        for (Map.Entry<String, TensorInfo> entry : sig.getOutputsMap().entrySet()) {
248            TensorInfo t = entry.getValue();
249            System.out.printf(
250                    "%d of %d: %-20s (Node name in graph: %-20s, type: %s)\n",
251                    i++, numOutputs, entry.getKey(), t.getName(), t.getDtype());
252        }
253        System.out.println("-----------------------------------------------");
254    }
255}
五、最后两套代码运行结果
六、待完善点
1、这里并没有对提供web服务输入图片以及图片数据二值话等进行处理。有兴趣的小伙伴可以自己进行尝试
2、并没有使用卷积神经网络等,只是用了wx+b和激活函数进行跳跃,以及阶梯下降算法和交叉熵
3、没有进行更多层级的设计等