
flip 一种简单的动画思路
无意间看到某博主文章,介绍关于 filp 如何制作动画,觉得有趣,便自己动手将dome实现了一遍,参考原文链接在此
FLIP
f - first 记录动画开始前的位置、大小等信息 ( translateY(0px) )<br> l - last 记录动画结束时的位置、大小等信息 ( translateY(100px) )<br> i - invert 对动画前后数据信息的计算(translateY --> 100px,同时利用translate等操作,将dom恢复到 first位置)<br> p - play 开始动画,并移除 i 步骤恢复至 first 的操作,启用tansition,动画就开始了
整个过程其实就是,先记录好动画前后的dom位置等数据信息 然后,利用css将dom恢复至初始位置,最后移除上一步恢复的状态(此时dom会自动回到last位置,只不过没有过渡效果,生硬的闪现),添加过渡效果,完成动画
栗子一(卡片增删动画)
效果如下:
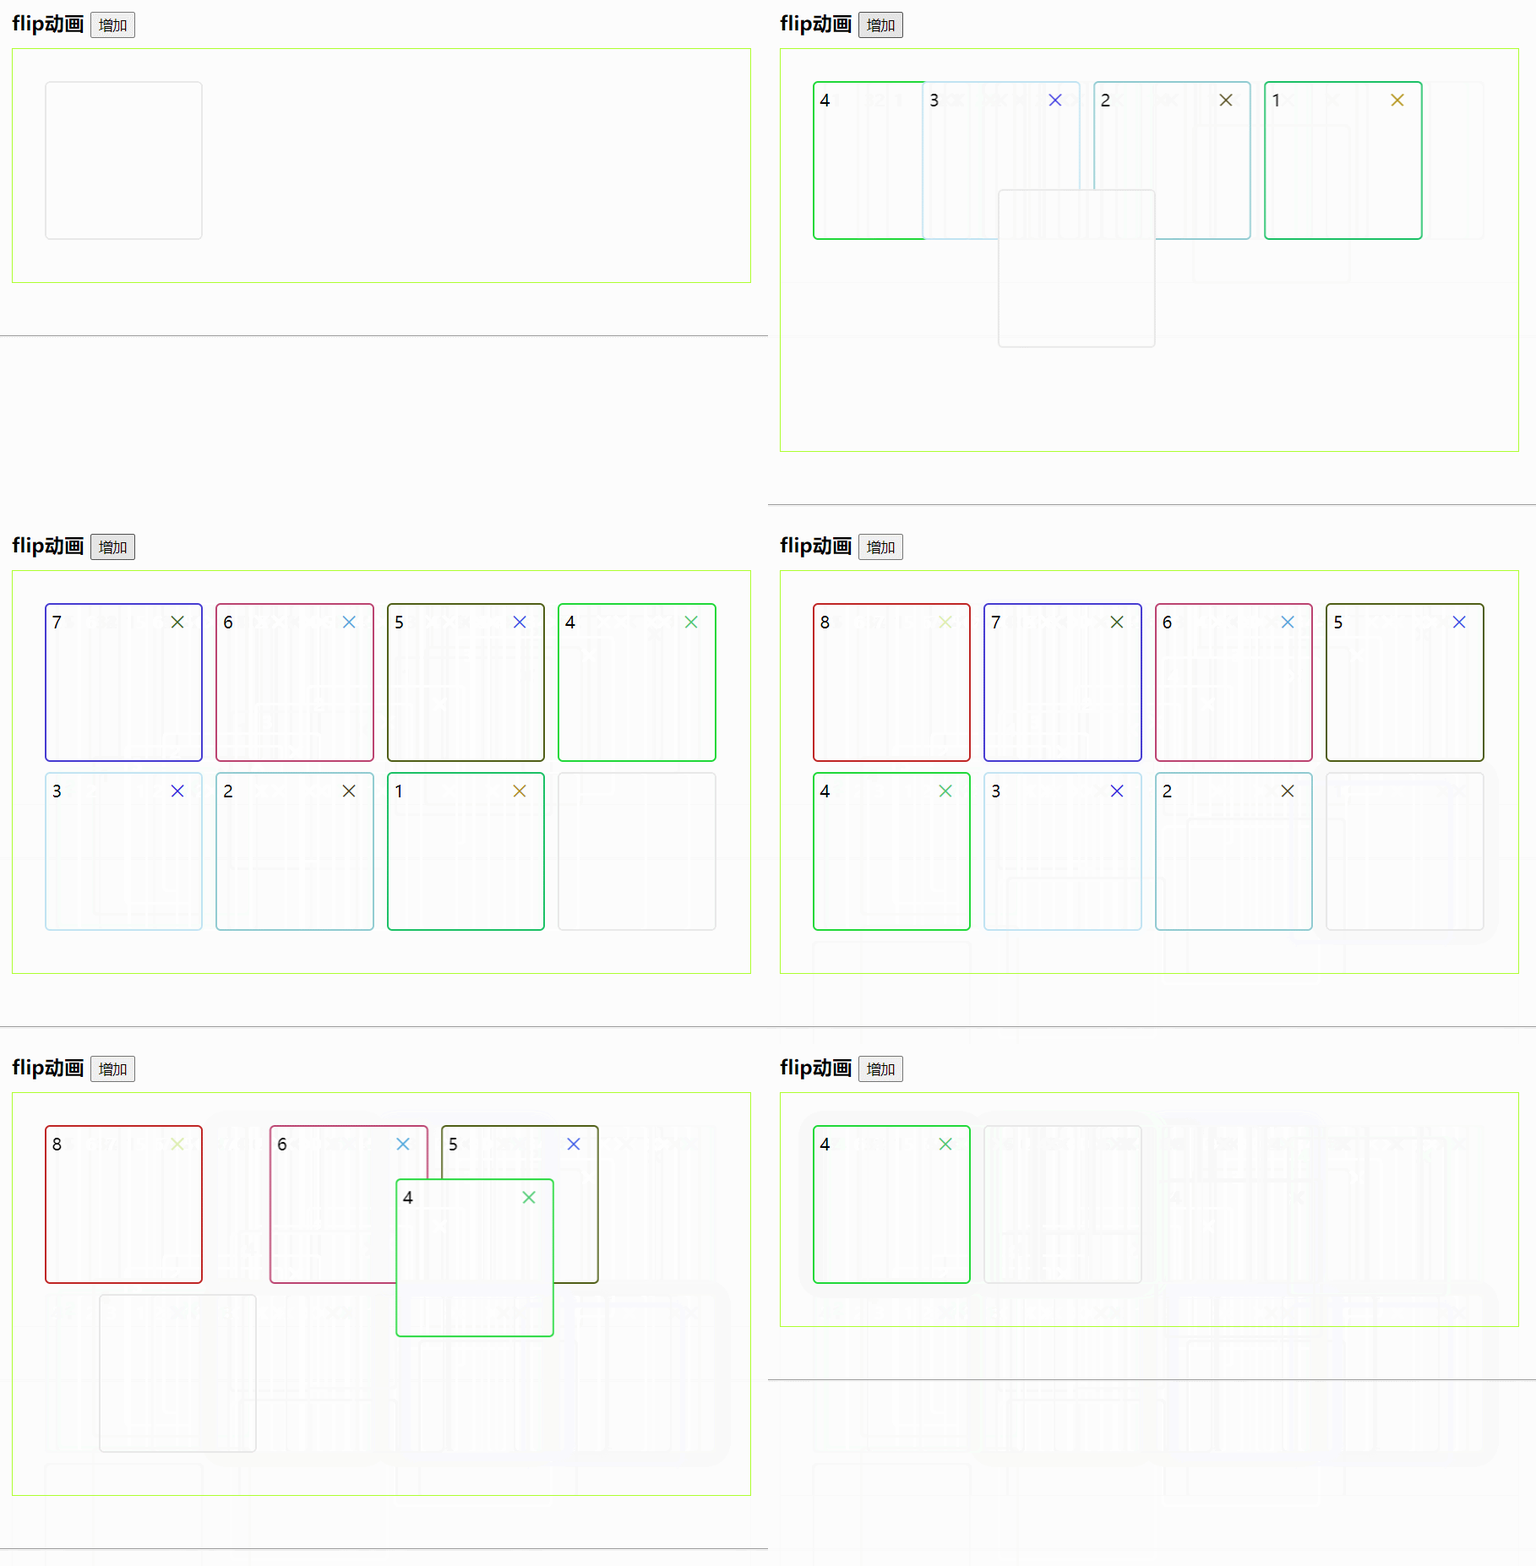 思路整理:
思路整理:
需求分析: 1、没点击增加按钮,就创建一个dom,然后插入到当前列表前面 2、点击删除符号,就将其dom删除 实现1,2步骤不难,利用创建和删除dom的api即可<br> 动画分析: 运用flip思路
1、f -- 记录当前dom的布局信息(getBoundingClientRect)可以实现< 2、l -- 同样运用 getBoundingClientRect 也可以获取到插入新增dom后的布局信息 3、i 和 p 过程,前两步拿到了 动画前和动画后 布局信息的变化,接下来就是 i 过程,运用css translate3d将dom恢复至动画前的位置(即插入dom前) 4、p -- 移除translate3d的恢复,此时dom会恢复到插入后的位置,此时再添加过渡效果,就可以了
具体代码
增加按钮
1function addBtn() {
2  const divEle = document.getElementsByClassName('item')
3   // 初始位置
4   record(divEle)
5   addEle()
6   // 结束位置 + 复位 + play
7   last(divEle)
8}
记录初始位置
1function record(eleAll) {
2    for( let i = 0;i < eleAll.length; i++ ) {
3        const { top,left } = eleAll[i].getBoundingClientRect()
4        eleAll[i]._top_ = top
5        eleAll[i]._left_ = left
6    }
7}
插入dom
1function addEle() {
2    const Box = document.getElementsByClassName('box')[0]
3    const div = document.createElement('div'), span = document.createElement('span')
4
5    span.className = 'del'
6    div.className = 'item'
7    div.innerHTML = index++
8    div.appendChild(span)
9
10    span.style.color = randomHexColorCode()
11    div.style.borderColor = randomHexColorCode()
12    div.style.zIndex = 'auto'
13
14    span.onclick = delBtn
15
16    Box.insertBefore(div,Box.childNodes[0])
17}
结束位置+动画
1function last(eleAll) {
2   for( let i = 0;i < eleAll.length; i++ ) {
3       const dom = eleAll[i]
4       const { top,left } = dom.getBoundingClientRect()
5       // 新增dom时,逻辑应为 原有dom后移动,新增dom不动,故记录了位置的才添加动画
6       if(dom._left_) {
7           // 恢复至开始位置
8           dom.style.transform = `translate3d(${ dom._left_ - left }px, ${ dom._top_ - top }px,0px)`
9
10           // play 过程,移除开始位置的设置,添加过渡
11           requestAnimationFrame(function() {
12               //启用tansition,并移除翻转的改变
13               dom.classList.add('active')
14               dom.style.transform = 'none'
15           })
16           dom.addEventListener('transitionend', () => {
17               dom.classList.remove('active')
18           })
19           // 兼容性不好
20           // dom.animate([
21           //     { transform: `translate(${dom._left_ - left}px, ${dom._top_ - top}px)` },
22           //     { transform: `translate(0px, 0px)` },
23           // ], { duration: 400 })
24       }
25
26   }
27}
栗子二(图片预览)
先看效果
 效果我们可以看出,图片从初始位置,移动到中心位置,并且是带动画效果逐渐放大的
分析 还是依托flip那几步骤
1、初始位置和结束位置getBoundingClientRect同样可以得到,无非就是再加上一个缩放比 2、同样地,过程还是动画前,先恢复至小图位置 3、移除恢复,添加过渡效果
代码
点击预览
1let originTop = 0,originLeft = 0,scale = 0;
2// 点击预览
3function preview(e) {
4    // 记录 first 位置
5    recordImg(e)
6    const { src } = e.childNodes[1]
7    // 插入dom,获取 last 位置
8    previewImg(src)
9
10}
记录位置
1function recordImg(ele) {
2   const { top,left } = ele.getBoundingClientRect()
3   originTop = top
4   originLeft = left
5}
预览
1function previewImg(src) {
2    const img = document.createElement('img')
3
4    img.src = src
5    img.className = 'preview_img'
6    document.body.appendChild(img)
7
8    img.onclick = previewClose
9    // 图片加载onload问题,直接出现,暂时设置不可见
10    img.style.display = 'none'
11
12    img.onload = function() {
13        img.style.display = 'block'
14        // 计算缩放比
15        scale = 50 / img.width
16        // 获取 last 位置
17        const { top,left } = img.getBoundingClientRect()
18        img._top_ = top
19        img._left_= left
20
21        // 计算 invert 图片回归原位(first)
22        img.style.transform = `translate3d(${ originLeft - left }px, ${ originTop - top }px,0px) scale(${scale})`
23        img.style.transformOrigin = '0 0'
24        // play 过程,移除回归原位的设置
25        playImg(img)
26    }
27
28}
paly 过程
1function playImg(ele) {
2   requestAnimationFrame(function() {
3       //启用tansition,并移除翻转的改变
4       ele.style.transform = `translate3d(0px,0px,0px) scale(1)`
5       ele.style.zIndex = `2`
6       // 遮罩
7       const preview = document.getElementsByClassName('preview')[0]
8       preview.style.opacity = '1'
9       preview.style.zIndex = '1'
10
11       preview.classList.add('active_preview')
12       ele.classList.add('active2')
13   })
14}
个人理解,flip是一种做动画的思路,当面对一些复杂,难以通过一些简单的过渡来实现的,可以采取此思路
完整代码
1<!DOCTYPE html>
2<html lang="en">
3<head>
4    <meta charset="UTF-8">
5    <meta http-equiv="X-UA-Compatible" content="IE=edge">
6    <meta name="viewport" content="width=device-width, initial-scale=1.0">
7    <title>Document</title>
8    <style>
9        body,h3{
10            padding: 0;
11            margin: 0;
12        }
13        .all{
14            padding: 30px;
15            width: 700px;
16            margin: 0 auto;
17        }
18        h3{
19            padding: 10px 0;
20        }
21        .box{
22            padding: 30px;
23            min-height: 100px;
24            overflow: hidden;
25            border: 1px solid greenyellow;
26        }
27        .item{
28            width: 150px;
29            height: 150px;
30            border: 2px solid #e8e8e8;
31            border-radius: 5px;
32            position: relative;
33            box-sizing: border-box;
34            margin-bottom: 10px;
35            margin-right: 12px;
36            float: left;
37            background-color: #fff;
38            padding: 5px;
39        }
40        .item:hover{
41            box-shadow: 0px 0px 15px #eee;
42            transform: translate3d(0px,2px,0px);
43            transition: all .3s ease-out;
44        }
45        .item:nth-child(4n) {
46            margin-right: 0px;
47        }
48        .del{
49            float: right;
50            display: flex;
51            padding: 5px;
52            width: 10px;
53            height: 10px;
54            position: relative;
55            margin-right: 10px;
56            cursor: pointer;
57        }
58        .del::before{
59            content: '一';
60            position: absolute;
61            top: 0;
62            transform: rotateZ(45deg);
63        }
64        .del::after{
65            content: '一';
66            position: absolute;
67            top: 0px;
68            transform: rotateZ(-45deg);
69        }
70        .active{
71            transition: transform 400ms ease-out;
72        }
73        .active2{
74            transition: all .6s ease-in-out;
75        }
76        .active_preview{
77            transition: opacity .6s ease-in-out;
78        }
79        hr{
80            margin: 20px 0;
81        }
82        .item_img{
83            width: 50px;
84            display: inline-flex;
85            border-radius: 5px;
86            overflow: hidden;
87            cursor: pointer;
88            position: relative;
89        }
90        .item_img:hover::before {
91            opacity: 1;
92        }
93        .item_img::before {
94            content: " ";
95            position: absolute;
96            left: 0;
97            top: 0;
98            width: 100%;
99            height: 100%;
100            opacity: 0;
101            cursor: pointer;
102            background-color: rgba(0,0,0,.5);
103            transition: all .3s;
104            z-index: 1;
105        }
106        .item_img img{
107            width: 100%;
108        }
109        .preview{
110            position: fixed;
111            top: 0;
112            left: 0;
113            right: 0;
114            bottom: 0;
115            background-color: rgba(0,0,0,.7);
116            z-index: -1;
117            opacity: 0;
118        }
119        .preview_img{
120            position: absolute;
121            top: 0;
122            left: 0;
123            right: 0;
124            bottom: 0;
125            margin: auto;
126            border-radius: 5px;
127        }
128    </style>
129</head>
130<body>
131    <div class="all" >
132        <h3>
133            <span>flip动画</span>
134            <button onclick="addBtn()" > 增加 </button>
135        </h3>
136        <div class="box" >
137            <div class="item"></div>
138        </div>
139    </div>
140    <hr>
141    <!-- 图片预览 -->
142    <h3>
143        <span>图片预览</span>
144    </h3>
145    <div class="box"  style="max-width: 800px;" >
146        <div class="item_img" onclick="preview(this)" >
147            <img src="https://i.picsum.photos/id/155/467/680.jpg?hmac=sWw0LvYr7xc_V-bjOgZgwCTKCrWXXAfFzTLR5E16jG8" alt="">
148        </div>
149    </div>
150    <!-- 预览区域 -->
151    <div class="preview"></div>
152    <script>
153        // flip 动画思路
154        /**
155         * f - first 记录动画开始前的位置、大小等信息 ( translateY(0px) )
156         * l - last  记录动画结束时的位置、大小等信息 ( translateY(100px) )
157         * i - invert 对动画前后数据信息的计算(translateY --> 100px,同时利用translate等操作,将dom恢复到 first位置)
158         * p - play 开始动画,并移除 i 步骤恢复至 first 的操作,启用tansition,动画就开始了
159         *
160         * 整个过程其实就是,先记录好动画前后的dom位置等数据信息
161         * 然后,利用css将dom恢复至初始位置
162         * 最后,移除上一步恢复的状态(此时dom会自动回到last位置,只不过没有过渡效果,生硬的闪现),添加过渡效果,完成动画
163         * **/
164        let index = 1
165        // 增加 按钮
166        function addBtn() {
167            const divEle = document.getElementsByClassName('item')
168            // 初始位置
169            record(divEle)
170            addEle()
171            // 结束位置 + 复位 + play
172            last(divEle)
173        }
174        // 记录初始位置
175        function record(eleAll) {
176            for( let i = 0;i < eleAll.length; i++ ) {
177                const { top,left } = eleAll[i].getBoundingClientRect()
178                eleAll[i]._top_ = top
179                eleAll[i]._left_ = left
180            }
181        }
182        // 插入dom,此时dom结构已经发生变化
183        function addEle() {
184            const Box = document.getElementsByClassName('box')[0]
185            const div = document.createElement('div'), span = document.createElement('span')
186
187            span.className = 'del'
188            div.className = 'item'
189            div.innerHTML = index++
190            div.appendChild(span)
191
192            span.style.color = randomHexColorCode()
193            div.style.borderColor = randomHexColorCode()
194            div.style.zIndex = 'auto'
195
196            span.onclick = delBtn
197
198            Box.insertBefore(div,Box.childNodes[0])
199        }
200        // 结束位置
201        function last(eleAll) {
202            for( let i = 0;i < eleAll.length; i++ ) {
203                const dom = eleAll[i]
204                const { top,left } = dom.getBoundingClientRect()
205                // 新增dom时,逻辑应为 原有dom后移动,新增dom不动,故记录了位置的才添加动画
206                if(dom._left_) {
207                    /**
208                     * flip 思路:
209                     * 1、计算出开始和结束的状态差
210                     * 2、dom变化后,通过transform直接让dom位于最开始状态
211                     * 3、添加 transition ,移除 transform(让dom位于初始状态的属性)
212                     * 4、dom 自动恢复结束状态
213                     * **/
214                    // 恢复至开始位置
215                    dom.style.transform = `translate3d(${ dom._left_ - left }px, ${ dom._top_ - top }px,0px)`
216
217                    // play 过程,移除开始位置的设置,添加过渡
218                    requestAnimationFrame(function() {
219                        //启用tansition,并移除翻转的改变
220                        dom.classList.add('active')
221                        dom.style.transform = 'none'
222                    })
223                    dom.addEventListener('transitionend', () => {
224                        dom.classList.remove('active')
225                    })
226                    // 兼容性不好
227                    // dom.animate([
228                    //     { transform: `translate(${dom._left_ - left}px, ${dom._top_ - top}px)` },
229                    //     { transform: `translate(0px, 0px)` },
230                    // ], { duration: 400 })
231                }
232
233            }
234        }
235        // 删除
236        function delBtn({ target }) {
237            const divEle = document.getElementsByClassName('item')
238            record(divEle)
239            delEle(target)
240            last(divEle)
241        }
242        // 删除 dom
243        function delEle(target) {
244            target.parentNode.remove()
245        }
246
247
248        // ----------图片预览--------
249        // 图片原始位置
250        let originTop = 0,originLeft = 0,scale = 0;
251        // 点击预览
252        function preview(e) {
253            // 记录 first 位置
254            recordImg(e)
255            const { src } = e.childNodes[1]
256            // 插入dom,获取 last 位置
257            previewImg(src)
258
259        }
260        // first 记录位置
261        function recordImg(ele) {
262            const { top,left } = ele.getBoundingClientRect()
263            originTop = top
264            originLeft = left
265        }
266        // 预览
267        function previewImg(src) {
268            const img = document.createElement('img')
269
270            img.src = src
271            img.className = 'preview_img'
272            document.body.appendChild(img)
273
274            img.onclick = previewClose
275            // 图片加载onload问题,直接出现,暂时设置不可见
276            img.style.display = 'none'
277
278            img.onload = function() {
279                img.style.display = 'block'
280                // 计算缩放比
281                scale = 50 / img.width
282                // 获取 last 位置
283                const { top,left } = img.getBoundingClientRect()
284                img._top_ = top
285                img._left_= left
286
287                // 计算 invert 图片回归原位(first)
288                img.style.transform = `translate3d(${ originLeft - left }px, ${ originTop - top }px,0px) scale(${scale})`
289                img.style.transformOrigin = '0 0'
290                // play 过程,移除回归原位的设置
291                playImg(img)
292            }
293
294        }
295        // paly 过程
296        function playImg(ele) {
297            requestAnimationFrame(function() {
298                //启用tansition,并移除翻转的改变
299                ele.style.transform = `translate3d(0px,0px,0px) scale(1)`
300                ele.style.zIndex = `2`
301                // 遮罩
302                const preview = document.getElementsByClassName('preview')[0]
303                preview.style.opacity = '1'
304                preview.style.zIndex = '1'
305
306                preview.classList.add('active_preview')
307                ele.classList.add('active2')
308            })
309        }
310        // 点击缩小
311        function previewClose({ target }) {
312            target.style.transform = `translate3d(${ originLeft - target._left_ }px, ${ originTop - target._top_ }px,0px) scale(${scale})`
313
314            const preview = document.getElementsByClassName('preview')[0]
315            preview.style.opacity = '0'
316
317            target.addEventListener('transitionend', () => {
318                target.remove()
319                preview.style.zIndex = '-1'
320            })
321
322
323        }
324        // 随机颜色
325        function randomHexColorCode() {
326            let n = (Math.random() * 0xfffff * 1000000).toString(16);
327            return '#' + n.slice(0, 6);
328        };
329    </script>
330</body>
331</html>