1本文源码
2GitHub:知了一笑
3https://github.com/cicadasmile/spring-boot-base
一、SpringBoot 框架的特点
1、SpringBoot2.0 特点
1)SpringBoot继承了Spring优秀的基因,上手难度小
2)简化配置,提供各种默认配置来简化项目配置
3)内嵌式容器简化Web项目,简化编码
Spring Boot 则会帮助开发着快速启动一个 web 容器,在 Spring Boot 中,只需要在 pom 文件中添加如下一个 starter-web 依赖即可.
1<dependency>
2    <groupId>org.springframework.boot</groupId>
3    <artifactId>spring-boot-starter-web</artifactId>
4</dependency>
4)发展趋势看 微服务是未来发展的趋势,项目会从传统架构慢慢转向微服务架构,因为微服务可以使不同的团队专注于更小范围的工作职责、使用独立的技术、更安全更频繁地部署。
二、搭建SpringBoot的环境
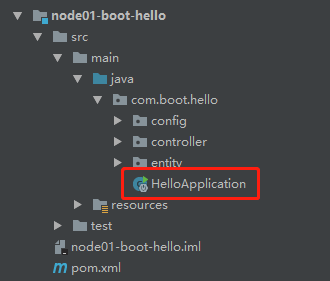
1、创建一个Maven项目
2、引入核心依赖
1<dependency>
2    <groupId>org.springframework.boot</groupId>
3    <artifactId>spring-boot-starter-web</artifactId>
4</dependency>
3、编写配置文件
application.yml
1# 端口
2server:
3  port: 8001
4、启动文件注解
1import org.springframework.boot.SpringApplication;
2import org.springframework.boot.autoconfigure.SpringBootApplication;
3@SpringBootApplication
4public class HelloApplication {
5    public static void main(String[] args) {
6        SpringApplication.run(HelloApplication.class,args) ;
7    }
8}
丝毫没有问题,就这样吧启动上面这个类,springboot的基础环境就搭建好了。 想想之前的Spring框架的环境搭建,是不是就是这个感觉:意会一下吧。
三、SpringBoot2.0 几个入门案例
1、创建一个Web接口
1import com.boot.hello.entity.ProjectInfo;
2import org.springframework.web.bind.annotation.RequestMapping;
3import org.springframework.web.bind.annotation.RestController;
4/**
5 * SpringBoot 2.0 第一个程序
6 */
7@RestController
8public class HelloController {
9    @RequestMapping("/getInfo")
10    public ProjectInfo getInfo (){
11        ProjectInfo info = new ProjectInfo() ;
12        info.setTitle("SpringBoot 2.0 基础教程");
13        info.setDate("2019-06-05");
14        info.setAuthor("知了一笑");
15        return info ;
16    }
17}
@RestController 注解 等价 @Controller + @ResponseBody 返回Json格式数据。
2、参数映射
1)首先看看SpringBoot 如何区分环境 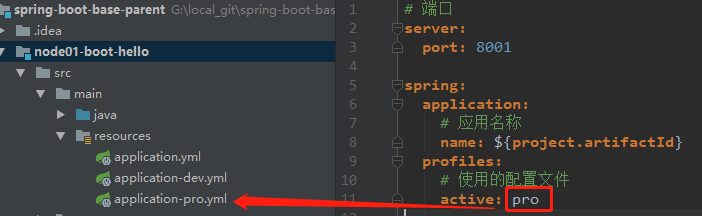
这里标识配置加载指定的配置文件。
2)参数配置 application-pro.yml
1user:
2  author: 知了一笑
3  title: SpringBoot 2.0 程序开发
4  time: 2019-07-05
3)参数内容读取
1@Component
2public class ParamConfig {
3    @Value("${user.author}")
4    private String author ;
5    @Value("${user.title}")
6    private String title ;
7    @Value("${user.time}")
8    private String time ;
9	// 省略 get 和 set 方法
10}
4)调用方式
1/**
2 * 环境配置,参数绑定
3 */
4@RestController
5public class ParamController {
6
7    @Resource
8    private ParamConfig paramConfig ;
9
10    @RequestMapping("/getParam")
11    public String getParam (){
12        return "["+paramConfig.getAuthor()+";"+
13                paramConfig.getTitle()+";"+
14                paramConfig.getTime()+"]" ;
15    }
16}
17
3、RestFul 风格接口和测试
1)Rest风格接口
1/**
2 * Rest 风格接口测试
3 */
4@RestController // 等价 @Controller + @ResponseBody 返回Json格式数据
5@RequestMapping("rest")
6public class RestApiController {
7    private static final Logger LOG = LoggerFactory.getLogger(RestApiController.class) ;
8    /**
9     * 保存
10     */
11    @RequestMapping(value = "/insert",method = RequestMethod.POST)
12    public String insert (UserInfo userInfo){
13        LOG.info("===>>"+userInfo);
14        return "success" ;
15    }
16    /**
17     * 查询
18     */
19    @RequestMapping(value = "/select/{id}",method = RequestMethod.GET)
20    public String select (@PathVariable Integer id){
21        LOG.info("===>>"+id);
22        return "success" ;
23    }
24}
2)测试代码
1@RunWith(SpringJUnit4ClassRunner.class)
2@SpringBootTest(classes = MockServletContext.class)
3@WebAppConfiguration
4public class TestRestApi {
5
6    private MockMvc mvc;
7    @Before
8    public void setUp() throws Exception {
9        mvc = MockMvcBuilders.standaloneSetup(new RestApiController()).build();
10    }
11
12    /**
13     * 测试保存接口
14     */
15    @Test
16    public void testInsert () throws Exception {
17        RequestBuilder request = null;
18        request = post("/rest/insert/")
19                .param("id", "1")
20                .param("name", "测试大师")
21                .param("age", "20");
22        mvc.perform(request)
23                .andExpect(content().string(equalTo("success")));
24    }
25
26    /**
27     * 测试查询接口
28     */
29    @Test
30    public void testSelect () throws Exception {
31        RequestBuilder request = null;
32        request = get("/rest/select/1");
33        mvc.perform(request)
34                .andExpect(content().string(equalTo("success")));
35    }
36}
这样SpringBoot2.0的入门案例就结束了,简单,优雅,有格调。
四、源代码
1GitHub:知了一笑
2https://github.com/cicadasmile/spring-boot-base
3码云:知了一笑
4https://gitee.com/cicadasmile/spring-boot-base