
今天玩一些新的东西,大家都没有看过这样的视频:
或者 这样的图片:
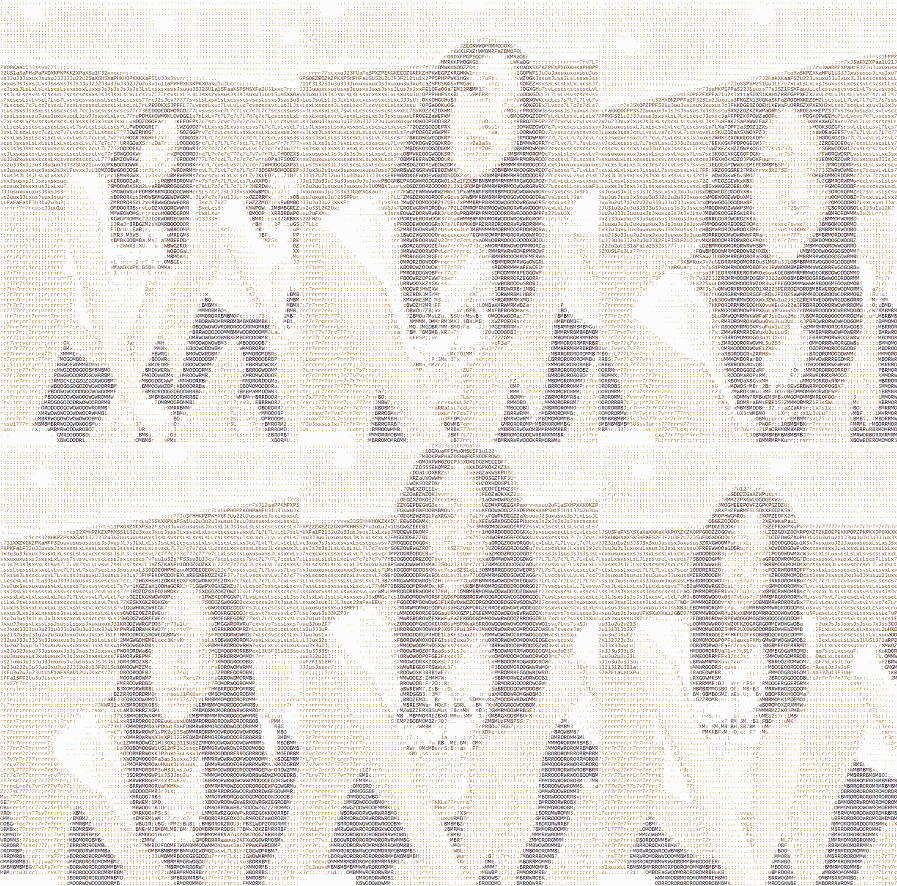
网上有很多生成这种图片/视频的工具,但是每个程序员都有一颗造轮子的心,我们当然要玩出自己的花样啦。老规矩,还是先讲原理,建议先用自己的方式实现一遍。原理很简单首先准备一组排好序的不同 “着色密度 ” 的ascii字符(事实上你可以用任何字符),比如 #KDGLftji+;,:. ,接着将源图转为灰度图,然后遍历图中的像素,根据r/g/b通道的值来匹配字符串中相应 “着色密度 ” 的字符,值越小则颜色越深,字符的“密度”也应越大。如果需要保留颜色,只需将灰度图和原图的像素位置一一对应即可。在开始实现功能之前,我们需要先了解一下颜色矩阵(ColorMatrix)。在计算机中,每个像素的颜色可以用一个向量(有的文章也叫矢量或分量)矩阵表示:[R, G, B, A]。颜色变换矩阵通常是用一个5x5的矩阵来表示,和空间中一个n维向量的平移变换需要用一个n+1维的矩阵来表示一样,颜色矩阵也需要引入一个齐次坐标来进行“平移操作”。以下是一些常见的颜色变换矩阵:
亮度矩阵
R
G
B
A
W
R
1
0
0
0
b
G
0
1
0
0
b
B
0
0
1
0
b
A
0
0
0
1
0
W
0
0
0
0
1
反色矩阵
R
G
B
A
W
R
-1
0
0
255
0
G
0
-1
0
255
0
B
0
0
-1
255
0
A
0
0
0
1
0
W
0
0
0
0
1
灰度矩阵
R
G
B
A
W
R
0.3086
0.6094
0.0820
0
0
G
0.3086
0.6094
0.0820
0
0
B
0.3086
0.6094
0.0820
0
0
A
0
0
0
1
0
W
0
0
0
0
1
ps:将像素去色的原理是使R=G=B,同时为了保持亮度不变,须使R+G+B尽量等于1 ,理论上来说要平分R、G、B通道值,应该是(R+B+G)/3,即系数应该约为0.3333才对,之所以比例不同,按照网上的解释,
这个比例主要是根据人眼中三种不同的感光细胞的感光强度比例分配的
还有一组比较常用的比例是0.2125,0.7154,0.0721,至于怎么来的还希望哪位大佬指点迷津。
下面是页面的html结构
1<!DOCTYPE html>
2<html lang="zh-cn">
3<head>
4    <meta charset="UTF-8">
5    <title>ascii art</title>
6    <style>
7
8        * {
9            margin: 0;
10            padding: 0;
11        }
12
13        canvas, img, #container {
14            display: block;
15            margin: auto;
16        }
17
18        #container {
19            line-height: 12px;
20            font-size: 12px;
21            font-family: 'SimHei', monospace;
22            letter-spacing: 6px;
23        }
24
25    </style>
26</head>
27<body>
28<img src="https://my.oschina.net//codingDog/blog/1845658/trump.png"/>
29<div id="container"></div>
30<script>
31  (function () {
32    // 这里是js代码
33  })()
34</script>
35</body>
36</html>
解释一下几个关键点,首先我们输出的文字必须是等宽字体,我这里使用的是黑体:font-family: 'SimHei', monospace; 别忘了加上fallback:monospace。等宽字体是指每个字宽高都固定的字体,这里的固定宽高是指同一种文字,比如中文的黑体宽度是英文的两倍,其他字体我没有试过,大家可以自己去实验。这也是我设置了 letter-spacing: 6px; 的原因:当黑体设置了font-size=line-height时,中文是宽高相等,英文宽是高的一半。
接下来是js代码:
1var container = document.getElementById('container')
2var offScreenCvs = document.createElement('canvas') // 创建离屏canvas
3var offScreenCtx = offScreenCvs.getContext('2d', { alpha: false }) // 关闭透明度
4var offScreenCvsWidth, offScreenCvsHeight
5var samplerStep = 4 // 采样间隔
6
7var img = new Image()
8var onImgLoaded = function () {
9  offScreenCvsWidth = img.width
10  offScreenCvsHeight = img.height
11  offScreenCvs.width = offScreenCvsWidth
12  offScreenCvs.height = offScreenCvsHeight
13  offScreenCtx.drawImage(img, 0, 0, offScreenCvsWidth, offScreenCvsHeight)
14  imageData = offScreenCtx.getImageData(0, 0, offScreenCvsWidth, offScreenCvsHeight)
15  // 采样点数 = 图片宽度 / 采样间隔;容器边长 = 采样点数 × 字体大小
16  container.style.width = (offScreenCvsWidth / samplerStep * 12) + 'px'
17  container.style.height = (offScreenCvsHeight / samplerStep * 12) + 'px'
18  render()
19}
20img.src = './trump.png'
21img.complete ? onImgLoaded() : (img.onload = onImgLoaded) // 确保onImgLoaded被执行
22
23var imageData
24var x, y, pos
25var asciiCharArray = '#KDGLftji+;,:.'.split('') // 准备不同密度的字符数组(降序)
26var durationPerChar = Math.ceil(255 / asciiCharArray.length) // 每个字符代表的密度阈值
27
28function render () {
29  var imageDataContent = imageData.data
30  var strArray = []
31  var part1, part2
32  var letter
33  var value
34  for (y = 0; y < offScreenCvsHeight; y += samplerStep) {
35    strArray.push('<p>') // 使用P标签换行
36    for (x = 0; x < offScreenCvsWidth; x += samplerStep) {
37      pos = y * offScreenCvsWidth + x
38      // 获取RBG加权平均后的灰度值
39      value = imageDataContent[pos * 4] * 0.3086 + imageDataContent[pos * 4 + 1] * 0.6094 + imageDataContent[pos * 4 + 2] * 0.0820
40      imageDataContent[pos * 4] = imageDataContent[pos * 4 + 1] = imageDataContent[pos * 4 + 2] = value
41      // 判断灰度值落在那个密度范围中,拿到对应的字符
42      part1 = Math.floor(value / durationPerChar)
43      part2 = value % durationPerChar
44      letter = part2 ? asciiCharArray[part1] : (part1 ? asciiCharArray[part1 - 1] : 'æ')
45
46      strArray.push(letter)
47    }
48    strArray.push('</p>')
49  }
50  container.innerHTML = strArray.join('')
51}
先解释一下这行: img.complete ? onImgLoaded() : (img.onload = onImgLoaded)
通常来说img.onload = 必须要放在 img.src = 之前,来保证onload回调一定会执行,否则的话如果图片在执行这段代码之前已经被浏览器缓存了,则有可能不会触发onload回调。但是有时候由于业务的需要,有些操作必须要在图片载入完成后执行,可是不一定立即执行,碰到这种情况,就可以用到Image对象的complete属性,该属性会返回当前图片是否加载完成的bollean值。于是,通过上面这行代码,就可以确保onImgLoaded函数在图片载入完成后一定会被触发。(本案例该写法不必须,但是建议养成这个习惯)
上面实际上已经完成了核心的功能,接下来对我们的代码做一些优化——
如果我们需要提供改变字体大小的功能怎么办?可以先直接把字体大小相关的字面值抽出为一个变量,如fontSize :
1...
2...
3var fontSize = 18 // 字体大小
4...
5...
6var onImgLoaded = function () {
7  ...
8  ...
9  container.style.width = (offScreenCvsWidth / samplerStep * fontSize) + 'px'
10  container.style.height = (offScreenCvsHeight / samplerStep * fontSize) + 'px'
11  container.style.fontSize = fontSize + 'px'
12  container.style.lineHeight = fontSize + 'px'
13  container.style.letterSpacing = (fontSize / 2) + 'px' // SimHei体英文宽是高的一半
14  render()
15}
但是PC浏览器不允许字体小于12px怎么办呢?我们可以用css的scale来缩放容器就行了,修改代码如下:
1...
2var onImgLoaded = function () {
3  ...
4  ...
5  imageData = offScreenCtx.getImageData(0, 0, offScreenCvsWidth, offScreenCvsHeight)
6  if (fontSize < 12) {
7    // 小于12px则将字体改为12px并通过 transform scale 进行缩放
8    container.style.transform = 'scale(' + (fontSize / 12) + ')'
9    container.style.transformOrigin = '50% 0'
10    fontSize = 12
11  }
12  container.style.width = (offScreenCvsWidth * fontSize / samplerStep) + 'px'
13  ...
14  ...
15}
16...
好了,现在我们生成的是灰色的图,但是如何生成彩色的图呢,估计大家第一反应就是给每个字外面包一层标签(比如span、font),但是笔者试了之后发现一旦图片尺寸稍微大一些,性能下降非常夸张,一度把我的浏览器给弄崩溃了(╥╯^╰╥),小伙伴们可以自行尝试。于是我打算用canvas来做渲染而不是使用开销极大的dom,上面的代码大部分可以重用,我修改了一下后的html结构:
1<!DOCTYPE html>
2<html lang="zh-cn">
3<head>
4    <meta charset="UTF-8">
5    <title>ascii art</title>
6    <style>
7
8        * {
9            margin: 0;
10            padding: 0;
11        }
12
13        canvas, img {
14            display: block;
15            margin: auto;
16        }
17
18    </style>
19</head>
20<body>
21<img src="https://my.oschina.net//codingDog/blog/1845658/trump.png"/>
22<canvas id="ascii-canvas"></canvas>
23<script>
24  (function () {
25    // canvas 实现
26  })()
27</script>
28</body>
29</html>
这是js代码:
1var offScreenCvs = document.createElement('canvas')
2var offScreenCtx = offScreenCvs.getContext('2d', { alpha: false })
3var asciiCvs = document.getElementById('ascii-canvas')
4var asciiCtx = asciiCvs.getContext('2d', { alpha: false })
5var offScreenCvsWidth, offScreenCvsHeight, asciiCvsWidth, asciiCvsHeight
6var fontSize = 8
7var samplerStep = 4
8
9var img = new Image()
10var onImgLoaded = function () {
11  offScreenCvsWidth = img.width
12  offScreenCvsHeight = img.height
13  offScreenCvs.width = offScreenCvsWidth
14  offScreenCvs.height = offScreenCvsHeight
15  offScreenCtx.drawImage(img, 0, 0, offScreenCvsWidth, offScreenCvsHeight)
16  imageData = offScreenCtx.getImageData(0, 0, offScreenCvsWidth, offScreenCvsHeight)
17  asciiCvsWidth = offScreenCvsWidth / samplerStep * fontSize
18  asciiCvsHeight = (offScreenCvsHeight / samplerStep + 1) * fontSize
19  asciiCvs.width = asciiCvsWidth
20  asciiCvs.height = asciiCvsHeight
21  render()
22}
23img.src = './trump.png'
24img.complete ? onImgLoaded() : (img.onload = onImgLoaded)
25
26var imageData
27var x, y, _x, _y, pos
28var asciiCharArray = '#KDGLftji+;,:.'.split('')
29var durationPerChar = Math.ceil(255 / asciiCharArray.length)
30
31function render () {
32  var imageDataContent = imageData.data
33  var part1, part2
34  var letter
35  var value
36  asciiCtx.fillStyle = '#ffffff'
37  asciiCtx.fillRect(0, 0, asciiCvsWidth, asciiCvsHeight)
38  asciiCtx.fillStyle = '#000000'
39  asciiCtx.font = fontSize + 'px SimHei'
40  for (y = 0, _y = 0; y < offScreenCvsHeight; y += samplerStep, _y++) {
41    for (x = 0, _x = 0; x < offScreenCvsWidth; x += samplerStep, _x++) {
42      pos = y * offScreenCvsWidth + x
43      value = imageDataContent[pos * 4] * 0.3086 + imageDataContent[pos * 4 + 1] * 0.6094 + imageDataContent[pos * 4 + 2] * 0.0820
44      imageDataContent[pos * 4] = imageDataContent[pos * 4 + 1] = imageDataContent[pos * 4 + 2] = value
45
46      part1 = Math.floor(value / durationPerChar)
47      part2 = value % durationPerChar
48      letter = part2 ? asciiCharArray[part1] : (part1 ? asciiCharArray[part1 - 1] : 'æ')
49
50      asciiCtx.fillText(letter, _x * fontSize, (_y + 1) * fontSize)
51    }
52  }
53}
完美,接下来给文字上色:
1...
2...
3var x, y, _x, _y, pos
4var r, g, b
5var asciiCharArray = '#KDGLftji+;,:.'.split('')
6...
7...
8function render () {
9  ...
10  ...
11  for (y = 0, _y = 0; y < offScreenCvsHeight; y += samplerStep, _y++) {
12    for (x = 0, _x = 0; x < offScreenCvsWidth; x += samplerStep, _x++) {
13      pos = y * offScreenCvsWidth + x
14      r = imageDataContent[pos * 4]
15      g = imageDataContent[pos * 4 + 1]
16      b = imageDataContent[pos * 4 + 2]
17      value = r * 0.3086 + g * 0.6094 + b * 0.0820
18      imageDataContent[pos * 4] = imageDataContent[pos * 4 + 1] = imageDataContent[pos * 4 + 2] = value
19
20      part1 = Math.floor(value / durationPerChar)
21      part2 = value % durationPerChar
22      letter = part2 ? asciiCharArray[part1] : (part1 ? asciiCharArray[part1 - 1] : 'æ')
23
24      asciiCtx.fillStyle = 'rgb(' + r + ',' + g + ',' + b + ')'
25      asciiCtx.fillText(letter, _x * fontSize, (_y + 1) * fontSize)
26    }
27  }
28}
29...
30...
搞腚!
核心的完成了下面就简单了,只要把资源换成视频,然后逐帧截取画面即可:
html结构如下:
1...
2...
3<body>
4<video id="video">
5    <source src="https://my.oschina.net//codingDog/blog/1845658/mov_bbb.mp4" type="video/mp4">
6    <source src="https://my.oschina.net//codingDog/blog/1845658/mov_bbb.ogg" type="video/ogg">
7    您的浏览器不支持 HTML5 video 标签。
8</video>
9<canvas id="ascii-canvas"></canvas>
10<script>
11...
12...
js代码如下:
1var video = document.getElementById('video')
2var offScreenCvs = document.createElement('canvas')
3var offScreenCtx = offScreenCvs.getContext('2d', { alpha: false })
4var asciiCvs = document.getElementById('ascii-canvas')
5var asciiCtx = asciiCvs.getContext('2d', { alpha: false })
6var offScreenCvsWidth, offScreenCvsHeight, asciiCvsWidth, asciiCvsHeight
7var fontSize = 8
8var samplerStep = 4
9
10var maxWidth = 400, maxHeight = 400
11
12video.onloadeddata = function () {
13  offScreenCvsWidth = video.videoWidth
14  offScreenCvsHeight = video.videoHeight
15  var ratio = offScreenCvsWidth / offScreenCvsHeight
16  if (video.videoWidth > maxWidth) {
17    offScreenCvsWidth = maxWidth
18    offScreenCvsHeight = Math.floor(offScreenCvsWidth / ratio)
19  }
20  if (video.videoHeight > maxHeight) {
21    offScreenCvsHeight = maxHeight
22    offScreenCvsWidth = Math.floor(offScreenCvsHeight * ratio)
23  }
24  offScreenCvs.width = offScreenCvsWidth
25  offScreenCvs.height = offScreenCvsHeight
26  asciiCvsWidth = (offScreenCvsWidth / samplerStep + 1) * fontSize
27  asciiCvsHeight = (offScreenCvsHeight / samplerStep + 1) * fontSize
28  asciiCvs.width = asciiCvsWidth
29  asciiCvs.height = asciiCvsHeight
30
31  offScreenCtx.drawImage(video, 0, 0, offScreenCvsWidth, offScreenCvsHeight)
32  imageData = offScreenCtx.getImageData(0, 0, offScreenCvsWidth, offScreenCvsHeight)
33  render()
34
35  video.onclick = function () {
36    video.paused ? video.play() : video.pause()
37  }
38
39  video.onplay = function () {
40    stop = false
41    rendering = false
42    requestAnimationFrame(tick)
43  }
44
45  video.onpause = function () {
46    stop = true
47  }
48}
49
50var imageData
51var x, y, _x, _y, pos
52var r, g, b
53var asciiCharArray = '#KDGLftji+;,:.'.split('')
54var durationPerChar = Math.ceil(255 / asciiCharArray.length)
55
56function render () {
57  var imageDataContent = imageData.data
58  var part1, part2
59  var letter
60  var value
61  asciiCtx.fillStyle = '#ffffff'
62  asciiCtx.fillRect(0, 0, asciiCvsWidth, asciiCvsHeight)
63  asciiCtx.fillStyle = '#000000'
64  asciiCtx.font = fontSize + 'px SimHei'
65  for (y = 0, _y = 0; y < offScreenCvsHeight; y += samplerStep, _y++) {
66    for (x = 0, _x = 0; x < offScreenCvsWidth; x += samplerStep, _x++) {
67      pos = y * offScreenCvsWidth + x
68      r = imageDataContent[pos * 4]
69      g = imageDataContent[pos * 4 + 1]
70      b = imageDataContent[pos * 4 + 2]
71      value = r * 0.3086 + g * 0.6094 + b * 0.0820
72      imageDataContent[pos * 4] = imageDataContent[pos * 4 + 1] = imageDataContent[pos * 4 + 2] = value
73
74      part1 = Math.floor(value / durationPerChar)
75      part2 = value % durationPerChar
76      letter = part2 ? asciiCharArray[part1] : (part1 ? asciiCharArray[part1 - 1] : 'æ')
77
78      asciiCtx.fillStyle = 'rgb(' + r + ',' + g + ',' + b + ')'
79      asciiCtx.fillText(letter, _x * fontSize, (_y + 1) * fontSize)
80    }
81  }
82}
83
84var stop = false // 是否停止
85var timeNow = Date.now() // 当前时间戳
86var timeLast = timeNow // 上一帧时间戳
87var delta = 0 // 与上一帧间隔
88var interval //
89var fps = 60 // 帧率
90
91interval = 1000 / fps // 每帧耗时
92
93var rendering = false
94var tick = function () {
95  if (stop) return false
96  timeNow = Date.now()
97  delta = timeNow - timeLast
98  if (delta > interval) {
99    timeLast = timeNow
100
101    if (!rendering) {
102      rendering = true
103      offScreenCtx.drawImage(video, 0, 0, offScreenCvsWidth, offScreenCvsHeight)
104      imageData = offScreenCtx.getImageData(0, 0, offScreenCvsWidth, offScreenCvsHeight)
105      render()
106      rendering = false
107    }
108  }
109  requestAnimationFrame(tick)
110}
除了tick,别的基本没变化,解释一下这个,事实上,只要渲染视频并不用这么一长段,下面这样即可:
1var tick = function () {
2  if (!rendering) {
3    rendering = true
4    offScreenCtx.drawImage(video, 0, 0, offScreenCvsWidth, offScreenCvsHeight)
5    imageData = offScreenCtx.getImageData(0, 0, offScreenCvsWidth, offScreenCvsHeight)
6    render()
7    rendering = false
8  }
9  requestAnimationFrame(tick)
10}
多余的这些代码其实可以称为是一段 动画或游戏渲染的范式 。因为的requestAnimationFrame渲染频率是根据浏览器的刷新率来的,而电脑实时的性能会影响屏幕的刷新率,但是通常我们的动画都是固定的帧率,为了保持最终渲染出来的帧率尽可能的符合设计,所以一般会根据设计的帧率来计算出每一帧的耗时,然后根据每一帧的实际耗时来算出理想状态下的变化量,以下就是比较常规的设计范式:
1var stop = false // 是否停止渲染
2var timeNow = Date.now() // 当前时间戳
3var timeLast = timeNow // 上一帧时间戳
4var delta = 0 // 与上一帧间隔
5var fps = 60 // 帧率
6var interval = 1000 / fps // 每帧耗时
7
8var rendering = false // 是否渲染某组件
9var tick = function () {
10  if (stop) return false
11  timeNow = Date.now()
12  delta = timeNow - timeLast
13  if (delta > interval) {
14    timeLast = timeNow
15
16    if (!rendering) {
17      // loop 代码
18    }
19
20  }
21  requestAnimationFrame(tick)
22}
教程结束~~~~じゃない
那gif怎么搞呢?
emmmm,gif-frames 可以把gif导出多张序列帧,后面的原理基本就和视频差不太多了,就给大家当课后作业吧 23333
 Demo1:Bad Apple!!(dom版)
Demo2:Big Buck Bunny(canvas版-彩色)
Demo3:trump(dom版)
Demo4:See the Pen ascii_art_pure by Kay (@oj8kay) on CodePen.