
欢迎访问我的GitHub
这里分类和汇总了欣宸的全部原创(含配套源码):https://github.com/zq2599/blog_demos
系列文章汇总
- jackson学习之一:基本信息
- jackson学习之二:jackson-core
- jackson学习之三:常用API操作
- jackson学习之四:WRAP_ROOT_VALUE(root对象)
- jackson学习之五:JsonInclude注解
- jackson学习之六:常用类注解
- jackson学习之七:常用Field注解
- jackson学习之八:常用方法注解
- jackson学习之九:springboot整合(配置文件)
- jackson学习之十(终篇):springboot整合(配置类)
关于springboot整合jackson
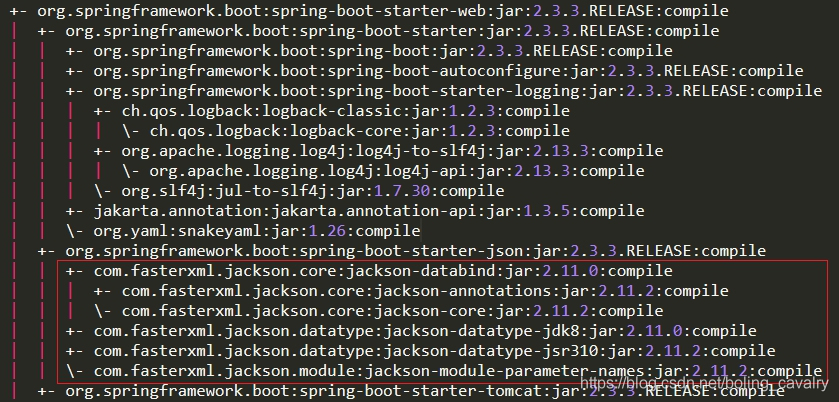
- 本文是《jackson学习》系列的第九篇,学习如何在springboot项目中使用jackson,以springboot-2.3.3版本为例,jackson是springboot的默认json处理工具,如下图红框所示,jackson在maven配置中被spring-boot-starter-web间接依赖,可直接使用:
- 在springboot项目中常用的配置方式有两种:
- 用properties或yml配置文件来配置,即本篇的内容;
- 用配置类来配置,这是下一篇文章的主题;
本篇概览
今天实战内容如下:
- 开发springboot应用,体验springboot默认支持jackson,包括jackson注解和ObjectMapper实例的注入;
- 在<font color="blue">application.yml</font>中添加jackson配置,验证是否生效;
源码下载
- 如果您不想编码,可以在GitHub下载所有源码,地址和链接信息如下表所示(https://github.com/zq2599/blog_demos):
名称
链接
备注
项目主页
https://github.com/zq2599/blog_demos
该项目在GitHub上的主页
git仓库地址(https)
https://github.com/zq2599/blog_demos.git
该项目源码的仓库地址,https协议
git仓库地址(ssh)
git@github.com:zq2599/blog_demos.git
该项目源码的仓库地址,ssh协议
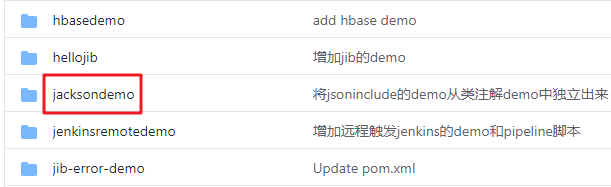
- 这个git项目中有多个文件夹,本章的应用在<font color="blue">jacksondemo</font>文件夹下,如下图红框所示:
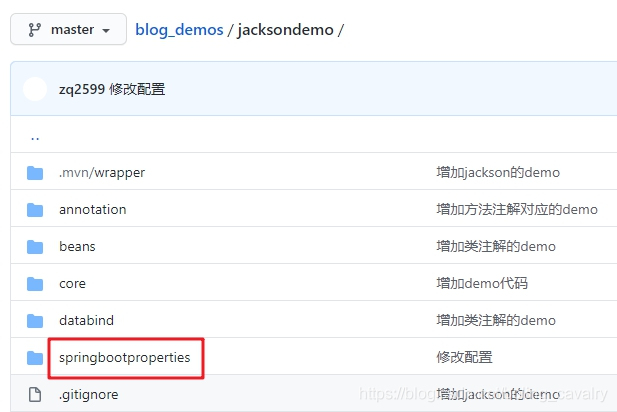
- <font color="blue">jacksondemo</font>是父子结构的工程,本篇的代码在<font color="blue">springbootproperties</font>子工程中,如下图:
开始实战
-
由于同属于《jackson学习》系列文章,因此本篇的springboot工程作为<font color="blue">jacksondemo</font>的子工程存在,pom.xml如下,需要注意的是parent不能使用spring-boot-starter-parent,而是通过dependencyManagement节点来引入springboot依赖:
<?xml version="1.0" encoding="UTF-8"?><project xmlns="http://maven.apache.org/POM/4.0.0" xmlns:xsi="http://www.w3.org/2001/XMLSchema-instance" xsi:schemaLocation="http://maven.apache.org/POM/4.0.0 https://maven.apache.org/xsd/maven-4.0.0.xsd"> <modelVersion>4.0.0</modelVersion> <parent> <artifactId>jacksondemo</artifactId> <groupId>com.bolingcavalry</groupId> <version>1.0-SNAPSHOT</version> <relativePath>../pom.xml</relativePath> </parent> <groupId>com.bolingcavalry</groupId> <artifactId>springbootproperties</artifactId> <version>0.0.1-SNAPSHOT</version> <name>springbootproperties</name> <description>Demo project for Spring Boot</description>
</project>1<properties> 2 <java.version>1.8</java.version> 3</properties> 4 5 6<!--不用spring-boot-starter-parent作为parent时的配置--> 7<dependencyManagement> 8 <dependencies> 9 <dependency> 10 <groupId>org.springframework.boot</groupId> 11 <artifactId>spring-boot-dependencies</artifactId> 12 <version>2.3.3.RELEASE</version> 13 <type>pom</type> 14 <scope>import</scope> 15 </dependency> 16 </dependencies> 17</dependencyManagement> 18 19<dependencies> 20 <dependency> 21 <groupId>org.springframework.boot</groupId> 22 <artifactId>spring-boot-starter-web</artifactId> 23 </dependency> 24 25 <dependency> 26 <groupId>org.springframework.boot</groupId> 27 <artifactId>spring-boot-starter-test</artifactId> 28 <scope>test</scope> 29 <exclusions> 30 <exclusion> 31 <groupId>org.junit.vintage</groupId> 32 <artifactId>junit-vintage-engine</artifactId> 33 </exclusion> 34 </exclusions> 35 </dependency> 36 37 <!-- swagger依赖 --> 38 <dependency> 39 <groupId>io.springfox</groupId> 40 <artifactId>springfox-swagger2</artifactId> 41 </dependency> 42 <!-- swagger-ui --> 43 <dependency> 44 <groupId>io.springfox</groupId> 45 <artifactId>springfox-swagger-ui</artifactId> 46 </dependency> 47</dependencies> 48 49<build> 50 <plugins> 51 <plugin> 52 <groupId>org.springframework.boot</groupId> 53 <artifactId>spring-boot-maven-plugin</artifactId> 54 </plugin> 55 </plugins> 56</build> -
启动类很平常:
package com.bolingcavalry.springbootproperties;
import org.springframework.boot.SpringApplication; import org.springframework.boot.autoconfigure.SpringBootApplication;
@SpringBootApplication public class SpringbootpropertiesApplication {
1public static void main(String[] args) {
2    SpringApplication.run(SpringbootpropertiesApplication.class, args);
3}
}
-
由于用到了swagger,因此要添加swagger配置:
package com.bolingcavalry.springbootproperties;
import org.springframework.context.annotation.Bean; import org.springframework.context.annotation.Configuration; import springfox.documentation.builders.ApiInfoBuilder; import springfox.documentation.builders.PathSelectors; import springfox.documentation.builders.RequestHandlerSelectors; import springfox.documentation.service.ApiInfo; import springfox.documentation.service.Contact; import springfox.documentation.service.Tag; import springfox.documentation.spi.DocumentationType; import springfox.documentation.spring.web.plugins.Docket; import springfox.documentation.swagger2.annotations.EnableSwagger2;
@Configuration @EnableSwagger2 public class SwaggerConfig {
1@Bean
2public Docket createRestApi() {
3    return new Docket(DocumentationType.SWAGGER_2)
4            .apiInfo(apiInfo())
5            .tags(new Tag("JsonPropertySerializationController", "JsonProperty相关测试"))
6            .select()
7            // 当前包路径
8            .apis(RequestHandlerSelectors.basePackage("com.bolingcavalry.springbootproperties.controller"))
9            .paths(PathSelectors.any())
10            .build();
11}
12
13//构建 api文档的详细信息函数,注意这里的注解引用的是哪个
14private ApiInfo apiInfo() {
15    return new ApiInfoBuilder()
16            //页面标题
17            .title("SpringBoot整合Jackson(基于配置文件)")
18            //创建人
19            .contact(new Contact("程序员欣宸", "https://github.com/zq2599/blog_demos", "zq2599@gmail.com"))
20            //版本号
21            .version("1.0")
22            //描述
23            .description("API 描述")
24            .build();
25}
}
-
序列化和反序列化用到的Bean类,可见使用了<font color="blue">JsonProperty</font>属性来设置序列化和反序列化时的json属性名,field0字段刻意没有get方法,是为了验证JsonProperty的序列化能力:
package com.bolingcavalry.springbootproperties.bean;
import com.fasterxml.jackson.annotation.JsonProperty; import io.swagger.annotations.ApiModel; import io.swagger.annotations.ApiModelProperty;
import java.util.Date;
@ApiModel(description = "JsonProperty注解测试类") public class Test {
1@ApiModelProperty(value = "私有成员变量")
2@JsonProperty(value = "json_field0", index = 1)
3private Date field0 = new Date();
4
5public void setField0(Date field0) {
6    this.field0 = field0;
7}
8
9@ApiModelProperty(value = "来自get方法的字符串")
10@JsonProperty(value = "json_field1", index = 0)
11public String getField1() {
12    return "111";
13}
14
15@Override
16public String toString() {
17    return "Test{" +
18            "field0=" + field0 +
19            '}';
20}
}
-
测试用的Controller代码如下,很简单只有两个接口,serialization返回序列化结果,deserialization接受客户端请求参数,反序列化成实例,通过toString()来检查反序列化的结果,另外,还通过Autowired注解从spring容器中将ObjectMapper实例直接拿来用:
package com.bolingcavalry.springbootproperties.controller;
import com.bolingcavalry.springbootproperties.bean.Test; import com.fasterxml.jackson.core.JsonProcessingException; import com.fasterxml.jackson.databind.ObjectMapper; import io.swagger.annotations.Api; import io.swagger.annotations.ApiOperation; import org.slf4j.Logger; import org.slf4j.LoggerFactory; import org.springframework.beans.factory.annotation.Autowired; import org.springframework.web.bind.annotation.RequestBody; import org.springframework.web.bind.annotation.RequestMapping; import org.springframework.web.bind.annotation.RequestMethod; import org.springframework.web.bind.annotation.RestController;
@RestController @RequestMapping("/jsonproperty") @Api(tags = {"JsonPropertySerializationController"}) public class JsonPropertySerializationController {
1private static final Logger logger = LoggerFactory.getLogger(JsonPropertySerializationController.class);
2
3@Autowired
4ObjectMapper mapper;
5
6@ApiOperation(value = "测试序列化", notes = "测试序列化")
7@RequestMapping(value = "/serialization", method = RequestMethod.GET)
8public Test serialization() throws JsonProcessingException {
9
10    Test test = new Test();
11    logger.info(mapper.writeValueAsString(test));
12
13    return test;
14}
15
16@ApiOperation(value = "测试反序列化", notes="测试反序列化")
17@RequestMapping(value = "/deserialization",method = RequestMethod.PUT)
18public String deserialization(@RequestBody Test test) {
19    return test.toString();
20}
}
验证(不用配置文件)
- 先来看看没有配置文件时,默认的jackson配置的表现,直接在IDEA上运行SpringbootpropertiesApplication;
- 浏览器访问http://localhost:8080/swagger-ui.html ,如下图红框1,json_field0和json_field1都是JsonProperty注释,出现在了swagger的model中,这证明jackson注解已经生效:
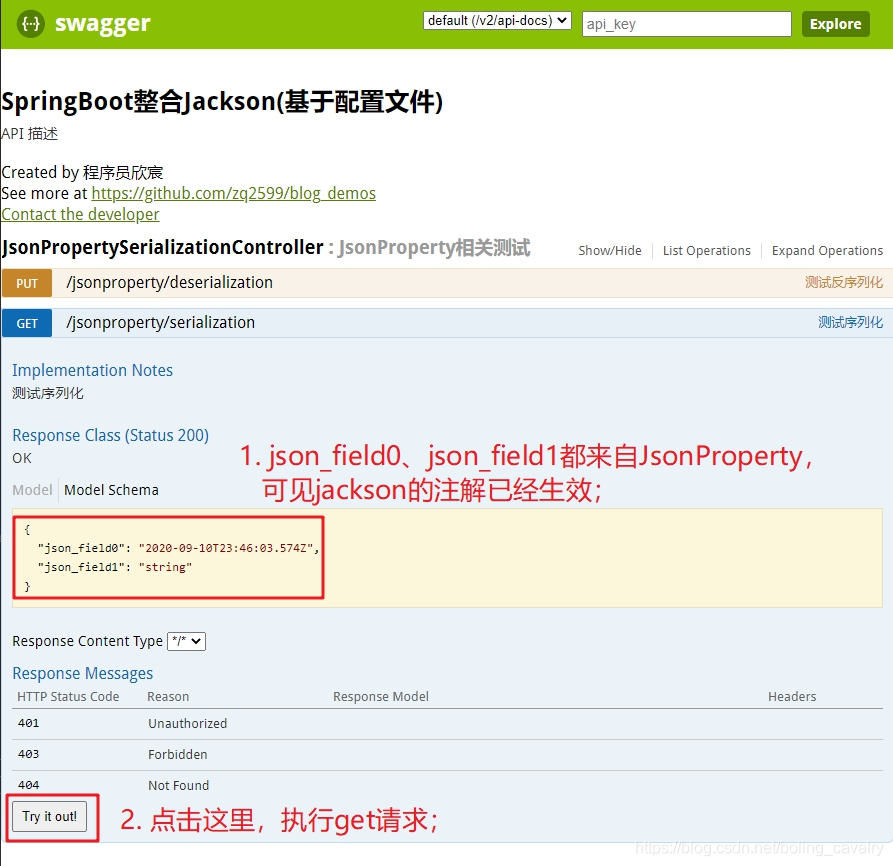
- 点击上图的红框2,看看springboot引用返回的序列化结果,如下图:
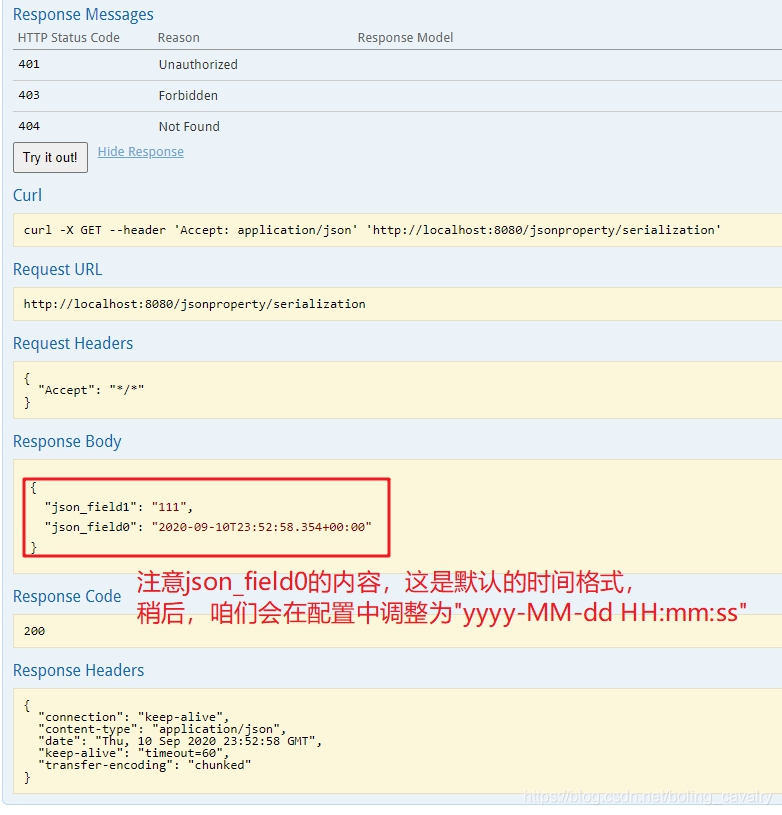
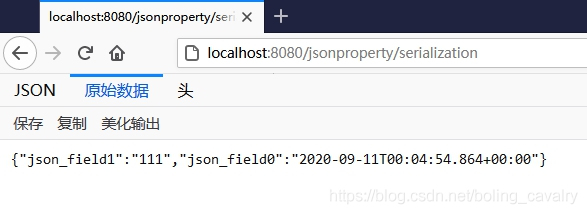
- 另外,上述红框中的json格式,每个属性单独一行,像是做了格式化调整的,这是springboot做的?还是swagger展示的时候做的?用浏览器访问http://localhost:8080/jsonproperty/serialization ,结果如下,可见<font color="red">springboot返回的是未经过格式化的json</font>:
- 接下来咱们添加jackson相关的配置信息并验证是否生效;
添加配置文件并验证
-
在<font color="blue">resources</font>目录新增<font color="red">application.yml</font>文件,内容如下:
spring: jackson: # 日期格式化 date-format: yyyy-MM-dd HH:mm:ss # 序列化相关 serialization: # 格式化输出 indent_output: true # 忽略无法转换的对象 fail_on_empty_beans: true # 反序列化相关 deserialization: # 解析json时,遇到不存在的属性就忽略 fail_on_unknown_properties: false # 设置空如何序列化 defaultPropertyInclusion: NON_EMPTY parser: # 允许特殊和转义符 allow_unquoted_control_chars: true # 允许单引号 allow_single_quotes: true
-
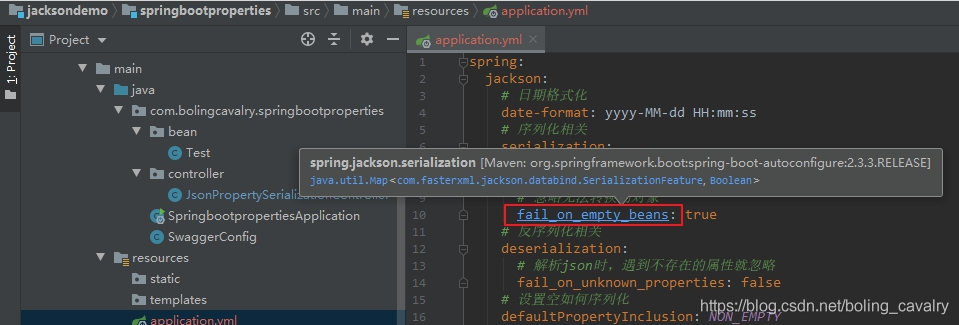
将鼠标放置下图红框位置,再按住Ctlr键,IDEA会弹出一个浮层,提示该配置对应的jackson代码,如下图:
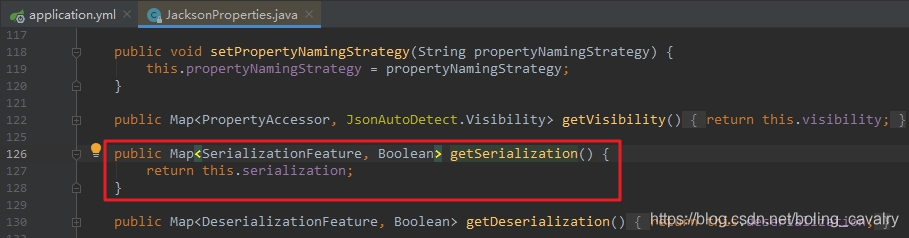
- 在上图中,按住Ctlr键,用鼠标点击红框位置即可打开此配置对应的jackson源码,如下图:
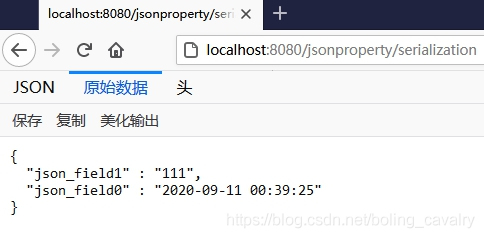
 4. 重新运行springboot应用,用浏览器访问:http://localhost:8080/jsonproperty/serialization ,结果如下图,可见<font color="blue">json_field0</font>的格式变成了<font color="red">yyyy-MM-dd HH:mm:ss</font>,而且json输出也做了格式化,证明application.yml中的配置已经生效:
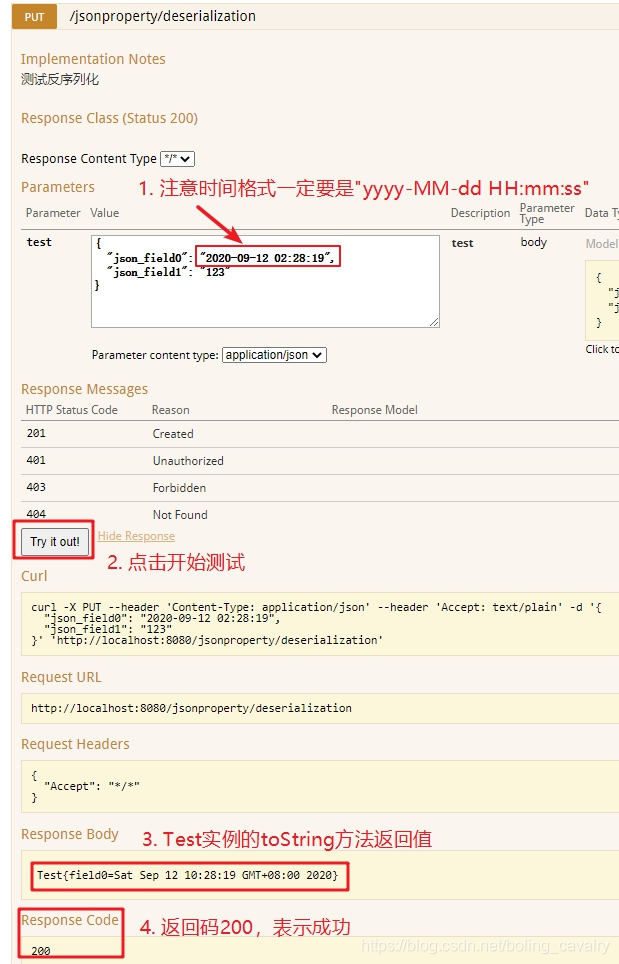
 5. 再来试试反序列化,打开swagger页面,操作和响应如下图所示,注意红框1里面请求参数的格式:
- 至此,在springboot中通过yml配置jackson的操作实战就完成了,接下来的章节,咱们在配置类中用代码来完成yml的配置;
你不孤单,欣宸原创一路相伴
欢迎关注公众号:程序员欣宸
微信搜索「程序员欣宸」,我是欣宸,期待与您一同畅游Java世界... https://github.com/zq2599/blog_demos