
Slony-I是一个“一主多备”的复制系统,支持级联复制(ascading)和失效转移failover.
官方文档:
slony-I的系统分析:https://wiki.postgresql.org/wiki/Slony
slony-I安装配置使用
系统要求:http://slony.info/documentation/requirements.html
使用限制:http://slony.info/documentation/2.2/limitations.html
配置与安装:http://slony.info/documentation/administration.html#INSTALLATION
使用配置:http://slony.info/documentation/tutorial.html#FIRSTDB
环境:
主库:centos linux 32bit虚拟机,ip为192.168.100.240
PostgreSQL9.2.13
Slony-I 2.2
备库: centos linux 32bit虚拟机, ip为192.168.100.241
PostgreSQL9.2.13
Slony-I 2.2
1.源码编译安装PostgreSQL
在主库和备库都,进行源码编译、安装、配置PostgreSQL数据库如下:
源码编译安装PostgbreSQL9.2。
安装目录:/opt/pgsql2
编译安装过程请参考:PostgreSQL在Linux下的源码编译安装
源码安装完毕后,要配置pg_hba.conf和postgresql.conf确保主、备库可以远程访问。
注意:PG版本要必须是Slony支持的版本,详见 http://slony.info/documentation/requirements.html 。
2.准备slony-I复制的主、备库
=====================
2.1声明环境变量
在主库和备库都,执行:
1su - postgres
2
3export CLUSTERNAME=lyy_cluster1
4export MASTERDBNAME=masterdb
5export SLAVEDBNAME=slavedb
6export MASTERHOST=192.168.13.128
7export SLAVEHOST=192.168.100.236
8export REPLICATIONUSER=postgres
注意:
1.REPLICATIONUSER通常是PostgreSQL数据库的超级用户。
2.修改MASTERHOST和SLAVEHOST时,尽量不要使用localhost,因为可能会导致错误:ERROR remoteListenThread_1: db_getLocalNodeId() returned 2 - wrong database?。
2.2根据环境变量准备数据库
在主库和备库都,根据环境变量来创建相应对象:
1--在主服务器中
2cd /opt/pgsql2/bin
3./createuser  -p 5432 -U postgres -SRD -P $PGBENCHUSER  --若已创建则无需再创建
4input password for new user :(此处输入新用户的密码即可)
5input password again:(此处输入新用户的密码即可)
6password:(此处输入超级用户postgres的密码即可)
7
8./createdb -p 5432 -U postgres -O $PGBENCHUSER -h $MASTERHOST $MASTERDBNAME
9password:(此处输入超级用户postgres的密码即可)
10
11--在备用服务器中
12cd /opt/pgsql2/bin
13./createuser -p 5432 -U postgres -SRD -P $PGBENCHUSER  --若已创建则无需再创建
14input password for new user :(此处输入新用户的密码即可)
15input password again:(此处输入新用户的密码即可)
16password:(此处输入超级用户postgres的密码即可)
17
18./createdb -p 5432 -U postgres  -O $PGBENCHUSER -h $SLAVEHOST $SLAVEDBNAME
19password:(此处输入超级用户postgres的密码即可)
20
21--在主服务器,创建要同步的数据表(数据表必须有主键或者唯一键,才能通过slony-i实现数据同步)
22[postgres@localhost bin]$ ./psql -U $PGBENCHUSER -h $MASTERHOST -d $MASTERDBNAME
23psql (9.2.13)
24Type "help" for help..
25masterdb=# CREATE TABLE lyy(id int primary key, name varchar);
26CREATE TABLE
2.3创建pl/pgsql过程语言
Slony-I 需要数据库有 pl/pgSQL 过程语言,如果模板数据 template1已经安装了pl/pgSQL,那么新建的$MASTERDBNAME也就也有了pl/pgSQL,如果已经存在了,则不需要执行以下语句:
在主库和备库都执行:
1--在bin目录下
2./createlang -h $MASTERHOST plpgsql $MASTERDBNAME
2.4手动从主库将表定义导入备库
当备库Slony-I 订阅主库之后,Slony-I不能自动从主库拷贝表定义到备库,所以我们需要把表定义从主库导入备库,我们通过 pg_dump来实现表定义的主、备同步:
1--在主服务器中执行pg_dump,将表定义备份到备库中
2--在bin目录下
3[postgres@localhost bin]$ ./pg_dump -s -U postgres -h 192.168.100.240 masterdb | ./psql -U postgres -h 192.168.100.241 slavedb
3.源码编译安装Slony-I
在主库和备库都,按照以下步骤安装slony-i。
slony下载地址:http://slony.info/downloads/2.2/source/
下载并解压slony-2.2,然后进行编译配置安装,要确保每一步安装正确后再进行下一步。
1cd ../slony-2.2
2./configure --with-pgconfigdir=/opt/pgsql944/bin --with-perltools
3gmake all
4gamke install
注意:如果slony-I后面的配置过程使用altperl脚本,则configure时必须指定--with-perltools。
4. 配置slony并启动同步复制
4.0配置并启用slony同步复制的理论基础(仅供理解):
Configuring the Database For Replication.
Creating the configuration tables, stored procedures, triggers and configuration is all done through the slonik tool. It is a specialized scripting aid that mostly calls stored procedures in the master/slave (node) databases.
The example that follows uses slonik directly (or embedded directly into scripts). This is not necessarily the most pleasant way to get started; there exist tools for building slonik scripts under the tools directory, including:
-
Section 6.1.1 - a set of Perl scripts that build slonik scripts based on a single slon_tools.conf file.
-
Section 6.1.2 - a shell script (e.g. - works with Bash) which, based either on self-contained configuration or on shell environment variables, generates a set of slonik scripts to configure a whole cluster.
以下两种方法省略详细介绍,详见文档http://slony.info/documentation/tutorial.html#FIRSTDB。
**方法一:**Using slonik Command Directly
方法二:Using the altperl Scripts
扩展至:http://file:///C:/Users/Yuanyuan/Desktop/slony1-2.2.4/doc/adminguide/additionalutils.html#ALTPERL
4.1直接使用slonik命令(以上方法一)
在主库配置slony cluster
在主库,创建并执行slony_setup.sh文件,实现slony cluster的配置:
1[postgres@localhost data]$ vi slony_setup.sh
2
3CLUSTERNAME=lyy_cluster1
4MASTERDBNAME=masterdb
5SLAVEDBNAME=slavedb
6MASTERHOST=192.168.100.240
7SLAVEHOST=192.168.100.241
8REPLICATIONUSER=postgres
9/opt/pgsql92/bin/slonik <<_EOF_
10    #--
11    # define the namespace the replication system
12    # uses in our example it is slony_example
13    #--
14    cluster name = $CLUSTERNAME;
15    #--
16    # admin conninfo's are used by slonik to connect to
17    # the nodes one for eachnode on each side of the cluster,
18    # the syntax is that of PQconnectdb in
19    # the C-API
20    # --
21    node 1 admin conninfo = 'dbname=$MASTERDBNAME \
22           host=$MASTERHOST user=$REPLICATIONUSER';
23    node 2 admin conninfo = 'dbname=$SLAVEDBNAME \
24           host=$SLAVEHOST user=$REPLICATIONUSER';
25    #--
26    # init the first node.  Its id MUST be 1.  This creates
27    # the schema _$CLUSTERNAME containing all replication
28    # system specific database objects.
29    #--
30    init cluster ( id=1, comment = 'Master Node');
31
32    #--
33    # Slony-I organizes tables into sets.  The smallest unit
34    # a node can subscribe is a set. The master or origin of
35    # the set is node 1.
36    #--
37    create set (id=1, origin=1, comment='All masterdb tables');
38    set add table (set id=1, origin=1, id=1,
39                   fully qualified name = 'public.lyy',
40                   comment='lyy table');
41#    set add sequence (set id=1, origin = 1, id = 1,
42#                  fully qualified name = 'public.t1_id_seq',
43#                  comment = 't1 id sequence');
44
45    #--
46    # Create the second node (the slave) tell the 2 nodes how
47    # to connect to each other and how they should listen for events.
48    #--
49
50    store node (id=2, comment = 'Slave Node', event node=1);
51    store path (server = 1, client = 2, conninfo='dbname=$MASTERDBNAME \
52                host=$MASTERHOST user=$REPLICATIONUSER');
53    store path (server = 2, client = 1, conninfo='dbname=$SLAVEDBNAME \
54                host=$SLAVEHOST user=$REPLICATIONUSER');
55_EOF_
56
57[postgres@localhost data]$sh slony_setup.sh
注释:本步执行完毕后,初始化完毕一个名为lyy_cluster1的slony集群。
并相应的产生一个名为_lyy_cluster1的模式,里面含有slony运行所需的配置表、序列、函数、触发器等(主要是通过slony-i安装过程中在/opt/pgsql92/share下生成的slony1_base.2.2.4.sql和slony1_funcs.2.2.4.sql)。
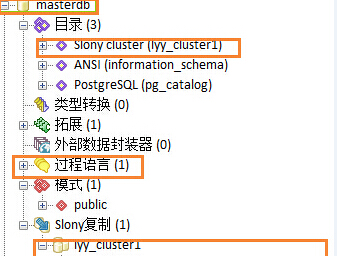
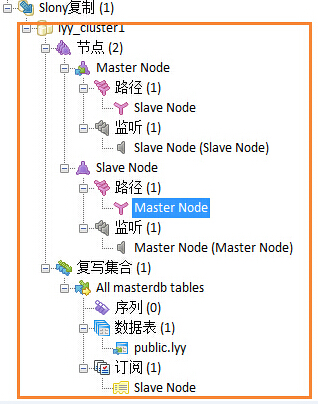
还会在同步表lyy下创建相应的触发器。
在主库:
1masterdb=# \d lyy
2           Table "public.lyy"
3 Column |       Type        | Modifiers
4--------+-------------------+-----------
5 id     | integer           | not null
6 name   | character varying |
7Indexes:
8    "lyy_pkey" PRIMARY KEY, btree (id)
9Triggers:
10    _lyy_cluster1_logtrigger AFTER INSERT OR DELETE OR UPDATE ON lyy FOR EACH ROW EXECUTE PROCEDURE _lyy_cluster1.logtrigger('_lyy_cluster1', '1', 'k')
11    _lyy_cluster1_truncatetrigger BEFORE TRUNCATE ON lyy FOR EACH STATEMENT EXECUTE PROCEDURE _lyy_cluster1.log_truncate('1')
12    _lyy_cluster_logtrigger AFTER INSERT OR DELETE OR UPDATE ON lyy FOR EACH ROW EXECUTE PROCEDURE _lyy_cluster.logtrigger('_lyy_cluster', '1', 'k')
13    _lyy_cluster_truncatetrigger BEFORE TRUNCATE ON lyy FOR EACH STATEMENT EXECUTE PROCEDURE _lyy_cluster.log_truncate('1')
14Disabled triggers:
15    _lyy_cluster1_denyaccess BEFORE INSERT OR DELETE OR UPDATE ON lyy FOR EACH ROW EXECUTE PROCEDURE _lyy_cluster1.denyaccess('_lyy_cluster1')
16    _lyy_cluster1_truncatedeny BEFORE TRUNCATE ON lyy FOR EACH STATEMENT EXECUTE PROCEDURE _lyy_cluster1.deny_truncate()
17    _lyy_cluster_denyaccess BEFORE INSERT OR DELETE OR UPDATE ON lyy FOR EACH ROW EXECUTE PROCEDURE _lyy_cluster.denyaccess('_lyy_cluster')
18    _lyy_cluster_truncatedeny BEFORE TRUNCATE ON lyy FOR EACH STATEMENT EXECUTE PROCEDURE _lyy_cluster.deny_truncate()
在备库:
1slavedb=# \d lyy
2           Table "public.lyy"
3 Column |       Type        | Modifiers
4--------+-------------------+-----------
5 id     | integer           | not null
6 name   | character varying |
7Indexes:
8    "lyy_pkey" PRIMARY KEY, btree (id)
9Triggers:
10    _lyy_cluster1_denyaccess BEFORE INSERT OR DELETE OR UPDATE ON lyy FOR EACH ROW EXECUTE PROCEDURE _lyy_cluster1.denyaccess('_lyy_cluster1')
11    _lyy_cluster1_truncatedeny BEFORE TRUNCATE ON lyy FOR EACH STATEMENT EXECUTE PROCEDURE _lyy_cluster1.deny_truncate()
12Disabled triggers:
13    _lyy_cluster1_logtrigger AFTER INSERT OR DELETE OR UPDATE ON lyy FOR EACH ROW EXECUTE PROCEDURE _lyy_cluster1.logtrigger('_lyy_cluster1', '1', 'k')
14    _lyy_cluster1_truncatetrigger BEFORE TRUNCATE ON lyy FOR EACH STATEMENT EXECUTE PROCEDURE _lyy_cluster1.log_truncate('1')
在主库启动主库节点及监视器
在主库,执行以下命令启动slon daemon:
[postgres@localhost bin]$./slon lyy_cluster1 "dbname=masterdb user=postgres host=192.168.100.240"&
执行当前命令的终端会不断地返回检测信息,所以该终端不要关闭也不要再执行其他操作。
在备库启动备库节点及监视器
在备库。执行以下命令启动slon deamon:
[postgres@localhost bin]$./slon slony_example "dbname=slavedb user=postgres host=192.168.100.241" &
执行当前命令的终端会不断地返回检测信息,所以该终端不要关闭也不要再执行其他操作。
在主库执行备库订阅主库
在主库,执行订阅过程, 通过脚本文件subscribe_set.sh来执行订阅过程:
1[postgres@localhost data]$ vi subscribe_set.sh
2
3CLUSTERNAME=lyy_cluster1
4MASTERDBNAME=masterdb
5SLAVEDBNAME=slavedb
6MASTERHOST=192.168.100.240
7SLAVEHOST=192.168.100.241
8REPLICATIONUSER=postgres
9/opt/pgsql92/bin/slonik <<_EOF_
10     # ----
11     # This defines which namespace the replication system uses
12     # ----
13     cluster name = $CLUSTERNAME;
14     # ----
15     # Admin conninfo's are used by the slonik program to connect
16     # to the node databases.  So these are the PQconnectdb arguments
17     # that connect from the administrators workstation (where
18     # slonik is executed).
19     # ----
20     node 1 admin conninfo = 'dbname=$MASTERDBNAME host=$MASTERHOST \
21                              user=$REPLICATIONUSER';
22     node 2 admin conninfo = 'dbname=$SLAVEDBNAME host=$SLAVEHOST \
23                              user=$REPLICATIONUSER';
24     # ----
25     # Node 2 subscribes set 1
26     # ----
27     subscribe set ( id = 1, provider = 1, receiver = 2, forward = no);
28_EOF_
29
30[postgres@localhost data]$sh subscribe_set.sh
目前,本次数据库的slony的同步复制已经配置完毕。
验证slony-I同步复制生效
在主库,向表lyy插入数据:
1[postgres@localhost bin]$ ./psql -U postgres -d masterdb
2psql (9.2.13)
3Type "help" for help.
4masterdb=# insert into lyy values(1,'lyy');
5INSERT 0 1
在备库,查询表lyy中的数据情况:
1postgres@localhost bin]$ ./psql -U postgres -d slavedb
2psql (9.2.13)
3Type "help" for help.
4slavedb=# select * from lyy;
5 id | name
6----+------
7(0 rows)
8slavedb=# select * from lyy;
9 id | name
10----+------
11  1 | lyy
12(1 row)
可以在主库执行增删操作,然后在备库执行查询操作,进行比对。
注意:slony-I 同步复制的备库是不能对同步的表数据进行修改的:
1slavedb=# insert into test values(4,'fff');
2ERROR:  Slony-I: Table test is replicated and cannot be modified on a subscriber node - role=0
4.2使用altperl脚本配置并启动(以上方法二):
配置slony_tool.conf并初始化slony集群
默认情况下,slony的配置文件样本已默认安装至/usr/local/etc/slon_tools.conf-sample。
1cd /usr/local/etc
2--复制一个slon_tools.conf-sample,命名为slon_tools.conf
3[root@localhost etc]#cp slon_tools.conf-sample /usr/local/etc/slon_tools.conf
4--开始编辑slon_tools.conf
5[root@localhost etc]#vi slon_tools.conf
配置详情:
1    #修改CLUSTER_NAME为前面我们设置的
2    # The name of the replication cluster.  This will be used to
3    # create a schema named _$CLUSTER_NAME in the database which will
4    # contain Slony-related data.
5    $CLUSTER_NAME = 'lyy_cluster1';
6
7    #slony的pid文件目录。如果没有,则根据提示创建,并授予要求的权限。
8    # The directory where Slony store PID files.  This
9    # directory will need to be writable by the user that invokes
10    # Slony.
11    $PIDFILE_DIR = '/var/run/slony1';
12
13    #日志文件存储目录,如果没有,则修改配置或者根据配置创建目录。
14    # The directory where Slony should record log messages.  This
15    # directory will need to be writable by the user that invokes
16    # Slony.
17    $LOGDIR = '/var/log/slony1';
18
19    #修改节点信息为我们的主、备节点的信息,样本中提供的多出的节点可以注释或者删除掉。
20    # Include add_node lines for each node in the cluster.  Be sure to
21    # use host names that will resolve properly on all nodes
22    # (i.e. only use 'localhost' if all nodes are on the same host).
23    # Also, note that the user must be a superuser account.
24    add_node(node     => 1,
25             host     => '162.168.100.240',
26             dbname   => 'masterdb',
27             port     => 5432,
28             user     => 'postgres',
29             password => 'postgres');
30    add_node(node     => 2,
31             host     => '192.168.100.241',
32             dbname   => 'slavedb',
33             port     => 5432,
34             user     => 'postgres',
35             password => 'postgres');
36
37     #修改要同步的表或者序列
38     # This array contains a list of tables that already have primary keys.
39        "pkeyedtables" => [
40                           'public.lyy',
41                           ],
42
43    #如果没有序列和无主键表需要同步,则将以下示例注释掉。
44    # For tables that have unique not null keys, but no primary
45    # key, enter their names and indexes here.
46#lyy comment this
47#       "keyedtables" => {
48#           'table3' => 'index_on_table3',
49#           'table4' => 'index_on_table4',
50#       },
51
52    # Sequences that need to be replicated should be entered here.
53# lyy comment this
54#       "sequences" => ['sequence1',
55#                       'sequence2',
56#                       ],
57     },
58
59#在主库,初始化slony cluster
60[root@localhost etc]# slonik_init_cluster | /opt/pgsql92/bin/slonik
61<stdin>:10: Set up replication nodes
62<stdin>:13: Next: configure paths for each node/origin
63<stdin>:16: Replication nodes prepared
64<stdin>:17: Please start a slon replication daemon for each node
注释:同样的,本步执行完毕后,初始化完毕一个名为lyy_cluster1的slony集群。
并相应的产生一个名为_lyy_cluster1的模式,里面含有slony运行所需的配置表、序列、函数、触发器等(主要是通过slony-i安装过程中在/opt/pgsql92/share下生成的slony1_base.2.2.4.sql和slony1_funcs.2.2.4.sql)。
启动slon并进行数据集合订阅:
1# 在主库,启动节点1的slon
2[root@localhost etc]# slon_start 1
3Invoke slon for node 1 - /opt/pgsql92/bin//slon -p /var/run/slony1/lyy_cluster2_node1.pid -s 1000 -d2  lyy_cluster1 'host=192.168.100.240 dbname=master user=postgres port=5432 password=postgres' > /var/log/slony1/node1/master-2015-09-15.log 2>&1 &
4Slon successfully started for cluster lyy_cluster1, node node1
5PID [7839]
6Start the watchdog process as well...
7
8# 在备库,启动节点2的slon
9[root@localhost etc]# slon_start 2
10Invoke slon for node 2 - /opt/pgsql92/bin//slon -p /var/run/slony1/cluster1_node2.pid -s 1000 -d2  cluster1 'host=192.168.100.241 dbname=slavedb user=postgres port=5432 password=postgres' > /var/log/slony1/node2/slavedb-2015-09-15.log 2>&1 &
11Slon successfully started for cluster lyy_cluster1, node node2
12PID [7613]
13Start the watchdog process as well...
14
15# 在主库,创建数据集合 (此处 1 是一个 set 集合号)
16[root@localhost etc]# slonik_create_set 1 | /opt/pgsql92/bin/slonik
17<stdin>:11: Subscription set 1 (set1_name) created
18<stdin>:12: Adding tables to the subscription set
19<stdin>:16: Add primary keyed table public.lyy
20<stdin>:19: Adding sequences to the subscription set
21<stdin>:20: All tables added
22
23# 在主库,订阅 集合1 到 节点2 (1= set ID, 2= node ID)
24[root@localhost etc]# slonik_subscribe_set 1 2 | /opt/pgsql92/bin/slonik
25<stdin>:6: Subscribed nodes to set 1
目前,本次数据库的slony的同步复制已经配置完毕。
验证slony-I同步复制生效
在主库,向表lyy插入数据:
1[postgres@localhost bin]$ ./psql -U postgres -d masterdb
2psql (9.2.13)
3Type "help" for help.
4masterdb=# insert into lyy values(1,'lyy');
5INSERT 0 1
在备库,查询表lyy中的数据情况:
1postgres@localhost bin]$ ./psql -U postgres -d slavedb
2psql (9.2.13)
3Type "help" for help.
4slavedb=# select * from lyy;
5 id | name
6----+------
7(0 rows)
8slavedb=# select * from lyy;
9 id | name
10----+------
11  1 | lyy
12(1 row)
可以在主库执行增删操作,然后在备库执行查询操作,进行比对。
5.Slony-I的其他操作
slony的switchover操作(也就是把主节点改成从节点,从节点升级为主节点):
slonik_move_set set1 node1 node2 | /opt/pgsql92/bin/slonik
slony的failver操作:
slonik_failover node1 node2 | /opt/pgsql92/bin/slonik
6.在pgadmin中配置使用slony-I
转至:http://my.oschina.net/liuyuanyuangogo/blog/507936
7.slony-I的使用限制
Slony-I只能同步以下内容:
1.表数据(不能同步DDL,表必须含有主键或者唯一键)
2.序列
Slony-I不能自动同步以下内容:
1.对大对象(BLOBS)的变更
2.对DDL(数据定义语句)的变更
3.对用户和角色的变更
这些使用限制的主要原因是:slony-I是通过触发器收集变更情况的,而触发器不能够捕获定义和大对象的修改。对于DDL的变更,slony-I提供了SLONIK EXECUTE SCRIPT命令来执行DDL的SQL脚本,但slony-I不会自动执行,你得手动组织变更的DDL sql语句并用SLONIK EXECUTE SCRIPT(当然这也可以通过直接到备库执行sql语句来实现定义修改)。
另外,如果表定义中with oid,那么原库中的表记录oid的取值不能同步为相同的值。
建议:如果您无法接受以上使用限制,那您值得尝试一下PostgrSQL 8.0之后的PITR(Point in Time Recovery),PITR对于远程节点是基于WAL日志的。
参考资料:
========
http://www.cnblogs.com/gaojian/p/3196244.html
http://blog.chinaunix.net/uid-15145533-id-2775796.html
也可以只用pgbench来测试slony-i的数据同步。
pgbench使用:http://www.postgresql.org/docs/9.2/static/pgbench.html