
一、需要在pom.xml文件添加plugin
项目目录结构
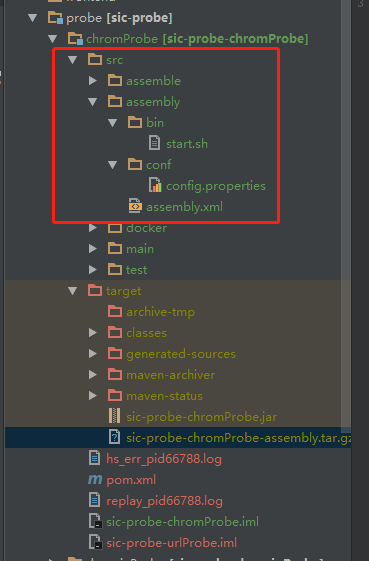
pom.xml
1 1 <build>
2 2         <plugins>
3 3
4 4             <plugin>
5 5                 <artifactId>maven-assembly-plugin</artifactId>
6 6                 <version>2.6</version>
7 7                 <configuration>
8 8                      <!--G:\IdeaWorkspace\sic_platform\probe\chromProbe\src\assembly\assembly.xml-->
9 9                      <!--描述文件路径-->
1010                     <descriptor>src/assembly/assembly.xml</descriptor>
1111                        <!-- 生成的tar.gz文件的名字,如果没有设置就默认用pom文件里的artifactId+version-->
1212                        <finalName>${project.name}-${project.version}</finalName>
1313                        <!--属性控制是否在生成的打包文件的文件名中包含assembly id-->
1414                        <appendAssemblyId>false</appendAssemblyId>
1515                 </configuration>
1616                 <executions>
1717                     <execution>
1818                         <id>make-assembly</id>
1919                         <!-- 绑定到package生命周期阶段上 -->
2020                         <phase>package</phase>
2121                         <goals>
2222                             <goal>single</goal>
2323                         </goals>
2424                     </execution>
2525                 </executions>
2626             </plugin>
2727
2828         </plugins>
2929 </build>
bin下是启动脚本,conf下是配置文件,里面可以配置脚本参数
二、assembly配置
如下:还有很多配置可以参考官网:http://maven.apache.org/plugins/maven-assembly-plugin/assembly.html
1 1 <!-- - Copyright 1999-2011 Alibaba Group. - - Licensed under the Apache License,
2 2     Version 2.0 (the "License"); - you may not use this file except in compliance
3 3     with the License. - You may obtain a copy of the License at - - http://www.apache.org/licenses/LICENSE-2.0
4 4     - - Unless required by applicable law or agreed to in writing, software -
5 5     distributed under the License is distributed on an "AS IS" BASIS, - WITHOUT
6 6     WARRANTIES OR CONDITIONS OF ANY KIND, either express or implied. - See the
7 7     License for the specific language governing permissions and - limitations
8 8     under the License. -->
9 9 <assembly>
1010     <id>assembly</id>
1111     <formats>
1212         <format>tar.gz</format>
1313     </formats>
1414     <includeBaseDirectory>true</includeBaseDirectory>
1515     <fileSets>
1616         <fileSet>
1717             <directory>src/assembly/bin</directory>
1818             <outputDirectory>bin</outputDirectory>
1919             <!-- <fileMode>0100</fileMode> -->
2020         </fileSet>
2121         <fileSet>
2222             <directory>src/assembly/conf</directory>
2323             <outputDirectory>conf</outputDirectory>
2424         </fileSet>
2525         <!--如果工程依赖其他项目的conf,可以在这里添加-->
2626         <!--<fileSet>
2727
2828             <directory>../pre-api/src/main/assembly/conf</directory>
2929             <outputDirectory>conf</outputDirectory>
3030         </fileSet>
3131         <fileSet>
3232             <directory>../pre-api/src/main/assembly/lib</directory>
3333             <outputDirectory>lib</outputDirectory>
3434         </fileSet>-->
3535     </fileSets>
3636     <dependencySets>
3737         <dependencySet>                <!-- 将工程的依赖包打包到lib目录下。 -->
3838             <outputDirectory>lib</outputDirectory>
3939         </dependencySet>
4040     </dependencySets>
4141 </assembly>
三、start.sh的脚本,
只需改动启动的main方法的路径即可 : com.topsec.sic.collector.urlProbe.HeadlessChromeTest
会输出日志logs,可以查看logs里的日志文件判断main方法是否执行!
1 1 #!/bin/bash
2 2 cd `dirname $0`
3 3 BIN_DIR=`pwd`
4 4 cd ..
5 5 DEPLOY_DIR=`pwd`
6 6 CONF_DIR=$DEPLOY_DIR/conf
7 7
8 8 SERVER_NAME=`sed '/application.host.name/!d;s/.*=//' conf/config.properties | tr -d '\r'`
9 9
1010 LOGS_DIR=$DEPLOY_DIR/logs
1111 if [ ! -d $LOGS_DIR ]; then
1212     mkdir $LOGS_DIR
1313 fi
1414 STDOUT_FILE=$LOGS_DIR/stdout.log
1515
1616 LIB_DIR=$DEPLOY_DIR/lib
1717 LIB_JARS=`ls $LIB_DIR|grep .jar|awk '{print "'$LIB_DIR'/"$0}'|tr "\n" ":"`
1818
1919 JAVA_OPTS=" -Djava.awt.headless=true -Djava.net.preferIPv4Stack=true -Duser.timezone=Asia/Shanghai "
2020 JAVA_DEBUG_OPTS=""
2121 if [ "$1" = "debug" ]; then
2222     JAVA_DEBUG_OPTS=" -Xdebug -Xnoagent -Djava.compiler=NONE -Xrunjdwp:transport=dt_socket,address=8000,server=y,suspend=n "
2323 fi
2424 JAVA_JMX_OPTS=""
2525 if [ "$1" = "jmx" ]; then
2626     JAVA_JMX_OPTS=" -Dcom.sun.management.jmxremote.port=1099 -Dcom.sun.management.jmxremote.ssl=false -Dcom.sun.management.jmxremote.authenticate=false "
2727 fi
2828 JAVA_MEM_OPTS=""
2929 BITS=`java -version 2>&1 | grep -i 64-bit`
3030 if [ -n "$BITS" ]; then
3131 #    JAVA_MEM_OPTS=" -server -Xmx2g -Xms2g -Xmn256m -XX:PermSize=128m -Xss256k -XX:+DisableExplicitGC -XX:+UseConcMarkSweepGC -XX:+CMSParallelRemarkEnabled -XX:+UseCMSCompactAtFullCollection -XX:LargePageSizeInBytes=128m -XX:+UseFastAccessorMethods -XX:+UseCMSInitiatingOccupancyOnly -XX:CMSInitiatingOccupancyFraction=70 "
3232     JAVA_MEM_OPTS=" -server -Xmx512m -Xms512m -Xmn256m -XX:PermSize=128m -Xss256k -XX:+DisableExplicitGC -XX:+UseConcMarkSweepGC -XX:+CMSParallelRemarkEnabled -XX:+UseCMSCompactAtFullCollection -XX:LargePageSizeInBytes=128m -XX:+UseFastAccessorMethods -XX:+UseCMSInitiatingOccupancyOnly -XX:CMSInitiatingOccupancyFraction=70 "
3333 else
3434 #    JAVA_MEM_OPTS=" -server -Xms1g -Xmx1g -XX:PermSize=128m -XX:SurvivorRatio=2 -XX:+UseParallelGC "
3535     JAVA_MEM_OPTS=" -server -Xms256m -Xmx256m -XX:PermSize=128m -XX:SurvivorRatio=2 -XX:+UseParallelGC "
3636 fi
3737
3838 echo -e "Starting the $SERVER_NAME ...\c"
3939 #   nohup java $JAVA_OPTS $JAVA_MEM_OPTS $JAVA_DEBUG_OPTS $JAVA_JMX_OPTS -classpath $CONF_DIR:$LIB_JARS com.topsec.trd.scanner.leack.check.Main > $STDOUT_FILE 2>&1 &
4040 java $JAVA_OPTS $JAVA_MEM_OPTS $JAVA_DEBUG_OPTS $JAVA_JMX_OPTS -classpath $CONF_DIR:$LIB_JARS com.topsec.sic.collector.urlProbe.HeadlessChromeTest > $STDOUT_FILE 2>&1
4141
4242 COUNT=0
4343 while [ $COUNT -lt 1 ]; do
4444     echo -e ".\c"
4545     sleep 1
4646
4747     COUNT=`ps -ef | grep java | grep "$DEPLOY_DIR" | awk '{print $2}' | wc -l`
4848
4949     if [ $COUNT -gt 0 ]; then
5050         break
5151     fi
5252 done
5353
5454 echo "OK!"
5555 PIDS=`ps -ef | grep java | grep "$DEPLOY_DIR" | awk '{print $2}'`
5656 echo "PID: $PIDS"
5757 echo "STDOUT: $STDOUT_FILE"
关于nohup的用法可参考 https://www.cnblogs.com/jinxiao-pu/p/9131057.html ,使命令永久的在后台执行。
四、上传文件到服务器,执行脚本
使用idea点击clean,package打包,在target目录下生成sic-probe-chromProbe-assembly.tar,将文件上传到服务器,执行命令:tar -zxvf sic-probe-chromProbe-assembly.tar.gz解压,解压后的目录结构如下:
11 drwxr-xr-x 6 sqy root       48 May  9 17:31 sic-probe-chromProbe
22 -rw-r--r-- 1 sqy root 34145112 May  9 17:30 sic-probe-chromProbe-assembly.tar.gz
33 [root@node105 prep-url-sqy]# cd sic-probe-chromProbe
44 [root@node105 sic-probe-chromProbe]# ll
55 total 4
66 drwxr-xr-x 2 sqy root   21 May  9 11:35 bin
77 drwxr-xr-x 2 sqy root   30 May  9 17:00 conf
88 drwxr-xr-x 2 sqy root 4096 May  9 17:30 lib
bin下就是启动脚本,需要注意的是,脚本只有读写权限,需要执行chmod命令给脚本加上执行权限
11 -rw-r--r-- 1 root root 2534 May  9 11:35 start.sh
22 [root@node105 bin]# chmod 755 start.sh
33 [root@node105 bin]# ll
44 total 4
55 -rwxr-xr-x 1 root root 2534 May  9 11:35 start.sh
启动脚本查看日志就行了
1 $ ./start.sh