
Spring Cloud Alibaba系列之Nacos服务注册与发现
1、前言简介
服务注册与发现是微服务架构体系中最关键的组件之一。Spring Cloud Alibaba Nacos Discovery组件提供了服务自动注册到 Nacos 服务端的功能,并且能够动态感知和刷新某个服务实例的服务列表。除此之外,Nacos Discovery 也将服务实例的一些元数据信息,例如 host,port, 健康检查 URL,主页等内容注册到 Nacos
2、实验环境准备
- 环境准备:
- 64bit JDK 1.8
- SpringBoot2.3.7.RELEASE
- SpringCloud(Hoxton.SR9)
- SpringCloudAlibaba2.2.2.RELEASE
- Maven 3.2+
- 开发工具
- IntelliJ IDEA
- smartGit
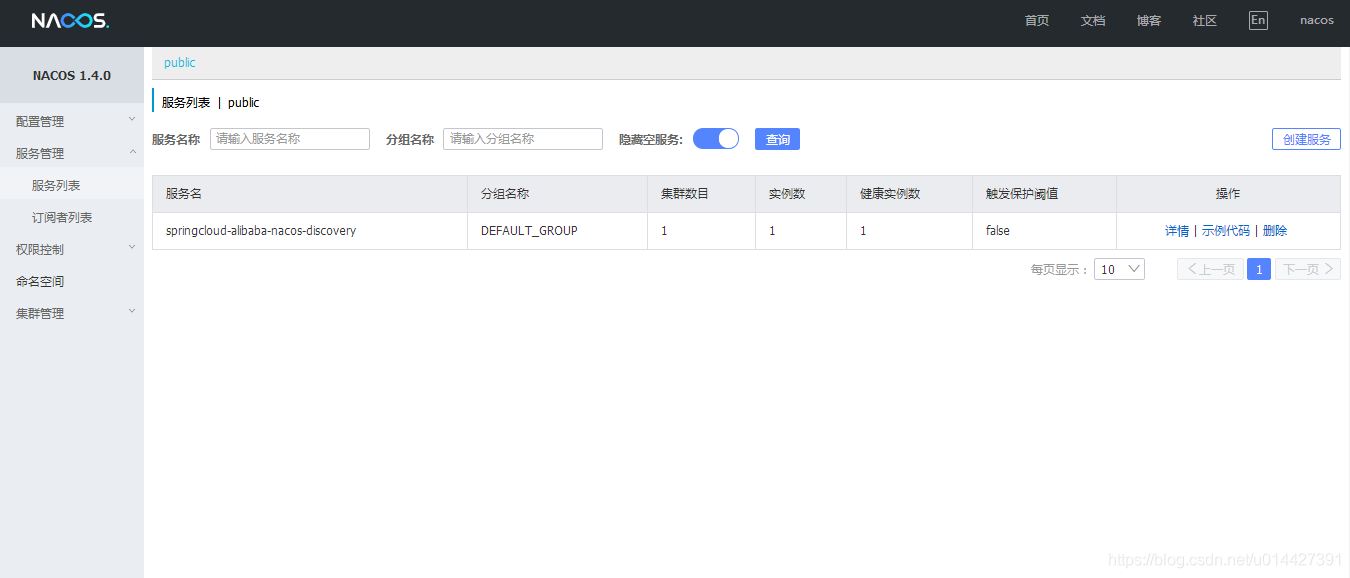
3、启动Nacos Server
学习本博客的服务注册和发现,需要先启动Nacos Server,Nacos Server是一个服务的注册中心,详情可以参考上一篇博客,也可以参考Nacos快速开始手册:https://nacos.io/zh-cn/docs/quick-start.html
4、Aliyun Java Initializr
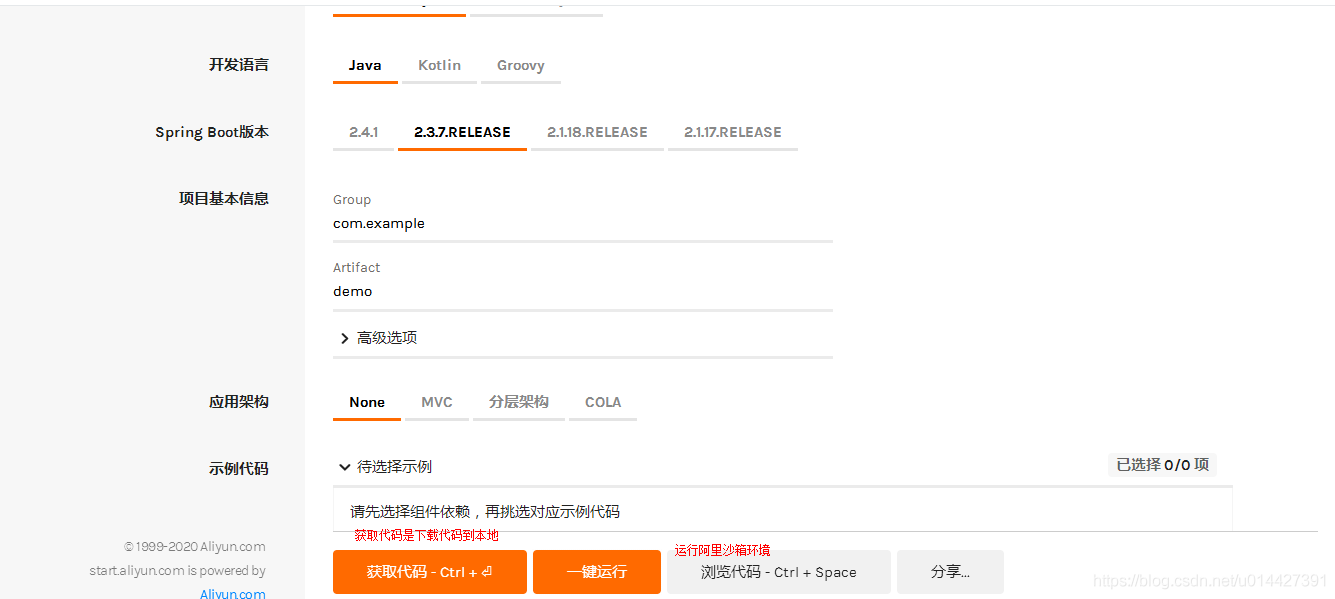
阿里云提供了可以快速构建项目的网站Aliyun Java Initializr,Java 工程脚手架,用于帮助开发者快速生成工程骨架,链接:https://start.aliyun.com/bootstrap.html,对于初学者还是自己进行maven配置,熟练的开发者可以使用此平台快速构建项目:
5、Sandbox 沙箱环境
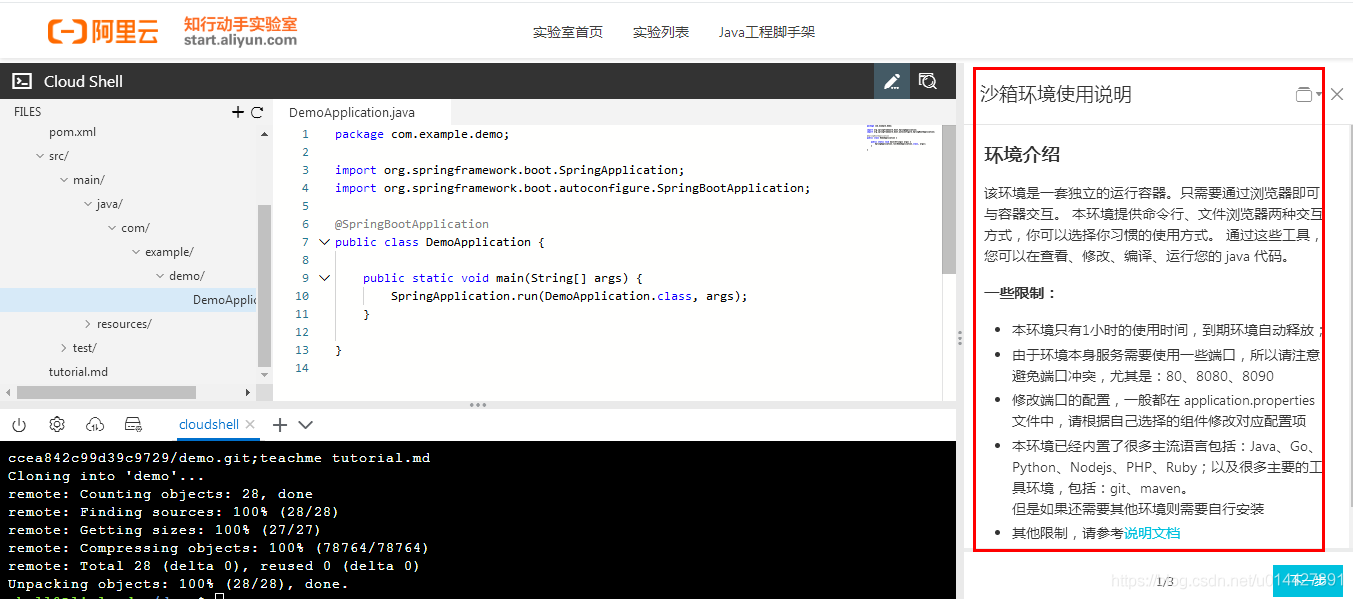
阿里的Sandbox 沙箱环境,为开发者带来一套快速上手、免除任何环境依赖、免费、便捷的开发和运行环境。链接:https://start.aliyun.com/handson
6、IDEA Spring Initializr
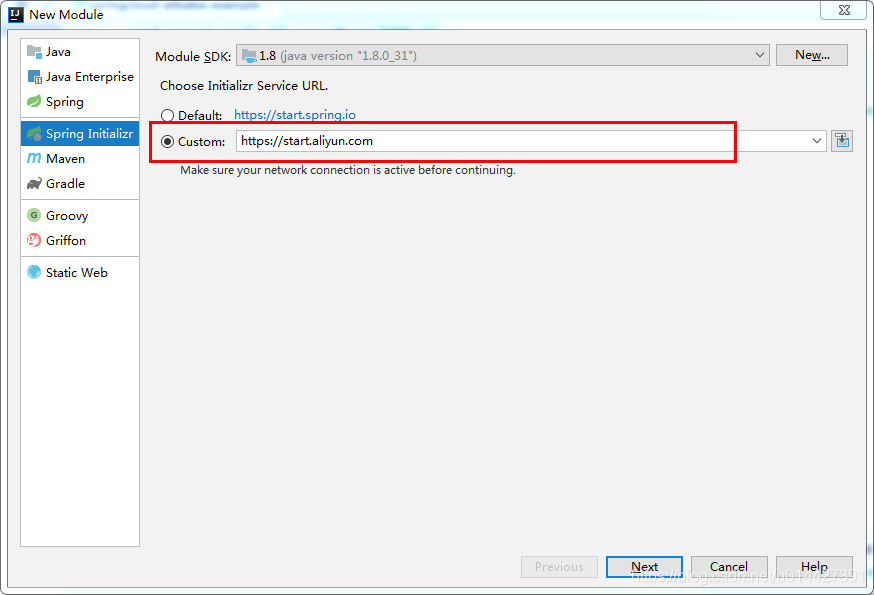
在IDEA开发软件中,可以使用initializr service url,用于快速创建项目:https://start.aliyun.com
7、启动Nacos服务提供者
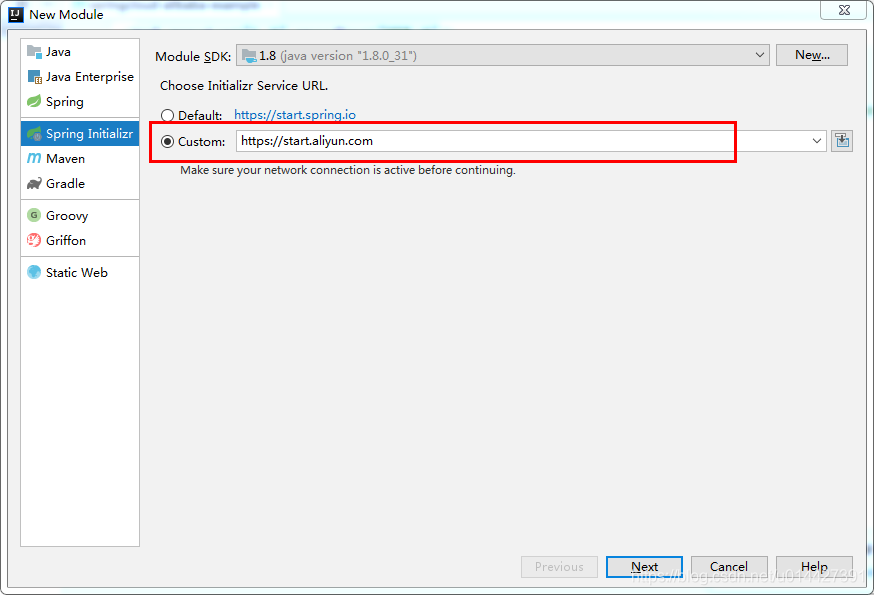
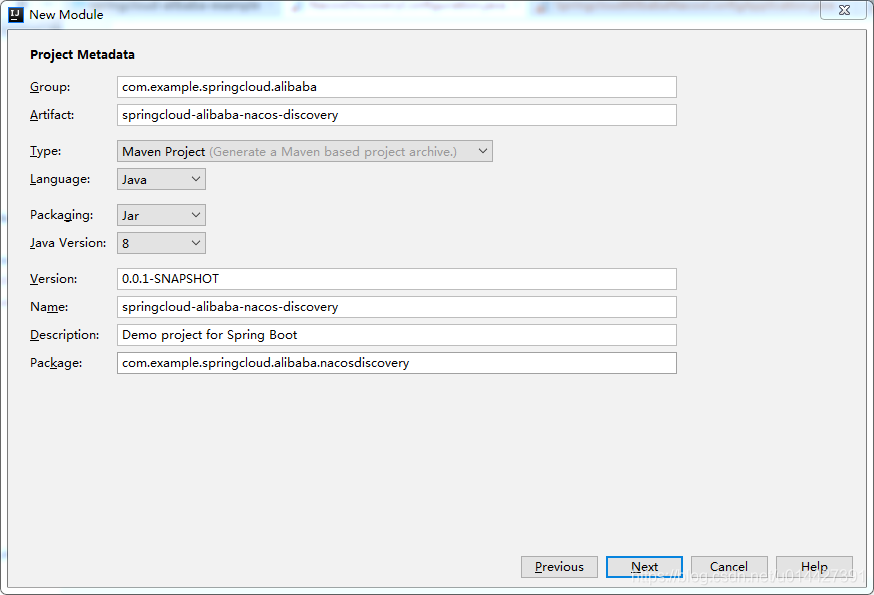
选择jdk版本,pom package方式
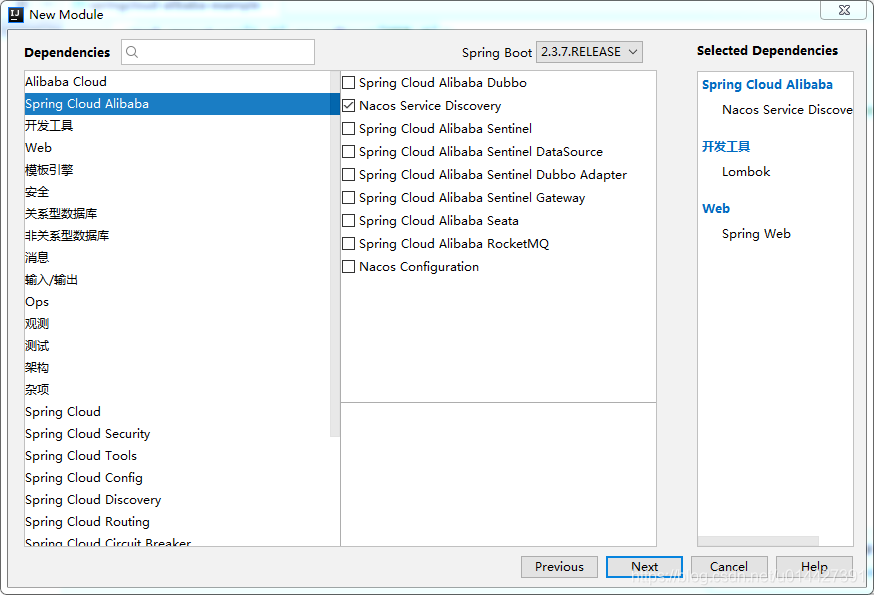
选择Nacos的Nacos Discovery
自动生成的pom参考,初学者可以自行配置一下maven:
1<?xml version="1.0" encoding="UTF-8"?>
2<project xmlns="http://maven.apache.org/POM/4.0.0" xmlns:xsi="http://www.w3.org/2001/XMLSchema-instance"
3         xsi:schemaLocation="http://maven.apache.org/POM/4.0.0 https://maven.apache.org/xsd/maven-4.0.0.xsd">
4    <modelVersion>4.0.0</modelVersion>
5    <groupId>com.example.springcloud.alibaba</groupId>
6    <artifactId>springcloud-alibaba-nacos-discovery</artifactId>
7    <version>0.0.1-SNAPSHOT</version>
8    <name>springcloud-alibaba-nacos-discovery</name>
9    <description>Demo project for Spring Boot</description>
10
11    <properties>
12        <java.version>1.8</java.version>
13        <project.build.sourceEncoding>UTF-8</project.build.sourceEncoding>
14        <project.reporting.outputEncoding>UTF-8</project.reporting.outputEncoding>
15        <spring-boot.version>2.3.7.RELEASE</spring-boot.version>
16        <spring-cloud-alibaba.version>2.2.2.RELEASE</spring-cloud-alibaba.version>
17    </properties>
18
19    <dependencies>
20        <!-- Spring WebMVC Starter -->
21        <dependency>
22            <groupId>org.springframework.boot</groupId>
23            <artifactId>spring-boot-starter-web</artifactId>
24        </dependency>
25
26        <!-- Spring Boot Actuator Starter -->
27        <dependency>
28            <groupId>org.springframework.boot</groupId>
29            <artifactId>spring-boot-starter-actuator</artifactId>
30        </dependency>
31
32        <!-- Spring Cloud Alibaba Nacos Discovert Starter -->
33        <dependency>
34            <groupId>com.alibaba.cloud</groupId>
35            <artifactId>spring-cloud-starter-alibaba-nacos-discovery</artifactId>
36        </dependency>
37
38        <dependency>
39            <groupId>org.projectlombok</groupId>
40            <artifactId>lombok</artifactId>
41            <optional>true</optional>
42        </dependency>
43        <dependency>
44            <groupId>org.springframework.boot</groupId>
45            <artifactId>spring-boot-starter-test</artifactId>
46            <scope>test</scope>
47            <exclusions>
48                <exclusion>
49                    <groupId>org.junit.vintage</groupId>
50                    <artifactId>junit-vintage-engine</artifactId>
51                </exclusion>
52            </exclusions>
53        </dependency>
54    </dependencies>
55
56    <dependencyManagement>
57        <dependencies>
58            <dependency>
59                <groupId>org.springframework.boot</groupId>
60                <artifactId>spring-boot-dependencies</artifactId>
61                <version>${spring-boot.version}</version>
62                <type>pom</type>
63                <scope>import</scope>
64            </dependency>
65            <dependency>
66                <groupId>com.alibaba.cloud</groupId>
67                <artifactId>spring-cloud-alibaba-dependencies</artifactId>
68                <version>${spring-cloud-alibaba.version}</version>
69                <type>pom</type>
70                <scope>import</scope>
71            </dependency>
72        </dependencies>
73    </dependencyManagement>
74
75    <build>
76        <plugins>
77            <plugin>
78                <groupId>org.apache.maven.plugins</groupId>
79                <artifactId>maven-compiler-plugin</artifactId>
80                <version>3.8.1</version>
81                <configuration>
82                    <source>1.8</source>
83                    <target>1.8</target>
84                    <encoding>UTF-8</encoding>
85                </configuration>
86            </plugin>
87            <plugin>
88                <groupId>org.springframework.boot</groupId>
89                <artifactId>spring-boot-maven-plugin</artifactId>
90                <version>2.3.7.RELEASE</version>
91                <configuration>
92                    <mainClass>
93                        com.example.springcloud.alibaba.nacosdiscovery.SpringcloudAlibabaNacosDiscoveryApplication
94                    </mainClass>
95                </configuration>
96                <executions>
97                    <execution>
98                        <id>repackage</id>
99                        <goals>
100                            <goal>repackage</goal>
101                        </goals>
102                    </execution>
103                </executions>
104            </plugin>
105        </plugins>
106    </build>
107
108</project>
109
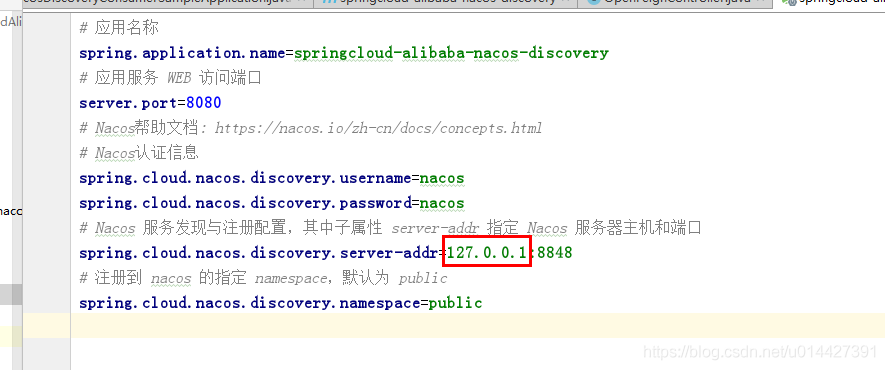
application.properties配置:
1# 应用名称
2spring.application.name=springcloud-alibaba-nacos-discovery
3# 应用服务 WEB 访问端口
4server.port=8080
5# Nacos帮助文档: https://nacos.io/zh-cn/docs/concepts.html
6# Nacos认证信息
7spring.cloud.nacos.discovery.username=nacos
8spring.cloud.nacos.discovery.password=nacos
9# Nacos 服务发现与注册配置,其中子属性 server-addr 指定 Nacos 服务器主机和端口
10spring.cloud.nacos.discovery.server-addr=127.0.0.1:8848
11# 注册到 nacos 的指定 namespace,默认为 public
12spring.cloud.nacos.discovery.namespace=public
13
激活Nacos Discovery服务注册和发现
1package com.example.springcloud.alibaba.nacosdiscovery.nacosdiscovery;
2
3import org.springframework.cloud.client.discovery.EnableDiscoveryClient;
4import org.springframework.context.annotation.Configuration;
5
6@EnableDiscoveryClient
7@Configuration
8public class NacosDiscoveryConfiguration {
9
10
11
12}
13
写个接口测试:
1package com.example.springcloud.alibaba.nacosdiscovery.controller;
2
3import org.springframework.web.bind.annotation.GetMapping;
4import org.springframework.web.bind.annotation.PathVariable;
5import org.springframework.web.bind.annotation.RestController;
6
7/**
8 * <pre>
9 *      ServerController
10 * </pre>
11 *
12 * <pre>
13 * @author mazq
14 * 修改记录
15 *    修改后版本:     修改人:  修改日期: 2020/12/25 10:49  修改内容:
16 * </pre>
17 */
18@RestController
19public class ServerController {
20
21
22
23
24    @GetMapping("/api/test/{message}")
25    public String echo(@PathVariable String message) {
26
27
28
29        return String.format("echo message:%s", message);
30    }
31
32}
33
linux测试接口:
1[www@localhost ~]$ curl http://127.0.0.1:8080/api/test/hello
2echo message:hello
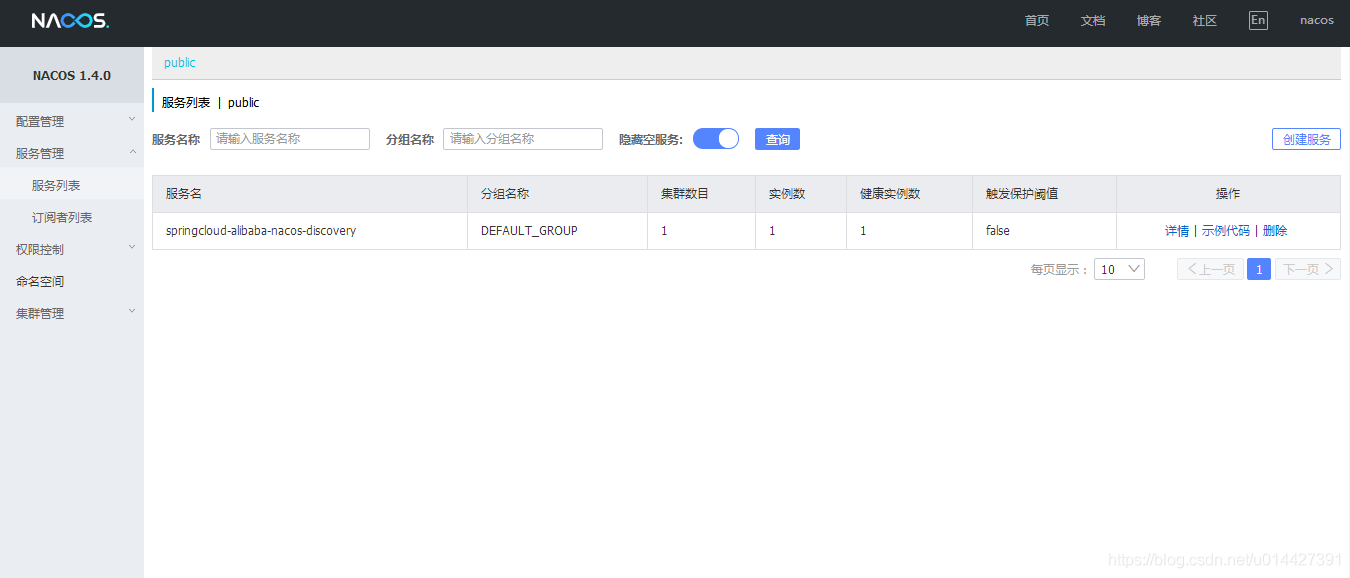
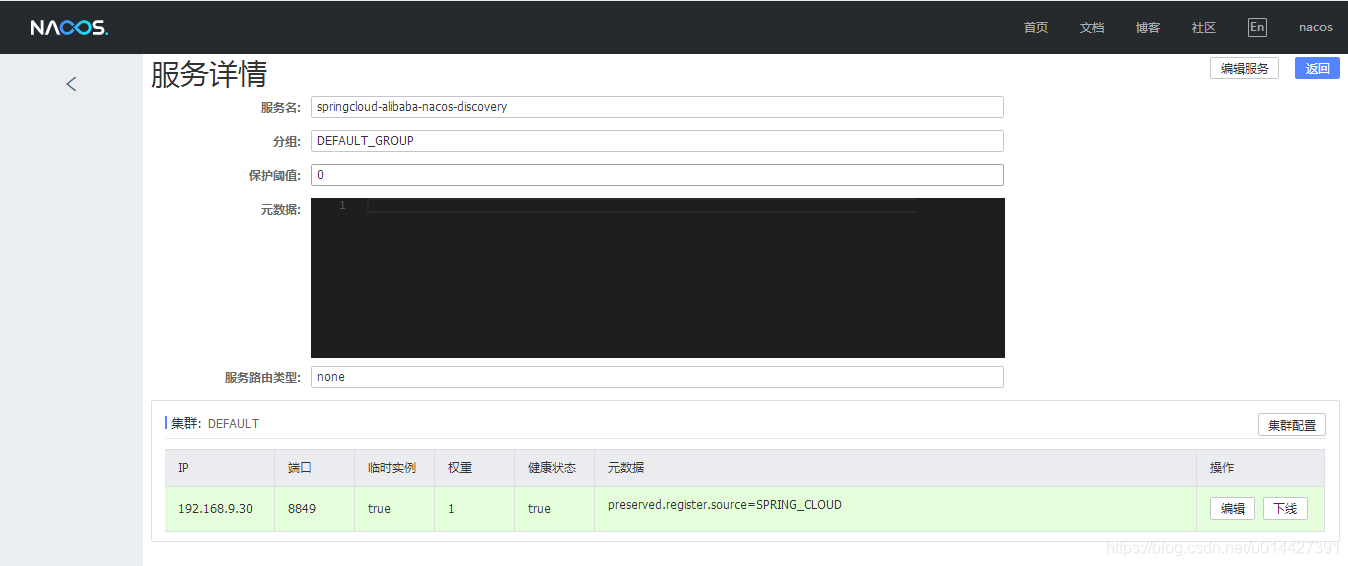
8、Nacos服务调用
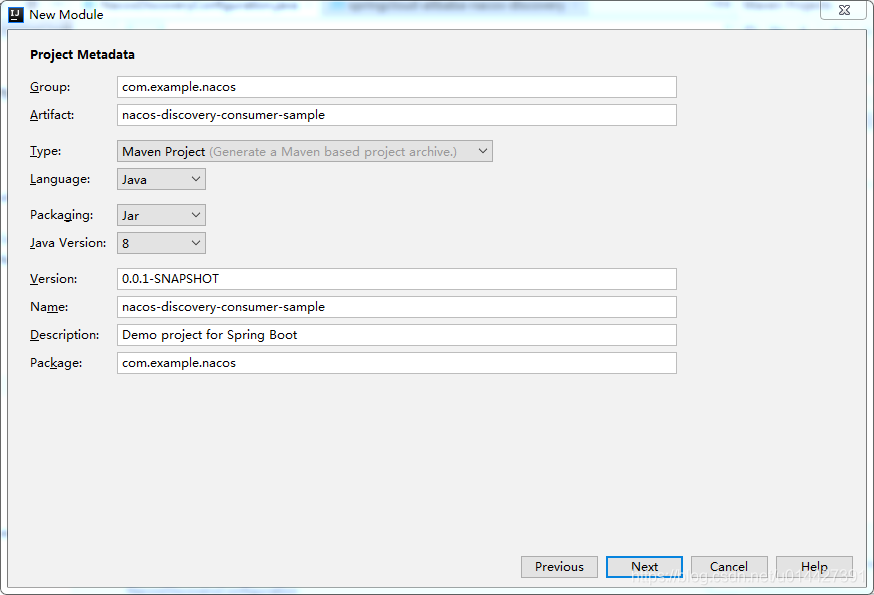
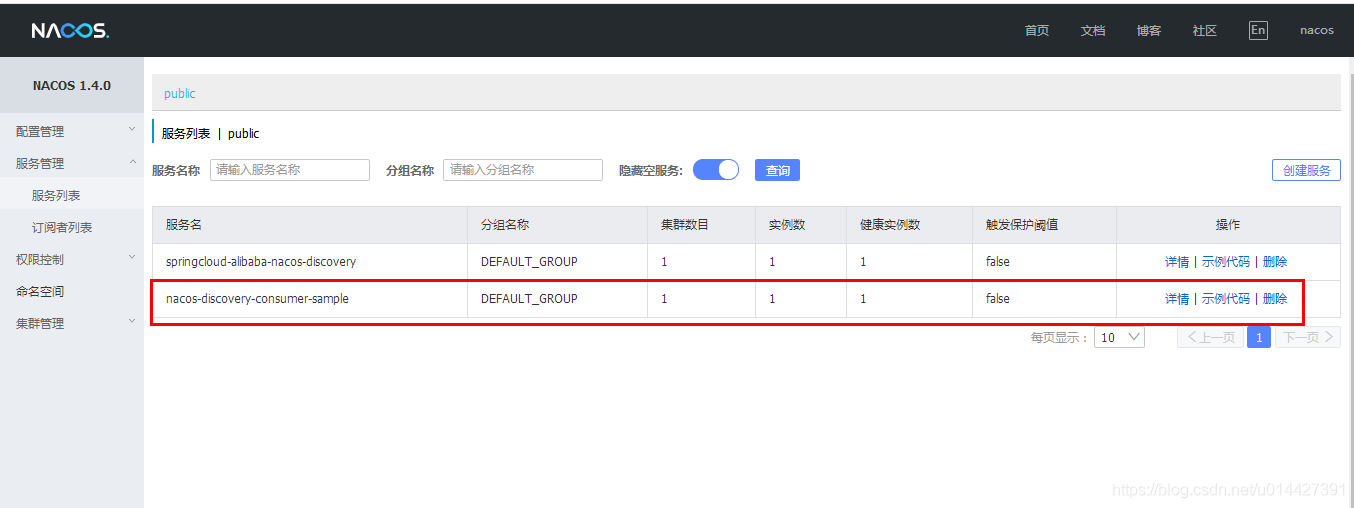
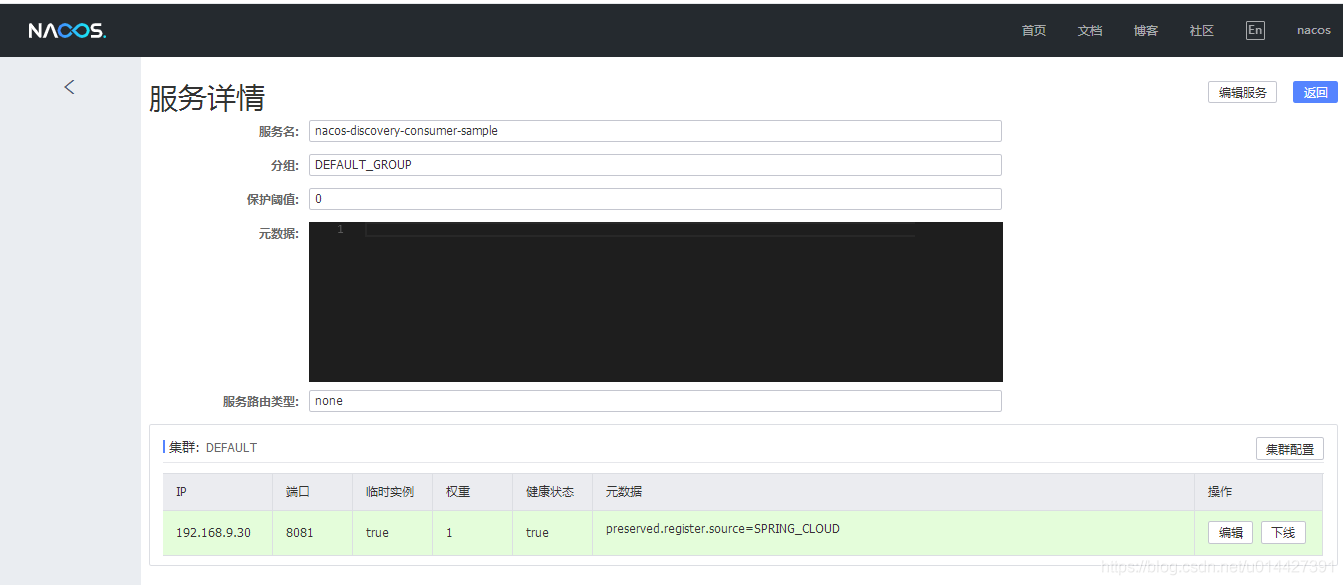
新建一个nacos服务调用例子,服务消费者:
如果需要openFeign,可以加上对应配置:
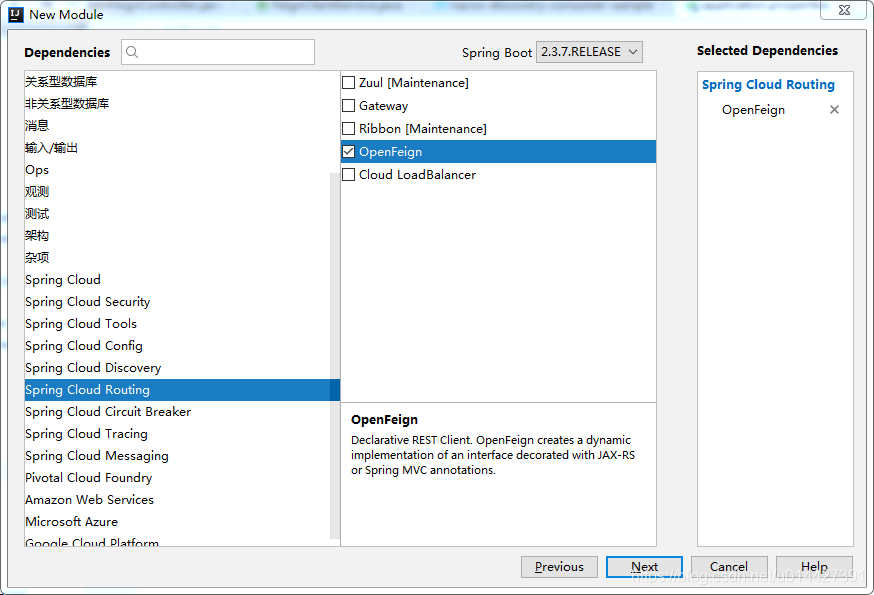
1<dependency>
2    <groupId>org.springframework.cloud</groupId>
3    <artifactId>spring-cloud-starter-openfeign</artifactId>
4</dependency>
在前面的SpringCloud学习,博客链接:SpringCloud博客专栏 ,我们已经接触过SpringCloud服务调用的两种方法:一种是ribbon+restTemplate,另一种是feign服务调用
8.1、@LoadBalanced RestTemplate服务调用
注意加上@LoadBalanced,实现负载均衡:
1package com.example.nacos.nacosdiscovery;
2
3import org.springframework.cloud.client.discovery.EnableDiscoveryClient;
4import org.springframework.cloud.client.loadbalancer.LoadBalanced;
5import org.springframework.context.annotation.Bean;
6import org.springframework.context.annotation.Configuration;
7import org.springframework.web.client.RestTemplate;
8
9@EnableDiscoveryClient
10@Configuration
11public class NacosDiscoveryConfiguration {
12
13
14
15
16    @LoadBalanced
17    @Bean
18    public RestTemplate restTemplate() {
19
20
21
22        return new RestTemplate();
23    }
24
25}
26
RestTemplate 调用服务:
1package com.example.nacos.controller;
2
3import org.springframework.beans.factory.annotation.Autowired;
4import org.springframework.web.bind.annotation.GetMapping;
5import org.springframework.web.bind.annotation.PathVariable;
6import org.springframework.web.bind.annotation.RestController;
7import org.springframework.web.client.RestTemplate;
8
9/**
10 * <pre>
11 *      RestTemplateController
12 * </pre>
13 *
14 * <pre>
15 * @author mazq
16 * 修改记录
17 *    修改后版本:     修改人:  修改日期: 2020/12/25 11:44  修改内容:
18 * </pre>
19 */
20@RestController
21public class RestTemplateController {
22
23
24
25
26    @Autowired
27    RestTemplate restTemplate;
28
29
30    @GetMapping(value = {
31
32
33   "/api/call/{message}"})
34    public String call(@PathVariable String message){
35
36
37
38        return restTemplate.getForObject("http://springcloud-alibaba-nacos-discovery/api/test/"+message,String.class);
39    }
40
41
42}
43
测试:
1[www@localhost ~]$ curl http://127.0.0.1:8081/api/call/hello
2echo message:hello
8.2、使用OpenFeign服务调用
1package com.example.nacos.service;
2
3import org.springframework.cloud.openfeign.FeignClient;
4import org.springframework.stereotype.Service;
5import org.springframework.web.bind.annotation.GetMapping;
6import org.springframework.web.bind.annotation.PathVariable;
7
8/**
9 * <pre>
10 *      FeignClientService
11 * </pre>
12 *
13 * <pre>
14 * @author mazq
15 * 修改记录
16 *    修改后版本:     修改人:  修改日期: 2020/12/25 14:08  修改内容:
17 * </pre>
18 */
19@FeignClient(value = "springcloud-alibaba-nacos-discovery")
20@Service
21public interface FeignClientService {
22
23
24
25    @GetMapping(value = {
26
27
28   "/api/test/{message}"})
29    String call(@PathVariable(value = "message") String message);
30}
31
32
33
34package com.example.nacos.controller;
35
36import com.example.nacos.service.FeignClientService;
37import org.springframework.beans.factory.annotation.Autowired;
38import org.springframework.web.bind.annotation.GetMapping;
39import org.springframework.web.bind.annotation.PathVariable;
40import org.springframework.web.bind.annotation.RestController;
41
42/**
43 * <pre>
44 *		OpenFeignController
45 * </pre>
46 *
47 * <pre>
48 * @author mazq
49 * 修改记录
50 *    修改后版本:     修改人:  修改日期: 2020/12/25 14:32  修改内容:
51 * </pre>
52 */
53@RestController
54public class OpenFeignController {
55
56
57
58
59    @Autowired
60    private FeignClientService feignClientService;
61
62    @GetMapping(value = {
63
64
65   "/api/feign/call/{message}"})
66    public String feignCall(@PathVariable String message){
67
68
69
70        return feignClientService.call(message);
71    }
72}
73
74
75
76[www@localhost ~]$ curl http://127.0.0.1:8081/api/feign/call/hello
77echo message:hello
激活OpenFeign配置:
1package com.example.nacos;
2
3import org.springframework.boot.SpringApplication;
4import org.springframework.boot.autoconfigure.SpringBootApplication;
5import org.springframework.cloud.openfeign.EnableFeignClients;
6
7@SpringBootApplication
8@EnableFeignClients
9public class NacosDiscoveryConsumerSampleApplication {
10
11
12
13
14    public static void main(String[] args) {
15
16
17
18        SpringApplication.run(NacosDiscoveryConsumerSampleApplication.class, args);
19    }
20
21}
22
注意要点:
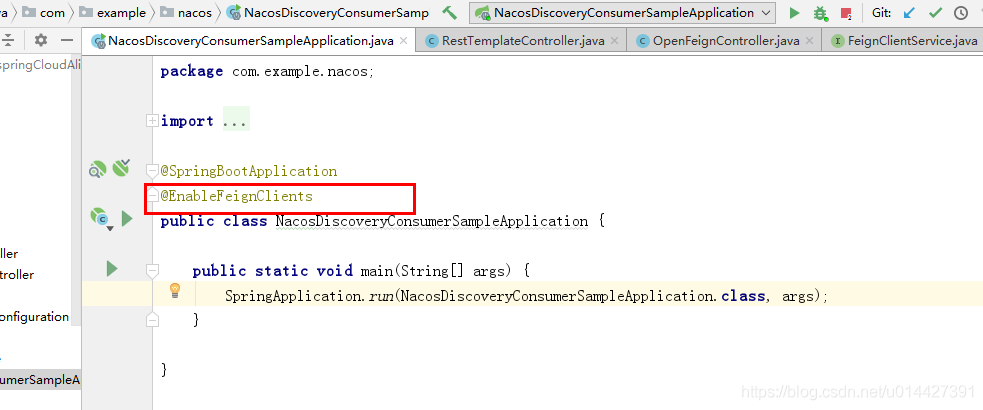
①、@EnableFeignClients要加在Application类?加在配置类SpringBoot扫描不到,原因不是很清楚,估计需要跟下源码才清楚
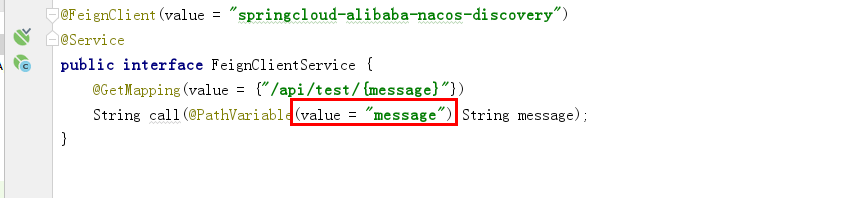
②、@PathVariable最好加上value属性,才能匹配到
本博客的例子代码可以在github找到下载链接:代码下载
9、Nacos参考资料
- Nacos中文手册:https://nacos.io/zh-cn/docs/what-is-nacos.html
- Nacos Github WIKI:https://github.com/alibaba/nacos/wiki
- Nacos官网博客:https://nacos.io/zh-cn/blog/index.html
本文同步分享在 博客“smileNicky”(CSDN)。
如有侵权,请联系 support@oschina.cn 删除。
本文参与“OSC源创计划”,欢迎正在阅读的你也加入,一起分享。