
一、MySQL一主一从
- 数据库服务器192.168.4.51配置为主数据库服务器
- 数据库服务器192.168.4.52配置为从数据库服务器
- 客户端192.168.4.50测试配置
其中192.168.4.51是主服务器,另一台192.168.4.52作为从服务器,通过调取主服务器上的binlog日志,在本地重做对应的库、表,实现与主服务器的数据同步。【获取资源】
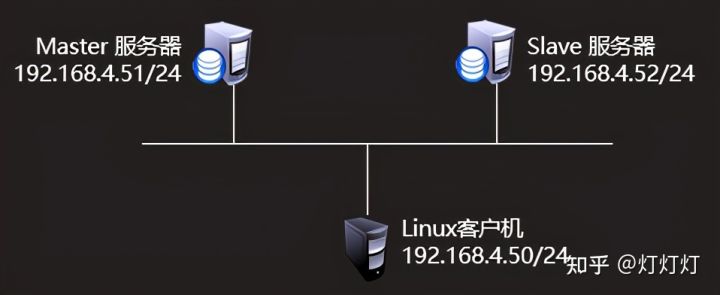
主机51和主机52分别运行MySQL数据库服务,且管理员root用户可以本机登录;主机50作为客户机 只需有命令行连接命令mysql即可。【获取资源】
步骤一:配置主服务器192.168.4.51
1)启用binlog日志
11 ]# vim /etc/my.cnf
22  [mysqld]
33   server_id=51            //server_id
44 log-bin=master51        //日志名
55 :wq
66 ]# systemctl  restart mysqld
2)用户授权
用户名自定义、客户端地址使用% 或 只指定 从服务器的地址 都可以、只给复制数据的权限即可。
11 ]# mysql -uroot -p密碼
22 mysql> grant  replication slave on *.*  to repluser@"%" identified  by "123qqq...A";
33 mysql>quit;
3)查看binlog日志信息
查看日志文件名 和 偏移量位置。
1mysql> show master status\G;
2
3*************************** 1\. row ***************************
4
5File: master51.000001 //日志名
6
7Position: 441 //偏移量
8
9Binlog_Do_DB:
10
11Binlog_Ignore_DB:
12
13Executed_Gtid_Set:
14
151 row in set (0.00 sec)
步骤二:配置从服务器192.168.4.52
1)指定server_id
Server_id值可以自定义,但不可以与主服务器相同。
11 ]# vim /etc/my.cnf
22                         [mysqld]
33                         server_id=52   //server_id值
44                         :wq
55 ]# systemctl  restart mysqld  //重启服务
2)确保与主服务器数据一致(如果是使用2台新部署的数据库服务器配置主从同步,此操作可以忽略)
11 ]# mysqldump  -uroot  –p密码   --master-data   数据库名   > /allbak.sql  //在主服务器上备份数据
22 ]# scp  /allbak.sql    root@192.168.4.52:/root/   //将备份文件拷贝给从服务器
33 mysql> create database 数据库名 ;  //在从服务器上创建与主服务器同名的数据库
44 ]# mysql  -uroot –p密码  数据库名  <  /root/allbak.sql //从服务器使用备份文件恢复数据
55 ]# vim /root/allbak.sql //在从服务器查看备份文件中的binlog日志信息
66 ......
77 ......
88 CHANGE MASTER TO MASTER_LOG_FILE='master51.000001', MASTER_LOG_POS=441; //日志名与偏移量
3)指定主服务器信息【获取资源】
数据库管理员root本机登录,指定主服务器信息,其中日志文件名和偏移量 写allbak.sql文件记录的。
11 ]# mysql -uroot –p密码     //管理员root 本机登录
2 2 mysql> show slave status;  //查看状态信息,还不是从服务器
3 3 Empty set (0.00 sec)
4 4 mysql> change   master  to //指定主服务器
5 5     -> master_host=“192.168.4.51”,                 //主服务器ip地址
6 6     -> master_user=“repluser”,                        //主服务器授权用户
7 7     -> master_password=“123qqq…A”,            //主服务器授权用户密码
8 8     -> master_log_file=“master51-bin.000001”,//主服务器日志文件
9 9     -> master_log_pos=441;                  //主服务器日志偏移量
1010 mysql> start  slave;
1111 mysql> show slave status\G; //查看状态信息
1212 *************************** 1\. row ***************************
1313                Slave_IO_State: Waiting for master to send event
1414                   Master_Host: 192.168.4.51  //主服务器ip地址
1515                   Master_User: repluser
1616                   Master_Port: 3306
1717                 Connect_Retry: 60
1818               Master_Log_File: master51.000001
1919           Read_Master_Log_Pos: 437
2020                Relay_Log_File: host52relay-bin.000002
2121                 Relay_Log_Pos: 604
2222         Relay_Master_Log_File: master51.000001
2323              Slave_IO_Running: Yes        //IO线程yes状态
2424             Slave_SQL_Running: Yes        //SQL线程yes状态
2525               Replicate_Do_DB:
2626           Replicate_Ignore_DB:
2727            Replicate_Do_Table:
2828        Replicate_Ignore_Table:
2929       Replicate_Wild_Do_Table:
3030   Replicate_Wild_Ignore_Table:
3131                    Last_Errno: 0
3232                    Last_Error:
3333                  Skip_Counter: 0
3434           Exec_Master_Log_Pos: 437
3535               Relay_Log_Space: 812
3636               Until_Condition: None
3737                Until_Log_File:
3838                 Until_Log_Pos: 0
3939            Master_SSL_Allowed: No
4040            Master_SSL_CA_File:
4141            Master_SSL_CA_Path:
4242               Master_SSL_Cert:
4343             Master_SSL_Cipher:
4444                Master_SSL_Key:
4545         Seconds_Behind_Master: 0
4646 Master_SSL_Verify_Server_Cert: No
4747                 Last_IO_Errno: 0
4848                 Last_IO_Error:
4949                Last_SQL_Errno: 0
5050                Last_SQL_Error:
5151   Replicate_Ignore_Server_Ids:
5252              Master_Server_Id: 50
5353                   Master_UUID: 4881ee4b-8800-11e9-830a-525400001e32
5454              Master_Info_File: /var/lib/mysql/master.info
5555                     SQL_Delay: 0
5656           SQL_Remaining_Delay: NULL
5757       Slave_SQL_Running_State: Slave has read all relay log; waiting for more updates
5858            Master_Retry_Count: 86400
5959                   Master_Bind:
6060       Last_IO_Error_Timestamp:
6161      Last_SQL_Error_Timestamp:
6262                Master_SSL_Crl:
6363            Master_SSL_Crlpath:
6464            Retrieved_Gtid_Set:
6565             Executed_Gtid_Set:
6666                 Auto_Position: 0
6767          Replicate_Rewrite_DB:
6868                  Channel_Name:
6969            Master_TLS_Version:
7070 1 row in set (0.00 sec)
步骤三:客户端测试配置
1)在主服务器添加访问数据的连接用户
授权用户对所有数据有增删改查的权限即可【获取资源】
11 ]# mysql –uroot –p密码
22 mysql> grant select,insert,update,delete on  *.* to  admin@"%" identified by "123qqq...A";
33 Query OK, 0 rows affected, 1 warning (0.03 sec)
44 mysql> quit
2)客户端连接主服务器访问数据
在50主机 使用主服务器51的授权用户连接【获取资源】
11 ]# mysql -h192.168.4.51-uadmin -p123qqq...A
2 2 mysql> show grants;
3 3 +------------------------------------------------------------+
4 4 | Grants for admin@%                                         |
5 5 +------------------------------------------------------------+
6 6 | GRANT SELECT, INSERT, UPDATE, DELETE ON *.* TO 'admin'@'%' |
7 7 +------------------------------------------------------------+
8 8 1 row in set (0.00 sec)
9 9 mysql> insert into db3.user(name,uid) values("lili",288); //db3库和user表是主从同步之前主服务器已有的。
1010 Query OK, 1 row affected (0.05 sec)
1111 mysql> insert into db3.user(name,uid) values("lili",288);
1212 Query OK, 1 row affected (0.28 sec)
1313 mysql> insert into db3.user(name,uid) values("lili",288);
1414 Query OK, 1 row affected (0.05 sec)
1515 mysql> select name,uid from db3.user where name="lili";
1616 +------+------+
1717 | name | uid  |
1818 +------+------+
1919 | lili |  288 |
2020 | lili |  288 |
2121 | lili |  288 |
2222 +------+------+
2323 3 rows in set (0.00 sec)
- 客户端连接从服务器访问数据
客户端50主机使用授权用户连接从服务器可以看到和主服务器同样的数据
11 ]# mysql -h192.168.4.52 –uadmin  -p123qqq…A
2 2 mysql> select name,uid from db3.user where name="lili";
3 3 +------+------+
4 4 | name | uid  |
5 5 +------+------+
6 6 | lili |  288 |
7 7 | lili |  288 |
8 8 | lili |  288 |
9 9 +------+------+
10
1110 3 rows in set (0.00 sec)
二、一主多从结构
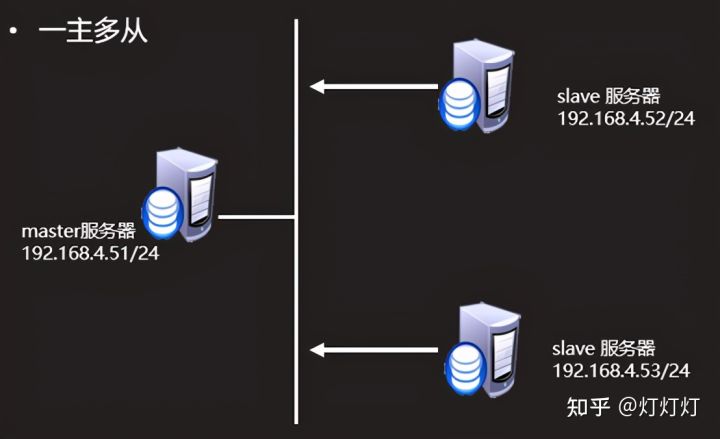
- 配置192.168.4.53数据库服务器为主机192.168.4.51的从服务器
- 客户端测试配置。
创建1台新虚拟机,配置ip地址为192.168.4.53、运行数据库服务,且数据库管理员root用户可以本机登录。
【获取资源】
步骤一:配置从服务器192.168.4.53
1)启用binlog日志
11 ]# vim /etc/my.cnf
22  [mysqld]
33   server_id=53        //server_id
44 :wq
55 ]# systemctl  restart mysqld
2)确保与主服务器数据一致
在主服务器51 备份所有数据 并把备份文件拷贝给53服务器。
11 ]# mysqldump -uroot –p123qqq…A –-master-data –B db4 db3 >  /root/twodb.sql
22 ]# scp /root/twodb.sql  root@192.168.4.53:/root/
在53主机使用备份文件恢复数据,并查看备份文件记录的日志名和偏移量【获取资源】
11 ]# mysql -uroot –p123qqq…A  < /root/twodb.sql
22 ]# grep  mater51  /root/twodb.sql
33 CHANGE MASTER TO MASTER_LOG_FILE='master51.000001', MASTER_LOG_POS=1098; //日志名与偏移量
3)指定主服务器信息
填写备份文件里显示的日志文件名 和 偏移量位置。
11 mysql> change   master  to //指定主服务器
22     -> master_host=“192.168.4.51”,                 //主服务器ip地址
33     -> master_user=“repluser”,                        //主服务器授权用户
44     -> master_password=“123qqq…A”,            //主服务器授权用户密码
55     -> master_log_file=“master51-bin.000001”,//主服务器日志文件
66     -> master_log_pos=1098;                  //主服务器日志偏移量
77 mysql> start slave;
查看状态信息
11 ]# mysql –uroot –p123qqq…A –e “show slave status\G” | grep –i  yes
22             Slave_IO_Running: Yes        //IO线程yes状态
33             Slave_SQL_Running: Yes        //SQL线程yes状态
44 ]# mysql –uroot –p123qqq…A –e “show slave status\G” | grep –i  “master_host”
55 Master_Host: 192.168.4.51  //主服务器ip地址
步骤二:客户端测试(192.168.4.50)
1)连接主服务器插入新记录
11 ]# mysql -h192.168.4.51-uadmin -p123qqq...A
22 mysql> insert into db3.user(name,uid) values("lucy",888); //db3库和user表是主从同步之前主服务器已有的。
33 Query OK, 1 row affected (0.05 sec)
2)在从服务器本机53 可以查询到新插入的数据
11 ]# mysql  -uroot  –p123qqq…A
22 mysql> select name,uid from db3.user;
33 +------+------+
44 | name | uid  |
55 +------+------+
66 | lili |  288 |
77 | lucy |  888 |
88 +------+------+
99 2 rows in set (0.00 sec)
三、配置主从从结构
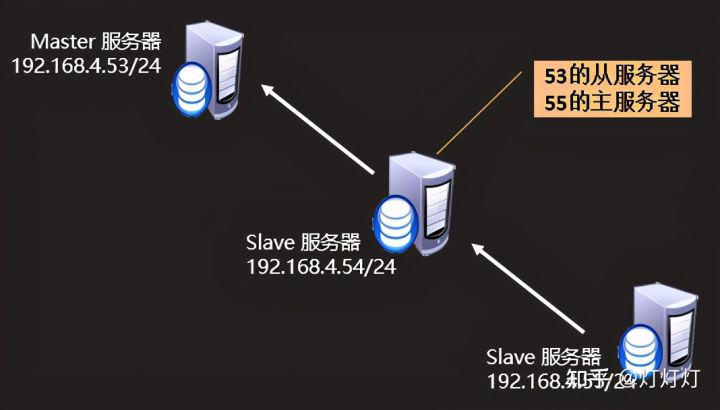
- 配置主机192.168.4.53为主服务器
- 配置主机192.168.4.54为53主机的从服务器
- 配置主机192.168.4.55为54主机的从服务器
- 客户端测试配置。
使用3台虚拟机,分别运行mysql数据库服务,且管理员root可以本机登录;主机192.168.4.53为主服务器;主机192.168.4.54为从服务器;主机192.168.4.55为从服务器。
步骤一:环境准备
为了在启用binlog日志及同步之前保持主、从库的一致性,主从同步未配置之前,要保证从库上要有主库上的数据,禁用selinux,关闭防火墙服务,保证物理连接正常
1)关闭防火墙,禁用selinux,已不可忽略:
11 ]# systemctl  stop firewalld
22 ]# setenforce  0
步骤二:配置主服务器192.168.4.53
2)用户授权【获取资源】
11 ]# mysql -uroot -p123456
22 mysql> grant   replication  slave   on  *.*  to  yaya@"%"   identified    by  "123qqq…A“;
33 Query OK, 0 rows affected, 1 warning (0.03 sec)
3)启用binlog日志,修改/etc/my.cnf配置,重新启动MySQL服务程序
指定服务器ID号、允许日志同步:
11 ]# vim /etc/my.cnf
22 [mysqld]
33 log_bin=db53                     //启用binlog日志,并指定文件名前缀
44 server_id=53                    //指定服务器ID号
4)重启mysql服务:
1 ]# systemctl restart mysqld
5)确保/var/lib/mysql下面有两个文件:
11 ]#  ls  /var/lib/mysql/db51.*
22 /var/lib/mysql/db53.000001  /var/lib/mysql/db53.index
6)查看主服务正在使用的日志信息
查看主服务器状态,记录下当前的日志文件名、偏移的位置(下面SLAVE发起复制时需要用到):
11    mysql> show  master  status;
22 +-------------+----------+--------------+------------------+-------------------+
33 | File        | Position | Binlog_Do_DB | Binlog_Ignore_DB | Executed_Gtid_Set |
44 +-------------+----------+--------------+------------------+-------------------+
55 | db53.000001 |437       |      |                  |                   |
66 +-------------+----------+--------------+------------------+-------------------+
77 1 row in set (0.00 sec)
步骤三:配置从服务器192.168.4.54
1)在服务器192.168.4.53上做用户授权(数据同步使用的连接用户)
11 ]# mysql -u root -p123456
22 mysql> grant  replication slave on *.*  to  user55@”%” identified by  “654321” ;
2)修改/etc/my.cnf配置,启用binlog日志,指定server_id 和 允许级联复制
11 ]# vim /etc/my.cnf
22 [mysqld]
33 server_id=54
44 log-bin=db54
55 log_slave_updates                          //允许级联复制
3)配置完成后,重启mysql服务:
1 ]# systemctl restart mysqld
4)确保/var/lib/mysql下面有两个文件:
11 ]# ls /var/lib/mysql/db52.*
22 /var/lib/mysql/db54.000001   /var/lib/mysql/db54.index
5)查看正在使用的日志信息
11 ]# mysql -uroot -p123456
22 mysql>  show  master  status;
33 +-------------+----------+--------------+------------------+-------------------+
44 | File        | Position | Binlog_Do_DB | Binlog_Ignore_DB | Executed_Gtid_Set |
55 +-------------+----------+--------------+------------------+-------------------+
66 |db54.000001  |      154 |
77 +-------------+----------+--------------+------------------+-------------------+
88 1 row in set (0.00 sec)    //查看日志文件名、偏移的位置
验证主服务器的的授权用户
11 ]# mysql -h192.168.4.53 -uyaya -p123456
22 mysql>                                //验证成功
7)通过change master语句指定master服务器的IP地址、同步用户名/密码、起始日志文件、偏移位置(参考master上的状态输出):
11 ]# mysql -uroot -p123456
2 2
3 3 mysql> change master to
4 4
5 5 -> master_host="192.168.4.53”;
6 6
7 7 -> master_user="yaya",
8 8
9 9 -> master_password="123456",
1010
1111 -> master_log_file="db53.000001”;
1212
1313 -> master_log_pos=437;
1414
1515 Query OK, 0 rows affected, 2 warnings (0.43 sec)
8)启动slave进程
11 mysql> start slave;
22
33 Query OK, 0 rows affected (0.03 sec)
9)查看进程状态信息,通过show slave status语句可查看从服务器状态,确认其中的IO线程、SQL线程正常运行,才能成功同步,IO线程和SQL线程必须是Yes
1mysql> show slave status \G;
2************************
3Master_Host: 192.168.4.53 //主服务器IP地址
4************************
5Slave_IO_Running: Yes    //IO线程状态YES
6Slave_SQL_Running: Yes  //SQL线程状态YES
步骤四:配置从服务器192.168.4.55
1)验证主库的授权用户
11 ]# mysql  -h192.168.4.54  -uuser54 -p654321
2 2 mysql: [Warning] Using a password on the command line interface can be insecure.
3 3 Welcome to the MySQL monitor.  Commands end with ; or \g.
4 4 Your MySQL connection id is 7
5 5 Server version: 5.7.17-log MySQL Community Server (GPL)
6 6 Copyright (c) 2000, 2016, Oracle and/or its affiliates. All rights reserved.
7 7 Oracle is a registered trademark of Oracle Corporation and/or its
8 8 affiliates. Other names may be trademarks of their respective
9 9 owners.
1010 Type 'help;' or '\h' for help. Type '\c' to clear the current input statement.
1111 mysql>                  //验证成功
2)指定server_id
11 [mysqld]
22 server_id=55
3)重新启动服务
1 ]# systemctl restart mysqld
4)管理员登录指定主库信息
11 ]# mysql -uroot -p123456
22 mysql> change  master  to
33     -> master_host="192.168.4.54”;
44     -> master_user="user55”;
55     -> master_password="654321",
66     -> master_log_file=" db54.000001”;
77     -> master_log_pos=154;
88 Query OK, 0 rows affected, 2 warnings (0.37 sec)
5)启动slave进程
11 mysql>  start  slave;
22 Query OK, 0 rows affected (0.04 sec)
6)查看进程状态信息
11 mysql> show slave status\G
2 2 *************************** 1\. row ***************************
3 3                Slave_IO_State: Waiting for master to send event
4 4                   Master_Host: 192.168.4.54
5 5                   Master_User: user55
6 6                   Master_Port: 3306
7 7                 Connect_Retry: 60
8 8               Master_Log_File: db54.000001
9 9           Read_Master_Log_Pos: 154
1010                Relay_Log_File: db55-relay-bin.000001
1111                 Relay_Log_Pos: 315
1212         Relay_Master_Log_File: db54.000001
1313              Slave_IO_Running: Yes
1414             Slave_SQL_Running: Yes
步骤五:客户端验证配置
在主库授权访问数据的连接用户;户端连接主库执行与权限匹配的sql操作;
授权用户连接第1台从库,可以看到主库的数据;权用户连接第2台从库,可以看到主库的数据
1)在主服务器上在主库上授权访问gamedb库的用户
11 ]# mysql -uroot  -p123456
22 mysql> grant  all  on  gamedb.*   to   dada@"%"  identified by  "123456";
33 Query OK, 0 rows affected, 1 warning (0.03 sec)
2)客户端使用授权用户连接主库,建库、表、插入记录
11 ]# mysql  -h192.168.4.53    -udada  -p123456
2 2 Welcome to the MariaDB monitor.  Commands end with ; or \g.
3 3 Your MySQL connection id is 7
4 4 Server version: 5.7.17-log MySQL Community Server (GPL)
5 5 Copyright (c) 2000, 2017, Oracle, MariaDB Corporation Ab and others.
6 6 Type 'help;' or '\h' for help. Type '\c' to clear the current input statement.
7 7 MySQL [(none)]>   //验证成功
8 8 MySQL [(none)]> create  database  gamedb;   //创建测试库
9 9 Query OK, 1 row affected (0.04 sec)
1010 MySQL [(none)]> create  table  gamedb.t1(id int);   //在gamedb下创建t1表
1111 Query OK, 0 rows affected (0.17 sec)
1212 MySQL [(none)]> insert into  gamedb.t1 values(8888);   //在t1表中插入数值
1313 Query OK, 1 row affected (0.22 sec)
3)客户端使用授权用户连接2台从库时,也可以看到主库上新的库表记录
11 ]# mysql  -h192.168.4.54    -udada  -p123456  //验证54主机的状态
2 2 Welcome to the MariaDB monitor.  Commands end with ; or \g.
3 3 Your MySQL connection id is 10
4 4 Server version: 5.7.17-log MySQL Community Server (GPL)
5 5 Copyright (c) 2000, 2017, Oracle, MariaDB Corporation Ab and others.
6 6 Type 'help;' or '\h' for help. Type '\c' to clear the current input statement.
7 7 MySQL [(none)]> select  * from gamedb.t1;         //查询插入的表格
8 8 +------+
9 9 | id   |
1010 +------+
1111 | 8888 |
1212 +------+
1313 1 row in set (0.00 sec)
1414 MySQL [(none)]> exit
1515 [root@room9pc01 ~]# mysql  -h192.168.4.55   -udada  -p123456 //验证55主机的状态
1616 Welcome to the MariaDB monitor.  Commands end with ; or \g.
1717 Your MySQL connection id is 6
1818 Server version: 5.7.17 MySQL Community Server (GPL)
1919 Copyright (c) 2000, 2017, Oracle, MariaDB Corporation Ab and others.
2020 Type 'help;' or '\h' for help. Type '\c' to clear the current input statement.
2121 MySQL [(none)]> select  * from gamedb.t1;
2222 +------+
2323 | id   |
2424 +------+
2525 | 8888 |
2626 +------+
2727 1 row in set (0.00 sec)
四、配置半同步复制模式
- 开启一主多从服务器192.168.4.54 半同步复制模式
- 查看半同步复制模式是否开启
从服务器192.168.4.54 为例演示配置,54主机既做主服务器又做从服务器,所以两种角色的半同步复制模块和功能都要启用。【获取资源】
步骤一:查看是否允许动态加载模块。
1)查看是否允许动态加载模块(默认允许)
11 mysql> show  variables  like  'have_dynamic_loading';
22 +----------------------+-------+
33 | Variable_name        | Value |
44 +----------------------+-------+
55 | have_dynamic_loading | YES   |
66 +----------------------+-------+
77 1 row in set (0.01 sec)
2)命令行加载插件
11 mysql> install  plugin   rpl_semi_sync_master   SONAME   ”semisync_master.so”; //加载master模块
22 mysql> install  plugin   rpl_semi_sync_slave SONAME  'semisync_slave.so'; //加载slave模块
查看模块是否安装成功:
11 mysql> select  plugin_name, plugin_status from  information_schema.plugins  where plugin_name like '%semi%';
22 +----------------------+---------------+
33 | PLUGIN_NAME          | PLUGIN_STATUS |
44 +----------------------+---------------+
55 | rpl_semi_sync_master | ACTIVE         |        //模块安装成功
66 | rpl_semi_sync_slave  | ACTIVE         |
77 +----------------------+---------------+
88 2 rows in set (0.00 sec)
3)启用半同步复制 (在安装完插件后,半同步复制默认是关闭的)
11 mysql> set  global rpl_semi_sync_master_enabled = 1; //启用master半同步复制
22 Query OK, 0 rows affected (0.00 sec)
33 mysql> set  global rpl_semi_sync_slave_enabled = 1; //启用slave半同步复制
44 Query OK, 0 rows affected (0.00 sec)
查看半同步复制模式是否启用:
11 mysql>  show  variables  like  "rpl_semi_sync_%_enabled";
22 +------------------------------+-------+
33 | Variable_name                | Value |
44 +------------------------------+-------+
55 | rpl_semi_sync_master_enabled | ON    |    //模块已启用
66 | rpl_semi_sync_slave_enabled  | ON    |
77 +------------------------------+-------+
88 2 rows in set (0.00 sec)
4)修改配置文件,永久启用半同步复制
11 [root@master51 ~]# vim /etc/my.cnf
22 [mysqld]
33 plugin-load="rpl_semi_sync_master=semisync_master.so;rpl_semi_sync_slave=semisync_slave.so"
44 rpl-semi-sync-master-enabled = 1
55 rpl-semi-sync-slave-enabled = 1
66 :wq
5)重启数据库服务,并查看状态信息
11 ]# mystemctl  restart mysqld
2 2 ]# mysql -uroot -p123qqq...A
3 3 mysql> select  plugin_name, plugin_status from  information_schema.plugins  where plugin_name like '%semi%';
4 4 +----------------------+---------------+
5 5 | plugin_name          | plugin_status |
6 6 +----------------------+---------------+
7 7 | rpl_semi_sync_master | ACTIVE        | //模块已加载
8 8 | rpl_semi_sync_slave  | ACTIVE        |
9 9 +----------------------+---------------+
1010 2 rows in set (0.00 sec)
1111 mysql>  show  variables  like  "rpl_semi_sync_%_enabled";
1212 +------------------------------+-------+
1313 | Variable_name                | Value |
1414 +------------------------------+-------+
1515 | rpl_semi_sync_master_enabled | ON    | //模式已启用
1616 | rpl_semi_sync_slave_enabled  | ON    |
1717 +------------------------------+-------+
1818 2 rows in set (0.00 sec)
最后,祝大家早日学有所成,拿到满意offer,快速升职加薪,走上人生巅峰。
可以的话请给我一个三连支持一下我哟??????【获取资料】