
对于iOS开发者而言,CocoaPods并不陌生,通过pod相关的命令操作,就可以很方便的将项目中用到的三方依赖库资源集成到项目环境中,大大的提升了开发的效率。CocoaPods作为iOS项目的包管理工具,它在命令行背后做了什么操作?而又是通过什么样的方式将命令指令声明出来供我们使用的?这些实现的背后底层逻辑是什么?都是本文想要探讨挖掘的。
一、Ruby是如何让系统能够识别已经安装的Pods指令的?
我们都知道在使用CocoaPods管理项目三方库之前,需要安装Ruby环境,同时基于Ruby的包管理工具gem再去安装CocoaPods。通过安装过程可以看出来,CocoaPods本质就是Ruby的一个gem包。而安装Cocoapods的时候,使用了以下的安装命令:
sudo gem install cocoapods
安装完成之后,就可以使用基于Cocoapods的 pod xxxx 相关命令了。gem install xxx 到底做了什么也能让 Terminal 正常的识别 pod 命令?gem的工作原理又是什么?了解这些之前,可以先看一下 RubyGems 的环境配置,通过以下的命令:
gem environment
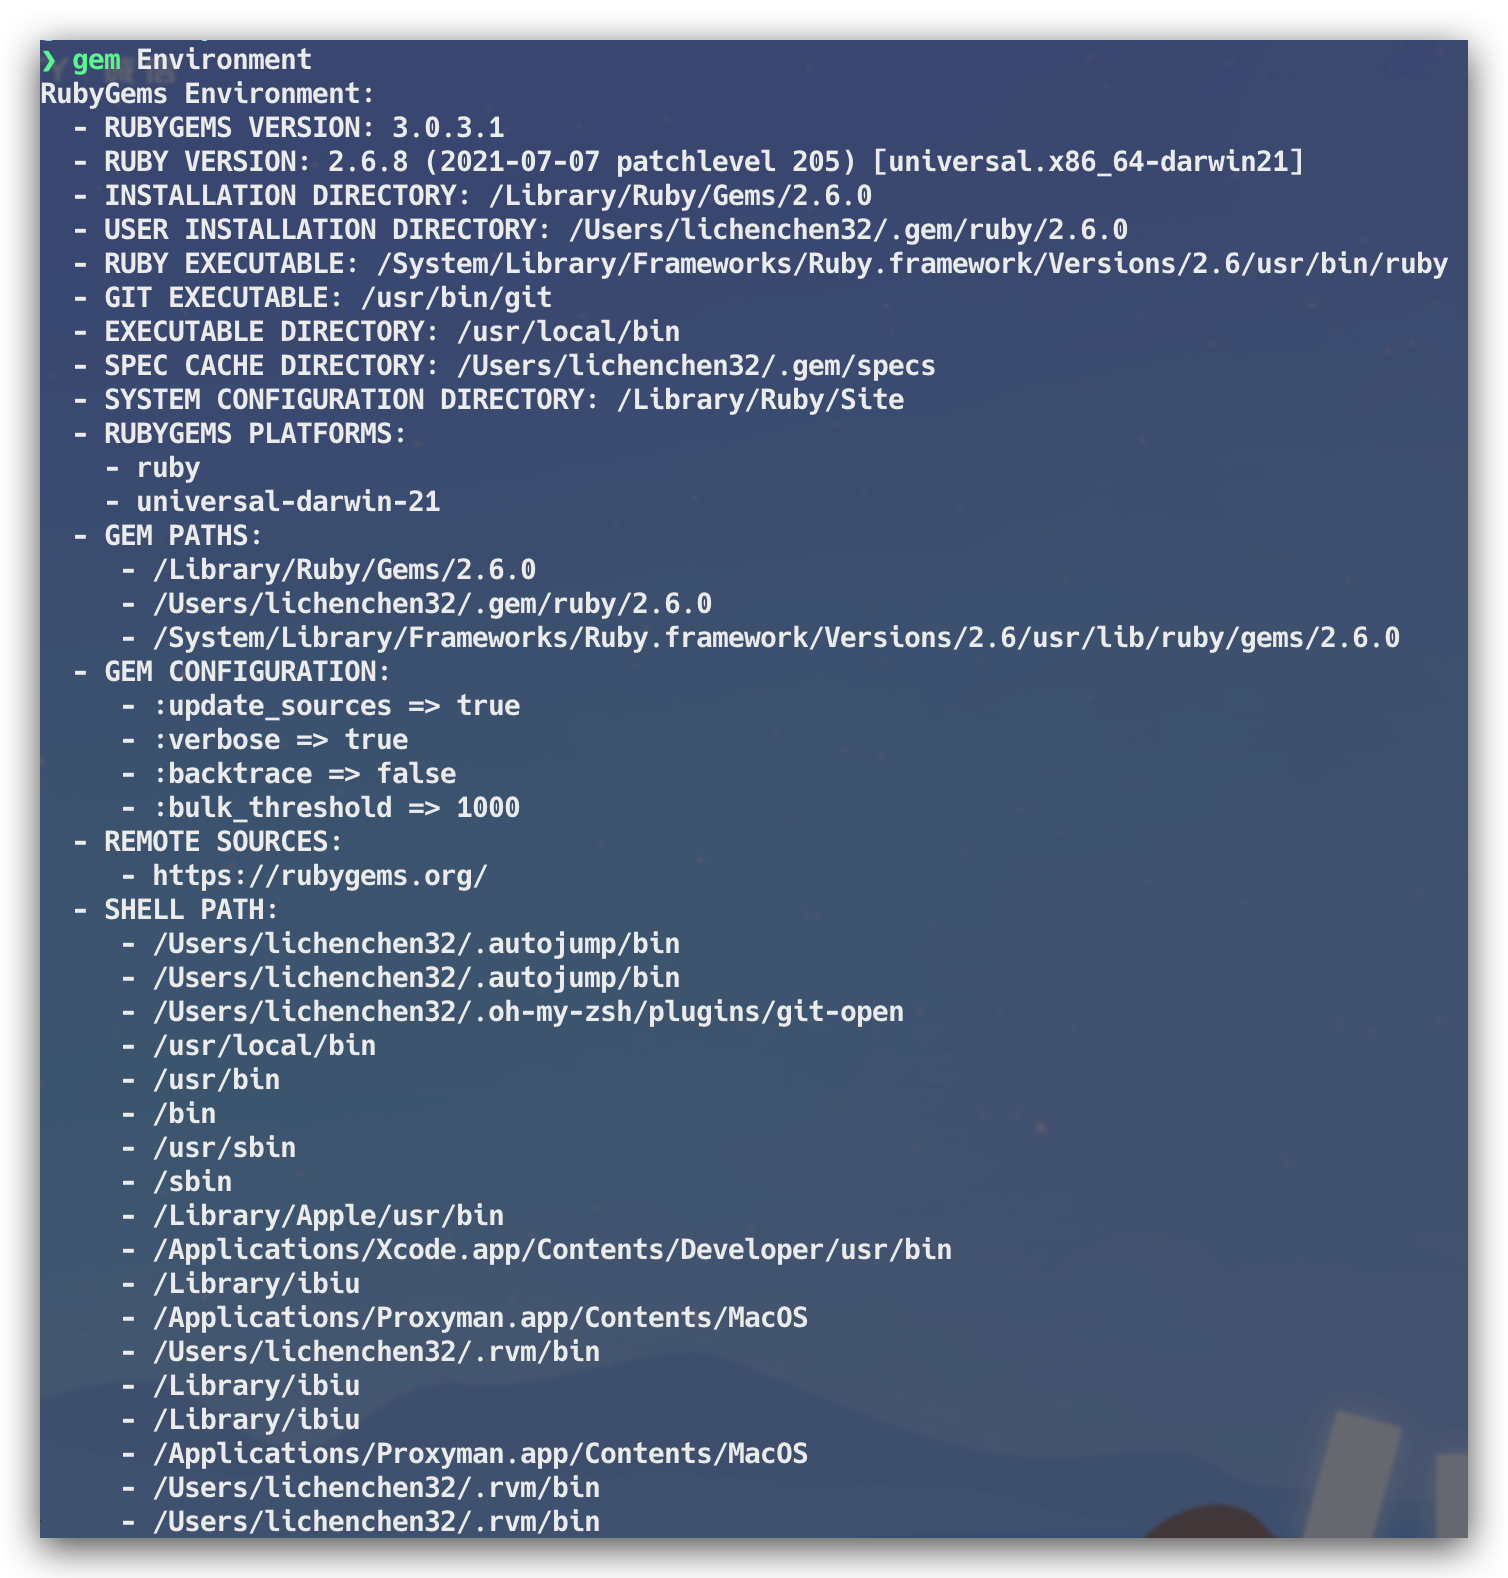

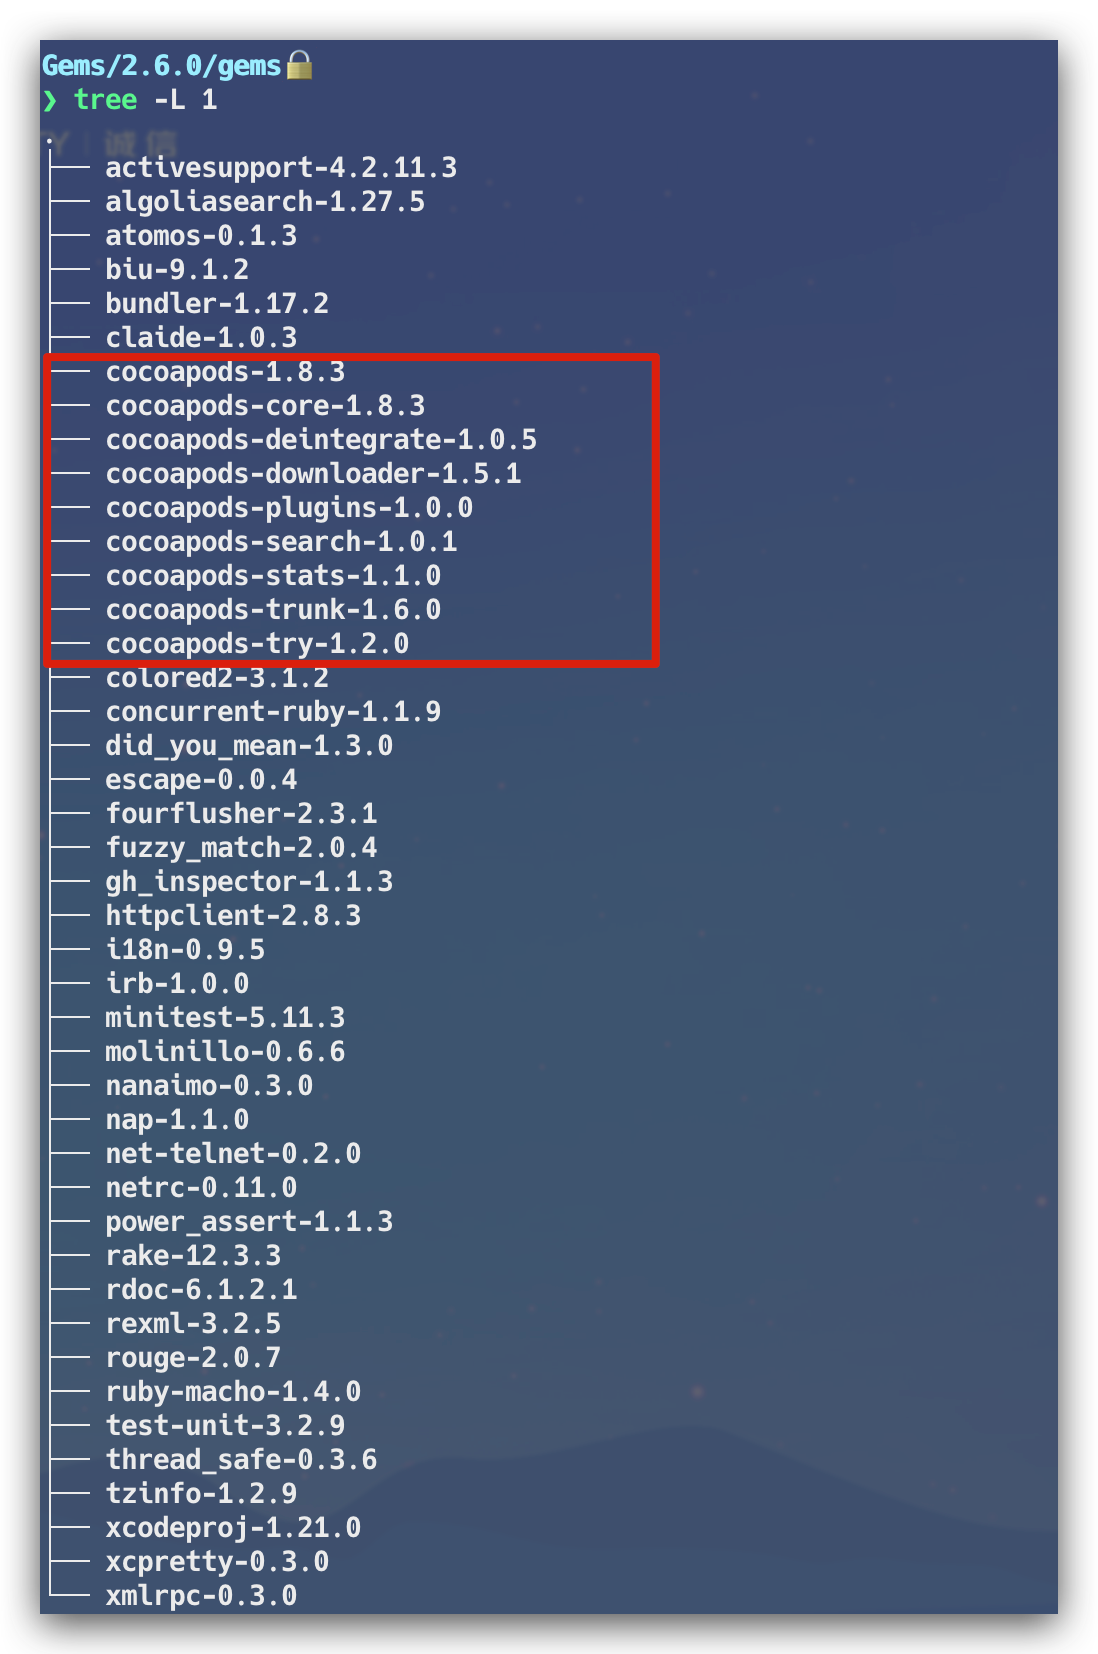
通过以上的命令,可以看到Ruby的版本信息,RubyGem的版本,以及gems包安装的路径,进入安装路径 /Library/Ruby/Gems/2.6.0 后,我们能看到当前的Ruby环境下所安装的扩展包,这里能看到我们熟悉的Cocoapods相关的功能包。除了安装包路径之外,还有一个 EXECUTABLE DIRECTORY 执行目录 /usr/local/bin,可以看到拥有可执行权限的pod文件,如下:
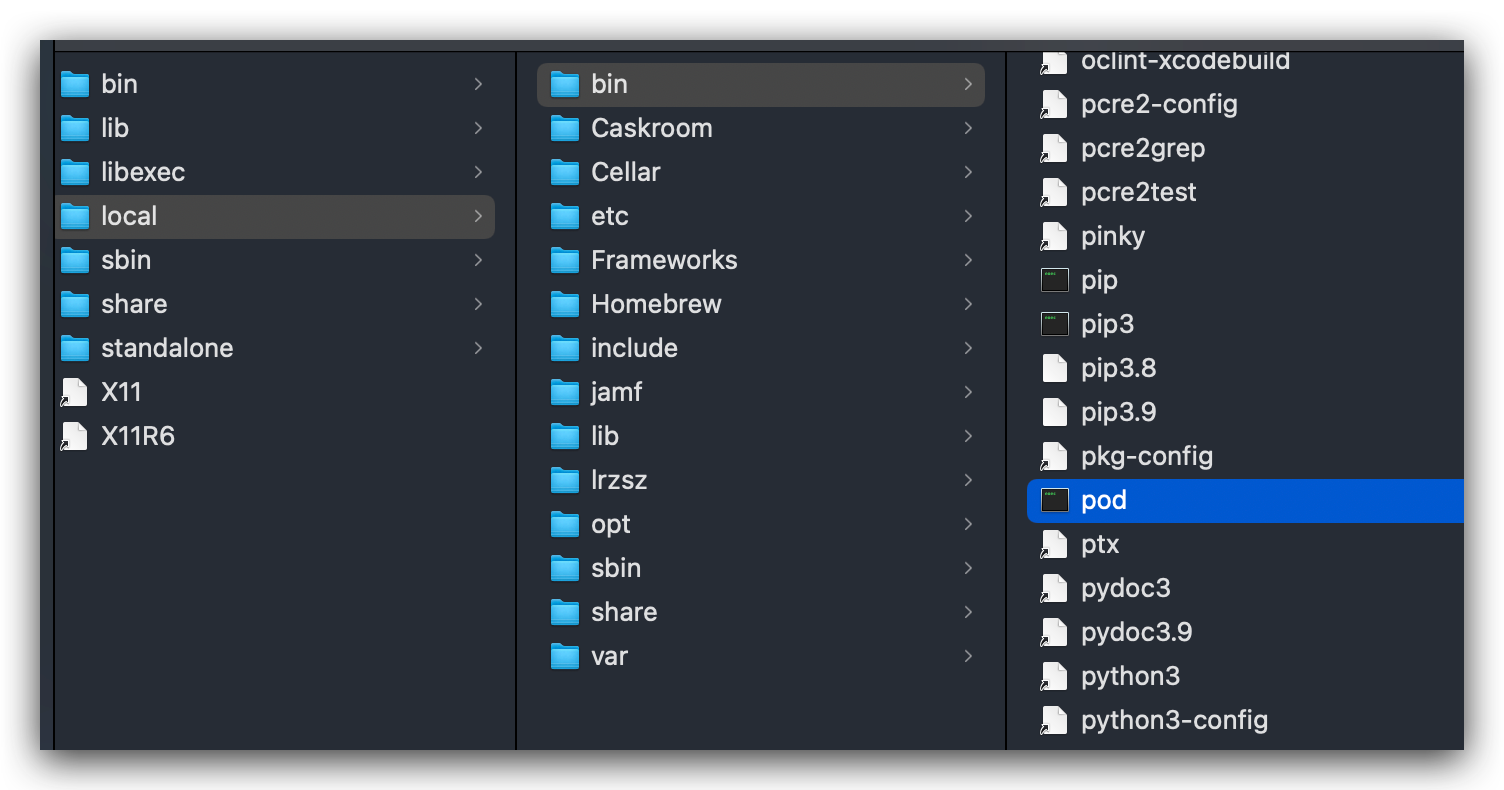
预览一下pod文件内容:
1#!/System/Library/Frameworks/Ruby.framework/Versions/2.6/usr/bin/ruby
2#
3# This file was generated by RubyGems.
4#
5# The application 'cocoapods' is installed as part of a gem, and
6# this file is here to facilitate running it.
7#
8
9require 'rubygems'
10
11version = ">= 0.a"
12
13str = ARGV.first
14if str
15  str = str.b[/\A_(.*)_\z/, 1]
16  if str and Gem::Version.correct?(str)
17    version = str
18    ARGV.shift
19  end
20end
21
22if Gem.respond_to?(:activate_bin_path)
23load Gem.activate_bin_path('cocoapods', 'pod', version)
24else
25gem "cocoapods", version
26load Gem.bin_path("cocoapods", "pod", version)
27end
根据文件注释内容可以发现,当前的可执行文件是 RubyGems 在安装 Cocoapods 的时候自动生成的,同时会将当前的执行文件放到系统的环境变量路径中,也即存放到了 /usr/local/bin 中了,这也就解释了为什么我们通过gem安装cocoapods之后,就立马能够识别pod可执行环境了。
虽然能够识别pod可执行文件,但是具体的命令参数是如何进行识别与实现呢?继续看以上的pod的文件源码,会发现最终都指向了 Gem 的 activate_bin_path 与 bin_path 方法,为了搞清楚Gem到底做了什么,在官方的RubyGems源码的rubygems.rb 文件中找到了两个方法的相关定义与实现,摘取了主要的几个方法实现,内容如下:
1  ##
2  # Find the full path to the executable for gem +name+.  If the +exec_name+
3  # is not given, an exception will be raised, otherwise the
4  # specified executable's path is returned.  +requirements+ allows
5  # you to specify specific gem versions.
6  #
7  # A side effect of this method is that it will activate the gem that
8  # contains the executable.
9  #
10  # This method should *only* be used in bin stub files.
11  def self.activate_bin_path(name, exec_name = nil, *requirements) # :nodoc:
12    spec = find_spec_for_exe name, exec_name, requirements
13    Gem::LOADED_SPECS_MUTEX.synchronize do
14      spec.activate
15      finish_resolve
16    end
17    spec.bin_file exec_name
18  end
19
20  def self.find_spec_for_exe(name, exec_name, requirements)
21	#如果没有提供可执行文件的名称,则抛出异常
22    raise ArgumentError, "you must supply exec_name" unless exec_name
23    # 创建一个Dependency对象
24    dep = Gem::Dependency.new name, requirements
25    # 获取已经加载的gem
26    loaded = Gem.loaded_specs[name]
27    # 存在直接返回
28    return loaded if loaded && dep.matches_spec?(loaded)
29    # 查找复合条件的gem配置
30    specs = dep.matching_specs(true)
31    specs = specs.find_all do |spec|
32	  # 匹配exec_name 执行名字,如果匹配结束查找
33      spec.executables.include? exec_name
34    end if exec_name
35	# 如果没有找到符合条件的gem,抛出异常
36    unless spec = specs.first
37      msg = "can't find gem #{dep} with executable #{exec_name}"
38      raise Gem::GemNotFoundException, msg
39    end
40	#返回结果
41    spec
42  end
43  private_class_method :find_spec_for_exe
44
45  ##
46  # Find the full path to the executable for gem +name+.  If the +exec_name+
47  # is not given, an exception will be raised, otherwise the
48  # specified executable's path is returned.  +requirements+ allows
49  # you to specify specific gem versions.
50
51  def self.bin_path(name, exec_name = nil, *requirements)
52    requirements = Gem::Requirement.default if
53      requirements.empty?
54    # 通过exec_name 查找gem中可执行文件
55    find_spec_for_exe(name, exec_name, requirements).bin_file exec_name
56  end
57
58class Gem::Dependency
59  def matching_specs(platform_only = false)
60    env_req = Gem.env_requirement(name)
61    matches = Gem::Specification.stubs_for(name).find_all do |spec|
62      requirement.satisfied_by?(spec.version) && env_req.satisfied_by?(spec.version)
63    end.map(&:to_spec)
64
65    if prioritizes_bundler?
66      require_relative "bundler_version_finder"
67      Gem::BundlerVersionFinder.prioritize!(matches)
68    end
69
70    if platform_only
71      matches.reject! do |spec|
72        spec.nil? || !Gem::Platform.match_spec?(spec)
73      end
74    end
75
76    matches
77  end
78end
79
80class Gem::Specification < Gem::BasicSpecification
81  def self.stubs_for(name)
82    if @@stubs
83      @@stubs_by_name[name] || []
84    else
85      @@stubs_by_name[name] ||= stubs_for_pattern("#{name}-*.gemspec").select do |s|
86        s.name == name
87      end
88    end
89  end
90
91end
92
93
通过当前的实现可以看出在两个方法实现中,通过 find_spec_for_exe 方法依据名称name查找sepc对象,匹配成功之后返回sepc对象,最终通过spec对象中的bin_file方法来进行执行相关的命令。以下为gems安装的配置目录集合:
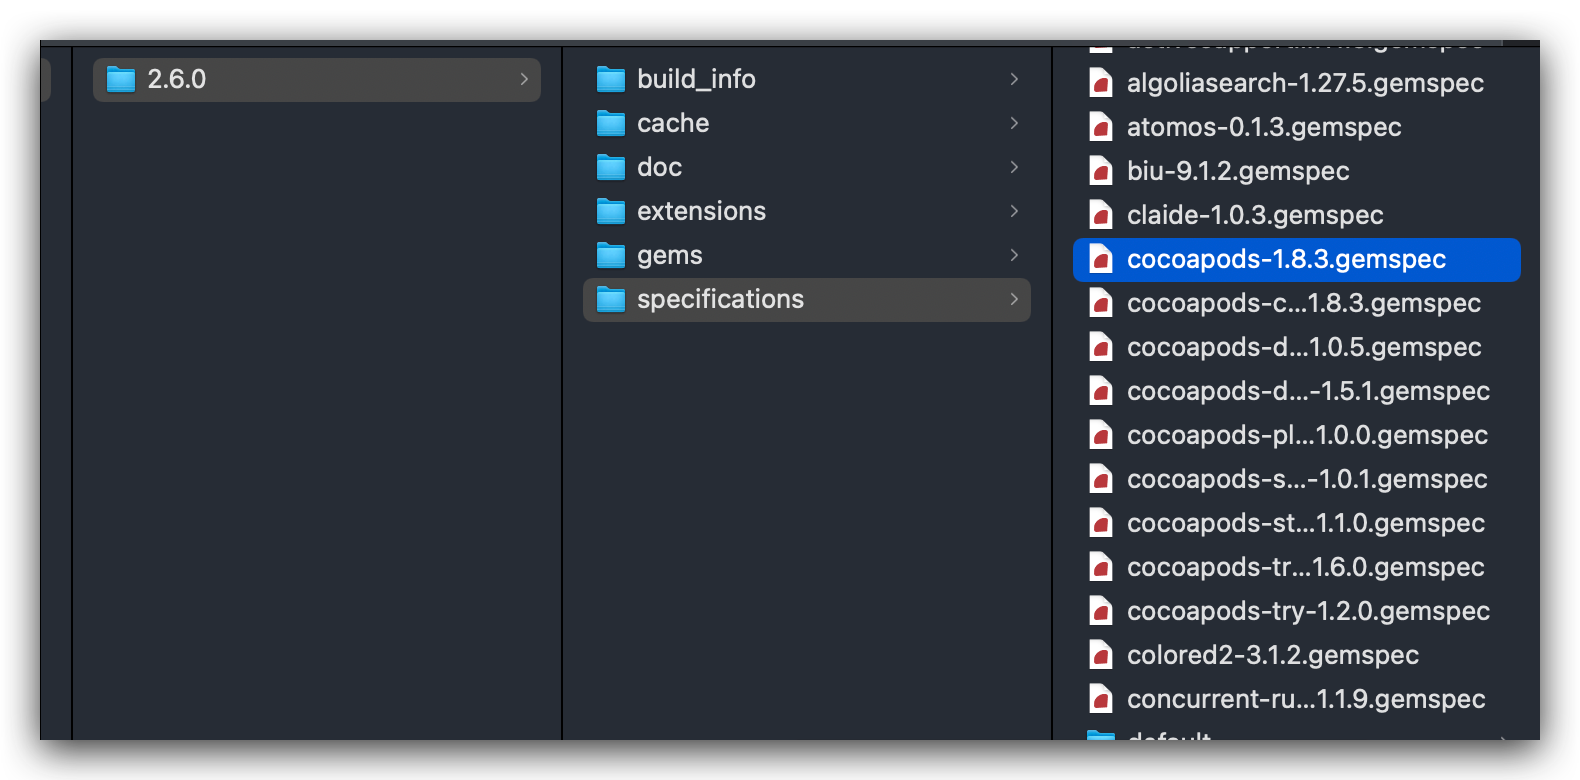
注:bin_file 方法的实现方式取决于 gem 包的类型和所使用的操作系统。在大多数情况下,它会根据操作系统的不同,使用不同的查找算法来确定二进制文件的路径。例如,在Windows上,它会搜索 gem包的 bin 目录,而在 Unix 上,它会搜索 gem 包的 bin目录和 PATH 环境变量中的路径。
通过当前的实现可以看出在两个方法实现中,find_spec_for_exe 方法会遍历所有已安装的 gem 包,查找其中包含指定可执行文件的 gem 包。如果找到了匹配的 gem 包,则会返回该 gem 包的 Gem::Specification 对象,并调用其 bin_file 方法获取二进制文件路径。而 bin_file 是在 Gem::Specification 类中定义的。它是一个实例方法,用于查找与指定的可执行文件 exec_name 相关联的 gem 包的二进制文件路径,定义实现如下:
1  def bin_dir
2    @bin_dir ||= File.join gem_dir, bindir
3  end
4  ##
5  # Returns the full path to installed gem's bin directory.
6  #
7  # NOTE: do not confuse this with +bindir+, which is just 'bin', not
8  # a full path.
9  def bin_file(name)
10    File.join bin_dir, name
11  end
到这里,可以看出,pod命令本质是执行了RubyGems 的 find_spec_for_exe 方法,用来查找并执行gems安装目录下的bin目录,也即是 /Library/Ruby/Gems/2.6.0 目录下的gem包下的bin目录。而针对于pod的gem包,如下所示:

至此,可以发现,由系统执行环境 /usr/local/bin 中的可执行文件 pod 引导触发,Ruby通过 Gem.bin_path("cocoapods", "pod", version) 与 Gem.activate_bin_path('cocoapods', 'pod', version) 进行转发,再到gems包安装目录的gem查找方法 find_spec_for_exe,最终转到gems安装包下的bin目录的执行文件进行命令的最终执行,流程大致如下:
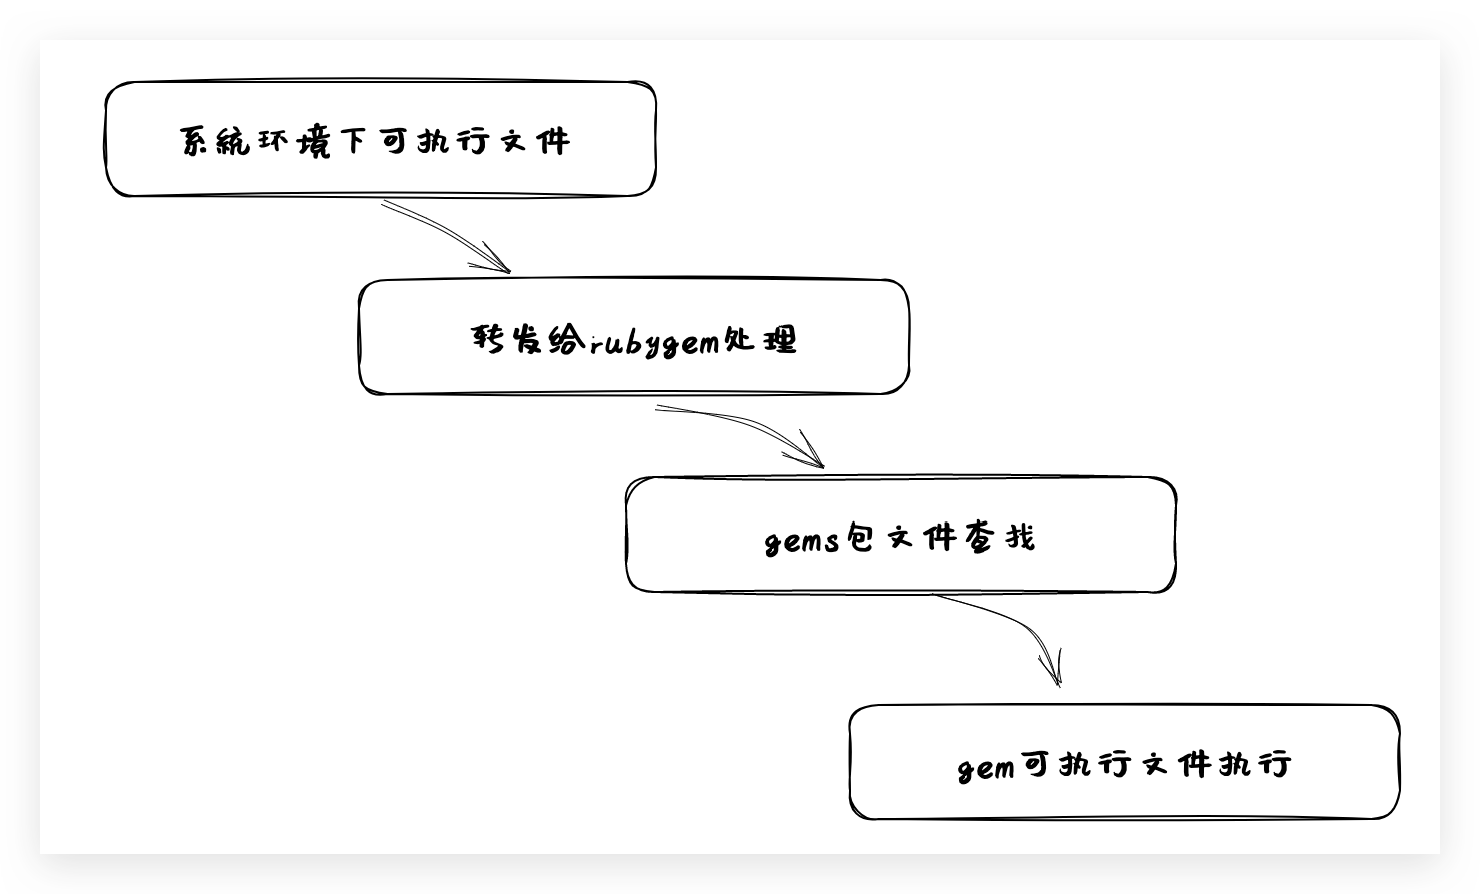
而对于pod的命令又是如何进行识别区分的呢?刚刚的分析可以看出对于gems安装包的bin下的执行文件才是最终的执行内容,打开cocoapod的bin目录下的pod可执行文件,如下:
1#!/usr/bin/env ruby
2
3if Encoding.default_external != Encoding::UTF_8
4
5  if ARGV.include? '--no-ansi'
6    STDERR.puts <<-DOC
7    WARNING: CocoaPods requires your terminal to be using UTF-8 encoding.
8    Consider adding the following to ~/.profile:
9
10    export LANG=en_US.UTF-8
11    DOC
12  else
13    STDERR.puts <<-DOC
14    \e[33mWARNING: CocoaPods requires your terminal to be using UTF-8 encoding.
15    Consider adding the following to ~/.profile:
16
17    export LANG=en_US.UTF-8
18    \e[0m
19    DOC
20  end
21
22end
23
24if $PROGRAM_NAME == __FILE__ && !ENV['COCOAPODS_NO_BUNDLER']
25  ENV['BUNDLE_GEMFILE'] = File.expand_path('../../Gemfile', __FILE__)
26  require 'rubygems'
27  require 'bundler/setup'
28  $LOAD_PATH.unshift File.expand_path('../../lib', __FILE__)
29elsif ENV['COCOAPODS_NO_BUNDLER']
30  require 'rubygems'
31  gem 'cocoapods'
32end
33
34STDOUT.sync = true if ENV['CP_STDOUT_SYNC'] == 'TRUE'
35
36require 'cocoapods'
37
38# 环境变量判断是否配置了profile_filename,如果配置了按照配置内容生成
39if profile_filename = ENV['COCOAPODS_PROFILE']
40  require 'ruby-prof'
41  reporter =
42    case (profile_extname = File.extname(profile_filename))
43    when '.txt'
44      RubyProf::FlatPrinterWithLineNumbers
45    when '.html'
46      RubyProf::GraphHtmlPrinter
47    when '.callgrind'
48      RubyProf::CallTreePrinter
49    else
50      raise "Unknown profiler format indicated by extension: #{profile_extname}"
51    end
52  File.open(profile_filename, 'w') do |io|
53    reporter.new(RubyProf.profile { Pod::Command.run(ARGV) }).print(io)
54  end
55else
56  Pod::Command.run(ARGV)
57end
58
59
可以发现,pod命令参数的解析运行是通过 Pod::Command.run(ARGV) 实现的。通过该线索,我们接着查看Pod库源码的Command类的run方法都做了什么?该类在官方源码的lib/cocoapods/command.rb 定义的,摘取了部分内容如下:
1  class Command < CLAide::Command
2    def self.run(argv)
3      ensure_not_root_or_allowed! argv
4      verify_minimum_git_version!
5      verify_xcode_license_approved!
6      super(argv)
7    ensure
8      UI.print_warnings
9    end
10  end
源码中在进行命令解析之前,进行了前置条件检查判断: 1、检查当前用户是否为 root 用户或是否在允许的用户列表中 2、检查当前系统上安装的 Git 版本是否符合最低要求 3、检查当前系统上的 Xcode 许可是否已经授权
如果都没有问题,则会调用父类的 run 方法,而命令的解析可以看出来应该是在其父类 CLAide::Command 进行的,CLAide 是 CocoaPods的命令行解析库,在 command.rb 文件中,可以找到如下 Command 类的实现:
1
2    def initialize(argv)
3      argv = ARGV.coerce(argv)
4      @verbose = argv.flag?('verbose')
5      @ansi_output = argv.flag?('ansi', Command.ansi_output?)
6      @argv = argv
7      @help_arg = argv.flag?('help')
8    end
9
10    def self.run(argv = [])
11      plugin_prefixes.each do |plugin_prefix|
12        PluginManager.load_plugins(plugin_prefix)
13      end
14      # 转换成ARGV对象
15      argv = ARGV.coerce(argv)
16      # 处理有效命令行参数
17      command = parse(argv)
18      ANSI.disabled = !command.ansi_output?
19      unless command.handle_root_options(argv)
20	    # 命令处理
21        command.validate!
22        # 运行命令(由子类进行继承实现运行)
23        command.run
24      end
25    rescue Object => exception
26      handle_exception(command, exception)
27    end
28
29    def self.parse(argv)
30      argv = ARGV.coerce(argv)
31      cmd = argv.arguments.first
32      # 命令存在,且子命令存在,进行再次解析
33      if cmd && subcommand = find_subcommand(cmd)
34	    # 移除第一个参数
35        argv.shift_argument
36        # 解析子命令
37        subcommand.parse(argv)
38	  # 不能执行的命令直接加载默认命令
39      elsif abstract_command? && default_subcommand
40        load_default_subcommand(argv)
41      # 无内容则创建一个comand实例返回
42      else
43        new(argv)
44      end
45    end
46    # 抽象方法,由其子类进行实现
47    def run
48      raise 'A subclass should override the `CLAide::Command#run` method to ' \
49        'actually perform some work.'
50    end
51	# 返回 [CLAide::Command, nil]
52    def self.find_subcommand(name)
53      subcommands_for_command_lookup.find { |sc| sc.command == name }
54    end
通过将 argv 转换为 ARGV 对象(ARGV 是一个 Ruby 内置的全局变量,它是一个数组,包含了从命令行传递给 Ruby 程序的参数。例如:ARGV[0] 表示第一个参数,ARGV[1] 表示第二个参数,以此类推),然后获取第一个参数作为命令名称 cmd。如果 cmd 存在,并且能够找到对应的子命令 subcommand,则将 argv 中的第一个参数移除,并调用 subcommand.parse(argv) 方法解析剩余的参数。如果没有指定命令或者找不到对应的子命令,但当前命令是一个抽象命令(即不能直接执行),并且有默认的子命令,则加载默认子命令并解析参数。否则,创建一个新的实例,并将 argv 作为参数传递给它。
最终在转换完成之后,通过调用抽象方法run 调用子类的实现来执行解析后的指令内容。到这里,顺其自然的就想到了Cocoapods的相关指令实现必然继承自了CLAide::Command 类,并实现了其抽象方法 run。为了验证这个推断,我们接着看Cocoapods的源码,在文件 Install.rb 中,有这个 Install 类的定义与实现,摘取了核心内容:
1module Pod
2  class Command
3    class Install < Command
4      include RepoUpdate
5      include ProjectDirectory
6
7      def self.options
8        [
9          ['--repo-update', 'Force running `pod repo update` before install'],
10          ['--deployment', 'Disallow any changes to the Podfile or the Podfile.lock during installation'],
11          ['--clean-install', 'Ignore the contents of the project cache and force a full pod installation. This only ' \
12            'applies to projects that have enabled incremental installation'],
13        ].concat(super).reject { |(name, _)| name == '--no-repo-update' }
14      end
15
16      def initialize(argv)
17        super
18        @deployment = argv.flag?('deployment', false)
19        @clean_install = argv.flag?('clean-install', false)
20      end
21	  # 实现CLAide::Command 的抽象方法
22      def run
23        # 验证工程目录podfile 是否存在
24        verify_podfile_exists!
25        # 获取installer对象
26        installer = installer_for_config
27        # 更新pods仓库
28        installer.repo_update = repo_update?(:default => false)
29        # 设置更新标识为关闭
30        installer.update = false
31        # 透传依赖设置
32        installer.deployment = @deployment
33        # 透传设置
34        installer.clean_install = @clean_install
35        installer.install!
36      end
37    end
38  end
39end
通过源码可以看出,cocoaPods的命令解析是通过自身的 CLAide::Command 进行解析处理的,而最终的命令实现则是通过继承自 Command 的子类,通过实现抽象方法 run 来实现的具体命令功能的。到这里,关于Pod 命令的识别以及Pod 命令的解析与运行是不是非常清晰了。
阶段性小结一下,我们在Terminal中进行pod命令运行的过程中,背后都经历了哪些过程?整个运行过程可以简述如下: 1、通过Gem生成在系统环境目录下的可执行文件 pod,通过该文件引导 RubyGems 查找 gems包目录下的sepc配置对象,也即是cocoaPods的sepc配置对象 2、查找到配置对象,通过bin_file方法查找cocoaPods包路径中bin下的可执行文件 3、运行rubygems对应cocoaPods的gem安装包目录中bin下的二进制可执行文件pod 4、通过执行 Pod::Command.run(ARGV) 解析命令与参数并找出最终的 Command 对象执行其run方法 5、在继承自Command的子类的run实现中完成各个命令行指令的实现
以上的13阶段实际上是Ruby的指令转发过程,最终将命令转发给了对应的gems包进行最终的处理。而45则是整个的处理过程。同时在Cocoapods的源码实现中,可以发现每个命令都对应一个 Ruby 类,该类继承自 CLAide::Command 类。通过继承当前类,可以定义该命令所支持的选项和参数,并在执行命令时解析这些选项和参数。
二、Ruby 是如何动态生成可执行文件并集成到系统环境变量中的?
刚刚在上一节卖了个关子,在安装完成Ruby的gem包之后,在系统环境变量中就自动生成了相关的可执行文件命令。那么Ruby在这个过程中又做了什么呢?既然是在gem安装的时候会动态生成,不如就以gem的安装命令 sudo gem install xxx 作为切入点去看相关的处理过程。我们进入系统环境变量路径 /usr/bin 找到 Gem 可执行二进制文件,如下:
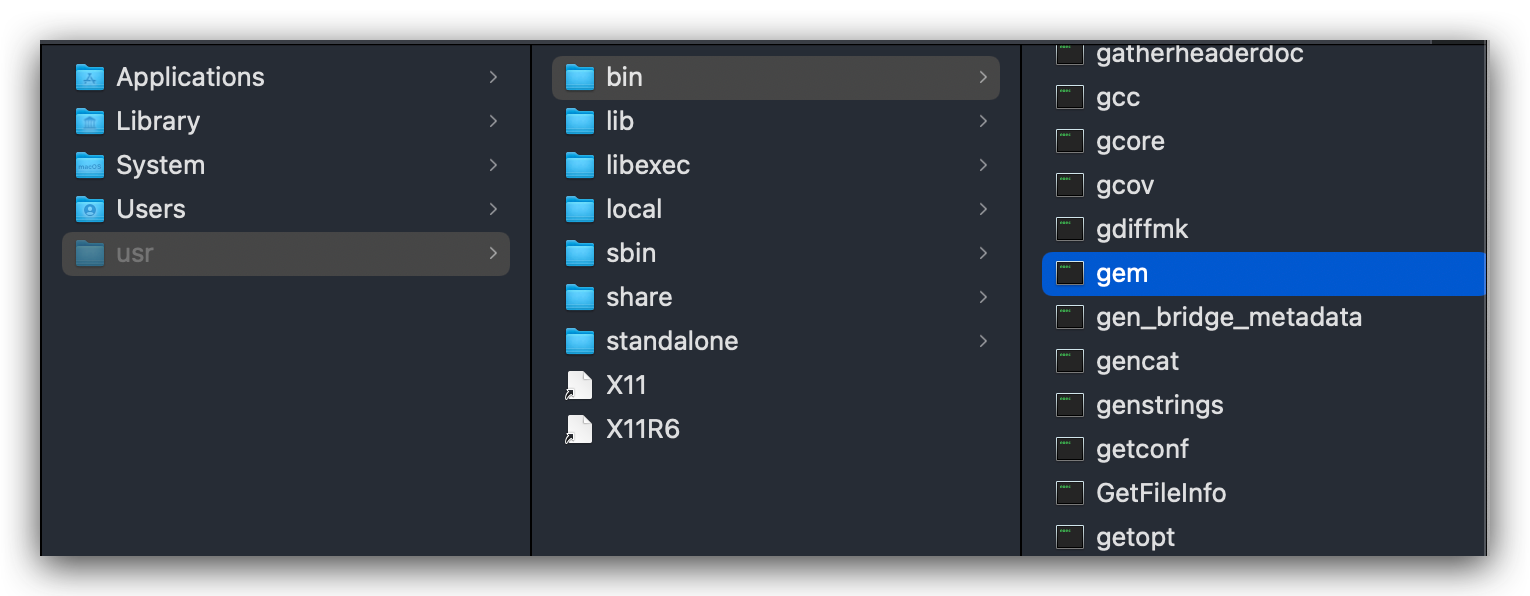
打开gem,它的内容如下:
1#!/System/Library/Frameworks/Ruby.framework/Versions/2.6/usr/bin/ruby
2#--
3# Copyright 2006 by Chad Fowler, Rich Kilmer, Jim Weirich and others.
4# All rights reserved.
5# See LICENSE.txt for permissions.
6#++
7
8require 'rubygems'
9require 'rubygems/gem_runner'
10require 'rubygems/exceptions'
11
12required_version = Gem::Requirement.new ">= 1.8.7"
13
14unless required_version.satisfied_by? Gem.ruby_version then
15  abort "Expected Ruby Version #{required_version}, is #{Gem.ruby_version}"
16end
17
18args = ARGV.clone
19
20begin
21  Gem::GemRunner.new.run args
22rescue Gem::SystemExitException => e
23  exit e.exit_code
24end
25
26
可以发现最终通过执行 Gem::GemRunner.new.run args 来完成安装,显然安装的过程就在 Gem::GemRunner 类中。依旧查看RubyGems的源码,在 gem_runner.rb 中,有着以下的定义:
1def run(args)
2    build_args = extract_build_args args
3
4    do_configuration args
5
6    begin
7      Gem.load_env_plugins
8    rescue StandardError
9      nil
10    end
11    Gem.load_plugins
12
13    cmd = @command_manager_class.instance
14
15    cmd.command_names.each do |command_name|
16      config_args = Gem.configuration[command_name]
17      config_args = case config_args
18                    when String
19                      config_args.split " "
20                    else
21                      Array(config_args)
22      end
23      Gem::Command.add_specific_extra_args command_name, config_args
24    end
25
26    cmd.run Gem.configuration.args, build_args
27  end
可以看出来命令的执行最终转到了 cmd.run Gem.configuration.args, build_args 的方法调用上,cmd是通过 @command_manager_class 进行装饰的类,找到其装饰的地方如下:
1def initialize
2    @command_manager_class = Gem::CommandManager
3    @config_file_class = Gem::ConfigFile
4end
发现是它其实 Gem::CommandManager 类,接着查看一下 CommandManager 的 run 方法实现,在文件 command_manager.rb 中 ,有以下的实现内容:
1  ##
2  # Run the command specified by +args+.
3
4  def run(args, build_args=nil)
5    process_args(args, build_args)
6  # 异常处理
7  rescue StandardError, Timeout::Error => ex
8    if ex.respond_to?(:detailed_message)
9      msg = ex.detailed_message(highlight: false).sub(/\A(.*?)(?: \(.+?\))/) { $1 }
10    else
11      msg = ex.message
12    end
13    alert_error clean_text("While executing gem ... (#{ex.class})\n    #{msg}")
14    ui.backtrace ex
15
16    terminate_interaction(1)
17  rescue Interrupt
18    alert_error clean_text("Interrupted")
19    terminate_interaction(1)
20  end
21
22
23  def process_args(args, build_args=nil)
24	# 空参数退出执行
25    if args.empty?
26      say Gem::Command::HELP
27      terminate_interaction 1
28    end
29	# 判断第一个参数
30    case args.first
31    when "-h", "--help" then
32      say Gem::Command::HELP
33      terminate_interaction 0
34    when "-v", "--version" then
35      say Gem::VERSION
36      terminate_interaction 0
37    when "-C" then
38      args.shift
39      start_point = args.shift
40      if Dir.exist?(start_point)
41        Dir.chdir(start_point) { invoke_command(args, build_args) }
42      else
43        alert_error clean_text("#{start_point} isn't a directory.")
44        terminate_interaction 1
45      end
46    when /^-/ then
47      alert_error clean_text("Invalid option: #{args.first}. See 'gem --help'.")
48      terminate_interaction 1
49    else
50	  # 执行命令
51      invoke_command(args, build_args)
52    end
53  end
54
55  def invoke_command(args, build_args)
56    cmd_name = args.shift.downcase
57    # 查找指令,并获取继承自 Gem::Commands的实体子类(实现了excute抽象方法)
58    cmd = find_command cmd_name
59    cmd.deprecation_warning if cmd.deprecated?
60    # 执行 invoke_with_build_args 方法(该方法来自基类 Gem::Commands)
61    cmd.invoke_with_build_args args, build_args
62  end
63
64  def find_command(cmd_name)
65    cmd_name = find_alias_command cmd_name
66    possibilities = find_command_possibilities cmd_name
67    if possibilities.size > 1
68      raise Gem::CommandLineError,
69            "Ambiguous command #{cmd_name} matches [#{possibilities.join(", ")}]"
70    elsif possibilities.empty?
71      raise Gem::UnknownCommandError.new(cmd_name)
72    end
73	# 这里的[] 是方法调用,定义在下面
74    self[possibilities.first]
75  end
76  ##
77  # Returns a Command instance for +command_name+
78  def [](command_name)
79    command_name = command_name.intern
80    return nil if @commands[command_name].nil?
81    # 调用 `load_and_instantiate` 方法来完成这个过程,并将返回的对象存储到 `@commands` 哈希表中,这里 ||= 是默认值内容,类似于OC中的?:
82    @commands[command_name] ||= load_and_instantiate(command_name)
83  end
84
85  # 命令分发选择以及动态实例
86  def load_and_instantiate(command_name)
87    command_name = command_name.to_s
88    const_name = command_name.capitalize.gsub(/_(.)/) { $1.upcase } << "Command"
89    load_error = nil
90
91    begin
92      begin
93        require "rubygems/commands/#{command_name}_command"
94      rescue LoadError => e
95        load_error = e
96      end
97      # 通过 Gem::Commands 获取注册的变量
98      Gem::Commands.const_get(const_name).new
99    rescue StandardError => e
100      e = load_error if load_error
101      alert_error clean_text("Loading command: #{command_name} (#{e.class})\n\t#{e}")
102      ui.backtrace e
103    end
104  end
通过以上的源码,可以发现命令的执行,通过调用 process_args 执行,然后在 process_args 方法中进行判断命令参数,接着通过 invoke_command 来执行命令。在 invoke_command 内部,首先通过find_command 查找命令,这里find_command 主要负责查找命令相关的执行对象,需要注意的地方在以下这句:
@commands[command_name] ||= load_and_instantiate(command_name)
通过以上的操作,返回当前命令执行的实体对象,而对应的脚本匹配又是如何实现的呢(比如输入的命令是 gem install 命令)?这里的 load_and_instantiate(command_name) 的方法其实就是查找实体的具体操作,在实现中通过以下的语句来获取最终的常量的命令指令实体:
Gem::Commands.const_get(const_name).new
上面的语句是通过 Gem::Commands 查找类中的常量,这里的常量其实就是对应gem相关的一个个指令,在gem中声明了很多命令的常量,他们继承自 Gem::Command 基类,同时实现了抽象方法 execute,这一点很重要。比如在 install_command.rb 中定义了命令 gem install 的具体的实现:
1  def execute
2    if options.include? :gemdeps
3      install_from_gemdeps
4      return # not reached
5    end
6
7    @installed_specs = []
8
9    ENV.delete "GEM_PATH" if options[:install_dir].nil?
10
11    check_install_dir
12    check_version
13
14    load_hooks
15
16    exit_code = install_gems
17
18    show_installed
19
20    say update_suggestion if eglible_for_update?
21
22    terminate_interaction exit_code
23  end
在 invoke_command 方法中,最终通过 invoke_with_build_args 来最终执行命令,该方法定义Gem::Command中,在 command.rb 文件中,可以看到内容如下:
1  def invoke_with_build_args(args, build_args)
2    handle_options args
3    options[:build_args] = build_args
4
5    if options[:silent]
6      old_ui = ui
7      self.ui = ui = Gem::SilentUI.new
8    end
9
10    if options[:help]
11      show_help
12    elsif @when_invoked
13      @when_invoked.call options
14    else
15      execute
16    end
17  ensure
18    if ui
19      self.ui = old_ui
20      ui.close
21    end
22  end
23  # 子类实现该抽象完成命令的具体实现
24  def execute
25    raise Gem::Exception, "generic command has no actions"
26  end
可以看出来,最终基类中的 invoke_with_build_args 中调用了抽象方法 execute 来完成命令的运行调用。在rubyGems里面声明了很多变量,这些变量在 CommandManager 中通过 run 方法进行命令常量实体的查找,最终通过调用继承自 Gem:Command 子类的 execute 完成相关指令的执行。在rubyGems中可以看到很多变量,一个变量对应一个命令,如下所示:

到这里,我们基本可以知道整个gem命令的查找到调用的整个流程。那么 gem install 的过程中又是如何自动生成并注册相关的gem命令到系统环境变量中的呢?基于上面的命令查找调用流程,其实只需要在 install_command.rb 中查看 execute 具体的实现就清楚了,如下:
1def execute
2    if options.include? :gemdeps
3      install_from_gemdeps
4      return # not reached
5    end
6
7    @installed_specs = []
8
9    ENV.delete "GEM_PATH" if options[:install_dir].nil?
10
11    check_install_dir
12    check_version
13
14    load_hooks
15
16    exit_code = install_gems
17
18    show_installed
19
20    say update_suggestion if eglible_for_update?
21
22    terminate_interaction exit_code
23  end
24
25  def install_from_gemdeps # :nodoc:
26    require_relative "../request_set"
27    rs = Gem::RequestSet.new
28
29    specs = rs.install_from_gemdeps options do |req, inst|
30      s = req.full_spec
31
32      if inst
33        say "Installing #{s.name} (#{s.version})"
34      else
35        say "Using #{s.name} (#{s.version})"
36      end
37    end
38
39    @installed_specs = specs
40
41    terminate_interaction
42  end
43def install_gem(name, version) # :nodoc:
44    return if options[:conservative] &&
45              !Gem::Dependency.new(name, version).matching_specs.empty?
46
47    req = Gem::Requirement.create(version)
48
49    dinst = Gem::DependencyInstaller.new options
50
51    request_set = dinst.resolve_dependencies name, req
52
53    if options[:explain]
54      say "Gems to install:"
55
56      request_set.sorted_requests.each do |activation_request|
57        say "  #{activation_request.full_name}"
58      end
59    else
60      @installed_specs.concat request_set.install options
61    end
62
63    show_install_errors dinst.errors
64  end
65
66  def install_gems # :nodoc:
67    exit_code = 0
68
69    get_all_gem_names_and_versions.each do |gem_name, gem_version|
70      gem_version ||= options[:version]
71      domain = options[:domain]
72      domain = :local unless options[:suggest_alternate]
73      suppress_suggestions = (domain == :local)
74
75      begin
76        install_gem gem_name, gem_version
77      rescue Gem::InstallError => e
78        alert_error "Error installing #{gem_name}:\n\t#{e.message}"
79        exit_code |= 1
80      rescue Gem::GemNotFoundException => e
81        show_lookup_failure e.name, e.version, e.errors, suppress_suggestions
82
83        exit_code |= 2
84      rescue Gem::UnsatisfiableDependencyError => e
85        show_lookup_failure e.name, e.version, e.errors, suppress_suggestions,
86                            "'#{gem_name}' (#{gem_version})"
87
88        exit_code |= 2
89      end
90    end
91
92    exit_code
93  end
94
95
96
可以看出,最终通过request_set.install 来完成最终的gem安装,而request_set 是Gem::RequestSet 的实例对象,接着在 request_set.rb 中查看相关的实现:
1##
2  # Installs gems for this RequestSet using the Gem::Installer +options+.
3  #
4  # If a +block+ is given an activation +request+ and +installer+ are yielded.
5  # The +installer+ will be +nil+ if a gem matching the request was already
6  # installed.
7
8  def install(options, &block) # :yields: request, installer
9    if dir = options[:install_dir]
10      requests = install_into dir, false, options, &block
11      return requests
12    end
13
14    @prerelease = options[:prerelease]
15
16    requests = []
17    # 创建下载队列
18    download_queue = Thread::Queue.new
19
20    # Create a thread-safe list of gems to download
21    sorted_requests.each do |req|
22      # 存储下载实例
23      download_queue << req
24    end
25
26    # Create N threads in a pool, have them download all the gems
27    threads = Array.new(Gem.configuration.concurrent_downloads) do
28      # When a thread pops this item, it knows to stop running. The symbol
29      # is queued here so that there will be one symbol per thread.
30      download_queue << :stop
31	  # 创建线程并执行下载
32      Thread.new do
33        # The pop method will block waiting for items, so the only way
34        # to stop a thread from running is to provide a final item that
35        # means the thread should stop.
36        while req = download_queue.pop
37          break if req == :stop
38          req.spec.download options unless req.installed?
39        end
40      end
41    end
42
43    # 等待所有线程都执行完毕,也就是gem下载完成
44    threads.each(&:value)
45
46    # 开始安装已经下载的gem
47    sorted_requests.each do |req|
48      if req.installed?
49        req.spec.spec.build_extensions
50
51        if @always_install.none? {|spec| spec == req.spec.spec }
52          yield req, nil if block_given?
53          next
54        end
55      end
56
57      spec =
58        begin
59          req.spec.install options do |installer|
60            yield req, installer if block_given?
61          end
62        rescue Gem::RuntimeRequirementNotMetError => e
63          suggestion = "There are no versions of #{req.request} compatible with your Ruby & RubyGems"
64          suggestion += ". Maybe try installing an older version of the gem you're looking for?" unless @always_install.include?(req.spec.spec)
65          e.suggestion = suggestion
66          raise
67        end
68
69      requests << spec
70    end
71
72    return requests if options[:gemdeps]
73
74    install_hooks requests, options
75
76    requests
77  end
可以发现,整个过程先是执行完被加在队列中的所有的线程任务,然后通过遍历下载的实例对象,对下载的gem进行安装,通过 req.sepc.install options 进行安装,这块的实现在 specification.rb 中的 Gem::Resolver::Specification 定义如下:
1  def install(options = {})
2    require_relative "../installer"
3	# 获取下载的gem
4    gem = download options
5	# 获取安装实例
6    installer = Gem::Installer.at gem, options
7	# 回调输出
8    yield installer if block_given?
9	# 执行安装
10    @spec = installer.install
11  end
12
13  def download(options)
14    dir = options[:install_dir] || Gem.dir
15    Gem.ensure_gem_subdirectories dir
16    source.download spec, dir
17  end
18
19
20
从上面的源码可以知道,最终安装放在了 Gem::Installer 的 install 方法中执行的。它的执行过程如下:
1def install
2	# 安装检查
3    pre_install_checks
4	# 运行执行前脚本hook
5    run_pre_install_hooks
6    # Set loaded_from to ensure extension_dir is correct
7    if @options[:install_as_default]
8      spec.loaded_from = default_spec_file
9    else
10      spec.loaded_from = spec_file
11    end
12
13    # Completely remove any previous gem files
14    FileUtils.rm_rf gem_dir
15    FileUtils.rm_rf spec.extension_dir
16
17    dir_mode = options[:dir_mode]
18    FileUtils.mkdir_p gem_dir, :mode => dir_mode && 0o755
19
20	# 默认设置安装
21    if @options[:install_as_default]
22      extract_bin
23      write_default_spec
24    else
25      extract_files
26      build_extensions
27      write_build_info_file
28      run_post_build_hooks
29    end
30
31	# 生成bin目录可执行文件
32    generate_bin
33    # 生成插件
34    generate_plugins
35
36    unless @options[:install_as_default]
37      write_spec
38      write_cache_file
39    end
40
41    File.chmod(dir_mode, gem_dir) if dir_mode
42
43    say spec.post_install_message if options[:post_install_message] && !spec.post_install_message.nil?
44
45    Gem::Specification.add_spec(spec)
46	# 运行install的hook脚本
47    run_post_install_hooks
48
49    spec
这段源码中,我们清晰的看到在执行安装的整个过程之后,又通过 generate_bin 与generate_plugins 动态生成了两个文件,对于 generate_bin 的生成过程如下:
1def generate_bin # :nodoc:
2    return if spec.executables.nil? || spec.executables.empty?
3
4    ensure_writable_dir @bin_dir
5
6    spec.executables.each do |filename|
7      filename.tap(&Gem::UNTAINT)
8      bin_path = File.join gem_dir, spec.bindir, filename
9      next unless File.exist? bin_path
10
11      mode = File.stat(bin_path).mode
12      dir_mode = options[:prog_mode] || (mode | 0o111)
13
14      unless dir_mode == mode
15        require "fileutils"
16        FileUtils.chmod dir_mode, bin_path
17      end
18	  # 检查是否存在同名文件被复写
19      check_executable_overwrite filename
20
21      if @wrappers
22	    # 生成可执行脚本
23        generate_bin_script filename, @bin_dir
24      else
25        # 生成符号链接
26        generate_bin_symlink filename, @bin_dir
27      end
28    end
29  end
在经过一系列的路径判断与写入环境判断之后,通过 generate_bin_script 生成动态可执行脚本文件,到这里,是不是对关于gem进行安装的时候动态生成系统可识别的命令指令有了清晰的认识与解答。其实本质是Ruby在安装gem之后,会通过 generate_bin_script 生成可执行脚本并动态注入到系统的环境变量中,进而能够让系统识别到gem安装的相关指令,为gem的功能触发提供入口。以下是generate_bin_script 的实现:
1  ##
2  # Creates the scripts to run the applications in the gem.
3  #--
4  # The Windows script is generated in addition to the regular one due to a
5  # bug or misfeature in the Windows shell's pipe.  See
6  # https://blade.ruby-lang.org/ruby-talk/193379
7
8  def generate_bin_script(filename, bindir)
9    bin_script_path = File.join bindir, formatted_program_filename(filename)
10
11    require "fileutils"
12    FileUtils.rm_f bin_script_path # prior install may have been --no-wrappers
13
14    File.open bin_script_path, "wb", 0o755 do |file|
15      file.print app_script_text(filename)
16      file.chmod(options[:prog_mode] || 0o755)
17    end
18
19    verbose bin_script_path
20
21    generate_windows_script filename, bindir
22  end
23
24
25
26
关于脚本具体内容的生成,这里就不再细说了,感兴趣的话可以去官方的源码中的installer.rb 中查看细节,摘取了主要内容如下:
1  def app_script_text(bin_file_name)
2    # NOTE: that the `load` lines cannot be indented, as old RG versions match
3    # against the beginning of the line
4    <<-TEXT
5#{shebang bin_file_name}
6#
7# This file was generated by RubyGems.
8#
9# The application '#{spec.name}' is installed as part of a gem, and
10# this file is here to facilitate running it.
11#
12
13require 'rubygems'
14#{gemdeps_load(spec.name)}
15version = "#{Gem::Requirement.default_prerelease}"
16
17str = ARGV.first
18if str
19  str = str.b[/\\A_(.*)_\\z/, 1]
20  if str and Gem::Version.correct?(str)
21    #{explicit_version_requirement(spec.name)}
22    ARGV.shift
23  end
24end
25
26if Gem.respond_to?(:activate_bin_path)
27load Gem.activate_bin_path('#{spec.name}', '#{bin_file_name}', version)
28else
29gem #{spec.name.dump}, version
30load Gem.bin_path(#{spec.name.dump}, #{bin_file_name.dump}, version)
31end
32TEXT
33  end
34
35  def gemdeps_load(name)
36    return "" if name == "bundler"
37
38    <<-TEXT
39
40Gem.use_gemdeps
41TEXT
42  end
小结一下:之所以系统能够识别我们安装的gems包命令,本质原因是RubyGems在进行包安装的时候,通过 generate_bin_script 动态的生成了可执行的脚本文件,并将其注入到了系统的环境变量路径Path中。我们通过系统的环境变量作为引导入口,再间接的调取gem安装包的具体实现,进而完成整个gem的功能调用。
三、CocoaPods是如何在Ruby的基础上都做了自己的领域型DSL?
想想日常使用cocoaPods引入三方组件的时候,通常都在Podfile中进行相关的配置就行了,而在Podfile中的配置规则其实就是Cocoapods在Ruby的基础上提供给开发者的领域型DSL,该DSL主要针对与项目的依赖库管理进行领域规则描述,由CocoaPods的DSL解析器完成规则解析,最终通过pods的相关命令来完成整个项目的库的日常管理。这么说没有什么问题,但是Cocoapods的底层逻辑到底是什么?也是接下来想重点探讨挖掘的。
继续从简单 pod install 命令来一探究竟,通过第一节的源码分析,我们知道,该命令最终会转发到 cocoaPods 源码下的 install.rb中,直接看它的 run方法,如下:
1class Install < Command
2···
3  def run
4    # 是否存在podfile文件
5	verify_podfile_exists!
6	# 创建installer对象(installer_for_config定义在基类Command中)
7	installer = installer_for_config
8	# 更新仓库
9	installer.repo_update = repo_update?(:default => false)
10	# 关闭更新
11	installer.update = false
12	# 属性透传
13	installer.deployment = @deployment
14	installer.clean_install = @clean_install
15	# 执行安装
16	installer.install!
17  end
18
19  def installer_for_config
20      Installer.new(config.sandbox, config.podfile, config.lockfile)
21  end
22···
23 end
执行安装的操作是通过 installer_for_config 方法来完成的,在方法实现中,实例了 Installer 对象,入参包括 sandbox 、podfile 、lockfile ,而这些入参均是通过 config 对象方法获取,而podfile的获取过程正是我们想要了解的,所以知道 config 的定义地方至关重要。在 command.rb 中我发现有如下的内容:
include Config::Mixin
这段代码引入了 Config::Mixin 类,而他在 Config 中的定义如下:
1class Config
2···
3	module Mixin
4	  def config
5		Config.instance
6	  end
7	end
8    def self.instance
9      @instance ||= new
10    end
11    def sandbox
12      @sandbox ||= Sandbox.new(sandbox_root)
13    end
14    def podfile
15      @podfile ||= Podfile.from_file(podfile_path) if podfile_path
16    end
17    attr_writer :podfile
18    def lockfile
19      @lockfile ||= Lockfile.from_file(lockfile_path) if lockfile_path
20    end
21
22    def podfile_path
23      @podfile_path ||= podfile_path_in_dir(installation_root)
24    end
25···
26end
定义了一个名为Mixin的模块,其中包含一个名为config的方法,在该方法中实例了 Config 对象。这里定义了刚刚实例 Installer 的时候的三个入参。重点看一下 podfile,可以看出 podfile 的实现中通过 Podfile.from_file(podfile_path) 来拿到最终的配置内容,那么关于Podfile 的读取谜底也就在这个 from_file 方法实现中了,通过搜索发现在Cocoapods中的源码中并没有该方法的定义,只有以下的内容:
1require 'cocoapods-core/podfile'
2
3module Pod
4 class Podfile
5    autoload :InstallationOptions, 'cocoapods/installer/installation_options'
6
7    # @return [Pod::Installer::InstallationOptions] the installation options specified in the Podfile
8    #
9    def installation_options
10      @installation_options ||= Pod::Installer::InstallationOptions.from_podfile(self)
11    end
12  end
13end
可以看到这里的class Podfile 定义的Podfile 的原始类,同时发现源码中引用了 cocoapods-core/podfile 文件,这里应该能猜想到,关于 from_file 的实现应该是在cocoapods-core/podfile 中完成的。这个资源引入是 Cocoapods的一个核心库的组件,通过对核心库 cocoapods-core,进行检索,发现在文件 podfile.rb 中有如下的内容:
1module Pod
2
3  class Podfile
4    # @!group DSL support
5
6    include Pod::Podfile::DSL
7···
8
9   def self.from_file(path)
10      path = Pathname.new(path)
11      # 路径是否有效
12      unless path.exist?
13        raise Informative, "No Podfile exists at path `#{path}`."
14      end
15	  # 判断扩展名文件
16      case path.extname
17      when '', '.podfile', '.rb'
18	    # 按照Ruby格式解析
19        Podfile.from_ruby(path)
20      when '.yaml'
21        # 按照yaml格式进行解析
22        Podfile.from_yaml(path)
23      else
24	    # 格式异常抛出
25        raise Informative, "Unsupported Podfile format `#{path}`."
26      end
27    end
28
29   def self.from_ruby(path, contents = nil)
30	  # 以utf-8格式打开文件内容
31      contents ||= File.open(path, 'r:utf-8', &:read)
32
33      # Work around for Rubinius incomplete encoding in 1.9 mode
34      if contents.respond_to?(:encoding) && contents.encoding.name != 'UTF-8'
35        contents.encode!('UTF-8')
36      end
37
38      if contents.tr!('“”‘’‛', %(""'''))
39        # Changes have been made
40        CoreUI.warn "Smart quotes were detected and ignored in your #{path.basename}. " \
41                    'To avoid issues in the future, you should not use ' \
42                    'TextEdit for editing it. If you are not using TextEdit, ' \
43                    'you should turn off smart quotes in your editor of choice.'
44      end
45
46	  # 实例podfile对象
47      podfile = Podfile.new(path) do
48        # rubocop:disable Lint/RescueException
49        begin
50          # 执行podFile内容(执行之前会先执行Podfile初始化Block回调前的内容)
51          eval(contents, nil, path.to_s)
52          # DSL的异常抛出
53        rescue Exception => e
54          message = "Invalid `#{path.basename}` file: #{e.message}"
55          raise DSLError.new(message, path, e, contents)
56        end
57        # rubocop:enable Lint/RescueException
58      end
59      podfile
60    end
61
62    def self.from_yaml(path)
63      string = File.open(path, 'r:utf-8', &:read)
64      # Work around for Rubinius incomplete encoding in 1.9 mode
65      if string.respond_to?(:encoding) && string.encoding.name != 'UTF-8'
66        string.encode!('UTF-8')
67      end
68      hash = YAMLHelper.load_string(string)
69      from_hash(hash, path)
70    end
71
72    def initialize(defined_in_file = nil, internal_hash = {}, &block)
73      self.defined_in_file = defined_in_file
74      @internal_hash = internal_hash
75      if block
76        default_target_def = TargetDefinition.new('Pods', self)
77        default_target_def.abstract = true
78        @root_target_definitions = [default_target_def]
79        @current_target_definition = default_target_def
80        instance_eval(&block)
81      else
82        @root_target_definitions = []
83      end
84    end
从上面的源码可以知道,整个的 Podfile 的读取流程如下: 1. 判断路径是否合法,不合法抛出异常 2. 判断扩展名类型,如果是 '', '.podfile', '.rb' 扩展按照 ruby 语法规则解析,如果是yaml则按照 yaml 文件格式解析,以上两者如果都不是,则抛出格式解析异常 3. 如果解析按照 Ruby 格式解析的话过程如下:
• 按照utf-8格式读取 Podfile 文件内容,并存储到 contents 中
• 内容符号容错处理,主要涉及" “”‘’‛" 等 符号,同时输出警告信息
• 实例 Podfile 对象,同时在实例过程中初始化 TargetDefinition 对象并配置默认的Target 信息
• 最终通过 eval(contents, nil, path.to_s) 方法执行 Podfile 文件内容完成配置记录
这里或许有一个疑问:Podfile里面定义了 Cocoapods 自己的一套DSL语法,那么执行过程中是如何解析DSL语法的呢?上面的源码文件中,如果仔细查看的话,会发现有下面这一行内容:
include Pod::Podfile::DSL
不错,这就是DSL解析的本体,其实你可以将DSL语法理解为基于Ruby定义的一系列的领域型方法,DSL的解析的过程本质是定义的方法执行的过程。在Cocoapods中定义了很多DSL语法,定义与实现均放在了 cocoapods-core 这个核心组件中,比如在dsl.rb 文件中的以下关于Podfile的 DSL定义(摘取部分):
1module Pod
2  class Podfile
3	  module DSL
4
5      def install!(installation_method, options = {})
6        unless current_target_definition.root?
7          raise Informative, 'The installation method can only be set at the root level of the Podfile.'
8        end
9
10        set_hash_value('installation_method', 'name' => installation_method, 'options' => options)
11      end
12
13      def pod(name = nil, *requirements)
14        unless name
15          raise StandardError, 'A dependency requires a name.'
16        end
17
18        current_target_definition.store_pod(name, *requirements)
19      end
20
21      def podspec(options = nil)
22        current_target_definition.store_podspec(options)
23      end
24
25      def target(name, options = nil)
26        if options
27          raise Informative, "Unsupported options `#{options}` for " \
28            "target `#{name}`."
29        end
30
31        parent = current_target_definition
32        definition = TargetDefinition.new(name, parent)
33        self.current_target_definition = definition
34        yield if block_given?
35      ensure
36        self.current_target_definition = parent
37      end
38
39      def inherit!(inheritance)
40        current_target_definition.inheritance = inheritance
41      end
42
43      def platform(name, target = nil)
44        # Support for deprecated options parameter
45        target = target[:deployment_target] if target.is_a?(Hash)
46        current_target_definition.set_platform!(name, target)
47      end
48
49      def project(path, build_configurations = {})
50        current_target_definition.user_project_path = path
51        current_target_definition.build_configurations = build_configurations
52      end
53
54      def xcodeproj(*args)
55        CoreUI.warn '`xcodeproj` was renamed to `project`. Please update your Podfile accordingly.'
56        project(*args)
57      end
58  .......
59  end
60end
看完 DSL的定义实现是不是有种熟悉的味道,对于使用Cocoapods的使用者而言,在没有接触Ruby的情况下,依旧能够通过对Podfile的简单配置来实现三方库的管理依赖,不仅使用的学习成本低,而且能够很容易的上手,之所以能够这么便捷,就体现出了DSL的魅力所在。
对于**领域型语言**的方案选用在很多不同的业务领域中都有了相关的应用,它对特定的**业务领域场景**能够提供**高效简洁**的实现方案,对使用者友好的同时,也能提供高质量的领域能力。**cocoapods**就是借助Ruby强大的面向对象的脚本能力完成**Cocoa库**管理的实现,有种偷梁换柱的感觉,为使用者提供了领域性语言,让其更简单更高效,尤其是使用者并没有感知到其本质是**Ruby****。**记得一开始使用Cocoapods的时候,曾经一度以为它是一种新的语言,现在看来都是Cocoapods的DSL所给我们的错觉,毕竟使用起来实在是太香了。
作者:京东零售 李臣臣
来源:京东云开发者社区 转载请注明来源