
最近在写springboot项目中一个数据转移的组件,本来是用java中的timer和Executor实现
可以有个springboot测试时关闭单例工厂的现象。现在试一试spring自己的线程管理是否可是不包上面的错误
帖子中内容直接粘贴就可以实现
原贴连接已经附上
Spring Boot 的定时任务:
第一种:把参数配置到.properties文件中:
代码:
-
package com.accord.task; -
import java.text.SimpleDateFormat; -
import java.util.Date; -
import org.springframework.scheduling.annotation.Scheduled; -
import org.springframework.stereotype.Component; -
/** -
* 从配置文件加载任务信息 -
* [@author](https://my.oschina.net/arthor) 王久印 -
* 2018年3月1日 -
*/ -
[@Component](https://my.oschina.net/u/3907912) -
public class ScheduledTask { -
private static final SimpleDateFormat dateFormat = new SimpleDateFormat("HH:mm:ss"); -
//@Scheduled(fixedDelayString = "${jobs.fixedDelay}") -
@Scheduled(fixedDelayString = "2000") -
public void getTask1() { -
System.out.println("任务1,从配置文件加载任务信息,当前时间:" + dateFormat.format(new Date())); -
} -
@Scheduled(cron = "${jobs.cron}") -
public void getTask2() { -
System.out.println("任务2,从配置文件加载任务信息,当前时间:" + dateFormat.format(new Date())); -
} -
}
application.properties文件:
-
jobs.fixedDelay=5000 -
jobs.cron=0/5 * * * * ?
SpringBootCron2Application.java中:
-
package com.accord; -
import org.springframework.boot.SpringApplication; -
import org.springframework.boot.autoconfigure.SpringBootApplication; -
import org.springframework.scheduling.annotation.EnableScheduling; -
@SpringBootApplication -
@EnableScheduling -
public class SpringBootCron2Application { -
public static void main(String[] args) { -
SpringApplication.run(SpringBootCron2Application.class, args); -
} -
}
注:@EnableScheduling 这个一定要加上;否则,不会定时启动任务!
@Scheduled中的参数说明:
-
@Scheduled(fixedRate=2000):上一次开始执行时间点后2秒再次执行; -
@Scheduled(fixedDelay=2000):上一次执行完毕时间点后2秒再次执行; -
@Scheduled(initialDelay=1000, fixedDelay=2000):第一次延迟1秒执行,然后在上一次执行完毕时间点后2秒再次执行; -
@Scheduled(cron="* * * * * ?"):按cron规则执行。
在线Cron表达式生成器:http://cron.qqe2.com/
第二种定时任务:单线程和多线程
1、创建定时任务:
-
package com.accord.task; -
import org.slf4j.Logger; -
import org.slf4j.LoggerFactory; -
import org.springframework.scheduling.annotation.Scheduled; -
import org.springframework.stereotype.Component; -
/** -
* 构建执行定时任务 -
* @author 王久印 -
* 2018年3月1日 -
* TODO -
*/ -
@Component -
public class ScheduledTask2 { -
private Logger logger = LoggerFactory.getLogger(ScheduledTask2.class); -
private int fixedDelayCount = 1; -
private int fixedRateCount = 1; -
private int initialDelayCount = 1; -
private int cronCount = 1; -
@Scheduled(fixedDelay = 5000) //fixedDelay = 5000表示当前方法执行完毕5000ms后,Spring scheduling会再次调用该方法 -
public void testFixDelay() { -
logger.info("===fixedDelay: 第{}次执行方法", fixedDelayCount++); -
} -
@Scheduled(fixedRate = 5000) //fixedRate = 5000表示当前方法开始执行5000ms后,Spring scheduling会再次调用该方法 -
public void testFixedRate() { -
logger.info("===fixedRate: 第{}次执行方法", fixedRateCount++); -
} -
@Scheduled(initialDelay = 1000, fixedRate = 5000) //initialDelay = 1000表示延迟1000ms执行第一次任务 -
public void testInitialDelay() { -
logger.info("===initialDelay: 第{}次执行方法", initialDelayCount++); -
} -
@Scheduled(cron = "0 0/1 * * * ?") //cron接受cron表达式,根据cron表达式确定定时规则 -
public void testCron() { -
logger.info("===initialDelay: 第{}次执行方法", cronCount++); -
} -
}
使用 @Scheduled来创建定时任务 这个注解用来标注一个定时任务方法。
通过看 @Scheduled源码可以看出它支持多种参数:
(1)cron:cron表达式,指定任务在特定时间执行;
(2)fixedDelay:表示上一次任务执行完成后多久再次执行,参数类型为long,单位ms;
(3)fixedDelayString:与fixedDelay含义一样,只是参数类型变为String;
(4)fixedRate:表示按一定的频率执行任务,参数类型为long,单位ms;
(5)fixedRateString: 与fixedRate的含义一样,只是将参数类型变为String;
(6)initialDelay:表示延迟多久再第一次执行任务,参数类型为long,单位ms;
(7)initialDelayString:与initialDelay的含义一样,只是将参数类型变为String;
(8)zone:时区,默认为当前时区,一般没有用到。
2、开启定时任务:
-
package com.accord; -
import org.springframework.boot.SpringApplication; -
import org.springframework.boot.autoconfigure.SpringBootApplication; -
import org.springframework.scheduling.annotation.EnableScheduling; -
@SpringBootApplication -
@EnableScheduling -
public class SpringBootCron2Application { -
public static void main(String[] args) { -
SpringApplication.run(SpringBootCron2Application.class, args); -
} -
}
注:这里的 @EnableScheduling 注解,它的作用是发现注解 @Scheduled的任务并由后台执行。没有它的话将无法执行定时任务。
引用官方文档原文:
@EnableScheduling ensures that a background task executor is created. Without it, nothing gets scheduled.
3、执行结果(单线程)
就完成了一个简单的定时任务模型,下面执行springBoot观察执行结果:
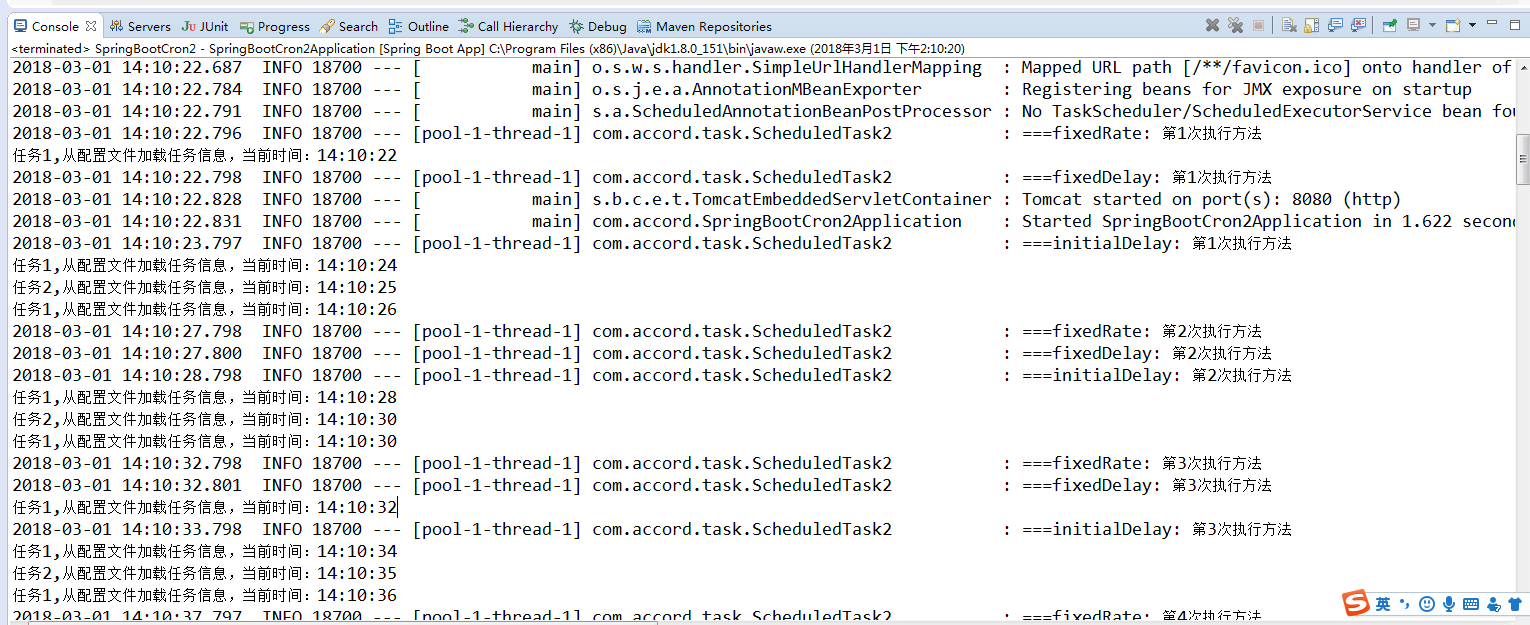
从控制台输入的结果中我们可以看出所有的定时任务都是在同一个线程池用同一个线程来处理的,那么我们如何来并发的处理各定时任务呢,请继续向下看。
4、多线程处理定时任务:
看到控制台输出的结果,所有的定时任务都是通过一个线程来处理的,我估计是在定时任务的配置中设定了一个SingleThreadScheduledExecutor,于是我看了源码,从ScheduledAnnotationBeanPostProcessor类开始一路找下去。果然,在ScheduledTaskRegistrar(定时任务注册类)中的ScheduleTasks中又这样一段判断:
-
if (this.taskScheduler == null) { -
this.localExecutor = Executors.newSingleThreadScheduledExecutor(); -
this.taskScheduler = new ConcurrentTaskScheduler(this.localExecutor); -
}
这就说明如果taskScheduler为空,那么就给定时任务做了一个单线程的线程池,正好在这个类中还有一个设置taskScheduler的方法:
-
public void setScheduler(Object scheduler) { -
Assert.notNull(scheduler, "Scheduler object must not be null"); -
if (scheduler instanceof TaskScheduler) { -
this.taskScheduler = (TaskScheduler) scheduler; -
} -
else if (scheduler instanceof ScheduledExecutorService) { -
this.taskScheduler = new ConcurrentTaskScheduler(((ScheduledExecutorService) scheduler)); -
} -
else { -
throw new IllegalArgumentException("Unsupported scheduler type: " + scheduler.getClass()); -
} -
}
这样问题就很简单了,我们只需用调用这个方法显式的设置一个ScheduledExecutorService就可以达到并发的效果了。我们要做的仅仅是实现SchedulingConfigurer接口,重写configureTasks方法就OK了;
package com.pingan.ph.cis.data.transfer.selfoperation;
import org.springframework.context.annotation.Configuration; import org.springframework.scheduling.annotation.SchedulingConfigurer; import org.springframework.scheduling.config.ScheduledTaskRegistrar;
import java.util.concurrent.Executors;
@Configuration //所有的定时任务都放在一个线程池中,定时任务启动时使用不同都线程。 public class ScheduleConfig implements SchedulingConfigurer { @Override public void configureTasks(ScheduledTaskRegistrar taskRegistrar) { //设定一个长度10的定时任务线程池 taskRegistrar.setScheduler(Executors.newScheduledThreadPool(10)); } }
5、执行结果(并发)
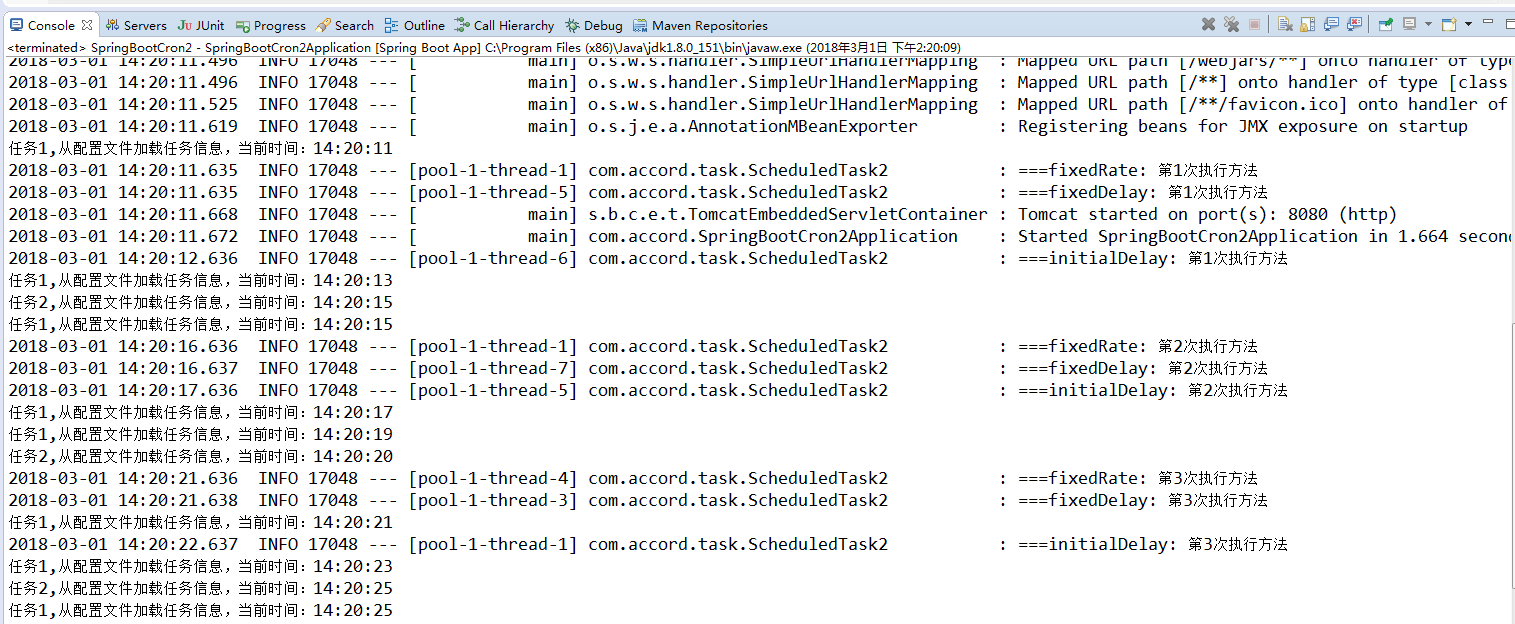
通过控制台输出的结果看出每个定时任务都是在通过不同的线程来处理了。