
1、什么是继承?
子类可以使用父类的所有功能,并且对功能进行扩展。
-
新增方法
-
改用方法
(1)、ES6使用extends子类继承父类的方法。
1 // 父类
2    class A{
3        constructor(name){
4            this.name= name;
5        }
6        getName () {
7            return this.name;
8        }
9    };
10    // 子类继承
11    class B extends A {
12        constructor(name){
13           super(name) //  记得用super调用父类的构造方法!
14        }
15        getName(){
16            const name = super.getName();
17            return name;
18        }
19    }
20
21    var b = new B('2');
22    console.log(b.getName()); //2
(2)、ES5的继承方法:
1// 父类
2function P(name) {
3    this.name = name;
4}
5// 父类方法
6P.prototype.get=function(){
7    return this.name;
8}
9// 子类
10function C(name){
11    P.call(this,name);
12}
13// 封装继承。也就是C.prototype.__proto__ = P.prototype
14function I(Pfn,Cfn){
15    var prototype = Object.create(Pfn.prototype);
16    prototype.constructor = Cfn;
17    Cfn.prototype = prototype;
18}
19// 调用继承方法,并传入参数
20I(P,C);
21
22
23var c = new C('maomin');
24console.log(c.get()); // maomin
25
(3)、ES3实现继承
使用ES3实现继承无非是替代了Object.create(Pfn.prototype),我们先来看下
 大家知道我们封装的
I方法是原理是C.prototype.__proto__ = P.prototype。但是我们不推荐这样,因为__proto__是浏览器内置的属性,并不是JS内置的,所以不推荐这样做。我们来封装一个方法来替代Object.create(Pfn.prototype)。
1function objectCreate (o) {
2 function P1() {}
3 P1.prototype = o;
4 return new P1();
5}
6
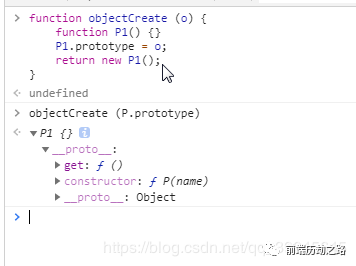 完整代码:
完整代码:
1 // 父类
2    function P(name) {
3        this.name = name;
4    }
5   // 父类方法
6    P.prototype.get = function () {
7        return this.name;
8    }
9 // 子类
10    function C(name) {
11        P.call(this, name);
12    }
13 // 封装object.create()
14    function objectCreate(o) {
15        function P1() {}
16        P1.prototype = o;
17        return new P1();
18    }
19    // 封装继承
20    //C.prototype.__proto__ = P.prototype;
21    function I(Pfn, Cfn) {
22        var prototype = objectCreate(Pfn.prototype);
23        prototype.constructor = Cfn;
24        Cfn.prototype = prototype;
25    }
26
27    // 调用继承方法,并传入参数
28    I(P, C);
29
30    var c = new C('maomin');
31    console.log(c.get()); // maomin
(4)、新增API
新增ES6方法 Reflect.setPrototypeOf()可以实现C.prototype.__proto__ = P.prototype
1 function A(name){this.name=name}
2   A.prototype.get=function () {return this.name}
3   function B (name) {A.call(this,name)}
4   Reflect.setPrototypeOf(B.prototype,A.prototype);
5   var b = new B('maomin');
6   console.log(b.get()); //maomin
2、关于Promise,你知道什么?
(1)、Promise是什么?
Promise是异步编程的一种解决方案,同时他有很多规范,如Promise/A,Promise/B,Promise/D以及Promise/A的升级版Promise/A+,而ES6中采用了Promise/A+规范。
(2)、Promise的作用是什么?
-
解决“回调地狱”问题
-
解决并发请求问题
-
解决异步编程代码执行顺序理解困难的问题
① 解决“回调地狱”问题
我们先看下面代码,看到会不会觉得太冗余了啊。如果代码多的话,很难维护。
1 let count = 0;
2    setTimeout(() => {
3        count++;
4        console.log(`地狱${count}层`);
5        setTimeout(() => {
6            count++;
7            console.log(`地狱${count}层`);
8            setTimeout(() => {
9                 count++;
10                 console.log(`地狱${count}层`);
11            }, 500);
12        }, 500);
13    }, 500);
我们可以看到使用Promise让它永远在第一层,打印出 我还在人间 ,而不会越来越深。
1 let count = 0;
2    new Promise(resolve =>{
3        setTimeout(() => {
4             count++;
5             resolve();
6        }, 500);
7    }).then(()=>{
8        return new Promise(resolve=>{
9            setTimeout(() => {
10                 count++;
11                 resolve();
12            }, 500);
13        })
14    }).then(()=>{
15        console.log('我还在人间')
16    })
② 解决并发请求问题可以在执行result1 、result2 结束后再执行下面的代码
1const result1 = fetch('/getName');
2const result2 = fetch('/getAge');
3Promise.all([result1,result2]).then(()=>{
4// 执行
5})
6
③解决异步编程代码执行顺序理解困难的问题我们先看下这个场景,get方法是异步的方法,在执行getInfo方法时,并不会先执行get方法,而是先打印出我是getInfo方法。
1function get() {
2    setTimeout(() => {
3        console.log('执行get方法');
4    }, 1000);
5}
6function getInfo() {
7    get();
8    console.log('我是getInfo方法');
9}
10getInfo();
11// 我是getInfo方法
12// 执行get方法
13
那么,我们使用Promise来解决异步,同时我们使用了ES6async与await来等待get方法执行完再执行下面的代码。
1function get() {
2    return new Promise((resolve)=>{
3        setTimeout(() => {
4            console.log('执行get方法');
5            resolve();
6        }, 1000);
7    })
8}
9async function getInfo() {
10    await get();
11    console.log('我是getInfo方法');
12}
13getInfo();
14// 执行get方法
15// 我是getInfo方法
16
3、如何实现Promise?
我们先来了解Promise
-
Promise包含then方法 -
then方法的两个参数resolve和reject -
Promise包含3个状态:pending(等待态)、resolved(成功态)、rejected(失败态)。
返回成功resolve:
1new Promise((resolve,reject)=>{
2    setTimeout(() => {
3        resolve('success!') //返回成功状态
4    }, 1000);
5}).then((v)=>{
6    console.log(v);
7},(e)=>{
8    console.log(e);
9})
10
返回错误reject:
1new Promise((resolve,reject)=>{
2    setTimeout(() => {
3        reject('error!') //返回失败状态
4    }, 1000);
5}).then((v)=>{
6    console.log(v);
7},(e)=>{
8    console.log(e);
9})
10
好了,我们来实现一下,封装一个Promise。
1 function myPromise(fn) {
2        this.status = 'pending'; // 初始化等待状态
3        this.data = undefined; // 初始化一个存储变量
4        this.resolvedCallback = []; //成功方法保存
5        this.rejectedCallback = []; // 失败方法保存
6
7        const resolve = (val) => {
8            if (this.status === 'pending') {
9                this.status = 'resolved';
10                this.data = val;
11                this.resolvedCallback.forEach(fu => fu.call(this));
12            }
13        }
14
15        const reject = (val) => {
16            if (this.status === 'pending') {
17                this.status = 'rejected';
18                this.data = val;
19                this.rejectedCallback.forEach(fu => fu.call(this));
20            }
21        }
22
23        fn(resolve, reject);
24    }
25    // 封装then方法
26    myPromise.prototype.then = function (onResolved, onRejected) {
27        return new myPromise((resolve, reject) => {
28
29            const resolvedCallback = () => {
30                const result = onResolved(this.data);
31                if (result instanceof myPromise) {
32                    result.then(resolve, reject);
33                } else {
34                    resolve(result);
35                }
36            }
37            const rejectedCallback = () => {
38                const result = onRejected(this.data);
39                if (result instanceof myPromise) {
40                    result.then(resolve, reject);
41                } else {
42                    resolve(result);
43                }
44            }
45
46            if (this.status === 'resolved') {
47                resolvedCallback();
48            } else if (this.status === 'rejected') {
49                rejectedCallback();
50            } else { // this.status === 'pending'
51                this.resolvedCallback.push(resolvedCallback);
52                this.rejectedCallback.push(rejectedCallback);
53            }
54
55        })
56
57    }
58    // 使用
59    new myPromise((resolve, reject) => {
60        setTimeout(() => {
61            resolve('success!');
62        }, 1000);
63    }).then((v) => {
64        console.log(v)
65    }, (e) => {
66        console.log(e)
67    }).then(() => {
68        console.log('1')
69    })
下一期更新 请关注 第三期
作者:Vam的金豆之路
主要领域:前端开发
我的微信:maomin9761
微信公众号:前端历劫之路

本文转转自微信公众号前端历劫之路原创https://mp.weixin.qq.com/s/0vHHCviZSQfaJRX7mZkqNQ,如有侵权,请联系删除。