
通常公司肯定不止一个系统,每个系统都需要进行认证和权限控制,不可能每个每个系统都自己去写,这个时候需要把登录单独提出来
- 登录和授权是统一的
- 业务系统该怎么写还怎么写
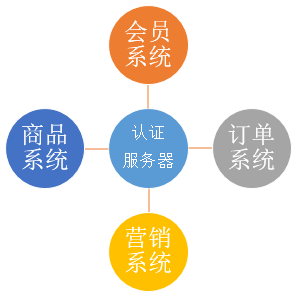
最近学习了一下Spring Security,今天用Spring Security OAuth2简单写一个单点登录的示例
在此之前,需要对OAuth2有一点了解
这里有几篇文章可能会对你有帮助
1. 服务器端配置
1.1. Maven依赖

<project xmlns="http://maven.apache.org/POM/4.0.0" xmlns:xsi="http://www.w3.org/2001/XMLSchema-instance" xsi:schemaLocation="http://maven.apache.org/POM/4.0.0 http://maven.apache.org/xsd/maven-4.0.0.xsd"> <modelVersion>4.0.0</modelVersion>
</project>1<groupId>com.cjs.example</groupId> 2<artifactId>cjs-oauth2-sso-auth-server</artifactId> 3<version>0.0.1-SNAPSHOT</version> 4<packaging>jar</packaging> 5 6<name>cjs-oauth2-sso-auth-server</name> 7 8<parent> 9 <groupId>org.springframework.boot</groupId> 10 <artifactId>spring-boot-starter-parent</artifactId> 11 <version>2.0.3.RELEASE</version> 12 <relativePath/> <!-- lookup parent from repository --> 13</parent> 14 15<properties> 16 <project.build.sourceEncoding>UTF-8</project.build.sourceEncoding> 17 <project.reporting.outputEncoding>UTF-8</project.reporting.outputEncoding> 18 <java.version>1.8</java.version> 19</properties> 20 21<dependencies> 22 <dependency> 23 <groupId>org.springframework.boot</groupId> 24 <artifactId>spring-boot-starter-security</artifactId> 25 </dependency> 26 <dependency> 27 <groupId>org.springframework.security.oauth</groupId> 28 <artifactId>spring-security-oauth2</artifactId> 29 <version>2.3.3.RELEASE</version> 30 </dependency> 31 <dependency> 32 <groupId>org.springframework.boot</groupId> 33 <artifactId>spring-boot-starter-thymeleaf</artifactId> 34 </dependency> 35 <dependency> 36 <groupId>org.thymeleaf.extras</groupId> 37 <artifactId>thymeleaf-extras-springsecurity4</artifactId> 38 </dependency> 39 <dependency> 40 <groupId>org.springframework.boot</groupId> 41 <artifactId>spring-boot-starter-web</artifactId> 42 </dependency> 43 <dependency> 44 <groupId>org.springframework.boot</groupId> 45 <artifactId>spring-boot-starter-jdbc</artifactId> 46 </dependency> 47 <dependency> 48 <groupId>mysql</groupId> 49 <artifactId>mysql-connector-java</artifactId> 50 <version>5.1.46</version> 51 </dependency> 52 53 <dependency> 54 <groupId>org.projectlombok</groupId> 55 <artifactId>lombok</artifactId> 56 <optional>true</optional> 57 </dependency> 58 <dependency> 59 <groupId>org.springframework.boot</groupId> 60 <artifactId>spring-boot-starter-test</artifactId> 61 <scope>test</scope> 62 </dependency> 63 <dependency> 64 <groupId>org.springframework.security</groupId> 65 <artifactId>spring-security-test</artifactId> 66 <scope>test</scope> 67 </dependency> 68</dependencies> 69 70<build> 71 <plugins> 72 <plugin> 73 <groupId>org.springframework.boot</groupId> 74 <artifactId>spring-boot-maven-plugin</artifactId> 75 </plugin> 76 </plugins> 77</build>
1.2. 配置授权服务器
package com.cjs.example.config;
import org.springframework.context.annotation.Configuration; import org.springframework.security.oauth2.config.annotation.configurers.ClientDetailsServiceConfigurer; import org.springframework.security.oauth2.config.annotation.web.configuration.AuthorizationServerConfigurerAdapter; import org.springframework.security.oauth2.config.annotation.web.configuration.EnableAuthorizationServer; import org.springframework.security.oauth2.config.annotation.web.configurers.AuthorizationServerEndpointsConfigurer; import org.springframework.security.oauth2.config.annotation.web.configurers.AuthorizationServerSecurityConfigurer;
import javax.annotation.Resource; import javax.sql.DataSource;
@Configuration @EnableAuthorizationServer public class AuthorizationServerConfig extends AuthorizationServerConfigurerAdapter {
1@Resource
2private DataSource dataSource;
3
4/\*\*
5 \* 配置授权服务器的安全,意味着实际上是/oauth/token端点。
6 \* /oauth/authorize端点也应该是安全的
7 \* 默认的设置覆盖到了绝大多数需求,所以一般情况下你不需要做任何事情。
8 \*/
9@Override
10public void configure(AuthorizationServerSecurityConfigurer security) throws Exception {
11    super.configure(security);
12}
13
14/\*\*
15 \* 配置ClientDetailsService
16 \* 注意,除非你在下面的configure(AuthorizationServerEndpointsConfigurer)中指定了一个AuthenticationManager,否则密码授权方式不可用。
17 \* 至少配置一个client,否则服务器将不会启动。
18 \*/
19@Override
20public void configure(ClientDetailsServiceConfigurer clients) throws Exception {
21    clients.jdbc(dataSource);
22}
23
24/\*\*
25 \* 该方法是用来配置Authorization Server endpoints的一些非安全特性的,比如token存储、token自定义、授权类型等等的
26 \* 默认情况下,你不需要做任何事情,除非你需要密码授权,那么在这种情况下你需要提供一个AuthenticationManager
27 \*/
28@Override
29public void configure(AuthorizationServerEndpointsConfigurer endpoints) throws Exception {
30    super.configure(endpoints);
31}
}
**说明:**这里授权服务器我主要是配置了注册客户端,客户端可以从内存中或者数据库中加载,这里我从数据库中加载,因为这样感觉更真实一点儿。
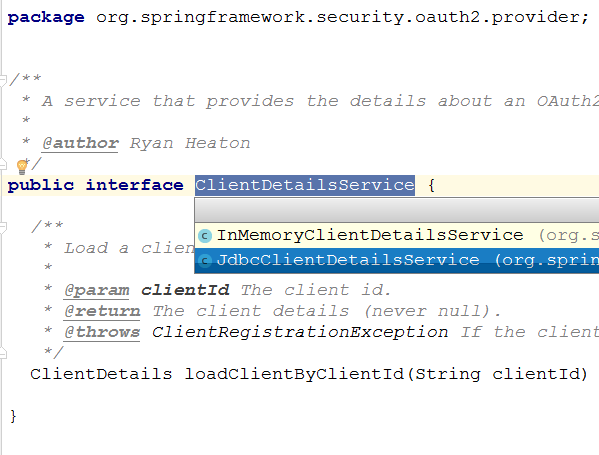
查看JdbcClientDetailsService源码我们不难看出其表结构。(PS:也可以自定义,就像UserDetailsService那样)
这里,我准备的SQL脚本如下:
CREATE TABLE oauth_client_details ( client_id VARCHAR(256) PRIMARY KEY, resource_ids VARCHAR(256), client_secret VARCHAR(256), scope VARCHAR(256), authorized_grant_types VARCHAR(256), web_server_redirect_uri VARCHAR(256), authorities VARCHAR(256), access_token_validity INTEGER, refresh_token_validity INTEGER, additional_information VARCHAR(4096), autoapprove VARCHAR(256) ); INSERT INTO oauth_client_details (client_id, client_secret, scope, authorized_grant_types, web_server_redirect_uri, autoapprove) VALUES ('MemberSystem', '$2a$10$dYRcFip80f0jIKGzRGulFelK12036xWQKgajanfxT65QB4htsEXNK', 'user_info', 'authorization_code', 'http://localhost:8081/login', 'user_info'); INSERT INTO oauth_client_details (client_id, client_secret, scope, authorized_grant_types, web_server_redirect_uri, autoapprove) VALUES ('CouponSystem', '$2a$10$dYRcFip80f0jIKGzRGulFelK12036xWQKgajanfxT65QB4htsEXNK', 'user_info', 'authorization_code', 'http://localhost:8082/login', 'user_info');
这里注册了两个客户端,分别是MemberSystem和CouponSystem。
1.3. 配置WebSecurity
package com.cjs.example.config;
import com.cjs.example.support.MyUserDetailsService; import org.springframework.beans.factory.annotation.Autowired; import org.springframework.context.annotation.Bean; import org.springframework.context.annotation.Configuration; import org.springframework.security.authentication.AuthenticationManager; import org.springframework.security.config.annotation.authentication.builders.AuthenticationManagerBuilder; import org.springframework.security.config.annotation.web.builders.HttpSecurity; import org.springframework.security.config.annotation.web.builders.WebSecurity; import org.springframework.security.config.annotation.web.configuration.EnableWebSecurity; import org.springframework.security.config.annotation.web.configuration.WebSecurityConfigurerAdapter; import org.springframework.security.crypto.bcrypt.BCryptPasswordEncoder; import org.springframework.security.crypto.password.PasswordEncoder;
@Configuration @EnableWebSecurity public class SecurityConfig extends WebSecurityConfigurerAdapter {
1@Autowired
2private MyUserDetailsService myUserDetailsService;
3
4@Override
5protected void configure(HttpSecurity http) throws Exception {
6    http.authorizeRequests()
7            .antMatchers("/oauth/\*\*","/login/\*\*", "/logout").permitAll()
8            .anyRequest().authenticated()   // 其他地址的访问均需验证权限
9            .and()
10            .formLogin()
11            .loginPage("/login")
12            .and()
13            .logout().logoutSuccessUrl("/");
14}
15
16@Override
17public void configure(WebSecurity web) throws Exception {
18    web.ignoring().antMatchers("/assets/\*\*");
19}
20
21@Override
22protected void configure(AuthenticationManagerBuilder auth) throws Exception {
23    auth.userDetailsService(myUserDetailsService).passwordEncoder(passwordEncoder());
24}
25
26@Bean
27@Override
28public AuthenticationManager authenticationManager() throws Exception {
29    return super.authenticationManager();
30}
31
32@Bean
33public PasswordEncoder passwordEncoder() {
34    return new BCryptPasswordEncoder();
35}
}
说明:
- 这里,主要配置了UserDetailsService
package com.cjs.example.support;
import com.cjs.example.domain.SysPermission; import com.cjs.example.domain.SysRole; import com.cjs.example.domain.SysUser; import com.cjs.example.service.UserService; import org.springframework.beans.factory.annotation.Autowired; import org.springframework.security.core.authority.SimpleGrantedAuthority; import org.springframework.security.core.userdetails.User; import org.springframework.security.core.userdetails.UserDetails; import org.springframework.security.core.userdetails.UserDetailsService; import org.springframework.security.core.userdetails.UsernameNotFoundException; import org.springframework.stereotype.Service;
import java.util.ArrayList; import java.util.List;
@Service public class MyUserDetailsService implements UserDetailsService {
1@Autowired
2private UserService userService;
3
4/\*\*
5 \* 授权的时候是对角色授权,而认证的时候应该基于资源,而不是角色,因为资源是不变的,而用户的角色是会变的
6 \*/
7
8@Override
9public UserDetails loadUserByUsername(String username) throws UsernameNotFoundException {
10    SysUser sysUser = userService.getUserByName(username);
11    if (null == sysUser) {
12        throw new UsernameNotFoundException(username);
13    }
14    List<SimpleGrantedAuthority> authorities = new ArrayList<>();
15    for (SysRole role : sysUser.getRoleList()) {
16        for (SysPermission permission : role.getPermissionList()) {
17            authorities.add(new SimpleGrantedAuthority(permission.getCode()));
18        }
19    }
20
21    return new User(sysUser.getUsername(), sysUser.getPassword(), authorities);
22}
}
1.4. 新建登录页面
package com.cjs.example.controller;
import org.springframework.stereotype.Controller; import org.springframework.web.bind.annotation.GetMapping; import org.springframework.web.bind.annotation.RequestMapping;
@Controller public class LoginController {
1@RequestMapping("/login")
2public String login() {
3    return "login";
4}
5
6@GetMapping("/index")
7public String index() {
8    return "index";
9}
}
1.5. application.yml
server: port: 8080 spring: datasource: url: jdbc:mysql://10.123.52.189:3306/oh_coupon username: devdb password: d^V$0Fu!/6-<s driver-class-name: com.mysql.jdbc.Driver logging: level: root: debug
2. 客户端配置
2.1. Maven依赖
<project xmlns="http://maven.apache.org/POM/4.0.0" xmlns:xsi="http://www.w3.org/2001/XMLSchema-instance" xsi:schemaLocation="http://maven.apache.org/POM/4.0.0 http://maven.apache.org/xsd/maven-4.0.0.xsd"> <modelVersion>4.0.0</modelVersion>
</project>1<groupId>com.example</groupId> 2<artifactId>cjs-oauth2-sso-ui</artifactId> 3<version>0.0.1-SNAPSHOT</version> 4<packaging>jar</packaging> 5 6<name>cjs-oauth2-sso-ui</name> 7 8<parent> 9 <groupId>org.springframework.boot</groupId> 10 <artifactId>spring-boot-starter-parent</artifactId> 11 <version>2.0.3.RELEASE</version> 12 <relativePath/> <!-- lookup parent from repository --> 13</parent> 14 15<properties> 16 <project.build.sourceEncoding>UTF-8</project.build.sourceEncoding> 17 <project.reporting.outputEncoding>UTF-8</project.reporting.outputEncoding> 18 <java.version>1.8</java.version> 19</properties> 20 21<dependencies> 22 <dependency> 23 <groupId>org.springframework.boot</groupId> 24 <artifactId>spring-boot-starter-web</artifactId> 25 </dependency> 26 <dependency> 27 <groupId>org.springframework.boot</groupId> 28 <artifactId>spring-boot-starter-security</artifactId> 29 </dependency> 30 <dependency> 31 <groupId>org.springframework.boot</groupId> 32 <artifactId>spring-boot-starter-thymeleaf</artifactId> 33 </dependency> 34 <dependency> 35 <groupId>org.thymeleaf.extras</groupId> 36 <artifactId>thymeleaf-extras-springsecurity4</artifactId> 37 </dependency> 38 <dependency> 39 <groupId>org.springframework.security.oauth</groupId> 40 <artifactId>spring-security-oauth2</artifactId> 41 <version>2.3.3.RELEASE</version> 42 </dependency> 43 <dependency> 44 <groupId>org.springframework.security.oauth.boot</groupId> 45 <artifactId>spring-security-oauth2-autoconfigure</artifactId> 46 <version>2.0.1.RELEASE</version> 47 </dependency> 48 49 <dependency> 50 <groupId>org.projectlombok</groupId> 51 <artifactId>lombok</artifactId> 52 <optional>true</optional> 53 </dependency> 54</dependencies> 55 56<build> 57 <plugins> 58 <plugin> 59 <groupId>org.springframework.boot</groupId> 60 <artifactId>spring-boot-maven-plugin</artifactId> 61 </plugin> 62 </plugins> 63</build>
2.2. WebSecurity配置
package com.cjs.example.config;
import org.springframework.boot.autoconfigure.security.oauth2.client.EnableOAuth2Sso; import org.springframework.context.annotation.Configuration; import org.springframework.security.config.annotation.method.configuration.EnableGlobalMethodSecurity; import org.springframework.security.config.annotation.web.builders.HttpSecurity; import org.springframework.security.config.annotation.web.configuration.WebSecurityConfigurerAdapter;
@EnableOAuth2Sso @Configuration @EnableGlobalMethodSecurity(prePostEnabled = true) public class UiSecurityConfig extends WebSecurityConfigurerAdapter {
1@Override
2public void configure(HttpSecurity http) throws Exception {
3    http.antMatcher("/\*\*")
4            .authorizeRequests()
5            .antMatchers("/", "/login\*\*").permitAll()
6            .anyRequest()
7            .authenticated();
8}
}
说明:
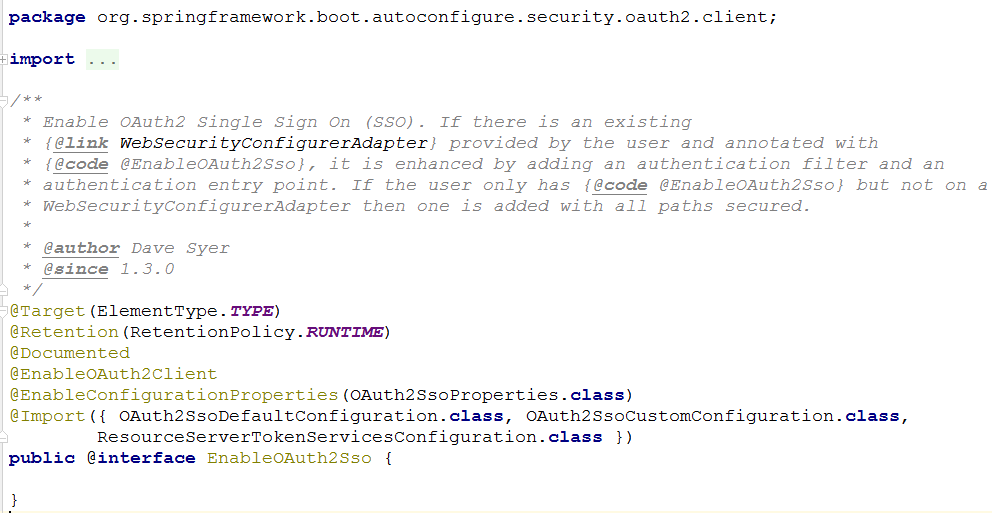
这里最重要的是应用了**@EnableOAuth2Sso**注解
Spring Boot 1.x 版本和 2.x 版本在OAuth2这一块的差异还是比较大的,在Spring Boot 2.x 中没有@EnableOAuth2Sso这个注解,所以我引用了spring-security-oauth2-autoconfigure
2.3. 定义一个简单的控制器
package com.cjs.example.controller;
import com.cjs.example.domain.Member; import org.springframework.security.access.prepost.PreAuthorize; import org.springframework.stereotype.Controller; import org.springframework.web.bind.annotation.RequestMapping; import org.springframework.web.bind.annotation.ResponseBody; import org.springframework.web.servlet.ModelAndView;
import java.util.ArrayList; import java.util.List;
@Controller @RequestMapping("/member") public class MemberController {
1/\*\*
2 \* 会员列表页面
3 \*/
4@RequestMapping("/list")
5public ModelAndView list() {
6    ModelAndView modelAndView = new ModelAndView("member/list");
7    return modelAndView;
8}
9
10/\*\*
11 \* 导出
12 \*/
13@PreAuthorize("hasAuthority('memberExport')")
14@ResponseBody
15@RequestMapping("/export")
16public List<Member> export() {
17    Member member = new Member();
18    member.setName("苏九儿");
19    member.setCode("1000");
20    member.setMobile("13112345678");
21    member.setGender(1);
22    Member member1 = new Member();
23    member1.setName("郭双");
24    member1.setCode("1001");
25    member1.setMobile("15812346723");
26    member1.setGender(1);
27    List<Member> list = new ArrayList<>();
28    list.add(member);
29    list.add(member1);
30    return list;
31}
32
33/\*\*
34 \* 详情
35 \*/
36@PreAuthorize("hasAuthority('memberDetail')")
37@RequestMapping("/detail")
38public ModelAndView detail() {
39    return new ModelAndView(" member/detail");
40}
}
2.4. application.yml
server: port: 8081 servlet: session: cookie: name: UISESSIONMEMBER
security: oauth2: client: client-id: MemberSystem client-secret: 12345 access-token-uri: http://localhost:8080/oauth/token user-authorization-uri: http://localhost:8080/oauth/authorize resource: user-info-uri: http://localhost:8080/user/me logging: level: root: debug spring: thymeleaf: cache: false
说明:
- 这里需要注意的是不要忘记设置cookie-name,不然会有一些莫名其妙的问题,比如“User must be authenticated with Spring Security before authorization can be completed”
3. 运行效果
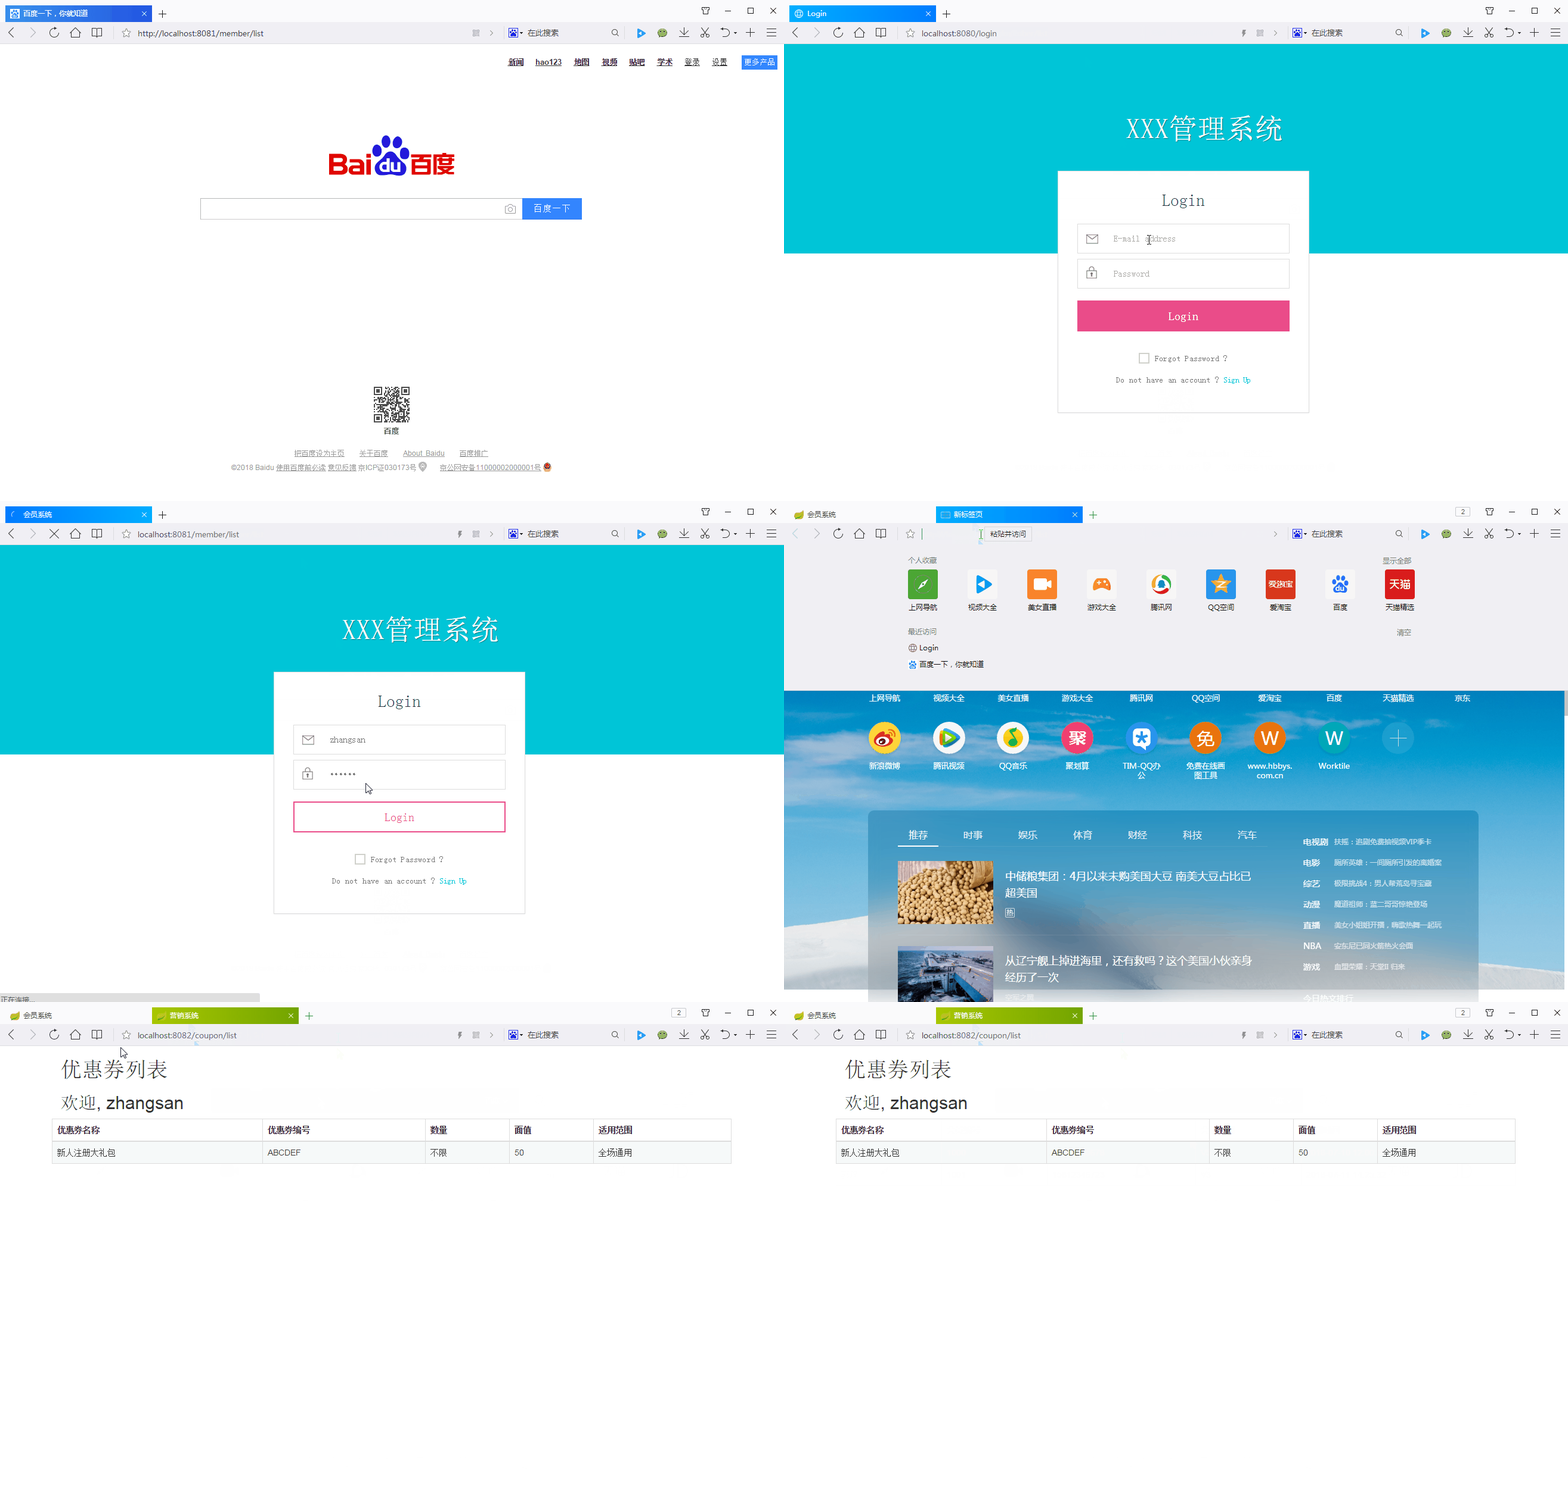
在这个例子中,会员系统(localhost:8081)和营销系统(localhost:8082)是两个系统
可以看到,当我们登录会员系统以后,再进营销系统就不需要登录了。
3.1. 遗留问题
- 退出
- 记住我
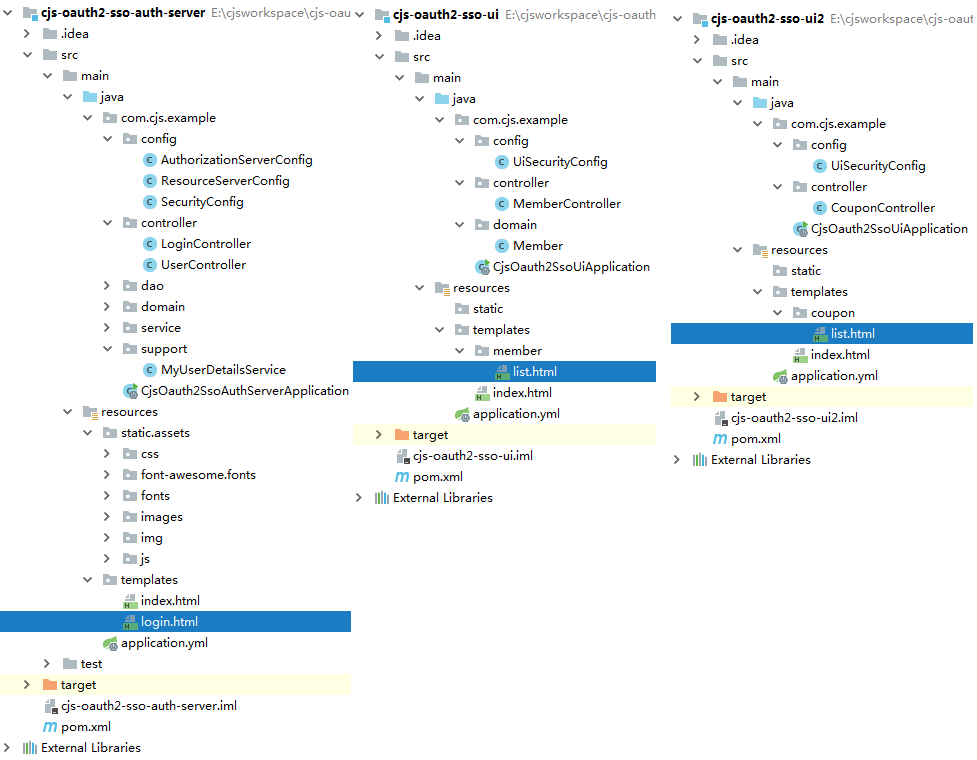
3.2. 工程结构
https://github.com/chengjiansheng/cjs-oauth2-example.git
3.3. 参考
https://github.com/eugenp/tutorials/tree/master/spring-security-sso
https://blog.csdn.net/sinat_24798023/article/details/80536881
https://segmentfault.com/a/1190000012384850
http://www.baeldung.com/spring-security-oauth-revoke-tokens