最近项目准备使用SpringSecurityOAuth2做权限认证管理,所以先了解一下SpringSecurityOAuth的使用原理并做一个demo做参考
一、项目知识准备
-
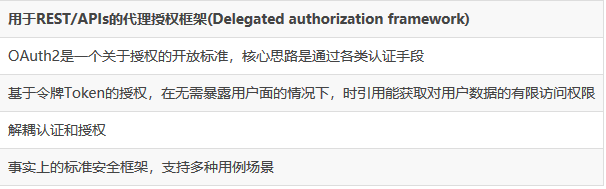
什么是OAuth2
OAuth 2.0 的标准是 RFC 6749 文件 OAuth 引入了一个授权层,用来分离两种不同的角色:客户端和资源所有者。......资源所有者同意以后,资源服务器可以向客户端颁发令牌。客户端通过令牌,去请求数据:
-
OAuth2核心-授权

-
OAuth2的四种方式
模式
授权码(authorization-code)
隐藏式(implicit)
密码式(password)
客户端凭证(client credentials)
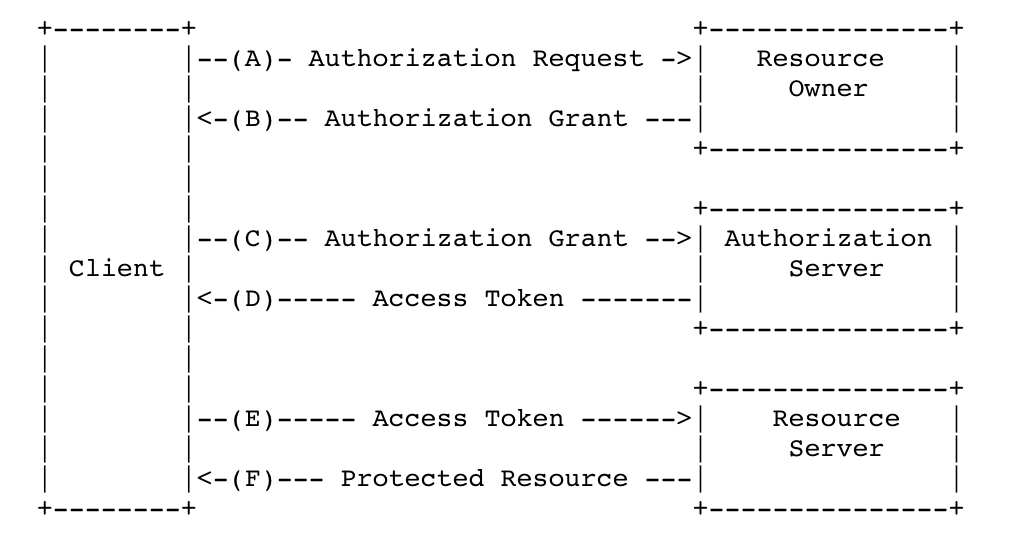
4. 握手流程(摘自RFC6749)
5. SpringSecurity
基于Spring的企业应用系统提供声明式的安全訪问控制解决方式的安全框架(简单说是对访问权限进行控制嘛),应用的安全性包括用户认证(Authentication)和用户授权(Authorization)两个部分
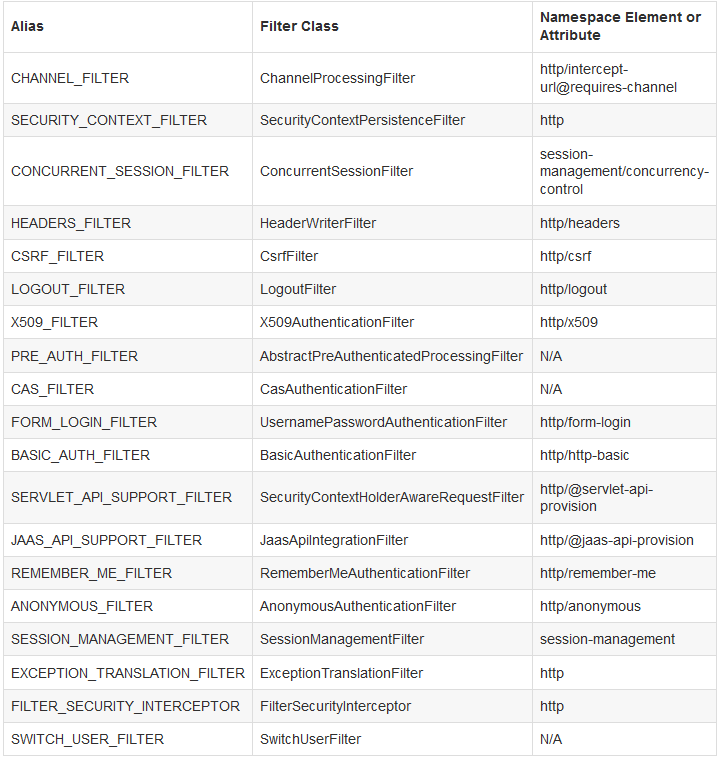
*6. SpringSecurity 中默认的内置过滤列表:
(其他后续补充)
二、项目准备
1. 环境
SpringBoot 2.1.0.RELEASE jdk1.8 SpringCloud Greenwich.SR1 consul服务发现与注册
2. 项目
项目
描述
fp-commons
jar公用
fp-gateway
网关
fp-authorization-server
OAuth2认证服务器
3. 项目搭建
1(1)网关搭建 frame-gateway
2
3    pom.xml:
4        引入依赖文件;在启动器上添加 注册监听@EnableDiscoveryClient
5        并注入 DiscoveryClientRouteDefinitionLocator
6    application.xml:
7        spring-main-allow-bean-definition-overriding: true (相同名称注入允许覆盖)
8        spring.application.name:SpringCloud-consul-gateway   (设置应用名称必须)
9        bootstrap.yml 中配置 consul(比application先加载)
10        prefer-ip-address: true (使用ip注册,有些网络会出现用主机名来获取注册的问题)
(2)fp-commons jar公用
1    pom.xml:
2          引入依赖文件;添加一些公用方法
(3)fp-authorization-server
(git中提交了一个至简版本的OAuth2认证中心,只有token生成功能,没有资源保护以及认证)
1    只需要配置AuthorizationServerConfigurerAdapter 认证服务器
2    以及WebSecurityConfigurerAdapter SpringSecurity配置 两个文件,就能实现token生成。
3    如果没有需要保护的资源不用ResourceServerConfigurerAdapter 资源服务器配置
三、认证服务器搭建
基本的SpringBoot搭建略过,这里只介绍SpringSecurity OAuth2的token实现,基本的数据处理以及其他看源码。
首先完成ClientDetailsService的自定义实现(获取客户端相关信息)
1/**
2* @Description 自定义客户端数据
3* @Author wwz
4* @Date 2019/07/28
5* @Param
6* @Return
7*/
8@Service
9public class MyClientDetailsService implements ClientDetailsService {
10    @Autowired
11    private AuthClientDetailsMapper authClientDetailsMapper;
12    @Override
13    public ClientDetails loadClientByClientId(String clientId) throws ClientRegistrationException {
14        AuthClientDetails clientDetails = authClientDetailsMapper.selectClientDetailsByClientId(clientId);
15        if (clientDetails == null) {
16            throw new ClientRegistrationException("该客户端不存在");
17        }
18        MyClientDetails details = new MyClientDetails(clientDetails);
19        return details;
20    }
21}
以及UserDetailsService的自定义实现(获取用户相关信息)
1/**
2 * @Description 自定义用户验证数据
3 * @Author wwz
4 * @Date 2019/07/28
5 * @Param
6 * @Return
7 */
8@Service
9public class MyUserDetailsService implements UserDetailsService {
10
11    @Autowired
12    private AuthUserMapper authUserMapper;
13
14    @Override
15    public UserDetails loadUserByUsername(String username) throws UsernameNotFoundException {
16        // 自定义用户权限数据
17        AuthUser authUser = authUserMapper.selectByUsername(username);
18        if (authUser == null) {
19            throw new UsernameNotFoundException("用户名不存在");
20        }
21        if (!authUser.getValid()) {
22            throw new UsernameNotFoundException("用户不可用");
23        }
24        Set<GrantedAuthority> grantedAuthorities = new HashSet<>();
25        if (authUser.getAuthRoles() != null) {
26            for (AuthRole role : authUser.getAuthRoles()) {
27                // 当前角色可用
28                if (role.getValid()) {
29                    //角色必须是ROLE_开头
30                    GrantedAuthority grantedAuthority = new SimpleGrantedAuthority(role.getRoleName());
31                    grantedAuthorities.add(grantedAuthority);
32                    if (role.getAuthPermissions() != null) {
33                        for (AuthPermission permission : role.getAuthPermissions()) {
34                            // 当前权限可用
35                            if (permission.getValid()) {
36                                // 拥有权限设置为   auth/member/GET  可以访问auth服务下面 member的查询方法
37                                GrantedAuthority authority = new SimpleGrantedAuthority(permission.getServicePrefix() + "/" + permission.getUri() + "/" + permission.getMethod());
38                                grantedAuthorities.add(authority);
39                            }
40                        }
41                    }
42                }
43                //获取权限
44            }
45        }
46        MyUserDetails userDetails = new MyUserDetails(authUser, grantedAuthorities);
47        return userDetails;
48    }
49}
然后新建认证服务配置MySecurityOAuth2Config,继承AuthorizationServerConfigurerAdapter
1/**
2 * @Description OAuth2认证服务配置
3 * @Author wwz
4 * @Date 2019/07/28
5 * @Param
6 * @Return
7 */
8@Configuration
9@EnableAuthorizationServer
10public class MySecurityOAuth2Config extends AuthorizationServerConfigurerAdapter {
11    @Autowired
12    private AuthenticationManager authenticationManager;    // 认证方法入口
13
14    @Autowired
15    private RedisConnectionFactory connectionFactory;  // redis连接工厂
16
17    @Autowired
18    private MyUserDetailsService userDetailsService;  // 自定义用户验证数据
19
20    @Autowired
21    private MyClientDetailsService clientDetailsService; // 自定义客户端数据
22    // 加密方式
23    @Bean
24    public PasswordEncoder passwordEncoder() {
25        return new BCryptPasswordEncoder();
26    }
27
28    /***
29     * 设置token用redis保存
30     */
31    @Bean
32    public TokenStore tokenStore() {
33        //token保存在redis中(也可以保存在数据库、内存中new InMemoryTokenStore()、或者jwt;)。
34        //如果保存在中间件(数据库、Redis),那么资源服务器与认证服务器可以不在同一个工程中。
35        //注意:如果不保存access_token,则没法通过access_token取得用户信息
36        RedisTokenStore redis = new RedisTokenStore(connectionFactory);
37        return redis;
38    }
39
40    /**
41     * 配置令牌端点(Token Endpoint)的安全约束
42     */
43    @Override
44    public void configure(AuthorizationServerSecurityConfigurer oauthServer) throws Exception {
45        oauthServer
46                .tokenKeyAccess("permitAll()")
47                .checkTokenAccess("isAuthenticated()")
48                .allowFormAuthenticationForClients();   // 允许表单登录
49    }
50
51    /**
52     * 配置 oauth_client_details【client_id和client_secret等】信息的认证【检查ClientDetails的合法性】服务
53     * 设置 认证信息的来源:数据库,内存,也可以自己实现ClientDetailsService的loadClientByClientId 方法自定义数据源
54     * 自动注入:ClientDetailsService的实现类 JdbcClientDetailsService (检查 ClientDetails 对象)
55     * 这个方法主要是用于校验注册的第三方客户端的信息,可以存储在数据库中,默认方式是存储在内存中
56     */
57    @Override
58    public void configure(ClientDetailsServiceConfigurer clients) throws Exception {
59        // 设置从自定义接口获取客户端信息
60        clients.withClientDetails(clientDetailsService);
61// clients.inMemory() // 使用in-memory存储
62//                .withClient("client_name") // client_id
63//                .secret(passwordEncoder().encode("111")) // client_secret
64//                .redirectUris("http://localhost:8001")
65//                // 该client允许的授权类型
66//                .authorizedGrantTypes("password", "authorization_code", "refresh_token", "client_credentials")
67//                .scopes("app", "app1", "app3"); // 允许的授权范围
68    }
69
70    /**
71     * 配置授权(authorization)以及令牌(token)的访问端点和令牌服务(token services)
72     */
73    @Override
74    public void configure(AuthorizationServerEndpointsConfigurer endpoints) throws Exception {
75        endpoints
76                .tokenStore(tokenStore())  // 配置token存储
77                .userDetailsService(userDetailsService)  // 配置自定义的用户权限数据,不配置会导致token无法刷新
78                .authenticationManager(authenticationManager)
79                .tokenServices(defaultTokenServices());      // 加载token配置
80
81    }
82
83    /**
84     * 把认证的token保存到redis
85     * <p>注意,自定义TokenServices的时候,需要设置@Primary,否则报错,</p>
86     * 自定义的token
87     * 认证的token是存到redis里的 若ClientDetails中设定了有效时间则以设定值为准
88     */
89    @Primary
90    @Bean
91    public DefaultTokenServices defaultTokenServices() {
92        DefaultTokenServices tokenServices = new DefaultTokenServices();
93        tokenServices.setTokenStore(tokenStore());
94        tokenServices.setSupportRefreshToken(true);
95        tokenServices.setClientDetailsService(clientDetailsService);
96        tokenServices.setAccessTokenValiditySeconds(60 * 60 * 12);  // token有效期自定义设置,默认12小时
97        tokenServices.setRefreshTokenValiditySeconds(60 * 60 * 24 * 7);  // refresh_token默认30天
98        return tokenServices;
99    }
100}
接着新建Security的配置MySecurityConfig 继承WebSecurityConfigurerAdapter
1**
2 * @Description security 配置
3 * ResourceServerConfigurerAdapter 是比WebSecurityConfigurerAdapter 的优先级低的
4 * @Author wwz
5 * @Date 2019/07/28
6 * @Param
7 * @Return
8 */
9@Configuration
10@EnableWebSecurity
11@Order(2)  // WebSecurityConfigurerAdapter 默认为100 这里配置为2设置比资源认证器高
12public class MySecurityConfig extends WebSecurityConfigurerAdapter {
13    // 自定义用户验证数据
14    @Bean
15    public MyUserDetailsService userDetailsService() {
16        return new MyUserDetailsService();
17    }
18
19    // 加密方式
20    @Bean
21    public PasswordEncoder passwordEncoder() {
22        return new BCryptPasswordEncoder();
23    }
24
25    // 验证器加载
26    @Override
27    @Bean
28    public AuthenticationManager authenticationManagerBean() throws Exception {
29        return super.authenticationManagerBean();
30    }
31
32    @Override
33    protected void configure(HttpSecurity http) throws Exception {
34        http
35                // 匹配oauth相关,匹配健康,匹配默认登录登出 在httpSecurity处理,,其他到ResourceServerConfigurerAdapter OAuth2处理  1
36                .requestMatchers().antMatchers("/oauth/**", "/actuator/health", "/login", "/logout")
37                .and()
38                // 匹配的全部无条件通过 permitAll 2
39                .authorizeRequests().antMatchers("/oauth/**", "/actuator/health", "/login", "/logout").permitAll()
40                // 匹配条件1的 并且不再条件2通过范围内的其他url全部需要验证登录
41                .and().authorizeRequests().anyRequest().authenticated()
42                // 启用登录验证
43                .and().formLogin().permitAll();
44        // 不启用 跨站请求伪造 默认为启用, 需要启用的话得在form表单中生成一个_csrf
45        http.csrf().disable();
46    }
47
48    @Override
49    protected void configure(AuthenticationManagerBuilder auth) throws Exception {
50        auth.userDetailsService(userDetailsService()).passwordEncoder(passwordEncoder());
51    }
52}
到此,SpringSecurity OAuth2至简的项目搭建完成,下一步为4种token的基本验证
四、4种token获取(这里使用postman做token获取)
- password模式认证
请求地址:
http://192.168.3.14:8001/auth/oauth/token?grant_type=password&username=username&password=111
参数:
参数名
说明
grant_type
类型必须为password
username
用户名
password
密码
client_id
客户端id
client_serce
客户端密码
请求:
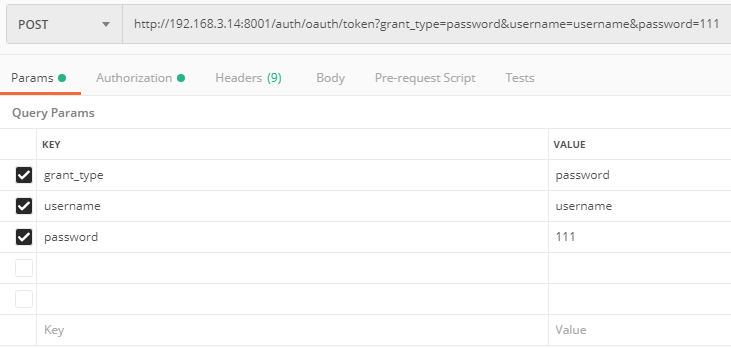
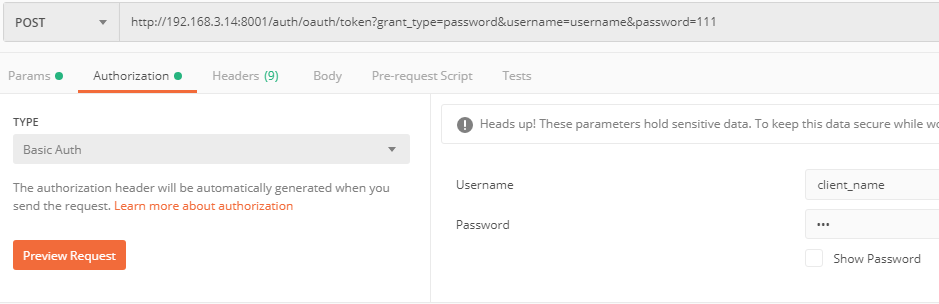
响应: 返回信息 包括 access_token 通行token, refresh_token 重新申请token,scope资源范围 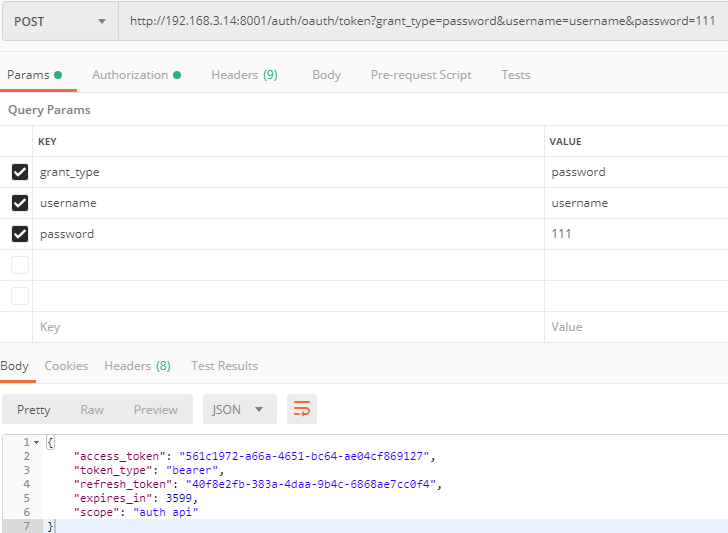
验证:
无权访问页面
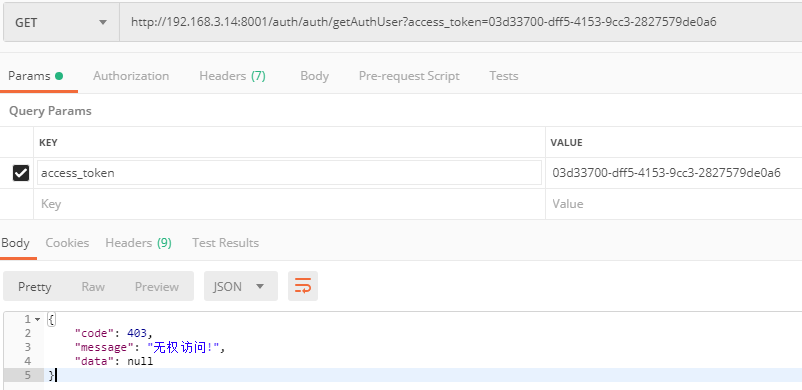
访问页面
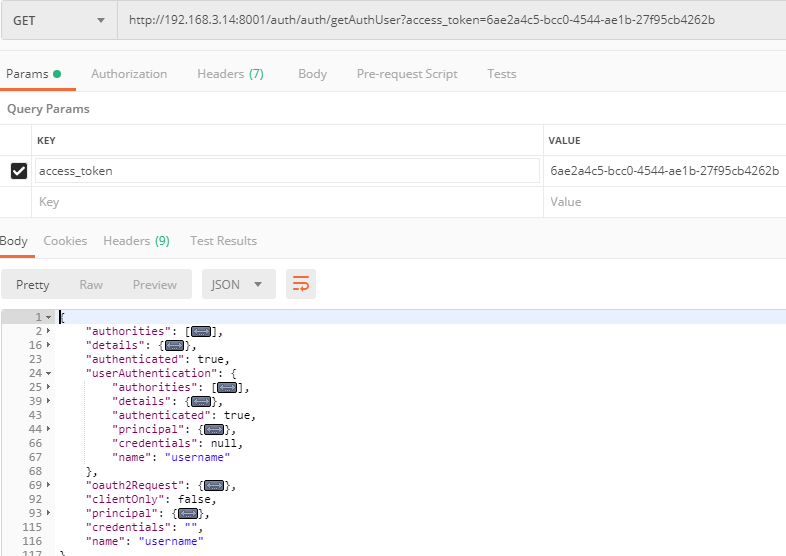
- client_credentials模式
请求地址:
参数:
参数名
说明
grant_type
类型必须为client_credentials
client_id
客户端id
client_serce
客户端密码
请求

响应:返回参数 包括access_token,scope 权限范围 (但是不包含refresh_token) 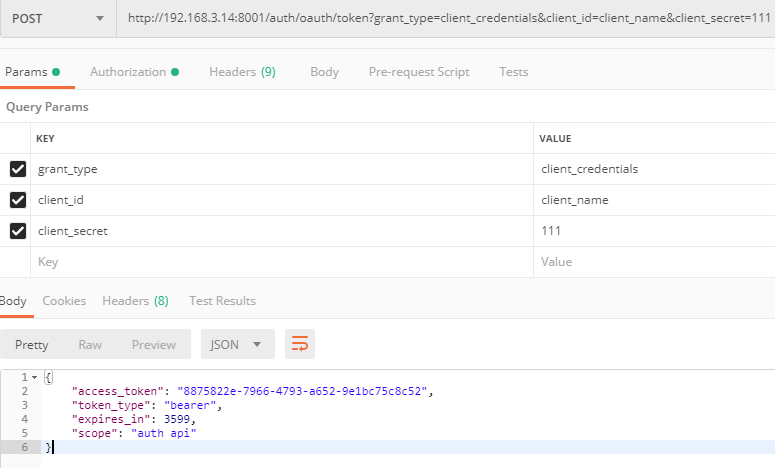
验证:默认无任何权限 当然,这里的权限也可以在ClientDetails中的authorities字段中默认增加权限
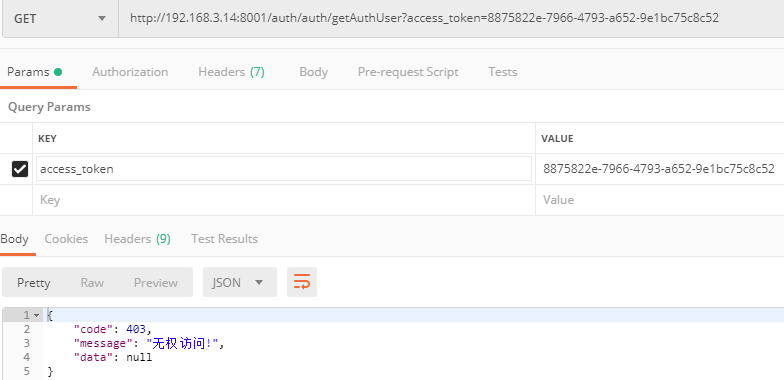
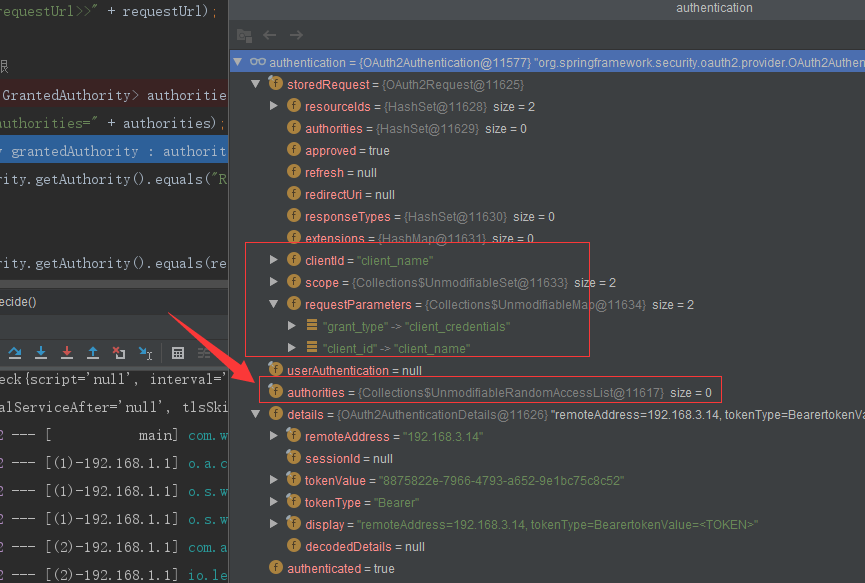
-
refresh_token 模式
refresh_token 只有请求过一次并且获取到refresh_token才能用该值重新申请可用token,并且,申请了新的token后,原先为过期的token立即失效,refresh_token作为新的token的refresh_token继续使用。
请求地址:
参数
参数名
说明
grant_type
类型必须为refresh_token
refresh_token
刷新token
请求:
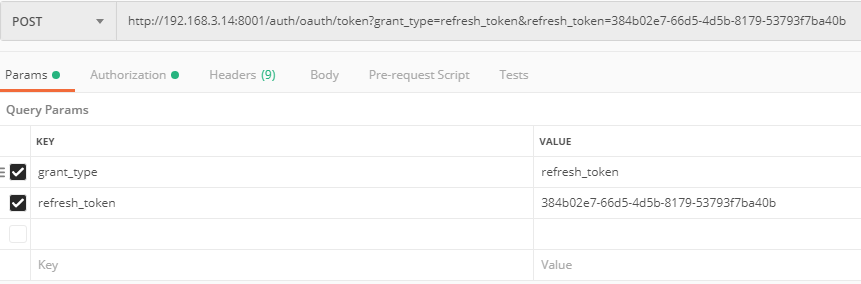
响应:返回结果包括 新的token,原refresh_token,scope权限 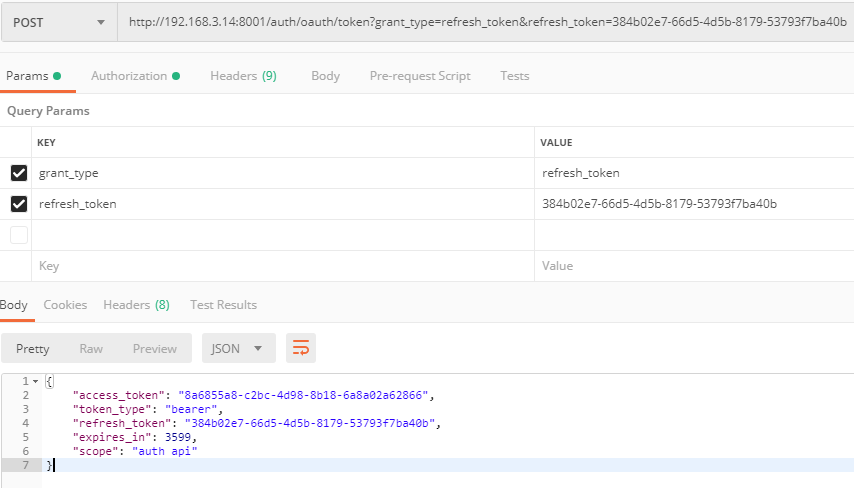
- authorization_code模式
请求:
1第一次请求:http://192.168.3.14:8001/auth/oauth/authorize?response_type=code&client_id=client_name&redirect_uri=http://192.168.3.14:8001/auth/oauth/token&scope=auth
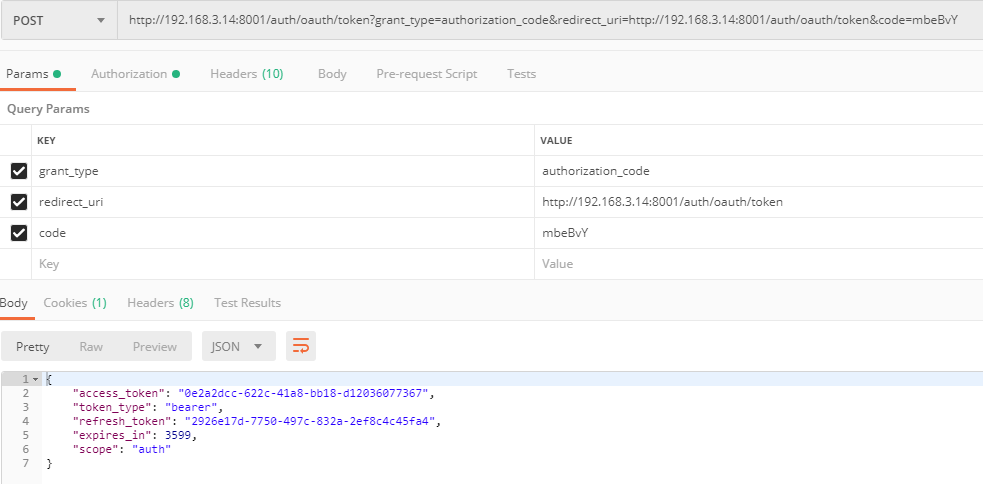
2第二次请求:http://192.168.3.14:8001/auth/oauth/token?grant_type=authorization_code&redirect_uri=http://192.168.3.14:8001/auth/oauth/token&code=mbeBvY
参数:
第一次参数
参数名
说明
response_type
类型必须为code
client_id
客户端id
redirect_uri
返回code地址 与后端client_Id对应 redirect_uri,与第二步请求token对应
第二次参数
参数名
说明
grant_type
类型必须为authorization_code
code
为返回code 这里为 mbeBvY
redirect_uri
返回code地址 上一步redirect_uri http://192.168.3.14:8001/auth/oauth/token
上述,填错一个就会报错code只能使用一次 再次请求失效
第一次请求后跳转 登录界面

登录后跳转授权页面然后返回到携带的redirect_uri路径 并带上code

第二次请求
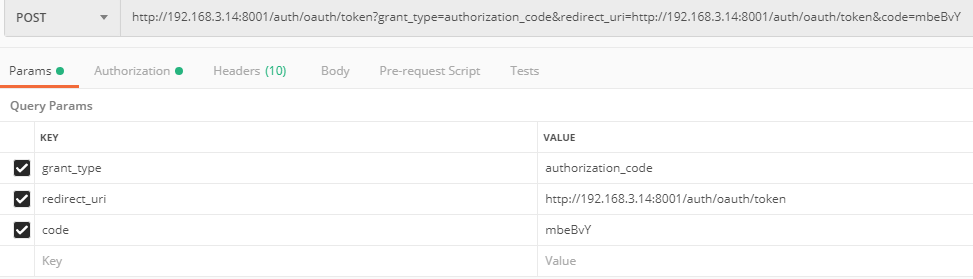
响应:返回结果包括 token, refresh_token,scope权限