转载该文章的原因是为了保存利用命令行jar包上传到本地库的方法,哈哈。。
一:Kaptcha介绍
简单介绍:
kaptcha 是一个扩展自 simplecaptcha 的验证码库,在 Java 编程中 是一个非常实用的验证码生成工具。我们可以利用这个工具生成各种样式的验证码,因为它是可配置的,我们可以根据需求定制。
工作原理:
kaptcha 的工作原理是调用 com.google.code.kaptcha.servlet.KaptchaServlet ,生成一个验证码图片,响应到客户端,同时将生成的真是的验证码字符串放到 HttpSession 中。
使用kaptcha可以方便的配置:
- 验证码的字体
- 验证码字体的大小
- 验证码字体的字体颜色
- 验证码内容的范围(数字,字母,中文汉字!)
- 验证码图片的大小,边框,边框粗细,边框颜色
- 验证码的干扰线(可以自己继承com.google.code.kaptcha.NoiseProducer写一个自定义的干扰线)
- 验证码的样式(鱼眼样式、3D、普通模糊……当然也可以继承com.google.code.kaptcha.GimpyEngine自定义样式)
二:使用Kaptcha生成验证码
由于中央库里没有该jar包,所以需要我们用命令添加到本地库
-
首先下载jar包
-
安装到本地库
解压下载好的源码到f盘,利用命令添加到本地库
F:\kaptcha-2.3.2>mvn install:install-file -DgroupId=com.google.code -DartifactId=kaptcha -Dversion=2.3.2 -Dfile=F:\kaptcha-2.3.2\kaptcha-2.3.2.jar -Dpackaging=jar -DgeneratePom=true
pom.xml中的配置如下,注意要和上面的groupId、artifactId和version保持一致
1    <dependency>
2        <groupId>com.google.code</groupId>
3        <artifactId>kaptcha</artifactId>
4        <version>2.3.2</version>
5    </dependency>
3. 开始写代码
ChineseText.java
1public class ChineseText extends Configurable implements TextProducer {
2
3    public String getText() {
4        int length = getConfig().getTextProducerCharLength();
5        //char[] charS = getConfig().getTextProducerCharString();
6
7        String[] s = new String[]{"验","证","码","测","试"};
8
9        Random rand = new Random();
10        StringBuffer sb = new StringBuffer();
11        for(int i = 0; i < length; i++){
12            int ind = rand.nextInt(s.length);
13            sb.append(s[ind]);
14        }
15        return sb.toString();
16    }
17    /**
18     * 中午实例
19     * @return
20     */
21    public String getText1() {
22        int length = getConfig().getTextProducerCharLength();
23        String finalWord = "", firstWord = "";
24        int tempInt = 0;
25        String[] array = { "0", "1", "2", "3", "4", "5", "6", "7", "8", "9",
26                "a", "b", "c", "d", "e", "f","g","h","i","j","k","l","m","n",
27                "o","p","q","r","s","t","u","v","w","x","y","z" };
28
29        Random rand = new Random();
30
31        for (int i = 0; i < length; i++) {
32            switch (rand.nextInt(array.length)) {
33            case 1:
34                tempInt = rand.nextInt(26) + 65;
35                firstWord = String.valueOf((char) tempInt);
36                break;
37            case 2:
38                int r1,
39                r2,
40                r3,
41                r4;
42                String strH,
43                strL;// high&low
44                r1 = rand.nextInt(3) + 11; // 前闭后开[11,14)
45                if (r1 == 13) {
46                    r2 = rand.nextInt(7);
47                } else {
48                    r2 = rand.nextInt(16);
49                }
50
51                r3 = rand.nextInt(6) + 10;
52                if (r3 == 10) {
53                    r4 = rand.nextInt(15) + 1;
54                } else if (r3 == 15) {
55                    r4 = rand.nextInt(15);
56                } else {
57                    r4 = rand.nextInt(16);
58                }
59
60                strH = array[r1] + array[r2];
61                strL = array[r3] + array[r4];
62
63                byte[] bytes = new byte[2];
64                bytes[0] = (byte) (Integer.parseInt(strH, 16));
65                bytes[1] = (byte) (Integer.parseInt(strL, 16));
66
67                firstWord = new String(bytes);
68                break;
69            default:
70                tempInt = rand.nextInt(10) + 48;
71                firstWord = String.valueOf((char) tempInt);
72                break;
73            }
74            finalWord += firstWord;
75        }
76        return finalWord;
77    }
78}
生成验证码的servlet
1public class KaptchaServlet extends HttpServlet implements Servlet {
2    /**
3     *
4     */
5    private static final long serialVersionUID = 1L;
6    private Properties props;
7    private Producer kaptchaProducer;
8    private String sessionKeyValue;
9
10    public KaptchaServlet() {
11        this.props = new Properties();
12
13        this.kaptchaProducer = null;
14
15        this.sessionKeyValue = null;
16    }
17
18    public void init(ServletConfig conf) throws ServletException {
19        super.init(conf);
20
21        ImageIO.setUseCache(false);
22
23        @SuppressWarnings("rawtypes")
24        Enumeration initParams = conf.getInitParameterNames();
25        while (initParams.hasMoreElements()) {
26            String key = (String) initParams.nextElement();
27            String value = conf.getInitParameter(key);
28            this.props.put(key, value);
29        }
30
31        Config config = new Config(this.props);
32        this.kaptchaProducer = config.getProducerImpl();
33        this.sessionKeyValue = config.getSessionKey();
34    }
35
36    public void doGet(HttpServletRequest req, HttpServletResponse resp)
37            throws ServletException, IOException {
38        resp.setDateHeader("Expires", 0L);
39
40        resp.setHeader("Cache-Control", "no-store, no-cache, must-revalidate");
41
42        resp.addHeader("Cache-Control", "post-check=0, pre-check=0");
43
44        resp.setHeader("Pragma", "no-cache");
45
46        resp.setContentType("image/jpeg");
47
48        String capText = this.kaptchaProducer.createText();
49        String s1 = capText.substring(0, 1);
50        String s2 = capText.substring(1, 2);
51        int r = Integer.valueOf(s1).intValue() + Integer.valueOf(s2).intValue();
52
53        req.getSession().setAttribute(this.sessionKeyValue, String.valueOf(r));
54
55        BufferedImage bi = this.kaptchaProducer.createImage(s1+"+"+s2+"=?");
56
57        ServletOutputStream out = resp.getOutputStream();
58
59        ImageIO.write(bi, "jpg", out);
60        try {
61            out.flush();
62        } finally {
63            out.close();
64        }
65    }
66}
web.xml中的配置
1<?xml version="1.0" encoding="UTF-8"?>
2<web-app version="2.4" xmlns="http://java.sun.com/xml/ns/j2ee"
3    xmlns:xsi="http://www.w3.org/2001/XMLSchema-instance"
4    xsi:schemaLocation="http://java.sun.com/xml/ns/j2ee
5    http://java.sun.com/xml/ns/j2ee/web-app_2_4.xsd">
6
7
8    <!-- 登陆验证码Kaptcha 2-->
9    <servlet>
10        <servlet-name>Kaptcha</servlet-name>
11        <servlet-class>
12            com.verify.kaptcha.KaptchaServlet
13        </servlet-class>
14        <init-param>
15            <description>图片边框,合法值:yes , no</description>
16            <param-name>kaptcha.border</param-name>
17            <param-value>yes</param-value>
18        </init-param>
19        <init-param>
20            <description>
21                边框颜色,合法值: r,g,b (and optional alpha) 或者
22                white,black,blue.
23            </description>
24            <param-name>kaptcha.border.color</param-name>
25            <param-value>black</param-value>
26        </init-param>
27        <init-param>
28            <description>边框厚度,合法值:>0</description>
29            <param-name>kaptcha.border.thickness</param-name>
30            <param-value>1</param-value>
31        </init-param>
32        <init-param>
33            <description>图片宽 200</description>
34            <param-name>kaptcha.image.width</param-name>
35            <param-value>200</param-value>
36        </init-param>
37        <init-param>
38            <description>图片高 50</description>
39            <param-name>kaptcha.image.height</param-name>
40            <param-value>50</param-value>
41        </init-param>
42        <init-param>
43            <description>图片实现类</description>
44            <param-name>kaptcha.producer.impl</param-name>
45            <param-value>
46                com.google.code.kaptcha.impl.DefaultKaptcha
47            </param-value>
48        </init-param>
49        <init-param>
50            <description>文本实现类</description>
51            <param-name>kaptcha.textproducer.impl</param-name>
52            <param-value>
53                com.google.code.kaptcha.text.impl.DefaultTextCreator
54            </param-value>
55        </init-param>
56        <init-param>
57            <description>文本集合,验证码值从此集合中获取</description>
58            <param-name>kaptcha.textproducer.char.string</param-name>
59            <param-value>1234567890</param-value>
60        </init-param>
61        <init-param>
62            <description>验证码长度 5</description>
63            <param-name>kaptcha.textproducer.char.length</param-name>
64            <param-value>2</param-value>
65        </init-param>
66        <init-param>
67            <description>字体 Arial, Courier</description>
68            <param-name>kaptcha.textproducer.font.names</param-name>
69            <param-value>Arial, Courier</param-value>
70        </init-param>
71        <init-param>
72            <description>字体大小 40px.</description>
73            <param-name>kaptcha.textproducer.font.size</param-name>
74            <param-value>40</param-value>
75        </init-param>
76        <init-param>
77            <description>
78                字体颜色,合法值: r,g,b 或者 white,black,blue.
79            </description>
80            <param-name>kaptcha.textproducer.font.color</param-name>
81            <param-value>black</param-value>
82        </init-param>
83        <init-param>
84            <description>文字间隔 2</description>
85            <param-name>kaptcha.textproducer.char.space</param-name>
86            <param-value>2</param-value>
87        </init-param>
88        <init-param>
89            <description>干扰实现类</description>
90            <param-name>kaptcha.noise.impl</param-name>
91            <param-value>
92                <!-- com.google.code.kaptcha.impl.NoNoise -->
93                com.google.code.kaptcha.impl.DefaultNoise
94            </param-value>
95        </init-param>
96        <init-param>
97            <description>
98                干扰颜色,合法值: r,g,b 或者 white,black,blue.
99            </description>
100            <param-name>kaptcha.noise.color</param-name>
101            <param-value>black</param-value>
102        </init-param>
103        <init-param>
104            <description>
105                图片样式: 水纹com.google.code.kaptcha.impl.WaterRipple
106                鱼眼com.google.code.kaptcha.impl.FishEyeGimpy
107                阴影com.google.code.kaptcha.impl.ShadowGimpy
108            </description>
109            <param-name>kaptcha.obscurificator.impl</param-name>
110            <param-value>
111                com.google.code.kaptcha.impl.WaterRipple
112            </param-value>
113        </init-param>
114        <init-param>
115            <description>背景实现类</description>
116            <param-name>kaptcha.background.impl</param-name>
117            <param-value>
118                com.google.code.kaptcha.impl.DefaultBackground
119            </param-value>
120        </init-param>
121        <init-param>
122            <description>背景颜色渐变,开始颜色</description>
123            <param-name>kaptcha.background.clear.from</param-name>
124            <param-value>green</param-value>
125        </init-param>
126        <init-param>
127            <description>背景颜色渐变,结束颜色</description>
128            <param-name>kaptcha.background.clear.to</param-name>
129            <param-value>white</param-value>
130        </init-param>
131        <init-param>
132            <description>文字渲染器</description>
133            <param-name>kaptcha.word.impl</param-name>
134            <param-value>
135                com.google.code.kaptcha.text.impl.DefaultWordRenderer
136            </param-value>
137        </init-param>
138        <init-param>
139            <description>
140                session中存放验证码的key键
141            </description>
142            <param-name>kaptcha.session.key</param-name>
143            <param-value>KAPTCHA_SESSION_KEY</param-value>
144        </init-param>
145        <init-param>
146            <description>
147                The date the kaptcha is generated is put into the
148                HttpSession. This is the key value for that item in the
149                session.
150            </description>
151            <param-name>kaptcha.session.date</param-name>
152            <param-value>KAPTCHA_SESSION_DATE</param-value>
153        </init-param>
154    </servlet>
155    <servlet-mapping>
156        <servlet-name>Kaptcha</servlet-name>
157        <url-pattern>/randomcode.jpg</url-pattern>
158    </servlet-mapping>
159
160
161    <welcome-file-list>
162        <welcome-file>index.jsp</welcome-file>
163    </welcome-file-list>
164</web-app>
验证码页面index.jsp
1<%@ page language="java" contentType="text/html; charset=UTF-8"
2    pageEncoding="UTF-8"%>
3<!DOCTYPE html PUBLIC "-//W3C//DTD HTML 4.01 Transitional//EN" "http://www.w3.org/TR/html4/loose.dtd">
4<html>
5<head>
6<meta http-equiv="Content-Type" content="text/html; charset=UTF-8">
7<title>kaptcha生成验证码</title>
8<script type="text/javascript">
9    function changeR(node){
10        // 用于点击时产生不同的验证码
11        node.src = "randomcode.jpg?time="+new Date().getTime() ;
12    }
13</script>
14</head>
15<body>
16<div style="text-align: center;">
17<h2>验证码之kaptcha</h2>
18<img alt="random" src="randomcode.jpg" onclick="changeR(this)" style="cursor: pointer;"><br/><br/>
19    <form action="checkCode.jsp">
20        <input type="text" name="checkCode">
21        <input type="submit" value="提交">
22    </form>
23</div>
24</body>
25</html>
验证的页面checkCode.jsp
1<%@ page language="java" contentType="text/html; charset=UTF-8"
2    pageEncoding="UTF-8"%>
3<!DOCTYPE html PUBLIC "-//W3C//DTD HTML 4.01 Transitional//EN" "http://www.w3.org/TR/html4/loose.dtd">
4<html>
5<head>
6<meta http-equiv="Content-Type" content="text/html; charset=UTF-8">
7<title>Kaptcha验证码验证</title>
8</head>
9<body>
10    <%
11        //从session中取服务器中的验证码
12        String kaptchaServer = (String)request.getSession().getAttribute
13        (com.google.code.kaptcha.Constants.KAPTCHA_SESSION_KEY);
14        String kaptchaClient = request.getParameter("checkCode");
15        out.print("<div style='text-align: center;'>");
16        if (kaptchaServer.equals(kaptchaClient))
17            out.print("<h2>verify success</h2>");
18        else
19            out.println("<h2>verify fail</h2>");
20
21        out.print("<h4>kaptchaServer===><span style='color:red;'>"+kaptchaServer+"</span>\tkaptchaClient===><span style='color:red;'>"+kaptchaClient+"</span></h4>");
22        out.print("</div>");
23    %>
24</body>
25</html>
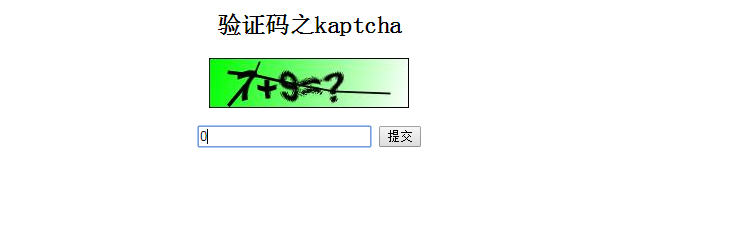
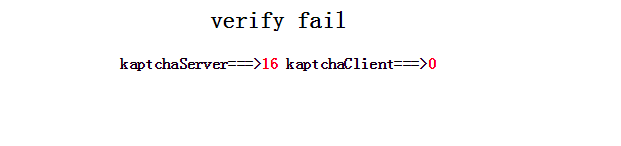
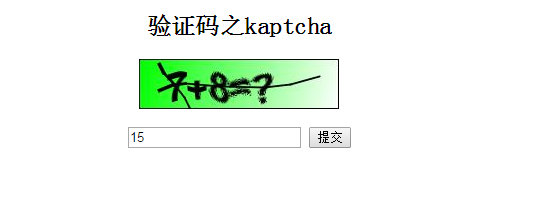
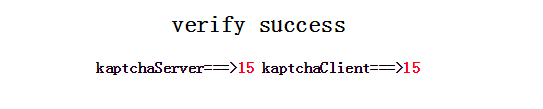
下面来看看效果图