
一、简介
Spring MVC框架在工作中经常用到,配置简单,使用起来也很方便,很多书籍和博客都有介绍其处理流程,但是,对于其原理,总是似懂非懂的样子。我们做技术,需要做到知其然,还要知其所以然。今天我们结合源码来深入了解一下Spring MVC的处理流程。

以上流程图是Spring MVC的处理流程(参考:spring-mvc-flow-with-example),原作者对流程的解释如下:
1Step 1: First request will be received by DispatcherServlet.
2
3Step 2: DispatcherServlet will take the help of HandlerMapping and get to know the Controller class name associated with the given request.
4
5Step 3: So request transfer to the Controller, and then controller will process the request by executing appropriate methods and returns ModelAndView object (contains Model data and View name) back to the DispatcherServlet.
6
7Step 4: Now DispatcherServlet send the model object to the ViewResolver to get the actual view page.
8
9Step 5: Finally DispatcherServlet will pass the Model object to the View page to display the result.
针对以上流程,这里需要更加详细一点:
1、请求被web 容器接收,并且根据contextPath将请求发送给DispatcherServlet
2、DispatcherServlet接收到请求后,会设置一些属性(localeResolver、themeResolver等等),在根据request在handlerMappings中查找对应的HandlerExecutionChain;然后根据HandlerExecutionChain中的handler来找到HandlerAdapter,然后通过反射来调用handler中的对应方法(RequestMapping对应的方法)
3、handler就是对应的controller,调用controller中的对应方法来进行业务逻辑处理,返回ModelAndView(或者逻辑视图名称)
4、ViewResolver根据逻辑视图名称、视图前后缀,来获取实际的逻辑视图
5、获取实际视图之后,就会使用model来渲染视图,得到用户实际看到的视图,然后返回给客户端。
二、Demo样例
我们运行一个小样例(github地址:https://github.com/yangjianzhou/spring-mvc-demo)来了解Spring MVC处理流程,项目结构如下:
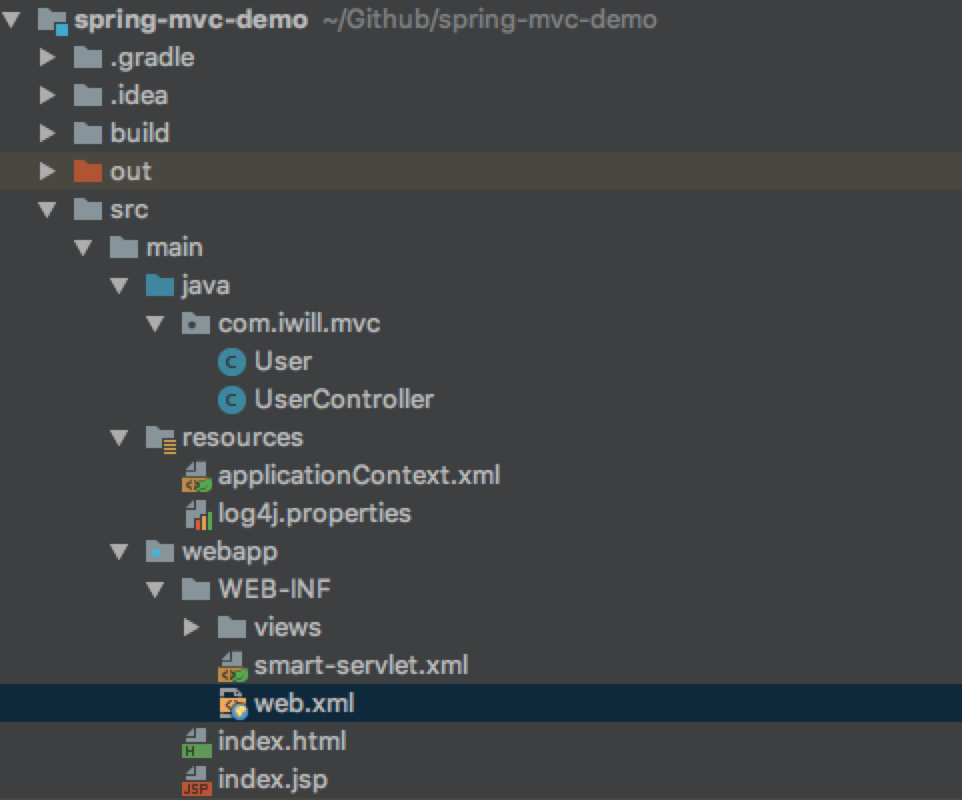
web.xml配置如下:
1<?xml version="1.0" encoding="UTF-8"?>
2<web-app version="2.5" xmlns="http://java.sun.com/xml/ns/javaee"
3         xmlns:xsi="http://www.w3.org/2001/XMLSchema-instance"
4         xsi:schemaLocation="http://java.sun.com/xml/ns/javaee
5	http://java.sun.com/xml/ns/javaee/web-app_2_5.xsd">
6    <context-param>
7        <param-name>contextConfigLocation</param-name>
8        <param-value>classpath:/applicationContext.xml</param-value>
9    </context-param>
10    <listener>
11        <listener-class>org.springframework.web.context.ContextLoaderListener</listener-class>
12    </listener>
13
14    <servlet>
15        <servlet-name>smart</servlet-name>
16        <servlet-class>org.springframework.web.servlet.DispatcherServlet</servlet-class>
17        <load-on-startup>1</load-on-startup>
18    </servlet>
19
20    <servlet-mapping>
21        <servlet-name>smart</servlet-name>
22        <url-pattern>/</url-pattern>
23    </servlet-mapping>
24
25    <welcome-file-list>
26        <welcome-file>index.jsp</welcome-file>
27    </welcome-file-list>
28
29</web-app>
smart-servlet.xml的内容如下:
1 <context:component-scan base-package="com.iwill.mvc"/>
2
3    <!-- 在使用Excel PDF的视图时,请先把这个视图解析器注释掉,否则产生视图解析问题-->
4    <bean class="org.springframework.web.servlet.view.InternalResourceViewResolver"
5          p:order="100" p:viewClass="org.springframework.web.servlet.view.JstlView"
6          p:prefix="/WEB-INF/views/" p:suffix=".jsp"/>
UserController.java的代码如下:
1package com.iwill.mvc;
2
3import org.apache.log4j.Logger;
4import org.springframework.stereotype.Controller;
5import org.springframework.web.bind.annotation.RequestMapping;
6import org.springframework.web.bind.annotation.RequestMethod;
7import org.springframework.web.servlet.ModelAndView;
8
9@Controller
10@RequestMapping("/user")
11public class UserController {
12
13    Logger logger = Logger.getLogger(UserController.class);
14
15    @RequestMapping("register")
16    public String register() {
17        logger.info("invoke register");
18        return "user/register";
19    }
20
21    @RequestMapping(method = RequestMethod.POST)
22    public ModelAndView createUser(User user) {
23        ModelAndView mav = new ModelAndView();
24        mav.setViewName("user/createSuccess");
25        mav.addObject("user", user);
26        return mav;
27    }
28}
三、请求接收
DispatcherServlet的类继承关系如下:
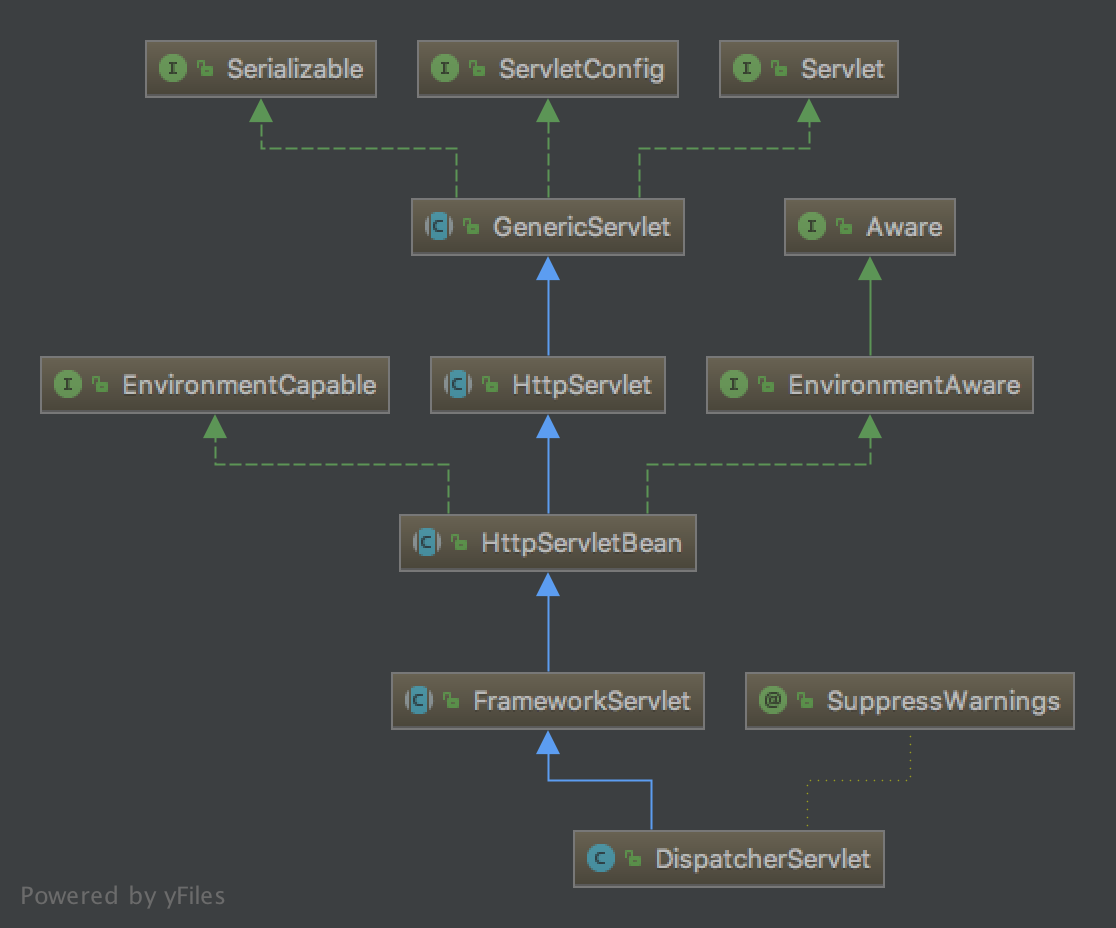
可以看出,DispatcherServlet是一个HttpServlet,因此,它可以处理http请求。
在浏览器中输入http://localhost:8080/spring-mvc-demo/user/register,因为在web服务器上配置了spring-mvc-demo的contextPath为spring-mvc-demo,所以/spring-mvc-demo/user/register的请求就会被DispatcherServlet处理,请求处理路径如下:
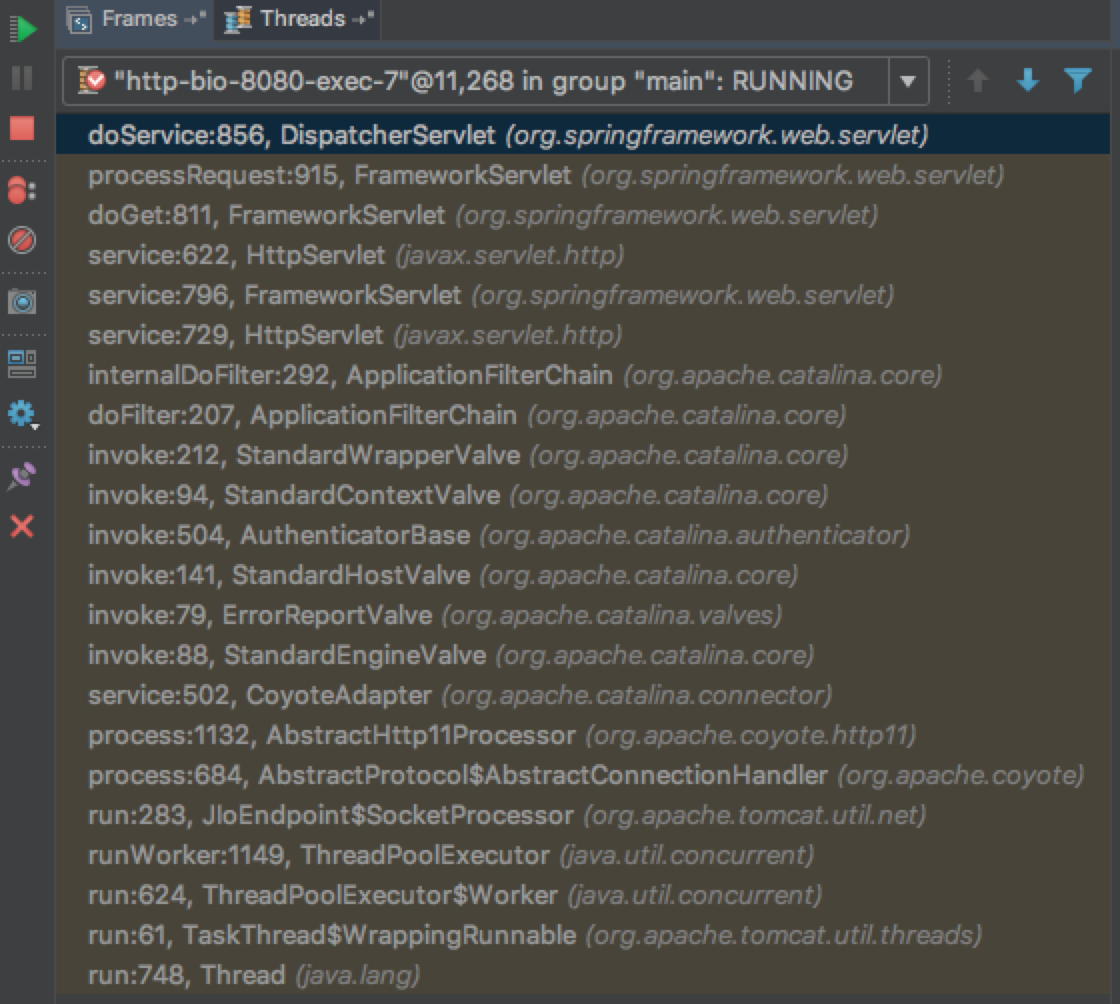
请求由tomcat传递给了DispatcherServlet了,DispatcherServlet接收后,就开始自己的特殊处理了。
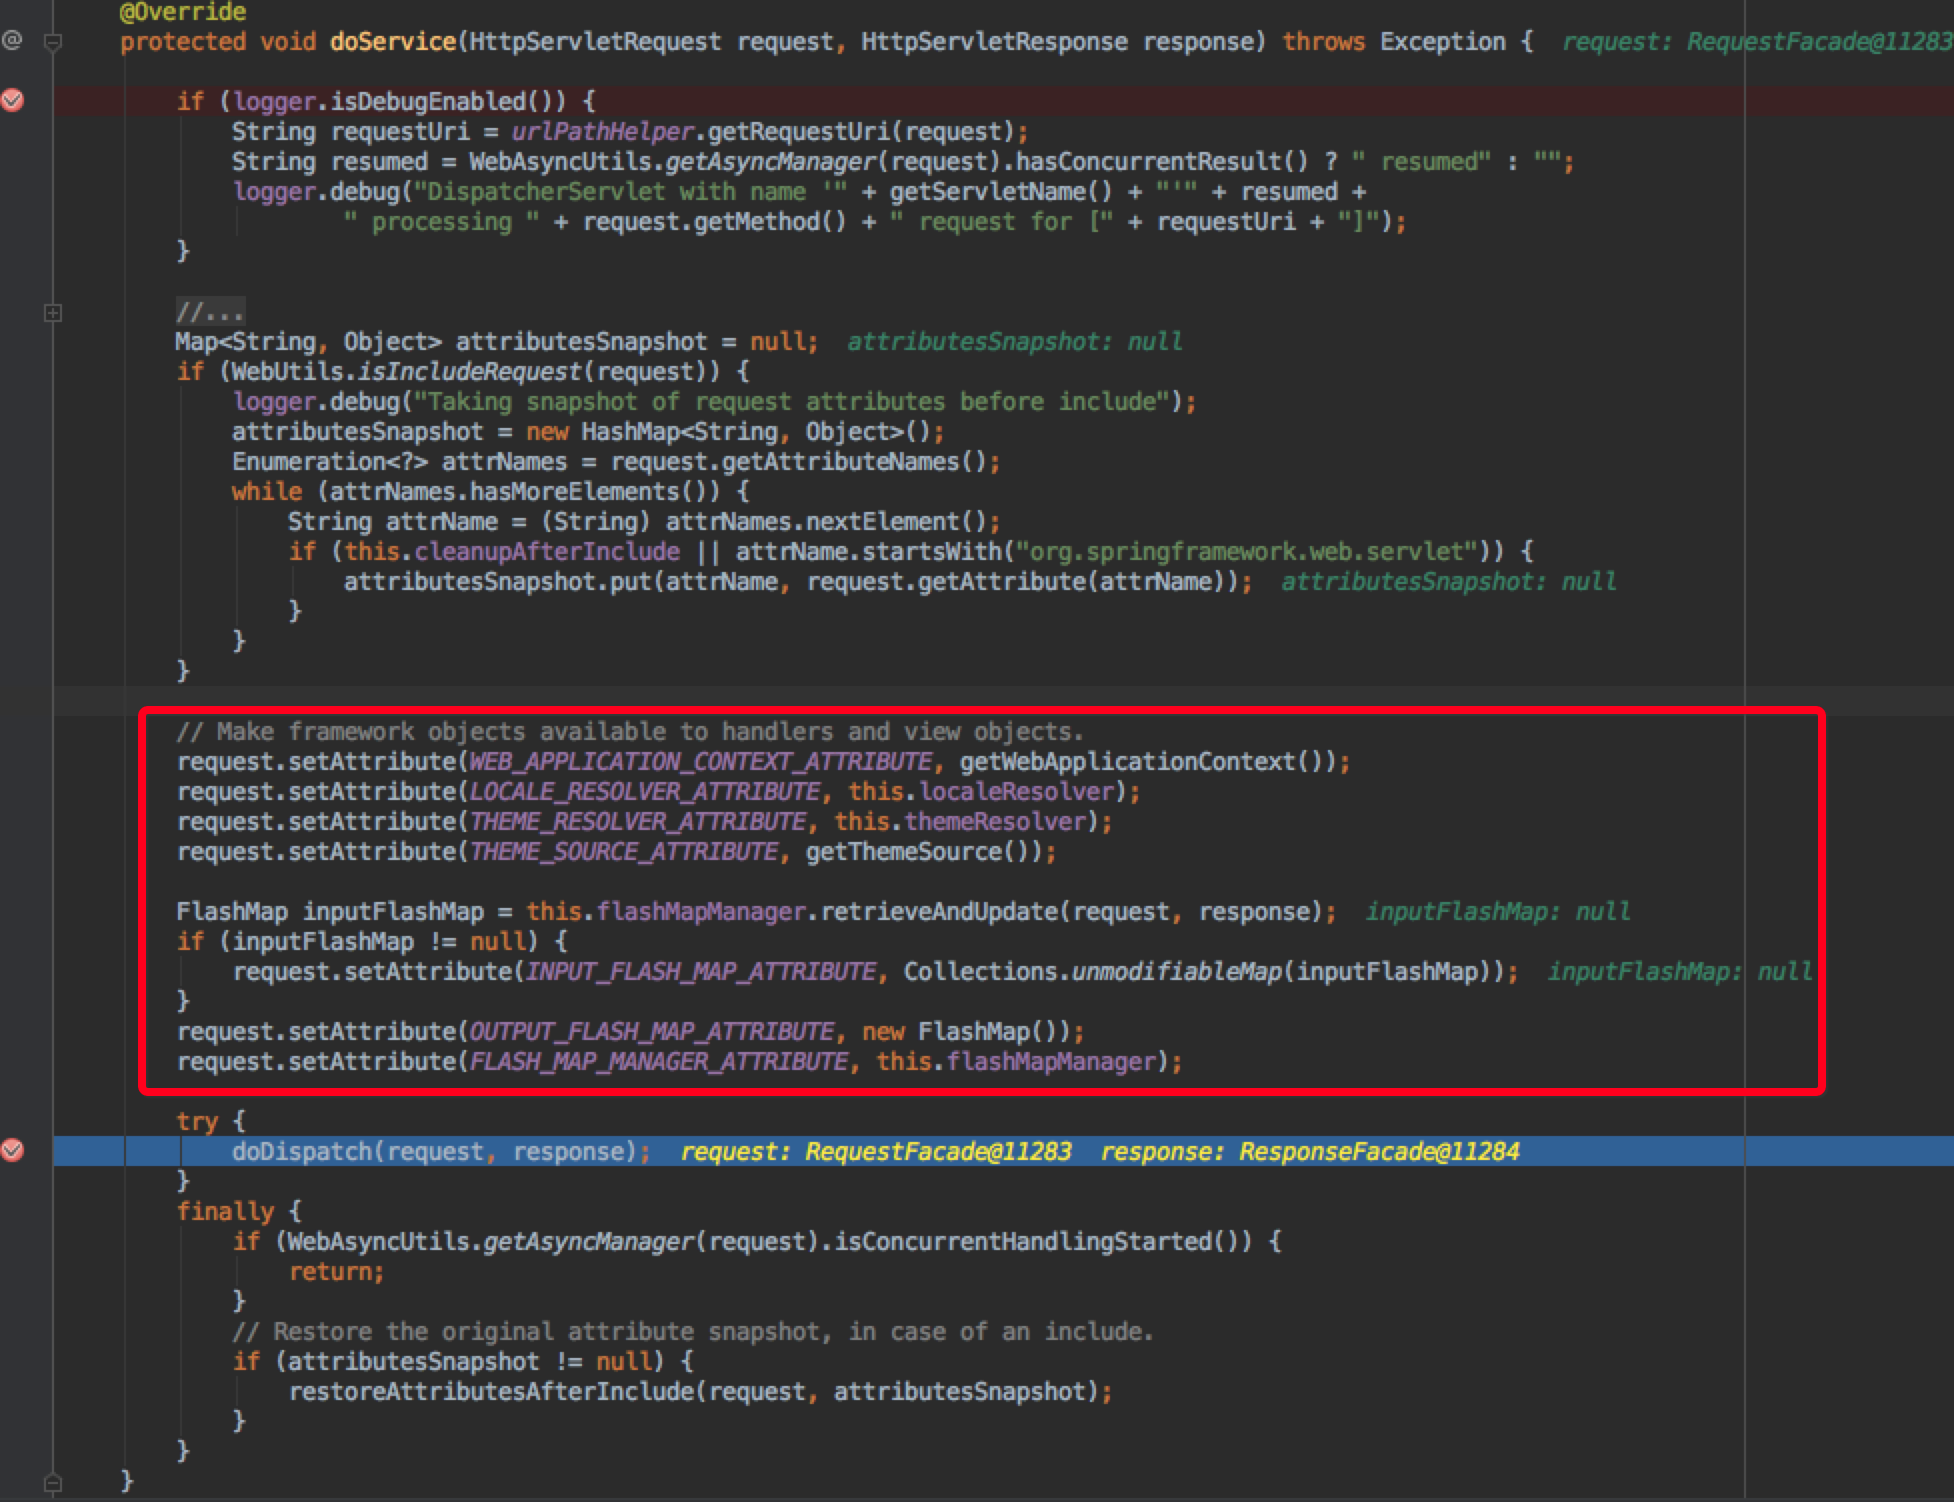
红框中是Spring MVC自己特有的逻辑,主要是与视图、主题有关。
接下来的主要处理逻辑在org.springframework.web.servlet.DispatcherServlet#doDispatch中:
1protected void doDispatch(HttpServletRequest request, HttpServletResponse response) throws Exception {
2		HttpServletRequest processedRequest = request;
3		HandlerExecutionChain mappedHandler = null;
4		boolean multipartRequestParsed = false;
5
6		WebAsyncManager asyncManager = WebAsyncUtils.getAsyncManager(request);
7
8		try {
9			ModelAndView mv = null;
10			Exception dispatchException = null;
11
12			try {
13				processedRequest = checkMultipart(request);
14				multipartRequestParsed = processedRequest != request;
15
16				// 根据request在handlerMappings中获取HandlerExecutionChain
17				mappedHandler = getHandler(processedRequest, false);
18				if (mappedHandler == null || mappedHandler.getHandler() == null) {
19					noHandlerFound(processedRequest, response);
20					return;
21				}
22
23				//根据handler在handlerAdapters中获取HandlerAdapter
24				HandlerAdapter ha = getHandlerAdapter(mappedHandler.getHandler());
25
26				// Process last-modified header, if supported by the handler.
27				String method = request.getMethod();
28				boolean isGet = "GET".equals(method);
29				if (isGet || "HEAD".equals(method)) {
30					long lastModified = ha.getLastModified(request, mappedHandler.getHandler());
31					if (logger.isDebugEnabled()) {
32						String requestUri = urlPathHelper.getRequestUri(request);
33						logger.debug("Last-Modified value for [" + requestUri + "] is: " + lastModified);
34					}
35					if (new ServletWebRequest(request, response).checkNotModified(lastModified) && isGet) {
36						return;
37					}
38				}
39
40				if (!mappedHandler.applyPreHandle(processedRequest, response)) {
41					return;
42				}
43
44				try {
45					//适配器调用实际的handler
46					mv = ha.handle(processedRequest, response, mappedHandler.getHandler());
47				}
48				finally {
49					if (asyncManager.isConcurrentHandlingStarted()) {
50						return;
51					}
52				}
53
54				applyDefaultViewName(request, mv);
55				mappedHandler.applyPostHandle(processedRequest, response, mv);
56			}
57			catch (Exception ex) {
58				dispatchException = ex;
59			}
60            //逻辑视图名转换为物理视图名,并进行视图渲染
61			processDispatchResult(processedRequest, response, mappedHandler, mv, dispatchException);
62		}
63		catch (Exception ex) {
64			triggerAfterCompletion(processedRequest, response, mappedHandler, ex);
65		}
66		catch (Error err) {
67			triggerAfterCompletionWithError(processedRequest, response, mappedHandler, err);
68		}
69		finally {
70			if (asyncManager.isConcurrentHandlingStarted()) {
71				// Instead of postHandle and afterCompletion
72				mappedHandler.applyAfterConcurrentHandlingStarted(processedRequest, response);
73				return;
74			}
75			// Clean up any resources used by a multipart request.
76			if (multipartRequestParsed) {
77				cleanupMultipart(processedRequest);
78			}
79		}
80	}
首先获取HandlerExecutionChain(入口:mappedHandler = getHandler(processedRequest, false);),方法如下:
1	protected HandlerExecutionChain getHandler(HttpServletRequest request) throws Exception {
2		for (HandlerMapping hm : this.handlerMappings) {
3			if (logger.isTraceEnabled()) {
4				logger.trace(
5						"Testing handler map [" + hm + "] in DispatcherServlet with name '" + getServletName() + "'");
6			}
7			HandlerExecutionChain handler = hm.getHandler(request);
8			if (handler != null) {
9				return handler;
10			}
11		}
12		return null;
13	}
之后就是根据handler获取HandlerAdapter(入口:HandlerAdapter ha = getHandlerAdapter(mappedHandler.getHandler())):
1	protected HandlerAdapter getHandlerAdapter(Object handler) throws ServletException {
2		for (HandlerAdapter ha : this.handlerAdapters) {
3			if (logger.isTraceEnabled()) {
4				logger.trace("Testing handler adapter [" + ha + "]");
5			}
6			if (ha.supports(handler)) {
7				return ha;
8			}
9		}
10		throw new ServletException("No adapter for handler [" + handler +
11				"]: The DispatcherServlet configuration needs to include a HandlerAdapter that supports this handler");
12	}
handler适配器调用handler的方法(入口:mv = ha.handle(processedRequest, response, mappedHandler.getHandler())):
1protected ModelAndView invokeHandlerMethod(HttpServletRequest request, HttpServletResponse response, Object handler)
2			throws Exception {
3
4		ServletHandlerMethodResolver methodResolver = getMethodResolver(handler);
5		Method handlerMethod = methodResolver.resolveHandlerMethod(request);
6		ServletHandlerMethodInvoker methodInvoker = new ServletHandlerMethodInvoker(methodResolver);
7		ServletWebRequest webRequest = new ServletWebRequest(request, response);
8		ExtendedModelMap implicitModel = new BindingAwareModelMap();
9
10		Object result = methodInvoker.invokeHandlerMethod(handlerMethod, handler, webRequest, implicitModel);
11		ModelAndView mav =
12				methodInvoker.getModelAndView(handlerMethod, handler.getClass(), result, implicitModel, webRequest);
13		methodInvoker.updateModelAttributes(handler, (mav != null ? mav.getModel() : null), implicitModel, webRequest);
14		return mav;
15	}
通过Object result = methodInvoker.invokeHandlerMethod(handlerMethod, handler, webRequest, implicitModel)会调用底层的方法:

红框中,通过反射调用UserController的register方法。这样请求就被传递到了实际的controller方法了。
四、响应返回
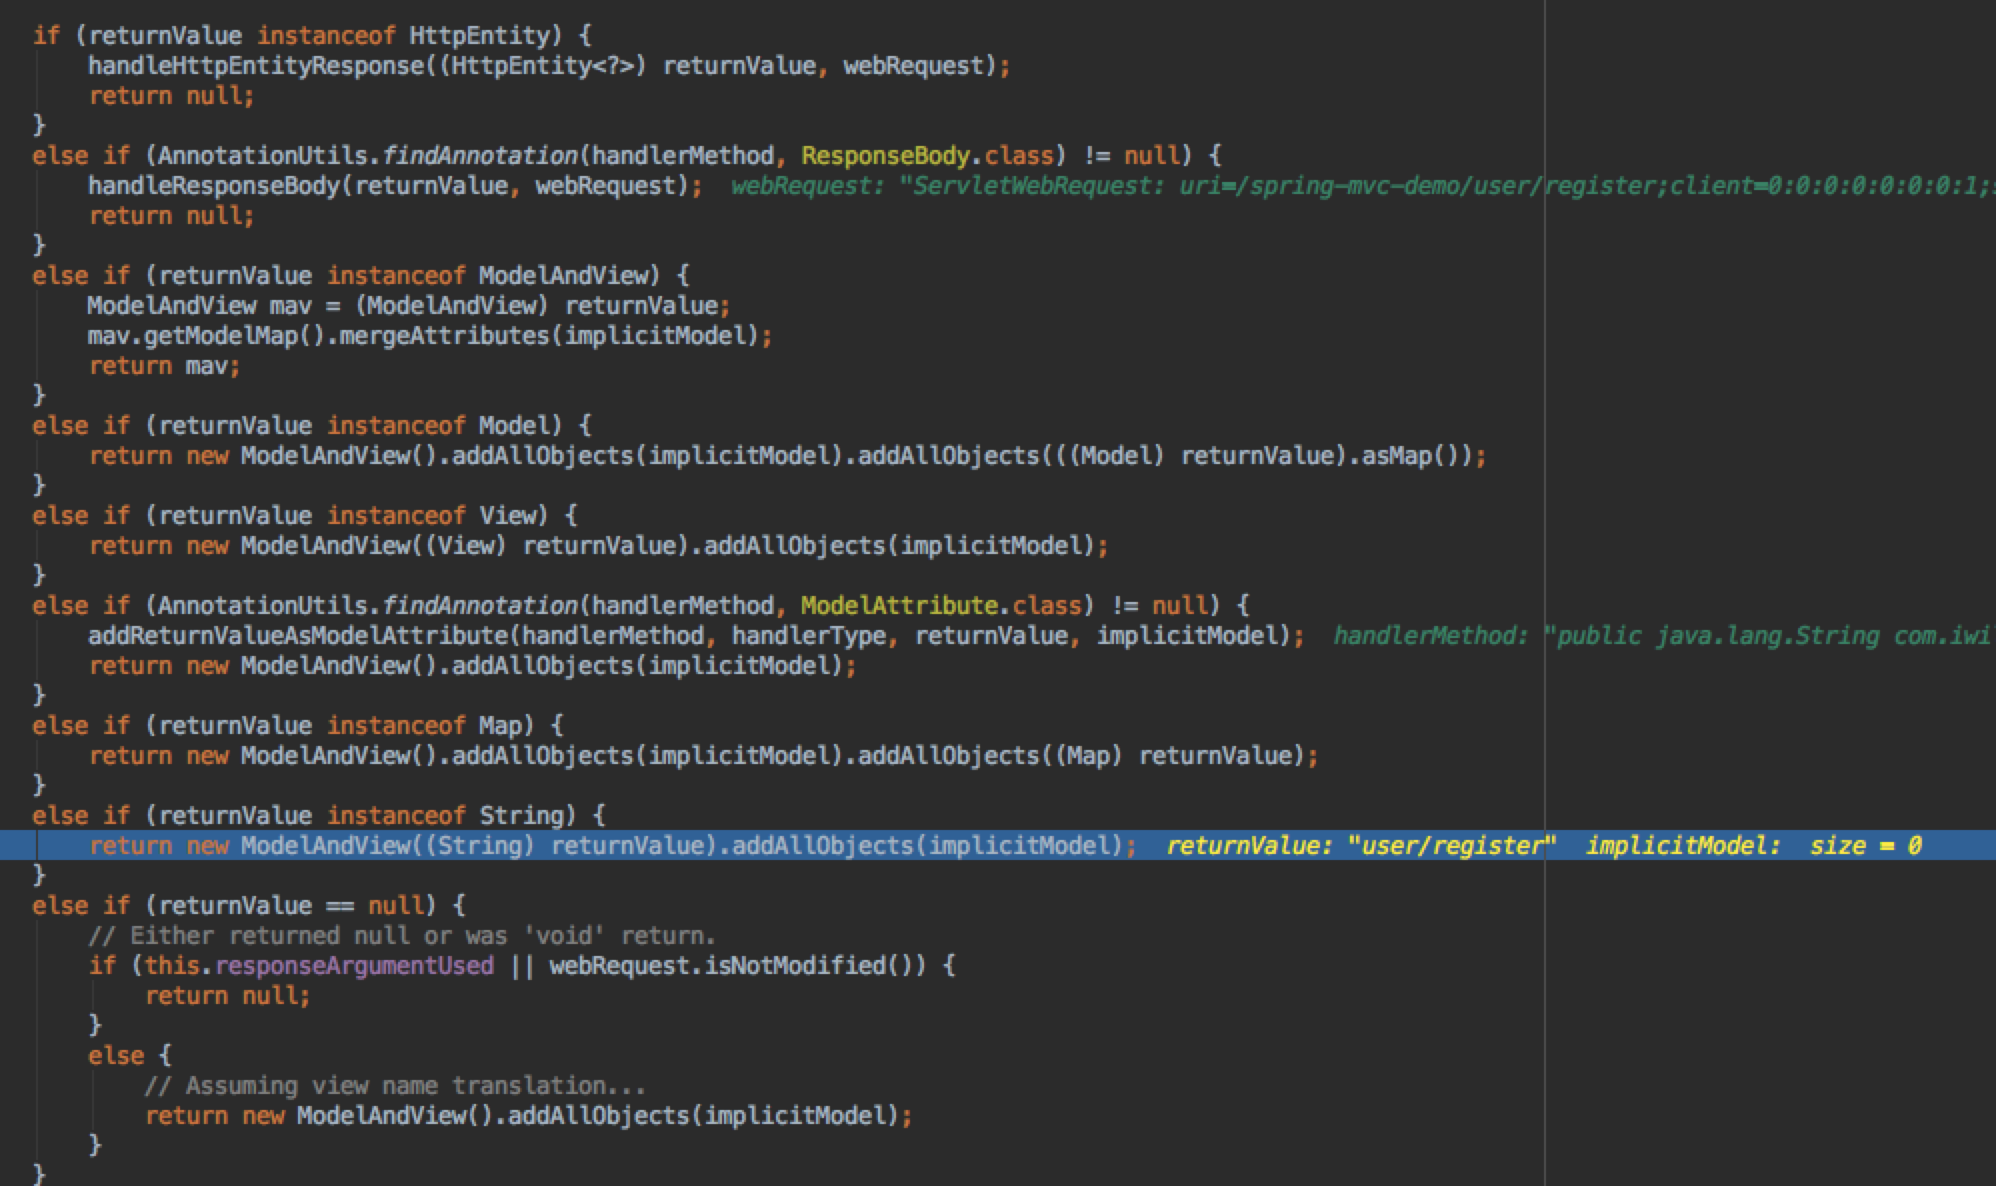
UserController#register处理后,就返回逻辑视图名:user/register。在org.springframework.web.servlet.mvc.annotation.AnnotationMethodHandlerAdapter.ServletHandlerMethodInvoker#getModelAndView中,就会将String转化为ModelAndView:
在org.springframework.web.servlet.DispatcherServlet#render中,就会将逻辑视图ModelAndView转化物理视图。
 resolveViewName就是使用ViewResolver来获取物理视图名:
1	protected View resolveViewName(String viewName, Map<String, Object> model, Locale locale,
2			HttpServletRequest request) throws Exception {
3
4		for (ViewResolver viewResolver : this.viewResolvers) {
5			View view = viewResolver.resolveViewName(viewName, locale);
6			if (view != null) {
7				return view;
8			}
9		}
10		return null;
11	}

物理视图名会被缓存,不需要重复解析,提高性能。
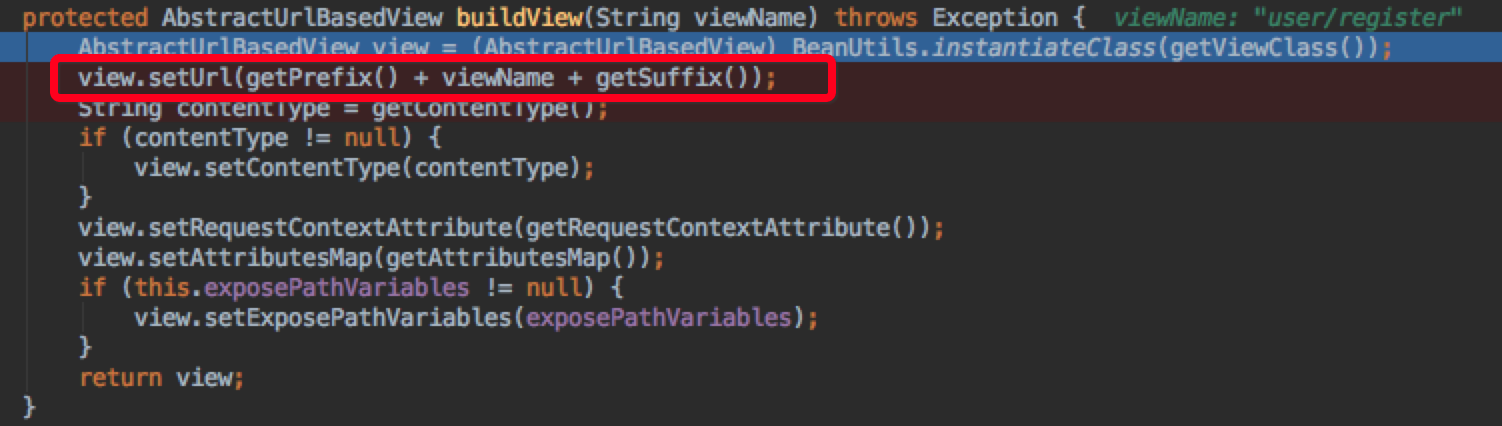
这里就是prefix和suffix的用途了,用于定位实际视图。
获取到了物理视图之后,就进行视图渲染了。
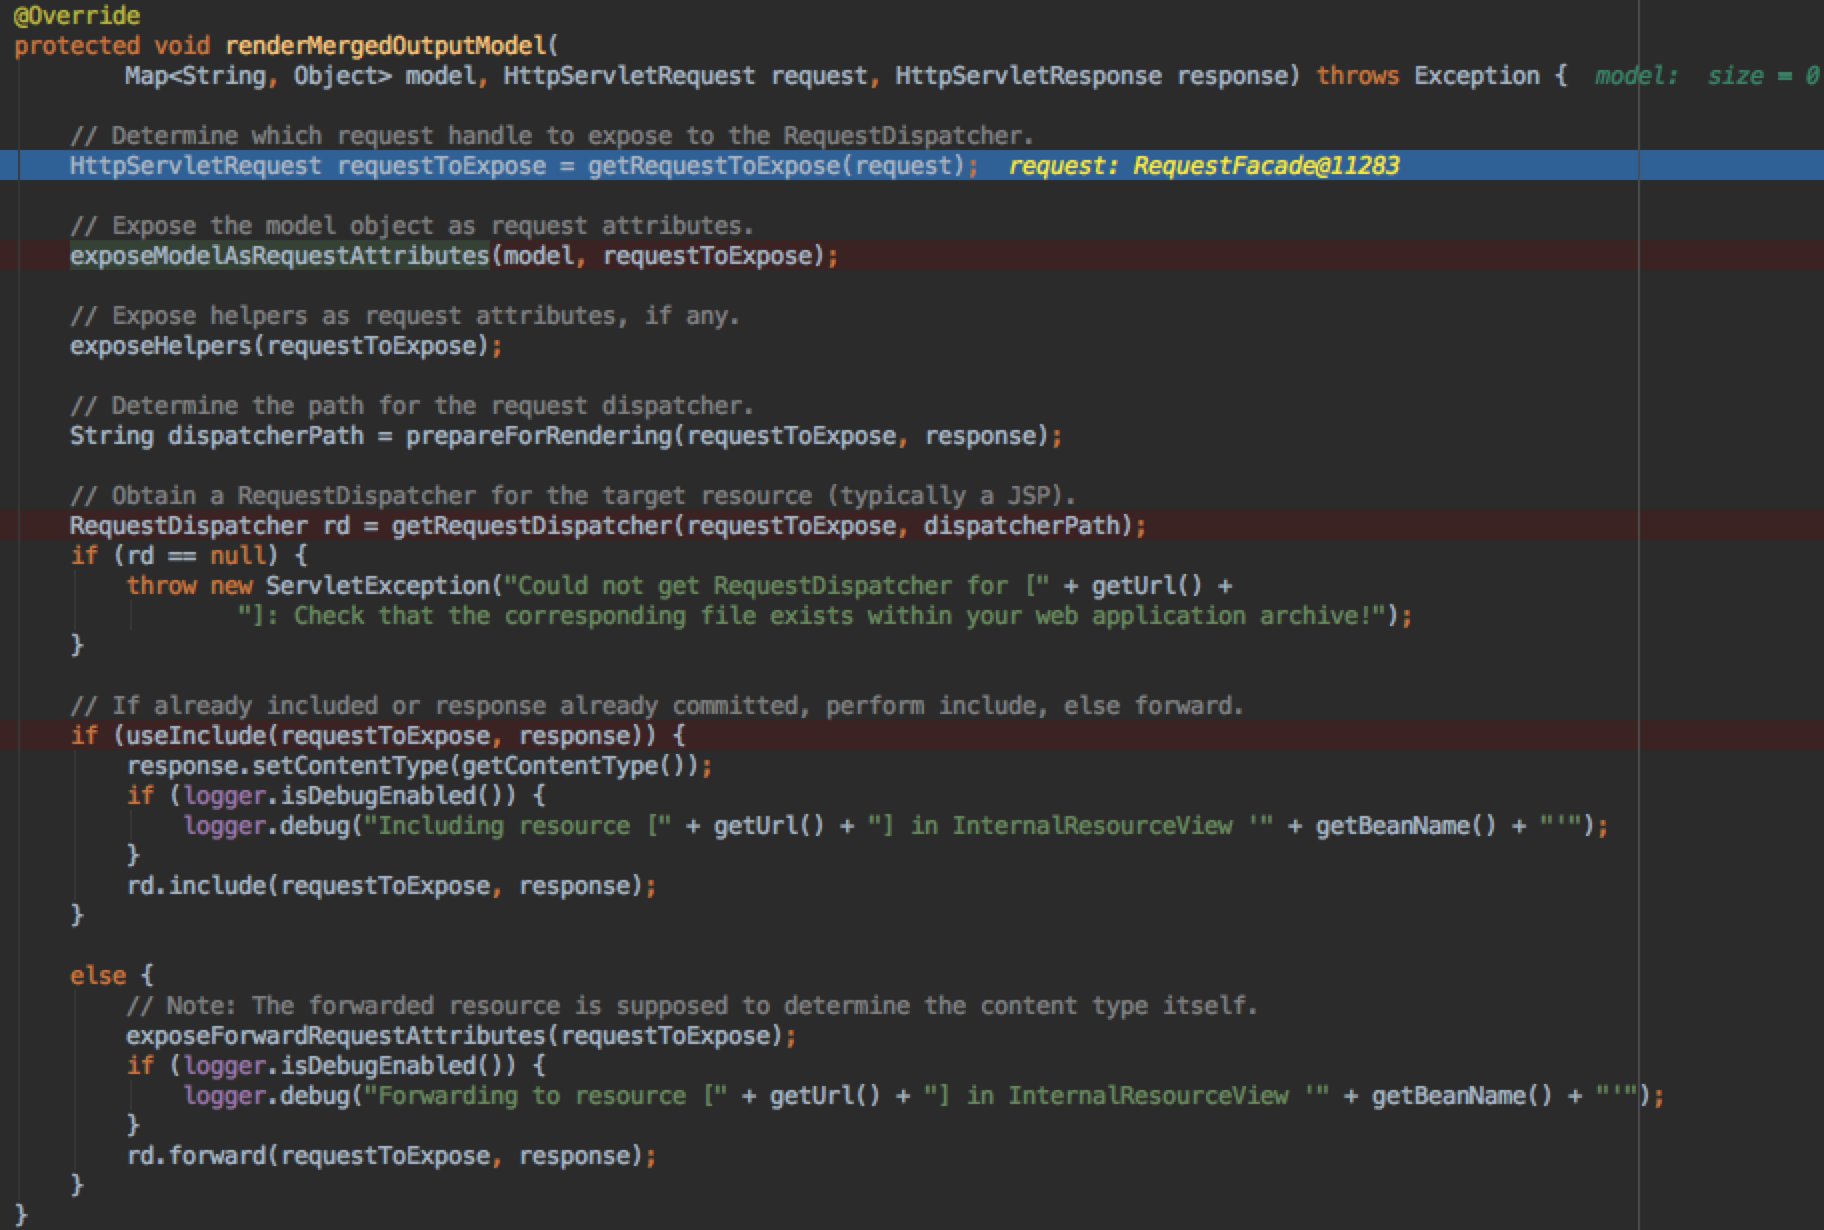
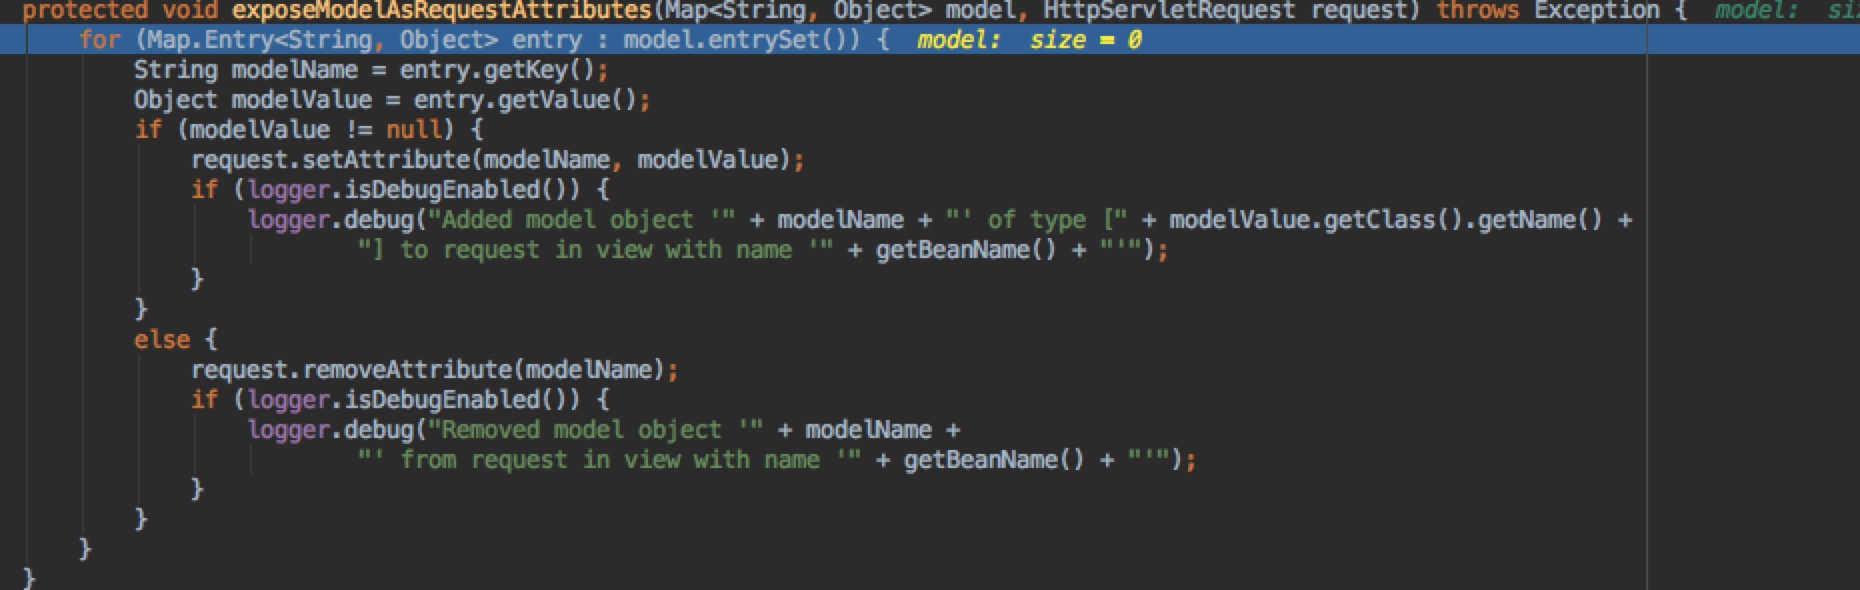
针对jsp格式的视图,我们配置的view是org.springframework.web.servlet.view.JstlView,渲染过程就是将model中的值set到request的attribute中,之后就是使用jsp自己的规则来显示jsp文件就好。