

 个人小程序。里面是基于百度大脑 腾讯优图做的人脸检测。是关于人工智能的哦。
2017年第一篇自己在工作中的总结文档。土豪可以打赏哦。
https://git.oschina.net/xshuai/smplat.git 项目在GIT上面了。这里就是源代码地址。麻烦看仔细点
- 项目简述:
使用SpringMVC+Maven搭建,整合MongoDB。入门级整理总结,不足之处多多理解。
- 项目结构:
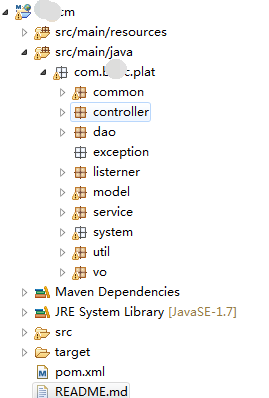
- XML相关配置
POM.XML
注意: SpringMVC使用的版本4.0.5 其他版本的请自行测试
1<!--增加mongodb也会自动增加mongojavadriver-->
2<dependency>
3     <groupId>org.springframework.data</groupId>
4     <artifactId>spring-data-mongodb</artifactId>
5     <version>1.2.0.RELEASE</version>
6</dependency>
7<!--相关驱动-->
8 <dependency>
9      <groupId>org.mongodb</groupId>
10      <artifactId>mongo-java-driver</artifactId>
11      <version>2.10.1</version>
12</dependency>
WEB.XML配置引入相关xml文件
1  <context-param>
2    <param-name>contextConfigLocation</param-name>
3    <param-value>classpath:spring-mvc.xml;classpath:mongodb-context.xml</param-value>
4  </context-param>
SPRING-MVC.XML
注意: SpringMVC配置仅供参考哦
1<?xml version="1.0" encoding="UTF-8"?>
2<beans xmlns="http://www.springframework.org/schema/beans"
3xmlns:xsi="http://www.w3.org/2001/XMLSchema-instance"
4xmlns:p="http://www.springframework.org/schema/p"
5xmlns:context="http://www.springframework.org/schema/context"
6xmlns:util="http://www.springframework.org/schema/util"
7xmlns:mvc="http://www.springframework.org/schema/mvc"
8xmlns:task="http://www.springframework.org/schema/task"
9xsi:schemaLocation="http://www.springframework.org/schema/beans
10					http://www.springframework.org/schema/beans/spring-beans-3.1.xsd
11					http://www.springframework.org/schema/util
12					http://www.springframework.org/schema/util/spring-util.xsd
13					http://www.springframework.org/schema/context
14					http://www.springframework.org/schema/context/spring-context-3.1.xsd
15					http://www.springframework.org/schema/mvc
16					http://www.springframework.org/schema/mvc/spring-mvc-3.1.xsd
17					http://www.springframework.org/schema/mvc/spring-mvc.xsd
18					">
19
20	<!-- 配置1: 自动扫描controller包下的所有类,使其认为spring mvc的控制器 -->
21	<context:component-scan base-package="com.bdxc" >
22	    <context:include-filter type="annotation" expression="org.springframework.stereotype.Controller" />
23	  	<context:exclude-filter type="annotation" expression="org.springframework.stereotype.Service" />
24	  	<context:exclude-filter type="annotation" expression="org.springframework.stereotype.Repository" />
25  	</context:component-scan>
26	<!-- 配置静态资源,直接映射到对应的文件夹,不被DispatcherServlet处理,3.04新增功能,需要重新设置spring-mvc-3.0.xsd -->
27	<mvc:resources mapping="/images/**" location="/images/"/>
28	<mvc:resources mapping="/js/**" location="/js/"/>
29	<mvc:resources mapping="/css/**" location="/css/"/>
30	<mvc:resources mapping="/swf/**" location="/swf/"/>
31	<mvc:resources mapping="/file/**" location="/file/"/>
32	<mvc:resources mapping="/FusionCharts/**" location="/FusionCharts/"/>
33	<mvc:resources mapping="/bootstrap/**" location="/bootstrap/"/>
34	<mvc:resources mapping="/uploads/**" location="/uploads/"/>
35	<mvc:resources mapping="/signs/**" location="/signs/"/>
36	<mvc:resources mapping="/anzhuangbao/**" location="/anzhuangbao/"/>
37	<!-- 配置2: 避免IE执行AJAX时,返回JSON出现下载文件 -->
38	<bean id="mappingJacksonHttpMessageConverter" class="org.springframework.http.converter.json.MappingJackson2HttpMessageConverter">
39		<property name="supportedMediaTypes">
40			<list>
41				<value>text/html;charset=UTF-8</value>
42			</list>
43		</property>
44	</bean>
45	 <!-- 配置3: 保证interceptor中通过handler获得请求的method对象  -->
46	<bean class="org.springframework.web.servlet.mvc.method.annotation.RequestMappingHandlerMapping" />
47	<bean class="org.springframework.web.servlet.mvc.method.annotation.RequestMappingHandlerAdapter" p:ignoreDefaultModelOnRedirect="true">
48		<property name="messageConverters">
49			<list>
50				<ref bean="mappingJacksonHttpMessageConverter" />
51			</list>
52		</property>
53	</bean>
54	<!-- 配:5:对模型视图名称的解析,即在模型视图名称添加前后缀 -->
55<!-- viewResolver 视图解析器,将视图名(ModelAndView中的view)解析成URL-->
56	 <bean class="org.springframework.beans.factory.annotation.AutowiredAnnotationBeanPostProcessor"/>
57	<bean id="viewResolver"
58		class="org.springframework.web.servlet.view.InternalResourceViewResolver">
59		<property name="suffix" value=".jsp" />
60		<property name="prefix" value="/WEB-INF/"/>
61		<property name="order" value="20"></property>
62		<property name="viewClass"
63			value="org.springframework.web.servlet.view.InternalResourceView" />
64	</bean>
65
66	<!-- 配置6: 配置Spring自带文件上传操作类 -->
67	<bean id="multipartResolver" class="org.springframework.web.multipart.commons.CommonsMultipartResolver">
68		<property name="defaultEncoding">
69	      <value>UTF-8</value>
70		</property>
71		<property name="maxUploadSize">
72	        <value>2147483648</value>
73                 <!-- 上传文件大小限制为31M,31*1024*1024 -->
74		</property>
75		<property name="maxInMemorySize">
76			<value>4096</value>
77		</property>
78	</bean>
79
80	<mvc:interceptors>
81		<mvc:interceptor>
82			<mvc:mapping path="/**" />
83			<bean class="com.bdxc.plat.system.interceptors.EncodingInterceptor" />
84		</mvc:interceptor>
85		<mvc:interceptor>
86			<mvc:mapping path="/" />
87			<bean class="com.bdxc.plat.system.interceptors.AuthInterceptor" />
88		</mvc:interceptor>
89	</mvc:interceptors>
90		<!-- 国际化配置 -->
91	<bean id="localeResolver" class="org.springframework.web.servlet.i18n.CookieLocaleResolver" >
92		<property name="cookieName" value="clientlanguage"/>
93		<property name="cookieMaxAge" value="94608000"/>
94	</bean>
95</beans>
96
MONGODB-CONTEXT.XML
这块会涉及到mongodb是否验证用户名及密码的配置
1<?xml version="1.0" encoding="UTF-8"?>
2<beans xmlns="http://www.springframework.org/schema/beans"
3	xmlns:xsi="http://www.w3.org/2001/XMLSchema-instance" xmlns:context="http://www.springframework.org/schema/context"
4	xmlns:mongo="http://www.springframework.org/schema/data/mongo"
5	xsi:schemaLocation="http://www.springframework.org/schema/context http://www.springframework.org/schema/context/spring-context-3.0.xsd http://www.springframework.org/schema/data/mongo http://www.springframework.org/schema/data/mongo/spring-mongo-1.0.xsd http://www.springframework.org/schema/beans http://www.springframework.org/schema/beans/spring-beans-3.0.xsd">
6
7	 <!-- 加载mongodb的属性配置文件 -->
8	<context:property-placeholder location="classpath:config.properties" />
9
10	<!-- 定义mongo对象,对应的是mongodb官方jar包中的Mongo,replica-set设置集群副本的ip地址和端口 -->
11	<mongo:mongo id="mongo" replica-set="${mongo.hostport}" >
12         <!-- 一些连接属性的设置 -->
13		<mongo:options
14			connections-per-host="${mongo.connectionsPerHost}"
15			threads-allowed-to-block-for-connection-multiplier="${mongo.threadsAllowedToBlockForConnectionMultiplier}"
16			connect-timeout="${mongo.connectTimeout}"
17			max-wait-time="${mongo.maxWaitTime}"
18			auto-connect-retry="${mongo.autoConnectRetry}"
19			socket-keep-alive="${mongo.socketKeepAlive}"
20			socket-timeout="${mongo.socketTimeout}"
21			slave-ok="${mongo.slaveOk}"
22			write-number="1"
23			write-timeout="0"
24			write-fsync="true" />
25	</mongo:mongo>
26	<mongo:db-factory dbname="${mongo.dbname}" mongo-ref="mongo"/>
27	<!-- 增加验证如果没有的话这块可以注释 -->
28	<bean id="userCredentials" class="org.springframework.data.authentication.UserCredentials">
29		<constructor-arg name="username" value="${mongo.username}"></constructor-arg>
30		<constructor-arg name="password" value="${mongo.password}"></constructor-arg>
31	</bean>
32	<!-- mongo的工厂,通过它来取得mongo实例,dbname为pe的数据库名,没有的话会自动创建-->
33        <!-- 可以点击class查看MongoTemplate类提供的 构造方法就可以看出验证需要传递哪些参数 -->
34	<bean id="mongoTemplate" class="org.springframework.data.mongodb.core.MongoTemplate">
35		<constructor-arg name="mongo" ref="mongo" />
36		<constructor-arg name="databaseName" value="${mongo.dbname}" />
37                <!-- 增加验证如果没有的话这块可以注释 -->
38		<constructor-arg name="userCredentials" ref="userCredentials"/>
39	</bean>
40	 <!-- 映射转换器,扫描back-package目录下的文件,根据注释,把它们作为mongodb的一个collection的映射 -->
41	<mongo:mapping-converter base-package="com.bdx.plat.model" />
42	<!-- mongodb bean的仓库目录,会自动扫描扩展了MongoRepository接口的接口进行注入 -->
43	<mongo:repositories base-package="com.bdxc" />
44</beans>
- 相关的java内容,看源代码的构造和api可以有很大帮助哦
MongoTemplate.java可以看到有2个构造方法这样就根据自己的MongoDB是否有验证进行xml配置
1	/**
2	 * Constructor used for a basic template configuration
3	 *
4	 * @param mongo must not be {@literal null}.
5	 * @param databaseName must not be {@literal null} or empty.
6	 */
7	public MongoTemplate(Mongo mongo, String databaseName) {
8		this(new SimpleMongoDbFactory(mongo, databaseName), null);
9	}
10
11	/**
12	 * Constructor used for a template configuration with user credentials in the form of
13	 * {@link org.springframework.data.authentication.UserCredentials}
14	 *
15	 * @param mongo must not be {@literal null}.
16	 * @param databaseName must not be {@literal null} or empty.
17	 * @param userCredentials
18	 */
19	public MongoTemplate(Mongo mongo, String databaseName, UserCredentials userCredentials) {
20		this(new SimpleMongoDbFactory(mongo, databaseName, userCredentials));
21	}
UserCredentials.java 查看验证传递的参数 username & password
1public class UserCredentials {
2
3	public static final UserCredentials NO_CREDENTIALS = new UserCredentials(null, null);
4
5	private final String username;
6	private final String password;
7
8	/**
9	 * Creates a new {@link UserCredentials} instance from the given username and password. Empty {@link String}s provided
10	 * will be treated like no username or password set.
11	 *
12	 * @param username
13	 * @param password
14	 */
15	public UserCredentials(String username, String password) {
16		this.username = StringUtils.hasText(username) ? username : null;
17		this.password = StringUtils.hasText(password) ? password : null;
18	}
整合MongoDB的内容就这些。后续会将整个代码及项目上传git,访问路径会在此博文更新
以下内容是小测试。
基于该框架写了一个微信的回调和授权(Oauth),SpringMVC+MongoDB+Maven搭建微信后台框架,包含了回调配置和授权Oauth配置 项目结构在最上面有截图哦。
1#基于SpringMVC+MongoDB数据库做的微信接入等一些常用接口的DEMO
2只实现了回调 和oauth 接口
31. common存放相关基础代码和微信常量
41.1 com/bdxc/plat/common/weixin/WXConstants.java 修改为自己的微信相关的APPID APPSERCET
51.2 com.bdxc.plat.controller存放为请求访问层代码
61.2.1 WXConfigController.java 回调配置需要用到,GET为回调。POST 为用户发送信息进行处理并返回
71.2.2 WXOauthController.java Oauth授权获取用户信息的代码
8
92. com.bdxc.plat.vo 存放微信相关的接口基础对象
10
113.com.bdxc.plat.util 存放相关工具类代码包含微信需要用到的
123.1 com.bdxc.plat.util.weixin 存放微信相关工具类
13
144.com.bdxc.plat.service.weixin 存放微信用户给公众发送信息进行处理的方法, 上一级为操作数据的service 不保存不需要关注
15
165.com.bdxc.plat.model.weixin 存微信的消息类型的对象,上一级为数据库的model  不保存不需要关注
-
回调配置代码实现
/**
-
回调配置
-
@author 宗潇帅
-
@Title WXConfigController
-
@时间 2017-1-4上午11:06:05 */ @Controller @RequestMapping(value="/wxconfig") public class WXConfigController { private static Logger logger = Logger.getLogger(WXConfigController.class);
@RequestMapping(value="/valid",method={RequestMethod.GET},produces = "application/json;charset=UTF-8") public void valid(HttpServletRequest request,HttpServletResponse response,PrintWriter out) throws Exception{ System.out.println("回调请求======================="); //微信加密签名 String signature = request.getParameter("signature"); //时间戳 String timestamp = request.getParameter("timestamp"); //随机数 String nonce = request.getParameter("nonce"); //随机字符串 String echostr = request.getParameter("echostr"); out = response.getWriter(); //通过检验signature对请求进行校验,若校验成功则原样返回echostr,表示接入成功,否则接入失败 if(SignUtil.checkSignature(signature, timestamp, nonce)){ out.print(echostr); }else{ System.out.println("非微信发送的GET请求"); } logger.info("回调请求发送的参数为signature"+signature+"\n"+"timestamp"+timestamp+"\n"+"nonce"+nonce+"\n"+"echostr"+echostr); out.flush(); out.close(); } @RequestMapping(value="/valid",method={RequestMethod.POST},produces = "application/json;charset=UTF-8") public void infos(HttpServletRequest request,HttpServletResponse response,PrintWriter out) throws Exception{ /* 消息的接收、处理、响应 */
1 // 将请求、响应的编码均设置为UTF-8(防止中文乱码)
2 request.setCharacterEncoding("UTF-8");
3 response.setCharacterEncoding("UTF-8");
4 CoreService coreService = new CoreService();
5 // 调用核心业务类接收消息、处理消息
6 String respMessage = coreService.processRequest(request);
7 logger.info(respMessage);
8 // 响应消息
9 out = response.getWriter();
10 out.print(respMessage);
11 out.close();
} }
-
-
StringUtil代码
/** *
- 请求校验工具类
/ public class SignUtil { /* * 验证签名 *
* @param signature * @param timestamp * @param nonce * @return */ public static boolean checkSignature(String signature, String timestamp, String nonce) { String[] arr = new String[] {WXConstants.TOKEN, timestamp, nonce }; // 将token、timestamp、nonce三个参数进行字典序排序
Arrays.sort(arr); StringBuilder content = new StringBuilder(); for (int i = 0; i < arr.length; i++) { content.append(arr[i]); } MessageDigest md = null; String tmpStr = null;1 try { 2 md = MessageDigest.getInstance("SHA-1"); 3 // 将三个参数字符串拼接成一个字符串进行sha1加密 4 byte[] digest = md.digest(content.toString().getBytes()); 5 tmpStr = byteToStr(digest); 6 } catch (NoSuchAlgorithmException e) { 7 e.printStackTrace(); 8 } 9 10 content = null; 11 // 将sha1加密后的字符串可与signature对比,标识该请求来源于微信 12 return tmpStr != null ? tmpStr.equals(signature.toUpperCase()) : false; 13}}
免费的外网映射https://my.oschina.net/xshuai/blog/597760
-
Oauth接口,微信授权登录的代码实现
/**
-
oauth获取用户信息并保存到mongodb
-
@author 宗潇帅
-
@Title WXOauthController
-
@时间 2017-1-4上午11:06:14 */ @Controller @RequestMapping(value="/wx") public class WXOauthController {
private static Logger logger = Logger.getLogger(WXOauthController.class); @Autowired private WXUserInfoService wxUserInfoService; /**
-
oauth获取用户相关信息
-
@param request
-
@param response
-
@return
-
@throws Exception */ @RequestMapping(value="/oauth",method={RequestMethod.POST,RequestMethod.GET}) public String oauth(HttpServletRequest request,HttpServletResponse response) throws Exception{ //接受参数 HttpSession httpSession = request.getSession(); String code = request.getParameter("code"); String scope = request.getParameter("scope"); logger.info("==============[OAuthServlet]获取网页授权code="+code); logger.info("==============[OAuthServlet]获取网页跳转权限="+scope); if(null != code && !"".equals(code)){ logger.info("==============[OAuthServlet]获取网页授权code不为空,code="+code); //根据code换取openId OAuthInfo oa = WeixinUtil.getOAuthOpenId(WXConstants.appId,WXConstants.appSecret,code); //第一次获取到存到session里面 防止用户刷新页面 if(oa!=null){ httpSession.setAttribute("openid", oa.getOpenId()); }else{ //如果用户是刷新页面。则读取session的openid Object openid = httpSession.getAttribute("openid"); if(openid!=null){ OAuthInfo authInfo = new OAuthInfo(); String openids = openid.toString(); System.out.println("刷新页面留存的openid"+openids); authInfo.setOpenId(openids); oa = authInfo; }else{ //session也为空 建议用户重新进入页面 // request.getRequestDispatcher("/warn.jsp").forward(request, response); return ""; }
1 	}
2 	AccessToken oasign = WXConstants.ACCESS_TOKEN;
3 	WXUserInfo info = WeixinUtil.getWXUserInfo(oasign.getToken(), oa.getOpenId());
4 	if(!"".equals(oa) && null != oa){
5 		logger.info("==============[OAuthServlet]获取网页授权openID="+oa.getOpenId());
6 		//保存信息
7 		try {
8 			wxUserInfoService.insert(info);
9 			request.setAttribute("openid", oa.getOpenId());
10 			request.setAttribute("nickname", info.getNickname());
11 			request.setAttribute("headimgurl", info.getHeadimgurl());
12 			request.setAttribute("city", info.getCity());
13 			request.getRequestDispatcher("/index.jsp").forward(request, response);
14 			return null;
15 		} catch (Exception e) {
16 			e.printStackTrace();
17 			logger.info("保存失败"+e.getMessage());
18 		}
19 	}else{
20 		logger.info("==============[OAuthServlet]获取网页授权openId失败!");
21 	}
22 }else{
23 	logger.info("==============[OAuthServlet]获取网页授权code失败!");
24 }
25 return null;
} }
-
-
基于mongodb做了一个测试,授权登录的用户进行将相关信息保存。简单实现没有做任何封装。使用的是MongoTemplate这个类进行的增删改查。
测试号关注超过100人就会有问题。因此我全部移除了,想看效果的重新关注测试号,demo的框架换成了上面使用的SpringMVC+MongoDB+Maven整合(微信回调Oauth授权),因此有些菜单点击会有错误哦。
第一访问会提示确认登录的相关信息。确认登录后就是右边显示的相关内容哦。
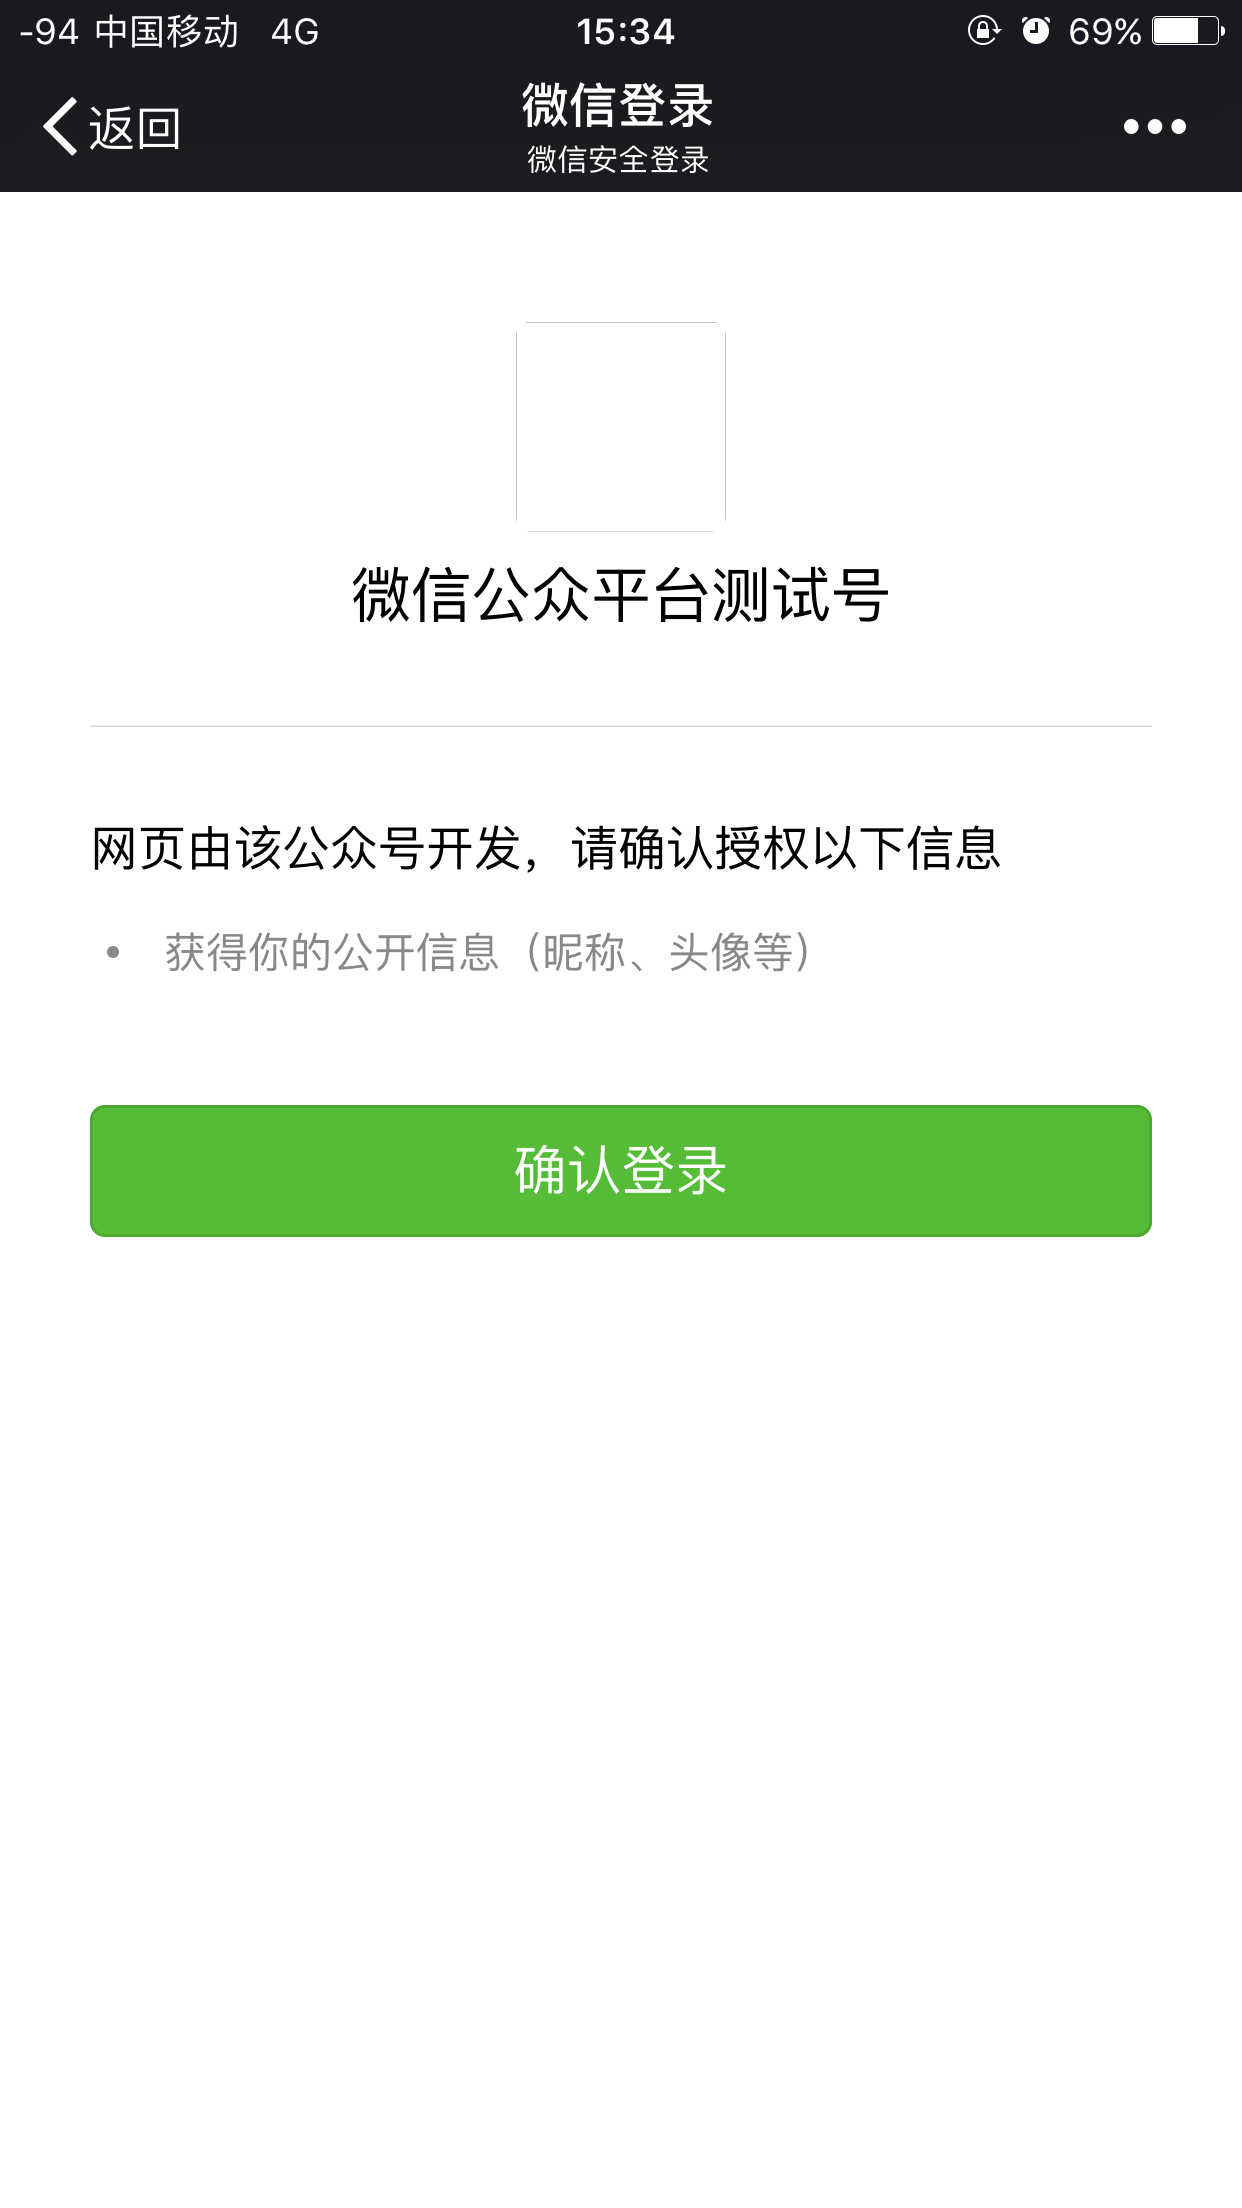

确认登录后获取到openid,那就可以拿到用户的相关信息了。存在了mongodb数据库

mongodb是documents 非关系型数据库。保存的都是以文本 大家可以理解为json字符串
得到的数据如下面代码显示。id是mongodb生成的唯一id
1{
2  "_id" : ObjectId("586cbbe7150f14811ce04546"),
3  "_class" : "com.bdxc.plat.model.WXUserInfo",
4  "subscribe" : 1,
5  "openid" : "o2VKNju8JqCeGVoEWJ1S8Ue_up8E",
6  "nickname" : "小帅丶",
7  "sex" : 1,
8  "language" : "zh_CN",
9  "city" : "海淀",
10  "province" : "北京",
11  "country" : "中国",
12  "headimgurl" : "http://wx.qlogo.cn/mmopen/Lj9cibm6LlmjNM8CGSYKuMQiaD4tTPwUjD7zVkkn2u6kFqv4zDwtcfHFntHyxtjjmXeicLDqVqQB42vUukxB5Mia8HgoV94gsN02/0",
13  "subscribe_time" : "1483520921",
14  "unionid" : "oUmIot2Yo2Mb_8fVW3UVw9AW1w4Y",
15  "remark" : "",
16  "groupid" : 0,
17  "tagid_list" : []
18}
本文主要是说mongodb验证用户名和密码的xml的配置内容。顺便博主拿微信写了个demo。后续完善后会上传git。目前有servlet的版本在众包提供服务哦。https://zb.oschina.net/service/f9918c2f1e643513
土豪可以打赏哦。