
零.前言
我们在使用fish-redux构建应用的时候,界面代码(view)和事件的处理逻辑(reducer,effect)是完全解耦的,界面需要处理事件的时候将action分发给对应的事件处理逻辑去进行处理,而这个分发的过程就是下面要讲的dispatch, 通过本篇的内容,你可以更深刻的理解一个action是如何一步步去进行分发的。
一.从example开始
为了更好的理解action的dispatch过程,我们就先以todo_list_page中一条todo条目的勾选事件为例,来看点击后事件的传递过程,通过断点debug我们很容易就能够发现点击时候发生的一切,具体过程如下:
- 用户点击勾选框,GestureDetector的onTap会被回调
- 通过buildView传入的dispatch函数对doneAction进行分发,发现todo_component的effect中无法处理此doneAction,所以将其交给pageStore的dispatch继续进行分发
- pageStore的dispatch会将action交给reducer进行处理,故doneAction对应的_markDone会被执行,对state进行clone,并修改clone后的state的状态,然后将这个全新的state返回
- 然后pageStore的dispatch会通知所有的listeners,其中负责界面重绘的_viewUpdater发现state发生变化,通知界面进行重绘更新
二.Dispatch实现分析
Dispatch在实现的过程中借鉴了Elm。
Dispatch在fish-redux中的定义如下
typedef Dispatch = void Function(Action action);
本质上就是一个action的处理函数,接受一个action,然后对action进行分发。
下面我门通过源码来进行详细的分析
1.component中的dispatch
buildView函数传入的dispatch是对应的component的mainCtx中的dispatch,
_mainCtx和componet的关系如下
component -> ComponentWidget -> ComponentState -> _mainCtx -> _dispatch
而 _mainCtx的初始化则是通过componet的createContext方法来创建的,顺着方法下去我们看到了dispatch的初始化
1// redux_component/context.dart DefaultContext初始化方法
2
3  DefaultContext({
4    @required this.factors,
5    @required this.store,
6    @required BuildContext buildContext,
7    @required this.getState,
8  })  : assert(factors != null),
9        assert(store != null),
10        assert(buildContext != null),
11        assert(getState != null),
12        _buildContext = buildContext {
13    final OnAction onAction = factors.createHandlerOnAction(this);
14
15    /// create Dispatch
16    _dispatch = factors.createDispatch(onAction, this, store.dispatch);
17
18    /// Register inter-component broadcast
19    _onBroadcast =
20        factors.createHandlerOnBroadcast(onAction, this, store.dispatch);
21    registerOnDisposed(store.registerReceiver(_onBroadcast));
22  }
context中的dispatch是通过factors来进行创建的,factors其实就是当前component,factors创建dispatch的时候传入了onAction函数,以及context自己和store的dispatch。onAction主要是进行Effect处理。
这边还可以看到,进行context初始化的最后,还将自己的onAction包装注册到store的广播中去,这样就可以接收到别人发出的action广播。
Component继承自Logic
1// redux_component/logic.dart
2
3  @override
4  Dispatch createDispatch(
5      OnAction onAction, Context<T> ctx, Dispatch parentDispatch) {
6    Dispatch dispatch = (Action action) {
7      throw Exception(
8          'Dispatching while appending your effect & onError to dispatch is not allowed.');
9    };
10
11    /// attach to store.dispatch
12    dispatch = _applyOnAction<T>(onAction, ctx)(
13      dispatch: (Action action) => dispatch(action),
14      getState: () => ctx.state,
15    )(parentDispatch);
16    return dispatch;
17  }
18
19    static Middleware<T> _applyOnAction<T>(OnAction onAction, Context<T> ctx) {
20    return ({Dispatch dispatch, Get<T> getState}) {
21      return (Dispatch next) {
22        return (Action action) {
23          final Object result = onAction?.call(action);
24          if (result != null && result != false) {
25            return;
26          }
27
28          //skip-lifecycle-actions
29          if (action.type is Lifecycle) {
30            return;
31          }
32
33
34          if (!shouldBeInterruptedBeforeReducer(action)) {
35            ctx.pageBroadcast(action);
36          }
37
38          next(action);
39        };
40      };
41    };
42  }
43}
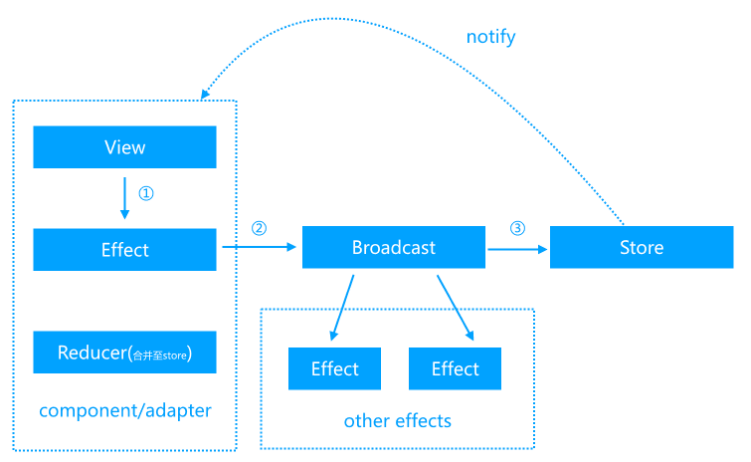
上面分发的逻辑大概可以通过上图来表示
- 通过onAction将action交给component对应的effect进行处理
- 当effect无法处理此action,且此action非lifecycle-actions,且不需中断则广播给当前Page的其余所有effects
- 最后就是继续将action分发给store的dispatch(parentDispatch传入的其实就是store.dispatch)
2. store中的dispatch
从store的创建代码我们可以看到store的dispatch的具体逻辑
1// redux/create_store.dart
2
3  final Dispatch dispatch = (Action action) {
4    _throwIfNot(action != null, 'Expected the action to be non-null value.');
5    _throwIfNot(
6        action.type != null, 'Expected the action.type to be non-null value.');
7    _throwIfNot(!isDispatching, 'Reducers may not dispatch actions.');
8
9    try {
10      isDispatching = true;
11      state = reducer(state, action);
12    } finally {
13      isDispatching = false;
14    }
15
16    final List<_VoidCallback> _notifyListeners = listeners.toList(
17      growable: false,
18    );
19    for (_VoidCallback listener in _notifyListeners) {
20      listener();
21    }
22
23    notifyController.add(state);
24  };
store的dispatch过程比较简单,主要就是进行reducer的调用,处理完成后通知监听者。
3.middleware
Page继承自Component,增加了middleware机制,fish-redux的redux部分本身其实就对middleware做了支持,可以通过StoreEnhancer的方式将middlewares进行组装,合并到Store的dispatch函数中。
middleware机制可以允许我们通过中间件的方式对redux的state做AOP处理,比如fish-redux自带的logMiddleware,可以对state的变化进行log,分别打印出state变化前和变化后的值。
当Page配置了middleware之后,在创建pageStore的过程中会将配置的middleware传入,传入之后会对store的dispath进行增强加工,将middleware的处理函数串联到dispatch中。
1// redux_component/component.dart
2
3  Widget buildPage(P param) {
4    return wrapper(_PageWidget<T>(
5      component: this,
6      storeBuilder: () => createPageStore<T>(
7            initState(param),
8            reducer,
9            applyMiddleware<T>(buildMiddleware(middleware)),
10          ),
11    ));
12  }
13
14// redux_component/page_store.dart
15
16PageStore<T> createPageStore<T>(T preloadedState, Reducer<T> reducer,
17        [StoreEnhancer<T> enhancer]) =>
18    _PageStore<T>(createStore(preloadedState, reducer, enhancer));
19
20// redux/create_store.dart
21
22Store<T> createStore<T>(T preloadedState, Reducer<T> reducer,
23        [StoreEnhancer<T> enhancer]) =>
24    enhancer != null
25        ? enhancer(_createStore)(preloadedState, reducer)
26        : _createStore(preloadedState, reducer);
所以这里可以看到,当传入enhancer时,createStore的工作被enhancer代理了,会返回一个经过enhancer处理过的store。而PageStore创建的时候传入的是中间件的enhancer。
1// redux/apply_middleware.dart
2
3StoreEnhancer<T> applyMiddleware<T>(List<Middleware<T>> middleware) {
4  return middleware == null || middleware.isEmpty
5      ? null
6      : (StoreCreator<T> creator) => (T initState, Reducer<T> reducer) {
7            assert(middleware != null && middleware.isNotEmpty);
8
9            final Store<T> store = creator(initState, reducer);
10            final Dispatch initialValue = store.dispatch;
11            store.dispatch = (Action action) {
12              throw Exception(
13                  'Dispatching while constructing your middleware is not allowed. '
14                  'Other middleware would not be applied to this dispatch.');
15            };
16            store.dispatch = middleware
17                .map((Middleware<T> middleware) => middleware(
18                      dispatch: (Action action) => store.dispatch(action),
19                      getState: store.getState,
20                    ))
21                .fold(
22                  initialValue,
23                  (Dispatch previousValue,
24                          Dispatch Function(Dispatch) element) =>
25                      element(previousValue),
26                );
27
28            return store;
29          };
30}
这里的逻辑其实就是将所有的middleware的处理函数都串到store的dispatch,这样当store进行dispatch的时候所有的中间件的处理函数也会被调用。
下面为各个处理函数的执行顺序,
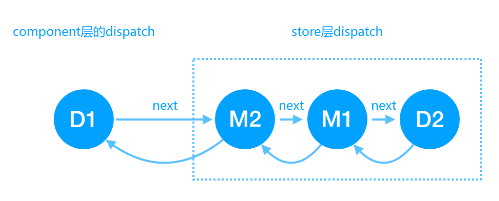
首先还是component中的dispatch D1 会被执行,然后传递给store的dispatch,而此时store的dispatch已经经过中间件的增强,所以会执行中间件的处理函数,最终store的原始dispatch函数D2会被执行。
三.总结
通过上面的内容,现在我们可以知道一个action是如何一步步的派送给effect,reducer去进行处理的,我们也可以通过middleware的方式去跟踪state的变化,这样的扩展性给框架本身带来无限可能。
原文链接
本文为云栖社区原创内容,未经允许不得转载。