
初始化项目
准备工作: 首先要安装node,node官网:https://nodejs.org/en/ 全局安装npm
npm install --global gulp
npm安装typescript
npm install -g typescript
开始初始化项目 通过执行命令 npm init -y 初始化一个项目并创建package.json文件 使用 tsc --init 创建ts的配置文件tsconfig.json
使用构建工具webpack
安装依赖包
npm i -D webpack webpack-cli webpack-dev-server
- webpack 构建工具webpack
- webpack-cli webpack的命令行工具
- webpack-dev-server webpack的开发服务器
npm i -D ts-loader typescript
- typescript ts编译器
- ts-loader ts加载器,用于在webpack中编译ts文件
npm i -D html-webpack-plugin clean-webpack-plugin
- html-webpack-plugin webpack中html插件,用来自动创建html文件
- clean-webpack-plugin webpack中的清除插件,每次构建都会先清除目录
配置webpack 在根目录下配置webpack.config.js
1const path = require("path");
2const HtmlWebpackPlugin = require("html-webpack-plugin");
3const { CleanWebpackPlugin } = require("clean-webpack-plugin");
4
5module.exports = {
6  // 指定入口文件
7  entry: "./src/index.ts",
8  // 开发模式使用,方便查错误
9  devtool: "inline-source-map",
10  // 配置服务器
11  devServer: {
12    contentBase: "./dist",
13  },
14  // 指定打包文件所在目录
15  output: {
16    path: path.resolve(__dirname, "dist"),
17    filename: "bundle.js",
18    environment: {
19      arrowFunction: false, // 关闭webpack的箭头函数,可选
20    },
21  },
22  // 用来设置引用模块
23  resolve: {
24    extensions: [".ts", ".js"],
25  },
26  // 配置webpack的loader
27  module: {
28    rules: [
29      {
30        test: /.ts$/,
31        use: {
32          loader: "ts-loader",
33        },
34        exclude: /node_modules/,
35      },
36    ],
37  },
38  // 配置webpack的插件
39  plugins: [
40    new CleanWebpackPlugin(),
41    new HtmlWebpackPlugin({
42      template: "./src/index.html",
43    }),
44  ],
45};
以上是一些基本的配置,但是在实际开发中,webpack在配置开发环境与生产环境时,配置的有些东西不太相同,所以我们应该分开写我们生产环境和开发环境的webpack配置
所以我们就在根目录下创建build文件夹存放我们的webpack配置文件
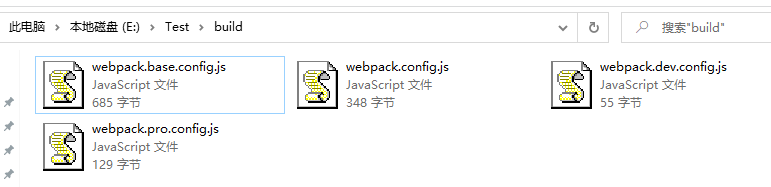
npm i -D webpack-merge
基本配置webpack.base.config.js
1const path = require("path");
2const HtmlWebpackPlugin = require("html-webpack-plugin");
3
4module.exports = {
5  entry: "./src/index.ts",
6  output: {
7    path: path.resolve(__dirname, "dist"),
8    filename: "bundle.js",
9    environment: {
10      arrowFunction: false, // 关闭webpack的箭头函数,可选
11    },
12  },
13  resolve: {
14    extensions: [".js", ".ts"],
15  },
16  module: {
17    rules: [
18      {
19        test: /.ts$/,
20        use: [
21          {
22            loader: "ts-loader",
23          },
24        ],
25        exclude: /node_modules/,
26      },
27    ],
28  },
29  plugins: [
30    new HtmlWebpackPlugin({
31      template: "./src/index.html",
32    }),
33  ],
34};
开发环境配置webpack.dev.config.js
1module.exports = {
2  devtool: "inline-source-map",
3};
生产环境配置webpack.pro.config.js
1const { CleanWebpackPlugin } = require("clean-webpack-plugin");
2
3module.exports = {
4  plugins: [new CleanWebpackPlugin()],
5};
配置主文件webpack.config.js
1const { merge } = require("webpack-merge");
2const baseConfig = require("./webpack.base.config");
3const devConfig = require("./webpack.dev.config");
4const proConfig = require("./webpack.pro.config");
5
6module.exports = (env, argv) => {
7  let config = argv.mode === "development" ? devConfig : proConfig;
8  return merge(baseConfig, config);
9};
配置tsc
根目录下创建tsconfig.json,可以根据自己需要自行配置
1{
2  "compilerOptions": {
3    "target": "ES2015",
4    "module": "ES2015",
5    "strict": true
6  }
7}
编写代码
根目录下创建src文件夹,src文件中创建index.html和index.ts index.ts
1const box = document.querySelector('#app')
2const hello: string = 'Damumu'
3
4if (box !== null) {
5  box.innerHTML = hello
6}
index.html
1<!DOCTYPE html>
2<html lang="en">
3<head>
4  <meta charset="UTF-8">
5  <meta http-equiv="X-UA-Compatible" content="IE=edge">
6  <meta name="viewport" content="width=device-width, initial-scale=1.0">
7  <title>TS & webpack</title>
8</head>
9<body>
10  <div id="app"></div>
11</body>
12</html>
配置命令
修改package.json添加如下配置
1{
2  ......
3  "scripts": {
4    "start": "webpack-dev-server --mode=development --config ./build/webpack.config.js",
5    "build": "webpack --mode=production --config ./build/webpack.config.js"
6  },
7  ......
8}
最后,在命令行执行npm run build对代码进行编译,或者执行npm start来启动开发服务器