

Spring5.0之:@Configuration的使用
@Configuration用于定义配置类,可替换XML配置文件,被注解的类内部包含有一个或者多个被**@Bean注解的方法,这些方法将会被AnnotationConfigApplicationContext或者AnnotationConfigWebApplicationContext**类进行扫描,并用于构建Bean定义,初始化Spring容器。
@Configuration public class MySpringConfig { @Bean public UserEntity userEntity() { return new UserEntity("xuyu", 21); } }
AnnotationConfigApplicationContext annotationConfigApplicationContext = new AnnotationConfigApplicationContext(MySpringConfig.class);
一、用@Configuration加载spring
1.1、@Configuration配置spring并启动spring容器
1.2、@Configuration启动容器+@Bean注册Bean
1.3、@Configuration启动容器+@Component注册Bean
1.4、使用 AnnotationConfigApplicationContext 注册 AppContext 类的
二、组合多个配置类
2.1、在@configuration中引入其它注解配置
2.2、@configuration嵌套
三、@EnableXXX注解
四、@Profile逻辑组配置
五、使用外部变量
一、@Configuation加载Spring方法
1.1、@Configuration配置spring并启动spring容器
@Configuration标注在类上,相当于把该类作为spring的xml配置文件中的
<beans>,作用为:配置spring容器(应用上下文)
@Configuration public class TestConfiguration { public TestConfiguration() { System.out.println("TestConfiguration容器启动初始化。。。"); } }
相当于:
1<?xml version="1.0" encoding="UTF-8"?>
2<beans xmlns="http://www.springframework.org/schema/beans" xmlns:xsi="http://www.w3.org/2001/XMLSchema-instance"
3    xmlns:context="http://www.springframework.org/schema/context" xmlns:jdbc="http://www.springframework.org/schema/jdbc"
4    xmlns:jee="http://www.springframework.org/schema/jee" xmlns:tx="http://www.springframework.org/schema/tx"
5    xmlns:util="http://www.springframework.org/schema/util" xmlns:task="http://www.springframework.org/schema/task" xsi:schemaLocation="
6        http://www.springframework.org/schema/beans http://www.springframework.org/schema/beans/spring-beans-4.0.xsd
7        http://www.springframework.org/schema/context http://www.springframework.org/schema/context/spring-context-4.0.xsd
8        http://www.springframework.org/schema/jdbc http://www.springframework.org/schema/jdbc/spring-jdbc-4.0.xsd
9        http://www.springframework.org/schema/jee http://www.springframework.org/schema/jee/spring-jee-4.0.xsd
10        http://www.springframework.org/schema/tx http://www.springframework.org/schema/tx/spring-tx-4.0.xsd
11        http://www.springframework.org/schema/util http://www.springframework.org/schema/util/spring-util-4.0.xsd
12        http://www.springframework.org/schema/task http://www.springframework.org/schema/task/spring-task-4.0.xsd" default-lazy-init="false">
13</beans>
主方法进行测试:
public class TestMain { public static void main(String[] args) {
1    // @Configuration注解的spring容器加载方式,用AnnotationConfigApplicationContext替换ClassPathXmlApplicationContext
2    ApplicationContext context = new AnnotationConfigApplicationContext(TestConfiguration.class);
3
4    // 如果加载spring-context.xml文件:
5    // ApplicationContext context = new ClassPathXmlApplicationContext("spring-context.xml");
6}
}
从运行主方法结果可以看出,spring容器已经启动了:

1.2、@Configuration启动容器+@Bean注册Bean,@Bean下管理bean的生命周期
@Bean标注在方法上(返回某个实例的方法),等价于spring的xml配置文件中的<bean>,作用为:注册bean对象
bean类:
1public class TestBean {
2
3    private String username;
4    private String url;
5    private String password;
6
7    public void sayHello() {
8        System.out.println("TestBean sayHello...");
9    }
10
11    public String toString() {
12        return "username:" + this.username + ",url:" + this.url + ",password:" + this.password;
13    }
14
15    public void start() {
16        System.out.println("TestBean 初始化。。。");
17    }
18
19    public void cleanUp() {
20        System.out.println("TestBean 销毁。。。");
21    }
22}
配置类:
1import org.springframework.context.annotation.Bean;
2import org.springframework.context.annotation.Configuration;
3import org.springframework.context.annotation.Scope;
4
5@Configuration
6public class TestConfiguration {
7    public TestConfiguration() {
8        System.out.println("TestConfiguration容器启动初始化。。。");
9    }
10
11    // @Bean注解注册bean,同时可以指定初始化和销毁方法
12    // @Bean(name="testBean",initMethod="start",destroyMethod="cleanUp")
13    @Bean
14    @Scope("prototype")
15    public TestBean testBean() {
16        return new TestBean();
17    }
18}
主方法测试类:
1import org.springframework.context.ApplicationContext;
2import org.springframework.context.annotation.AnnotationConfigApplicationContext;
3
4public class TestMain {
5    public static void main(String[] args) {
6
7        // @Configuration注解的spring容器加载方式,用AnnotationConfigApplicationContext替换ClassPathXmlApplicationContext
8        ApplicationContext context = new AnnotationConfigApplicationContext(TestConfiguration.class);
9
10        // 如果加载spring-context.xml文件:
11        // ApplicationContext context = new
12        // ClassPathXmlApplicationContext("spring-context.xml");
13
14         //获取bean
15        TestBean tb = (TestBean) context.getBean("testBean");
16        tb.sayHello();
17    }
18}
结果:

注:
(1)、@Bean注解在返回实例的方法上,如果未通过@Bean指定bean的名称,则默认与标注的方法名相同;
(2)、@Bean注解默认作用域为单例singleton作用域,可通过@Scope(“prototype”)设置为原型作用域;
(3)、既然@Bean的作用是注册bean对象,那么完全可以使用@Component、@Controller、@Service、@Ripository等注解注册bean,当然需要配置@ComponentScan注解进行自动扫描。
@Bean下管理bean的生命周期
可以使用基于 Java 的配置来管理 bean 的生命周期。
@Bean支持两种属性,即initMethod和destroyMethod,这些属性可用于定义生命周期方法。在实例化 bean 或即将销毁它时,容器便可调用生命周期方法。生命周期方法也称为回调方法,因为它将由容器调用。使用
@Bean注释注册的 bean 也支持 JSR-250 规定的标准@PostConstruct和@PreDestroy注释。如果您正在使用 XML 方法来定义 bean,那么就应该使用 bean 元素来定义生命周期回调方法。以下代码显示了在 XML 配置中通常使用 bean 元素定义回调的方法。
1package com.mayikt.v1.entity;
2
3public class TestBean {
4
5    public void sayHello() {
6        System.out.println("TestBean sayHello...");
7    }
8    public void start() {
9        System.out.println("TestBean 初始化。。。");
10    }
11    public void cleanUp() {
12        System.out.println("TestBean 销毁。。。");
13    }
14}
15
16@Configuration
17@ComponentScan(basePackages = "com.mayikt.v1.entity")
18public class TestConfiguration {
19    public TestConfiguration() {
20        System.out.println("TestConfiguration容器启动初始化。。。");
21    }
22
23    //@Bean注解注册bean,同时可以指定初始化和销毁方法
24    @Bean(name="testBean",initMethod="start",destroyMethod="cleanUp")
25    @Scope("prototype")
26    public TestBean testBean() {
27        return new TestBean();
28    }
29}
30
31public class TestMain {
32    public static void main(String[] args) {
33        ApplicationContext context = new AnnotationConfigApplicationContext(TestConfiguration.class);
34        TestBean tb = (TestBean) context.getBean("testBean");
35        tb.sayHello();
36        System.out.println(tb);
37
38        TestBean tb2 = (TestBean) context.getBean("testBean");
39        tb2.sayHello();
40        System.out.println(tb2);
41    }
42}

分析:
结果中的1:表明initMethod生效
结果中的2:表明@Scope("prototype")生效
1.3、@Configuration启动容器+@Component注册Bean
1//添加注册bean的注解
2@Component
3public class TestBean {
4
5    private String username;
6    private String url;
7    private String password;
8
9    public void sayHello() {
10        System.out.println("TestBean sayHello...");
11    }
12    public String toString() {
13        return "username:" + this.username + ",url:" + this.url + ",password:" + this.password;
14    }
15    public void start() {
16        System.out.println("TestBean 初始化。。。");
17    }
18    public void cleanUp() {
19        System.out.println("TestBean 销毁。。。");
20    }
21}
22
23@Configuration
24//添加自动扫描注解,basePackages为TestBean包路径
25@ComponentScan(basePackages = "com.mayikt.v1.entity")
26public class TestConfiguration {
27    public TestConfiguration() {
28        System.out.println("TestConfiguration容器启动初始化。。。");
29    }
30}
31
32public class TestMain {
33    public static void main(String[] args) {
34
35        // @Configuration注解的spring容器加载方式,用AnnotationConfigApplicationContext替换ClassPathXmlApplicationContext
36        ApplicationContext context = new AnnotationConfigApplicationContext(TestConfiguration.class);
37        // 如果加载spring-context.xml文件:
38        // ApplicationContext context = new
39        // ClassPathXmlApplicationContext("spring-context.xml");
40        //获取bean
41       TestBean tb = (TestBean) context.getBean("testBean");
42        tb.sayHello();
43    }
44}

1.4、使用 AnnotationConfigApplicationContext 注册 AppContext 类
AnnotationConfigApplicationContext 的register 方法传入配置类来注册配置类
1public class TestMain {
2    public static void main(String[] args) {
3        // @Configuration注解的spring容器加载方式,用AnnotationConfigApplicationContext替换ClassPathXmlApplicationContext
4        ApplicationContext context = new AnnotationConfigApplicationContext();
5        ((AnnotationConfigApplicationContext) context).register(TestConfiguration.class);
6        String[] beanDefinitionNames = context.getBeanDefinitionNames();
7        for (int i = 0; i < beanDefinitionNames.length; i++) {
8            System.out.println(beanDefinitionNames[i]);
9        }
10    }
11}

1.5、@Configuation总结
@Configuation等价于<Beans></Beans>
@Bean等价于<Bean></Bean>
@ComponentScan等价于<context:component-scan base-package="com.xxx"/>
二、组合多个配置类
2.1、在@configuration中引入其它注解配置
@Configuration @Import(TestConfiguration.class) public class WebConfig { }
@Configuration @ComponentScan(basePackages = "com.mayikt.v1.entity") public class TestConfiguration { public TestConfiguration() { System.out.println("TestConfiguration容器启动初始化。。。"); }
1//@Bean注解注册bean,同时可以指定初始化和销毁方法
2@Bean(name="testBean2",initMethod="start",destroyMethod="cleanUp")
3@Scope("prototype")
4public TestBean2 testBean2() {
5    return new TestBean2();
6}
}
public class TestMain2 { public static void main(String[] args) {
1    // @Configuration注解的spring容器加载方式,用AnnotationConfigApplicationContext替换ClassPathXmlApplicationContext
2    ApplicationContext context = new AnnotationConfigApplicationContext(WebConfig.class);
3    // 获取bean
4    TestBean2 tb2 = (TestBean2) context.getBean("testBean2");
5    tb2.sayHello();
6
7    TestBean tb = (TestBean) context.getBean("testBean");
8    tb.sayHello();
9}
}
结果:

2.2、@configuration嵌套
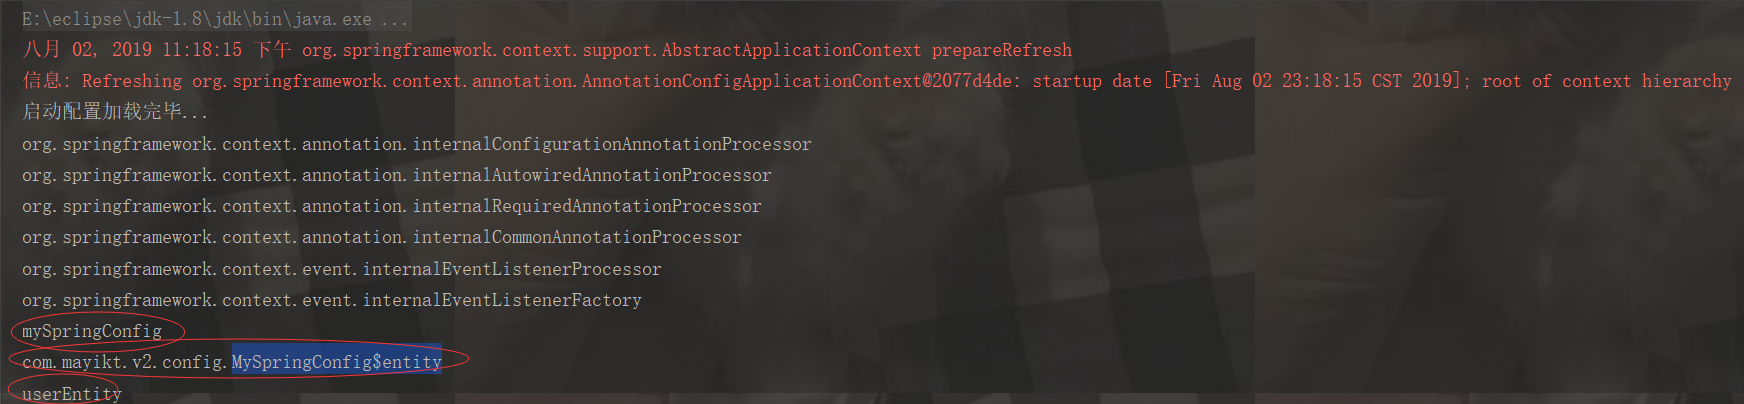
@Configuration public class MySpringConfig { @Configuration static class entity{ @Bean UserEntity userEntity(){ return new UserEntity("mayikt", 21); } } /*@Bean public UserEntity userEntity() { return new UserEntity("xuyu", 21); }*/ }
public class V2TestSpring { private static AnnotationConfigApplicationContext annotationConfigApplicationContext;
1public static void main(String\[\] args) {
2    annotationConfigApplicationContext = new AnnotationConfigApplicationContext(MySpringConfig.class);
3    System.out.println("启动配置加载完毕...");
4    UserEntity userEntity = annotationConfigApplicationContext.getBean("userEntity", UserEntity.class);
5    String\[\] beanDefinitionNames = annotationConfigApplicationContext.getBeanDefinitionNames();
6    for (int i = 0; i < beanDefinitionNames.length; i++) {
7        System.out.println(beanDefinitionNames\[i\]);
8    }
9}
}
结果
3、@EnableXXX注解
配合@Configuration使用,包括 @EnableAsync, @EnableScheduling, @EnableTransactionManagement, @EnableAspectJAutoProxy, @EnableWebMvc。
@EnableAspectJAutoProxy---《spring AOP 之:@Aspect注解》
@EnableScheduling--《Spring 3.1新特性之二:@Enable*注解的源码,spring源码分析之定时任务Scheduled注解》
4、@Profile逻辑组配置
5、使用外部变量
1、@PropertySource + Environment,通过@PropertySource注解将properties配置文件中的值存储到Spring的 Environment中,Environment接口提供方法去读取配置文件中的值,参数是properties文件中定义的key值。
2、@PropertySource(PropertySourcesPlaceholderConfigurer)+@Value
思考问题:springbean对象在什么时候创建的?
答案:默认情况下是非懒加载的。
@Lazy
- Lazy表示为懒加载,当真正需要引用获取的时候才会被加载
- True 表示为非懒加载 false表示为在IOC容器加载的时候被创建
1@Service
2@Lazy(true)
3public class UserService {
4    public UserService() {
5        System.out.println("UserService无参数构造被加载...");
6    }
7}