
缓存用于提升系统的性能,特别适用于一些对资源需求比较高的操作。本文介绍如何基于spring boot cache技术,使用caffeine作为具体的缓存实现,对操作的结果进行缓存。
demo场景
本demo将创建一个web应用,提供两个Rest接口。一个接口用于接受查询请求,并有条件的缓存查询结果。另一个接口用于获取所有缓存的数据,用于监控缓存的内部状态。
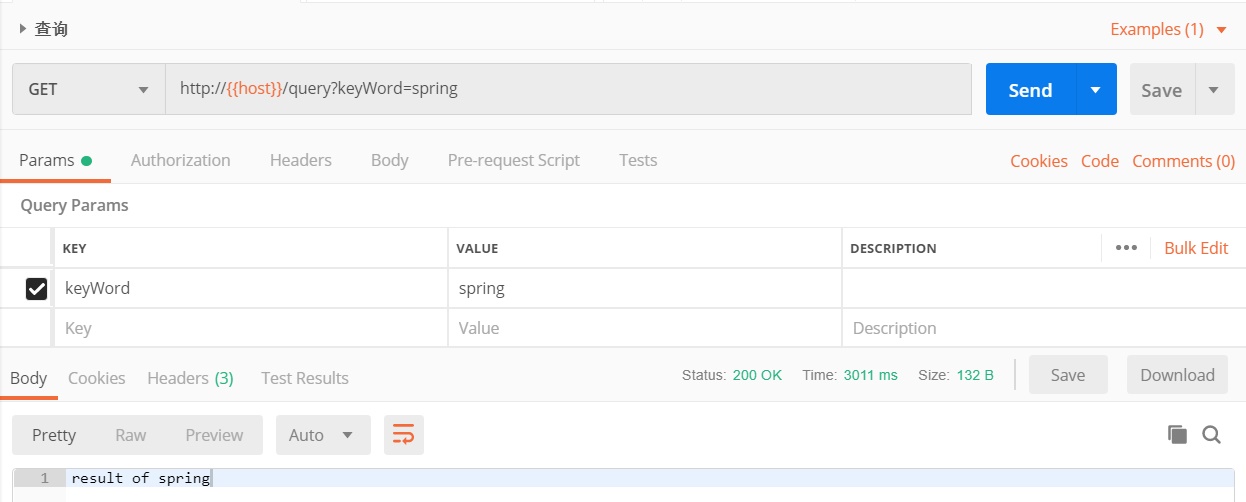
可以看到这次查询耗时3秒左右。
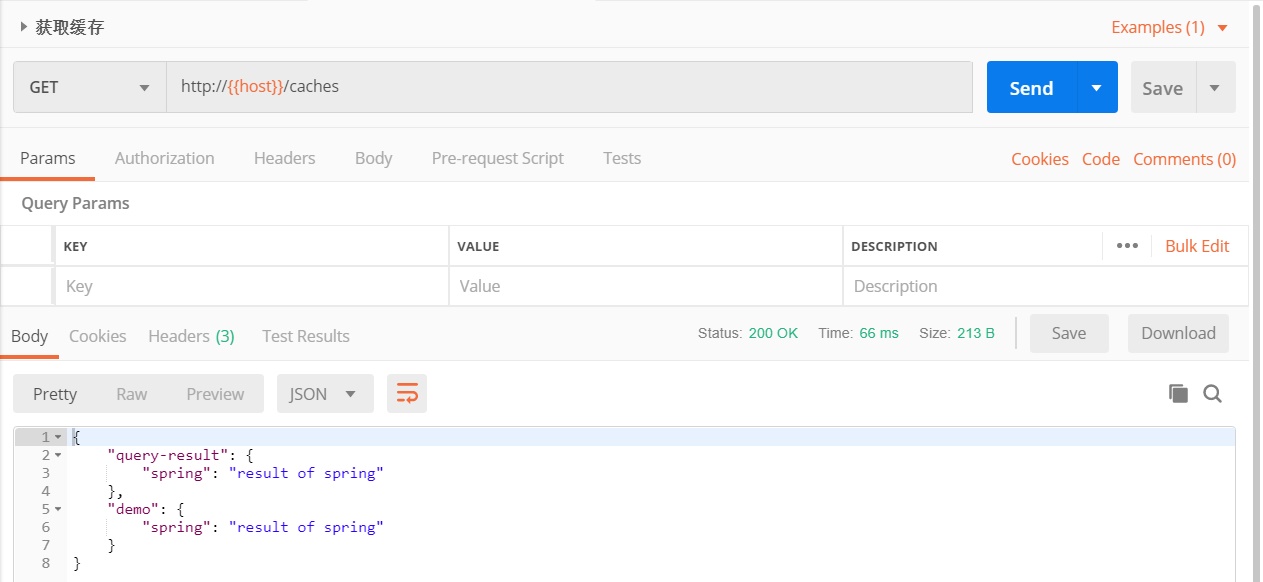
可以看到我们的查询结果已被缓存。这里将一次查询的结果缓存了两份,具体技术细节后面介绍。
接下来介绍具体demo的实现过程。
demo实现
本demo已经上传到github,读者可以在github上获取源码。
本demo使用Maven作为项目构建工具。按照作者的日常编程习惯,首先创建了一个root module,用于统一管理依赖。具体的功能在子module caffeine-cache中。
本demo的代码结构如下:
1demo-spring-cache/
2  |- pom.xml
3  L caffeine-cache/
4      |- pom.xml
5      L src/
6          L main/
7              |- java/
8              |   L heyikan
9              |       |- Application.yml
10              |       |- QueryController.java
11              |       L QueryService.java
12              L resources/
13                  L application.yml
创建root module
1<?xml version="1.0" encoding="UTF-8"?>
2<project xmlns="http://maven.apache.org/POM/4.0.0"
3         xmlns:xsi="http://www.w3.org/2001/XMLSchema-instance"
4         xsi:schemaLocation="http://maven.apache.org/POM/4.0.0 http://maven.apache.org/xsd/maven-4.0.0.xsd">
5    <modelVersion>4.0.0</modelVersion>
6
7    <groupId>com.heyikan.demo</groupId>
8    <artifactId>demo-spring-cache</artifactId>
9    <version>1.0-SNAPSHOT</version>
10    <packaging>pom</packaging>
11
12    <modules>
13        <module>caffeine-cache</module>
14    </modules>
15
16    <properties>
17        <java.version>1.8</java.version>
18        <maven.compiler.source>${java.version}</maven.compiler.source>
19        <maven.compiler.target>${java.version}</maven.compiler.target>
20
21        <spring-boot.version>2.1.3.RELEASE</spring-boot.version>
22    </properties>
23
24    <dependencyManagement>
25        <dependencies>
26            <dependency>
27                <groupId>org.springframework.boot</groupId>
28                <artifactId>spring-boot-dependencies</artifactId>
29                <version>${spring-boot.version}</version>
30                <type>pom</type>
31                <scope>import</scope>
32            </dependency>
33        </dependencies>
34    </dependencyManagement>
35
36</project>
root module的主要作用是统一管理依赖。当项目中有多个module的时候,作者一般会构建一个root module,然后其他的moudule都继承自这个module,形成一个两级module的继承结构。
网上大部分的demo,一般是直接创建目标module,且继承自
spring-boot-starter-parent。spring-boot-starter-parent管理了大部分常用的依赖,使用这些依赖我们不用再费心考虑版本的问题。但是maven是单继承结构,继承了
spring-boot-starter-parent就无法继承自己项目当中的parent module(root module)。在一个多module的项目当中,module之间的相互依赖就不是spring-boot-starter-parent能预先管理的了。所以在实际项目当中,我们一般不会直接继承
spring-boot-starter-parent。而是通过在root module中importspring-boot-dependencies,来享受spring-boot为我们管理依赖的便利,同时在root module管理额外的依赖。具体的技术细节需要读者参考Maven的知识。作者只是阐述下这么做的原因,实际上跟demo本身的功能没有多大关系。
创建目标module
1<?xml version="1.0" encoding="UTF-8"?>
2<project xmlns="http://maven.apache.org/POM/4.0.0"
3         xmlns:xsi="http://www.w3.org/2001/XMLSchema-instance"
4         xsi:schemaLocation="http://maven.apache.org/POM/4.0.0 http://maven.apache.org/xsd/maven-4.0.0.xsd">
5    <parent>
6        <artifactId>demo-spring-cache</artifactId>
7        <groupId>com.heyikan.demo</groupId>
8        <version>1.0-SNAPSHOT</version>
9    </parent>
10    <modelVersion>4.0.0</modelVersion>
11
12    <artifactId>caffeine-cache</artifactId>
13
14    <dependencies>
15        <dependency>
16            <groupId>org.springframework.boot</groupId>
17            <artifactId>spring-boot-starter-web</artifactId>
18        </dependency>
19        <dependency>
20            <groupId>org.springframework.boot</groupId>
21            <artifactId>spring-boot-starter-cache</artifactId>
22        </dependency>
23        <dependency>
24            <groupId>com.github.ben-manes.caffeine</groupId>
25            <artifactId>caffeine</artifactId>
26        </dependency>
27    </dependencies>
28
29    <build>
30        <plugins>
31            <plugin>
32                <groupId>org.springframework.boot</groupId>
33                <artifactId>spring-boot-maven-plugin</artifactId>
34            </plugin>
35        </plugins>
36    </build>
37</project>
这个module主要引入了三个依赖:
- spring-boot-starter-web 打包了web项目的常规依赖
- spring-boot-starter-cache 打包了依赖功能的常规依赖
- caffeine 具体的依赖实现
spring cache提供了一层抽象和使用接口,底层可以切换不同的cache实现,caffeine就是其中之一,且性能表现较优。
spring cache还可以与redis集成,提供分布式缓存的能力。
创建Application
1package heyikan;
2
3import org.springframework.boot.SpringApplication;
4import org.springframework.boot.autoconfigure.SpringBootApplication;
5import org.springframework.cache.annotation.EnableCaching;
6
7@SpringBootApplication
8@EnableCaching
9public class Application {
10    public static void main(String[] args) {
11        SpringApplication.run(Application.class, args);
12    }
13}
熟悉spring-boot项目的读者应该对此比较熟悉,spring-boot项目需要创建一个Application来启动整个应用。
@EnableCaching注解用于启用缓存,没有这个注解,我们后面的缓存功能将不会生效。
创建Controller
1package heyikan;
2
3import com.github.benmanes.caffeine.cache.Cache;
4import org.springframework.beans.factory.annotation.Autowired;
5import org.springframework.cache.CacheManager;
6import org.springframework.http.ResponseEntity;
7import org.springframework.web.bind.annotation.GetMapping;
8import org.springframework.web.bind.annotation.RestController;
9
10import java.util.Map;
11import java.util.concurrent.ConcurrentMap;
12import java.util.function.Function;
13import java.util.stream.Collectors;
14
15@RestController
16public class QueryController {
17    @Autowired
18    private QueryService queryService;
19
20    @GetMapping("/query")
21    public ResponseEntity<?> query(String keyWord) {
22        String result = queryService.query(keyWord);
23        return ResponseEntity.ok(result);
24    }
25
26    @Autowired
27    @SuppressWarnings("all")
28    private CacheManager cacheManager;
29
30    @GetMapping("/caches")
31    public ResponseEntity<?> getCache() {
32        Map<String, ConcurrentMap> cacheMap = cacheManager.getCacheNames().stream()
33                .collect(Collectors.toMap(Function.identity(), name -> {
34                    Cache cache = (Cache) cacheManager.getCache(name).getNativeCache();
35                    return cache.asMap();
36                }));
37        return ResponseEntity.ok(cacheMap);
38    }
39}
QueryController提供了两个Rest接口,query用于模拟耗时的查询请求,getCache用于获取当前的缓存内容。
QueryController中引入了QueryService依赖,它是提供查询和缓存功能的核心组件。
QueryController中引入了CacheManager依赖,它持有所有的缓存,并提供了遍历的API。
创建缓存组件
1package heyikan;
2
3import org.slf4j.Logger;
4import org.slf4j.LoggerFactory;
5import org.springframework.cache.annotation.CacheConfig;
6import org.springframework.cache.annotation.Cacheable;
7import org.springframework.stereotype.Service;
8
9@Service
10@CacheConfig(cacheNames = {"query-result", "demo"})
11public class QueryService {
12    private static Logger LOG = LoggerFactory.getLogger(QueryService.class);
13
14    @Cacheable(unless = "#result.length() > 20")
15    public String query(String keyWord) {
16        LOG.info("do query by keyWord: {}", keyWord);
17        String queryResult = doQuery(keyWord);
18        return queryResult;
19    }
20
21    private String doQuery(String keyWord) {
22        try {
23            Thread.sleep(3000L);
24            String result = "result of " + keyWord;
25            return result;
26        } catch (InterruptedException e) {
27            throw new IllegalStateException(e);
28        }
29    }
30}
31
我们使用@CacheConfig配置缓存,如代码所示,数据将会同时缓存到"query-result"和"demo"中。
query方法是查询的入口,@Cacheable注解用于表示query方法的返回结果将被放到缓存中,默认以方法的参数作为key。
@Cacheable注解的unless属性补充了缓存的条件,按照代码所示,当query的返回结果其长度大于20的时候,就不会进行缓存。
doQuery方法代表实际的查询操作,模拟耗时的查询过程。
创建配置
application.yml文件内容如下:
1spring:
2  cache:
3    caffeine:
4      spec: maximumSize=500, expireAfterAccess=30s
5logging:
6  pattern:
7    console: "%-5level - %msg%n"
8  level:
9    - error
10    - heyikan=ALL
spring.cache.caffeine.spec配置了两个缓存指标:
- maximumSize 配置缓存的最大容量,当快要达到容量上限的时候,缓存管理器会根据一定的策略将部分缓存项移除。
- expireAfterAccess 配置缓存项的过期机制,如代码所示当缓存项被访问后30秒将会过期,从而被移除。
技术要点
缓存的结构
在上文获取缓存的接口中,我们得到的结果是:
1{
2    "query-result": {
3        "spring": "result of spring"
4    },
5    "demo": {
6        "spring": "result of spring"
7    }
8}
缓存的结构大概像Map<cacheName, Map<key, value>>,其中每一对key-value又称为一个缓存项。
上文中,我们缓存组件的query方法的返回结果,就是以参数为key,以结果为value,构建缓存项进行缓存的。
另外,我们配置的超时时间,也是以缓存项为粒度进行控制的。
包含缓存项的Map我们称为缓存实例,每一个实例有一个实例名(cacheName)。
cache结构相关的类图如下:
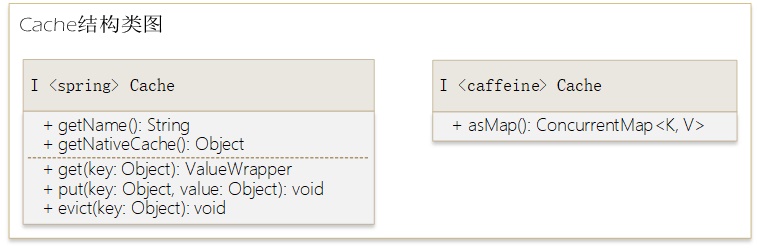
上图简单绘制了Spring中定义的Cache接口和caffeine中定义的Cache接口。
Spring的Cache定义了极其通用的方法,包括获取实例名、根据缓存项的key获取、更新和移除缓存项。
Spring并没有限定缓存所使用的具体存储结构,不管使用哪一种存储结构,在Spring的Cache中都以nativeCache进行表示,注意它是Object类型的。
caffeine的Cache接口,就是caffeine对nativeCache的又一层抽象,它提供了asMap方法可以对缓存项进行遍历。
使用缓存
在上文中,我们已经简单演示了如何使用缓存。除了获取缓存之外,我们几乎没有任何额外的代码,只是在合适的地方,添加了注解,就添加了缓存的功能。
所以在日常开发中,如果我们意识到某个操作可能会有很大开销,不妨把它移到一个独立的组件,实现之后根据具体情况考虑是否为它添加缓存。
注意:如果缓存的方法是组件内部调用的,可能没有缓存的效果。
比如,上文中的QueryService的query方法,是由QueryController调用的,缓存生效了。如果该方法由QueryService自身的其他方法调用,缓存无效。
在上文的demo中,我们已经使用了一些基本的功能,还有一些常用的功能如下:
指定key构建规则
在上文中,我们使用默认的规则来构建缓存项的key,即以参数keyWord作为key。
在必要的情况下,我们可以指定key构建的规则,使用spring el表达式:
1@Cacheable(cacheNames="books", key="#isbn")
2public Book findBook(ISBN isbn, boolean checkWarehouse, boolean includeUsed)
3
4@Cacheable(cacheNames="books", key="#isbn.rawNumber")
5public Book findBook(ISBN isbn, boolean checkWarehouse, boolean includeUsed)
6
7@Cacheable(cacheNames="books", key="T(someType).hash(#isbn)")
8public Book findBook(ISBN isbn, boolean checkWarehouse, boolean includeUsed)
第一个实例,我们使用三个参数中的其中一个来构建key。 第二个实例,我们使用参数内部的field来构建key。 第三个实例,我们使用静态方法来生成key。
更多内容可以参考Custom Key Generation Declaration。
有选择的cache
上文demo中我们使用unless属性对方法返回的结果进行判断,当返回结果满足一定条件时才进行缓存。
另外,我们还可以使用condition属性对方法的参数进行判断:
1@Cacheable(cacheNames="book", condition="#name.length() < 32")
2public Book findBook(String name)
上述代码表示,只有当参数的长度小于32时,我们才会缓存。
更多内容可以参考Conditional Caching。
扩展阅读
- Spring官方demo 这里提供了使用默认缓存的demo,内容更加简单,适合对spring-boot不熟悉的读者。
- Spring官方文档 这里有对如何使用cache的详细介绍,比如如何主动更新缓存、移除缓存,都是本demo中没有的内容。
- Spring Boot Caffeine Caching Example Configuration 这里介绍了如何使用Caffeine缓存,本文的内容相当一部分参考了这篇文章。